Drain Tile Installation

drain tile installation

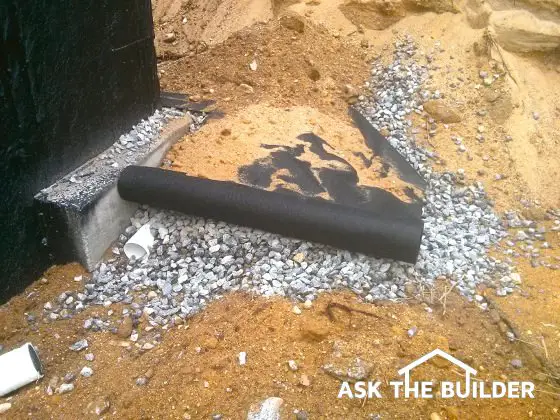
The builder is doing just about everything right installing this drain tile. Photo Credit: Tim Carter

DEAR TIM: My last house had a basement that leaked water. I’m building a new home and want my basement as dry as the Atacama Desert. I’m confident that my drain tile was not put in correctly at my last house. What are the best practices when installing drain tile around a foundation? What materials would you use? What are the biggest mistakes you can make when installing foundation drain tile? Beverly H., Falls River, MA

DEAR BEVERLY: You’ve touched on a subject that’s near and dear to my heart. My college degree is in geology with a special interest in two things: geomorphology and hydrogeology. Those are fancy words for the study of the surface of the earth and the study of ground water. Both of those disciplines are in play when it comes to foundation drain tile.

The last home I built for my family had a basement as dry as the Atacama Desert. It wasn’t hard to achieve this and sadly most builders either don’t understand how to do it or they decided to go cheap at this phase of the construction.

Foundation waterproofing is a place you never want to go cheap or cut corners. The reason is simple. It’s extremely expensive and disruptive to have to go back at a later date and correct poor workmanship. Can you imagine digging up around your foundation after a house is built? You could be removing porches, tearing up sidewalks, driveways, expensive landscaping, rupturing buried utilities, etc.

If you want to go cheap and save money, then do it with your bathroom vanity faucet or any other thing in your home that you can replace at a later date with minimal work and effort. There are quite a few things you can do to save money on a home and come back a few years later to upgrade with relative ease as more money becomes available.

When it comes to foundation drain tile, let’s start first with the pipe. I happen to prefer the white 4-inch plastic pipe that comes with two rows of pre-drilled holes. I don’t like the corrugated pipe with the slits in it.

I’ve always installed the pipe with the holes oriented in the down position and lay the pipe on 2 inches of washed gravel that about the size of grapes. In the Midwest you normally find this gravel and its rounded. In other parts of the nation you may get similar sized stone, but it’s angular because they make it by crushing larger stone. No matter what type you use, just be sure that the gravel has no smaller pieces of stone or sand in it. You want all the stones to be the size of a grape or maybe a little larger. Water flows through this stone very fast.

I prefer to lay the drain tile along the side of the foundation footer, not on top of it. I want the level of the ground water to be as low as possible and placing the drain tile pipe on top of the footer usually forces the ground water table up to within a few inches of the top of the basement slab.

It’s vitally important that you apply true foundation waterproofing compound to the foundation walls as part of this system. That’s a subject for another column. Understand that simple hot asphalt spray is not waterproofing. It’s damp-proofing. There are rubberized asphalt-based waterproofing products that do work well.

The next step is to cover the drain tile with plenty of gravel. One of my customers years ago was so concerned about water leakage that he paid the extra money to backfill the foundation wall to within 6 inches of the final grade with the gravel. This was a little expensive, but it’s the best practice.

On most of my jobs I covered the foundation drain tile pipe with 30 inches of the washed gravel. The next step is mission critical. It’s vital that you cover the gravel with some material that captures the fine silt that will be present in the backfill dirt. I tried two things and they both worked well. I would scatter a 1-foot layer of straw on the gravel or I’d lay a piece of 30-pound asphalt-saturated felt paper on top of the gravel.

Realize when you dig up dirt it gets fluffed up. The volume increases usually by about ten percent and you disturb and free up fine silt. When this dirt is put back in a hole it settles. As rain passes through the dirt, it carries fine silt with it as it compacts the soil. This silt will readily clog drain tile pipe and the gravel rendering them ineffective. It’s mandatory that you protect the gravel and the pipe from this wretched silt.

You should also employ Mother Nature to help keep your new basement dry. This is where the geomorphology comes in. In a perfect world, you should build on a lot where the lowest part of your lot is at least three feet lower than the bottom of your foundation.

This allows you to use gravity to drain any water that makes it to your drain tile and is flowing through it. If you have a properly sloped lot, then the drain tile pipe is buried and extends all the way to a low point where it exits on the surface.

Many builders pipe this foundation drain tile to a sump and then it needs to be pumped out of the house. The issue with electric-powered sump pumps is they tend to fail in severe storms when the power goes out. This is when you most need a sump pump!

Column 1144

May 15, 2016 AsktheBuilder Newsletter

I'll make this as fast as possible. I've got two pretty important tool / product reviews for you.

They're both SHOCKING, but for different reasons.

The links to them are below.

But first, I want to share a quick story of where I was yesterday.

Several days ago, I was hired by a homeowner who lives about an hour's drive from my house here in central New Hampshire (NH).

I've done a bad job of letting you know that I do consulting, but realize if you want me to come to your home, it's possible - even if you live thousands of miles away.

But I digress.

The owners of the house wanted me to look at rotting wood, crumbling fiber cement siding and roof leaks on their magnificent home.

The wife also was complaining about an ice-cold bathroom. I told her I had the solution to that and it was EASY to do!

I have to tell you that when you drive past certain drives in NH, don't for a minute think that a shack or a trailer might be around the bend or up at the top of the hill.

Their home was STUNNING. It was to be their dream home.

However, certain defects in the construction have turned into a nightmare.

The builder of the home used a finger-jointed wood product that was really popular here in NH, and other parts of the USA, the past fifteen years.

This CRAP is even on my own home. Remember, I didn't build the house I live in up here. I'm trying to change that, but that's a story for another day.

The issue with this crap wood trim product is that it's made from a hybridized tree that grows FAST.

This means there's lots of porous light-colored spring wood in it. Spring wood is the wood that grows as the tree puts on growth in the spring. As the year progresses and summer sets in, tree growth typically slows down. Usually there's less water and the growth becomes denser and darker in color.

When you look at the end of a log it takes a light and a dark ring to account for a given year's total growth.

The rot problems could be traced to two major mistakes on the part of the builder:

  • He didn't provide the necessary 1-inch overhang of the shingles on the bottom and side rake edges of the roof.
  • He didn't put up gutters to capture and divert the roof water that was splashing down onto hard surfaces like the driveway, sidewalks, rear decks and whatnot.

This splashing water was saturating the wood and fiber cement siding and causing serious rot.

What's the takeaway?

This couple TRUSTED the builder was good. They TRUSTED the builder was going to do the right thing.

The issue with this is that the builder may have been doing things WRONG his entire career. I feel this is the case here.

How do you AVOID these nightmares?

You need to educate yourself on basic best practices of building and be sure you have fantastic written specifications for your building or remodeling project.

The repairs to this house are going to cost at least $35,000, or more, by the time they get everything complete.

The sad thing is that it should have NEVER been an issue if just a few simple things had been done right ten years ago when the house was built.

Tool and Product Reviews

CLICK HERE now to read my review about the new Milwaukee 18-Gauge Brad Nailer that just uses electricity to drive a nail!

CLICK HERE to read my review about unbelievable Gorilla Step Ladders and Work Platforms.

GREAT PHOTOS are in both reviews.

I GUARANTEE you'll be surprised at both reviews.

That's enough for a Sunday.

READ BOTH REVIEWS ABOVE!!!!!

Tim Carter
Founder - www.AsktheBuilder.com

Do It Right, Not Over!

Gorilla Fiberglass Hybrid Ladder Review

Gorilla Ladder products

Here are the four Gorilla Ladder products. CLICK the image to BUY them. Photo credit: Tim Carter

Yesterday the Fed-Ex man dropped off a Gorilla Fiberglass Hybrid Ladder.

To be honest, he dropped off four Gorilla Ladder products!

CLICK these following links to BUY these amazing products:

At the time this review was written, there were no links on Amazon.com for the work platforms.

I didn't think it was possible to improve upon a simple thing like a step ladder.

I was WRONG.

I've used step ladders for over fifty years. I had become numb to how they work and figured you'd always have to struggle to open and close them.

I figured you'd always have to put up with how heavy and bulky they are, especially the non-conductive fiberglass step ladders.

The Gorilla Hybrid Ladders SHATTER all those stereotypes.

Within seconds of opening the nice shipping boxes, I quickly discovered these are ladders I'd NEVER allow anyone to borrow and I'd most certainly use them before any other ladder.

They were:

  • light
  • well-built
  • easy to open and close with one hand
  • sturdy
  • not bulky

These have excellent standing platforms as you get up off the normal steps. This leads to less fatigue.

The tops of the ladders have great slots and holes to help you manage your tools safely.

The work platforms have all the same features and benefits as the ladders. I don't even think I'd let my kids borrow these things even though the ladders and platforms are practically indestructible.

I'll let the photos do the rest of the job of telling you about these great products.

By the way, the aluminum ladder is my FAVORITE. I don't allow anyone in the house to touch it much less use it. It's feather-light, yet strong and sturdy.

CLICK or TAP HERE NOW to have the aluminum ladder delivered to you.

Gorilla Ladders

CLICK the image to BUY this ladder now. Photo credit: Tim Carter

ladder rivet gorilla

ladder top view

Look at all the places you can put tools. The large hole in the lower right is for a drill or impact driver chuck. The large center recess is for a gallon paint can. CLICK THE IMAGE TO BUY the ladder. Photo credit: Tim Carter

Gorilla Work Platform

Here's the work platform. It's huge and has a handy step for you to use to get up and off of it safely without blowing out a knee. Photo credit: Tim Carter

Platform Lock

When you extend the legs out on the platform, they LOCK in place so the platform doesn't collapse if you rock back and forth. You press in this yellow button so the legs can be folded back to store the platform. Photo credit: Tim Carter

Milwaukee 18 Gauge Brad Nailer Review

I'm going to preface this tool review with a couple of comments.

First and foremost, Milwaukee has a deep legacy of making superb power tools. I've used them for decades.

I'm fortunate to be a member of the working press and have been invited to quite a few Milwaukee Tool media events in the past few years. I've watched with fascination over this short time as they've decided to leave their decades-old comfort zone and expand from their traditional plumbers and electricians tool lines into the other trades including one dear to my heart - carpentry.

As you might expect, you could stumble if you decide to make tools for one trade that you've never made before. Unfortunately, this is the case with the new Milwaukee 18-gauge brad nailer 2740-21CT.

As a master carpenter for the past thirty years, I can tell you unequivocally this electric-powered nailer is just not ready for prime time. Just like the first version of many different computer software V 1.0 products can be full of bugs, so too the first version of this 18-gauge power tool.

Truth About Tool Reviews

I've used all the different nail guns for decades. My guess is I've driven well over 100,000 nails with nail guns based on the number of large boxes of nails I've purchased!

What's more, I'm in a very small minority. I'm one of the few people in the media that's got decades of real power tool experience. For over twenty years I had to use power tools six days of the week to make a living working in and on the homes of paying customers. In my opinion, that's how you measure a true professional - one who's had to make a living getting paid to do something.

WARNING: Many of the other people out there reviewing tools don't have this experience. In fact, many of them are hobby bloggers that have their tool review websites as a pastime. Many of these reviewers get a power tool from a manufacturer and within hours or a few days they have a review posted with great photos of the tool. They've not put the tool to the test on a real job site for weeks at a time.

You can easily check to see if a tool review website is worthy of your attention. Just go to the About Us page at the tool review site you're on and look for a photo of the person writing the reviews.

The next step is to read their bios to see how many years they worked as a carpenter, plumber, electrician, remodeler, etc. If they can't prove to you that they use, or have may years of using, power tools in the homes of paying customers, I maintain their review may not be worthy of your attention.

When I get a tool to review I actually use it. I put it through all the steps one might in the real world. This extra work pays off because you may be one like Ehren Q. below who left a comment about this review. Here's what he had to say:

"I've just broke mine from the box this week. Ive been punching about 5/6 nails. You were spot on by saying the area of vision was poor as well. Sure there is a light that is convenient, but it lights up a large metal tip.

I greatly appreciate your honest review as every other review I've read is saying this is a FANTASTIC tool, it's not. If I had the ability to return it I would."

My Nail Gun History

I clearly remember purchasing my first Senco pneumatic framing nailer years ago. It didn't take long for me to acquire many different nailers for both rough and finish work because these tools are such time savers and they can drive nails better than you can with a hammer. What's more, many of the nails have an adhesive on them and they hold better than a hand-driven nail.

A few years down the road in the late 1980's I made the transition from pneumatic nail guns to Paslode nailers that were powered by a tiny internal combustion engine. There was no need for a heavy, noisy compressor and gangly air hoses that were constant trip hazards and often got covered with mud. From the time you took a Paslode nail gun from its case, you'd be firing it in about ten seconds or less. 

Milwaukee got this part of the tool right, in fact they improved upon it because their new 18-gauge nailer only requires electricity to operate where the Paslode tools I used for decades, and continue to use, require electricity and small cartridges filled with propane. But I digress.

Hitting the Target

What you discover very quickly when using a nail gun is that it's vitally important for you to know exactly where the nail is going to go.

When you nail by hand, unless your eyesight is poor, your one hand places the point of the nail precisely where you want to drive it. Assuming you strike the nail squarely with a hammer and your other hand helps to hold the nail in place, the nail will go exactly where it needs to go.

With a nail gun, you must have a design that allows you to see the target area exactly where the point of the nail will go once you pull the trigger.

When driving nails into rough lumber, you can afford to be off say 3/8 of an inch. When you drive a standard 16-gauge finish nail, you can maybe afford to be off target about 1/8 inch.

However, when you drive a tiny 18-gauge brad nail, that margin for error drops to about 1/16th inch because your dealing with small trim wood such as the outside corners of crown molding or some other secondary trim lumber molding.

If you can't see where the nail is going to go, you could ruin a cabinet, an expensive piece of trim, etc. with just one squeeze of the trigger.

Firing Blind

The first thing I did when I opened this new Milwaukee 18-gauge brand nailer was hold it up to a 2x3 shelf support that's above one of my work benches. I wanted to see two things - how it felt and how well I could see where it was going to nail.

I was astonished by two things.

First, the tool is heavy - noticeably heavier than my Paslode 18-gauge brad nailer.

Second, I couldn't see where the nail was going to go. The entire tip of the tool was bulbous black and created a dark space where who knows where the nail would go.

It's best illustrated by photos. Here are two photos taken at the same angle while holding both tools as you would just before activating the trigger to fire the nail.

I attempted to take the photos in such a way as to represent exactly what I see with my eye as I look at the tool while using it. I did this using a stationary tripod to hold the camera and I placed the tools in the exact same spot over the tiny red cross that was my visual target.

interior door casing

This is a piece of interior door casing in my home. I made a red cross with a fine permanent marker. The lines are about 3/8-inch long in each direction. This is the target area the nail needs to hit. Photo credit: Tim Carter

Keep in mind that when you use a brad nailer that your margin of error is small. Much smaller than the target above.

gold standard brad nailer

This is the gold standard brad nailer in my opinion. It's the Paslode 18-gauge brand nailer. Had I pulled the trigger the nail would absolutely hit the center of the target. You can see the horizontal red line and the top half of the vertical line. The orange protective nosing on the tool has sight lines you line up so the nail goes exactly where you want it. Photo credit: Tim Carter


Milwaukee 18-gauge brad nailer

Here is the Milwaukee 18-gauge brad nailer. You can't even see the target. It's somewhere under all that metal that forms the nose of the gun. The tool was aligned exactly as the Paslode gun was in the above photo. You have no idea if the nail will go where you want it to go. Photo credit: Tim Carter

nail gun

Here's how I took the above photos. The camera was locked in position in all directions and could not move. The only thing that could move was the nail gun. Photo credit: Tim Carter

Tool Weight:

The two tools are not even in the same ballpark when it comes to weight.

Paslode says their tool weighs 4.9 pounds. My postal scale agrees with that with it coming in, including battery and propane cylinder at 4 pounds 14 ounces.

The Milwaukee 18-gauge brand nailer tips the scales at a beefy 6 pounds 13 ounces. Two pounds makes an enormous difference.

Number of Nails per Charge

Milwaukee says their tool will drive 1,200 nails if the battery is fully charged. I'll take their word for it as I'm not about to waste those many nails, since none came with the tool, and I don't have that kind of time.

Paslode says their tool will drive 12,000 nails per charge of their lithium-ion battery. Granted, the small propane cartridges will need to be changed out, but that takes about 30 seconds. If you don't have a spare Milwaukee battery, you're going to be taking one long 30-minute coffee break as you wait for their battery to get topped off.

Nails

I was very disappointed that the Milwaukee nail gun didn't come with one or two starter strips of nails. How frustrating if you purchase this as a gift for someone, they open it and they can't use it right away. Come on Milwaukee, the nails would cost you maybe a dime.

SUMMARY:

I don't particularly like writing reviews like this, but I feel it's really important for you and Milwaukee. You need to know that there are vast differences in tools that do the same job.

Milwaukee hopefully will take away from this that they should talk to seasoned pros who can tell them the best features of existing tools and the deal breakers that must be avoided when designing a tool from scratch.

Had they hired me many months ago when they were in the initial stages of designing this tool, I would have brought my Paslode gun to the meeting and drawn a few red crosses on a piece of woodwork and said, "Here, line up the cross with these marks on the orange rubber pad. When you think you have it, press the tool to the wood and pull the trigger."

I can tell you for a fact the product manager at Milwaukee would have put his first Paslode nail within 1/16th inch of the center of the red cross.

I would have then said, "Make sure you have that same visibility with your tool." Period

Mentioned in the May 15, 2016 AsktheBuilder Newsletter.

May 13, 2016 AsktheBuilder Newsletter

Yesterday I had the pleasure, if you want to call it that, of standing next to my open septic tank while it was being pumped.

I shot videos of the process looking down on it from my deck. Believe me, you don't necessarily want to see a close-up shot of the inside of a septic tank.

I'll have the video ready for you next issue should you want to see how septic tanks are pumped out.

Why should this be important to you? If you have city sewers it's not. But if you do have a septic tank, it's really important to have it pumped at least every three years - and more often if it's heavily used.

My tank was in really good shape. It has a 1,500 gallon capacity and there was only a very slight amount of scum / grease on the surface. There was only about a 3-inch layer of sludge at the bottom.

You want a somewhat clean tank like this so you don't ruin the leach field by sending effluent to it that has too many impurities.

I'm giving serious thought to installing a PVC pipe into the top of my tank that extends down about 3 feet. I'd then connect a bubbler motor that sends air down into the tank and creates lots of air bubbles for ten minutes every two hours.

This is how sewage at municipal city plants is treated. The sewer plants just aerate the sewage for a period of time before they then release it into a local river. Adding oxygen to sewage helps break down the impurities in the water FAST.

.
Did you know that fresh concrete can BLEED? If your contractor makes a mistake at this point, BAD THINGS happen. CLICK HERE to watch my CONCRETE BLEED video.
.

Ryan Dodged the Bullet

A few days ago, I told you about condo roof report I had to prepare for a woman who lives in Alameda, CA. That's right next to San Francisco Bay. I sent her the report an hour ago and saved her and her fellow condo neighbors about $35,000.

If you live in a condo association or similar situation that has a HOA, then you should be talking to me BEFORE you ever go out to bid on a project.

When I shared the story about the condo roof situation, you may have been one of the handful of subscribers that then hired me over the past three days to help save you tons of money.

I just HAD TO SHARE an email I received from Ryan, a subscriber to this newsletter. Ryan hired me to do a fast phone consult on a tar and chip driveway he was about to have done.

Ryan's a subscriber to this newsletter.

Understand that he lives on a common driveway that feeds four other houses, so a mistake made in this job could be very costly and make him look bad since he's spearheading the project for his neighbors.

Moments after Ryan and I hung up he met with one of the contractors bidding the job - the contractor with the *low* bid.

Realize that in the phone call I gave Ryan all sorts of information and questions to ask the contractor. Here's what Ryan sent to me last night:

"Thanks for the time today. I learned a lot from your expertise. The guy came out and things got a little interesting. I asked a few of your questions and he provided some decent answers, but we probed a little harder.

He claimed his Dad owned the asphalt plant and his application rate sounded a little suspect. He gave it to me twice about 30 seconds apart and the number wasn't the same! I also figured out we had a "miscommunication" on the quote.

The quote supposedly didn't include the driveway tails to each house, but I am sure we covered that on the first visit. I took your advice and told him I needed at least three recent references and an opportunity to see a completed job or two where he did the same tar and chip. He claimed due to privacy concerns he couldn't provide.

He mentioned he had a job about half hour away he could drive us to. Once we determined the quote was off, he offered to complete the tails for material only. Eventually we landed on him getting the new quotes put together, but he pushed to begin work right away on the main drive. That seemed odd he would not figure we would need to regroup given the quote went astray..

Long story short, he rushed off and didn't complete the measurements to get the individual drives to my neighbors' houses done. He also claimed he already bought stone and asphalt for our job. I reminded him his Dad owned the plant so he should be ok.

I then received a text within a couple hours with notice he was only guy in town that does tar & chip and we would be forced to do concrete or asphalt at a much higher rate but he would be happy to provide references and had decided to decline on completing our project.

I think we dodged a bullet and you kept me out of trouble with my neighbors! I will be using your advice to evaluate the other local contractors. It's funny as it looks like there are quite a few tar and chip options in Central OH!"

Ryan's LAST PARAGRAPH says it all. Can you see how he was dealing with a crook?

Also, the reason Ryan almost got taken is that he started to get bids for the job without having his own written specifications to hand out to each bidding contractor.

You MUST have those to AVOID getting hosed.

In certain situations I offer a service to produced detail written specifications. My Contractor Hiring Guides contain basic written specifications for most jobs, so those may be all you need.

You should consider those and you should get with me on the phone BEFORE you go out to bid so I can tell you exactly what you should be doing.

I'll be talking with Maureen in Delmar, CA in just 90 minutes about a job she's getting ready to do.

Bosch Tool Reviews

I recently published four tool reviews about Bosch Tools.

There's one I really want you to look at because it's not your ordinary review.

See if you can spot which one it is and tell me if you feel Bosch was happy with it. Remember, it's my job to tell you the truth about everything I see.

That way you can make an informed decision when you buy a tool.

Not all reviewers have the actual hands-on experience with tools to recognize the inherent downsides of a particular tool.

Bosch 12-inch Miter Saw Review

Bosch Job Site Radio Review

Bosch EXTREME Rotary Hammer Review

Bosch Digital Level Review

That's enough for a Friday.

I'll be back with you on Sunday most likely.

Tim Carter
Founder - www.AsktheBuilder.com

Do It Right, Not Over!

Bosch GIM 120 Digital Level

About a month ago, I got my hands on the new Bosch GIM 120 Digital Level.

I can remember about twenty years or so ago when the first digital levels hit the market.

For a contractor, yes - I'm one of the few media people that review tools that's actually worked for decades on the job sites of real paying customers, that worked with traditional levels with bubbles in alcohol vials, the digital levels were futuristic.

I remember testing one of the first ones and it pretty much drove me insane when I was using it.

Why you ask?

CLICK THIS IMAGE TO BUY THIS TOOL!

Well, with a traditional level, unless you have a super high quality one where the edges of the bubble just touch up against the lines marked on the vial, you have some wiggle room. The bubble can be within the lines and not be perfectly centered. For most, this passes as level.

But with a digital level, there's only ONE LEVEL. If you're off a little bit, the level lets you know. If you have a customer hovering over your shoulder or you make the mistake and leave your level on the job site, then you might get a headache in a hurry.

Does this mean you shouldn't get one? No.

If you're a homeowner and are a perfectionist, this is your DREAM TOOL.

If you're a contractor that wants perfection, BUY THIS TOOL.

CLICK HERE to read all the technical specifications of this precision instrument.

The Bosch GIM 120 is a precision tool that delivers solid performance, but I feel it's not necessary for daily use on most jobs because it will drive the average user insane trying to get whatever level. That's the voice of experience screaming at you.

CLICK HERE NOW to BUY the Bosch GIM 120 Digital Level.

Bosch 11255VSR Extreme Rotary Hammer Review

Several weeks ago, I had to tear into a basement slab at my own home as part of a bathroom remodel project.

At the bottom of the slab were PEX pipes that were providing heat for the basement. It was important to use a chipping hammer tool that provided extreme control and minimal fatigue so I didn't puncture one of the PEX pipes.

This is one reason I was attracted to the Bosch 11255VSR Rotary Hammer. It's got the power to do the job and it provides you with amazing control because it's not a big tool like some of Bosch's competitors.

This tool takes all the SDS-Plus bits you can think of. The D handle minimizes fatigue.

If you want the FULL list of technical specs, CLICK HERE.

Bosch extreme rotary hammer

CLICK THE IMAGE TO BUY THIS TOOL NOW!!!

I've used Bosch power tools for years and feel they're right there at the top with respect to quality and durability.

If you're looking for a tool that can last decades, then this is one you should consider.

I have a Bosch rotary hammer drill that's 30 years old, it received punishing treatment on my jobs and it still works as if it's brand new.

This new Bosch 112554VSR hammer tool has the same pedigree. CLICK HERE NOW to buy it.

Bosch PB360C Job Site Radio

A few years back, I tested the Makita job site radio. It was nice and delivered great sound, but I recently was able to use the Bosch PB360C radio and it's a superb product. I feel this Bosch radio is far superior to the Makita radio.

One of the outstanding features of this Bosch radio is the bluetooth connectivity. As technology continues to march forward, more and more contractors and serious DIYrs have lots of their music, audiobooks, etc. on their smart phones and tablets. These devices all have bluetooth and can easily connect to the Bosch dream machine.

If you love to read specifications about products, then CLICK HERE to discover all the fine points of this radio.

Bosch Job Site Radio

CLICK THIS IMAGE TO BUY this magnificent radio.

The radio can be powered by regular 120-volt AC or traditional Bosch batteries you have for your Bosch cordless tools. Just make sure you have compatible batteries. When you do use 120-volt AC, the radio then does double duty as a battery charger.

I loved how durable this radio is and it's got a wonderful deep bass tone. The controls are pretty intuitive and this radio will look fantastic in a workshop or office as much as it does on a construction site.

I guarantee you that you'll not be disappointed with this purchase.

CLICK HERE now to buy this radio or to see all the other radios Bosch makes.

Bosch CM12SD 12-Inch Miter Saw Review

I've used many miter saws in my career.

In fact, the first one I ever took on a job was a hand-powered one my father-in-law lent me. It was a Stanley saw that had a back saw that fit in two cast-iron guides. It was not bad, but you sure had to hold wood trim tight to get great cuts.

Decades ago, I got my first motorized miter saw. I can't remember the brand, but what a great improvement over the Stanley saw.

The Bosch CM12SD 12-inch miter saw is light years ahead of my first motorized saw and you can't even compare it to the Stanley saw.

If you want to engorge yourself on the technical specs of the Bosch monster saw, CLICK HERE.

bosch 12 inch miter saw

PROS:

This saw will cut beefy lumber and large trim.

This saw is extremely durable.

This saw is made to last for generations if you care for it.

This saw is accurate.

This saw is double bevel.

CONS:

This saw is heavy with a capital H.

This saw is not for the casual weekend user, it's made for a pro user.

Summary: I really liked testing this saw. It made very accurate cuts. The visibility of the blade was excellent.

This is a saw you want to put in a workshop and leave it there. It's not one you want to take in and out of the back of a pickup truck each day at the job site unless you are trying to bulk up to be a wrestler for the WWE. CLICK HERE to buy a Bosch miter saw, including this one.

May 10, 2016 AsktheBuilder Newsletter

I'm back.

If you're a new subscriber in the past ten days, I was on a much-needed vacation to California with my youngest daughter.

Meghan Method Book CoverKelly and I also got to spend four days with my oldest daughter Meghan who you might see just to the right of these words if you have your images turned on. Meghan wrote the Meghan Method book that demystifies interior decorating so a cave man can do it. CLICK her photo just to the right and get that book.

I'm going to spend this newsletter on some of the things I discovered while on vacation.

Most are about life and some are about home improvement.

If you're NEW to the list, this is not an ordinary newsletter so don't be so fast to unsubscribe. Hang in there.


.
CLICK HERE to discover the way to enjoy a beverage and not be BUGGED.
.


Recreation

Twenty-three years ago, and just about overnight, I became a professional writer.

You may not know this but in May of 1993, I was selected as one of the top 50 remodeling contractors by Remodeling magazine. I used that award to launch my new writing and media career.

A few years before that, I had come to the conclusion that I needed to get out of the day-to-day construction business to preserve my body.

I was a hands-on builder and carrying around all that weight, kneeling down, and working at dangerous job sites is a fast way to cause long-term harm to one's body.

Kathy, my wife, said, "You should take your book idea and write a syndicated newspaper column."

I had a major powerful epiphany right at that moment. Within nine months, I self-syndicated my Ask the Builder column in 30 newspapers. It still runs in about 80 papers nationwide each week.

Why is all this important? Over the past years, I've started to study words like I used to study building materials.

Think of recreation. It's a cool word.

What was its origin?

Simple. Think of what happens when you do it.

You "re-create" yourself.

When you play - any type of play - your body, especially your mind, recharges itself.

Usually recreation doesn't involve stressful decisions that face you minute by minute in regular daily life.

You may be swimming, playing tennis, hiking, laying in a beach chair, gardening, etc. It doesn't matter. You've switched over to a relaxing mode where your brain and body are idling.

It worked for me. I'm completely recharged.

You should try it. Go *re-create* yourself, even if it's in a local park for two hours.

Spalling Sidewalk

Kelly and I spent the first four days of the vacation with my oldest daughter and son-in-law Brent.

We went to Yosemite National Park and rented the lower floor of a single-family house in Yosemite West.

If you plan to go to Yosemite, this is the ONLY place to stay other than the famous Yosemite Lodge in the heart of Yosemite Valley.

All other motels / hotels are at least an hour, or more, drive from the park. Ouch!

The sidewalk leading from the driveway into the lower level of this house was made from concrete. It was poured at the same time as the small driveway pad. However the sidewalk was deteriorating and spalling.

I took a photo of it and wrote a column about why it happens and HOW to fix it.

CLICK HERE to see how to fix your spalled concrete.

Car Rental Discovery

We had to rent a car for our journey. Kelly and I drove 2,369 miles in ten days. She's a great driver.

The car rental companies, most of them, don't like it when you pick up the car from one city and drop it off at another location. You get HOSED by most rental companies if you decide to do this.

We had to do that. We flew into San Francisco and flew back from Los Angeles. But we didn't get HOSED!!!

I saved over $1,000.00!!!!!

CLICK HERE to read about a VERY COOL new rental company I discovered. If you decide to use them, check out to make sure the location you're picking up from is a CORPORATE and not franchise site.

Here's what else I discovered. Cadillac makes one superb car! I would have NEVER thought to test drive one. My Aunt Juanita used to drive one all the time, but they've not been on my radar.

I can tell you for a FACT that Kathy would love the car we rented. CLICK HERE to see a photo of this dream car.

Vacation Photos

So you want to see a few photos of where Kelly and I were?

CLICK HERE to see a few from Yosemite National Park.

CLICK HERE to see a few from Death Valley National Park.

Over the years, I've visited just about every national park west of the Mississippi River. I had always overlooked Death Valley because I thought it would be ugly and boring.

I was WRONG. It's now my favorite national park hands down.

I'll have many more photos for you in the next issue. I'll try to upload a bunch to inspire you to go visit these magical places.

Roofing Bid Review

When I flew into SFO - that's the airport code for San Francisco - little did I know that I was just a few miles directly across the bay from a set of condominiums that would soon be on my radar.

This past weekend a subscriber to this newsletter who lives in the condo complex wrote to me, "Tim, our condo association is going to need a new roof and our HOA has three bids. They're CONFUSING. Do you offer a service where you review the bids and can counsel us on what to do?"

The answer is YES! I've been doing this for years and really don't advertise it.

If you're about to undertake a big job that involves lots of money, then perhaps you might want to consider hiring me to offer you guidance and advice so you don't get HOSED.

Email me if you want a quote on what this service costs. It all depends on WHAT job your doing. Helping you with new home bids is more complex than just helping you with a roofing quote.

STAIN SOLVER SALE UPDATE

The Stain Solver sale ended this past weekend.

I didn't send out a reminder to you.

Here's why. The sale was SO SUCCESSFUL that we sold well over 50% of the TEN TONS of product we had just manufactured.

Did that sink in?

We shipped over SIX TONS of Stain Solver in about a week's time.

If I had reminded you, I knew you procrastinators would react and then we'd SELL OUT.

This would not be good as regular customers would show up to the store, and the shelves would be empty.

So we're bringing in supplies now to do another TEN TONS.

When I get that run, we'll have another SALE. It's going to be a BLOWOUT 4th of July SALE.

CLICK HERE to see photos of all the things Stain Solver can clean.

BOOM!

New Deck and Decking

While I was on vacation, I was still doing email.

A major composite deck material manufacturer reached out to me with some exciting news about a new product line. It was so powerful, I reacted just like you do when you see my Stain Solver sales.

I decided that I'm going to build an extension to our deck and replace the decking on our existing deck with the new composite deck material.

What product am I using?

You'll discover that in the next issue.....

It will take your breath away it's so beautiful and realistic.

I'll be back on Friday with more news.

Tim Carter
Founder - www.AsktheBuilder.com

Do It Right, Not Over!