DIY Shed AsktheBuilder Floor Joist Layout Video

Tim Carter, demonstrates how to get the floor joist layout perfect for 16-inch on center floor joists.

The first joist away from the edge is the critical one. Once you have this one spaced correctly, then all the others are 16 inches on center from that one.

For more DIY Shed building tips and information and to purchase the actual plans for the shed in this video, click the following links:

SHED PLANNING: https://www.askthebuilder.com/how-to-plan-a-shed

SHEDS for STORAGE: https://www.askthebuilder.com/storage-sheds

GARDEN SHEDS: https://www.askthebuilder.com/garden-sheds

SHED RAMPS: https://www.askthebuilder.com/shed-ramps/

ACTUAL SHED PLANS: http://go.askthebuilder.com/plans

DIY Shed AsktheBuilder Deck Corner Brackets Video

Tim Carter shows how to use a deck corner bracket to reinforce a corner when connecting deck joists with a band board. The same is true for a suspended wood floor system.

For more DIY Shed building tips and information and to purchase the actual plans for the shed in this video, click the following links:

SHED PLANNING: https://www.askthebuilder.com/how-to-plan-a-shed

SHEDS for STORAGE: https://www.askthebuilder.com/storage-sheds

GARDEN SHEDS: https://www.askthebuilder.com/garden-sheds

SHED RAMPS: https://www.askthebuilder.com/shed-ramps/

ACTUAL SHED PLANS: http://go.askthebuilder.com/plans

DIY Shed AsktheBuilder How to Straighten a Beam Video

Tim Carter demonstrates how to use an offset string to get a wood beam perfectly straight.

For more DIY Shed building tips and information and the actual plans for the shed in this video, click the following links:

SHED PLANNING: https://www.askthebuilder.com/how-to-plan-a-shed

SHEDS for STORAGE: https://www.askthebuilder.com/storage-sheds

GARDEN SHEDS: https://www.askthebuilder.com/garden-sheds

SHED RAMPS: https://www.askthebuilder.com/shed-ramps/

ACTUAL SHED PLANS: http://go.askthebuilder.com/plans

Bathroom Remodel Sequence

DEAR TIM: Last week you talked about a removing a shower floor in a project you’re doing. I have a big bathroom remodel project I’m about to start but I’ve never done one before. I don’t know when to do what and am worried about wasting time, materials and causing damage to finished surfaces. Is there a universal bathroom remodel sequence so I know when I should be doing what work? I’m sure you’ve done lots of remodels and any other tips you can share would be appreciated. Madelyn J., Morgan Hill, CA

DEAR MADELYN: Yes, I lost count of the bathroom remodels I’ve done over the years. Back in the day when I was deep into remodeling for paying customers, I can remember quite a few of the jobs. I was talking to my son the other day and told him that we could completely gut a bathroom to the stud walls and have it back in service in 12 days or less when everything went as planned.

You’re correct in thinking there’s a recommended sequence of events that needs to happen in a precise order. This ensures a bathroom remodel project moves ahead as fast as possible yet no one contractor has to endure a hardship because of the work put in place by another trade or subcontractor. This applies even to DIY folks like you who don’t need any additional aggravation while you’re trying to do the work at nights and on the weekends.

This bathroom is undergoing a major remodel. Each step must be done at the right time to minimize cost and get the job done fast. Photo Credit: Tim Carter

This bathroom is undergoing a major remodel. Each step must be done at the right time to minimize cost and get the job done fast. Photo Credit: Tim Carter

I often feel the best way to think of a bathroom remodel is to think about the sequence when one builds a new home. With almost every remodel, you need to do demolition work. That’s the first phase as you need to remove all the things that are going to be replaced. This phase is nasty work and I recommend you get this behind you as fast as possible.

Once you’ve gutted the bathroom, it’s time to make any repairs to the wood subfloor that may have happened by water leakage. It’s also time to do any other wall or ceiling framing where you use wood or metal studs. Get all of this wood framing complete before you do anything else.

Be sure you have all of the diagrams of all the plumbing fixtures, medicine cabinets, light fixtures, towel bars, etc. so you put the wood studs and blocking in the correct location. I’ve seen many a rough carpenter put a wall stud directly in the way of where a tub and shower faucet is going to be. Don’t make that same mistake.

The next phase of work is your heating and air conditioning. This work should be coordinated with the plumber as well. If your home has forced-air heating and cooling there may be ductwork changes. It’s always much harder to work with large objects, such as 6-inch metal ductwork, than with small things like 1/2-inch water supply lines.

For this reason, the plumber and electrician need to yield to the HVAC installer. However, the plumber also has very tight constraints as certain large pipes can only go in one place. This is why the plumber and HVAC man should meet at the job site and discuss what they need to accomplish so they don’t get in each other’s way.

Once the heating and cooling rough-in work is complete, it’s time to bring in the electrician. It’s very easy for an electrician to place his flexible wire where it needs to be. Some cities require the wires to be in metal conduit, but even this is easier to install than a 3-inch PVC toilet drain or a 1.5-inch sink drain pipe!

Be sure your light fixtures don’t interfere with any mirrors, opening medicine cabinet doors, etc. I’ve seen electricians install wall sconce boxes way too close to mirrors. All of this has to be thought out long before the electrician shows up to work and nail in boxes.

After the electric is complete and you’ve passed all your mechanical inspections, you need to make sure your bath fans are vented properly with metal pipe. Don’t make the mistake and use that wretched flexible pipe that looks like a plastic-covered slinky toy.

With all this work done, it’s time to insulate, install a great high-performance vapor barrier on any exterior walls and then drywall. The finished floor happens next followed by any finish carpentry trim work. You’d then will probably paint the walls and ceiling and then install the toilet, vanity, countertops and faucet.

In certain instances, I often decide to paint the walls and ceiling before I do the finished floor. It all depends on the job. The last thing you want is to spill paint on finished floor and believe me, accidents can and do happen.

I feel the biggest tip I can offer up is to plan, do more planning and go over the plan a third time. You need to make sure everything is going to work and there are no conflicts with fixtures. If time is of the essence and you don’t want delays, then get all finished fixtures at the job site and open them up. Be sure everything is perfect and there’s no concealed damage.

Column 1139

April 10, 2016 AsktheBuilder Newsletter

Holy Cucumber, the week FLEW past! Does it do the same for you?

I've made enormous progress on the bathroom remodel here. Yesterday I got two of the three new walls up. The third one will go up tomorrow after I spend today in a cramped and dark space above a basement closet.

While doing all the demolition for the basement bathroom, I now have access to the underside of the master bathroom floor, although some of the floor is over an adjacent closet that has a partial dropped ceiling to accommodate master bathroom plumbing drain pipes.

I'll be in this space installing a very cool radiant heating heat transfer plates. Don't worry, I'll be doing a video or two today so you don't have to wonder what these are all about.

Suffice it to say the idiot builder who built the house I'm living in - and I blame the owner too - didn't spend the extra - are you sitting down???? - $50 to make sure the master bathroom tile floor was warm and toasty.

Did I fail to mention the master bathroom of my house faces north? Did I fail to mention that my master bathroom has THREE EXTERIOR walls with FIVE WINDOWS?

Did I fail to mention the master bathroom has two SMALL baseboard radiant heaters that barely keep the room comfortable when the outside temperature drops below 40 F?

After today, the tile floor is going to be luxuriously WARM!!

Here's the BEST PART:

If you have a master bath floor that's COLD like mine and it's over a basement or crawlspace where you have access to the underside of the floor, you can do what I'm doing!

You don't have to have a monster boiler and expensive radiant heating system!

You can install a very small water heater, about 100 feet of PEX piping, a small circulating pump and you'll have a delightful TOASTY WARM floor!

.
CLICK HERE NOW to Discover the BEST Exterior House Paint Ingredients. I used this to paint MY HOUSE.
.

LAST CALL to See Amazing Doors

This is your last chance for many months to see some of the most amazing doors and door hardware I know of.

CLICK the following links and reply back to me if you're so inclined about what you like most about them.

I LOVE the one door that has the crown molding shelf above the stunning glass converging doors.

I'm convinced Kathy will have me doing this here at our home.

Here are the links:

Amazing Door #1

Amazing Door #2

Amazing Door #3

Amazing Door #4

Install Amazing Door Hardware Video

BIG Ass LED Garage / Shop Light

I've been testing a very powerful garage / shop LED light that may be of interest to you.

Please don't be upset about my crass language. That's the name of it.

  • This light is very powerful and bright.
  • This light is durable.
  • This could be the last garage light you buy.
  • Other things about it will AMAZE you.

Be SURE to leave comments at the bottom of the review page!!

CLICK HERE to read my review of the Big Ass LED Light.

New Bathroom Remodel Videos for You!

How to Remove Cement Board

How to Remove a Shower Pan - PART ONE

How to Remove a Shower Pan - PART TWO

How to FIND Radiant Heat Pipes in a Concrete Slab

Look at this thermal image photo below.

CLICK IT to watch a thermal image video I shot of my basement floor with the FLIR thermal imaging camera!

If you want to BUY one of the fantastic FLIR thermal imaging cameras, CLICK HERE.

That's quite enough for today.

Oh, if you like my ham radio stories, you may like these two recent ones:

Amazing Rumi's Bulgarian Photos

STEM Day at Belmont NH Middle School

I'll be back next week!

Oh, in case you hadn't noticed, NOTHING IS CHANGING in my newsletter.

Tim Carter
Founder - www.AsktheBuilder.com

Do It Right, Not Over!

DIY Shed AsktheBuilder How to Notch a Post Video

Tim Carter shows why a notched post is better than bolting a beam to a post.

For more DIY Shed building tips and information and to purchase the actual plans for the shed in this video, click the following links:

SHED PLANNING: https://www.askthebuilder.com/how-to-plan-a-shed

SHEDS for STORAGE: https://www.askthebuilder.com/storage-sheds

GARDEN SHEDS: https://www.askthebuilder.com/garden-sheds

SHED RAMPS: https://www.askthebuilder.com/shed-ramps/

ACTUAL SHED PLANS: http://go.askthebuilder.com/plans

DIY Shed AsktheBuilder How to Install Hold Down Anchor Video


Tim Carter explains the parts of a typical hold down anchor and how to connect a wood post to a concrete pier using one.

The hold down anchor prevents uplift. Strong winds can lift a wood shed from a foundation causing it to tumble across a yard or field.

For more DIY Shed building tips and information and the actual plans for the shed in this video, click the following links:

SHED PLANNING: https://www.askthebuilder.com/how-to-plan-a-shed

SHEDS for STORAGE: https://www.askthebuilder.com/storage-sheds

GARDEN SHEDS: https://www.askthebuilder.com/garden-sheds

SHED RAMPS: https://www.askthebuilder.com/shed-ramps/

ACTUAL SHED PLANS: http://go.askthebuilder.com/plans

Big Ass LED Light Review

big ass light

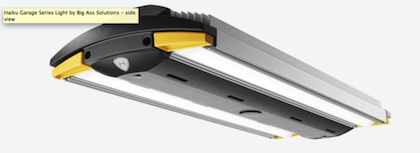
This is the Big Ass LED light. It's small, but it puts out LOTS of light. Copyright 2018 Tim Carter

Big Ass LED Light - Small but Bright!

A few months ago, I was approached by the fine folks at Haiku Home. They make fans and they recently started to dip their toes into the LED light marketplace announcing their Big Ass LED Light.

The engineers at Haiku Home came up with a durable, futuristic, and BRIGHT LED light meant for garages, shops and any other place where you need lots of light but not a big electric bill.

What are the Specs of the Big Ass Light?

This 2-foot light fixture made from a one-piece cast aluminum body puts out a brilliant 13,000 lumens while only sipping just 122 watts from your local electric provider. The color temperature of the light is very close to what you'd see at high noon on a clear day.

What is the Color Temperature of the Big Ass Light?

You can expect 5,000 Kelvin out of these lights so you get excellent color rendition with whatever you're working on.

How Much Does it Weigh?

When I first took delivery of the lights, I was astonished at what the lights weighed. I wondered if they incorporated lead weights in them.

I estimate the light weighs 15, or more, pounds. They're beefy and definitely deliver with respect to the THUD factor.

big ass lights

Click the image to purchase this light.

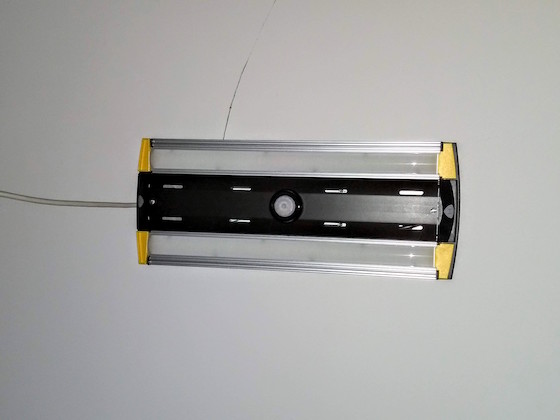
How Do You Hang the Lights?

You hang the lights with two included S-hooks. A standard three-prong plug provides the needed electrons. This means you'll have to adapt a standard lightbox in your ceiling to an outlet that you might find on a wall.

Does the Big Ass Light Have a Motion Sensor?

The light comes equipped with a motion sensor that can be adjusted to suit your needs for how you use your garage or workspace. This is a very handy feature and a twist of the sensor allows you to adjust the length of time you want the light on each time you activate the switch.

You can visit the Haiku Home site for all the details about this amazing light fixture.

How Much Does the Big Ass Light Cost?

My biggest complaint with this wonderful light was its price. At the time I'm writing this review, you have to part with just a few pennies under four hundred dollars for one of these at your local big box store.

For some reason, there's a very wide disparity in price if you go to Amazon.com where the light is listed at an astonishing $599.00 at the time this review was published in early April 2016.

The Big Ass LED Light comes with a corresponding big-ass price tag that many might not be willing to spend.

Garage Series Light

Click here to purchase this light

With that in mind, I decided to ask Clay Moran at Haiku Home some questions.  I was trying to get my head wrapped around why a garage light would be so costly.

Here they are with his thorough responses:

Why are the lights so expensive?  Can you go into detail as to what makes them retail for $500 when you can go to Amazon and get similar light fixtures for far less?

There are several reasons our lights are the priced the way they are. These fixtures are-and I mean this sincerely-not comparable to anything else out there.  They are incredibly bright – brighter than (16) 60-watt bulbs.  Each light is assembled in the U.S. and every light goes through a burn out period before they are shipped to ensure the highest quality.  The benefit of this is we catch any faulty LED bulbs before they are shipped out. Most lighting manufacturers test one fixture for every 100 they sell.  Our lights are made of one solid piece of extruded aluminum, which means you never have to worry about breaking bulbs in your shop. Our lights are so durable, in fact, that you can drive a 4 ton truck over them without a scratch. We know, because we did it - see here.   The expected lifetime on our LED’s blows CFL’s out of the water and means that you should never have to purchase another light. Most companies provide a 1-year warranty, and we provide a full 7-year warranty that includes the driver (power supply).     


Are there vast differences in components? If so, what? Please go into great detail about how you might have far superior components vs the other brands.

In addition to the information above, the Amazon link that you sent primarily shows bulbs, while our product is an entire fixture with lighting already installed. Besides hanging or securing as preferred, the only real installation required is plugging our light into an outlet. Further, when installed with the occupancy sensors, our customers have the potential for energy cost savings from eliminating wasted time with the light on.


The lights seem unnaturally heavy. Why? Was the weight done for the THUD factor because of the price?

Not at all, as mentioned above,  we want our lights to be the last our customers have to buy, so they are made from one solid piece of extruded aluminum for maximum durability. This comes with some extra weight!


Who is your customer? What is the demographic? Very few have the spare cash to spend $500 for a garage or shop light.

We have a huge demographic of customers- most male, 30’s-60’s in age, and especially popular among the wood-working population and for customers who work on cars or other projects in their garage and require bright, long-lasting, durable lighting.  


Any other information you can provide to justify the cost would be quite helpful.

An additional feature that adds convenience and ease of use to the lights is the easily removable lumen maintenance trays. These can be removed, cleaned, and replaced in just minutes, which is fantastic for folks with a lot of sawdust, grease, or other grime flying around their shop or garage.

DIY Shed AsktheBuilder How to Install Through Bolts Video

Tim Carter demonstrates how to install through bolts while assembling a wood floor system on wood 6 x 6 posts for a DIY shed.

Through bolts make for a better connection than lag bolts. Lag bolts are unacceptable because if the installer over tightens them, the wood fibers get shredded by the coarse threads and the connection becomes very weak.

Through bolts work much like iron rivets when connecting steel plates. Rivets are time-tested connection and work well.

For more DIY Shed building tips and information and to purchase the actual plans for the shed in this video, click the following links:

SHED PLANNING: https://www.askthebuilder.com/how-to-plan-a-shed

SHEDS for STORAGE: https://www.askthebuilder.com/storage-sheds

GARDEN SHEDS: https://www.askthebuilder.com/garden-sheds

SHED RAMPS: https://www.askthebuilder.com/shed-ramps/

ACTUAL SHED PLANS: http://go.askthebuilder.com/plans

DIY Shed AsktheBuilder How to Build a Wood Frame Floor Part 1 Video

How to Build a Wood Frame Floor Part 1

Tim Carter demonstrates in this DIY Shed series how to build a wood frame floor using treated lumber and 6 x 6 wood posts.

Earlier in this video series and playlist, Carter showed how to build and notch the wood posts.

For more DIY Shed building tips and information and to purchase the actual plans for the shed in this video, click the following links:

SHED PLANNING: https://www.askthebuilder.com/how-to-plan-a-shed

SHEDS for STORAGE: https://www.askthebuilder.com/storage-sheds

GARDEN SHEDS: https://www.askthebuilder.com/garden-sheds

SHED RAMPS: https://www.askthebuilder.com/shed-ramps/

ACTUAL SHED PLANS: http://go.askthebuilder.com/plans