Paint Walls With Bold Colors

interior walls painted gray

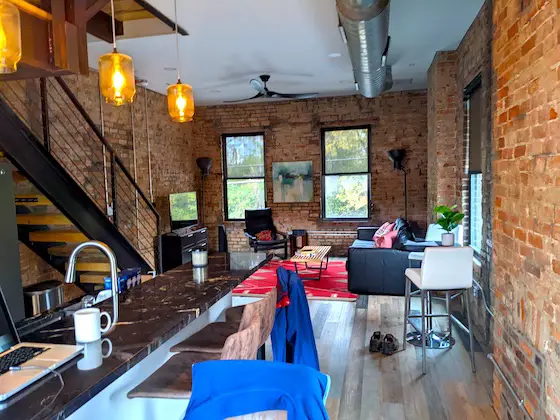
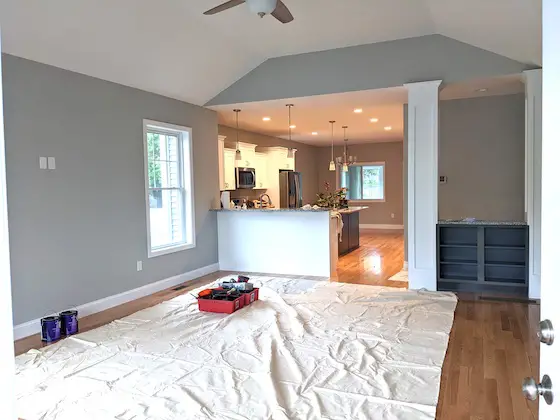
Who wants the inside of their home to look like a battleship? Spice it up and introduce bold colors to create distinct moods. Look below at the after photo with bold colors! Copyright 2023 Tim Carter

Paint Walls with Bold Colors - It Might Look Fantastic

I’ve had the distinct pleasure to attend numerous editors conferences over the years sponsored by different manufacturers. I’ve toured tool heat-treating hand-tool plants, precision saw-blade factories, small-engine plants, and paint factories to name but a few. Each experience is similar to Christmas morning because I got to see new things that otherwise are hidden from the public for a host of reasons.

One of the most fascinating tours was of a paint factory on the West Coast. Part of the tour was timed so we got to see the early stages of making a batch of interior paint. I believe the size of the vat was at least 5000 gallons but it could have been as much as 10,000 gallons. You need a massive metal stirring paddle to blend all the ingredients. Forget about using a wood stick!

Perhaps the most interesting part of the tour for me was the session spent with the on-staff color expert. This woman appeared to have no less than 20 years experience and she explained to us all the nuances of color, how the slightest shades of color can affect how you feel, and most importantly how distinct colors can control, to a large degree, your mood.

2020-23 Trend is Battleship Gray

Have you toured any new homes recently? If so, you may notice that many interior rooms are painted different shades of gray. Visit an art museum and you might not even notice that the walls are often painted gray. It’s an interesting color that actually is the absence of color. This is why gray is used in art museums so the paintings and photographs don’t compete against the background color of the walls.

Gray is most often created mixing pure white paint with some amount of black pigment. When most people think about color, they tend to think about every other color in the rainbow other than white or black. Gray provides a very interesting background for all other colors you might put in the rooms of your home just as it does in a museum.

All that said, you may be like my son. He purchased a new home that came on the market last spring. The builder had already painted all the rooms a medium gray for the above reason.

While that sounds like a good idea when I toured the house with my son, he said, “Dad, what the heck? I don’t want to wake up each day thinking I’m a sailor on a battleship. It’s just way too much gray! How hard would it be to paint the rooms over?”

I answered him that we could easily repaint half the rooms in the two-bedroom house in just three days. I told him it depended on the colors he’d choose as some lighter colors like yellow might require two coats.

He decided he wanted to do an experiment and go with some very bold colors. I thought he was making a mistake. His mother and I both shared with him that when he sees a color on a small strip of paper that you get at the paint store, once that color is on the wall it almost always appears much darker. This happens because there’s just so much color hitting your eyes vs looking at a sample that’s 2 inches wide and maybe 3/4-inch tall.

He said, “Dad, paint isn’t that expensive and since you’re helping and it doesn’t take long I can always repaint the room.” Oh, how convenient your dad can help you for the price of a free lunch! If you have children, I’m sure you’ve been conscripted to help with projects. To be honest, I loved working on his house.

The first room we painted was his living room. He chose a deep blue color. When I opened the can I gasped as quietly as I could thinking it was a huge mistake. The gray wall color happened to be a superb base and the blue covered it in one coat with ease. It was a bright sunny spring day and much to my surprise after the first wall was finished it looked amazing. I had thought it would make the room appear too small but I didn’t get that feeling. The other benefit to blue is it’s a calming color.

The kitchen was painted a stunning yellow much like a sunflower, the dining room was transformed using a deep spicy reddish brown, and his rear sunroom was coated with a stunning medium green.

painted interior walls with bright bold colors

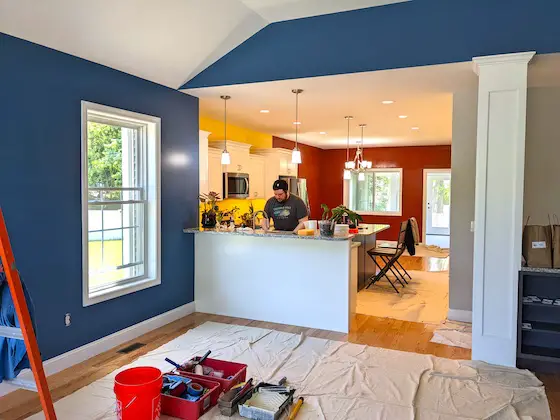
What a difference! The blue is stunning in person. The spicy reddish brown is not bad at all with light fabrics on the wall. Copyright 2023 Tim Carter

After we were finished, I had to admit the bold colors in this open-concept house not only looked spectacular, but they also didn’t clash. Once he started to hang paintings and fabrics on the wall, the colors looked even better.

I suggest that if you’re on the fence as to what to do, simply purchase a quart and paint one wall. Realize the color may look somewhat different at night than it does in the day. Experiment with flat paint vs. semi-gloss. You may find that might make a difference. No matter what, if you don’t like the color, you can repaint a typical room in just hours. Be brave! Try a bold color or two and you’ll not think you’re swabbing decks on a battleship when you mop your kitchen floor!

battleship new jersey 62

Do you want to feel like a sailor? Then paint the inside of your home like a battleship.

Column 1490

Cleaning and Restoring Tile and Slate Floors

Cleaning and Restoring Tile and Slate Floors - Easy!

terracotta tile floor wax coating

This tile floor may look good to you, but believe me it’s got layers of wax that was applied over dirt. Copyright 2022 Tim Carter

A month ago you may have read my column about how to get ceramic tile grout clean. As you might suspect, I received quite a few thank-you notes via the Ask Tim page on my www.AsktheBuilder.com website. It’s always gratifying to hear from you knowing that I helped you save time and money.

Pamela, who hails from Kenosha, WI, reached out to me after reading that same column. But she had a bigger problem than just her tile grout. Here’s what she sent me: “I would like to know how to properly clean, restore, and maintain the terracotta floor in my kitchen, the slate floor in my entry hall, and half bathroom. I believe the prior owner may have waxed them to get a shine, so there may be some buildup. The floors really don’t look that good no matter what I’ve tried.”

Pam used the image upload tool on my Ask Tim page and sent me a photo of each of the floors. I was able to see the problem right away and started a back-and-forth conversation with her. The first thing I shared was that her question was so good I was going to make a star out of her. I’d love to do the same with you with any problem you have at your home.

filthy slate entry floor wax

Look at how this slate floor was ruined by coats of wax and probably urethane. Look at how FILTHY the grout is in places. It was originally an off-white color! The owner may have to use paint stripper on the slate to remove what could be urethane.

Do you have tile or slate floors that look drab? Have you tried all sorts of polishes to only discover days or weeks later your floors look bad again? Have you been trained how to clean a floor? There’s absolutely no shame in admitting you’ve not been trained by a professional floor cleaner.

Finally, have you fallen into the trap of using those pad mops that come with disposable pads and have a spray bottle of cleaner/polish on them? Let’s unpack all of this so your tile and slate floors will look as fantastic as the day they were installed.

Once I peered at Pam’s photos, I could see she was right about the wax buildup. I suggested to her to go out and purchase a small quart bottle of a commercial wax remover and read the use instructions. I’ve used these for years when I’ve volunteered to help restore waxed terrazzo floors in my kids’s grade school. A group of parents got together to clean and restore all of the floors and stairwells in the entire school because it was just too much work for our older custodian.

I also asked Pam to take many photos as she worked on the project. I wanted to be able to share those with you. You can see them if you look up this column on my website.

The most dramatic photo that Pam shared with me, and I specifically asked her for it, was the one of the bucket of water that she dipped her scrub brush in as she removed the built-up layers of wax. The water was disgusting. Keep in mind Pam thought her floors were clean! Fortunately she didn’t bite off my head in our email exchange.

filthy cleaning water tile slate floor

This is the scrub water as layers of wax are removed. The wax stripper softened the wax and scrubbing with soapy water removes it. Look at how filthy the floors were when layer after layer of wax was applied. GROSS!

If you’re using real wax or those grocery-store pad mops on your floors, there’s a great chance you’re not really cleaning your floor. I was trained by a professional how to clean tile floors. This is but one way to get great results.

I start by sweeping the floor or vacuuming it. You want all loose debris off the floor. I then break out my old-fashioned string mop. I mop the floor with a solution of soapy water. I simply use the best liquid dish soap I can buy.

Many people don’t use a string mop correctly. Once you dip it in the soapy water and remove excess water, you spin the mop so the strings spin around like an amusement park ride. When the mop hits the floor, the strings should be pointing out in all directions in a circle. Move the mop sideways left and right working it back towards your body. Only clean about 10-12 square feet before rinsing out the mop to get fresh soapy water.

If the water gets filthy before you’re finished, discard it and get new soapy water. Otherwise you’re simply mopping the floor with filthy water for goodness sake. If you use one of the pad mops, you probably make the same mistake and don’t change the pad frequently enough. Such a waste of money!

After mopping the floor with soapy water, it’s time to rinse it. You put clear water in the mop bucket and do the same thing as you did with the soapy water. As the water gets cloudy, discard it and get fresh rinse water. Once you mop the floor and the water is no longer getting cloudy, you know it’s clean.

I wouldn’t recommend using any polish on your tile floors. Most tiles come from the factory with a glaze that’s a thin coating of real glass. That’s all the polish or shine you need. Slate has its own matte appearance that’s extremely attractive.

I have a theory that the pad mop polishes actually are designed to dull within days and attract dirt. This way you break out your pad mop, squirt their solution on the floor, and try to make your floor look good. Week after week you end up being like a hamster going around one of those metal wheels in a cage wasting your money. But what do I know? I used to each lunch for 20+ years sitting on empty overturned drywall mud buckets! Here’s to your new clean floors!

Column 1486

New Home Hacks

New Home Hacks Wish List - Fill Out the Form

Fill out this form and share the top three things you WISH you had in your current home or want in your next new home.

I'll send you a free PDF copy of all the ones worthy of being in my new book soon to come out.

How to Clean Shower Grout

hexagon shower marble floor tiles

Look below at a second photo where I've zoomed in on this one. You’ll see flecks of dirt left behind by an inexperienced cleaning person. Copyright 2022 Tim Carter

How to Clean Shower Grout - And Mop Floors Too!

Sarah reached out to me a few days ago. She was more frustrated than I get when I miss a 2-foot putt at the golf course. Six months before she had a new master shower installed with a marble-tile floor. The pieces of marble are small 1-inch hexagons.

Sarah’s finding impossible to keep the grout clean. Fortunately she uploaded a high-resolution photo of the tile floor via my Ask Tim page on my www.AsktheBuilder.com website. That photo allowed me to zero in on what I believe is the source of the problem.

black dirt flecks in white grout

See those black flecks? They're even on the smooth surface of the marble. That's a clue that they should be very easy to remove using the correct cleaning TOOL.

Sarah’s conundrum reminded me of another woman I had a contentious back-and-forth email exchange perhaps ten years ago. That memory caused me to think long and hard about how I’d respond to Sarah. You see, all those years ago the other woman claimed I had ruined her tile floor.

How to Offend a Woman in Seconds

I had sold this woman a bottle of the most powerful oxygen-bleach cleaner you could get. My wife and I used to own a company that manufactured the highest-strength oxygen bleach cleaner available in the USA. The two ingredients were made in the USA and it was certified organic. Most of the oxygen bleach products I see online are made with inferior Chinese chemicals and there's quite likely more filler in the bottle than active ingredient!

She was using it to clean her wood deck. For whatever reason she took her shoes off while cleaning the deck and got her socks saturated with the cleaning solution. This woman then walked back in her home with her wet feet across her tile floor.

This cleaning solution was so powerful that it often cleaned without you having to scrub. It happened on the woman’s kitchen floor. When the solution dried, you could clearly see her footprints. She insisted my solution had etched and ruined her tiles. She didn’t take too kindly to my retort that she was a poor housekeeper and that while she thought her kitchen floor was clean, it was far from it.

Fortunately she had a pantry closet with the same tile floor. I shared with her that if she would go into the corners of the pantry where no one ever walked, she’d see the original color of the tile. I never heard back from her.

Many People Don't Know How to Clean

Based on the photo that Sarah sent, it appears she, or the person responsible for cleaning the shower, doesn’t know how to clean. You tell me how I’m supposed to communicate that to her. Most women I know would react with flared nostrils. But I digress.

When I looked at Sarah’s photo, I could clearly see small flecks of dirt that were clinging to the grout. Sarah asked me in her email if the wrong grout had been used. The answer was absolutely not. It appears to me tile setter used a sanded grout. Once I zoomed into the photo, I could clearly see what appears to be tiny grains of milky silica sand. The silica sand makes the grout strong and very durable.

What often happens is the tile setter strikes the grout joints with the grout sponge and removes a bit too much grout. The top surface of the grout is now below the top surface of the tiles.

You Must Use the Correct Tools

Cleaning, like many other tasks, requires that you use the correct tool for the job. In Sarah’s case the cleaning person may be using the worst possible tool. For example, a sponge or scouring pad of some sort might have been used for the past six months. These don’t have the ability, in many cases, to apply enough mechanical agitation to the grout to get small pieces of dirt and grit out of the grout.

The best tool to clean grout is a stiff scrub brush that’s equipped with nylon bristles. These bristles need to be stiff enough that they don’t flop around like a toothbrush. They need to have just a small amount of flex to them as you move the brush across the grout.

nylon grout cleaning brush

This is a perfect nylon brush that will allow you to have the bristles contact the grout. GO HERE to order one now.

What’s more, the cleaning strokes have to be parallel to the grout lines to be effective. If you slide the brush across the grout lines at a 90-degree angle, the bristles might not get down to the surface of the grout with enough pressure to effectively clean.

The type of tile Sarah chose is the hardest one to clean. Each small 1-inch piece of tile has six sides each oriented at 60 degrees to one another! Imagine trying to orient the scrub brush to have the strokes be parallel with all of the grout joints.

You may have been taught to use circular scrubbing motion to clean floors. That works well when the floor surface is all in the same plane and smooth. Recessed grout lines are the bane of most professional cleaning people.

Another cleaning tip for showers is to be sure to use a squeegee to wipe down the walls and the floor after you shower. The goal is to remove as much water as possible from the surfaces. Water is part of the recipe for mildew and mold growth. It’s best to actually use a second older towel to wipe down the shower surfaces drying them as you dried your skin. Keep the shower door open or the shower curtain pulled back after you leave the bathroom. You want the shower to dry as rapidly as possible.

How To Mop a Floor

I was taught how to mop a floor when I was fourteen years old. It's not hard to do, but many people do it wrong. Here's how to get amazing results.

Step 1. Sweep the floor to get up all loose debris and grit.

Step 2. Get a traditional string mop that doesn't have a bound bottom like you see some janitors use.

Step 3. Fill the mop bucket with clean soapy water. Get the mop saturated with the water. Squeeze out excess water.

Step 4. Spin the mop like an amusement park ride as you put it on the floor. The strings of the mop should be radiating out from the center of the mop handle.

Step 5. Use sideways back and forth motion about four-feet wide pulling the mop closer to you.

Step 6. Put the mop back into the bucket, swish it around and repeat steps 3 through 5.

Step 7. Change the water frequently as soon as it appears murky and filthy.

Step 8. Rinse the floor with clear water and change this water out too as it gets filthy. Trust me, it will because while the floor SEEMS CLEAN, it's not.

Column 1483

DIY Ceramic Tile Kitchen Backsplash

ceramic tile backsplash

DIY Ceramic Tile Kitchen Backsplash - While it looks quite complex, it’s not as hard to install a ceramic tile kitchen backsplash as you might think. Copyright 2022 Tim Carter

DIY Ceramic Tile Kitchen Backsplash - Not Too Hard

Six months ago my son purchased a new house. He had been looking to move from his apartment for well over a year. The white-hot real estate market made it quite difficult to locate a house in his price range. Each tired and worn-out house we toured with him needed quite a bit of work and I cautioned him that if he thought it was hard to buy a house, wait until he needed to hire contractors to do most of the work to transform a house into a home.

Fortunately out of nowhere a brand-new house came on the market just a few miles from his apartment. It was built by an older builder that was on-site each day ensuring all the work was done perfectly. It was one of the best-built homes I’ve ever seen here in New Hampshire and I advised my son to stretch and purchase it. He did and six weeks later we were helping him move in.

But as often happens in many new spec-built homes, the builder leaves things undone. One of them happened to be the kitchen backsplash. The kitchen has magnificent granite countertops with a 4-inch-high granite backsplash, but that’s not what my son wanted. He wanted a full backsplash that extended from the granite to the underside of the wall cabinets.

I had told him the day we looked at the house that installing a ceramic tile backsplash was a simple job. “Son, you can do it yourself with my guidance. I’m more than willing to help, but I want you to do most of the work for a host of reasons.” He knew I had helped his older sister build her home in Bar Harbor. It’s always been a dream of mine to help my kids do projects on their homes so it was now his turn.

Tile Backsplash Adds Pizazz and Jazz

Are you in the same situation? Do you want to jazz up your kitchen, make it look better, and easier to clean up around the sink and stove? Great! Let me help you install a tile backsplash just as I helped my son. Let’s get started!

The first step is to select a tile that has trim pieces. In almost all situations you need special pieces of tile that have finished edges. These pieces are required where the tile ends along a wall and doesn’t butt up against a cabinet or something else that would hide the unglazed edge of the tile.

If the tile you absolutely must have doesn’t have glazed trim pieces, you can hide the unglazed edge with a thin piece of painted wood trim, a fancy metal trim molding, or carefully formed grout that disguises the unglazed tile edge. There are hundreds of photos and images online that will inspire you as to how to deal with this small conundrum.

Basic Installation Tools

You’ll need a few tools. The size of the tile determines the size and shape of the notches in the trowel that spreads the mastic that holds the tile to the wall. Most of the time you’ll discover a v-notched 1/4 x 1/4-inch trowel will do the job. The tile manufacturer may have written instructions calling out the size of the trowel notches. You can also get amazing guidance from the Ceramic Tile Education Foundation about all aspects of installing tile.

While a diamond wet saw is what I’d use to make many cuts, it’s not practical for you to buy one for this one project. You can use a tile snapper to make most straight cuts on normal tile. Harder porcelain tiles and glass tile can’t be cut with a snapper. You may want to purchase an inexpensive 4-inch angle grinder and equip it with a dry-diamond cutting blade.

The last tool you’ll need is a rubber float to spread the tile grout. I’ve got a four-part video series on my AsktheBuilder.com website that shows you how to use this tool and how to install the grout so it never crumbles or cracks. I urge you to watch this video series.

Cut Accurately Around Electric Boxes

You need to exercise diligence when installing the tile around electric outlets and switches. The tile must extend to all the edges of the electrical box that’s in the wall. This allows the small metal frame of the outlets and switches to rest on the surface of the tile after the tile is in place. Doing this ensures the faces of the outlets and switches is flush with the top surface of the cover plates. Be sure to turn off the circuit breakers before you unscrew the outlets and switches from the electric boxes!

As you install the tile, don’t allow any of the mastic or thinset to ooze up into the spaces between the tile. If it does, remove it immediately using a toothpick or thin putty knife. This space must be kept open so grout can fill the spaces and gaps between the tiles.

If you want to ensure success do a tiny test panel. Purchase enough tile to cover a small piece of drywall that measures 18 by 24 inches. Hone your beginner skills tiling and grouting this scrap piece of drywall. You’ll be stunned by how simple it is to get professional results.

Column 1482

Renovating an Old Building

renovated loft apartment brick walls

Renovating an Old Building | This modern loft apartment was built in 1890. The brick shell and massive wood floors were in great shape, but everything else had to be redone. Copyright 2022 Tim Carter

Renovating an Old Building - Think Outside the Box

Not a week goes by that I don’t receive an email asking me about what’s involved in renovating an old building. Most who reach out to me realize it can be an expensive endeavor, but the allure of restoring a sound old building to either its former glory or transforming it into an attractive modern look sometimes overrides the financial aspects of the project.

And as you’re about to discover, there may be a lucrative investment opportunity you’ve not thought about when it comes to old buildings. A little over a week ago I stayed in a renovated one-bedroom loft apartment that was part of a solid brick building built in 1890 in the East End of Cincinnati, Ohio.

The owner of the building is a long-time friend of mine. At the time he renovated the building five years ago, he was doing construction and real estate investing. I was nearly 1,000 miles away, but he sometimes called me to ask for advice when he was faced with a problem or a difficult choice. I was always happy to help him.

Keep in mind that when you build just about anything, you have choices to make. All too often I see people make poor choices. They select products that have a short useful life or require lots of ongoing maintenance. With raging inflation and a tight labor market that I don’t feel is going to improve in the coming years, ongoing maintenance can become a vast bottomless money pit.

Fortunately my friend made all the right choices when it came to the renovation. He knew he was going to keep the building for many years to create a passive income stream. He owned a handful of other buildings on the same street and the neighborhood was being reborn. It was exciting for me to watch this transformation from a distance.

My friend made wise decisions about all sorts of materials that cost a little bit more to install now, but would be virtually maintenance-free for many years to come. Here are a few examples. He could have installed standard asphalt shingles on the steep roof, but instead he went with standing-seam metal roofing. This metal roof will not require maintenance for at least 40 years.

He had to install both interior and exterior staircases. He could have just used treated lumber outside and standard lumber inside. But no, he went with industrial-sized steel outside with cast concrete treads. Even the handrails and guardrails were made from wrought iron that can last well over 100 years with periodic painting every ten years.

I remember a conversation we had about what was the best exterior paint to use and I shared that he should go with one that has a urethane resin base. I painted my last house in Cincinnati about 25 years ago with this type of paint and the paint looks as good today as it did decades ago.

There are things you should be aware of if you decide to do an old-house renovation. First and foremost be aware of the lead-paint hazards. Be sure to test any and all painted surfaces that you’ll be working with. Note that even old clear varnishes sometimes had lead. Small amount of lead can make you very ill, so you need to treat lead paint with the utmost respect.

In almost all cases you’ll have to install all new mechanical systems. Budget for all new plumbing drain and water lines. You’ll want to install all new electrical wiring. Be sure you install 20-amp circuits in critical locations so you avoid tripped circuit breakers in the future.

Most of all don’t cut corners on the heating and air-conditioning. This system is what keeps you comfortable year-round. It’s vital the contractor does accurate heat-gain and heat-loss calculations so the equipment is sized properly. Be sure you have return-air vents in all rooms except for the kitchen and bathrooms. The return-air system needs to be designed properly as it ensures each room is comfortable no matter what the outdoor temperature might be.

If your goal is to renovate a property to rent, don’t overlook the possibility of short-term rentals. My wife and I rent houses several times a year when we go visit my daughter, her husband, and my granddaughter. There are many people who prefer to do this rather than being crammed into a motel or hotel.

When you do the math, you might discover you can double your rental income using short-term rentals. You might only need to rent the space for 120-150 days a year to achieve this financial result. In many cases the building might get far less wear and tear vs. renting to a tenant that lives in the space everyday all year long.

Column 1481

X Files Predicts the Covid Shamdemic

The X Files was a fascinating television series.

Here's some footage shot in 2015 or possibly 2016 which means it was probably scripted a year before that.

Watch it with an open mind. Realize tens of thousands of people are now dying mysteriously, many of them healthy young people. Have you wondered why? Have you even been exposed to this news?

If not, that should send a chill through your bones like a January New Hampshire Nor'easter.

Be prepared to have your mind opened up: