Solar Panels Return on Investment

solar panels pv on asphalt shingle roof

Have you thought about what has to happen to put a new shingle roof on this building? It might be a good idea to exercise your tiny gray cells.

Solar Panels Return on Investment - Moving Target

In August of 2022, Robert reached out to me after receiving last week's newsletter. Here's part of what he said:
"Along the line of conservation of resources, what are your thoughts on solar panels on one’s home? I live in North Richland Hills, Texas and have been thinking about it. As I am 81, I don’t expect to live to reap great financial benefits but think that it is something that might be worth pursuing."

It's very important to realize, I LOVE solar power. I love both active and passive solar heating. I love solar hot-water rooftop or parabolic-mirror heating systems.

All you have to do is stand outside in the sunlight on a calm day in central New Hampshire on an early January day at solar noon and you can FEEL the infrared rays warming you even through a winter jacket. Infrared as well as visible electromagnetic energy is such wonderful magic God created for us!

It's All About Money

Robert zeroed in immediately on how you should always assess energy-improvement decisions.

He realizes that the return on investment may take longer than the amount of time he hopes to be on this side of the grass. Good for him to display that amount of honesty.

You should also consider data from the National Association of Realtors. Back in 2016 while compiling data for my Roofing Ripoff expose' book, I reached out to them asking, "What is the average length of time a homeowner lives in their home?"

At that time, the answer was between eight and nine years. Yes, I know you have no intention of moving, but things come up. Health issues may force you into an assisted-living facility.

How will you square your ROI when you move out of your home?

That said, you may have so many acorns stored up that money is meaningless to you. You might be able to pay for your solar panel system with what you make in interest or dividends in several months so who cares what they cost? Installing them may make you feel warm and fuzzy. Unfortunately if this describes you, you're in a very tiny minority as most people don't have lots of acorns or the ones they have are small.

When Do You Start Saving Money After Installing your Solar Panels?

It's important to realize that you don't start to save even one penny until such time as you've repaid yourself in full, including interest or investment income, ALL OF THE MONEY you spent to install your solar panels, battery array, and transfer switch.

Do you understand that? Here's a very simple example.

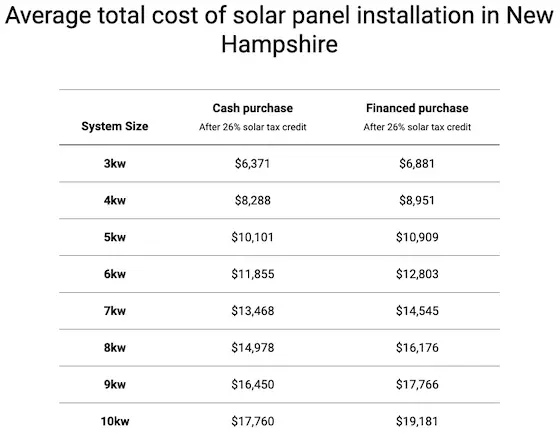
Imagine after all tax credits, incentives, rebates, etc. that I'd still have to write a check to a solar-panel installation company for my new 10 kw solar system. Let's assume I have to finance the purchase as most people do. Based on an online calculator I used the cost in August of 2022 would be $19,181.

table showing cost of solar panel installation

My average electric bill is now $260 per month. There are connection fees, taxes, etc. included. Let's assume that, on average, the amount of electricity I have to pay for each month is $230.00.

In one year I wouldn't have to give the NH Electric Coop (NHEC) $2,760.00.

Assuming all things stay the same, which they wouldn't, simple math shows that it would take 6.94 years just to break even. At that point the loan is now paid off. The money I had been sending to the bank can now be used to pay for other things that I want or need. Now the panels are truly saving me/you money. But not until the loan is paid off.

Keep in mind this is the most simple ROI analysis. It's far more complex in real life. Yes, the ROI period shortens as electric rates go up. But keep in mind your solar panels degrade and produce less and less power each year. See below.

The ROI analysis should also include what happens if you pay cash for the solar panel installation. Prior to writing the check to installer, your money was making money in the marketplace. Granted, you can't predict future results, but whatever money you were making each could have been allocated to pay your electric bill. Once your check is cashed, that income stream disappears.

But what happens in year nine or ten when all of a sudden I realize I need a new roof? See below.

What About Your Roof Structure?

Can your roof support the extra dead load of the panels? You might be surprised to discover that your local building department has a pre-solar-installation inspection. If you live in an area where heavy snow is possible, will a deep, wet snowfall that sticks to the panels and roof cause a collapse?

What About Your Roof's Warranty?

There's a very good chance that the installation of solar panels on your asphalt roof will immediately VOID the shingle warranty. Look at the language and you may see a reference to third-party foot traffic. That's exactly what solar-panel installers are - they're third-party people.

What About Your Home Insurance?

Did you know that some insurance companies won't cover houses with solar panels? A story in the Sun-Sentinel talked about homeowner Holly Strawbridge's modest 8 kW rooftop system. Edison Insurance Company was her carrier and sent out an inspector. Once the company heard back from the inspector, they cancelled Holly's entire policy. "I was shocked," Strawbridge said. "I've never filed an insurance claim and I've lived in this house since 2001."

You better check with your insurance company BEFORE you install your system. Find out if there's going to be a premium INCREASE to cover your system. If so, this needs to be factored into your return on investment.

Be aware that solar panels can cause fires. Amazon had a spate of solar-panel fires at their fulfillment centers that they kept private for as long as they could.

How Well Will the Panels Work?

Is your house oriented the correct way to get the most amount of electricity from the sun? My roof isn't. The long axis of my own home runs north/south. Putting solar panels on my roof means I only get great sunlight to the panels for part of the day.

What about trees? Does your lot have an issue with shade or partial shade? If you live in the Northern Hemisphere, the panels need to face south for maximum benefit.

Are you going to get solar panels that have a bypass diode that's connected to a string of solar cells connected in a series? If so, when just one panel is shaded and not producing power the entire string of cells stops creating electricity.

What about ambient air temperature? It's a known fact that solar panels produce less power in blistering-hot climates. They produce extraordinary amounts of power if the air temperature is cold. How will this affect your return on investment?

What about snow? How much electricity do the panels create when covered with snow? If your panels are beyond the reach of a typical snow rake, what is it going to cost you to have the snow removed? What are the chances the panels will get damaged during the snow removal? What will that cost to repair? How do all these costs eat into your electric savings?

What Happens When It's Time for a New Roof?

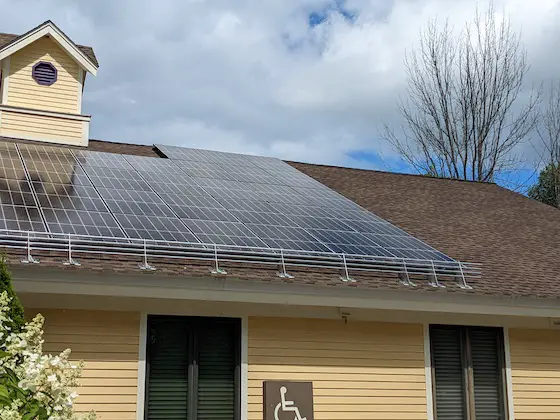
A vast majority of homes in the USA, possibly yours, are covered with asphalt shingles. In a rooftop installation, the solar panels are placed on top of your roof using brackets. How long will your asphalt shingles last? In my Roofing Ripoff book, I shared with you that asphalt shingles made today don't last as long as ones made decades ago.

What is the EXTRA COST you to have to pay the roofing contractor remove and reinstall your panels so he can install your new roof shingles? How many years of electric savings does this wipe out?

To help put this into perspective, one of my newsletter subscribers shared a tale. Greg lives in Ocoee, FL and sent to me, "When we retired two years ago we moved to a home with 34 solar panels on it. For my wife, this was a HUGE plus. Me? I already was thinking how when we would get a new roof 15 months into the future that there would be an added expense for removal and replacement. It was $5000 extra for that remove and replacement, so this is truly a factor that will come into play eventually for anyone with solar panels. Plus, our lowest possible bill used to be $13.13. Now Duke energy has added a "minimum bill adjustment" so now our lowest possible bill is $35.35. Just an arbitrary fee tacked on. Having the solar is still good, but your caveats are absolutely accurate."

What Happens as the Sun Destroys Your Solar Panels?

A small percentage of ultraviolet rays from the sun contain active photons. When these strike your solar panels at 186,000 miles per second they blast apart the molecular structure of the panels. It's a known fact that solar panels made today, in 2022, degrade and year after year produce less and less power because of this photon destruction.

What Happens When your Local Utility Company Changes the Monthly Connection Fee?

Have you thought about how the cost to maintain the electric infrastructure in your area is going to be paid for as time goes on? As more and more people install solar panels and not send the utility company money each month, the cost to maintain the wires on the poles goes up. Your system is connected to the grid. As the utility company revenue DROPS as more and more people install solar panels, your monthly connection fee will surely rise and rise logarithmically.

As you can see, it's not all unicorns and rainbows when it comes to solar panel return on investment. Don't allow your decision to purchase solar panels to be controlled solely by emotion.

I wish you the best of luck.

Column 1471

Why Exterior Paint Peels

peeling exterior paint on wood siding

Why Exterior Paint Peels | The reasons why this exterior paint is peeling are as plentiful as bread toast crumbs on a kitchen counter. Copyright 2022 Tim Carter

Why Exterior Paint Peels

Two weeks ago in this column I shared why it’s so hard to preserve exterior wood using any number of products. One of them was paint. You may have been one of the many readers that reached out to me.

If I had to boil down all the emails I received to just one, it would have said, “Tim, I have to paint my exterior (fill in the blank). I don’t have a choice. Why do paints fail, what can I do to get the longest-lasting result, and what is the best exterior paint in your opinion?”

Hoo Boy! Do you realize countless professional papers have been written about these topics? Did you know that people with PhDs in chemistry spend their entire careers wrestling with these questions? I know as one of them was a close friend of mine back in college. That said, I’m going to do my best to share the most that I can in the limited space of this column. Let’s get started.

First and foremost it’s important for you to realize that common exterior house paint is really just glue with color added to it. Think about it. Glue sticks to things, right? That’s what you want - you want your paint to stick to your house siding, your windows, your furniture, deck railing, etc. And if given the choice, you’d want it to do so for say 20 or 30 years!

Two weeks ago I shared with you that paint and wood don’t play well together because wood has a propensity to expand and contract when it gets wet and then dries. Most paints can’t take this back and forth motion and eventually crack and lose their grip on the wood. Peeling paint is the result.

Have you noticed that you don’t often see paint peel from your car, aluminum siding, wheelbarrows, etc.? The reason is simple. Metal doesn’t expand and contract to the degree wood does. Yes, paint will peel from metal, but the root cause is often based in poor preparation or cheap paint.

Glues work best when they’re applied to clean, dust-free, and dry surfaces. The same is true with exterior paint. Let’s exorcise the pressure-wash demon here and now. Pressure washing the object you’re about to paint does not get it perfectly clean. You can test this with ease.
Take your dirty filthy car to a DIY car wash where you spray it with a pressure washer. Go ahead and use the soap setting, get the wand as close as you feel comfortable to the paint, rinse it, then pull your car out of the bay and drive to the edge of the lot. Let your car dry in the sun. You’ll see there’s still a light film of dirt on the paint.

To get any exterior object really clean, you need to rub the surface with a sponge or brush using soapy water. You then rinse with clear water.This mechanical agitation gets the object clean just as your hands rubbing across your skin gets you clean in the shower. This is an indisputable fact.

One of the root causes for paint failure on exterior wood objects is the lack of pre-painting each piece of wood before the thing is built. Think of how you build a deck railing, fence, picnic table, etc. You make all the cuts, assemble the pieces, and then paint it. The issue is each place where one piece of wood touches another you’ve got a tiny crack. Unless you live in the Atacama Desert, water enters the unpainted wood at these locations and you know the rest of the story.

Most people don’t have the patience to cut all the pieces of wood and then prime and paint them. The end grain of each piece requires at least three coats of paint for ultimate protection. Once the paint has dried and cured for a week, then assemble them. I can see you shaking your head now!

Years ago I knew this was really important. When I built my last house, I covered the entire exterior with thousands of linear feet of redwood siding and redwood trim boards. It took extra hours of work, but each time I cut a piece of siding or a trim board, I painted the cut edge of the end grain of the wood that would butt up against another piece. I didn’t paint all the sides that would be hidden but this one simple step paid off in spades.

You can drive by this house in Cincinnati, Ohio. I painted it with the best paint available at the time. It had a urethane resin. The resin is the glue component of the paint. I painted the house 25 years ago and drove past it a year ago. There’s not one place where the paint is peeling. The current owners do what I do and wash the outside of the house every two years. The paint looks as good as the day I put it on.

The last thing I want to share is the adhesive-chain issue. If you’re painting something that’s already got multiple coats of paint on it, realize that you have a chain. Each previous layer of paint is a link in the chain. While you may do everything right when applying the last coat of paint, a layer three levels down may fail because that painter didn’t do things right or he used a cheap paint with inferior glue.

This is why it’s so very important to use the best paint, read the label instructions and if the manufacturer says to prime bare wood, then do it. For best results, apply the finish paint within hours of the primer drying to get the best mechanical and chemical bond between the two linked layers!

Column 1469

Klein Thermal Imager TI 220


klein thermal imager ti 220

Klein Thermal Imager TI 220 | Look how small this is! The black circle is the lens for the sensor.

Klein Thermal Imager TI 220

I tested the new Klein Thermal Imager and it's a real dandy. You plug it into a smartphone and the phone's screen allows you to see the thermal image.

I've tried no less than three others and this one is:

  • easier to use
  • takes fantastic clear infrared photos
  • is extremely compact

This is a tool that you can share with family members so you can discover all sorts of heat loss and heat gain leaks in your home or small business.

Go here to order one now.

Is the App Easy to Use?

You need to download the Klein Thermal Imager TI 220 app from the Google Play store. It's free. Here are two screenshots showing how easy it is to turn on/off the different settings:

klein thermal imager ti 220 settings 1

This is the first thing you see when you cilck Settings on the app. You can scroll down to see more settings.

klein thermal imager ti 220 settings 2

These are the rest of the settings in the app.

What are the Specs for the TI 220?

You can view all the specs for the thermal imager here.

What do the Thermal Images Look Like?

See for yourself:

klein ti 220 photo library

Your photos that you capture each day look like this. Click any one to enlarge it full screen. It's easy to share them via any method on your smartphone.


klein ti 220 thermal imager window AC

I took a photo outside my home of a window AC unit. The sun was shining on it and bouncing the infrared rays from the top of the AC unit to the bottom rail of the window sash. Look at how hot the sash is compared to the other parts of the sash frame. The right side of the sash frame is bright red because the sun is hitting it at almost a 90-degree angle.

klein thermal imager ti 220 lake water temp

I took a photo trying to take the temperature of the Lake Winnisquam water down from my deck. It's ACCURATE at 200 yards away! Amazing. 80.2 F

klein thermal imager truck tire and hood

My Ford F-250 Super Duty 4x4 was sitting in the sun for about two hours. It was mid-morning. Look how HOT the tire is. It's black rubber and I had not been out driving. That's just heat absorption from the sun's infrared rays!  Look at how HOT the hood is. YEOUUUCH! 150 F

klein thermal imager ti 220


klein thermal imager ti 220

klein thermal imager ti 220

This is the handy little case you get. The imager and the two spare USB connectors fit inside.

How Loop Vents Work

plumbing loop vent

How Loop Vents Work | This is the magic of a time-tested plumbing loop vent for island sinks. Don’t take the shortcut using an AAV. Copyright 2022 Tim Carter

How Loop Vents Work - Forget About AAVs

Have you heard the old saying, “You don’t know what you don’t know.” I think it’s an overarching axiom with just about everything there is to know about building homes. Stop and think for a moment about all you don’t know about all of the things hidden behind your plaster or drywall walls and ceilings not the least of which is your entire plumbing drain and vent system.

I’ve been a master plumber since 1981 and it’s one of the trades I love the most. I find it attractive because when installing plumbing drain and vent pipes in a new home it’s a true three-dimensional puzzle. If you have a young family member looking for a rewarding career where she/he will always be in demand, suggest plumbing. It’s a marvelous way to meet homeowners who will thank you for fixing their pipes.

My guess is the first thing you don’t know is the true purpose of the plumbing vent pipe that pokes up through your roof. Most homeowners I talk with compare it to their chimney. A chimney is designed to expel smoke or combustion gas out of a house. Thus, you might think the plumbing vent pipe’s job is to spew stinky sewer gas outdoors.

Roof Vent Pipe Lets Air In not Out

The exact opposite is true. The purpose of the vent pipe is to let air into the plumbing system just like that tiny pinprick hole you put into a large jug of drinking water that has a spigot in it. If you’ve ever tried to use one of those jugs without poking the hole in it, you discover rapidly the water in the jug has a very hard time getting out.

Before I share with you the way kitchen island sinks have been vented for decades, allow me to indulge you with the movement of water and air in the pipes hidden behind your walls and ceilings.

Imagine no one’s home or you’re sleeping. Let’s also imagine you don’t have any dripping faucets that waste vast amounts of water. When no water is running the only water in the plumbing pipes is that you have in the traps under fixtures and perhaps some condensate water in the vent pipes. The rest of the volume of all the pipes is filled with air and sewer gas.

What Happens When Toilets Are Flushed

When you flush a toilet, 1.6 gallons of water rushes through the toilet bowl into the pipes below the toilet. As the water cascades down the vertical pipes it pushes the air in the pipes ahead of it. This air must be replaced and it comes into the system via that stubby pipe sticking up through your roof. This same scenario happens when you put water down any other drain pipe in your home. It’s precisely why each plumbing fixture in your home needs to have a vent pipe as part of the drain.

If you go to my www.AsktheBuilder.com website you can watch my How to Vent Plumbing video. What you’ll see are all sorts of vent pipes that go up walls behind your bathroom vanities, your kitchen sink that’s on a wall, and all your other fixtures.

But how can you do this if you have a sink in the middle of a kitchen? Who wants some ugly plastic pipe going up through the countertop up to the ceiling? No one! Wait, I know what you’re about to say, “Tim, isn’t that what air admittance valves (AAVs) are for?” Yes, these devices that have moving parts were invented to try to solve the problem. The issue is I constantly have people pay me to tell them why they have sewer gas smell in their kitchens. It happens when the moving parts in the AAVs fail.

For all the decades before AAVs, plumbers like me installed a humble loop vent inside the island sink cabinet. It’s an ingenious, elegant, and simple solution that has no moving parts and is guaranteed to work for the life of your home. The best part is it takes maybe just an extra 30 minutes to install a loop vent.

First and foremost, the entire loop vent system including the drain pipe must be constructed using 2-inch pipe. This is paramount because it’s vital the horizontal portion of the drain pipe never fill completely with water. There has to be a layer of air above the water that’s traveling down the pipe on its way to the sewer or septic tank. The short horizontal pipe draining your kitchen sink needs to be a smaller 1.5 inch pipe to restrict the amount of water entering the loop vent.

The loop vent system looks like the giant letter P resting on its side. To top part of the P is where the kitchen sink pipe connects. The lower leg of the P is the vent part of the system. Here’s the magic of how it works.

I show you how to create a perfect loop vent in this wonderful product.

Imagine you fill your kitchen sink to the brim with water. You then pull out the stopper and the water begins to rush into the short 1.5-inch pipe. This pipe fills completely with water until the sink drains. As the water drops down into the vertical 2-inch pipe it’s swirling and there’s more than enough volume to allow air into the pipe as well as the water. Remember, before the stopper was pulled there was nothing but air in the plumbing system including the entire length of drain pipe from your sink to the sewer or septic tank.

When the water hits the horizontal part of the loop vent heading towards the sewer, it starts to level out with perhaps a 1/2-inch air space on top of the rushing water. As the water heads towards the sewer, the air on top of the water is rushing over it the other direction going up the other vertical pipe that’s part of the loop vent. It’s replacing the air that used to be in the pipe. It’s that simple and the best part is it will be trouble-free for the life of your home!

Column 1468

Earthquake Beds

Earthquake Beds - Claustrophobic? Not for You!!

Watch this video and tell me if you'd get one of these.

Think about this: How LONG will it take rescuers to get to you? Don't be naive' for goodness sake.

And then, what about fire? What happens if a fire rages out of control in your damaged building?

Why Does Wood Crack

why does wood crack cracked deck lumber

These pieces of outdoor wood decking show serious signs of neglect. The large cracks allow water to soak deep into the wood. Copyright 2022 Tim Carter

Why Does Wood Crack - It's Water's Fault

Do you own anything made from wood that lives its life outdoors? It could be a stunning deck, perhaps a decorative privacy fence, maybe a pergola, or even a teak table and chair set. I’ve owned all of the above and more over quite a few trips around the sun.

When I was younger, I didn’t think much of the work, time, and expense it required to keep the wood looking like new. But every year as I cleaned and re-sealed one of my outdoor wood things, the work grew more and more tiresome. In many ways all of my outdoor wood possessions were like my three kids when they were young. They also required constant care.

Over the past ten years I finally surrendered to the unrelenting power of the sun and rain. My dock panels and steps leading down to the lake are the only things left I have made from wood. Fortunately I finally discovered a wood sealer that appears to last for four years instead of the normal two I got from every other product. Every other outdoor wood object I owned has been replaced with something that isn’t made from wood.

Wood is Hygroscopic - It Swells & Shrinks

Allow me to share with you why you’ll probably wave the white flag and concede to the forces of Mother Nature at some point in time. It’s important to realize that wood is hygroscopic. This simply means that its size changes in response to the moisture content of the wood. Wood expands when it gets wet and then it shrinks as it dries. This movement, over time, starts to rip the wood apart.

If you look closely at a new piece of milled wood, it’s usually smooth and free from any surface defects. However this appearance is transitory. As soon as you subject untreated wood to frequent wet/dry cycles, you’ll start to see very tiny checking cracks develop. These are tiny hairline cracks in the top surface of the wood.

The next time it rains, these cracks allow the water to penetrate deeper and faster into the wood. This causes even greater expansion pressure between the wood fibers and soon the lignin in the wood fails. Small cracks get bigger and eventually a piece of wood will split in two. Think of how a steel wedge is used to split a piece of firewood. Water does the same exact thing to your wood deck, fence, or teak furniture.

This is why it’s paramount to keep outdoor wood sealed so water doesn’t soak into the wood to make tiny cracks huge cracks as you might see on a neglected fishing pier boardwalk that extends out into the ocean.

UV Light Blasts Wood Apart

If you think water is bad for wood, wait until you layer on top of it the punishing ultraviolet (UV) rays of the sun. A small percentage of the sun’s UV rays contain active photons. When photons hit an object traveling 186,000 miles per second, imagine a microscopic nuclear explosion.

Photons are so powerful they can break atomic bond of metals. Have you ever wondered why the corrugated metal roofs you see on barns and other agricultural buildings are rusty? Do you know what the roof looked like when new? They were shiny silver like a new galvanized garbage can. The fresh zinc coating can be blinding in the sun.

UV Light Removes Zinc

But each day when photons hit the zinc, they break bonds and then the next rain washes the zinc from the roof. Eventually there’s no zinc protective coating left and the exposed steel begins to rust. The same thing happens with copper flashings on roofs. Have you ever noticed how the roof surface below a copper flashing looks new and is mold-free? It’s because copper is a natural biocide and each rainfall transfers copper from the flashing to the roof surface.

Why is My Wood Fuzzy?

Knowing this, imagine how destructive UV light is to your wood! Wood is so much more fragile than zinc or copper. The UV rays blast apart the lignin that holds the wood fibers together. This is why after you wash your deck, fence, pergola, or furniture it’s fuzzy. The fuzz is wood fibers that are just barely hanging on like your child’s tooth that’s about to fall out. You have to allow the wood to dry, then go through the painstaking process of sanding it to get the wood smooth again.

Avoid Clear Wood Sealers

You can minimize UV damage to wood by using outdoor wood sealers that have a fair amount of pigment in them. The pigment acts like sunscreen or a sacrificial anode in a water heater. The pigment is a shield and gives up its life so the UV rays, photons, don’t make it to the wood. But you know how this ends. Your deck color starts to fade just as zinc washes off the galvanized roof panels. Soon there’s not enough pigment left and the UV rays can get to the wood.

Paint is the ultimate protector for wood, but the issue is it will eventually fail. Because your wood is hygroscopic and expands and contracts at a greater rate than the paint, the paint eventually cracks and peels. Then you have an even bigger mess on your hands. Now you know why I eat lunch each summer day with my feet resting on my composite deck while enjoying my food that’s on a wonderful aluminum table and my posterior is parked in a matching aluminum chair!

Column 1467

Save Money DIY Projects

pipe scaffolding next to old house

DIY Home Projects - You can rent pipe scaffolding like this with the aluminum platforms. It's safe and easy to erect. Copyright (C) 2022 Tim Carter

DIY Home Projects That Save Money

The volume of incoming DIY help requests via the Ask Tim page of my www.AsktheBuilder.com website is rising faster than the Fed can hike interest rates to tame the raging inflation. With the prices of bare necessities such as fuel and food taking larger bites out of your budget, there’s scant money leftover to hire contractors to do work for you, even if you can get them to return phone calls. You may be one that needs my help.

Because you can’t afford to hire a contractor, you may be one of the millions that’s made the decision to tackle a larger project yourself. I know it can be intimidating, but believe it or not it’s never been easier to do some larger projects than it is now. Years ago you couldn’t watch videos about how to do something. Now many manufacturers have excellent instructional videos that can give you the confidence you’ll be able to do the job just as good, or better, than some subcontractor sent to work on your most valuable asset - your home!

What Tools Work for DIY Projects?

Add to this the vast selection of tools you can rent to help you accomplish tasks that require you to be up in the air. Years ago man lifts didn’t even exist. Now you can get motorized lifts with giant articulating arms that allow you to safely paint that tall gable end on your home, or reach a difficult sidewall above a steep roof. Never before has it been easier and safer for you to do exterior work on your home.

For example, imagine you wanted to install gutter guards. I’ve tested many and discovered the best ones out there. You should go to my website and read my Gutter Guard Test Results column. Some companies charge astronomical prices to install these simple products. If a man lift can drive around your home, you might complete the job in less than a day. It’s possible to save well over $1,000, or more.

Two months ago a friend of mine rented one of these man lifts to do exterior painting. He’s okay with using ladders for work up about 15 feet in the air, but terrified to go up further. In just two weekends he not only got all the high painting work done, but he also used the lift to install a heavy light bar over his bocce ball court.

Pipe Scaffolding is Safe and Easy to Erect

An often overlooked tool you may not be aware of is simple pipe scaffolding. I have four sets of my own I’ve owned for forty years. Masons traditionally use this scaffolding and it’s strong, safe, and stable. Once you stack the pieces together, install the cross braces, set the aluminum platforms, and then the guard rails, it’s as if you’re standing on the ground. The scaffolding allows you to kick anxiety and fear to the curb while you diligently work 20 or 25 feet up in the air.

Here where I live in central New Hampshire, I can rent six sets of this scaffolding, including the aluminum work platforms, for just $300 per month. This would allow you to build one tower that would get the bottom of your feet 30 feet up in the air. It’s plenty of scaffolding to set around a ranch home so you can walk across the top of all six sets placed next to one another and travel almost 50 feet down one side of your home. Don’t underestimate what you can do with this strong steel pipe scaffolding.

Angel, a young woman who lives in upstate New York, is using this scaffolding to help her build a dormer on her home. I’ve been coaching her over the phone as she marches through this daunting project. She attempted to get contractors to bid the job, but none called her back. She’s got the three Ds: diligence, determination, and discipline and she’ll not only get the dormer done, she’ll save tens of thousands of dollars in the process.

Let’s say you want to install new vinyl siding on your home but you’ve never done the job before. What would you say if I told you it’s extremely easy to do it and modern trim pieces have made it even easier. Add to this the extensive amount of how-to videos you can watch for free online, many produced by the actual vinyl siding manufacturers.

There are some aspects of installing vinyl siding that do require some expertise, but the odds are your home might not have these challenges. I visited the Vinyl Siding Institute website and they have a huge section that shows you how to install vinyl siding including a marvelous free interactive installation manual. There are wonderful videos there too.

When you see how easy it is to install vinyl siding, I’m guessing you’ll get motivated just like Angel. Her dormer job is much much harder than just installing vinyl siding and she should be an inspiration for you.

I’ll leave you with this. My father-in-law had a great saying that you should consider, “Success breeds success.” It simply means that your confidence builds as you tackle tougher and tougher projects achieving great results each time. If you have a garden shed, cover it with vinyl siding first. Once you complete that, you’ll say, “Heck, that wasn’t so bad. I’m sure I can do the house now with some of that pipe scaffolding!”

Please send me before and after photos of the tough project you completed.

Column 1466

White Fluffy Mold on Concrete

white fluffy mold on concrete

You're looking at salt, not mold. My finger is pointing to efflorescence on a concrete garage floor. These are harmless rock salt crystals not mold as many believe it to be. Copyright 2022 Tim Carter

White Fluffy Mold on Concrete - It's Salt

Not too many years ago I recorded a video in my garage as spring debuted. You can watch this video for free on right here on my website.

This video gets comments each and every week from folks like you. Most of the comments surprise me because the viewer is relieved to discover the fluffy white deposits on their concrete floors, brick walls, or basement walls is harmless salt, not deadly mold.

High School Chemistry - Salt Dissolves in Water

I routinely fall into the trap thinking that you might know all about efflorescence and the truth is many don’t understand it at all. I remember doing an experiment in high school chemistry class that demonstrated the mechanics of what causes this white powder to appear and how to get rid of it.

In my case, rock salt is used on the roads in central New Hampshire during ice and snow storms. The rock salt, once it comes into contact with the ice or snow, dissolves and turns the frozen precipitation into a salty liquid brine. This salt-water brine then drips off my car when I park it in my garage.

The brine soaks into the concrete floor. With the garage temperature close to freezing and there’s no wind in the garage, the evaporation of the water in the concrete happens very slowly. And each time I drive back into the garage, I add more liquid brine into the concrete.

Brine Comes to Surface and Poof!

When spring arrives with warmer temperatures, the brine starts to come to the surface of the concrete like the hosta shoots that peak up from the soil next to our front sidewalk. The first place the efflorescence appears is along the tiny hairline cracks where the salt brine entered the concrete with ease. Soon patches of fluffy white crystals surround the parking area of the car.

I can see why you might think these harmless salt deposits are some sort of scary mold. They do look strange and they can appear in a short amount of time. But you might make a big mistake trying to get rid of them.

How NOT to Get Rid of the Salt

You get out your hose and try to wash the deposits away. This just dissolves the salt again and allows it to soak back into the concrete to only appear again in a few days when the brine comes back to the surface of the concrete.

Best Way to Remove the Salt Deposits

The best way to get rid of efflorescence is to just brush the salt off the concrete or brick and blow it away. You may need to use a stiff scrub brush in some instances. Never use a steel wire brush as that will harm any masonry surface, including concrete.

The salt deposits can and do happen in places that don’t get snow and ice. Many soils and sand deposits contain the invisible salts that can create efflorescence. The salt can be an ingredient in concrete paving brick you may use for a patio. The salt can be part of the sand used to make brick mortar.

Salt on Retaining Walls

The salt can be in soil behind a retaining wall. In all these cases, when water enters the masonry surface, it dissolves the salt just like you might have done that day in your high school chemistry lab. Now you have the brine in the masonry. Wind and warmth pull this liquid to the surface where the water in the brine evaporates leaving the salt behind.

Hard Water Deposits

This is the exact same process with normal hard-water deposits you might see in your kitchen or bathroom. The salts are already dissolved in your drinking water. When this water gets on a dark countertop, or the bright metal finish of a faucet, you can see the white salts in a few hours after the water droplets evaporate.

You can often buff the surface with an old towel and remove them. If allowed to accumulate on a shower door, faucet, or counter, you can remove them with ease using a paper towel saturated with white vinegar. Vinegar is a mild acid and it can dissolve light amounts of hard-water deposits with ease if you’re patient.

Go here to see dramatic before and after photos of how vinegar removed thick hard-water deposits. SCROLL to the bottom of the page to see the photos of the tile around the fountain.

Don’t rub the deposits with the paper towel. Just drape the saturated towel over the area that has the deposits and walk away. Let the vinegar work on its own for a few hours. In almost all cases when you come back and rub the surface with the paper towel, rinse with clear water, and dry with a clean rag, the deposits will be gone.

Beware Vinegar on Marble

Don’t use the vinegar on polished or burnished marble surfaces. Or, if you do, test it with a small drop applied with a cotton swab. Put one single drop of vinegar on the marble and come back in a few hours.

You want to see if the vinegar alters the polish of the marble. You may not realize it, but the marble has a very similar chemical makeup as the salt, Strong acids will etch marble. It’s just a matter if the low-grade vinegar acid will harm your marble.

Column 1465