Isometric Plumbing Drawing

isometric plumbing drawing

This is a sample of a real plumbing isometric drawing I create on an almost daily basis for homeowners, builders, and architects. CALL ME 24/7 if you need me to draw one for you: 603-470-0508 Go here and place your order.

By: Tim Carter - Master Plumber

What is a Plumbing Isometric Drawing?

An isometric plumbing drawing shows plumbing drain, waste, and vent lines, how they interconnect, and it includes the actual pipe sizes. This drawing communicates to the plumbing plan examiner that you know how all the pipes should be installed on a job and that the pipe sizes will be correct.

The last thing an inspector wants is to arrive at a job site and tell you that all the pipes have to be taken out because they're too small or you've not vented the fixtures properly.

tim carter master plumber

Yes, it's me, Tim Carter! I've been a master plumber since 1981. I'm taking a break from installing a garage floor drain in my daughter's home on Mt. Desert Island in Downeast Maine. CALL ME NOW if you need a residential riser diagram for your project: 603-470-0508

Does the Plumbing Isometric Drawing Show All Fittings?

No, a residential plumbing isometric drawing rarely shows all the required fittings for a job. The drawing's primary purpose is to show that you know the correct pipe size to use for each fixture and its vent. How the pipes are installed is dictated by the layout of the framing in the building. Commercial, institutional, and industrial isometric drawings can be done that do show the exact fittings that will be used on a job.

Who Draws Isometric Plumbing Drawings?

I'm one of the few people that draw these plans. I've been a master plumber since 1981 and love drawing them. Some mechanical engineers and some plumbers may do it, but they often don't want to draw ones for residential jobs. I specialize in residential drawings. You can place your order for your drawings here.

tim carter master plumber seal

Tim Carter has been a master plumber since 1981 and can draw your residential riser diagram.

What Fixtures are in a Residential Isometric Plumbing Layout?

The normal isometric drawing will show:

  • all bathrooms
  • kitchen sink or island sink
  • floor drains
  • 1/2 bathrooms
  • washing machine and laundry tub
  • utility sinks
  • future bathrooms being roughed in but not finished at time of construction

Plumbing Isometric Drawings Examples

Here are a few examples of plumbing isometric, or plumbing riser, diagrams I've done:

plumbing riser diagram

Your isometric plumbing drawing will look similar to this one. You can order yours here.

isometric plumbing drawing fixtures

This is an example of a simple bathroom isometric plumbing drawing. I use color to make it easier to show the different pipe sizes. If you need an isometric drawing for your job, go here and place your order.

Window Replacement Cost Sky High

tim installing window on ladder

Window Replacement Cost | Installing new replacement windows does not guarantee that your condensation problems will disappear. The payback period to pay for them in energy savings can be 20, or more, years.  PHOTO CREDIT: Kathy Carter - Copyright 2022

Window Replacement Cost is Sky High

A good friend of mine who lives in the suburbs of Chicago reached out to me a few weeks ago. He asked me what I knew about the cost to replace windows. He didn’t want to make a grave financial error navigating the treacherous waters of replacement windows.

With the average cost of window replacement running over $1,000 per window (2022 prices), one of the first questions I asked my friend was his motivation. Were his windows inoperable? Was he sick of painting his existing ones? Did he want to save money on his heating and cooling costs? Did he just want new windows that looked better? Because the cost of windows replacement is in the stratosphere, you should really think about why you want new windows before you commit financial suicide.

How Much Does it Cost to Replace Windows?

With inflation rising faster than a jack-in-the-box popping out of a metal can, you’re about to experience sticker shock when you get estimates. My friend lives in a modest solid-brick bungalow that sports ten normal-sized windows. He received estimates ranging from $10,197 to $31,498. Do the math and you can see the average cost of a replacement window runs between, $1,100 and $3,150. That’s enough to cause you to quiver.

Why Should I Replace My Windows?

You may want to replace your windows to get better performance and save energy. Window technology is constantly improving. Modern glass can incorporate special coatings that reduce the amount of ultraviolet (UV) and infrared (IR) light entering your home. Other coatings can bounce back heat to its source so heat from your home can stay indoors during the winter months. Some coatings make your windows stay cleaner longer.

Are DIY Window Films Good?

This said, you can apply transparent films to your existing windows and achieve the same results. One film can reject 97 percent of the IR light that’s trying to transform your house into a blast furnace. Another film can block a significant amounts of UV light that work to fade your fabrics and carpets. These films cost a tiny fraction of what a new window might set you back. Many are DIY and not that hard to install. I’ve installed window films myself with ease.

Will Replacement Windows Pay For Themselves?

Let’s unpack the most common motivation for purchasing replacement windows. A salesperson may have cast a spell cast upon you convincing you that you’re going to save lots of money on your utility bills once the windows are installed. I’m afraid you’re in for some grim news.

I’ve said this for years in past columns and no one has ever challenged this statement. That tells me it rings true: You don’t start to save money on an energy improvement until such time as you have recaptured in fuel and electricity savings ALL of the money you spent plus any interest you may have paid to finance the purchase.

Sounds confusing, right? It’s not. I propose we use the mid-point between the two estimates and round it off. Let’s use $20,000 for the cost of the new windows. Let’s also assume he pays cash using money from his mattress and doesn’t finance the purchase. If you finance your window purchase, you need to add in all of the interest you’ll be paying on your loan plus the cost of the windows.

What is the Average Cost to Heat & Cool a House?

My friend paid $1,539.00 in 2021 to heat and cool his home. When it comes time in the future to see what you’re saving, it’s best to compare the actual energy quantities you use, not the actual price. Fuel and electric price changes create very fuzzy math.

I reached out to the Gilkey Window Company in my hometown of Cincinnati, OH asking them what the average energy savings might be if I purchased their best windows. They told me it was reasonable to experience a 15% reduction in my heating and cooling fuel usage. The savings can go as high as 25% but it’s probably wise to stick with 15%.

If my friend installed high-quality replacement windows he might spend $230.85 less per year in energy costs. We can use that number to get a worse-case payback scenario. My calculator showed it would take over 86 years to break even. Yes, as energy costs rise, the payback period is less. Do your own math using your true annual heating and cooling costs. I think you’ll be stunned by the length of your payback period.

Is it Hard to Calculate the Payback Period of Replacement Windows?

It’s important to realize the computation of actual payback period of replacement windows is far more complex. It might be a good exercise to see what happens if you keep your money and invest it. The return on your investment might pay for the rising cost of fuel and you’ll still have your money that you would have given to the window company.

You then might want to factor in how long you’ll be in your home. The national average used to be nine years not too long ago. Will you still live in your home when you finally break even on your purchase?

All that said, I think you can see that it can take many many years before you truly begin to save money when you purchase replacement windows. Maybe it’s a smarter idea to install new weatherstripping, window films, and paint your existing windows with the best urethane-resin paint you can find. Urethane house paints can last up to twenty years if you do all the preparation right.

Column 1454

The Kite Story

The Kite Story

by: Scott M. Anderson - Scott is the youngest son of my best friend Richard Anderson - Read about Richard here.

I was around twelve years old. My dad said, "Hey, son, I got an idea! Let's go fly a kite." I was thinking, ain't I too old to fly a kite with my dad? Bet when he said I got an idea, I knew there was probably more to it.

So we jumped in the work van and took off to the Sports Farm off of Campbell Road.

Melvin Lake Memorial Park Harrison OH

This farm was for middle-aged men who enjoyed the game of softball. My dad's team around this time was the Mooseheads. I remember him playing right field. He was a good batter. There was a gigantic wooded barn in the middle of the complex that sold beer and peanuts.

When we arrived at the big gravel parking lot, I got the orange kite out. Just a normal kite for kids, nothing special. Then around the back of the van, my dad pulls out a small boat motor. The kind you hook up on the aluminum boats at the park. It had a small battery that powered it.

After that, he showed me some rope that was spooled about six inches wide. "Go and get that kite flying!"

So I got the kite flying about twenty feet high on its own string. "Bring the end of the kite back here," he said. I gave it to him and then my mind went puzzled. He tied the end of the kite line to the big spool of thin rope. Next, the spool was fitted around the end of the boat motor. He had taken off the blades of the motor and was going to use the spinning shaft as a rope winder.

When he put the motor in reverse, the kite drifted away. Slowly. That was it? Instead of using the kite rope, we are now using the rope off the spool and motor. That was it?

Then, about ten minutes later, the kite was getting high. I mean really high.

Five minutes after that, I could barely see it. Five more minutes later, I could not see it anymore.

"Dad, look at the spool! It's almost running empty!" So he stopped the motor. We sat there for about ten minutes, looking into the deep blue sky, seeing nothing but clouds.

"Pretty cool, huh son?" No kite in sight. "Pretty cool, Dad!"

I wondered if anyone has ever tried this. "How did you come up with this?" I asked.

Dad quipped back and said he just got the idea. "Hey, let's put the motor in forward and see if it winds back in."

After about ten minutes, we both started laughing so hard together. "I see it, Dad. I see it!"

The orange kite, finally visible to the eye, was descending. After another ten minutes, it finally reached arms length.

"Go get it, son!" I ran as fast as I could and grabbed the kite in my arms.

After holding it for a moment, I was thinking, "Did this kite go to outer space?"

Turns out, flying a kite with my dad was a pretty fun experience. And we were laughing the whole ride home.

Stamped Concrete Restoration

faded stamped concrete

Stamped Concrete Restoration | This is a great example of damaged stamped concrete. It could be a combination of ultraviolet light damage as well as pressure washing. Copyright 2022 Tim Carter ALL RIGHTS RESERVED

How to Restore Faded Stamped Concrete

You may be wondering about how to restore faded stamped concrete. If you’ve witnessed hundreds and hundreds of full moons in your lifetime and make frequent use of your critical-thinking skills, you know the sun is constantly at work ruining things inside and outside your home. One of these might be the expensive stamped-concrete patio, driveway, or sidewalk you had installed a few years ago.

The Sun Causes Stamped Concrete Fade

The same thing happens with exterior wood stains and sealers. I just concluded a very fascinating test of a particular exterior wood stain and it looks fantastic after two years of harsh exposure to the sun. I’m convinced I may get another two years out of it, but eventually it will succumb to the sun’s ultraviolet (UV) rays.

Stamped concrete restoration is a short-term solution. You may wonder what is the exact mechanism that caused your stamped concrete, that you were probably told would look good for decades, to fade and look dull after as little as three or five years. While I was doing research for my Roofing Ripoff expose’ book a few years back, I discovered a small percentage of the sun’s UV rays contain active photons. You can READ the first few chapters of Roofing Ripoff for FREE.

Do Photons Destroy Stamped Concrete Patios?

These photons are like miniature cruise missiles. When they strike fabrics, wood stains, paint, wood, certain soft metals, etc. they can blast apart molecules and even break atomic bonds. Imagine photons being so strong they can break the atomic bonds of copper, zinc, and lead! You are fighting a powerful foe as you begin your stamped concrete restoration project.

It should now make sense to you why the zinc coating on metal roofs disappears and why roof surfaces are free of algae and mold below copper and lead flashings. The atoms broken off by the UV rays wash down the roof with each rainfall and create a poisoned field such that algae and mold can’t survive.

Can Dry Pigments Withstand UV Rays?

Knowing this, I believe you can now see why the solid pigments used by the stamped-concrete installers are child’s play for the UV rays striking your pavement. The photons simply destroy the pigments over time. But the problem is two-fold. The pigments are really not much different than a thin ganache icing on a birthday cake.

What Else Ruins Stamped Concrete or Colored Concrete Paving Brick?

Strong acids such as muriatic acid and others used by masonry contractors can ruin stamped concrete and colored concrete paving brick. These will dissolve the cement paste that contains the dry pigments that create the color. You'll be left seeing the actual dull color of the sand and stones in the concrete.

What Creates the Color in Stamped Concrete?

The color in your stamped concrete comes from pigments that have the consistency of cake flour for the most part. The concrete finisher broadcasts these dry pigments on top of the wet concrete and uses a wide float to get them to mix with the Portland cement paste that is coating all of the particles of sand and gravel in a thin top-layer of the concrete.

whitewashing pigments

Here are just a few of the many many dry pigments available. You can blend different pigments to get different shades that you don't see here! YOU CAN BUY ANY WHITEWASH OR CONCRETE PIGMENT YOU WANT BY JUST CLICKING THE PHOTO.

How Thick is the Colored Cement Paste?

This cement-paste covering is extremely thin. While the cement paste can be sticky and bond well to the sand and gravel, it can be worn off with normal foot traffic and regular rainfall. Pressure washing a pigmented concrete slab is the kiss of death. Nothing ruins the appearance of stamped concrete faster than pressure washing its surface. I have photographs here on my AsktheBuilder website of new vs pressure-washed colored concrete paving bricks. The difference is like night vs. day.

paving brick cracked in half - comparing aggregate color

I cracked the new precast concrete paving brick in half. Look at how light-colored the aggregate is! Over time when the red cement paste wears off, the pavers will look different. My traditional clay paving brick patio under the cracked brick will stay red forever, because the red clay is the same color throughout the entire brick. © 2022 Tim Carter

When you remove this ultra-thin coating of colorized cement paste from the sand and gravel in the concrete, you begin to see the actual color of those components. What’s more, if you’ve ever looked closely at these stones you’ll discover they’re often quite smooth. Think how poorly a normal liquid stain adheres to a piece of glass - not well.

How to Restore Stamped Concrete

There are two methods that work to add color to restore faded stamped concrete or previously stained stamped concrete. You can use reactive or non-reactive stains. The reactive acid stains contain metallic salts that can chemically react with the Portland cement paste and add color. The non-reactive stains are normally just films that try to adhere to the concrete, sand, and gravel.

You simply need to manage your expectations when using either of these products constantly keeping in mind what the photons are going to do. They, as well as high-pressure concentrated streams of water, will eventually cause the restoration stains to fade and not look so good. How long will it take? That’s the million-dollar question!

Can Paving Brick Resist Photon Damage?

If you want a colorized pavement that the color will last for hundreds of years, you need to use traditional paving brick or natural stone. The color of the clay is solid throughout each brick. If you purchase brick that has a severe-weathering rating, it can withstand decades of Mother Nature’s abuse. Just travel to Athens, Ohio and marvel at the paving brick still visible on a few of its downtown streets. It’s unchanged since it was installed well over 100 years ago.

While the color range might not be as wide as with paving brick, you can also use pieces of natural stone colorized by Mother Nature. Granite is a great example. Think of how the color of granite never changes over time. You know this to be true if you visit cemeteries on a regular basis and note the granite headstones.

Are Granite Cobblestones a Good Alternative?

Granite cobblestones may be available to you in a wide-variety of different muted colors. There’s a stunning red granite bedrock on Mt. Desert Island in Maine, but that quarry has long since ceased operation. White or light-gray granite is usually the cobblestone I see in stock at most stone supply businesses.

Column 1453

April 24, 2022 AsktheBuilder Newsletter

Issue #1179 - Shelters, Ledge-Talker, Rusty & More

Are you kidding me? Well I'll be, this is your first issue, isn't it? You picked a great week to start, I can assure you of that.

This newsletter is quite long, but it's packed with some sound advice. I've even got a new feature!

Wait until you see what Yolanda sent me.

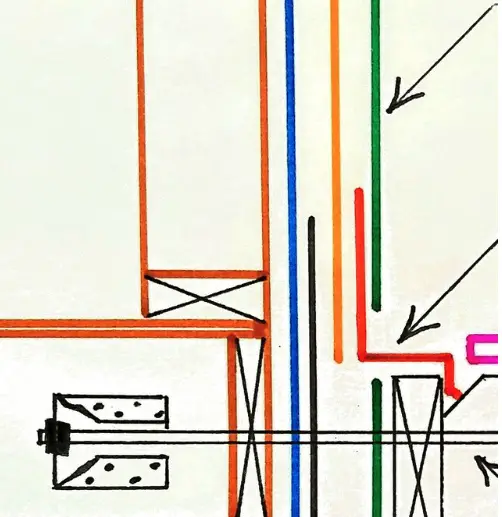
You, on the other hand, might have been here long enough to remember this image. I know it's fuzzy but what do you think the arrow is pointing to?
semi trailer swirling in tornado

It's that time of year again here in the USA.

Wretched twisters and tornadoes are roaming the landscape looking for food. They have an insatiable appetite for 2x4s, roof sheathing, cows, cars, trucks, train boxcars, and semi-tractor trailers to name but a few things they munch on.

Have you wondered what I think about having an above-ground tornado shelter? How about an underground tornado shelter? These both work for hurricanes too.

It would be worth a few minutes of your time to read this revised past column of mine about Above-Ground Tornado Shelters - and underground ones too!

Tim Bakes a Cake From Scratch

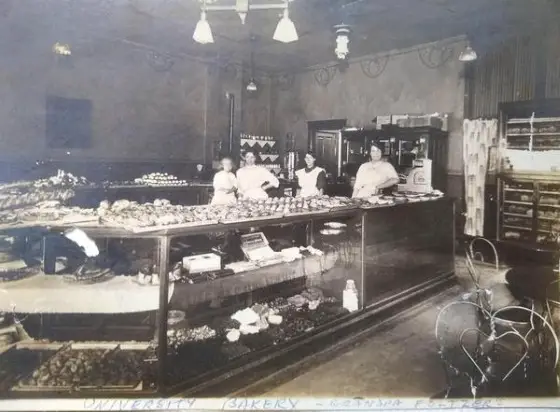
My grandfather and grandmother operated a neighborhood bakery in the early 1900s in Clifton Heights in Cincinnati, OH. Surely I've got some of their genes, right?

That's the bakery in the photo below. My grandmother is on the left with her hand on her left hip and the young woman on her right is her oldest daughter, my Aunt Clara.

grandfather and grandmother operated a neighborhood bakery

I decided to do something two days ago I've never done before - bake a cake from scratch. Kathy's birthday was just hours away and I had to do something. Store-bought cakes are out of the question.

She had printed out a recipe for a Root Beer Chocolate cake weeks ago. I guess she intended to make it, but the paper was collecting dust.

In the past, she's always dissuaded me from cooking or baking because when she was back home from the hospital with our firstborn, I made spaghetti one night and didn't fully drain the noodles. She's never let me forget the tiny puddle of water on the plate.

She's always told me she doesn't want to be poisoned by my culinary experiments. Well, those days are over.

I had to pull this mission off in secrecy as best as possible. Days ahead, I made sure I had all the ingredients. I scanned the steps in the recipe. It really didn't look that hard to do.

Since I'm up in the morning hours before Kathy, I knew that was the time to make the cake. The best part is there was no need to use an electric mixer. Everything was done by hand. I could do this being very quiet

Once I was deep into blending the ingredients, I panicked. It said to fold in the eggs, buttermilk, and vanilla. What the heck is FOLDING?

I immediately texted a very good friend of mine who's an expert baker. It took her a few minutes to respond and I was impatient. While waiting for her response, I used the whisk in this photo to slowly blend the ingredients.

root beer cake batter

I knew from a past family baking disaster that too much air in batter can cause dryness. So I was really careful.

My dear friend got back, but a moment too late. "Use a spatula and lift and fold over the batter."

Oh well, now I know!

Forty-five minutes later, the cake was out of the oven. I had chickened out and didn't use the Bundt pan because the recipe warned rookies like me that using the wrong one could result in the cake sticking in the pan.

I could not afford a mistake and went with two 9-inch round pans. That turned out to be a mistake because I didn't know about ganache icing!

In the past, I slathered on thick icing to make nice smooth sides to layer cakes.

Looking at this photo, you can see why it pays to use a Bundt pan. I'll have the courage next time, grandfather - I promise!

I know, I know ... You want to know how it tasted. I can tell you the small morsels from the pan were dreamy delicious. I'll share a taste report next week as the cake has not yet been eaten as I type and upload this newsletter.

NOTE: Wow, star anise - what an interesting spice and STRONG!
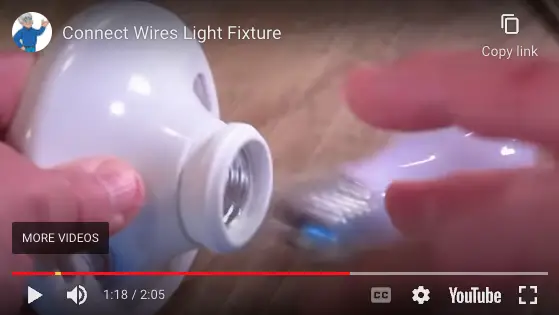
root beer layer cake ganache icing

Preventing SHOCK!

Watch This Video!

Did you know you can get ELECTROCUTED screwing in a simple light bulb? Pay CLOSE attention at 1:15 in the video! Click on the image below to watch the video. This is a mocha-chip moment if there ever was one!
light fixture electrical shock

Yolanda's Conundrum

NOTE: The following two back-to-back stories are a valuable teaching moment. Keep that in mind as you continue to read.

The only reason I devoted so much space to this topic is to save you enormous amounts of money, frustration, and a possible lawsuit you may or may not win.

Yolanda, who hails from the great state of Indiana, sent me the following photo.
waterfall countertop

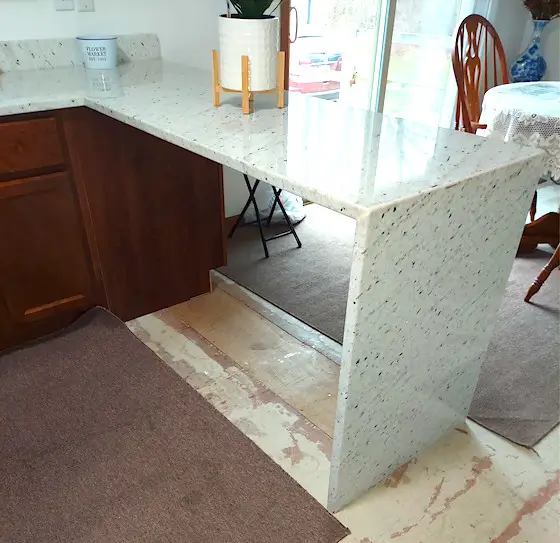
That's a stunning and expensive waterfall countertop she just had installed. But she was stunned by a comment the granite installer said as he was walking out the door:

"You're going to have to install a center support under the top to prevent it cracking and falling to the ground. Be really careful what you place on the top."

It's no wonder he said it while crossing the threshold!

My guess is Yolanda's face looked something like this:

Tims-surprised-look

Yolanda lamented, "...I am really upset because if he had told me that ahead of time, I've would have never done it. What can be done now?"

I responded to her letting her know I had a viable solution that would strengthen the top. It required one of my simple consult calls because there was far too much to type.

It's now days later and regrettably she's not taken me up on the offer even though I offered to record the call, and even transcribe it to a text document she could share with the contractor should she want.

What do you think Yolanda's stone top cost? Can you imagine your heartbreak had you been in Yolanda's shoes, flip flops, or Crocs?

Most importantly, what simple things could have been done ahead of time to ensure Yolanda got the waterfall top she dreamed of having?

After years of performing autopsies on similar situations, I know exactly where Yolanda went off the rails.

Had Yolanda talked to me early in the process showing me a photo of what she wanted, I could have shared with her how to get the exact top she dreamed of having.

It would be so strong a spry young dancer could perform on it without it splitting in two during a the-parents-are-away-for-the-weekend party.

You need to know that I offer you my protection no matter what you're planning to do. Just schedule a call.

I'm happy to record our call AND transcribe it into a text document you can read after the fact, hand to your contractor, or send to your attorney. If you want to save money, you can transcribe it yourself in minutes.

BTW, have you thought about Yolanda's FIRST MISTAKE?

She failed to jump on a call with me in the PLANNING STAGE. It often costs 5X or 10X MORE to retrofit a mistake after the fact. Most homeowners reach out to me screeching for me to throw them a life preserver as they flail about in the icy-cold deep I-trusted-the-contractor waters.

Don't be Yolanda. Be like Greg.

Who is Greg? He's a fellow Granite-Stater I met about six years ago. He had the exact same wretched IKO asphalt shingles on his roof that I had on mine before I wrote my Roofing Ripoff expose' book.

This is the short book where I shared, in my opinion, HOW you and millions of others were/are being RIPPED OFF by most of the asphalt shingle manufacturers. You can read the first few chapters for FREE.

It appears everything I said in the book was right because I've NEVER heard a peep from the attorneys who work for the unethical manufacturers!

Now, back to Greg.

Several days ago, Greg jumped on a call with me. He was on the brink of both financial and psychological suicide. He was seriously contemplating suing the roofer that put on his new metal-shingle roof.

He emailed me after the call sharing, "Thank you so much for talking me off the ledge today. You’re absolutely right that my emotions were more centered around retribution than a solution."

I saved Greg probably $25,000 and many months of untold psychological pain. You tell me what that's worth...

Yes, be like Greg. Consider talking to me before you make a grave financial error.

Very Tasty Bait

Tell the truth. Would you click this ad?

mini-saw ad

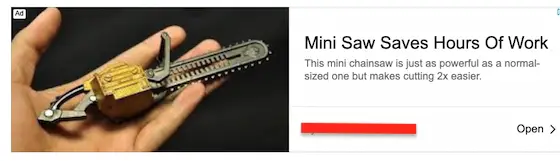
You wonder, how could a chain saw SO SMALL Save Hours of Work? That miniature saw and your curiosity seduce you. With the evil hex cast, your defenses drop like leaves falling from autumn trees. In a haze, you CLICK the ad.

Over the past week, I've seen several different versions of this ad. The text to the right of the photo says, "This mini chainsaw is just as powerful as a normal-sized one but makes cutting 2X easier."

WHAT?????

As powerful as my NORMAL gas-powered STIHL 18-inch saw?

Put your crack pipe DOWN!

I decided to go to the website. I should have clicked the ad to inflict some pain on the lying and dishonest seller.

Once there, the saw that's for sale is not what's in the ad photo but a probable knockoff of a small chainsaw STIHL sells.

I tested the small STIHL battery-powered saw three years ago. That tiny black blob with the orange tab at the end of the handle in the photo below is the sum total of the power.

Here is what this wonder saw looks like. The one that claims it's as powerful as a normal one:

mini-Stihl-saw

Trust me, a small saw like this, while convenient, is NOT as powerful as a normal chain saw.

Not by a long shot. Not on its best day. Not Ever.

Note: Barnum was a soothsayer. There are millions and millions of suckers out there, indeed!

STOP TRUSTING everything people tell you for God's sake. Stop being played by people and hucksters.

Note: Tell me how far you can see with your own eyes when you're not blocked by trees or a hill. Did you answer 5, 10, or 15 miles? Good, that's about right.

Now look at this ad aimed at those who succumb to sensational ad copy:

mini telescope ad

If you're not honing your critical-thinking skills each day, it might be a good investment of time.

From Tim's Digital Sack

I've decided to introduce a new feature. Think of it as Ask the Builder Letters to the Editor. From now on, I'm going to try to include at least one email reply I get from something you want to bloviate about.

Maybe I made you happy saving you money. Maybe I poked you in the eye with a sharp stick. Maybe I blew the dust off a fond memory that was stored away in your tiny gray cells. Don't be bashful.

It's your chance to shine like a star.

I'll share both brickbat and plaudits. Rusty's reply last week provided the inspiration.

I am a 90-yr-old woman who learns for the sake of learning, and you have plenty to offer the world! So I do enjoy your ideas on HOW TO! Have considered your thoughts on many things as common sense... and COOL!

Thanks, and Happy Easter Tim!

Rusty

<blush>Thanks, Rusty!</blush>

BTW, kudos to Rusty for remembering her grammar hyphenation rules. I didn't put those hyphens in for her! Some of us should have been like Rusty and paid more attention in our freshman Algebra and Latin classes!

That's quite enough for a Sunday.

Tim Carter
Founder - www.AsktheBuilder.com
Hilton Hotels Use - www.StainSolver.com
Field Day Soon! - www.W3ATB.com

Do It Right, Not Over!

P.S. What can you do if you clog a toilet and don't have a plunger handy? You should have paid attention in your high school physics class! Go here, scroll down, and watch a video that will save you in your time of need.

Men and Their Tools

richard anderson hammer

This is Richard's favorite tool - his tinner's hammer. This photo appeared in a special story I wrote for the Cincinnati Enquirer in June of 1995.

The following is a special assignment story I wrote for The Cincinnati Enquirer in the late spring of 1995. My editor at the Enquirer, Ann Haas, challenged me with this task. Not having a journalism degree, I knew enough that I had to interview a few experts to shed some light on the subject.

There was no doubt I had to feature my best friend at the time, Richard Anderson. I had noticed over the previous ten years his special relationship with his tools. That late spring day the article appeared in the paper, I was glad to see his tinner's hammer got top billing!

Perhaps the best part of the story is the surprise ending. It's a great example of how journalism SHOULD BE practiced today - in other words, do whatever is possible to keep personal bias out of the story, gather all the facts, and then put ALL OF THEM in the story allowing readers to take what they will.

Why put all of the facts in a story or report? Because HALF-TRUTHS are WHOLE LIES. - Tim Carter

Men and Their Tools

by: Tim Carter  original copyright (C) 1995

Have you seen the panic on the face of your father, husband, boyfriend, or brother when someone asks to borrow a tool?

How about when a tool is not returned, or is returned dirty or broken? I have friends who develop facial tics when confronted with such a situation.

With Father's Day on Sunday (a favorite tool-giving time), I've been thinking about the link between men and tools. I open several cabinets in my own home and see hundreds of tools. Most are older than my children. Many I've used almost daily during 20 years in the home remodeling business.

I think about the coolness of the chrome-plated steel of my plumbing wrenches. I look at my wood levels: they are worn, but accurate.

I feel a certain synergy in the presence of my tools. It is powerful. I'm just more confident when I know that they're all safely in my possession.

I realize I've compromised other prized possessions - such as my heavy-duty, three-quarter-ton pickup truck - for the tools. A week after I bought the truck, I had the bed removed and a custom-covered bed with cabinets and shelves bolted to the frame.

But I know I'm not unusual. A friend of mine, Richard Anderson, owner of Sergeant's Heating, Ventilating, and Air Conditioning in Harrison, admits he has strong feelings about his tools, too.

"Well sure, there are tools I prefer." Anderson says. "Take my tinner's hammer. I will go out of my way to get it, even if another hammer is closer. It feels good in my hand. It doesn't beat up the sheet metal when I strike it."

richard p anderson

Richard using his tinner's hammer to work sheet metal ductwork.

In the kitchen

Singing the same tuned about a different set of tools is the Maisonette's chef de cuisine, Jean-Robert de Cavel. When I visited him in the restaurant kitchen, the chef lamented the loss of a favorite ceramic knife.

jean-robert de cavel

Here is Jean-Robert with his steel tool box.

"If I get another, I surely won't bring it to work," he said.

He showed me an extensive collection of wire whisks. Some are old ones, purchased in France.

"I would love to know who made it and why he or shed thought it would work better," de Cavel said.

In another part of the kitchen is a rack with numerous chinois, funnels used to make smooth sauces. "They are always in high demand," says Marsha Banschback, assistant pastry chef. Often, she confessed, a funnel will be "hidden" for protection from less-careful hands.

As I get up to leave the Maisonnete, de Cavel starts chuckling.

"As a carpenter," he says, "you would appreciate how I bring my tools to work each day. I - and all my assistant chefs - carry our cooking tools in the same metallic boxes you must use for your tools."

Shovel love

Later, my tool-time thinking takes me back to my wife's last birthday. I thought I had the perfect gift: a gardening shovel to replace her favorite shovel that I had somehow left coated with concrete.

kathy carter favorite shovel

This is Kathy's favorite shovel. This photo was taken on her birthday in April, 2022. The shovel has seen better days and since the story was written, I got her a magnificent stainless-steel garden spade that I'm not allowed to touch.

I made sure my gift - with a nice, long handle - was the last one she opened.

"Oh, thanks," Kathy said flatly. "It looks like a nice shovel."

My instincts told me better. I asked her why she didn't like the new tool. "It's just not my shovel!" she responded.

I'm stunned. This tool obsession is definitely not relegated to men.

"The first tools were stones and bones," says Harold Fishbein, author and University of Cincinnati professor of psychology. "The manufacturing of tools was central to human evolution."

"You know," Fishbein adds, "women maybe manufactured the first complex tools. Man first lived by hunting and gathering, with 80 percent of the food being gathered. Women most likely the gatherers. They needed tools with which to dig. They needed to make things to carry the food back to the camp site."

My men and tools connection shot full of holes, I go home, get a chisel from my truck, and proceed to chip the concrete from Kathy's old shovel. Fifteen minutes later, it looks almost as good as new.

April 22, 2022 Deck Stain Test Q&A

What's that old saying?

You can't see the forest for the trees.

Based on the questions I received from yesterday's announcement about my Deck Stain Test Results being available, I think it might apply to ME!

Things that are so obvious to me because I'm so deep into the minutia of the project, might be obscured to you.

Here are just a few of the questions I received in the past 24 hours in no particular order:

Tim, what's in it for ME? Why should I invest money purchasing your results when I can get FREE reviews online?


  1. My results will save you hundreds of dollars in stain costs over time.
  2. My results will save you frustration and prevent an argument or two or three between you and your spouse who wonders why you're so stubborn.
  3. My results are based on decades of experience using sealers KNOWING which ones to AVOID.
  4. My results are not tainted as some might be from some inexperienced hobby blogger who might be on the take from a deck stain manufacturer.


The FREE results you might use probably don't talk much about film-formers. I went to great lengths to ELIMINATE these from my choices. Film formers PEEL.

If you use a film former, this is what your deck is going to look like soon. This photo shows a film-former sealant used by the company that built my dock. I'm talking about the panel above the green line. I didn't put on the original sealer on my dock, they did:
cedar dock panels

Note how the film-former sealant PEELED.

The panel in the lower-left corner of the photo below the green line was NEW cedar wood I stained with the better product. I had to re-build four of my dock panels in 2020 and I was able to stain the wood with the RIGHT product.

Finally, deck stains cost about $50 per gallon and the price is INCREASING WEEKLY because of raging inflation.

Is it worth several cups of expensive coffee to discover a penetrating sealer that might last four years if you apply it correctly?

You tell me.

After all, it's only money. If you have plenty of money and time to waste, then you should probably STOP READING right now.

Tim, I don't like that Mahogany Flame color. I want to use a clear or natural sealer. Will I get the same results?

The answer is maybe. I discovered decades ago the pigments in the stains act to protect the wood fibers from being destroyed by active photons that are in about 5% of the sun's ultraviolet light. If you go with a clear or natural stain, you could see color change in your wood.

Tim, you used cedar wood on your dock. I have treated lumber on my deck. Will I get the same results?

You should get the same results. It's all a matter of absorbency. I cover this in detail in my Deck Stain Test Results.

Tim, are there mistakes I can make applying the sealer that will impact how long it lasts?

You bet. There are LOTS of mistakes you can make causing you to WASTE YOUR MONEY.

I cover many of these mistakes in my Deck Stain Test Results.

Tim, do your test results come with a Money-Back Guarantee?

Yes. Once you read the short document, if you feel it wasn't worth it to get the information just email me and Kathy will issue a refund.
satisfaction gif

Tim, how long do you think your magic sealer will last?

I know I'll not be re-sealing my dock this year, so that means I'll get THREE years out of it. It's possible I might get FOUR years out of it depending on how much color fade I see next spring.

If you decide to not invest in my Deck Stain Test Results and hope you find the right sealer, I truly wish you the best of luck.

Please let me know if yours lasts three, or more, years. I'd love to see your before/after photos. Be SURE you create a control sample!!!

I explain how I created my control sample in my Deck Stain Test Results 2022.

I'll be back on Sunday. It's an interesting newsletter.

Wait until you see the part about Yolanda!

And, I've got a NEW feature I'm starting:

Tim's Digital Sack

Tim Carter
Founder - www.AsktheBuider.com

Do It Right, Not Over!

April 21, 2022 AsktheBuilder Flash

Deck Stain Test Results READY

I've been getting SO MANY requests, I decided to release the results of my Deck Stain Test early.

You might be one that said, "Tim, come on! I want to stain my deck THIS WEEKEND. Pick up the pace. TAKE MY MONEY. Tell me what you used!"

deck stain peeling 2022

If you want to know the name of the product I used as well as some background on the test, you can get it here NOW.

SPOILER ALERT: If you purchased my Deck Stain Test Results six years ago and expect to get a free update, you need to know I mimic my business after Consumer Reports.

You pay for each issue you get from them, including new tests on something they featured years before. They don't give you free updates. Thanks for your understanding!

Happy Staining!

Tim Carter
Founder - www.AsktheBuilder.com

Cheap DIY Shed

outdoor sheds for sale

Cheap DIY Shed | These pre-built sheds are NOT cheap, but I can show you how to build a diy cheap shed. See below. Copyright 2022 Tim Carter

Cheap DIY Shed - Easy to Build

Not a week goes by that I don’t get an email or a question on my live streaming video segments about inflation. I’m by no means an economist but I’ve seen enough full moons to know that inflation is raging and it’s going to get much worse. I do the grocery shopping for my wife and I and food prices are up at least 35%. Gasoline is now up 85% where I live. Building material prices are going up faster than a bottle rocket on the 4th of July. The prices of used cars are up 40%.

I’m bewildered how the reported inflation rate I see in the news is so much lower than what I’m experiencing. I know for a fact the government administration is cooking the inflation number so it doesn't cast them in a bad light with voters. But many people can see through this sham.

One primary reason inflation is so high is because the current USA administration is printing money and spending it like a drunken sailor. Flooding the market with this paper is DILUTING the dollars you and I have in our wallets and bank accounts. Because the value of each dollar is going down, people who sell things want MORE of them. This reckless money-printing-and-spending policy spans the past five administrations.

The USA national debt is out of control and this spells doom for the value of the dollar.

Smart people are exchanging their dollars for assets that are not pieces of paper. This mad rush to buy assets like houses, cars, collectibles, etc. is causing prices of those items to rise in a simple real-time example of supply vs. demand economics. Nothing about this is hard to understand.

Simple Cheap DIY Shed

Years ago, I built a large 16x24-foot two-story shed that could be easily converted into a small house if I could no longer afford to live in my current house. Currently, it’s loaded with all sorts of accumulated stuff from fifty years of family life. Before I built the shed, much of this was in an offsite storage facility with sky-high monthly rent.

Last week, I picked up two bags of bird seed for my lovely wife at a local agriculture supply store. There in the parking lot were quite a few pre-assembled sheds ready to be delivered to homes. There were a multitude of designs. You may see these in your city or town at big box stores too. I’ve inspected these sheds and the construction quality is minimal in my opinion. The floors are flimsy and the wall studs are spaced at 24-inch centers when I’d build at 16 inches on center.

You should read my shed-building tips column.

My eye was drawn to the signs showing what these sheds cost. The prices took my breath away to be honest. A plain-vanilla shed was $7,783 and one with a little more pizzazz was $8,762.50. These were April 2022 prices.  Both measured 10 x 20 feet. You may discover the same sheds in your city or town but they could be more because of a multitude of reasons.

Build a Cheap DIY Storage Shed

As I drove home I thought, “That’s insane. I’m sure one of my readers could build one of these simple sheds watching all my shed-building videos and save thousands of dollars.” I then decided to find out the current rate for off-site storage in my town. It’s a good thing I was sitting down looking at my monitor as the current price is $193 per month for a 10 x 20 storage space. That’s $2,316 per year and you know next year the price will jump ten percent, if not more. It’s possible you can build a 10x20 shed that will last for 40 years for what you’d spend in two years of rent!

Sell Your Crap to Get Shed Money

To save lots of money, and to get all or some of the money you need to build your own shed, you might want to do what I’ve been doing. I’ve been on this journey of selling or donating all the things I no longer use or need for the past two years. This year I intend to take it to the next level. My goal is to sell hundreds of things in the next four months. Whatever I can’t sell, I take to the Free Room at my town recycling center so others can benefit using them.

I’ve transformed countless dust-covered items I had forgotten about into thousands of dollars of cash by selling them to nearby residents using special garage and yard-sale groups that are on any number of social-media platforms. I’ve discovered you get top dollar if you take lots of great photographs showing the actual condition of the object and provide all the needed dimensions.

It also helps to write a creative story about the history of the object. Buyers tell me they love my stories, especially the one about the small silver bowl that I thought might have been on a sailing ship coming to the colonies back in the early 1700s.

Purging things you no longer need nor want serves another important purpose. You then don’t have to have such a large shed to store your things. Should you decide to stop paying the outrageous off-site storage fees, the first step is to determine the actual size of the shed you’ll need. Based on autopsies I’ve done countless times, folks like you almost always build a shed that’s too small.

DIY Storage Shed Size

It’s easy to determine the size of a shed. All you have to do is take all the things you plan to put in the shed and place them out on your lawn as you’d put them in the shed. You can use empty cardboard boxes to simulate things. If you’re skilled and can think in three dimensions, you can draw this out to scale on graph paper.

Once you place the items on the lawn, then surround them with string to make the outline of the shed. Try to create a shed size that’s a multiple of 2 feet in both directions. You’ll discover this will minimize material waste. It’s not happenstance that the sizes of pre-built sheds or shed kits conform to this standard.

Check Zoning Before Building

The next two steps are mission-critical. First and foremost you need to check with your city or town to see what the zoning regulations will allow you to build. These regulations can be strict or lax. It varies widely, trust me. The second step is to create a complete material list and price it out as soon as possible. Inflation is causing prices to go up monthly.

When I was driving back from getting the bird seed, I decided to prepare a complete material list for a simple cheap diy shed. It's a 10x20 shed, but you can use my material list to calculate the cost of a:

  • 10 x 10 shed
  • 10 x12 shed
  • 10 x 14 shed
  • 10 x 16 shed

My list saves you the time and trouble of trying to figure out what you need. I also included links to the top products I like to use as well as links to how you can get access to over 100 videos I shot showing how to build a shed. You get my 100-Percent Satisfaction Guarantee!

Column 1452

satisfaction gif

Deck Ledger Flashing

deck-by-lake

Deck Ledger Flashing | Can you imagine what might happen if this deck collapsed during a wedding or graduation party? It can happen to you! Copyright 2022 Tim Carter

Deck Ledger Flashing - Fire Cut and Kick Out

Deck collapses happen all the time across the world. The issue is many of them never make the news. Several years ago I attended an all-day training session put on by a top USA manufacturer. This company is a leader in making fantastic metal structural connectors for decks, homes, and other structures.

Defective Decks - How Many?

They estimated at the time that over 80 percent of the decks in the USA are structurally deficient and ticking time bombs. That speculation is staggering and it should immediately put your head on a swivel.

My youngest daughter’s roommate was a victim of one of these deck collapses. She walked out onto a small deck four years ago and it detached from the building. Both the woman and the deck crashed 12 feet to the ground. She was rushed to the hospital with a ruptured spleen and a broken neck. She survived, but is now partially disabled.

Deck Ledger Flashing Detail - Prevents Rot

You’ve undoubtedly heard the saying a chain is only as strong as its weakest link. The weak link of the typical deck is where it attaches to the house. This deck structural member is called a ledger board. In reality it’s not much different from a steel beam you might see in your basement or the steel beams that support bridges that you drive under in your city or town.

Deck Ledger Board - Handles Half Deck Weight

An enormous amount of weight is transferred to this ledger board. In most cases, half the weight of the entire deck, all the furniture that’s on it, and the combined weight of you, your family, and friends is pushing down on this single board. It can be thousands of pounds.

Deck Joist Pulling Away From Ledger

But it gets worse. Not only is the weight pushing down, but if you and your friends start dancing on the deck creating a harmonic side-to-side motion, you can exert a force that begins to cause the deck to pull away from your home. This is a recipe for disaster if the deck ledger board or the untreated wood on the exterior of your home has rotted because the ledger board was not installed correctly. This is why my daughter’s roommate was lying unconscious on the ground that fateful day.

Deck Ledger Flashing Prevents Rot

It’s important to realize that treated lumber can and does rot. I’ve witnessed it myself. Each day when I go out for a walk, I pass by treated-lumber guardrail posts that are as rotten as logs laying in the forest just 50 feet away. Keep in mind that not all treated lumber has the same amount of chemical preservatives. What’s more, how do you know if the wood was properly treated? Any number of things could have gone wrong at the treatment plant. Inferior products of all types are made all the time. This is why there are product recalls on an almost weekly basis.

Rain Creates Corrosive Brew

Do you, by chance, recall some of your high school chemistry? Did you do any lab experiments about galvanic reactions? Each time it rains on your deck, a toxic brew is created. The rain leaches copper from the treated lumber. This liquid attacks any exposed steel or iron. If your deck was built using inferior fasteners with a paper-thin coating of zinc, they might be corroding as I type this. This same corrosion can be happening with any of the joist hangers and other structural framing connectors.

All of this is exacerbated if your deck is located in a marine environment. Sea salt is also corrosive. I went on my first cruise a few years ago and attended a talk given by the ship captain and his top two crew members. I’ll never forget when they were talking about the constant battle they face with the seawater. The captain said in his heavy Eastern European accent, “The sea eats iron and men.”

You need to up your game should your deck be exposed to marine conditions. If it were me, I’d use as much stainless steel as I could find when it comes to fasteners, bolts, connectors, etc.. Whatever isn’t stainless steel should be double-dipped hot galvanized metal. I’d also do annual inspections of the deck to ensure corrosion is minimal or non-existent.

Over the years I’ve discovered a foolproof way to stop deck ledger board rot. I’m not the only one that’s worked in this area, but my method is the only one I’ve seen that incorporates two different techniques that work together to keep deck ledger boards, and the primary connectors, as dry as possible.

deck flashing

The correct flashing with the proper profile is seen at the top of the photo overlaying the inferior deck flashing that was installed by a nonprofessional. The old flashing edge stopped at the top edge of the ledger allowing water to flow back under the flashing using capillary attraction. Note how the new tin flashing has a kick out where the metal points away from the deck ledger board. This deck ledger flashing helps keep the treated lumber dry.  PHOTO CREDIT: Tim Carter Copyright 2022

The one trick is to do what the master carpenters did well over one hundred years ago when they installed floor joists in solid brick buildings. As cities got bigger, brick buildings got taller, and fire fighting became more professional, it became crystal clear why firefighters were getting killed when brick walls collapsed.

The walls of the buildings that didn’t have angled fire cuts on the ends of the joists tipped outwards sending tons of brick to the ground without notice crushing fire fighters when the floor joists burned through and broke in two inside the buildings. The second trick is to use a kick out on the all-important flashing that covers the top of the deck ledger board. I show how to do both in a special detailed illustration you can get right now.

deck ledger flashing drawing

This is just a small part of my special deck ledger flashing illustration. Go here to see the entire flashing illustration and get all of the notes and links to the top products to make it.

I’ve prepared a full-color illustration of showing how I’d install your deck ledger flashing so it doesn’t rot or pull away from your home. This document also contains links to the best deck hardware and fasteners, the all-important special connecting anchors, and the absolute best treated lumber to use when building your deck ledger board.

Column 1451