Tile Pattern and Design Ideas

DEAR TIM: I'm installing ceramic tile at my house and want to spice it up. Anyone can install the same pieces of tile that are the same color. I was thinking of creating designs and patterns in my floor with different colored tile. Is this a bad idea? What are the pros and cons of doing this? How would you approach this job if you were doing it? Do you have any grouting tips once I get to that point? Lisa A., Danbury, CT

DEAR LISA: I think what you're about to do is a great idea. I've seen plenty of plain tile floors in my lifetime. But flooring that's multi-colored and contains interesting design elements is always an eye catcher.

The pros of doing this is that it will make you happy and you'll get great satisfaction from doing the work. The cons are that highly specialized flooring or designs that are attractive to you may be a turn off for others. If you go to sell your house, the floor may discourage buyers.

This is a fairly complex pattern created from pieces of different colored granite. It could have been done with tile. Photo Credit: Tim Carter

My advice would be to keep in mind the overall look of what you're thinking about and how it will work with your furniture, walls and other decorative items. Also think about how the floor will look after you put furniture back on it. You may work really hard on aspects of the floor that will be covered with large pieces of furniture.

The first thing to do is to plan out what you want to do on paper. If you can draw what you have in your head to scale and then see how it will work overall with your furnishings, do so. Use colored pencils or markers if need be to try to recreate on paper what the floor may end up looking like.

If you like what you have done on paper, then purchase a few sample pieces of the flooring to see how the colors work together. You'll discover you have all sorts of options with respect to ceramic tile, granite flooring and even marble. The biggest challenge, when working with these materials, is ensuring that the top surface of all the materials is in the same plane once the floor is finished.

If you have any doubt as to the final look of your floor, you might want to dry lay the pieces of flooring in place and stand back to see what it looks like. If the design you want involves cutting flooring pieces, this may not be possible.

If you don't like the look, you may be able to return the flooring for a full credit. Be sure the material is returnable if you have the slightest doubt about what it will look like once in place.

You can achieve amazing results by just creating simple borders around rooms with different colored flooring. Some tile and granite come in different sizes so you can create bands of color or interest by simply changing the size of the flooring in different rows.

Medallions or other large patterns are fantastic in the center of rooms where you may have a table with a glass top. The floor will show through the table.

When it's time to grout, realize that water is both your friend and foe. You need plenty of clean water to get the grout from the surface of the tile flooring. But if you put too much water on the fresh grout, you can weaken it. It will crumble and turn to powder in a short time.

The key when grouting is to make sure the grout is not too wet. You should only grout about 15 square feet of surface at a time unless you know what you're doing. If the relative humidity is low, the grout will dry quickly. You need to realize that dried grout haze on the tile or granite can be a nightmare.

You can watch a video that shows how to grout ceramic tile at www.AsktheBuilder.com. Simply type "tile grout video" into the search engine.

Column 959

October 28, 2012 AsktheBuilder Hurricane Sandy Alert

Kathy and I heard you yesterday. We're taking your advice.

I've only got a few minutes here. You may be happy to know I'm leaving a day early to get back to New Hampshire. Even still, when Kathy and I awake tomorrow morning in Albany, NY, the winds and rain could be fierce as we try to make the final sprint across MA to NH.

I got some great tips from others. If you're going to be impacted by Hurricane Sandy, take photos now of everything in your home. Photograph every wall, all your furniture, your garage, your basement, open drawers, take photos of the inside of closets, etc. You want a photo record of everything you have.

Don't be frozen with fear. Get moving now. Forget about material possessions that can be replaced. At the end of the day, they mean little.

Focus on things that can't be replaced. You know what those are.

I need to scoot. I'll be on the road in less than an hour.

If you're on Facebook can you do many a favor? Please got to the AsktheBuilder.com Facebook page and Share the Special Alert I sent you yesterday. Cindi emailed me asking me to put that email up on Facebook. I did it an hour ago. SHARE it if you can so others may benefit from tips there that they've not heard before.

I'll try to communicate with you on Tuesday, but I may not be able to. My Internet could be down or I'll be out helping others. I've already been activated by my local ham radio ARES group. We're at a Level 2 planning to be at Level 4 by the time I get back to NH at 3 pm tomorrow.

I could be out on the radio helping others at shelters for days so I'll be unable to get out the next newsletter.

Thanks for anything you can do to help others.

October 27, 2012 AsktheBuilder Hurricane Alert

If you're a new subscriber in the past three days, this is NOT a typical newsletter. This is a Special Alert newsletter to help you.

This alert is primarily for all of those that live on the East Coast of the USA north of North Carolina. If you don't live there, you may have friends or relatives who do that may benefit from some of the following tips. FORWARD this email to them.


Now is the Time to Act

Believe it or not, I'm not in New Hampshire as I write this. I'm in Cincinnati, OH for a brief time visiting with my father-in-law. I'll be driving back to New Hampshire on Monday - right into the gaping maw of Sandy.

I've been getting a flood of emails from subscribers like you asking me what they can do to help their houses survive. Well, look into the history books about the famous Long Island Express hurricane of 1938 and it can be overwhelming as to what to do. It laid waste to New Hampshire and other parts of New England.

Five weeks ago, I started taking CERT training. You need to know this right now:

If Tropical Storm Sandy turns out to be like what the forecast is saying, you will NOT get help from your fire or police department.

READ THAT AGAIN. You will NOT get help. They don't have enough resources and they will be charged with saving the MOST VALUABLE things in your community. Your house, you and your family are the LEAST VALUABLE things in the community as far as they're concerned.

Here's the truth in my own town. The area around my house in New Hampshire (say a radius of 15 miles) has maybe 500 firefighters and perhaps 100 total fire trucks. Yet perhaps 25,000 people live in that same circle. If just 10 percent need help they will be overwhelmed. Get it? Do the math in YOUR town.

Don't take any of the above personally. Just understand you could be on your own for days or weeks. It's not that the professionals don't want to help you, they may not be able to help you.


Insurance:

CALL your insurance agent RIGHT NOW and get the skinny on whether or not you're covered. You may THINK you're covered for water damage, but you might not be. You may only be covered for water damage IF the water is brought into your home by the wind.

I'm NOT an insurance expert. At the very least, get out your policy NOW and read it. If you don't have flood insurance, see if that rider can be added this weekend.


Trees:

Gather things of value now that could be hurt by water, wind or trees crashing down onto your home. Get valuable away from windows or glass doors.

Park your cars and vehicles away from trees that could fall on them. Park AWAY from where water can rise and flood the car.


Basements - Crawlspaces:

Get anything of value up off the floor now. Get it to high ground. About ten years ago, friends of mine who lived on what they thought was high ground had their basement completely fill with water in about 20 minutes during a fierce thunderstorm.

The side of their yard all of a sudden became a small river with water running 1-foot deep. The water came up against their foundation and BROKE a flimsy basement window. Water POURED through this window and filled the basement.

Other friends of mine had their cottages wiped out by Tropical Storm Irene last August. They had about 8 hours of warning to prepare. It was not enough time for them.

You have at least two days. GET WORKING NOW to move things to high ground and where you know water will not reach.

Can water flood your basement or house? If so, react now.


Electricity:

You could be out of electricity for days. Your sump pump will not work. Gas stations may not be able to pump gas.

Get your car/truck filled with gas now. Have enough gasoline to operate chain saws / generators / pumps, etc. on hand now.

After the storm there WILL BE GIANT LINES of people trying to get gas from the FEW stations that MIGHT BE OPEN. GET YOUR GASOLINE NOW.

What can you do now to survive that? Flashlights, batteries, etc. I'm sure it's possibly too late. The stores could be sold out by now.


Generators:

Be SURE you know how they work and don't use one in an enclosed space. Carbon monoxide from generators KILLS people all the time.


Wind:

Think now about what you will / can do if the wind blows out windows or doors. What about wind-driven rain leakage? How will you deal with it?

Is anything of value outside that can be blown away?

Do you need to clean out gutters now to handle the heavy rain?

You should have gotten those fantastic gutter guards I talked about two weeks ago. Too late now, but you can get them to be ready for the NEXT storm.

Water will leak through brick walls and chimneys. I've written extensively about wind-driven rain, brick walls and mortar joints. It's TOO LATE to prepare now for that. Just understand water can pour through brick walls.

Wind can topple brick chimneys. If it does, where will it fall on your house? Stay away from that part of the house during the storm.


Friends and Neighbors:

Now is the time to assess what the combined resources are of you and your neighbors. You're going to have to possibly RELY on each other for a while. Who has what tools? How can you work together?

That argument about the fence, bushes, etc. seems pretty petty now doesn't it? It's times like this where you wish you bent over backwards to be a great neighbor.

If you get into trouble, you better hope that your neighbors will have the right attitude to help you.


Common Sense:

It's time for you to use common sense and start to prioritize what you're going to do.

What can you do now? What will you do during the storm and what will you do AFTER the storm if no help comes?

Get a plan together now.

Wish me luck driving across I-90 from Cincinnati, OH to NH. I'll be making my way past Buffalo, NY Monday about 7 pm or so. I'm trying to get to Utica, NY by 9 pm.

If you have other great tips to share BEFORE the storm that I missed, get them to me. I'll create a bullet point list and send it out later today or tomorrow.

This information was shared about in October 2015 when Hurricane Joaquin was about to make landfall.

CLICK HERE to read my November 3, 2012 Newsletter answering many emails that I received after sending out this Newsletter.

October 23, 2012 AsktheBuilder Newsletter & Tips

Lots of exciting stuff is happening here at AsktheBuilder.com. For one, the DIY shed project has come to a close! More on that below. If you're one that purchased the videos, read the announcement below.

As the weather turns colder and I'll be spending more time indoors, I'm embarking on a new project that's sure to get your attention. Soon you'll be able to watch in-depth teaching videos. I've been waiting for a few years for all the elements to do this to come into alignment. The great news is that technology has advanced to a point where this can be done somewhat easily and cost effectively.

Here's an example. Would you like to attend a live online class - or watch a taped version of the class - where I show you how to:

  • solder a copper pipe
  • make PEX pipe fittings
  • cut a straight line with a circular saw
  • patch a small hole in drywall use a coping saw
  • cut ceramic tile with different tools
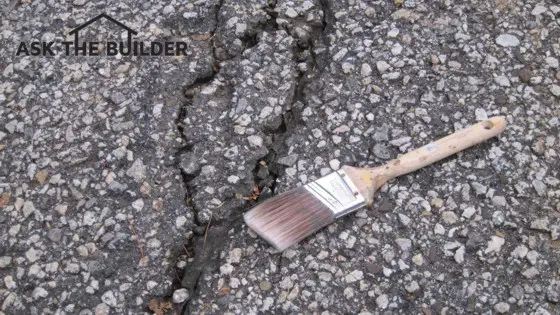
  • cut in a straight line with a paintbrush and NO tape

I think you get the picture. There are HUNDREDS of things you probably want me to show you. Keep in mind I'm talking about something I could demonstrate in 15 or 30 minutes. What do you want me to show you? REPLY to this email and tell me. Change the Subject to: Video Classes. I'll put it on the list!

P.S. Remember, your idea for a class needs to be something I can show you in 30 minutes or less. In other words, don't tell me you need me to show you how to remodel your kitchen. I can't do that in 30 minutes. :->>>


Tip of the Week - Using the Right Saw

I think you'll enjoy this story about a young carpenter.

One day this fledgling carpenter had to make a rectangular hole in the center of a very expensive Douglas Fir exterior front door. The hole was for a mail slot. A fancy brass frame covered the hole on both sides of the door. The hole needed to be about 12 inches long by about 2 inches high.

The door was 1 and three-quarters-inch thick. This carpenter thought the best tool to use for this job was a jigsaw. He thought this because the hole was pretty small and it seemed impossible to cut the small 2-inch legs of the hole with any other tool.

The young lad carefully drilled three-eighths-inch pilot holes at each corner of the rectangle for the jigsaw blade. He plugged in the saw and started to cut being sure to keep the blade on the pencil line.

He completed the cut and the hole looked perfect - at least from the side of the door that was facing up. He made the cut while the door was resting flat on saw horses.

The rookie carpenter picked up the door, carried it to the frame and began to install it. Shock came to his face when he looked at the other side of the door.

The cutout hole was grotesque and much larger than the perfect rectangle that he saw on the other side. Fortunately for him the brass hardware frame just barely covered the gaping hole.

What the inexperienced carpenter didn't realize is the jigsaw blade would tilt when cutting through thick material. The blade wasn't rigid enough to stay oriented at a 90-degree angle as it cut through the thick, dense wood.

That wet-behind-the-ears carpenter was me many years ago.

Ever since that day, I've used the right saw for the job. In retrospect, I should have used a circular saw to carefully cut the long legs of the rectangle. A router, making several passes at several depths, could have been used to cut the small 2-inch legs.

The bottom line is that you need to know the limitations of the saws and other tools you use. Match them up accordingly with the task at hand.


Bosch Clutter Contest - You MUST Look at the Current Clutter Photos!

I don't know about you, but money is tight right now. Wouldn't you like to win $1,000 worth of Bosch loot? I know I would, but I'm not eligible because I'm a member of the media.

Bosch is promoting a fantastic line of new storage boxes. They're call the L-Boxx. I've owned all sorts of tool boxes and bags over the years, but I have to tell you that these new L-Boxxes are some of the most practical storage boxes I've ever seen.

Bosch Take Back Your Day

But let's get back to the contest. All you have to do is take two or three photos of your messy garage storage shelves, your firetrap basement workshop, your packed-solid work shed, or the garbage dump you call the back of your work van or pickup truck. You get the point.

You then upload these photos to the Bosch website - very easy to do - and then just write up a description of the chaos that exists around your tools.

I know what you're thinking, "Tim, I've entered lots of contests but I NEVER win. This will be another WASTE of time." Hah! You're wrong!

You have a fantastic chance of winning. I know because I've seen the other entries!!! Go look for yourself. I'll bet you that you've got a MUCH BIGGER mess and you can win!

Go now to the Bosch Take-Back-Your-Day Contest page and look at all the entries at the bottom of the page. Do this BEFORE you take your photos. You'll get inspiration looking through the entries. I'm sure your workspace is worthy of a win!

Do you know someone with a messy workspace? FORWARD this email to them and get them to enter!


DIY Shed Video Update

If you purchased either through Kickstarter or directly from me the complete video set of my DIY Shed Project, you'll be happy to hear that I'm starting on the editing process now.

If you've not purchased them yet, go here to get them.

Two things delayed this process. A little over three weeks ago I received the bad news that my very close friend Mike was at death's door. That caused a major disruption in my life right when I was trying to tape the last videos. I finally taped the last videos this past Saturday.

Just after hearing about Mike's terminal condition, my iMac hard drive crashed. It took about five days to get it back from the Apple store. But just after getting it back, I had to leave town to attend Mike's memorial service.

I know, you're sick of excuses. But it's the truth. The good news is that you're going to get far more than you bargained for. Originally I was to give you 100 videos. I've far surpassed that. I have no idea how many videos I have, but just the set about building the stairs is nearly 25 in-depth videos!

I'll be releasing access to the videos as I edit them. This will allow you to get started on your shed project. I'll start at the beginning and work forward for you.


Stain Solver FLASH SALE

Here's a quick Stain Solver sale for you. Our second-most popular size is on sale.

The 4.5-pound, our second-most popular SKU, size is now 10 percent off with FREE SHIPPING too. There are only 300 of these at this sale price. When they are gone, the price jumps back up to the regular price. Hurry, these will sell out FAST.


Makita Job Site Radio Review

I reviewed a very nice job site radio. Go here to watch the video review.


Do You Want Me to CALL You?

Do you have a problem at your house? Maybe you need coaching about how to do something.

For years I've had a product at my shopping cart where I can help you for just 15 minutes. I've helped hundreds of people over the years.

Well, I've put this item on sale. It's now 60 percent OFF! CLICK HERE to get this fantastic price.

I've NEVER BEFORE offered this kind of huge discount on this product. It's insane on my part because of the time commitment. But I feel that in these tough economic times, you may need help over the phone.

Only 200 people will get it for this price. You can buy multiple units of the 15 minutes if you want.

For example, if you feel you need to talk for an hour, then purchase four of the 15-Minute segments. You get the point.

It's going to be on a first-buy first-called-back basis. If you need to talk to me SOON, you better pull the trigger on this sale right now.

If you live somewhere else other than the USA, you'll have to have Skype installed to do this. I can't afford - at the sale price - to make international calls on my regular phone.

How To Build a Ramp

DEAR TIM: I need to build a ramp that will allow me to get my lawn tractor into an outdoor shed of mine that has a wood floor system. I've never done this and wonder how it's done, what tools I'll need and what are some great materials to use. Can you help me get started? I want to make sure the ramp doesn't fail and is not dangerous. Lizzie B., Dayton, OH

DEAR LIZZIE: I've built more than my fair share of ramps, so I believe I can help you. The great news is that this is a pretty easy task. You should be able to accomplish this job in a weekend with little effort.

The first thing you have to do is determine the slope of the ramp. If at all possible, try to keep the slope around 11 or 12 degrees. This translates to about 2 inches of rise for every 12 inches of run. Steep ramps can be dangerous when wet and they can be very problematic for lawn mowers that have low-hanging belly mowers.

how to build a ramp

This ramp was built in less than two hours with simple tools. Photo Credit: Tim Carter

If the ramp is too steep where it connects to the flat floor of your shed, you can have the bottom of the belly mower scrape at the pivot point. I've seen mowers get stuck because the rear drive wheels of the garden tractor lift up and loose traction.

You'll probably end up using a measuring tape, circular saw, hammer, drill, framing square, spade, level, and a few miscellaneous tools. Most of these are pretty common or can be borrowed from friends if necessary.

I prefer to use all treated lumber for the outdoor ramps I build. I frequently use 4-inch by 4-inch timbers for the ramp supports and then cover this with treated 3/4-inch-thick plywood. Yes, you can purchase plywood that has the same chemicals as treated framing lumber. It can last for years and years getting wet without rotting.

What's really critical is how you attach the ramp to the shed. You don't want the ramp to crash to the ground one day while you're walking on it or a garden tractor is on the inclined plane.

One way that's worked well for me is to engineer the ramp so the ramp plywood overlaps the framing lumber at the doorway to the shed. I try to make this overlap at least 4 inches if possible. This often means you have to nail additional framing lumber to the inside face of the outer floor joist of the shed. The outer floor joist of the shed and the added framing lumber have to be cut away to have the same slope as the ramp will have.

Taking the time to make this connection allows the plywood for the ramp to help hold the ramp supports close to the shed. For the shed to fall away, the plywood would have to rip away from the actual shed joists. That would be very difficult if you use stainless steel fasteners or galvanized ones that will never rust.

I often attach a simple treated 2x4 to the face of the outer shed floor joist. This acts like a tiny beam to support the ends of the 4x4s that make up the supports for the ramp. I notch the bottoms of the 4x4s so they sit flat on the 2x4 ledge. The top of each of the 4x4s is flush with the beveled floor joist of the shed. This allows the ramp to be smooth and in the same plane.

I space the 4x4s two feet on center. This provides plenty of support for the thick 3/4-inch plywood. Where the 4x4's touch the ground, I usually put an additional 4x4 under them. This 4x4 runs perpendicular to the ends of the ramp 4x4s. It acts as a beam to support the ramp timbers and helps keep the ends all in the same plane.

The 4x4 that supports the ends of the ramp timbers needs to be placed below grade so that the end of the ramp ends up touching the ground. You don't want a big drop-off at the end of the ramp. It needs to transition smoothly to the ground.

Most of the ramps I've built are no more than 8-feet long. If you have to build a longer ramp, you'll probably have to add support under the ramp 4x4s as they'll get a little spongy. You can do this with concrete blocks, rocks or other masonry materials that you place on the ground under each 4x4 ramp timber. You want the ramp to be solid, not like a trampoline.

Be sure to use galvanized or stainless steel fasteners. The ramp will be exposed to the weather and you don't want it to fail because your nails, screws or bolts rusted away.

It's important to keep the ramp free of all dirt, algae, mold and mildew. If a ramp has this on it and becomes wet, it can become very slippery. You can add rubber mats that will provide great traction when wet, but be sure the rubber is clean.

You can watch a video that shows the major components of a shed. Simply click on this "shed ramp video" link.

Column 958

How to Build a Ramp Video

How to Build a Ramp

Hi, I'm Tim Carter and I want to show your some of the components when building a very simple ramp for your garden shed. This ramp is going into a garden shed and it is made out of four 4x4's that are a little less then eight-feet long.

The 4x4's rest on top of a 2x4 that is attached to the front of the shed. The 4x4's are notched to fit over the 2x4. The top of the ramp is a 3/4-inch thick piece of treated plywood. That's nice material.

At the bottom of the ramp, the 4x4's rest on top of another 4x4. This 4x4 has been buried in the ground and is level with the shed. This keeps all the four 4x4's spaced properly. The gap at the bottom will be filled with 3/4-inch, angular gravel. Some of the gravel will go under the plywood and help support the end of the ramp.

With the top edge of the ramp extending up and into the shed, the rain will be blocked from getting under the garage door. It also ties the ramp into the shed framing, locking the ramp in place.

It is easy to construct the ramp. You want to be sure that the ramp is not more then 11-degrees. That is about two inches of rise for every 12" of run. That will make it so your lawn mower doesn't drag or get stuck going into or out of the shed.

Makita LXRM03 Radio Video

Hi, I'm Tim Carter and I've got a really neat tool that I need to show you. It's one that's absolutely necessary around every jobsite, as far as I am concerned. It's going to put you in a good mood, that's why it is important.

This is the Makita LXRM03B 18-volt LXT Lithium-Ion Cordless FM/AM Jobsite Radio with iPod Docking Station Tool. It is a beauty. Very handsome and very rugged. Produces great sound and it a multi-powered audio device. This unit has an AM and FM radio. In addition you can plug in an iPod, iPhone or MP3 player to this radio.

The radio has 5-preset buttons for your favorite stations. It has a built-in alarm clock in case you need to be some where at a certain time. It also features a count down timer.

The unit is powered by an 18-volt Lithium-Ion battery, but has an input jack so it can run off 115-volt power source.

Under a lid on the top of the radio is a docking station for your iPhone or iPod.

The battery is accessed from a cover on the back side of the radio. In that same compartment is a place for two AA batteries. These keep the memory chip powered so you don't lose present stations, date, time, etc. when the 18-volt battery dies.

So what do you think? It produces great sound and I should know. I am a ham radio operator and this is a great radio. I can't talk around the world with it, but that is okay. It's a great receiver.

Go take a look at it, but keep your credit card handy. You are probably going to use it and take that radio home.

I'm Tim Carter, W3ATB, and I'm gonna be clear on your final.


October 18, 2012 AsktheBuilder Newsletter & Tips

I want to thank you for passing on your kind words about my good friend Mike Wilson. I drove all day Saturday from New Hampshire to Richmond, Virginia. That put me within striking distance for his memorial service on Sunday in Raleigh, NC.

Prior to my leaving, I decided to write down some of my memories about him in an attempt to describe who he was. That was a good thing for me to do. It helped start the healing process. If you want to know more about Mike, just go to this page I created on my blog in his honor.

When you drive 1,800 miles by yourself in less than 96 hours, you have lots of time to think about things. Here are some random thoughts that crossed my mind:

  • The speed limits in New Jersey are recommendations.
  • If you put cell phone antennas in trees, the radio waves cause grotesque mutations causing the tree to be twice as tall as any nearby tree. The mutations also create stubby limbs and an obese thick tree trunk. Oh wait, that's the actual antenna pole.
  • Rookie Formula One and NASCAR drivers use the New Jersey Turnpike for lane changing practice.
  • Freeways are not free. In addition to the 45+ cent tax per gallon of gasoline I paid each time I filled up, I spent an additional $60 in tolls to get to and from the memorial service. Yikes!
  • You can avoid enormous volumes of traffic driving through the night.
  • The word dragoons is one letter off dragons for a reason. Dragoons of the past were the ancestors, I believe, of our current bad-a** special-force military personnel.


Tip of the Week - Shower Curtains and Doors

If you want to keep bathroom mold and mildew at a minimum, you need to keep your shower area as dry as possible. This means it's best to squeegee down the walls after you shower. Get as much water down the drain as possible.

If you have a shower curtain, shake it to get off as much liquid water as possible before exiting the shower. If you have a swinging door, leave the shower door OPEN. You want the inside of the tub and shower area to dry as rapidly as possible.

Without water, mold and mildew have a tough time flourishing.


Second Tip of the Week - Save Sweet Moola

Yesterday, I attended a closing where I refinanced a second mortgage on my house. I cut my interest rate in half. This will save me $6,000 a year on interest. WOW!

There's a secondary benefit to this. That extra money that used to go to the mortgage company can now be saved for a rainy day. Or you can save part of it and use the other part for needed home improvements.

Take a look at your current home mortgage situation and do the math. It could be very advantageous for you to refinance with rates at historic lows.


Back Up Your Data!

You may wonder what the following has to do with home improvement. I'll tell you. It will radically improve your home life if you know you'll never lose one-of-a-kind computer data. Much of last week I was in distress about my friend Mike and one other thing - my DIY Shed videos.

Ten days ago, I tried to triage the hard drive on my iMac. I was just getting started to edit all the shed videos. All of the videos for the shed project were on my iMac as well as a backup external hard drive. The hard drive on my computer was becoming seriously unresponsive and by Monday morning, it had completely locked up.

It's back now from the Apple store with a brand new hard drive, and it's as good as new. I forgot how fast the computer runs when the hard drive is at 100 percent.

Fortunately, I had been running the Time Machine feature on my iMac. This software performs automatic backups of all programs and data. I had no idea if the data on the computer hard drive had become corrupted or if it was going to be lost.

I also didn't know if the backup drive had great copies. I just ASSUMED the videos were on the backup drive. I can tell you that I'm about to sign up for a secondary cloud service backup plan as well. Cloud backups are copies of your important files that reside on a remote computer(s) someplace else in the world.

The problem with doing backups at your own home is that a disaster could wipe out both your computer and your backup drives. If you religiously keep a second set of data outside your home, you're protected.

Most people will not go to this extreme. If you're not backing up one-of-a-kind photos, data, documents, scanned images, etc. to an external hard drive as well as a cloud service, you're possibly making a serious mistake.


Clutter Contest Alert!

Next week I'll be announcing a contest that's easy to enter and one you have a great chance of winning! Some contests are too hard to win, but not this one. In fact, if I was eligible, I'd have a great chance of winning. You have to have a messy set of garage, workshop or basement tool area shelves.

Bosch Take Your Day Back

My buddy Loren will be wasting his time if he enters. If you go to his garage, his tool bench, shelves are in perfect order. No dust, no clutter, everything in it's place. It looks like a museum display.

You and I, however, are not like Loren.

Bosch Tools is looking for the messiest garage or basement storage shelves they can find. Whatever you do, don't clean up the shelves where you store your tools and supplies until after next week when I make the announcement. You'll need them nice and messy so you can take a photo or two to send in.

Be SURE you open next week's newsletter so you get the details about this contest.


Schlage Electronic Deadbolt Review

Last week I installed a very cool electronic deadbolt lock made by Schlage. I put in the Plymouth Keypad Deadbolt. It's a handsome lock that allows you to control access through a door without using a key. It does come with a key in case you forget the codes or the battery dies. Image

This deadbolt was so very easy to install. It required one screwdriver! I had it installed in minutes. You can program in temporary codes for a workman or other person who just needs temporary access to your home.

The keypad is illuminated for nighttime use.

My only complaint with the lock is the design of the outer twist knob. I felt that it could have a slightly better shape that would allow you to squeeze it between your index finger and thumb so that when pulling the door closed, you'd have a better purchase.

Now, I say that assuming you don't have a regular door knob. I used this deadbolt as the primary and only locking mechanism on my shed door.

I highly recommend this deadbolt. It's very well made and I simply love that you don't need a key.


Kids Love Stain Solver

Do you need a smile today? I've got a photo for you that should put a big grin on your face. Go to the Stain Solver Facebook page and scroll down. You'll see two happy lads! Just wait till you see the expression on the older boy's face!

I'd appreciate it if you would do one or more of the following while there:

  • Friend Stain Solver
  • Like the post
  • Share the post on your time line
  • Comment

How to Patch a Hole in Blacktop

patch hole blacktop paint brush

This cracked area in the blacktop will soon be a pothole. You can make a permanent repair using skills and magic. Photo Credit: Tim Carter

DEAR TIM: There are several places in my asphalt / blacktop driveway that are starting to crack. It looks like holes and entire sections of the blacktop will fail. I can't afford to have a professional come in to repair the drive. In the past the patches I've installed have all failed and popped out. Is there a way to patch my driveway and have the repairs last for many years? What did I do wrong? Amy S. Goochland, VA

DEAR AMY: Potholes in driveways and roadways are the bane of homeowners, drivers and road maintenance workers. They appear like mushrooms after a spring rain, often with little warning. Unfortunately many potholes re-appear again, like yours, because the repair process was done poorly or skipped one or two very important steps.

It's possible to repair your driveway yourself, but realize it may take some extra effort on your part to get long-lasting results. You can make quick work of the job if you have access to a special power tool that you can rent at a tool rental center.

Why do most asphalt hole repairs fail?

Most blacktop or asphalt hole repairs fail because of two reasons. The shape of the hole is wrong and the base material under the blacktop is either fouled or not compacted. If you desire to patch the hole in your driveway only one time, you must do several things correctly.

In your case, it sounds like you'll have to remove some of the cracked blacktop to make the repair. It's possible your repairs in the past failed if you tried to add patching compound on a shallow depression. That method will never work if you're using the ready-mixed asphalt repair products that come in a bag.

Do what the Dentist does!

Think about how fillings in teeth work. Your dentist drills into your tooth and creates a hole where the bottom of the hole is slightly larger than the top. He adds a filling compound that gets hard quite quickly. Because of the shape of the hole, the filling is locked in place. You need to do the same thing with your pothole.

What to do at the edges of the cracked area?

I'd use a power demolition hammer with a 1.5-inch-wide flat chisel at the end to excavate the failing blacktop in the center of the cracked area. When you're at the edges of the cracked area be sure you lean the top of the power hammer in towards the center of the hole. This will create an angled face on the edges of the blacktop. Remove all loose pieces of blacktop from the hole so the gravel base is exposed.

Make sure the crushed gravel under the blacktop is free of any mud or soil. If there is mud in it, removed the fouled gravel and replace it with crushed gravel that matches what was originally under the blacktop. Compact it well with a tamping tool or a flat piece of wood you hit with a hammer. You can add a small amount of water to the gravel to help compact it.

Read the instructions on the bag of blacktop repair material. They will tell you the minimum and maximum thickness of the repair patch. Usually you can safely add 3 inches of patch material, but you must do it in several stages. You add 1 inch of material to the hole and then compact it.

Your final layer of patching material needs to be slightly less than one-half inch above the surrounding existing blacktop. Using a heavy metal tamper you want to pound the repair material so it's flush with the surrounding blacktop. Be sure there's no shallow depression that will cause a puddle to form after a rain.

If the repair is in a spot where car or truck tires contact it, I'd recommend you place a piece of scrap plywood over the repair area until it cures and gets hard. The repair compounds that come in a bag will get very hard over time, but when first installed they're soft.

Anytime no car traffic is expected on the patch, remove the plywood to allow air to get to the repair compound. Exposing the patch to air and sunlight will accelerate the curing process.

You can watch my video that shows how to patch blacktop. Simply type "driveway repair video" into the search engine at www.AsktheBuilder.com.

This column was featured as the I Didn't Know That! column in the July 23, 2013 AsktheBuilder Newsletter.

Column 957

October 10, 2012 AsktheBuilder Newsletter & Tips

This is going to be a fairly short newsletter because I got some expected, but bad news yesterday. A very close childhood friend of mine, Mike Wilson, had to be sent back to Heaven early yesterday morning. I've spent the last 24 hours in a semi-fog flooded with a mixture of great sadness, fond memories of us in our younger days and reflecting on my own mortality. Mike was one year older than me, but way too young to check out.

Tim and Mike Wilson


Here's a photo of Mike and me taken back in 1971 or 1972. He's got his arm on my shoulder. We were bursting full of testosterone that day!

Eleven months ago, he was diagnosed with stage four colon cancer. It's a very long story, but his oncologist believes his disease was directly related to his prostate cancer struggle from eight years ago. If I have the story right, he was getting regular scans after his prostate treatment, but the person reading the scans six or seven years ago *missed* the onset of the new colon cancer.

Bottom Line: If you or a loved one is undergoing follow-up scans for cancer treatments, *always* get a second opinion on the scans. I'm no doctor and I'm most definitely not a image expert, but I might not be typing all this right now if Mike had thought to not put all his eggs in one basket. Rest in Peace Mike. You'll be sorely missed.

I want to thank you in advance if you reply to me with condolences. I'll not be able to reply to you individually as I'm in a horrible rush to get things done in advance of my trip to his memorial service.


Fantastic DIY Gutter Guards

Over ten years ago, I started a quest to locate the best gutter guard. I've tested just about every gutter guard known to man in the past fifteen years. For years and years, all the gutter guards I tested FAILED.

They never failed in the fall, as they all did a marvelous job of keeping leaves from the gutters. They failed over the winter and in the spring when either the gutter guard got clogged over time with tiny organic debris, or the guards would allow tiny debris to get into the gutter.

One day while cruising the aisles at the National Builders Show, I saw a fascinating gutter guard. I turned around and walked back to the booth. What I saw was an amazing technology that I knew was the Holy Grail of Gutter Guards. This product had a stainless-steel micro-mesh screen that reminded me of Kathy's pantyhose. You know how tightly knit the nylon is in panty hose!

I knew immediately that no debris would get into the gutter. I started to test the different brands of the micro mesh and even got to meet Alex, the inventor of the micro-mesh gutter guard technology. In a side-by-side test of the two leading micro-mesh products years ago, I discovered that MasterShield was the better product in *my* opinion in a real-world real-conditions test at my home.

Looking at the micro-mesh gutter guard I like, you'd swear that water would just run over the top and onto the ground as it seemed impossible for water to pass through the tightly woven mesh. But Alex devised a way for water to actually be pulled through the tiny spaces between the threads of stainless steel!

Realize that not all micro-mesh gutter guard products are the same. Some of the impostors out there can't handle large volumes of water. In heavy rains, water can run across the inferior products. Some fail after a few years because the micro mesh gets fouled by the oil leaching from the asphalt shingles. In torrential downpours at my house, the water never ran over the gutter guards onto the ground.

My biggest beef with the Mastershield product was you could not buy it as a DIY product. You had to have it dealer installed. I begged the owners of Mastershield to come up with a DIY product as tens of thousands of people would want to install it themselves.

Please understand that my interest in gutter guards was based on the 300+ feet of gutter I had at my last home. It was a nightmare cleaning the gutters multiple times a year. I had to have a product that worked well and needed no ongoing maintenance.

Fast forward several years and I'm bursting with excitement that you can now buy a new DIY version of the amazing micro-mesh gutter guard! It's designed by the original patent holder for this technology! Alex and his team, after years of me pestering them, have announced a DIY micro-mesh gutter guard called Clean Gutter.

You've got plenty of time to get this product installed before the snow flies at your house. Clean out your gutters perfectly one last time as soon as most of the leaves fall at your house, and then install the Clean Gutter guards. It should be the last time you have to deal with your gutters! Go ahead and order some now.

If you do decide to purchase these affordable DIY gutter guards, you need to know that I get a very small commission. But as with all situations like this, I only do this with products I own or use on my own home. If a product passes that ultimate test, you know it'll work well for you too. Let me know what you think after you get it installed! If you don't want to install it yourself, a local handyman can do it easily for you.


Tip of the Week - Getting the BEST New or Replacement Windows or Doors

Years ago, while doing research about windows and doors, I discovered a well-kept secret about how to find the best ones. As you well know, the people selling windows or doors try to play Jedi mind tricks on you with fancy talk and features trying to convince you they have the best products.

Guess what? What if I told you that an independent association with the highest integrity can point you to the best windows and doors? I'm not talking the folks at that magazine that begins with a "C". They don't even come close to what I'm talking about.

I talk in great detail about this mystical association in a video I just taped. The link to it is at the end of this column. You MUST watch this video, but for now continue to read the rest of my story.

I guarantee you'll be amazed at what you discover. My guess is you'll head off to two websites after you watch the video: AsktheBuilder.com to read more about AAMA (the mystical association) and Simonton.com (see below).

I built my shed this summer and wanted two windows in it to provide a view to the lake, fresh air and lots of daylight. Energy efficiency and quality construction were of paramount importance to me too.

I chose to use Simonton windows because they sport the exclusive gold AAMA label. Just a handful of window and door products have passed the rigorous testing standards that allow them to display the prestigious gold label. You'll see the actual label in the video below.

Realize that Simonton makes windows for both new construction and replacement. If you're in need of new windows, take a hard look at Simonton.

Simonton was a sponsor to my shed project, but I only chose to use their product at my own home because I feel you can't beat their quality. Evidently AAMA feels the same way since they allow their gold label to be place on the windows!

Watch this video. It'll all make sense.