Working with Concrete in a Bag

Concrete Bags

Concrete bags on a pallet are ready for water and a hoe. You can transform these bags of concrete into many things around your home. You just need minor skills and practice! Photo Credit: Tim Carter

"Believe it or not, the concrete in the bags that you see at hardware stores and home centers is pretty much the same concrete you would get if you called a ready-mix plant...."

Concrete Bags Make Superb Concrete

  • perfect for small projects
  • mixes easily in a wheelbarrow or plastic sheet
  • mix until it's like firm applesauce
  • too much water weakens concrete in a bag

DEAR TIM: I need to replace a small section of sidewalk that's only 4 feet by 4 feet. I've never worked with concrete before and wonder if I can actually do this.

I see the bags of concrete at the hardware store and could easily get these to my home. What's involved with this process and how can I succeed the first time?

What tools would I need to purchase? What are some tips you can share to help me do this job? I have other concrete projects but am anxious about whether I can do them. Julie Q., Campton, NH

Mix Concrete in a Tough Plastic Bag

DEAR JULIE: I love your attitude. Many people get frozen in their fear of failure and don't even try to do a job like this. I can already tell you that you will do well, especially if you follow my tips.

Is Concrete in a Bag Strong?

Concrete in a bag is strong as long as you use the correct amount of water when mixing it. Some come with a 4,000 pounds per square inch (PSI) rating. It's important to realize you can add more Portland cement to make it even stronger.

Let's talk about the actual concrete mix in the bags. Believe it or not, the concrete in the bags that you see at hardware stores and home centers is pretty much the same concrete you would get if you called a ready-mix plant and had it delivered to your home in a giant truck equipped with a rotating drum.

Is Ready-Mix Concrete in Trucks Better?

The ready-mix concrete plant can make all sorts of different mixes for you. They offer convenience as they mix the material.

There are some disadvantages from using ready-mix concrete:

  • large trucks weighing over 70,000 pounds may crack your driveway
  • small loads can be very expensive. 
  • you often need many people to help unload

What Strength Concrete Do I Need?

You need a minimum of 4,000 PSI concrete for concrete exposed to freezing weather. Remember, that's the minimum strength. It's better to pour it 4,500 or 5,000 PSI.

Concrete is formulated at different strengths. Most of the bagged concrete mixes are rated at 4,000 pounds per square inch (psi). That strength is achieved so long as you don't add too much water to the mix. They tell you on the bag labels how much water to add to get to that strength. Pay attention to that.

Will Concrete Last in Cold Climates?

4,500 PSI strength is very good for concrete exposed to freeze-thaw cycles in cold climates. Concrete absorbs liquid water, and this water inside concrete can tear it apart if the bonds between the cement, sand, and gravel are not strong.

You weaken concrete by adding too much water to it when you mix it or if you add water to it as you finish it.

Is it Easy to Mix Concrete in a Bag?

It's pretty easy to mix concrete. I do it in a wheelbarrow.

I've seen a unique bag system where you just put the dry concrete mix in a strong plastic bag, add the water and move the bag back and forth.

Both methods work well. You can even mix concrete using heavy sheets of plastic in case you can't purchase the plastic mixing bags.

Is it Easy to Finish Concrete in a Bag?

It is easy to finish concrete. You just need to follow a few steps:

  • screed the concrete so there's no excess between the form boards
  • float the concrete to drive the rocks down from the surface
  • the top 1/4 inch of the surface of the concrete should just be the coarse sand and Portland cement
  • wait for it to stiffen up, rub with a magnesium or wood float

For you to succeed on your sidewalk, I need you to first practice finishing concrete. Mixing is easy, but finishing requires some skill. I highly recommend that you pour a small, thin test slab first to practice to see how concrete transforms from the plastic to the hard state.

Should I Do a Practice Pour?

Buy one bag of the concrete mix. Look on the label for a table that shows you how far it will go. You should be able to make a small thin slab about 2 feet by 2 feet that's only 2 inches thick. That's plenty big to practice.

Lay a sheet of 6 mil plastic on your garage floor. Build a small square form from wood that will hold the concrete. Lay this form on the plastic. Mix the bag of concrete mix with the required water and mix until it's a uniform texture. Remember, you can always add more water. Add the water in stages as you mix.

Pour the mixture into the form. Use a straight piece of wood to make the concrete flush with the top of the wood forms. Slide the piece of wood side to side rapidly as you pull or push the piece of wood from one end of the form to the other. This double action eliminates voids on top of the slab and helps drive the stones down below the surface.

When Do You Float the Fresh Concrete?

You want the top of the concrete to be the coarse sand and cement paste with the stones in the mix perhaps down about 1/8 or 1/4 inch. This sandy top layer allows you to create the desired finish.

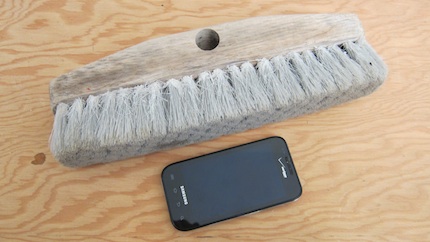
You'll need a wood or magnesium hand float tool and an edging tool to produce the smooth edges for your slab. If your existing sidewalk finish is a broom finish with just lines, you'll just need a push broom to create the final texture.

You have to wait about 30 minutes or an hour before you can start to put a finish on fresh concrete. It depends on the temperature of the concrete, the air temperature and the relative humidity of the air.

When freshly mixed, you can easily put your finger deep into the mix. You do not want to start to finish the concrete until it has started to firm up. When the concrete is hard enough that thumb pressure indents it about one-half inch, start to rotate the hand float on the surface and see what happens. It should produce a great result!

You can watch several videos that show how to mix and place concrete at www.AsktheBuilder.com. Simply type "concrete video" into the search engine. There are MANY ADDITIONAL Concrete Finishing tips here at www.AsktheBuilder.com.

Column 944

July 10, 2012 AsktheBuilder Newsletter And Tips

This past Saturday morning I was once again on top of the highest peak east of the Mississippi River - Mt. Washington. I was on my ham radio operating at the finish line of the Newton's Revenge bicycle race up the mountain.

As you can see from the photo, it was a little windy and foggy up at the top. Every now and then there would be a break in the dense fog and clouds. The flags tell the tale. One of the riders wanted a photo of himself with his bike at the summit after he made the epic climb.

Wind, clouds and fog are the norm at the top of Mt. Washington. The temperature on Saturday morning was 52 F and the winds were sustained at 40-50 mph with 70 mph gusts. From time to time the wind blew me a half-step forward. It was an experience indeed.

To bring home the importance of ham radio, I read a story on USAToday.com about a big storm that hit the Smokey Mountains National Park on the evening of July 7th. Most of the damage was at Cades Cove. There's only one long road back into this part of the park, so if it's blocked, you're SOL. This paragraph in the story tells you why ham radio operators are so important:

"Rescue efforts on Thursday night were hampered by power being knocked out to a key radio repeater in the area, which led to spotty transmission from campers seeking assistance. Jordan described the communications problems as "extremely frustrating" as emergency officials tried to plot their response."

If there was a local ham radio club near there, they could have been on the air in hours, if not minutes. We bring our own power. We don't need the utility company's power.

On Saturday morning, we had our radio central command post up and running in fifteen minutes. Those of us with powerful mobile radios in our cars and trucks have 24/7/365 communications.

If you want to be able to communicate to the outside world in an emergency, get your ham radio license, join an amateur radio club in your area and get up to speed. It's not hard to do.


Tip of the Week: Staying COOL

I lived in Cincinnati, OH for nearly 55 years. On Saturday, July 7th, it was 103 F there. Here in Meredith, New Hampshire it was a comfortable 80 F. The midsection of the USA and East Coast has been brutalized by Mother Nature for about two weeks now.

Realize that added insulation in an attic doesn't necessarily keep you cooler on hot days. If your attic temperature soars to 140 - 160 F, which it can do easily in this extreme heat, the insulation itself can get HOT if there is no air movement. If the insulation is as hot as the attic, then it does you no good.

Insulation is a solid material and it can get hot. Remember, insulation just slows the transfer of heat.

If you want the inside of your home to stay as cool as possible, and you do not have central air conditioning, you must try to keep your attic as cool as possible. Traditional whole-house fans can really help in this effort.

A whole-house fan will transfer tens of thousands of cubic feet per hour of outside air into and through your attic. It pulls this air in through windows and doors in your house. This air moving past your body will offer you some comfort as it evaporates the perspiration from your body.

The in-rushing air into the attic space pushes the hot air out of your attic through plenty of exhaust vents at the gable ends of your house or through roof vents. As the sun goes down and the outside air temperature drops, the fan will continue to cool off the roof, the framing lumber and the insulation in your attic. The outside air coming in through the windows will cool things in the house so you're ready to fight Mother Nature the next morning.

If you have central air conditioning, then install powered attic ventilator fans that will pull cooler outside air in through soffit vents. The intention is to keep the attic temperature as low as possible so your central air conditioner doesn't have to work as hard.


The DIY Shed Project Has Begun!

A few days ago, I started the shed project. The official carpenter pencils are here, the custom T-shirts should be done any day, and the awesome hats are being made now. If you're a project backer that deserves these items, they'll be on the way to you soon!

Best of all, the LIVE webcam is up and running! You can watch me build the shed LIVE if you want. The cost to do this is pennies per day. Here's a photo of me this weekend goofing around in front of the camera with my Milwaukee Cordless Saw and framing square.

You can purchase access to the webcam right now, on sale, for just $10 for the entire project. That's 33% off. The sale ENDS on Sunday, July 15th, at midnight ET. The price jumps to $15 next Sunday.

This week, if all goes well, I'll have the concrete piers installed. The forms for the piers came from Form Footer. They're really a fantastic product. You don't need tools to put them together, and the forms come with the steel reinforcing bars already CUT AND BENT!!! That's a tremendous advantage.

Thanks to Quikrete as well for helping out with the concrete for the piers.

I should be on an excavator digging the pier holes as this newsletter is delivered to your Inbox. Go ahead, click and get access to the camera so you can see me dig!


Stain Solver News

I've got a huge announcement next week about Stain Solver. At that time I'm going to share a story about Jack Cherco from Chicago. He and I had lunch last week while he was here in New Hampshire for a wedding. If you own a small or medium retail business, you do not want to miss this story and announcement. It's BIG.

^ ^ ^ Re-read that paragraph - It's important. ^ ^ ^

Two days ago, Cheryl McTavish sent me two photos. The before photo of her Spanish pavers is just below. You're not going to believe the AFTER photo. I'll swear on a stack of Bibles standing on the summit of Mt. Washington with swirling storm clouds around me that I did NOT use Photoshop or any other digital enhancements on the *after* photo.

Click here and look at what Stain Solver did to Cheryl's floor. Be sure to read about what it did to two embroidered tablecloths that had red wine stains on them. The only thing Cheryl needs to do is to update the date settings on her digital camera. She's a year and a month behind!


Tripping Up Stairs

I've built countless sets of stairs in my career. I wrote a Building Simple Stairs ebook a few years ago. I'm going to create, I hope, the most authoritative step-by-step video about how to build simple steps in the next month. I have to build steps up to the attic of the shed. You'll be able to purchase this series of stair-building videos soon.

It's extremely important that you get the stair risers, that's the height between each step, CORRECT. I don't mean the right dimension, but more that each riser needs to be exactly like the other. If you don't do this, you create steps that are very dangerous with people tripping and falling.

Our brains can easily detect a one-quarter-inch difference! Look at this video sent to me by Win Harrington of the 36th Street Subway Station in Brooklyn, NY. Did you by any chance trip on this staircase before the MTA maintenance workers fixed it?

This video was taped a few weeks ago and went viral on the Interweb.


Win a Pocket Door Kit!

Last week I casually mentioned doing a contest to give away a pocket door frame. Oh my gosh! I was inundated with responses. I would have never guessed there was that much interest.

LE Johnson has kindly offered to provide the prize! Thank you!

Here's how we're going to do it. Anyone can enter. All you have to do is write a simple 150-word essay about why you need this pocket door more than any other person. That's all you have to do to enter. You do NOT have to submit a photo or video as I mention below. But it may help your chances of winning.

Just write up why you need the pocket door hardware kit. LE Johnson makes different hardware for different types of doors. If you want a surface-mount slider door, you can have that hardware. The winner gets to pick what kit they want. Before you submit your written entry, take your time, check your spelling and grammar and really tell your story.

To get an extra edge in the voting, you can submit photos and video. You have to do a little extra work to do this. You have to upload the photo or video to a website that allows that. Then you submit to me the URL of where the judges can see the photo and/or video.

The photo should be of the door or wall where you plan to use the pocket door. Better yet, tape a video with your family being actors/actresses and upload the video to your YouTube channel. You can get a FREE channel on YouTube in just minutes.

The judging is going to be done by subscribers to this newsletter. You get to vote for the winner.

We'll open the contest for two weeks to give everyone plenty of time to get their story written, photos taken and videos uploaded. That's plenty of time.

Then I'll load all of the entries to a special page at my website. I'll share that page with you in an upcoming newsletter. You'll then be given a special link to use to vote. You'll only be able to vote once, unless you try to fool the system. That's not cool.

Go here to ENTER to win a FREE LE Johnson Pocket Door Kit!


Great Hammer Skills

Russell Morris from Australia sent me a link to a German commercial taped five years ago. It's worth watching. Maybe there was some magic done in post production, as I would have loved to see a wide shot towards the end instead of a close up. I don't want to ruin it for you, so you'll have to watch.

I'm convinced the nail you'll see at the end of the video was inserted in a pre-drilled hole. It's a massive nail and goes into the wood much too easily.

But it took great skill to do it nonetheless! I say this assuming it was real.


Paying a Contractor

Last week's newsletter about my consult in Antigua struck a raw nerve with a builder or remodeler named Kevin Toomey. He emailed me asking me if I required a deposit from a homeowner for a consult fee. I replied, "Yes. They have to pay a 30 percent deposit in advance."

Kevin thought I was hypocritical because I had said in last week's newsletter that contractors should not be paid in advance. I actually clarified that last week saying that a contractor should get money for custom-ordered materials.

I tried to explain to Kevin that purchasing a round-trip plane ticket to a city I had no intention of visiting, reserving a hotel room and renting a car was the same as ordering a custom-made front door.

But Kevin still didn't connect the dots, nor did he take the time to go to my website and read the countless past columns I have there about being fair to contractors and protecting your interests as the homeowner.

The Bottom Line is this: Realize that if you give more money to a contractor than he deserves for completed and satisfactory work, you're acting like a bank. You're HOPING the contractor completes the work to your satisfaction.

All too often the contractor disappears or doesn't complete the job. Why? He's possibly used your money to pay off bills from other past jobs and he doesn't have money to pay your project costs. When this happens, the contractor takes off.

This is why you develop a fair payment schedule, no matter how small or big the project is. If the project is short and only lasts five days, you can pay the contractor some money at the end of day two or three for all the work done so far and you find satisfactory.

Later this summer, after the shed project is complete, I'm going to compile all my payment columns into a book. You'll be the first to see it. It will have a cool payment plan schedule for any size job - big or small.

This book will give you great peace of mind so that you never find yourself hoping the contractor will finish your job. You'll ALWAYS have enough money in your account to bring in another contractor should yours disappear.

Step Footing

DEAR TIM: I'm not very good at reading blueprints and on the ones for my new home, the architect has drawn a step footing. Is this an accepted way to put in a foundation? Why can't the footer that rests under the foundation all be at the same level? What are some best practices when installing a stepped footer? Patricia A, Akron, OH

DEAR PATRICIA: Don't feel bad about not being able to read or understand blueprints. Many people aren't able to make sense of all the lines, dimensions, symbols and notes on the large sheets of paper. I was fortunate as a builder to have the ability to see two-dimensional blueprints in three dimensions in my head. Believe me, that really comes in handy.

Footers are a very important structural component of a house. In most cases, the footer is the only part of the house that touches the earth. Footers are commonly called spread footers because they spread the weight of the house over a wider area than if you just poured the foundation walls allowing them to touch the ground.

Here's a foundation footing that's making a transition from one level to another. It's poured continuously for extra strength. Photo Credit: Tim Carter

The best analogy I can give is pushing a knife through a stick of butter. If you put a knife on edge, you can push it into the butter with relative ease. But turn the knife sideways so the wide blade is in contact with the stick, and you'll not be able to press it into the butter unless the butter is room-temperature soft. The wide face of the knife blade spreads out the downward force over a greater area just like the footer.

A step footer or footing is one that's poured at different levels. When you see a complex one, it appears to look like a set of steps as the footer changes elevation with the ground. That's why it's called a step footer.

This footer is required where the building is constructed on sloped ground, or when part of the building will not have a full foundation. An example of a house like this is one that has a full basement but an attached garage next to it. A shallow foundation would be used for the garage because the garage floor is poured on grade.

The house my wife grew up in had a three-level stepped footing. The main part of the house had a full basement while part of the house had a crawlspace. The attached garage was poured on grade. If you were to cut the house in half now to look at it, you would clearly see the footer under the foundation was at three distinct levels. If you were to pour the foundation and footer at the same level in all these areas you'd waste lots of time, effort and money.

Poor soil conditions can cause a footer to step down. You can also have a situation where a house has a walk-out basement because the ground falls away down a hill. The foundation wall on the walk-out wall has to be poured deeper to resist frost heave.

The levels of the steps in a footer can be critical. If the foundation walls are being constructed with concrete block, you want the steps to be some multiple of 8 inches as a typical concrete block, with a mortar joint, is 8-inches tall. As the block layer lays the walls on the lower footers the top of his block eventually is even with the higher footer.

Poured concrete foundation forms also come in fairly standardized heights, so the foundation contractor will want the steps in the footer to match the heights of his forms.

It's a very good idea to have the foundation footer be continuous and the footer actually transition to a vertical section of concrete that connects to the footer above and below. This is why a footer is called out on a plan as "continuous".

Footers for houses are normally about 8-inches thick and can be as thick as 10 inches. There should be two steel rods that are placed about 1-foot apart horizontally and be about one-third of the distance up from the ground as the footer is thick. The steel rods must overlap each other at least 15 diameters, and more is better. I used to overlap my one-half-inch thick steel rods about 18 inches when I was building.

The steel rods must also be continuous through the entire footer. This means they have to be bent to go around both horizontal and vertical corners. The steel is a vital component of the footer and should never be left out.

Concrete is weak in tension. This means if you try to bend it, it will crack easily. Concrete is very strong in compression. You compress concrete when you try to squeeze it. Steel is very strong in tension. Adding it to concrete footers and concrete foundations vastly increases it's resistance to cracking.

Be sure the soil beneath the footer is compacted and will support the structure. The building inspector will help you here. Never pour a footer on soil that contains organic material.

You can watch several videos that show how to install a concrete foundation footer at www.AsktheBuilder.com. Simply type "concrete footer video" into the search engine on this page.

Column 943

New House Construction Tips

DEAR TIM: With mortgage interest rates at all-time lows, I feel it's best to build my new home now. I've got hundreds of questions about the process, but wonder if you can just give me some quick tips that will help me keep the cost down and avoid nightmares. I know many people who have regretted building a new home and who have been cheated by unscrupulous builders. Do you have a playbook that one can use to help avoid all or many of the pitfalls? Bryan P., Lowell, MA

DEAR BRYAN: Not only are mortgages at all-time lows, but you can also get a pretty good deal on some materials and labor. Many contractors are hungry for work as are their sub-contractors. It's a great environment to build. You'll just have to be sure to order many items in advance because many supply houses don't stock items like they once did. Delays in getting materials can really cause heartache and cost overruns.

I feel I can best advise you on what to do and what not to do by sharing a story. Just last week, I found myself in the West Indies of the Caribbean. The property manager for a foreign embassy had hired me to inspect a roof on a new home. This house was built four years ago, but the builder made multiple mistakes on the roof causing black tar stains to appear inside and water leakage in numerous locations.

My inspection revealed numerous mistakes. First and foremost, the plans and specifications for the job were very poor quality. The plans lacked detailed drawings of critical aspects of the complicated roof design. Too much was left to interpretation by the carpenters and roofers. Even though the plans were not the best, the builder deviated from them. These deviations lead to the water leakage.

The builder and roofer used the wrong underlayment for the sub-tropical location. The intense sunlight and dark roofing color caused the underlayment to liquefy and drip through cracks of the finished interior ceiling. A proper underlayment that would withstand the extreme heat was available at the time the house was built. The architect didn't specify this product, and the builder failed to read the written limitations about the product he used. Or if he did read them, he ignored the instructions.

The homeowner that built the house placed too much trust in the builder. She just thought and hoped he would do the right things. That didn't happen. The builder not only cut corners, but he also abandoned the job for nearly 18 months as it was nearing completion.

Another mission-critical mistake the owner made was giving the builder more money as the job progressed than he deserved. When the defects in the roof were discovered, it cost far more money to repair the roof than the homeowner still had in her possession.

As you can imagine, this defective roof and other mistakes made by the builder are causing the homeowner great angst, frustration and money. Sadly, all the problems could have been avoided.

Days before this was a forest. The trees are gone, hole is dug and concrete will soon be poured for the new house foundation. Photo Credit: Tim Carter

The most important thing you can do when building a new home is to slow down at the beginning of the job and develop excellent plans and written specifications. Select every material and item you'll have in your new home. Avoid allowances. Allowances are frequently created by an architect because everyone's in a rush to get started. These budget items are hidden time bombs as the allowances are frequently unrealistically low.

What's more, a builder can say later that something you chose in the allowance he didn't plan for. He'll then charge you more money. By eliminating allowances you can get a guaranteed price for the home as the builder can't make excuses. During the bidding phase he'll study the plans and specifications. It's his responsibility to identify what he needs to do and how much it will cost. That's what professionals do.

Consider hiring an independent inspector to check the quality of the work as the job progresses. Don't rely on the government building inspector. Some areas don't even have building inspectors! Realize the building code is basically a set of minimum standards. Houses built to code are not necessarily well-built homes. If you hire this secondary inspector, be sure in your contract with the builder that your inspector's word is final and that he speaks on your behalf.

The contract has to have very specific terms with respect to payments. The best way to ensure that you don't get cheated by the builder is to have him submit with his bid a very detailed breakdown of all costs of the job. Both the materials and labor for each aspect are listed. The builder's overhead and profit are also listed. Years ago, I developed Contractor Hiring Guides that have all this information. They can be found at the AsktheBuilder Store.

You make each bidding contractor fill out this breakdown of costs. You can then quickly see if the costs for each item are weighted correctly. When it's time to pay the builder each month, you just pay him for items that are completed and satisfactory. This way you always have enough money to complete the job should he disappear.

You can watch a video that shows what's on a great set of blueprints at www.AsktheBuilder.com. Simply type "blueprints video" into the search engine at www.AsktheBuilder.com.

Column 942

DIY Shed Project – How to Build a Shed Video

Hi, I'm Tim Carter from AsktheBuilder.com. It is July 4th and I am excited about starting the shed project. I want to give you a little tour of the shed construction site.

I was wearing the DIY Shed t-shirt, but didn't pan down far enough for you to see the logo.

First on the tour is the framing lumber. It has been onsite for a while and I just uncovered it so you can see it. In the back is the blue Dow closed-cell foam insulation that will be used to insulate the floor of the shed.

I will try to tape as many videos as possible from my point of view. Therefore, you will see things as I see them.

This is the stack of shingles already on the job site. The orange form behind the tree is a form for the footer. Up in another tree is the web cam that is pointed directly down on the shed construction site.

The site has several small trees that will be removed as we begin construction. So there is a quick overview of the shed project.

July 3, 2012 AsktheBuilder Newsletter And Tips

Happy Birthday America!!

You could be on vacation right now. It's one of those crazy weeks where a holiday falls smack dab in the middle of the week. As such, this is going to be an abbreviated newsletter.

Unfortunately, I'll not be resting on the 4th of July as I'm gearing up to start the shed project! Many of the materials are here, and I intend to break ground next week. This week, I'll be taping the planning, site work and layout videos. If everything goes per plan, next Tuesday - July 10th - I'll be working with a 12,000 pound excavating machine leveling the site and digging the holes for the piers.

An hour ago, I went and gave the okay to the T-shirt printer. He printed off one shirt to make sure the colors were fine and that I liked the look. If you backed my shed project on Kickstarter and chose an award that includes the T-shirt, this is what you'll be getting.

DIY Shed Project T-Shirt

I'm thrilled with what Craig Grant, a graphic designer from Atlanta, GA, did the logo for the project. You can see some of his other work at: www.copynumberfive.com


Tip of the Week - Roofing Consult in Antigua

This week's tip comes to you in story form. I think you'll find it interesting. This is a MUST READ if you're thinking of starting a big project soon. You could easily get into trouble.

Last week I was in the West Indies in Antigua. I was hired as an expert witness by a property manager. The job was to do a forensic inspection on a leaking roof. The house was built up against the sea, and it was a magnificent place to be. As you might expect, it was HOT and HUMID. I was on the roof in the morning, but even getting off the roof before 11:00 am, I was exhausted.

While up on the roof, I taped videos of the mistakes made by the builder. You can see one of the videos in my One-Day Consult product in my shopping cart.

http://shop.askthebuilder.com/one-day-consult/

After getting off the roof, I combined all of the videos I shot into one giant video that showed all the errors. I then compiled a written report for the property manager. I even burned 3 DVD's there so the attorney and judge for the case could see the defects without having to try to visualize them reading a confusing written report filled with technical jargon. By using video, it's just like you're up on the roof with me. Plus, the video camera doesn't lie or spin the facts as some experts have been known to do.

The dispute between the owner of the building and the builder has been ongoing for the past four years! I'll have to go back to appear in court late this year or early next year.

I'm telling you this so that you don't become a victim of poor workmanship. All the mistakes I uncovered could have been avoided with minimal effort. My inspection turned up the following mistakes:

  • poor plans and written specifications
  • homeowner placing too much trust with the builder
  • lack of proper inspection of the work
  • builder deviated from plans
  • wrong materials were used for the climate and conditions
  • homeowner advanced the builder too much money

There were other flaws, but those are the most egregious ones.

What's the takeaway for you? It's simple. You MUST have great plans and specifications for any job you intend to hire out. The plans and specifications should be so detailed, the builder should never have to ask you a question. He knows everything you want, exactly how it should be built and exactly what materials should be used.

As the project is happening, If you don't know what to look for during the job to make sure it's RIGHT, hire someone who can. There are great private inspectors out there. I would hire one with the ASHI certification.

You must never, ever, ever pay money up front or advance too much money on a job HOPING everything works out. Don't allow Jedi mind tricks spewing from the builder's mouth lull you into giving him money he doesn't deserve just yet.

Deposits: The only time a deposit is acceptable is when the material for a job is custom ordered. It's unrealistic for you, the homeowner, to expect a company to order the custom materials HOPING you'll buy them when they do arrive. NEVER advance money to a contractor for materials if the materials are STOCK items at a local store.

If a contractor doesn't have enough money to buy the materials himself, and/or doesn't have a charge account at the supply house, that should be a giant flashing red light to you.

Affidavits - Legal Receipts: Before you pay money to a builder, you must obtain signed, notarized, etc. affidavits that are legal documents that protect you from liens.

Talk to a fantastic real estate or contract attorney to familiarize yourself with all of the laws of your state about contracts, liens, affidavits, etc. Spending one hour with an attorney getting a copy of your state's Cliff Notes about what to do BEFORE you sign a contract will be the best money you'll ever spend on a big job. All too often people go to the attorney AFTER they're in trouble.

I don't heavily advertise that I do consults like this because they're so time consuming. What's more, if you have to travel any distance a three-hour flight can easily turn into a 12-hour nightmare. Read about my American Airlines Flight 673 to Antigua last week. Jeesh.

http://www.timcarter.com/american_airlines_flight_673.html

The consult price may take your breath away, but it just boils down to time. Talk to any attorney and you'll quickly discover that an expert witness gets a minimum of $200 per hour. The three days to do your consult, including all the expenses to get there and back, is actually a bargain for what I charge.

http://shop.askthebuilder.com/one-day-consult/

If you just need help on the phone, I do that as well. That's not as costly and sometimes I can get you out of trouble in just 15 minutes.


Privacy in a Wide-Open Space

Have you been in a home that has a large archway between two rooms? One that allows the two rooms to act as one large room? This architectural feature was commonplace in homes built in the early 1900's. There are tens of thousands of them in some of our older cities.

In Cincinnati, OH, where I worked my entire career, neighborhoods like Hyde Park, Pleasant Ridge, Clifton, Avondale, etc. were loaded with these houses. But most had something at each of these openings that created privacy in about ten seconds.

Pocket doors - In seconds you could pull out two pocket doors from either side of the archway to create instant privacy.

LE Johnson Pocket Doors

I've had pocket doors in many of my jobs and I had several in the last house I built for my family. They are enormous space savers and they are attractive. I love how the doors hide away until such time as you need them.

You may be a person that's heard bad things about pocket doors. How the rub, how they jump off the track, how they are flimsy. Well, if you use LE Johnson hardware and frames to install the doors, you never have a problem. I mean NEVER.

Are you getting ready to remodel? Build a new home? You absolutely MUST go look at all the different photos of how pocket doors can be used in a home. PAY ATTENTION to the types of doors that are being used in each situation! One door has fifteen panes of glass in it! Another door has a giant pane of frosted glass. Would you install that door in that room? Check it out!

You can use pocket doors between just about any room, for a closet, and in a situation at a large archway where two pocket doors meet in the center! Would you like to win a pocket door kit? How about a contest?

REPLY back to me saying, "Tim, I want you to run a CONTEST to give away a free pocket door kit." I think I might be able to make this happen, and we can have some fun with it along the way!

http://www.johnsonhardware.com/pdgal.htm


New Tool Conferences - Milwaukee and Bosch

I've been absent from your email boxes for over two weeks because of an insane travel schedule. A little over two weeks ago, I was in Milwaukee and then Chicago for five days total.

I was fortunate to attend the annual conferences the two manufacturers put on. Unfortunately, there are many tools still under an embargo so I can't talk about them. But here are a few things I can share.

Milwaukee has had a heated jacket out for years. This may not mean much to you if you live in Florida or Southern California. But if it gets cold where you live, can you imagine having a heated jacket powered by a small lithium-ion battery that's hidden in a side pocket of the jacket?

Milwaukee Heated Jacket

Now Milwaukee has improved on the jacket and offers it in a High-Visibility and black model. It has extra storage pockets, is water resistant and comes with controls so that you can adjust the jacket temperature to whatever the outdoor temperature is. This jacket works with the Milwaukee M12 system giving you 6 hours of run time. If you use the M18 batteries, you can get 18 hours of run time!

The jackets will be available in red, black, camouflage and the new high-vis color!

Bosch unveiled a sophisticated laser leveling tool that shows you high and low spots on a floor. This tool is perfect for those who want large ceramic tile or hardwood floors to be in the same plane with no humps or dips.

Bosch Floor Laser

It's ingenious how the tool works. It projects two laser beams like spinning tilted saw blades. These beams cross over one another creating a three-dimensional letter X. Where the two beams intersect at the center of the X, that means the floor is in the same plane. But if you see two parallel lines out on the floor that means the floor is high or low where the lines are not one.

You use a special target you set on the floor at the parallel lines that tells you how high or low the floor is!

Perhaps the biggest news - as far as I'm concerned - is the advancements in technology that are allowing the tool manufacturers to get the performance of an 18-volt cordless tool from a 12-volt tool. That's huge.

I also discovered there are vast differences between the cordless batteries from one manufacturer to another. Just because a cordless tool battery says lithium on it, don't let that send a tingle up your leg. There are so-so lithium batteries and there are GREAT ones. I wrote a quick column that highlights what the best batteries have in them.

https://www.askthebuilder.com/cordless-power-tool-batteries/

While at the Milwaukee Tool Conference, they asked for a few volunteers who have worked in the field. Most of the people who attend these conferences are hobby bloggers and only a small handful actually have any hands-on experience working with tools for a living.

Tim doing high steel work.

I have worked out on structural steel, so I volunteered. Here's a photo of a much thinner Tim Carter with more hair when I was working on the steel.

Tim and Mike Wilson

Failed Deck Sealer

Three years ago, I sealed my dock with a great clear water repellent. It did a fantastic job of repelling water, but the wood turned gray pretty quickly. I tried to remove the sealer a year later, but it really was holding on well to the cedar decking.

Before I left to go to Antigua, I was using a scrub brush on a pole on the dock to remove some duck droppings. Lo and behold, I was easily able to scrub off the deck sealer! After three years of sun and rain, it finally broke down.

I'm sharing this just to let you know that you need to be careful when you clean existing sealed decks. If you scrub too hard, you could remove the sealer - especially if the sealer is a less expensive one.

Cordless Power Tool Batteries

DEAR TIM: I'm considering getting some new power tools and wonder if the cordless tools I see really live up to all the marketing hype. I find it so hard to believe that a battery-powered tool can deliver the torque and power that I'd get from a traditional power tool powered by 120-volt electricity. I used a cordless tool years ago and the battery just didn't last long and it seemed weak. Do you own cordless tools, and more importantly, do you use them for tough jobs? Alicia M., Boulder, CO

DEAR ALICIA: I've got news for you. You absolutely want to give cordless power tools a serious look. Don't allow your past experience with cordless tools to taint the performance of the new tools. There have been enormous advancements in battery and tool technology that make these new power tools serious contenders.

First and foremost, I own a wide assortment of cordless power tools. I've had them for nearly two decades. I'll agree that the first generation or two of cordless batteries left me hopeful for better performance. I put up with lackluster performance to be free of the electric cord in certain situations.

Here's an example of the latest cordless power tools. Just a week ago, I used a powerful cordless impact driver to remove a few porch railings on a lower deck of mine. To do this job with a traditional corded tool, I would have had to drag to the back of the house a long extension cord to provide the power. For safety's sake, that cord would need to be plugged into a GFCI outlet to protect me in case the dew from the grass tried to short out the cord or the tool.

Instead, I grabbed my cordless impact driver and was working within seconds with no fear of electrocution. I didn't have to waste the time or energy futzing around with a power cord. Suffice it to say the railings all came off and the battery was not exhausted at all. My cordless impact driver is a must-have tool for me.

The latest technology in cordless tool batteries is lithium. This natural element is the lightest of all metals, and it's rapidly become the gold standard of cordless battery anatomy. You'll find lithium in the battery cells of the top cordless tools that you look at.

But there's much more to it than just what's inside the battery cells. Leading cordless tool manufacturers build their batteries differently than others. Heat buildup in a cordless tool battery is not good for the battery. This is why certain manufacturers go to great lengths to design the inside of the batteries so the cells are slightly separated, nest in trays to create an air space and are heavily protected from damage in case you drop a battery pack.

This is what the inside of a typical cordless tool battery looks like. The round cylinders are not rolls of coins. Those are the actual power cells. Photo Credit: Tim Carter

Furthermore, the leading tool companies have started to include electronics in the form of tiny circuit boards that help manage the power output of the batteries so that the tool motor is protected as well as the batteries. The tools are smart and have internal protection in case you try to work the tool too hard. Cheaper cordless tools will actually burn up in your hands because they don't have this overload protection.

The fascinating thing about the cordless tools and the batteries is that two tools that look the same and have the same voltage can produce strikingly different performance results. This is why it's imperative that you take the time to read high-quality tool reviews that cut through some of the marketing hype.

I can tell you for a fact that the internal electronics that are found in some cordless tool batteries absolutely enhance their run time and the actual power delivered. Realize that to get maximum run time and power, you have to couple the battery with a state-of-the-art motor that doesn't waste the battery power.

As with most things, you'll quickly discover that the sales price of the tool will almost always communicate to you which tool has the best batteries and internal components. It costs money to create a great cordless tool motor and a battery with the latest technology. That's why the top tools cost more.

Less expensive tools often may have the magic word lithium on the box, but that doesn't mean the battery is the best nor does it mean the tool possesses a sleek motor that will perform for years with no burn out.

The higher the voltage of a cordless tool, the more power it has. That's a fact. But here's the amazing thing. I recently was at a tool conference where a 12-volt cordless tool performed as well as an 18-volt tool. It's all a matter of how the motor, electronics, gearing and battery are combined. Twelve-volt cordless tools might be perfect for you because they are lighter in weight and fit the hands of a woman better.

If at all possible, try to watch videos of the tools in side-by-side tests. Try to see if you can use a cordless tool at a store before you commit to buying it. Read independent tool reviews that address battery life. Look for batteries that have fuel gauges on them.

One thing is for sure. If you spend the money on a high-quality tool, you'll get the power you need and long battery life.

You can watch videos of cordless power tools in action at www.AsktheBuilder.com. Simply type "cordless saw drill" into the search engine.

Column 941

June 12, 2012 AsktheBuilder Newsletter & Tips

I've been holding off on two projects here at my house this past week because of the never-ending rain. The rain clouds went away, and this past weekend I cleaned my lower deck and washed down the siding on the house. Kathy is very happy!

I discovered years ago a fantastic brush I use to wash down painted wood siding. It's a brush made to wash RVs and large trucks. The bristles are tough enough to clean away dirt, long enough to match the profile of what you're cleaning and soft enough so they don't scratch glass or painted surfaces. Here's a photo of it.

Long Handle Brush

I don't have a brand name of my brush, but the closest brush like it I could find on Amazon is the Camco 43633 RV Wash Brush with Adjustable Handle. My brush is so important to me, I have it stored in a special location in the garage so it doesn't get damaged or lost.

On another note, last week I sat for the exam for my General Class Ham Radio License. I'm proud to say I passed with a 94%. This means I now have privileges on several high-frequency radio bands that allow me to talk with people all over the world.

I know what you're thinking. "Tim, you can do that with Skype for free without a license." But when the Internet is down, there's an emergency, etc. I'll be able to communicate while the masses will be in the dark.

That's why you should consider getting into the hobby.

Tip of the Week - Pipe Dope

Three weeks ago, a good friend had several leaks develop on new shut off valves that were threaded onto male adapters. He had used Teflon tape to prevent leaks. Well, he ended up with some leaks.

I'm a master plumber, receiving my license back in the 1980's, and I gave up on Teflon tape long ago. If you don't apply it just right, you can have problems. I've always preferred using pipe dope or pipe thread sealing compound. The pipe dope I use contains Teflon.

Pipe Dope

Pipe dope is a paste you apply to the male threads of a male-female threaded connection. You don't need much, but you should completely coat the male threads.

I've NEVER had a leak when I've used this compound. EVER.

Groupon ALERT

Do you use Groupon? Be careful. A close friend called me on Friday. He felt his girlfriend in San Francisco got hoodwinked with a classic bait and switch.

She bought an $89 deal where a duct cleaning company said they would clean her air ducts. The company shows up, cleaned the SUPPLY ducts only and then tells her, "If you want your RETURN ducts cleaned, that will be an additional $300.00."

Under pressure to make a decision, she gave them the extra money.

I don't have access to what the wording was in the Groupon deal. It's entirely possible the written offer said that only the supply ducts would be cleaned, and in fine print said there may be additional charges. If you decide to use Groupon or any other online coupon crowdsourced deal, read and understand the offer.

When it comes to duct cleaning, you don't just clean part of the ducts. It would be a waste of time. You clean all of them.

Milwaukee Drill/Driver and Grinder Videos

Please watch these short videos:

Milwaukee Half-Inch Cordless Drill/Driver

Milwaukee 4.5-Inch Grinder

Kickstarter Shed Video Project Summary

I want to thank you for supporting my first Kickstarter project - assuming you were interested and were able to pledge. I received many emails from folks who wanted to help, but couldn't. I totally understand. The project is now closed and you can't pledge or donate to it.

Here's the good news. It was a learning process for all of us - especially me. I've never done a project on Kickstarter, but can tell you I'll be doing many more. See below what Project #2 will be.

I goofed up on the rewards for this first one. Future projects will have the rewards set up differently. Once a project is launched on Kickstarter and one person chooses a certain reward, you can't go in and modify that reward. You can create new rewards as the funding is happening, but that can get tricky.

Next time the rewards that have videos will be priced closer together. I don't know what I was thinking in this last project. In the future, one reward might be a fun one including all the bloopers that happen during that project. It's easy to get flustered or tongue tied while on camera. I'm sure in this shed project, there will be plenty. I'll create a blooper roll for that.

I've also decided that the project funding time is going to be no more than two weeks. That's plenty of time for you to decide you're all in.

Creating great rewards is challenging. That's why next time YOU will be part of the process. Yes, you're going to help create the rewards. I'm looking forward to that!

I can tell you the next project will be rebuilding a ceramic tile shower - Start to Finish. That video series will have some incredible detailed ceramic tile instructions.

Last Minute Father's Day Gift Ideas

Do you need a hint on some gift ideas for your Dad? Or, are you a Dad that likes to leave hints?

Here are two:

Do you want the tool storage solution I use in my garage and work area?

Or how about a RotoSaw? This is a really handy tool that allows you to make precision cuts. It's a combination of a small router and a jigsaw in one tool. That's the best way, I feel, to describe it.

Need more ideas? Use my Gift Guide! Yes, I know it says Christmas on it. The suggestions and links are still good. Go ahead, download it and get something nice for your Dad now.

Handyman Work

I received an email from an out-of-work craftsman last week. It's a long story, but I told him about a friend of mine who retired to the Del Webb community in Hilton Head, SC. Two or three days a week my friend helps a neighbor. This neighbor started a robust handyman company doing minor repairs and painting for many in the community. In fact, the Del Webb community is so big there are several competing handyman companies that are operated by residents who live in the community!

With the Baby Boomer population starting to swell and retire - well some are retiring, I'm still working and will be for a while - there's a huge opportunity in your city or town.

If you have some skills and are looking for work, think about this: Would you be interested in me hosting a live online TV course about Handyman Businesses? If so, REPLY to me and let me know. I can make it happen pretty quickly.

Australia Stain Solver

Do you live in Australia? Reply to me if you want to buy Stain Solver in Australia.

Cleaning Tip of the Week - Picnic Coolers

Friends of mine are already camping and July 4th is around the corner. Is your picnic cooler grungy looking, smelly or ???? You don't have to buy a new one.

You can make it like NEW and smell fresh with Stain Solver.

Password Tips

Last week I had a conversation with a very good friend of mine - Leo Notenboom. He operates the great website: www.Ask-Leo.com.

Leo produces a fantastic newsletter each week like this one, but it's all about computer stuff. If you're a PC user, Leo's got you covered. He doesn't delve into Apple or Mac issues. If you use a PC, you *need* Leo's newsletter. But I digress. I have Mac newsletter tips for you too, as I use a Mac. But that's another week.

Leo and I were talking about passwords because of hackers trying to get into my website. At the server level, you can see this happening. They haven't gotten in *yet*, and we're trying to make it very tough for them.

Undoubtedly, you have to use passwords for all sorts of things you do online. The discussion turned to what should I be doing at AsktheBuilder.com. Here's exactly what Leo said. Understand there was discussion in front of what you're about to read, but it's not that important.

What follows is the best part of the conversation. What you're about to read is VERY IMPORTANT. I can tell you that I've already changed many of my passwords to the type Leo describes below. Here is part of what Leo said to me:

"S0meT1me" is a much better password. One type of attack (dictionary) thwarted. However there are 221,919,451,578,090 possible combinations, and a brute force attack from an offline compromise (of the LinkedIn variety) could crack it in probably under an hour.

"--S0meT1me--" is WAY, WAY better. How much better? 546,108,599,233,516,079,517,120 possibilities, and using the same calculation that got me the "under an hour" figure above now returns 1.74 thousand CENTURIES. And yet it's JUST as easy to remember.

There's actually a strong argument that says:

----password----

(16 characters, the word password preceded and followed by 4 repeating, arbitrary characters) is even more secure. 21,930,887,362,370,823,132,822,661,920 possibilities and almost 70 million centuries.

BOTTOM LINE: when in doubt go long.

So there you have it. Think about your passwords.

Enjoy the rest of your week!

Tim Carter

Founder, www.AsktheBuilder.com

Do It Right, Not Over

How To Use a Pressure Washer

DEAR TIM: I want to rent a pressure washer to clean any number of things around my home. I intend to clean my composite deck, my patio, my driveway and wash down my house that has a combination of wood and vinyl siding. I’ve never used one before. Are they hard to use? Can you share some tips so I don’t hurt myself, my husband, my pets and my house? Peggy M., San Jose, CA

DEAR PEGGY: I’ve used pressure washers for years, and I'm here to tell you they're magnificent tools. When used to clean things that can withstand the pressure and power from the tip of the wand, they're enormous time savers. The famous line from the movie Spiderman, "With great power comes great responsibility.", describes much of what you need to know.

I actually don't think many people realize the enormous force that's generated at the tip of the wand where the water spray exits. Depending on the power of the machine you rent and the tip you use, the water stream can etch and erode concrete. That should help you understand what it can do to human or animal tissue, composite decking, wood, vinyl or any other material that's softer than concrete.

In other words, you must have a healthy respect for the machine and what it's capable of doing to you, your pets or your possessions. I can tell you that I'd spend the first 15 minutes testing out what the machine does on things you're going to throw away.

It's vital that you keep pets indoors so they don't think the spray wand is a play toy. My dog loves to play in water and thinks that the pressure washer is a great thing to be around. Not only is the sound from the gas engine hard on her hearing, the spray from the want could blind her or cut into her skin in less than a second. The same holds true for you and your husband. Never point the wand at an animal, human or plant.

You need to wear safety glasses or even goggles for full eye protection. The blast of water aimed at a driveway or patio edge can shoot up sand, rocks or dirt directly into your face. Paint chips from siding can fly into your face. This happens without warning. If you rent a gas-powered machine, wear ear muffs or great ear plugs.

Be sure you understand how the machine works. Many pressure washers depend on the incoming water from the garden hose to cool the pump that creates all the pressure. If you have the pressure washer on, but no water is flowing through the wand, you can damage the pump. Read the owners manual or any quick-start guide the tool rental business provides.

New pressure washers typically come with an assortment of tips for the wand. These can range from 0 degrees up to 40 degrees. The lower the number, the more concentrated and dangerous is the spray of water. I would start cleaning the house siding with a 40-degree tip to see if it achieves what you want. You'll probably have to use a 25-degree tip to get good results.

Never aim the spray wand up as you clean siding or aim it at cracks where siding butts up against windows, doors or any trim boards. You can drive water deep into these cracks and cause leaks or damage to your home. Never aim it at vinyl siding overlap seams such that the water stream gets behind the siding.

Remember, siding is installed knowing that Mother Nature's rain aims down not up. In rare instances rain may be horizontal, but almost never does rain blow hard in an upward fashion. It can happen because of the shape of roofs and dormers during violent wind storms or hurricanes, but it's not normal.

The last time I cleaned my own composite deck with a pressure washer, I damaged it. I was fatigued and not paying attention. I was also in a rush. For about one second, I got the tip too close and it sliced into the deck board. It's impossible to repair that damage. It's a good thing it's in an out-of-the-way place that I can hide with a few potted plants.

It only took two seconds to cause this damage to the composite decking. Photo Credit: Tim Carter

Realize that pressure washers can readily peel paint from just about any exterior surface. If you want to use it for this purpose, hold the spray wand so the stream of water attacks the paint at a very low angle. The spray wand would be nearly parallel with the painted surface.

Never allow children to play with a pressure washer. These machines should be in the same category as handguns or rifles. They're that dangerous when it comes to children and what harm can result if this tool is misused.

You can watch a video showing you the components of a pressure washer and how to use it at www.AsktheBuilder.com. Simply type "pressure washer video" into the search engine.

Column 939

Replacement Roof Job

Bill Leys sent in pictures of a roofing job that his company did in California. A condo building had a leaky roof. Well, I will let Bill tell the story.

"Hi Tim,

Here's a job done by my company, Central Coast Waterproofing. We are specialty contractors out of San Luis Obispo, CA. We travel the state repairing and waterproofing roof decks over living space.

This job is a 30 unit condo building in the Los Angeles neighborhood of Brentwood. It's 3-years old and the tiled roof deck originally installed leaked from the first storm after the building was occupied.

The developer's insurance company paid to have the tile and mud bed and waterproofing removed to the plywood, all new flashings, scuppers and floor drains were installed. Then we installed Hill Brothers Chemical Co. Desert Crete pedestrian traffic coating to 3500 square feet of area. Then we stamped the waterproofing to look like tile. Desert Crete is an ICC-ES evaluated decking system that is Class A fire rated as a roof and is One Hour Rated as a fire barrier between ceiling and roof.

The general contractor was Cal Building & Maintenance of Hawthorne. Shortly after the completion of the work, Los Angeles received some of the worst rain in recent years (March 2011) and the roof passed the test! Not one leak occurred."

Bill Leys
The Deck Expert

Thanks, Bill. Below are four before and four after pictures of the roof replacement.

If you want to submit pictures and the story behind your project, CLICK HERE to go to the Before & After Submission Page.

As a follow-up to this older story, read the Roof Replacement Costs column. It includes pricing from 2021 for roof installation and/or replacement.