November 2, 2011 AsktheBuilder Newsletter And Tips

What's in This Newsletter?

Latest News
Drywall Plug Video
Kitchen Ripoff
Tool Survey
Builders Speak Up
SquareNTape
Facebook

I'm pretty stoked. CAPS below for emphasis, not screaming.An hour ago, I finished the 2011 AsktheBuilder Christmas Gift Guide. It's being formatted now. I'll give you the link to it next week.

As I was creating the Gift Guide, I ran into something that drives me crazy. Pay attention if you or the company you work for sells ANYTHING and want more sales of your product.

Ten days ago, I got a really great tool from the Sears PR team. It's a simple tool that holds one of their Nextec lithium-ion batteries.

This tool is a remote power source for your cell phone, iPod, or any other device that you would recharge using a 120-volt transformer or cigarette lighter plug in your car or truck.

The tool has one socket for a cigarette lighter and two standard-sized USB sockets. Can see how convenient this would be when you're on the move and can't let your device sit still next to a wall plug? It's a GREAT tool to have while traveling, camping, hiking, stuck on the tarmac for 8 hours in a plane, etc.

But this great tool is NOWHERE to be found on the Sears website much less on Amazon.com. It's AWOL.

They're not alone. Ryobi has a similar remote power supply that accepts their Tek4 batteries. You can find other Ryobi tools on Amazon.com, but not this one.

Think about it. What products does YOUR company sell that hundreds or thousands are actively LOOKING for on Amazon.com? I'll bet more than you'd ever imagine.

A year ago we put Stain Solver on Amazon.com. The first month it sold so much that Amazon thought we were a fraud. They locked down our account and would not transfer money to us until they were confident that customers would be happy with it. I was not angry, but I was amazed at how much we sold!

If you have products you sell, for goodness sake get them on Amazon right now. Here's a handy link for you.


Drywall Plug Video

You know that saying, "Be careful what you wish for?"

Well, I heard you loud and clear. You want to see me create my own drywall plug using a scrap piece of drywall. I promise you that video will be done by next issue. Wow - thousands of requests for that video!


Canadian Kitchen RIP OFF Autopsy

Anita  from Cambridge, Ontario Canada emailed me. Oh, it was hard to stomach:

Hi Tim, I enjoy reading your newsletters. I'm hoping you can give me some advice with this issue.

I hired a company to re-do my kitchen. It was to be a three-week project. It began in July and now it's the end of October. The job is still not complete.

They took the old set of cupboards out. I hired another company to re-do the floor. Cabinets arrived weeks later. The workmanship is awful.

Nothing but bad cuts in and around the cupboards, doors not fitting, wrong holes made, poor spray jobs, sagging shelves, etc.

The latest was a granite company that they suggested. The granite is not level and a joint has lifted.

The most recent disaster happened when they put my wall oven next to the patio doors. I could not open the oven because it hit the door trim.

They have since re-located the oven, only to move the cupboards down 1 foot and they cracked the granite while doing this job.

I just don't know what to do.  This kitchen has cost me $35,000. I'm a quality inspector at a food factory. So of course, I noticed a lot of problems. Please give me your advice on what my rights are as a consumer. I'm looking forward to hearing from you.

Thanks, Anita

Anita, oh my goodness. You've suffered enough.

Do you watch the CSI shown on TV if they're up in Canada? They basically do an autopsy on a crime to explain all the details.

Let's do an autopsy on your kitchen job.

The obvious thing is the fact the contractor is not a professional. You've supplied all the facts to prove that.

DO NOT pay him another penny until all problems are fixed.

Money is the only real lever you have once a job starts. Payments of money should always be fixed to distinct points in the job.

You never want to give more money to the contractor than he deserves for work completed in a satisfactory manner.

You do have to sometimes put deposits down on custom items, but realize that you can bypass the contractor and give the money directly to the supplier - so the contractor doesn't give it to someone else.

Schedule a meeting with the contractor now. Discuss your dissatisfaction. Ask him when he'll fix the mistakes and complete the job. Take notes of the talk. Have him sign the notes at the end of the talk.

If he fails to satisfy or meet the deadline, contact your local TV stations to see if they have a Consumer Reporter. See if you can get on the news.

I could go on and on.

The sad thing is that all of your pain and suffering could have been avoided. I'm absolutely certain I could find a real pro kitchen remodeling contractor in about four hours if I was anywhere near Hamilton, Brampton or Mississauga. Those are all nearby towns that undoubtedly have pros.

All you needed to do was use my Kitchen Remodel Checklist to discover the professional in your area.

Anita, you can have the checklist for free because of what you went through. It will help you on other similar jobs.

If you don't want to suffer like Anita, I just DROPPED the price of this checklist to $7. That's nearly a 60 percent discount. I'll hold it at that price until midnight on Sunday in case you're going to remodel your kitchen soon.


Quick 3-Question Tool Survey

How do you feel about tools and their quality?

Can you please take this 30-second three question survey?

I'll publish the results for you next week so you can see how you stack up with those who take it.

Builders and Remodelers Speak Up!

Are you a builder or remodeler? Can you help me? Do you find my columns, videos and/or my newsletters helpful? Would you be kind enough to write me and tell me what you like and what I can do to improve your experience at AsktheBuilder.com? Please Reply and change the Subject Line to: Builder Feedback


Sneak Peek Gift - SquareNTape

Here's a gift idea that didn't make it into my Christmas Gift Guide. I wanted to share it with you early so you can get an idea of some of the COOL things in the guide.

I can tell you that I would have died to have this cool tape measure back when I was building! Talk about a time saver.

This is like three or four tools in one!

The best part is that you can get just the plastic frame if you want to adapt a tape measure you already use. Brilliant!


Facebook News

AsktheBuilder on FacebookThis past week I answered questions on my Facebook AsktheBuilder Fan Page about:

Work Bench Plans

Ice Dams

DeWALT Router

and more. BECOME a FAN now!
Drywall Corner Tips

Drywall Corner Tips

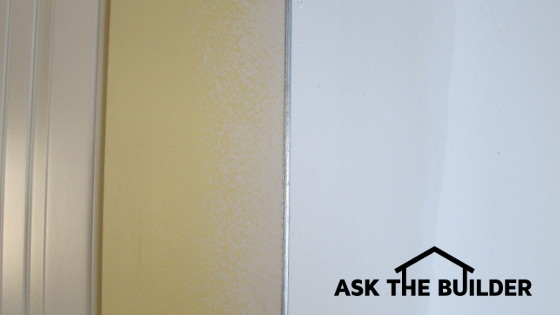
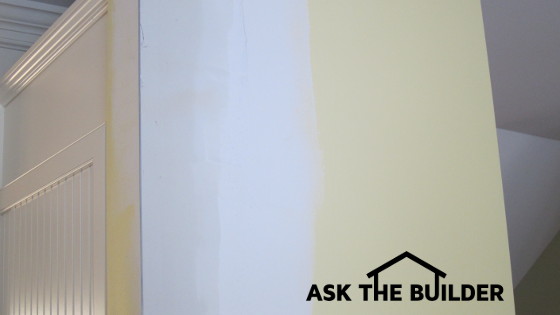
You can't see it because it's covered with drywall compound, but there's a metal corner bead at each end of this small wall. It needs to be expertly installed for pro results. PHOTO CREDIT: Tim Carter

DEAR TIM: It's time to hang and finish some drywall in a small room. This room has a pipe chase in it which means I have to finish an outside corner. I know how to do inside corners with tape, but every time I try an outside corner, the metal corner bead shows through. It looks horrible. Can you share some secret tips on how to install and finish an outside drywall corner? Sharon T., Palm Coast, FL

DEAR SHARON: Your challenge reminds me of the first few times I had to finish an outside drywall corner. Oh, did I ever struggle! I didn't have a pro show me how to do it, so it took some trial and error. Besides, back in the 1970's, we didn't have the Internet and all the wonderful free videos to watch. I've taped quite a few videos to show how this is done, and they are at my website.

The first thing to realize, and this could be out of your control, is the rough framing lumber on outside corners needs to be as straight as possible to achieve great results. Much of today's lumber is twisted, bowed and has very bad crowns to it. If you're building an outside corner, pick the best lumber for this location. The same is true for doorway rough openings.

The next issue you can have with outside corners is the actual drywall itself. There are two common mistakes that rookies make. The most common is jagged drywall hanging out past the plane of the wall on either side of the corner.

If you don't use a sharp razor knife and make a deep cut when you score the drywall, when you snap the drywall to make the finish cut on the backside, the edge of the drywall looks like a miniature mountain range. If this ragged drywall hangs over the wall plane, the metal corner bead will not lay flat on the wall surface on each side of the corner.

The second mistake you can make is hanging a sheet of drywall vertically that has a factory tapered edge. You may feel that putting the tapered edge of the drywall up at each corner is a good thing. In most cases, it makes finishing the metal corner bead more of a challenge. If you're an expert finisher, you can do corners this way as it makes it far easier for a finish carpenter to install ceiling crown molding. But let's not go there right now.

Once you have the drywall installed correctly, it's time to install the metal corner bead. Pros use a special tool that centers and pinches in the metal so the bead fits perfect. I'd invest in one of these tools if you were going to do lots of corner bead, but not for just one corner in one room.

Drywall Corner Tips

The mistake I made many years ago, and I feel you've made before, is flattening out the bead on the corner and/or twisting it as you apply it. The real trick is to create an acute angle with the corner bead. This means the finished corner would not be 90 degrees, but some angle slightly less than 90 degrees.

You achieve this acute angle by pinching the metal bead ever so slightly on the corner so the outside corner of the metal bead is puckering just a little bit and it actually is not in contact with the drywall as you near the corner.

In most corner beads, you'll see tiny holes out at the edge of the metal. These are the holes for the nails. Don't nail through the larger diameter holes. Those are for the joint compound to ooze through.

Always nail both sides of the bead at the same elevation. Don't nail one side of the bead top to bottom and then move to the other side. Tack the bead in place just partially securing it to the drywall and use an 8-inch broad knife on its edge to ensure the blade only touches the actual outside corner of the metal bead and then the drywall about 3 inches away from the corner. The void space is what you fill with joint compound.

If you have to do an archway or a soffit corner where two or more outside corners meet one another, always miter cut the metal corner bead so it doesn't overlap the adjacent piece. You can't have layers of metal on top of one another.

Hammer the nails slowly so you never strike the actual outside corner of the metal bead. Don't beat the nails in at the edge of the bead. This is finish work. They just have to be recessed enough so they're covered with about 1/16th inch of drywall compound.

You can't check the position of the bead often enough as you nail. Constantly use the broad knife to ensure the beat is pinched and it's centered on the corner. If you start to twist the bead, one side of the corner will end up with exposed metal and never get covered properly with drywall finishing compound.

Column 907

October 28, 2011 AsktheBuilder Tips And Newsletter

What's in This Newsletter?

Latest News
Buying a Lot
Hydraulic Cement & Front Steps
My Christmas Gift Guide
Repairing Drywall
Facebook News

This past weekend I had the enormous pleasure to stroll down memory lane. I was in Bar Harbor, Maine.

Thirty-seven years ago, I was there with my new bride of a week. This time Kathy stayed home to have some quiet time while I went up there with my oldest daughter Meghan. She wanted me to look at some land she's thinking of buying.

On our first afternoon there, we went to Sand Beach in Acadia National Park. This is the place my wife got wife's remorse.

Kathy and I were standing at water's edge and I looked down. Right there was a round doughnut-shaped object. I picked it up. "What is it?" Kathy questioned. "Some DUMB *** (rhymes with bass) lost the eye cushion to his binoculars," I quipped.

Wanting to show her how strong I was, I tried to throw the part about a quarter-mile out into the surf. As it was sailing through the air, I got wide-eyed and looked down at the binoculars hanging from my neck. She saw me look. Can you hear Kathy's voice?

Without hesitation she blurted out, "I married a DUMB ***."

So last Saturday afternoon standing at the same spot, I tried to find the part. Surely Neptune would return it along with some of my dignity. Needless to say it wasn't there. It long ago was pulverized or went down a whale's blow hole.

Buying a Lot or Raw Land Tips

Looking at the lot that Meghan wants, I was reminded that years ago I wrote a column about buying a vacant lot or land.

It was a pretty big hit so I created a 25-point checklist to help you avoid buying the wrong piece of land.

I get emails all the time from folks who have purchased a really bad piece of ground. You can prevent that using my checklist.

Here are some extra things that are not in the checklist:

It's dangerous to buy a snow-covered lot. What's under all that snow?

What about things nearby? How about a local airport and the land you want is on or immediately adjacent to final approach?

If the land is next to a lake or other body of water, are there special setbacks, building guidelines, etc. that make construction very expensive?

If the land is on a private road, what are the costs associated with maintaining the roadway?

The list goes on and on.

If you're thinking of buying some land, you may want to look at my Lot Selection checklist.

Perhaps one of the best buys you'll ever get for seven bucks.

Hydraulic Cement and Front Steps

"My front stairs are breaking down. Chunks of cement around the railing are broken off. A cement person told me he could repair the stairs with hydraulic cement.  Is this what hydraulic cement is good for? I'm not talking filling holes. I'm talking replacing the cement where chunks have broken off."

Maureen, don't hire this person. They're giving you bad advice. Hydraulic cement is one that usually contains some bentonite clay. This cement expands when it hardens. It's the material to use to plug a hole in a foundation or set an anchor bolt.

If you want to repair all the missing chunks, I have a great past column about Repairing Concrete  that tells you how to do it.

My Christmas Gift Guide!

I'll be finishing my new Christmas Gift Guide this weekend. Oh boy, is it loaded with some great ideas no matter what your budget is.

If you're looking for the perfect gift for that HARD-TO-BUY-FOR person on your list, I'm going to be your life preserver.

What's more, my daughter Meghan has created a gift guide of her own! It's full of fantastic lifestyle gifts.

We need to get past Halloween before we publish these guides.

No matter what, don't shop until you look at what I have and what Meghan suggests.

Repairing Drywall

Do you have a medium-sized hole in your drywall? Say from a door knob, fist, or maybe a softball? Yes, people hit softballs inside homes.

There are many drywall patching methods. They all achieve the desired result.

One way that works, assuming you have some scrap drywall around, is to cut a plug that will fill the hole. It's not hard to do and the drywall facing paper acts as the built-in tape to do the repair.

But what if you don't have the scrap? That's where this new product comes in. The Drywall Plug.

Go to their website and it will all make sense. If you have scrap drywall of your own, you can make a similar plug but cut the shape of the plug as a square or rectangle, not a circle.

Do you want me to tape a video showing you how to make your own plug? Reply to this email but CHANGE the subject line to: Drywall Plug Video.

Facebook News!

AsktheBuilder on FacebookDo you use Facebook? I've got a Facebook Fan Page that really sees some action during the week.

There's LOTS of tips there that never make it into this newsletter.

Please go there now and LIKE me so you can start to get FREE tips from me when you login to your Facebook page.

October 18, 2011 AsktheBuilder Tips And Newsletter

What's in This Newsletter?

Latest News
Interactive Delta Brizo Showroom
Washing Machine Time Bombs
Christmas Gift Guide
Firewood Storage
Latest Book I Read
Facebook Fan Page

I hate to be the wet blanket, but last week's Remodelers Show in Chicago was pathetic. It's a possibility that your local home and garden show in the spring had a larger convention-center footprint than this show.It's absolutely a sign of the times. What's more, the vast majority of attendees - remodelers - I talked to were within a day's drive. For the most part, the aisles were wide open.

I did see a few interesting things, and was able to do some business there, but the low attendance, lack of major name-brand exhibitors, etc. is a telling tale of how stressed the industry is. Last winter's National Builders Show was no different. It was just a shadow of it's former self.

Here are some links to videos I shot on the floor of the convention center:

Deck Pier Video

LED Lights for a Deck

Camouflage Vinyl Siding


Interactive Delta Brizo Showroom

Brizo Delta Faucet ShowroomWhile in Chicago I made my first-ever trip to the historic Merchandise Mart. It's the largest commercial building in the world I was told.
After you walk in the front door and go past the elevators, you'll see Delta and Brizo's new showroom. It's open to the public and you can see, touch and use all of their new faucets. The best part is you can operate all of them!

Ms. Kelly Litton, the store manager, took me on a tour. Watch this video I shot on the fly. Thanks to Todd Fratzel for his videography skills.


Washing Machine Time Bombs

Stainless Steel Washing Machine HosesA very good friend of mine, Bryan, lives in San Francisco. He rents an apartment and last week he had a major plumbing disaster. Luckily he was home when it happened. Had he been gone or at work, oh my.
One of the supply hoses to the washing machine burst. Bryan does not own the machine nor the connecting hoses. They are the property of the building owner. But right now the owner is blaming Bryan for messing with an overflow alarm. It's a long story.

Water flowed for ten minutes before he discovered the problem. I get at least one email a month from subscribers like you where this has happened.

A mold remediation company was called in to cut away the damaged drywall and set up heaters and dehumidifiers to prevent a mold bloom.

The question is, if you're renting do you have adequate liability insurance? If you live in a home and have homeowner's insurance, are you completely covered if something like this happens to you? Call your insurance agent. Get out your policy and have the agent PROVE to you that you have coverage.

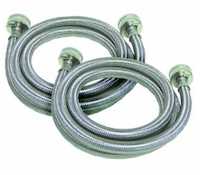
The entire incident could have been prevented with washing machine supply hoses that are clad with braided stainless steel to prevent blowout leaks. If your washing machine is anywhere OTHER than a basement with a concrete floor and a floor drain, you NEED these. Here are the stainless-steel washing machine hoses I use at my own home.


Christmas Gift Guide!

I'm starting to put together a DELUXE Christmas Gift Guide for that handywoman, handyman or pro around your home that's so hard to buy for.

It's going to be broken down into sections and list my favorite tools at different price points so no matter what your budget is, you'll be able to find that special gift that comes with the AsktheBuilder Seal of Approval!

This is a first ever for me. Look for it the second week of November. You'll not believe some of the things that will be in there!


Firewood Storage

I just wrote a new column about firewood storage tips. It talks about an inexpensive way to keep firewood dry. I know there are many other methods. If you want to share your method, just reply to this newsletter. Send high resolution photos if you can.

But if you want to see some spectacular photos of stacked firewood, then you just click that link. Wow! The one of the fake downed tree is my favorite, although it would be cool to be in that Hershey's kiss structure at night!


Latest Book I Read

Not Without Peril BookI live about 50 miles due south of one of the most dangerous mountains in the USA - Mt. Washington. Hundreds of people have died on this tiny mountain because the weather conditions near the summit are almost always radically different than they are in the valley at the trailheads.

By most standards, it's a tiny mountain, only 6,288 feet tall. This means many non-mountaineers try to climb thinking it's no big deal. Guess what? This past week the temperature at the summit was in the low 20sF and 100 mph winds were howling. Down at the base at the parking lot - it was mild weather.

Not Without Peril is a book I got for my birthday that tells fascinating stories, starting with the first person who died, about the conditions and poor decisions hikers made. If you like to read true suspense stories and want to gain a real respect for Mother Nature and Mt. Washington, you'll love this book.


Facebook Fan Page

AsktheBuilder on FacebookIf you were a fan of mine on Facebook last week, you were getting all my updates about the Remodelers Show. You could have even joined me at The Gage Restaurant on Thursday night! We had a blast. Please go LIKE me now and get ready for lots of new tips each week.

Firewood Storage Tips

firewood storage

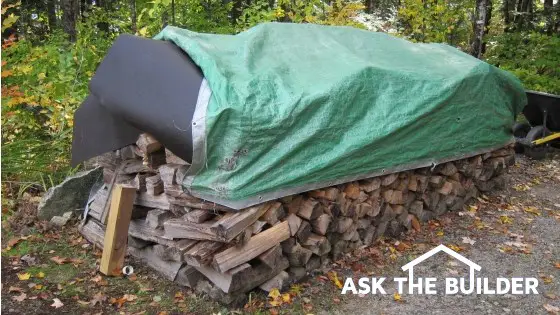
This firewood is protected from rain and snow. You can easily see the tar paper that covers the top of the firewood that's under the green tarp. PHOTO CREDIT: Tim Carter

DEAR TIM: I'm tired of trying to burn damp firewood. Neighbors of mine leave their wood unprotected as well. Right now I can't afford to build a nice firewood storage shed. I can't put it in my garage either as I'm worried about termites and insects. What are some affordable and effective methods to store firewood outdoors? I'm looking for stacking tips, and ways to help air dry the wood as well as keep it dry. Kelly L., Apple Valley, MN

DEAR KELLY: I see unprotected firewood piles all the time where I live here in New Hampshire. In fact, I see lots of neatly stacked firewood that has no top cover. I've always wondered how well that wood burns. No doubt you get a much hotter fire if the wood is dry, as some of the combustion BTUs are absorbed by the water and water vapor that is created as the damp wood cooks in the fire.

As you might imagine, I've seen, as I'm sure you have, all sorts of gorgeous and practical methods of covering firewood. A friend of mine has his own wonderful firewood shed that's adjacent to his home. I had plans drawn up for a new detached garage that had an extended shed roof at one end that was to be a giant firewood storage area.

There are endless possibilities with respect to firewood storage. But when money is tight and you need dry firewood stored outdoors, I'm a firm believer that some inexpensive tar paper and a fiberglass tarp are quite possibly one of the most practical methods to achieve the goal.

Many years ago, a retired engineer taught me how to stack firewood so it air dries quickly. The first thing to do is to split all the firewood to the size you intend to use when you burn it. Be sure when it's cut that it's the correct length to fit in your fireplace, wood stove or fireplace insert. You'd be surprised how many people try to maximize the length only to discover it's too long by an inch.

It's best to store the firewood off the ground. If you can afford some treated lumber 4x4s, these work great and can last decades. If you have access to some younger straight trees like some birch, you can cut those to make runners that are about 14 inches apart center to center. If you use trees, it's very important they be the same diameter. You want the stacked wood to be plumb so the piles don't tip over.

If you can't afford the treated lumber or don't have access to the trees, then at least store the wood on well-drained gravel. You just don't want the wood in contact with damp soil. This will allow the lower row of firewood to rot over time.

Think about the prevailing wind direction at your house. It's ideal to stack the wood so the long rows are parallel with the prevailing wind direction. Once the wood is covered, the piles act like a miniature wind tunnel as the wind blows through and across the wood.

At the end of each row of firewood, I usually have three stacks next to one another, you want to stack each successive layer at 90 degree angles to one another. This tower of firewood offers very good stability at each end so that the weight of the pile doesn't cause the wood at the end to tumble off the row.

I also keep about 6 inches of space between each row to promote air circulation. If you stack all the wood tightly, it takes longer to dry. If you do three rows of wood, try to make sure the center row is higher than the other two by about 4 inches.

Once you've got the wood all stacked, I usually go no higher than about 54 inches, then I cover the wood with two long pieces of overlapping tar paper. The higher center row of wood help ensure any water drains to the sides of the pile. I then cover the wood with a fiberglass tarp so the top is covered and it extends partially down the sides. I try to keep the ends of the rows uncovered as much as possible to promote great ventilation.

Don't cover the stack of firewood completely with a tarp. This traps water vapor and makes it nearly impossible for the wood to dry.

It's best to install some stakes and rope at the sides of the tarp to extend the tarp out away from the stacked wood much like a camping tent rain fly. These tarp wings ensure the sides of the wood stack don't get wet from all but the worst driving rain.

It's vitally important that you do everything possible to promote the movement of air through the wood if you want it to dry rapidly.

The real firewood pros stack and cover their wood for at least a year before they intend to burn it. This means you typically have two years worth of wood on site at the beginning of each wood-burning season.

Don't forget that some wood is easier to split when it's partially dry. Other wood is best split as soon as it's cut into links from the fallen tree. Talk to a professional woodsman to determine when it's best to split your wood. A hydraulic wood splitter will become your best friend if you intend to burn lots of firewood. I love my 27-ton hydraulic wood splitter.

Column 905

Camouflage Vinyl Siding Video

Hi, I'm Tim Carter and I am here at the Remodelers' Show in Chicago. I am walking down one of the aisles and I really found something cool. I think you will really like this, especially if you are outdoorsman, or if you are looking for a very unique shed. This will be the talk of the neighborhood.

Look at this really unique vinyl siding. It is camouflage siding. This is just a vinyl siding product just like you would use on your home. The trim pieces are also vinyl siding. This siding would be great for a little hunting shack. These kits will be available at the larger sporting goods stores.

A very unique siding product, but image if you wanted a special look for your backyard shed. You would have imaged you could get camo siding.

Deck LED Lighting Video

Hi, I'm Tim Carter and I am here at the Remodelers' Show in Chicago. I want to show you something I just discovered at one of the exhibits. It is a really great LED lighting that you can build into your deck.
EB015 Cleaning & Sealing Deck eBoo Cover

Here are the little lights shown in this sample piece of decking. Down on the floor, you can see the LED lights in place. In this video, the lights are on and you can see that they would make a great accent around your deck. And it even gets better.

Lets say you want some down-lighting on your 4x4 posts, check this out. On the side of the post, you have this light fixture you can install all around your deck. And even at the post caps, you can install small LED lights on all corners of the post cap.

These make great touches you can add to your deck to dress it up.

Building A Deck Pier Video

Building A Deck Pier

Hi, I'm Tim Carter and I am here at the Remodelers' Show in Chicago. I just stumbled across a really neat booth. If you are getting ready to build a new deck and you have to put in concrete piers and you are just wondering how in the world you are going to do that. And get it right. Look at this. You aren't going to believe it.

EB015 Cleaning & Sealing Deck eBook CoverThis is called the Form-Footer. This is a plastic system with all the various parts included. The rebar comes in the kit and is precut and everything just snaps together. Need more height? Just add another section to the form. This allows you to get the deck pier down below the frost line and above the ground.

A very interesting product, that sells for less then $100. Just dig the hole, drop in the assembled Form-Footer with all the rebar precut, and you are ready to pour concrete. One of the best footer devices I have seen. Wish I had these back when I was building decks!

This video was mentioned in the May 1, 2013 AsktheBuilder Newsletter.

Delta Faucet Showroom Video

Hi, I'm Tim Carter and I am at the Delta / Brizo Showroom at the Merchandise Mart in Chicago, IL. I am with Kelly Litton the manager of this facility.

Kelly states that this is the Flagship showroom for Delta Faucet Company. This showroom was built in May of this year. They figured Chicago was centrally located for the United States and close to their main facility in Indianapolis. And it is also at the Merchandise Mart which is an awesome center for people to come in, design and work on different things for the home.

One of the nice things about putting a showroom in a place like this is we are very urban. We are in the middle of downtown Chicago. Delta is concentrating on urban penetration. This will help us get the word out about the products we have in the big cities.

This is a beautiful showroom. Lets check out some products. In this showroom everything works. So you can definitely work all the systems. It only has cold water so testing the shower might be a little chilly.

One of the shower installs has a push button screen to turn on and off the various features. So testing the Delta faucets in real time is possible.

One of the things Delta is famous for is their innovative technology. Delta has had touch faucets for many years in the kitchen. This year they have added bathroom touch faucets. These faucets operate by simply touching it.

Now they are gone a step further. You don't have to touch the faucet. By just bringing your hand within about 4-inches of the faucet, it will turn on. As long as your hands are within that range, the faucet stays on. Remove your hands and it turns off. Great if you want to just wet your toothbrush. Bring it in close, the water comes on and wets your brush. When you remove it to brush your teeth, the water turns off.

Kelly indicates that this makes it convenient to get water when you need it and germ-free since you don't actually touch the fixture. Plus you don't have to clean it as often because you haven't touched it.

Tim also visited the Delta and Brizo Faucet Showroom in August 2010.

October 11, 2011 AsktheBuilder Tips And Newsletter

What's in This Newsletter?

Latest News
Chicago Meet Up
Strange Odors In Your Home
Outdoor Repairs and Cold
Lisa from London
Facebook Report

I've been crazy busy the past two weeks. How about you? Lots of great things are on the AsktheBuilder.com horizon. The biggest thing is a radical new website design. It's finished and we're getting ready to turn the design into CSS and HTML. I believe you're going to love it. I know I do.First, I finally tackled a major project here at my New Hampshire house. The builder who built this home I live in totally messed up the front porch. The Executive Summary is that his carpenters nailed the treated lumber ledger boards directly to the OSB sheathing.

Suffice it to say it was a mess. I fixed all the issues and now the fiber cement siding extends down over the foundation as it should have from the get go.

I disconnected the porch structure from the house using some clever 4x6 heavy angle irons that are bolted to the house foundation. I taped a series of videos that I hope to have uploaded for you next week. You're going to love that series of videos.

Ten days ago, I volunteered to help with communications for the NH Marathon. It was a nonevent radio-wise which means good things for the runners. No one was injured, so that means success. When a health emergency arises, radio traffic can get busy indeed.

I also finally located my missing ham radios. Now I've got a second handheld and will be installing my sweet mobile radio in my truck.


Last-Minute Chicago Meet Up

I'm leaving for Chicago in the morning to attend the Remodelers Show. I have tomorrow night open if you want to have a quick meet up. I'll be staying very close to the Hyatt on East Wacker next to the Chicago River if that helps orient you.

Please email me ASAP and let's see if we can get something together. I'm open to suggestions. Be sure to include your cell phone number. Change the Subject Line of your reply to: Chicago Meet Up.

I'll NOT be able to respond to you until tomorrow afternoon because of travel and a meeting I have just after getting from Midway to downtown. As soon as I can check email after lunch I will. Just leave tomorrow night or late afternoon open if you can. Be flexible if possible.

I hope to come back from the show with plenty of videos for you about new products.


Strange Odors in Your Home

In the past few days, I've received several emails from subscribers like you about strange odors. The commonality in all cases is the people lived in condominiums or apartment buildings.

In one case, a tenant traced the odor to spider spray and mothballs another tenant's exterminator used to eradicate the eight-legged creatures.

Another case was a lazy homeowner that allowed his dog to urinate in the basement of his condo. The pungent odor wafted through air leaks between the condos. With some caulk, the next door neighbor was able to stop the infiltration of the odor.

The takeaway should be that when living in close quarters with other humans, think about how you'll deal with offensive odors that may come your way.


Outdoor Repairs and Cold

Old Man Winter is just around the corner. You may live in a place where it's already snowed.

Suffice it to say you might only have a few weeks of decent weather to make repairs that will last.

Keep in mind that some materials - just about any with water in them - can become problematic as the temperature drops. You don't want latex paint or caulk freezing at night before it's had a chance to cure.

Realize that things dry somewhat slower as the sun gets lower in the sky.

Okay, I don't need to hear from you braggarts who live in Southern California, Arizona and Florida who get glorious weather most of the winter. Blah blah. :->


Lisa from London

Lisa from London, not London, Kentucky, the London in England, emailed me yesterday.

"The builder threw grout down my toilet and it has solidified. Is there a solution I can pour down the toilet to dissolve the grout?"

Lisa, if you can still see the grout in the bottom of the bowl, you can probably remove most of it very carefully with a sharp stick.

First clean and sanitize the bowl. Then pour a bucket of clean water quickly into the bowl to remove most of the water.

Use a sponge to get rid of any remaining water. Sharpen a dowel stick and tap it gently with a hammer to see if you can chunk up the grout.

Be careful not to hit the grout too hard. You don't want to break the china, nor scratch it.

Try to work from the edges into the center of the mass of grout.

Save all the debris and mail it to the idiot builder.

You can use muriatic acid to soften the grout and clean off any residue from the china. Be careful as the acid fumes are very powerful. Open the windows and wear gloves and goggles.


Facebook Report

AsktheBuilder on FacebookAre you a Facebook fan of mine? If not, why not?

Today I loaded a few photos I took over the past 24 hours. You may want to see them.

I also solved a few problems for other homeowners like you. Remember, if you're on Facebook, PLEASE leave a comment at the bottom of the column telling others what you discovered when reading my column. You'll see the Facebook comment widget at the bottom of the column. Thanks in advance!