Select Snowblowers Video

Tim Carter is using a sweet looking machine. It is a snow blower. This video will discuss the features and differences between snowblowers to help you when you are making your snowblower purchase.

While some snowblowers may look alike, there are differences. Check the width of the blade. In this video, there is a 24" and 26". While close in size, the larger one might be more difficult to turn and maneuver.

Chute control is another important feature. Some blowers use a handle to rotate the discharge chute from left to right. But some snowblowers require you do loosen a screw or knob to change the angle of the discharge chute. There are models that have all the controls at the operator’s position. The angle and direction of the discharge can be changed while standing at the handles. This is handy to change the snow direction without stopping the machine.

Engine size is a major factor. The bigger the engine, the more power available to handle snow. Especially important if you get a lot of heavy snow. Engines are not showing horsepower ratings any more. They tend to show the size of the engine in cubic centimeters (cc).

Another factor is how does the snowblower work. A dual stage, or two stage, snowblower has a front auger that pulls the snow back into the chute. The second stage is a high speed impeller that flips the snow up and out the discharge chute. This allows the snow to be blown out up to distances of 20 - 30 feet.

A single stage blower only has the front auger to collect and discharge the snow. The auger as it spins, shoots the snow up the chute. The snow is not thrown as far or as high.

If you are considering a snow blower purchase, talk with your neighbors about features of their's they like, or consider renting one to test its ability. Some of the larger ones are self-propelled. Many with different forward and reverse speeds. Things to consider if you have hills or just lots of snow.

If you don't like pulling and pulling to start the engine, look for a model with an electric start. Just push a button and it starts right up.

Above all, when you finally purchase your new snowblower, be sure to read the operator's manual and all the safety instructions.

February 16, 2010 AsktheBuilder News And Tips

What’s in This Issue?

Latest News
Counterfeit Pocket Doors
Hands-On Experience
Snap-Together Ceramic Tile
Latest Columns
Fire Pit

I do product reviews frequently. Please read my Disclosure Policy to understand the relationship between me and the companies that make the products or offer the services I review.

FOLLOW ME ON TWITTER

Friendly Question Reminder!

If you have a question for me, don't hit the Reply button just yet. Go immediately to my web site and type in the keywords about your problem into my Search engine. The search box is at the top of every page of my web site. You could have your answer in seconds if you do this! Please pay attention to all links you see at my web site. The exact products and services you often need are right in front of you, and you might be ignoring them.

Latest News

It's the middle of February. Holy Smokes. The weather here in New Hampshire has been glorious. We have had day after day of bright blue sky glistening on the smooth ice of Lake Winnisquam. But that's to end later today. Any moment now, 6 inches of new snow is forecast to blanket us. It's needed, as we've not had a decent snow in a month. There are many places where there is no snow cover. It looks like late March around here as I type this. The snowmobilers are very unhappy.

There's lots to share this issue, so I'll get started.

Counterfeit Pocket Doors and You Know You've Arrived

I use Google Alerts. This amazing feature sends you an email when it finds a keyword or phrase you're tracking on any newly published page on the Internet. Can you see how advantageous that could be in your business or hobby? A few days ago, I got an alert about this website:

www.TwitterInstantCash.com

Well lookie lookie who's at the bottom of *their* home page. Little old me. The owners of this site are promoting a FRAUD. I have nothing to do with them and I've never used this product. They don't have my permission to use me as an endorser. I'm angry as can be as you might expect. I'm quite certain they are losers.

But the point is, they feel I'm a celebrity on the Internet. They know I'm successful and have a recognizable brand. So they are playing off my success.

Guess what? The same thing is happening to a great brand of pocket doors I use: L.E. Johnson. There is a bogus company that's distributing counterfeit pocket doors in boxes that look like the real McCoy. To ensure you don't get ripped off, be SURE you purchase your L.E. Johnson pocket door from an authorized dealer. Go here to find one:

L.E. Johnson Dealer Locator

If you just want to buy a pocket-door frame while you're there, click that yellow oval at the top of the page that has a hyphen going into an equal sign. That takes you right to the online store.

Hands-On Experience + Great Writing Skills = $$$$

I'm looking to assemble a team of the best of the best. Are you, or do you know, an *excellent* writer that has extensive hands-on experience in any area of home improvement? You could be a professional, a serious DIY'r, or a professional writer that's cross trained in home improvement and be the person I'm looking for.

If so, I need you now. I'm looking to hire independent contractors who will write assigned topics in their area of expertise. If you pass my test and write enough columns, then you become one of my Certified Writers. This is a very exciting new project.

Please understand upfront that I'm going to be very selective. I need people who can follow instructions, have the highest integrity and ethics, and have a real command of the English language. If you don't, I'm afraid it won't work out. Want more details?

Go to: PlumbBobPress.com

Snap-Together Ceramic Tile

I just received some test samples of a porcelain ceramic floor tile that snaps together similar to what one does with laminate flooring. It's called SnapStone.

This is a floating floor system that lays on top of any other flooring. It's an ingenious system that appears to be well engineered. The tiles are cut very precisely, and the plastic frame they sit in looks like it would provide the needed support one usually gets from a bed of thinset mortar.

All the installation steps are the same as if you were using regular tile. The *only* thing you save is the one day you need to stay off a tile floor set in thinset. You might also save a mess if you've not worked with thinset before.

This tile comes with a very special grout that you must use. I suspect the grout is more like a sanded caulk than a cement-based grout one might normally use. The grout needs to have a pretty amazing degree of flexibility to work with a floating floor system.

I didn't price this tile out, so I can't tell you how it compares to regular tile. But it's interesting.

One thing I can't figure out is how to snap in a tile that has a tough L-shaped cut if you're working up against a finished surface. My guess is that you need to work away from the L-shaped cut piece. This could be problematic.

All in all, this may be a great system if you're a beginner and have a room with all simple straight cuts.

Give it a look at: SnapStone Tile

Latest Columns

Ceramic Fireplace Tile

Septic Cleaning

Vessel Sink

Framing Square

Tim Carter's Fire Pit

If you're a new subscriber, I have a secondary website that might be of interest to you. It has nothing to do with home improvement, and everything to do with improving our great nation.

The best part is that it doesn't make any difference how you feel, as you can voice your opinion on any of the topics discussed there. Just leave a comment.

I hope you stop by my Fire Pit and share some conversation.

AsktheBuilder.com

Converting A Pool Room

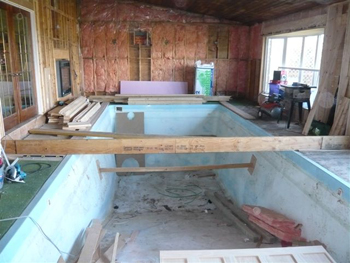
DEAR TIM: I have a 12x30 swimming pool in a 20x40 room. Pool has been empty for 6 years. I am building a floor over the pool. Should I partially fill the pool with gravel or just brace the walls with 4x4 or 4x6 beams. Kelly Bennett, Calgary, Alberta, Canada

DEAR KELLY: That's a pretty interesting job you have going with that indoor pool. The closest I've ever come to that situation is when I converted an old gas station that had a service bay with a mechanic's pit in it into a veterinary hospital.

Covering a swimming pool with a regular floor. PHOTO CREDIT: Kelly Bennett

Covering a swimming pool with a regular floor. PHOTO CREDIT: Kelly Bennett

In that situation, because we were pouring concrete, I filled in the pit with pea gravel.

I would not do that if I were you. Your idea of using 4x4s or 4x6s is a good one. I'd create upside down trusses using this lumber to brace the walls of the old pool. There's not as much lateral stress against those walls as you might think when the pool is empty. Even with water in the pool, it does little to offset the lateral pressure of a side wall tilting in. The water simply moves up to compensate.

Be sure you make strong connections between the beams so they never fail. You also need to install a fantastic vapor barrier over the entire pool area once you've constructed the trusses. Read my past columns on this and use a vapor barrier that meets the ASTM-E-1475 standard.

Vinyl Siding Replacement Alternative

Good Morning: I have a question regarding vinyl siding. I previously referred to your website and didn't find any answers. My husband and I will be selling our home in the near future. Our vinyl siding has faded areas everywhere, from reading on your website I see this is a common problem especially with lesser quality siding. Is there a vinyl-siding cleaner that will offer a “temporary fix”. We do not want to have to invest in new siding if can avoid it. I also read your on site where someone had mentioned a product called VinylRenu (this product offered to restore vinyl siding to is original color and rid the siding of faded areas). Do you know anything about this product? - April S.

Dear April: I can see why you don't want to face vinyl-siding replacement, as it can be very expensive. The sun's ultraviolet rays ravage low-quality vinyl siding that doesn't contain enough titanium dioxide to prevent the color loss. This same thing happens with car interiors, which is why people use the spray products that make the plastic look new.

That's the solution - apply a vinyl-restoration product. But first be sure to clean the siding well to remove any dirt, algae, sun-damaged color pigments, etc. Once the siding is dry, then try any of the spray-and-wipe products you can find. I would do a test first on some remote part of the house to see if you get great results. Do an exhaustive search on the Internet to discover all of the products that are available.

February 2, 2010 AsktheBuilder News And Tips

What's in This Issue?

Latest News
Every Other Day Q and A
Hole Pro Hole Saws
Sears Snowblower
Septic Tanks and Cleaning Tip
Recent Columns
Fire Pit

I do product reviews frequently. Please read my Disclosure Policy to understand the relationship between me and the companies that make the products or offer the services I review.

FOLLOW ME ON TWITTER

Friendly Question Reminder!

If you have a question for me, don't hit the Reply button just yet. Go immediately to my web site and type in the keywords about your problem into my Search engine. The search box is at the top of every page of my web site. You could have your answer in seconds if you do this! Please pay attention to all links you see at my web site. The exact products and services you often need are right in front of you, and you might be ignoring them.

Latest News

I'm really energized! I have all sorts of things going on up here in New Hampshire. The weather has been gorgeous. We've had a string of gorgeous days up here in New Hampshire. Here are some photos I've taken over the past few weeks.

You may also enjoy this video about the lake below my house and and this video taped just after it.

I'm working hard on several projects at once, but the biggest news is about my Stain Solver business. Just two weeks ago, we went through a huge growth spurt. I turned over the packaging and fulfillment of the product to a fantastic company in Cincinnati that can really handle huge volume. You and I are going to put them to the test with this issue. Read below about Septic Cleaning.

In addition, we're completing testing of a new shopping cart for AsktheBuilder.com. I've never been happy with the cart I currently have, and my team members, I believe, have discovered an amazing cart. I hope to unveil it in the next few weeks after we finish testing it.

And for the really big news ...... !

Every Other Day Q and A!

I get nearly 100 questions a day at the AsktheBuilder.com website. Ellen, who's worked for me for nearly 15 years, has been trained to answer many of the routine and repetitive questions we get. She sends on to me the ones that she feels need a little more polish. Can you see where this is going?

Beginning next week, you'll be able to sign up for a FREE email notification, just like this newsletter, where every other day I'll send to you a single short tip that could end up saving you thousands of dollars a year and many hours of frustration.

You'll read a real question sent in my someone just like you, and then my answer. These will be succinct Q and A's that should take you less than a minute to consume. When possible, I'll include links to relevant columns or videos of mine back at the website. Remember, this costs you nothing, Nada, Nyet.

A homeowner just around the corner or across the nation may be having the same problem you have, and now you'll get the answer delivered to you at NO COST and with virtually no effort. You'll just have to sign up for this new service next week. As a bonus for signing up, I'm going to share with you the Top Five Home-Improvement Tips of all Time. These are frequently overlooked and under appreciated tips. You'll get these the moment you confirm your subscription to this neat new AsktheBuilder.com feature.

Remember, I'll give you the link to the sign up for this NEXT WEEK.

Hole Pro Hole Saws

Just before Christmas, I get flooded with press releases and tools to test because manufacturers are competing for your limited spending dollars. One of the tools that came, but I was unable to test because of time constraints, was a boxful of amazing hole saws and a unique tool that lets you cut larger holes in drywall while capturing all or most of the dust. These tools are made by a company owned by women and run primarily by women I was told by Peggy Rader. I'm pretty certain Peggy is the President.

It shouldn't surprise you that even hole saws can benefit from intelligent design. Peggy and her team seem to have developed hole saws that are perfectly matched for any drill, including cordless drills. If you've ever used an older hole saw with a cordless drill, you know the friction created by the hole saw rapidly sucks the life from the cordless-drill batteries. These new hole saws from Hole Pro create much less friction.

You really want to look at their Power X-230 tool. This is the one that has the clear plastic shield that allows you to cut a perfect hole in a drywall or plaster ceiling with none of the dust cascading into your eyes or onto the finished things below you. I can't tell you how I wish I would have had this tool years ago. You'll not be disappointed with these hole saws.

Sears 24-Inch Snowblower

This may not appeal to you if you're living where Mother Nature doesn't pummel you with frozen water. Here in New Hampshire, snow and ice are as common from November to sometimes May as sugar sand is found on the splendid beaches of Siesta Key in Sarasota, Florida.

I recently had the chance to test the Sears 24-inch dual-stage snowblower. This is a dandy machine. I LOVE the new control that allows you to easily point the chute to where you want the snow to go. The blower starts easily, it's simple to operate and it really gobbles up snow.

If you don't like to use the pull starters where you yank a handle attached to a rope, no problem! This bad boy comes with an electric starter just like your car. You attach an extension cord and just push a button until the motor starts. Sweet!!!!

You're going to love this snowblower. I can assure you of that.

Septic Tanks and Cleaning Tip

Tens of millions of people here in the USA and all across the world use septic tanks to dispose of waste from their homes. City sewers simply can't be run to every house in the land.

Think about how fast something decomposes when it's exposed to the air. Many microorganisms are able to break it down. But in a septic tank, these small creatures can suffocate as the breakdown of the waste creates different gases like methane, that drive out the oxygen from the water in the tank. These helpful microorganisms are delivered into the tank regularly when you flush your toilet, but they don't last long.

All that's left in the tank are anaerobic (absence of oxygen) bacteria to do the dirty work. Imagine how thorough and fast the breakdown would be if you introduced oxygen into your tank every week. This is exactly what happens with certain septic systems where there's not room for a leach field. They're called aerobic systems. An electric pump injects air into your septic tank while an impeller spins whipping the water and waste in the tank like a blender on your kitchen counter. That's great if your tank is set up this way, but millions are not.

My Stain Solver can add the oxygen to your tank if you don't have an aerobic system! Each week, add one-half cup by pouring it into your toilet bowl and then flushing it down to the tank. Flush twice in a row to make sure all the powder makes it into the tank as rapidly as possible. The tank then gets a huge shot of beneficial oxygen on a regular basis. Pretty cool!

P.S. My 16-pound size is perhaps the best bargain for this use.

Recent Columns You Must Read!

DIY Attic Insulation

Ceramic Flooring Tile


Workbenches

Gutter Repair

Myth Busting the Famous Loretto Staircase!!

Tim Carter's Fire Pit

Are you a new subscriber in the past month or so? If so, you may be interested in visiting my FirePit so you and I can discuss the Constitution, Reckless Out-of-Control Spending and many other topics. I was in Washington, DC on September 12, 2009, a day that will absolutely be talked about in future history books. That should say it all.

AsktheBuilder.com
Kiln Lumber Drying

DEAR TIM: You mentioned moisture content in new construction can continue to dry and cause cracks in walls. Can you elaborate on moisture content? If kiln dried, is moisture reduced to 10%, etc? How long for moisture to get to 0%? Dave G, Red Bluff, CA

DEAR DAVE: Lumber is a hygroscopic material. This means it can absorb moisture in both liquid and gas form through its very open cellular structure. Think of a tree when it's standing up as a massive bundle of very tiny straws packed next to one another like the straws jammed into a canister at an old-time soda shop. Cut off the end of a piece of lumber exposing a fresh edge and then paint the end with some water. You'll see the water disappear into the wood as if there was a vacuum attached to the other end of the piece of lumber.

Kiln-dried lumber has the moisture baked out of it. It's not much different than the oven in your home. I can't tell you how long it would take in a kiln to get the moisture to zero percent. It doesn't matter because once you remove it from the kiln, the moisture content of the lumber will start to rise as it absorbs water from the air. It will stabilize to the humidity where the lumber is.

It's impossible to air dry lumber and get it to zero percent moisture content. There are very few, if any, places on Earth where the relative humidity is always zero. You may get it close if you set a piece outside to dry in the Atacama Desert.

Building Collapse Cause

Digging too close to a building's foundation can result in catastrophic problems. A few years back in Cincinnati, OH, construction next to a school building resulted in such a failure Sections of the school building collapsed, leaving a gaping hole in the side of the school. You can read more about this collapse on the Cincinnati Enquirer site. The article is Mix of causes likely in Summit collapse.

Just recently, I received the following email from Michael L. The email shows the catastrophic results of what happens when you dig a hole next to a building. In this case, an entire building in China collapsed. The photos below tell the story. Pay attention to the huge tension cracks that radiate from the corners of the windows. This shows you the enormous stress that happened as the building started to fold over and when it crashed to the ground.

Below is the exact text of the email I received along with the captions at the bottom of some of the photos. The captions were written by someone else, not me.

Author's Note: March 4th, 2010

I received an angry email from Ruth Tang about one of the captions you'll see below. She was deeply offended by the wording implying that everything made by the Chinese was of poor quality. I didn't write the captions, I am just the messenger. Above I state who sent me the information in the first place.

I'll add that there have been engineering failures on every continent. The most recent one here in the USA that comes to mind is the horrible tragedy in Kansas City Hyatt Regency Walkway collapse. One hundred and fourteen people met their Maker that day. To the best of my knowledge, no one died in this collapse in China.

"Oops! Beijing , we have a problem!!!!!!! Anyone who bought a condo here surely has a problem. Talk about a collapsed market!

YES, IT'S A 12 STORY BUILDING IN CHINA LYING ON THE GROUND.

Collapsed Building

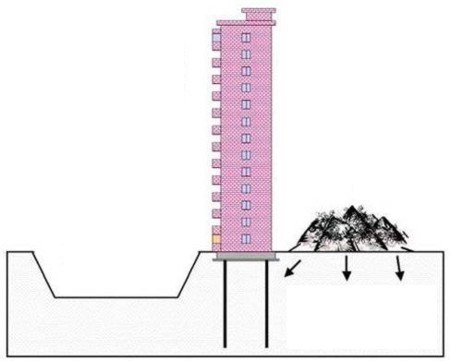
  • An underground garage was being dug on the south side, to a depth of 4.6 meters.
  • The excavated dirt was being piled up on the north side, to a height of 10 meters.
  • The building experienced uneven lateral pressure from south and north.
  • This resulted in a lateral pressure of 3,000 tons, which was greater than what the pilings could tolerate. Thus the building toppled over in the southerly direction.

The building as built.
First, the apartment building was constructed.

Garage being dug on the left side.
Then the plan called for an underground garage to be dug out.
The excavated soil was piled up on the other side of the building.

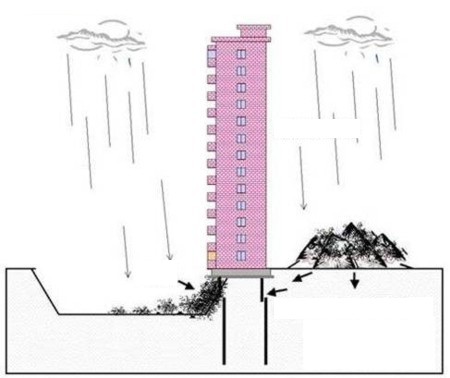
Heavy rains
Heavy rains resulted in water seeping into the ground.

Ground washing out

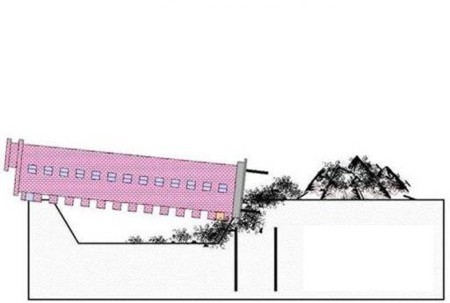
The building began to tilt.  Then it began to shift and the hollow concrete pilings were snapped due to the uneven lateral pressures

Building collapse

And thus was born the eighth wonder of the world.

Building collapse

If the buildings were closer together it would have resulted in a domino effect.
Building collapse

Building collapse

Building collapse

Building collapse
Now that, folks, is a snafu. Don't you feel better now, that these are the folks manufacturing nearly EVERYTHING we buy and use today?"

Vessel Sink Designs

vessel sink

This vessel sink’s owner was very creative. She added color and dimension with colored stones and shells that are unaffected by water. PHOTO CREDIT: Tim Carter

DEAR TIM: I saw a vessel sink in a powder room over the weekend while attending a party. I can see now why they are so popular. How do vessel sinks differ from traditional sinks that drop below the surface of the countertop?

Are there special plumbing connections that are required for a vessel sink that will cost more money? Would you install one in your home, as I don’t want to make a mistake? Susan M., Clarkston, MI

DEAR SUSAN: Bathroom vessel sinks or even in a powder room are indeed the rage. I remember when they first started to get attention about ten years ago. My oldest daughter and I were attending a national kitchen and bath convention and we saw a gorgeous solid-glass vessel sinks in a specialty booth.

I was stunned at how sleek it was, even though, in my opinion, the sink was imitating what people used to have in bedrooms before there was indoor plumbing! Go back to the 1800’s and you’d discover in the bedrooms on a wash stand decorative bowls and pitchers of water to wash your hands and face.

These new sinks are radically different in design than traditional sinks because both the inside and outside surfaces of the sink need to be finished. Because the underside of a traditional sink was always below the countertop and out of site, the manufacturers could save time and money by not finishing it.

The engineering of the overflow channel is different because this hidden conduit must be contained within the sides of the vessel so you can’t see it easily. The overflow should be able to handle the flow of water if the drain stopper gets closed and the faucet is on.

You also have to keep in mind the height of the cabinet that the vessel sink will rest on. The height off the ground of the top edge of the sink should be no less than 31 inches and certainly no higher than 36 inches off the floor. You’ll have to see how high your sink is and then do the math taking into consideration the thickness of the finished top to know what the cabinet should be.

A vessel sink faucet is a specialty item because it must be tall enough so the spout makes it over the top of the vessel and projects far enough into the bowl so that you have room to get your hands under the flow of water. Don’t think for a minute that every faucet will work well with every sink design.

Your existing plumbing connections will work with just about any vessel sink. If anything, the plumber will have to install an extra-long tailpiece from the bottom of the sink to connect to the P-trap under the fixture. This item is a commodity and not expensive at all. The water supply lines will connect to the new faucet with ease using flexible supply hoses that are wrapped with braided stainless-steel wire to keep them from bursting.


copper vessel sink

Copper vessel sink ©2017 Tim Carter

I installed a copper vessel sink in the house I used to live in. Actually it was a copper pan that my wife saw in a catalog, and she asked me if I could turn it into a sink. The only thing it’s missing is an overflow tube. I was able to punch a hole in the bottom of the pan large enough for the drain assembly, so it looks like it was a sink from the beginning. It works very well, and people who saw it loved it. The vessel sink faucet we used for this has a bamboo theme and it’s stunning.

You’ll discover that the costs for the vessel sink and faucet may be a little high. Part of this is the extra material they have to use because more of the sink and faucet must be finished as they sit above the counter. Another part of the cost is the popularity. That’s where the old economics law of supply and demand kicks in. You should see in the marketplace that a ceramic vessel sink may offer you the best bang for your buck.

Be sure you or the plumber really takes the time to do the math so that your sink does not end up too high. I would also highly recommend taking a piece of scrap plywood and do the necessary cutouts on it to make sure you have the sink at the correct height and the faucet hole in the right location so that the two fixtures work together.

You want to make sure that there is enough room for the faucet so it doesn’t hit the backsplash, your hands fit under the faucet in the sink and the vessel sink lip doesn’t hit the wall. It only takes a few minutes to create this simple plywood template. Now is the time to determine if all the parts work and the measurements are correct. Taking a chance with an expensive piece of granite or marble is not prudent.

Referenced in the February 16, 2010 AsktheBuilder Newsletter.

Column 816

Septic Tank Cleaning

septic tank about to be pumped

Septic Tank Cleaning | This is my septic tank about to be pumped. It’s a best practice to do this every two or three years. Copyright 2021 Tim Carter

Septic Tank Cleaning - Do it Every 2 or 3 Years

DEAR TIM: I just moved from the city to the country and was informed by a neighbor that septic cleaning should be added to my list of things to do. I’ve never had a septic tank and now am concerned about how to care for it and how often I should clean my septic tank. Is this something I can do? What’s involved in septic system cleaning? How can I extend the life of my septic system? Ruth T., Douglasville, GA

DEAR RUTH: I’m also the proud owner of a septic tank and system for the first time in 56 years. I grew up in the city and all the houses I lived in were connected to the city sewers. My attitude while living in those houses, although it’s wrong, was that if it flushes down the toilet or passes through a drain line all is well. You shouldn’t do that with any plumbing system, and it’s especially detrimental to a septic system.

This bare spot of ground is a clue that a warm septic tank is just below the surface. That warmth promotes biologic activity in the tank. PHOTO CREDIT: Tim Carter

This bare spot of ground is a clue that a warm septic tank is just below the surface. That warmth promotes biologic activity in the tank. PHOTO CREDIT: Tim Carter

Who Should Clean a Septic Tank?

A professional septic tank pumping company is the only one that should attempt to clean a septic tank.

CLICK or TAP HERE to get FREE BIDS from local septic tank pumping companies.

Septic tank cleaning and pumping should never be attempted by a non-professional. It’s dangerous work, and you can expose yourself to dangerous pathogens that thrive in the septic system. Never stick your head in the void space of a septic system as the decomposition of the waste material generates methane and other gases that push out oxygen from the system. You can pass out and die if you try to peer deep inside the tank.

What Equipment is Used to Clean a Septic Tank?

When you call a professional, they almost always come to your home with a large tank truck. The truck is equipped with a suction pump and a large flexible hose. Think of it as the largest wet-dry vacuum you’ve ever seen. This truck sucks the liquid and solids out of your tank so that your septic system works better.

Does Cleaning a Tank Help the Leach Field?

Septic tank cleaning helps prolong the life of your leach field. The leach field is an important part of a septic system that usually consists of piping surrounded by washed gravel or coarse sand. Partially treated water exits the septic tank and flows into the leach field to be purified by bacteria in the soil.

How Big Should a Septic Tank Be?

A septic tank needs to be sized according to how much average waste it receives each day. Typically it's sized by the number of bedrooms in a house.

For a septic system to work properly, it needs to have a significant volume of liquid space in the tank so the waste that’s dumped into the tank can start to break down. However, if the tank starts to fill with solids like sand, silt, gravel and any other solid objects that displace water, there is less liquid in the tank. What’s more, the tank needs to be regularly cleaned of scum, grease, and any other material that floats on the surface of the liquid in the tank.

It's best to do regular maintenance of the drain lines in your home too to help prevent clogs that could harm the septic tank.

How Often Should a Septic Tank Be Cleaned?

The cleaning schedule depends upon how heavily the septic tank is used, what’s put in it, if it was originally sized correctly for the size of the house, etc. There is no set schedule that works for everyone and every tank. I suggest that you call several septic system cleaning companies to see if they will come out and give you an evaluation of how your system is now. It’s well worth the money. If you wait too long, you can permanently harm your leach field. Those are very expensive to replace.

What Should Be Put in a Septic Tank?

In a perfect world, the only thing that should enter a septic tank should be what comes out of your body and tiny food scraps that make it through the tiny holes in a kitchen sink strainer.

To extend the life of your septic system, you need to clean it regularly, and then watch what you put into the tank in between cleanings. Obviously human waste is fine to put into the tank as well as anything you might put into your mouth to eat or drink. Anything else is pretty much a no-no.

Should Chlorine Bleach Be Put in a Septic Tank?

Avoid putting in chlorine bleach into your septic tank. Chlorine bleach can be added directly from bottles, but it’s also usually found in cleaners and soaps. Chlorine bleach can kill the beneficial bacteria in the tank that does the heavy lifting of breaking up solid waste in the tank. However, you should consider adding oxygen bleach to the septic tank as the oxygen increases the bacterial activity inside the tank.

Should I Put Grease, Paint, and Chemicals in a Septic Tank?

Do not add grease, paint, chemicals of any nature, etc. to the tank. Rinse heavily soiled and dirty clothes in a bucket and pour the muddy, sandy water outdoors. Remember, muddy clothes contain solid silt particles that can cause problems in the tank and leach field if they get that far.

What is a Great Source of Septic Tank Information?

The Small Flows Clearing House is a great place to get more information about septic tank design and maintenance.

Talk to different septic system cleaning professionals and they might tell you different things about the care of your system. One of the leading independent organizations that has really done lots of research on septic systems is the National Small Flows Clearinghouse (http://www.nesc.wvu.edu/wastewater.cfm) that’s associated with West Virginia University. They have an abundant amount of free information that will help you maintain your septic system.

Will Latex Paint Harm a Septic Tank?

Latex paint is especially sinister to a septic system and can wreak havoc in the leach field. NEVER clean paint brushes in a sink and allow that water to flow into your septic tank. Never clean any chemicals of any sort in sinks allowing the water to enter the tank. The rule I use is that if I can’t eat or drink it, it doesn’t go into the sink drain or toilet. Follow that simple rule, clean your tank regularly and all will be well.

Column 815

Framing Square Tips

Framing Square

This simple metal tool can be used for countless home improvement and construction tasks. PHOTO CREDIT: Tim Carter

The Framing Square

DEAR TIM: My Dad passed away and I was cleaning his tool-room out. One of the strange tools I saved was a large L-shaped piece of flat metal that has ruler markings on it all over the place. I’ve been told this is an aluminum framing square, but don’t know if that’s accurate. What are framing squares used for? Is it practical to own one, as I never saw my Dad use this framing square. Mandy P., Topeka, KS

DEAR MANDY: I remember cleaning out my Dad’s tool room long after we had to send him back to Heaven. Some of the tools he used, and they weren’t great, I still have. I just can’t part with them. I hope you’ll come to cherish the tools you saved, including the multifaceted framing square you now possess. It’s a magical tool indeed.

I have four framing squares of my own. That’s more than I need, but they are split up in between two houses. When I was still actively building, I always had two of these tools with me on my truck, and a third one in my workshop.

Ask ten different carpenters what their favorite use of a framing square might be and they’ll probably each tell you something different. When I was still building every day, you would find me using my square to create the angled lines on large framing lumber that would then be transformed into roof rafters. I also used my square to create parallel lines, spaced 1.5 inches apart and on 16-inch centers, on long 2x4’s that would be the top and bottom plates for walls. A vertical wall stud would fill the gap between the closely spaced lines.

The versatility of the framing square comes from the fact that the two legs, the body and the tongue, are set at exactly 90 degrees from one another. The body of the square is often 2-inches wide and almost always 24-inches long. The tongue is 1.5 inches wide and typically 16-inches long. One of my Dad’s tools I now own is a miniature framing square that 1/3 the size of a standard one.

If you remember your grade school or high school geometry classes, a 90-degree angle is considered square. If you have a rectangle or a square, each corner is 90 degrees. This flat tool you now own allows you to check the intersection of two lines to see if they are square.

You can use a framing square for any number of tasks. It makes a great straightedge if you’re trying to cut a very straight line with a razor knife. You carefully hold the tool in place and slowly slide the razor along the edge of the tool.

I taped a video one day showing how you can use a framing square to make a perfectly square cut when using a circular saw. If you’ve ever tried to cut a wide 2x10 or 2x12 before, you know it can be tough to keep the saw blade on the pencil line. If you clamp a framing square to the lumber, you can produce a square cut by sliding the flat bottom plate of the saw against the edge of the square. Bingo, a square cut!

You can use them to check the inside corners of a room for square by placing the tool into the corner. If there is no gap between the wall surfaces and the outside edges of the square, the walls might be square to one another. I say might, because the tool can’t tell you what’s happening to the walls beyond where the tips of the square are. What’s more, drywall compound used to cover the taped corner joint almost always makes the corners not square.

One thing you better do before you use your square is to check it to make sure it is square. Yes, it’s possible the tool was of poor quality to begin with or it may have been abused. You need to use your high school geometry to check it. Just do what Pythagoras, the famous Greek mathematician, would do if he had it in his hands.

He would take an accurate measuring tape and carefully measure to see if the tongue was 16 inches long and see if the 12-inch mark on the outside edge of the body is actually 12 inches from the outside corner of the square. If these measurements were accurate, he would then take the tape and hold it diagonally from the tip of the tongue on the outside edge and extend it to the 12-inch mark on the outside edge along the body. If the diagonal measurement is exactly 20 inches, the tool is still square!

Framing squares are a must-have tool for home improvement and building. They’re not expensive, and they deliver accurate results their entire life if you treat them well. Perhaps the most common one is an aluminum framing square. I do have a steel square, but it can rust if the protective coating gets worn off.

There are tables and other numbers on high-quality squares that allow you to do a multitude of tasks with the square. The most helpful tables on the square will help you cut roof rafters to the correct length if you know the roof slope. Roof slope is commonly called out in so many inches of rise per foot of run. A low-slope roof may be called a 4 / 12 slope roof because for every 12 inches of horizontal run, the roof goes up in elevation 4 inches. Hang around a seasoned master carpenter for a day and it may all make sense to you!

Column 814