August 9, 2009 AsktheBuilder News And Tips

What's in This Issue?

Tape Measure Errors
Chicago Trip
Stain Solver Sale

FOLLOW ME ON TWITTER

Friendly Question Reminder!

If you have a question for me, don't hit the Reply button just yet. Go immediately to my web site and type in the keywords about your problem into my Search engine. The search box is at the top of every page of my web site. You could have your answer in seconds if you do this! Please pay attention to all links you see at my web site. The exact products and services you often need are right in front of you, and you might be ignoring them.   Never forget that all past issues of my Newsletters can be found at my website.

Howdy! This is a quickie newsletter. I usually don't send them on a Sunday, but I had some news and wanted to alert you about the expiring super promo code for Stain Solver.

Tape Measure Errors

For the past few days, I've been installing ceramic wall tile with very narrow 1/16th-inch grout lines. This means your tolerance for cutting errors is half that! All of a sudden my cuts were off, some by a monster 1/8th inch. I knew I had marked the tile correctly.

Low and behold, I discovered that the hook end of my tape had some grit in it and was not sliding. What? You didn't realize that the 90-degree bend at the end of a tape measure moves? You bet it does! What's more, high-quality tapes do this reliably for years if you keep them clean.

klein-tools-tape

Hook end of a tape measure must be kept clean!

The reason this part moves is to account for the thickness of the metal on the hook end when you're taking an inside measurement between two points. Think about that. When you take an inside measurement, you're compressing the tape. When you then stretch the tape out on a board you do the opposite. If the hook end didn't slide that little bit when you stretch it, your measurement will be off a 1/16th inch. This is what was happening to me.

Oh, one more thing. Before you use a tape measure for accurate work, look at the hook end to be sure it's not bent. That can happen if you drop a tape measure. That bend in the hook will really mess up your measurements, especially if you're working with another helper who is feeding you dimensions. His tape may be accurate, but your tape could be off 1/4 inch or more because of the bent hook.

Chicago Wednesday August 12th

I'll be in Chicago on business this coming Wednesday and Thursday. If you want to chat for a little bit over some liquid refreshment, we can do it at the hotel lounge in the Hyatt on Wacker Drive. Email me if this is of interest to you.

Stain Solver Event Over in Less Than 48 Hours!

If you want to save huge money on my Stain Solver, you have less than 48 hours. The promo code for the 25 percent price reduction expires Monday, August 10th at midnight.

Stain Solver is a great wood cleaner and it does magic on tile grout. It gets stains out of clothes and anything that's water washable.  It's one of the best green cleaners, as it does all it's cleaning with oxygen ions.

Here's the code:   25sale (expired on August 10, 2009)

Go to: www.StainSolver.com

AsktheBuilder.com

August 4, 2009 AsktheBuilder News And Tips

What’s in This Issue?

Very Important News
Nail-Gun Safety
Mortar Gun
Drywall Finishing
Sanding Drywall
Spray Painting
Birthday Golf
Stain Solver Sale

FOLLOW ME ON TWITTER

Friendly Question Reminder!

If you have a question for me, don't hit the Reply button just yet. Go immediately to my web site and type in the keywords about your problem into my Search engine. The search box is at the top of every page of my web site. You could have your answer in seconds if you do this! Please pay attention to all links you see at my web site. The exact products and services you often need are right in front of you, and you might be ignoring them.

Never forget that all past issues of my Newsletters can be found at my website.

VERY IMPORTANT NEWS

If you want to keep getting my newsletter, you MUST add me to your Address Book or you Contact List in your email program or interface. This is really important if you use Yahoo!, Gmail, Hotmail, AOL, etc. If you don't add me, this newsletter might start to get automatically filtered OUT of your Inbox.

Here's what's happening. Because of the flood of Spam, these web-based email programs, as well as some proprietary software like Thunderbird, Eudora, etc. are segregating incoming mail based upon your Address Book. It's giving high priority to those emails from people you've indicated you like or added to your Address Book. You typically have friends in your Address Book or Contact list. That makes perfect sense!!

Please add: [email protected] to your Address Book right now. Thanks in advance.

- - -

Let's see, what's been happening over the past two weeks? Well, I've been working non-stop on my bathroom remodel and have rounded third and am heading for home plate. I should be finished by the next newsletter. I went to the hospital to get treated for shooting myself with my nail gun, I started the probate process for my Mom's estate (I'm the executor) and I had a birthday! Whew, that's a bunch of things in a few days!

Nail-Gun Safety

The accident with the nail gun happened this past weekend. It was totally my fault because I was in a rush. That's the takeaway you need to focus on. Slow down and THINK before activating any power tool.

I have several Paslode nail guns. One shoots a tiny 18-gauge finish nail that's perfect for pining small pieces of wood trim. I have another Paslode tool that shoots 2-inch-long 16-gauge finish nails. The trouble is both guns look nearly identical - same color and pretty much the same shape.

While building several window and door head casings for the bathroom, I needed both guns. This special trim board is made up of five different pieces of trim lumber and sits on top of two vertical pieces of window casing. The look is very Victorian. I use the long nails to attach a special crown molding to the top of a flat head board. The other nail gun is used to attach the corner pieces of trim and a long flat molding to the bottom of the head casing.

Well, I needed to glue and nail the tiny mitered corner pieces using the smaller nails that are only 1 and 1/4-inch long. To hold the triangular pieces of wood, I have to use my left hand while precisely positioning and firing the nail gun. Because I was in a hurry, I grabbed the wrong nail gun and fired it. Yeouuuuch! A long nail shot out the top of the wood and into my wrist at the base of my palm. It penetrated about 1 inch into my wrist. The physician's assistant who treated me told me the nail missed the radial nerve that connects to the thumb and index finger by 1/8 inch and the artery by about 1/4 inch. I was lucky.

Please be very careful when working with power tools.

Mortar Gun

I just took delivery of a very cool tool I'll be testing. But I wanted to let you know ahead of time in case you have to repoint the brick or stone on your home. This tool allows you to install mortar much like a caulk gun. I'll tell you more about it in the next few weeks. It really looks like an amazing tool.

Drywall Finishing

I hate to finish drywall. I can get professional results with ease, but I HATE doing it. It's mind-numbing work. I was taught how to do drywall finishing by several professionals who have worked over the years on my projects. It really has paid off to listen to them. I show many of the techniques in the Drywall Videos at my website.

Here's a trick that many homeowners don't know. When second coating the corners or even the flat seams, you really need to use compound that's been well mixed and has had a little water added to it. Be sure to read the label on the joint compound to see how much water you can safely add without degrading the adhesive qualities of the mud.

But suffice it to say the compound needs to be the consistency of warm cake icing. Not runny, but smooth and creamy. You'd be surprised how many homeowners I see who use the compound right out of the plastic buckets without adding water. They struggle spreading the mixture and it looks really rough. Be careful not to mix air into the compound. You'll get tiny bubbles in the mix that will have you pulling your hair out.

One final tip. If you have a room or two of drywall to finish, buy the joint compound in the boxes instead of the plastic buckets. It's cheaper and helps the planet as the plastic buckets are made with crude oil. You dump the box of mud into a 5-gallon bucket and away you go! This is why I always save the plastic buckets and lids as I know I'll use them in the future.

Sanding Drywall

I loathe sanding drywall. There's an abundance of products out there to make the task less messy, but drywall dust is just a menace. One of the tricks I was taught years ago by the pros was to use these handy sanding sponges in the corners where a wall corner meets the ceiling. A standard pole sander works great on the wide-open areas of a corner either where two wall meet or a wall meets a ceiling, but they are next to useless where two walls meet up at the ceiling. The pole sander just bumps into the wall or ceiling and can't do the job.

This is where the handy sanding sponges shine. I used these for this job and was pretty happy. They work best when you get the ones that have the abrasive material on four of the six surfaces of the sponge.

Spray Painting

As I'm getting my house in Ohio ready to sell, Kathy wants to dress up the return-air registers in the house. I was able to get gorgeous Victorian cast-aluminum grilles, but they needed to be painted. I tried using a brush, but that was futile.

Then I remembered I had a spray-paint tool that was sent to me to review. Wow!! This tool was easy to set up, worked like a champ and was easy to clean. There was minimal overspray, so all in all it was a great success. If you need to apply paint to hard-to-paint items, this should be on your radar. I'm going to try it next week to apply paint to the custom four-panel Victorian doors in the master bedroom. It should save me nearly an hour's time, if not more.

Birthday Golf with John Meredith and Jason

Here at the Carter house, it's a tradition that on your birthday you get to do whatever you want - assuming it's legal - without any questions or hassle from the other members of the family.  For me, that means going out and playing a round of golf.

The past few years, I've done that with my very good friend John Meredith. This year, his son-in-law Jason helped us regrade and re-landscape the golf course. On hole number nine, I pushed over a dead tree that was blocking my chip shot to the green. John and Jason howled with laughter. We play at the Buck Point Golf facility on the shore of Lake Brookville in Indiana. This course is a little rough around the edges, but it has a great layout and some very tough holes. I shot a 103. It was my fourth time out this year, and I'm still perfecting the sweet swing my golf coach Joel Suggs taught me back in January.

Anyway, after the golf game was finished, we had lunch. John is the owner and president of Saver Systems. His company makes fantastic sealers for masonry and wood. John brought to the table some secret photographs and an actual test sample of wood that had undergone extensive ultraviolet (UV) light testing. The photos showed samples of national brands of deck stain and his new blend tested side-by-side. Next week I'll share these photos with you, but suffice it to say that you'll NOT BELIEVE what you'll see.

John has been working on discovering the perfect recipe of his synthetic resin deck sealer and a nano-technology light-stabilizing chemical. It appears his chemist Gregg has hit the sweet spot because the actual sample and the photos showed little or no damage to the deck stain by the UV light. The color was as rich as if it had just been applied after hundreds and hundreds of hours of harsh UV exposure.

Here's the bottom line. Next week, John has told me he will do a pre-production batch of this deck stain for just you. That's right, no one else in the world but MY subscribers will have access to this deck sealer until next spring. He's only going to make 3,000 gallons and will limit sales of this to just ten gallons maximum to each person. And I can't believe this, but John said free shipping to all AsktheBuilder subscribers for this promotion! If your deck needs to be sealed before winter, this is the product to use. I plan to use some on my own front porch if I can get some.

I'll have the secret link to this deal in the next issue of the newsletter. I sure hope you are one of the lucky ones to get this product now instead of having to wait until next spring.

Stain Solver Sale

Last issue I promised you a huge Stain Solver sale to see if we could break the new mixer in the warehouse. Now's your chance. This promotion is a great tie in if you intend to try to be one of the folks who'll get John's amazing stain next week. My Stain Solver is the ultimate safe deck cleaner!!

It also works to clean anything, yes anything, that's water washable in and around your home.

This sale will only last seven days. The clock is already ticking on the promo code. It WILL expire, of that you can be quite certain.

The promo code is:   25sale      Remember, lower case!! (Sale ended on August 11, 2009.)

Go to Stain Solver.

You enter the promo code on the next page AFTER you add an item to the shopping cart. You'll get your best buy if you use it on a 16 or 50-pound size. Don't forget that the promo code works on all items in the cart, so now is the time to use it for anything you need.

AsktheBuilder.com

Marble Tile

marble tile floor

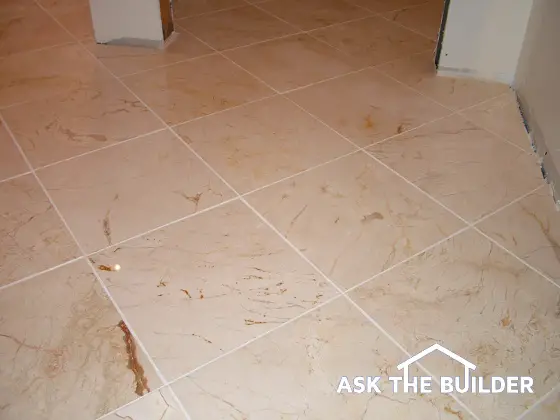
This marble tile floor took two days to install, but was well worth the effort. PHOTO CREDIT: Tim Carter

DEAR TIM: My wife insists on marble tile in our bathroom. I’ve never worked with marble tiles and wonder about how smart a choice they are. Is marble floor tile durable? What are the top things I need to know to ensure the marble tile flooring is installed so that it doesn’t crack? Is cleaning marble tile an issue once it’s installed? Steve P., Florence, KY

DEAR STEVE: Your marble tile bathroom is going to look splendid once complete, and best of all, your wife will be smiling ear to ear. Surely you’ve discovered by now it pays in spades to have a happy wife. Marble tile flooring is not new by any stretch of the imagination, and with minimal care and effort it will look gorgeous for many years.

Marble is a natural stone that is formed when limestone is heated and subjected to intense pressure. The crystals in the rock reorganize often creating a denser rock with interesting coloration and veining. Marble can be a softer stone when compared to granite or porcelain tile, but all the same it’s fairly durable. There are some marbles that are as hard as granite, so look for those if you want the most durable flooring. Sand and acidic liquids are marble tile’s biggest enemies. If you can keep these things out of the bathroom, you’ll be able to keep the marble sparkling for years.

Some marble tile is fragile out of the box. In fact, I just installed marble floor tiles that had a tendency to crack along the coloration veins. Only a few tiles in each box seemed to want to do this, so I had to be careful about how each tile was handled. But once the polished marble tile is set firmly in the cement-based thinset mortar, there’s no issue. The thinset mortar bonds the marble to the subfloor permanently, and it prevents the marble from separating.

Marble is like any ceramic tile or natural stone when it comes to cracking. These materials all have impressive compressive strength, meaning they don’t fail if you squeeze them. But if you bend or stretch marble, it can crack with ease. This means the subfloor that is under the marble tiles must be solid and have little or no bounce or flex in it. If it’s a wood subfloor, you don’t want seasonal changes in humidity to cause cracks as the floor picks up moisture and swells. This situation can be solved by making sure you install the marble tile on top of a crack-isolation membrane.

It’s also very important for the subfloor to be in the same plane. This means that there are no bumps or dips in the floor. You can make the floor be in the same plane by using a self-leveling underlayment compound that pours onto the floor like runny pancake batter. Once the material spreads out and levels itself, the floor is in the same plane. Just about all of these materials are rated to be used under marble tile.

Before you start the job, be sure you talk with your wife about the orientation of the marble tile in the room. The easy way to install marble tile is with the side of each tile parallel with a wall in the room. But you’ll discover that if you want to make the floor really look interesting, you’ll install the tile diagonally in the room. This means the tile are set at a 45-degree angle to all the walls. This method is much harder when it comes to cutting each tile, but the final look is stunning.

I’ve had the best luck using a one-eighth-inch gap between each tile. I maintain this spacing using clever plastic spacers that are circular. These spacers are shaped in such a way that one side is used where four tiles intersect and the other side can be used to create the exact gap at any point along the edge of a tile. They are reusable as they sit on top of the marble tile. I don’t like the spacers that drop down in the gap between tile. They can interfere with the thinset mortar causing a mess.

If you don’t exceed a gap of one-eighth inch between each tile, you can use unsanded grout between the marble tiles. I like that look, and the lack of silica sand in the grout ensures that the highly polished surface of the marble won’t get scratched as you spread the grout on top of the marble. To prevent shrinkage cracks in the grout, be sure it’s mixed with minimal water. The grout should be the consistency of cool cake icing that will not sag if you tilt the bucket on its side.

Once your marble tile is installed, take care of it with regular cleaning. Be sure to avoid using abrasive cleaners. If you can find a neutral pH cleaner, use that. These products can often be found at stores that just sell stone products. You can find them easily if you do an online search.

The trick is to perform regular cleaning and not wait for months before you tackle a cleaning job. If you just do a simple cleaning once a week, you’ll discover it’s not hard to clean the floor. The problems start when the tiles or the grout get heavily soiled and you try scrubbing your way out of the mess. With regular care, you just need a sponge and dry rag to make the marble shine just as it did the first day you walked on it.

Column 790

Backer Board

DEAR TIM: I’m getting ready to buy backer board for a ceramic-tile project. There are different types of tile backer board leaving me confused. What backer boards would you use and which would you avoid? I know you’ve favored cement backer board in your past work, so tell me if you still feel that it’s the best product. If you can share any backer board installation tips, I’d appreciate that. Dennis D., Waynesville, OH

DEAR DENNIS: To be more precise, I’ve installed lots of concrete backer board for years, all with good results. The concrete is unaffected by any water that might somehow get behind the ceramic tile. But these concrete products are heavy, problematic to cut and can wick water causing wood rot.

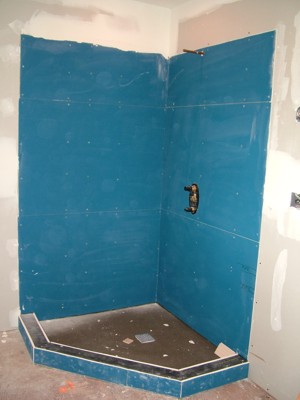
This coated backer board is easy to install and works well on walls and floors. PHOTO CREDIT:  Tim Carter

This coated backer board is easy to install and works well on walls and floors. PHOTO CREDIT: Tim Carter

Recently I’ve been experimenting with some of the alternative backer boards. The most recent one I’ve worked with has a water resistant gypsum core with a fiberglass mat backing and a handsome blue waterproof coating on the side that the tile adheres to. This material is code approved and recommended by a leading ceramic-tile association. I have to admit it far easier to work with than the cement back boards. I don’t miss the small pieces of sand and grit that scratch tub finishes!

Using this particular product also saves a step in the building process. If you do decide to use cement backer board, you must install a separate moisture barrier between the board and any wood that the board is attached to. Since the concrete can absorb and wick moisture, the barrier prevents wood rot should the backer board get saturated with water. I discovered first hand this can happen just a month ago when I demolished a 25-year-old bathroom that had waterlogged cement board in the shower. Because no water barrier was installed years ago, the bottoms of some of the wall studs were beginning to show water damage.

When I first got into the construction business nearly 35 years ago, a moisture-resistant drywall was the backer board of choice. It had a green paper so you could distinguish it easily from traditional drywall. Millions of square feet of this was installed in bathrooms, some by me, only to discover it didn’t do too well. Water passed through grout joints and eventually caused the green paper to fall apart. Virtually every building code now shuns this product for use in wet areas. I would never install this product behind tiles that were subject to water splashing on them.

As you prepare to install your ceramic backer board, the first thing to do is stop and read all the written instructions that deal with installing backer board. The product that I used with the bright blue coating had the instructions attached to each sheet. This is very helpful, and it can save you time and money so you don’t have a failure at a later point down the road.

Don’t underestimate the importance of using the correct fasteners when installing the backer board on walls. The combined weight of the board and the tiles you’ll attach to it is very high. I would absolutely use screws instead of nails, and not just drywall screws. You can usually find special backer board screws that have an oversized bugle-shaped head that securely fasten the board to wood or metal studs. Be sure the screws are coated so they will not rust. It’s also important to drive the screws flush with the surface of the board. Don’t allow them to tear the coated facing of the board.

If you’re installing your backer board in a shower or tub, don’t allow the board to come into contact with the concrete shower pan or the tub ledge. I prefer to hold up the backer board one-quarter inch off tub ledges and one-half inch off a concrete substrate in a poured shower. Holding the board up prevents the edge from sitting in any water.

Cutting backer board, especially if it’s a gypsum-core backer board, is done with a simple razor knife. The surface is scored with the razor, and you then snap the board creating a clean line. The razor is then used to cut the fiberglass backing. It’s the same procedure used to cut regular drywall.

Take your time to make sure that wall studs are plumb and in the same plane before you install backer board. These products conform exactly to what you fasten them to. If you want your tile to go in easily, the backer board itself must be plumb and flat.

Make sure the tile backer board that’s used on floors is attached to a sound subfloor. Screw down the wood subfloor to the floor joists before installing the backer board. If the floor seems springy or bouncy, you’ll likely deal with cracked tile. Be sure to install the backer board in a bed of cement thinset mortar to ensure there are no hollow spots or voids in between the backer board and the wood subfloor.

Column 789

July 20, 2009 AsktheBuilder News And Tips

What's in This Issue?

July
Electric Lawn Mower
Photos of Remodeling or New Construction
Carbon Monoxide Detectors
Stain Solver Sale
Hot Attics
Framing a Pocket Door

FOLLOW ME ON TWITTER

Friendly Question Reminder!

If you have a question for me, don't hit the Reply button just yet. Go immediately to my web site and type in the keywords about your problem into my Search engine. The search box is at the top of every page of my web site. You could have your answer in seconds if you do this! Please pay attention to all links you see at my web site. The exact products and services you often need are right in front of you, and you might be ignoring them.

Never forget that all past issues of my Newsletters can be found at my website.

July

It's been a crazy month of July so far, heck it's been over two weeks since I've last sent a newsletter. I went away for six much-needed days of rest just after the fourth of July. Kathy and I drove to upper Michigan. It was a great time to get away as the weather up there was spectacular.

As I write this, I'm here in Cincinnati, OH at my old home finishing some minor projects getting it ready to sell. I hope within a month to have a preliminary website up that I'll use to sell the home. I built the Queen Anne Victorian house with my own two hands and a few helpers back in 1986. You can watch a very quirky video I shot of the exterior about a month ago. I'm sorry about the production quality. I didn't have one of those expensive harnesses that takes the bounce out of walking with a camera!

In the past three years, Kathy and I have invested heavily in all new bathrooms, new kitchen, new HVAC, etc. A new roof will go on within a month. You'll be able to see photos along with some cool videos of the entire place very soon. If you want to own the AsktheBuilder house, this will be your only chance! I'll share the URL of the website with all the statistics and photos as soon as it goes live. Please hold back any questions about the house until then. All your answers will be at that website. Thanks in advance for holding off with your questions!

Electric Lawn Mower

Over the past two months, I've been testing a very cool electric lawn mower. This mower has an onboard battery that really has some guts. I was able to cut even wet grass with this bad boy. My yard in New Hampshire is anything but level, as it's very steep in places, but I was able to muscle it mowing sideways across the hills. On level ground, I have a terrace in the back of the house, it was a dream machine. I loved how quiet it was and that it helped keep me in shape. Give this electric lawn mower a look if you want to never have to mess with gasoline or oil again!

Photos of Remodeling or New Construction

I want to remind you to take photos of walls before insulation is installed or drywall is hung. Get the photos made into prints and write on the back where the photo was taken and what the person is seeing. Then place them in a plastic zip lock bag and screw the bag to the board where your electric panel is. Photos of rooms heavy with utilities like kitchens and bathrooms must be photographed. Consider placing those photos in the plastic bag that you can attach to the inside of the sink cabinets. These photos will be greatly appreciated by you at a later date, a future homeowner or his remodeling contractor.

Carbon Monoxide Detectors

After I send out this newsletter to you, I love to sit back and read the emails I get. Most put a smile on my face, but one I received the last time had the opposite effect. Joe Brondolo wrote the following:

"About a month ago I also lost my 12-year-old niece Caitlin. She and her best friend died of carbon monoxide poisoning while at a sleep over at her friends house. The CO came from the car that the other girl's mother apparently left running overnight in the garage. I was wondering if you could mention in your newsletter about the dangers of carbon monoxide. I would like as many people as possible informed so they don't have to go through the grief my family is going through. Every home should have a CO monitor. People think just because they don't have a gas burning appliance or a fireplace that they don't need one, not true. I am just trying to make something positive out of this horrible tragedy. Any help would be greatly appreciated."

Please read this horribly tragic news story.

Joe, after losing my mother last month, your loss seems so much greater. My mom got to live for 86 wonderful years. You had to send Catlin back to Heaven after just twelve short years. No doubt the Good Lord did it for a reason, but I'm at a loss to explain it.

Please take a cue from Joe. Get CO detectors and install them. You can have more than one in a home. Put one near your garage. Put another in the hallway near your furnace or other gas appliance.

Huge Stain Solver Sale

I just took delivery of a new mixer at the Stain Solver warehouse. Now we can really mix up Uncle Tim's Magic Crystals as my friend Kevin Savitz calls my Stain Solver. I want to test the limits of this new mixer. The best way is a huge sale. I want to see if you can burn up this new mixer. Go ahead, make my day. Try to wear out the bearings on this bad boy. Watch for the sale announcement next newsletter. You'll not want to miss it. Did you have a chance to see the new Stain Solver website?

Hot Attics

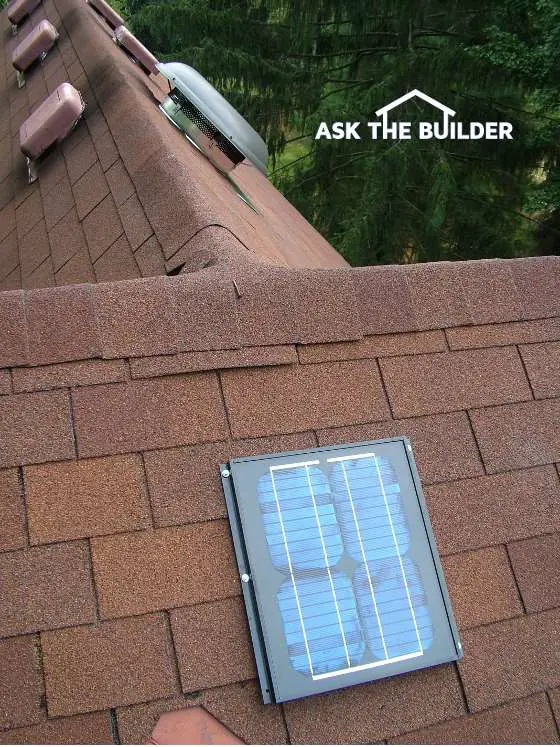
For two years, I've been testing two solar-powered attic fans. The solar panels are detachable and are pointed in such a way that they get maximum exposure to the sun. The fans were rated at 800 cubic feet of air per minute (CFM). The bottom line is that they have done nothing to lower the temperatures in my attic.

Solar Powered Attic Fan

This is a solar panel supplying free electricity to the attic fan under the silver dome on the rear roof. The fan blades spin, but they don't lower the attic temperature at all. Copyright 2018 Tim Carter

I want you to be VERY leery of claims made by fan manufacturers who say your attic temperatures will drop drastically. I wrote a column about hot attics and venting them not too long ago.

Framing a Pocket Door

Dave, a buddy of mine in Cincinnati, OH, helped me frame in a pocket door. It's really just a job for one person, but with the two of us it went in so easily I couldn't believe it. The only reason it took any extra time was because it was installed in a wall where there was no door before. This meant we had to create the rough opening and move a few electric cables. I took care of the electric work while Dave did the carpentry. But once the rough opening was created, it took less than 15 minutes to install the pocket-door frame. The door will never rub in the frame because I always use this kit for my pocket doors!

Click here to read past copies of my newsletters.

AsktheBuilder.com

Bathroom Mirror

DEAR TIM: The bathroom mirror in my existing home is not installed correctly. There are two problems. The bathroom wall mirror is not attached securely, and the bathroom mirror lighting is off center. It drives me crazy. What does it take to make things right? How could this problem have been avoided when the house was built or last remodeled? Is there an easy way to fix these problems now without tearing into the wall? Marlene H., Anderson, SC

DEAR MARLENE: You need to fix that mirror in the bathroom immediately before someone gets hurt. Glass is very heavy, and it’s possible the mirror can come crashing down on the vanity or the floor without warning. Not only can you get hurt, but the finishes of the top, vanity and floor can also be damaged.

A bathroom vanity mirror is a conundrum when building or remodeling. The problems you’re having can be traced to poor planning, poor construction and/or poor supervision. You can see why it’s so important to select all fixtures for a job long before you start. When this is done, and the technical specifications, as well as photos of the products, are on the jobsite as the framing, plumbing and electric is being installed, the workmen can make sure that wood blocking is in place to support the fasteners for the heavy mirror. The specifications also allow the installers to get the bathroom mirror lights perfectly centered with the bathroom vanity mirror.

The piece of cardboard is the exact shape of the mirror that will be installed as soon as the room is finished. Using a template like this ensures the bathroom mirror lighting is installed perfectly. PHOTO CREDIT:  Tim Carter

The piece of cardboard is the exact shape of the mirror that will be installed as soon as the room is finished. Using a template like this ensures the bathroom mirror lighting is installed perfectly. PHOTO CREDIT: Tim Carter

There are all sorts of mistakes that can happen if this isn’t done. Perhaps the biggest one I’ve seen happens when the bathroom mirror light is so big it overhangs on the sides of the mirror. In some cases, you can’t even open a bathroom mirror cabinet that has a swinging door. When faced with this dilemma, you often have to rip into the wall to make the necessary modifications to the electric boxes. You hope that no plumbing vent pipes are in the way when you do this type of repair work.

One way that’s worked best for me over the years so I never have to tear into a wall at the end of a job is to make a simple cardboard template of the mirror. I cut the cardboard to the precise size of the finished mirror and attach it to the wall in the exact location it will be when the room is finished. I do this just after the wall is framed so the plumber and electrician can see it.

The plumber knows to keep his vent pipe for the vanity as far away as possible because there’s a great chance there might be wall sconce lights on either side of the cabinet. If the plans for the job have great interior elevations of the bathrooms, they will show the exact location of the bathroom mirror lighting. Keep in mind that the plumber is usually on the job long before the electrician, so it’s very important to communicate to the plumber where the electric boxes will be.

The other benefit of creating the mirror template is that it shows you where any wood blocking needs to be installed so the mirror never pulls away from the wall. Hollow-wall anchors are great things, but my experience has shown me that solid wood blocking is the best thing to screw into when dealing with heavy items. There are heavy-duty anchors for fixtures, but sometimes the hole required for the anchor is so large the trim plate of the fixture will not cover it.

To fix your current problems, you may have to take the drywall or plaster down. Your biggest challenge will be relocating the electric boxes for the bathroom mirror lights. Since you know the width of the mirror and how far away you want the light fixtures from the mirror, you can move the electric boxes to the right locations. However, you may run into a problem if the electric cable that feeds the boxes doesn’t have enough slack.

If you don’t have much electrical experience, I urge you to work with a professional electrician. I would call this person in now before you do anything. See if he or she has a creative solution to the problem that doesn’t involve tearing into the wall. I know you would like to avoid this demolition, but it’s probably necessary to install the wood blocking to support your mirror.

Bathroom wall mirrors cause all sorts of headaches. Don’t forget how tall people are, and how high the backsplash behind the sink will be. I’ve seen many a mirror hung too low and mirrors that are too short.

Another big mistake is underestimating the importance of bathroom mirror lighting. If you’ve ever watched a Hollywood star in a dressing-room scene, you’ve undoubtedly seen the large mirrors surrounded with lights. It’s vitally important to have lights flooding your face if you intend to apply makeup. Down lighting in a bathroom at a mirror is not sufficient as it creates all sorts of shadows. You need lighting that is flooding your face from the mirror to take away all shadows.

Column 788

How To Grout Video

How to Grout

You have come this far, the tile is down and cut to size, you have mixed the grout, and you don’t want to mess up the ceramic tile project now. It could all blow up in your face at this point. The grout in the joints is still soft, since you just put it down.

To avoid making a mistake, you have to strike the grout joints the correct way. As seen in the older grout, there are no holes or imperfections in the tile joints. In the new grout (1:15), there are some holes or low or high spots. To smooth out the grout joints, get a large bucket of clean water and a large grout sponge. A grout sponge is a special sponge with rounded corners. It has no sharp edges like a standard sponge.

Wet the sponge and squeeze all the water out of it. It is critical to get out as much water as possible. You don’t want to put extra water on the grout. Too much water will dilute the cement in the grout and ruin it. It will crumble and fall apart.

Once all the water is out of the sponge, take it and lightly rub across the grout joint. You will notice that the rough, sandy grout now takes on a smooth, even finish. Just barely touch the sponge to the grout. If you are matching new grout with old grout, you have to blend it. Push a little of the new over onto the old to blend it together.

Be sure to rinse the sponge frequently. Keep it clean. Use a light circular motion over the grout joints. Use very little pressure - just a gently wiping to smooth the grout. Flip the sponge over to get another clean side. If you push down hard on the sponge, you will dig the grout out of the crack.

Be sure not to grout too large of an area. If you grout too much, you won’t be able to clean up and smooth the excess grout before it starts to set up. If it dries before you get to it, the project can be ruined.

At this point, the surface of the ceramic tiles will still be covered with lots of grout residue. This film needs to be cleaned up before it dries and you have a nightmare on your hands. To clean the surface, wet and squeeze the water out of the sponge and gently wipe in long strokes across the tiles. The grout residue will start to come up in the sponge. Repeat until the tile is cleaned. Pull across the tile very light and let it float over the joints. You need to remove as much of the grout film off as possible.

Video 4 of 4 | How to Grout Tile

Even after this is complete, there will be one final cleanup step. Watch the Finishing Floor Grout Video for this final step.

Grouting Video

How to Floor Grout Video 2 of 4

When getting ready to grout floor tile, there are a few steps to take to ensure a proper job. There are many ways to grout tile floors. Here are some tips that have worked for Tim, for the past 35 years!

First, take a damp sponge and lightly dampen some of the tiles. Not dripping wet, but just damp. That helps lubricate the tile so when the sanded grout is poured onto the tile, it won’t scratch. The grout powder contains little silica particles in it that are sharp. By lubricating the tile surfaces with water, it makes the grout move around easier.

After the grout is mixed to the consistency of bricklayers mortar, use a broad knife to put some of the grout onto the tiles. Use a rubber float to spread the grout. But don’t make a rookie mistake by using the rubber float dry. Get it damp first by dipping the surface in a bucket of water. Remove any excess water with your hand. The damp rubber float will help spread the grout easier.

Don’t spread the grout with the float parallel to the gap between the tiles. This allows the back edge of the float to drop down into the crack. Pull the rubber float at an angle across the crack. Push the grout down into the crack as you spread it. Don’t worry about leaving a little grout on the tile surface. It might make you nervous to leave it on the tile, but it will be okay.

Spread and push the grout in the gaps between the tiles, always moving the rubber float at an angle to the crack. To remove excess grout, hold the rubber float at a higher angle and strike it across the tile. The grout will be pushed off the tile. Use two hands if needed, but be sure that the crack is completely filled with grout. You can’t have any depressions in the joints.

Work on an area of about 3 feet by 3 feet. That is about the best size for working since you have to strike the joints with a sponge. But you can’t use the sponge right away, so work in a small area that is easy to reach. Once it is completed with spreading the grout, it will be ready for the sponge. Working in this size area will allow you to reach all the tiles without stepping on tiles that have not been cleaned off yet.

In the next video, you will see how to clean the grout off the ceramic tiles. Stay tuned.

Mixing Grout Video

Mixing Grout


When you are getting ready to grout floor tile, there can be a color match problem. The problem arises when there is an existing tile floor that has already been grouted. The new tile matches the existing tile, but how do you match the grout? The new grout will be installed and hopefully it will match.

First of all, you have to use sanded grout when you grout floor tile as shown. This is because the joints on this floor are so big, 3/8 of an inch wide. If you would use regular grout, which is just Portland cement, it would crack in these wide joints. The sanded grout contains small pieces of silica sand that acts like the rocks you can see in regular concrete. Therefore, the sanded grout is like miniature concrete. In addition, the silica sand is extremely hard and that gives sanded grout its durability.

SS02 Stain Solver Bottle with scoop

To match the grout color, first be sure to clean the existing tile floor. The grout has to be clean to match colors. It would be a mistake to match the new grout to the dirty color of the existing grout. One of the best cleaners for floor tile grout is oxygen bleach. So go to StainSolver.com and find out about oxygen bleach and how to clean grout and tile floors.

Another thing after cleaning the floor don’t try to match it right away. The grout is a different color when it is wet. Be sure the grout is completely dry before color matching. As you can see in the video (2:28), water on the grout makes it darker then the dry grout. It might take a day or two for the cleaned grout to complete dry. When clean and dry, get the little sample color cards and match the color. Or take a small section, if available, of the existing grout to the store to match the color.

The next step is to take a little bit of the sanded grout and pour it on the existing tile. The color of the grout right out of the bag is very close to the color of the grout when it is installed, cured and dried. The final tip is as soon as the grout is installed, it will be very dark because it is wet. Don’t freak out. If you matched it close from the bag, it will match once it is dried.

Now, how do you mix the grout? Use a smaller bucket, not a 5-gallon bucket, and pour about half the bag of sanded grout into the bucket. Next pour in some clear water, not too much. Using a nice stiff putty knife, mix up the water and grout. If you add too much water, the grout might be too thin to use. If you added too much water and you have some grout left in the bag, pour some more out of the bag into the bucket. This will allow you to thicken-up the mixture. Keep adding more powered grout until you achieve the proper thickness. The mixture should be nice and stiff, and doesn’t want to flow when the bucket is rotated. Scrape the sides of the bucket to be sure all the powered grout is mixed with the water.

Safety Warning: Due to the dust nature of the grout, be sure to wear a particle mask when working with grout. I am not wearing one in the video so you can hear what I am saying.

Be sure the existing floor grout is clean, and you get a good color match when purchasing the sanded grout. Then you will be good to go.

Read Ryan's comments on this video series in the August 31, 2010 Newsletter.

Outdoor Porch

DEAR TIM: I saw what’s being called an outdoor porch at a model home. It looked to me like a room without walls and was for the most part open to the elements. I’m puzzled by this concept as it doesn’t seem practical to have so many possessions sitting outdoors unprotected. Can you install outdoor porch swings in a room like this? I’m also stuck on what might be the best outdoor porch lights to illuminate these spaces once it’s dark. Gwen P., Wrightwood, CA

DEAR GWEN: You’re not the only one to be perplexed by this newer outdoor-porch trend. I have a traditional wrap-around outdoor porch on my home that provides shade and shelter during rain showers, but it’s not like the porches I ‘m seeing on new homes. While I don’t have an outdoor porch swing at my home now, it would take less than an hour to install the hangers for one.

This outdoor porch is more traditional. While not as big as a room, you can still sit on it most of the year in comfort. PHOTO CREDIT:  Tim Carter

This outdoor porch is more traditional. While not as big as a room, you can still sit on it most of the year in comfort. PHOTO CREDIT: Tim Carter

I agree with you about practicality with respect to these odd rooms. The outdoor porches I’ve seen in magazines, articles and at home shows would never survive the weather and interlopers I know to exist in many areas I’m familiar with. Driving rains, dust, birds, animals and thieves would ruin or rip off many of the things found in these spaces when you’re not around to watch or protect them. Large roof overhangs might protect the contents from most rainstorms, but blowing dust or snow surely could get to many of the furnishings I’ve seen in many of these rooms.

Outdoor porch lighting is something you really need to plan for no matter what size your porch may be. Recently I replaced the glaring traditional light bulbs on my outdoor patio with red light bulbs. The red light casts an eerie glow on the patio, but it allows me to see everything and not ruin my night vision whatsoever. White light, even when turned down with a rheostat, causes the pupils in your eyes to contract ruining your night vision.

You may want to test a single red bulb in one outdoor porch light to see how it works. Don’t make your final decision until you’ve spent several nights relaxing on the porch. You may be surprised as to how effective the red light is in illuminating the space while allowing you to look out at things beyond your porch. The red light on my patio allows me to gaze out upon the lake at my home seeing anything that’s on the water.

If red light is too radical for you, then you need to use very soft lighting that’s either indirect or is pointed down towards the ground. The softer lighting will be easy on your eyes and not cause strain at night. Indirect lighting that bounces off the ceiling can help create a very cozy mood.

The outdoor porch lights that you choose should match the overall feel of the room and the architecture of your home if at all possible. Be aware that inexpensive lights may have a finish that can pit or tarnish quickly. Pay attention to the warranty if you live in an area that has lots of pollution or salt mist that might corrode cheaper coated metal finishes.

Outdoor porch swings can be exceedingly comfortable, especially when they are designed properly. But they can come crashing to the porch floor if not hung properly. I don’t feel the use of a eyelet lag bolt is proper. This is a hardware item that simply screws into an overhead ceiling joist on your porch. They are prone to failure because of the weight of the swings and occupants.

I feel the better method is to use an eyelet through bolt. This is a longer bolt that passes through the entire ceiling joist or adjacent solid blocking and is held in place with washers and a nut. This hardware will only fail if the threads strip on the metal shaft or the nut pulls through the drilled hole. Both events are highly unlikely. To install an eyelet bolt such as this, you need to have access to the outdoor-porch framing. This can be a challenge if you’re trying to install the bolts on an already existing porch.

If you do decide to have an outdoor porch that’s like the one you saw at the home show, consider installing motion detectors that operate outdoor spotlights and an alarm. The spotlights could come on at night when an uninvited trespasser sneaks up and tries to take any of the items from the porch. If he’s so bold as to ignore the glare of the lights, then perhaps an alarm that activates as he walks into the space will cause him to run away.

The weather and other things that Mother Nature provides will probably be your bigger threat. Bird droppings, small mammals that move in and dust and pollen in the spring will surely become bothersome after you find yourself constantly dealing with these things. But if you furnish the room with things that can survive the direct blast from a garden hose, maybe it won’t be so bad!

Column 787