April 11, 2009 AsktheBuilder News And Tips

What’s in This Issue?

Happy Easter and Passover
Abbreviated Newsletter & Stain Solver


FOLLOW ME ON TWITTER


Friendly Question Reminder!

If you have a question for me, don't hit the Reply button just yet. Go immediately to my web site and type in the keywords about your problem into my Search engine. The search box is at the top of every page of my web site. You could have your answer in seconds if you do this! Please pay attention to all links you see at my web site. The exact products and services you often need are right in front of you, and you might be ignoring them.


Happy Easter and Passover

I drove back to Cincinnati, Ohio to spend Easter with Kathy and Kelly. Tristan is up at school as his break was three weeks ago. Meghan came with me as did Brent the videographer. We really lucked out as the weather so far has been perfect. We're here just as Spring is really coming on strong, which means I get to see two springs this year! Spring won't happen in New Hampshire for another month I'm told. When we left this past Wednesday morning, Loch Winnisquam was still choked with ice, although there was open water. In fact, it looked like a geology lesson in plate tectonic with the slabs of ice moving randomly about. But an hour ago, I got a message from a resident that the lake is officially iced out as of today. Woo Hoo! Get out the kayak!

Lake Winnisquam Sunrise

Tomorrow, Easter, is an honored tradition at the Carter house. It's a no-holds-barred scramble for the foil-wrapped dark chocolate Easter eggs. Because my left hip is bothering me, I'll not be able to hip check my kids so much as we race for the eggs. I'm addicted to the those darned things. Now I'll have to start walking five miles a day until I burn off that chocolate I'll accumulate over the next few days.


Abbreviated Newsletter and Stain Solver

Because of the holiday, this is an abbreviated newsletter. Since the last issue, I've added over 1,000 new subscribers, so if you're new, this is NOT the normal newsletter. Next week you're going to get a doozy of a newsletter. Wait until you see all the videos I just loaded to the website. Yeowwwww! Buy popcorn at the store this week. You'll need it.

What's more, I received an email 90 minutes ago that really put me in a pickle. Last week I announced a huge sale - 25 percent price reduction -  on my Stain Solver. If you're a new subscriber, please consider looking at it.  Well, the sale ends in less than 24 hours. Because it was a holiday weekend, I decided a few days ago NOT to send out a reminder. I just thought you would want to spend the time with your family rather than shop.

You need to know I own Stain Solver. It's not some product I hawk as a spokesperson. Kathy - my wife - and I launched this product about 14 years ago. But right now Kathy and Ellen (Ellen runs the Stain Solver business)  are really upset at me because of all the overtime that happened over the past few days at the warehouse.

Furthermore, I know that the next across-the-board sale where you get a promo code for 25 percent off anything in my store is NOT going to happen for awhile. I will have a special on selected items, but no big sale is on the horizon.

I'm in the dog house with Kathy and Ellen. In fact, I was enlisted Thursday morning for four hours to mix and pack Stain Solver myself! You may think, big deal, but realize that just 12 hours before this I was still in a car driving from New Hampshire to Cincinnati, and I'd been in that car 15 hours!   As fast as I was mixing and packing, it was disappearing. It was a record week of sales, and Ellen, Kathy, Roger, Gail, John, etc. are beat. The last thing THEY want are more orders!

But back to the email - Suzanne Weinstein of Wesley Chapel, Florida wrote to me just minutes ago:

Subject Line:  WOW!  (all caps - I didn't make that up)

"I cannot believe how wonderful my tile floors look after using Stain Solver. I actually have only cleaned one part because I wanted to see the before and after. It is amazing. I was VERY skeptical that your product could be as good as advertised. My Dad told me I was wasting my money (I just emailed him several pictures to show him the difference!). Your product arrived only 3 ½ days after ordering. I am so impressed. Thanks for an outstanding product."

Sue sent a photo that you just can't believe. It's a white-tile floor with half the room black grout and the other half is WHITE grout. You can see why she wrote to me, as she never thought the grout would be white again.

Thus my dilemma. I felt obligated to share Sue's email because the product really works. If you want to clean just about anything, Stain Solver can do it. I write this at great risk as Kathy, Ellen and the rest of the crew are going to keel haul me if you respond as I think you might. But maybe, just maybe you won't get this email until Monday when it's too late.

This huge event is over in less than 24 hours. If you want a heck of a deal, you need to act now.

The promo code is:

25off

A regular newsletter is coming in about a week. Lot's of great news and some tool reviews around the corner.

Thanks again!

Tim Carter
Founder - AsktheBuilder.com

AsktheBuilder.com

Inspection Report

DEAR TIM: What should I expect when I get the inspection report from my builder just before I take occupancy of my new home? How detailed are inspection reports? Friends tell me that I should have an independent inspector produce the home-inspection report. Is that the best way to go? Can you get an inspection-report sample before the walk through so you know what is going to be inspected? I’m afraid I’ll be saddled with a lemon if I don’t get a great inspection. Ashley T., Charlotte, NC

DEAR ASHLEY: I’m sure your builder is a great guy, but he’s the last person who should be performing the inspection on your new home. He’s a little too close to the situation, and has a vested interest in not disclosing defects that might cost him extra money. Your friends are spot on in telling you that you need an independent inspector to look at any number of things both inside and outside the home. Be aware that this independent inspector is not to be confused with the building inspector that works for your local county or city.

The building inspector that works for your local government produces a building-inspection report, but this report is often for his eyes only. He’s making sure that the house meets all building codes. This creates tremendous confusion with many homeowners because many believe that if their home passes the building inspection and is granted a Certificate of Occupancy, that all must be well. This isn’t true. Many government inspectors, and top-quality builders will tell you that the building code is a set of minimum standards. Passing the government-mandated building inspection is like getting a 70 percent on a test.


Purchase my Easy-to-Use Home Inspection Checklist Now. This Simple-To-Use Tool allows you to spot many defects before you have to hire a real inspector. You can then eliminate a house and move on to one with fewer defects.

You have nothing to lose. If my checklist doesn't work for you, I'll give you your money back. Oh, one more thing, it's an Instant Download! You can have the checklist in your hands just minutes from now!


You want a real professional to hand you an inspection report when you hire him to discover defects in a new or existing home. PHOTO CREDIT:  Tim Carter

You want a real professional to hand you an inspection report when you hire him to discover defects in a new or existing home. PHOTO CREDIT: Tim Carter

You need to hire a certified home inspector, one that has the best credentials. There are any number of organizations that certify inspectors. The requirements to get certified run from filling out a form and mailing a check all the way to passing a written technical test, performing a minimum of 250 professional, fee-paid home inspections conducted in accordance with published standards of practice and a code of ethics. The best inspectors attend routine continuing education to stay up to date with the latest in home construction techniques, new materials and professional practices. You want an inspector that’s completed all the things I just mentioned.

It may be possible for you to get a copy of the inspection report form before hand, but you may want to take a virtual home inspection online. Some of the top home-inspection societies and associations have this on their websites.

The top inspectors will look at the exterior building materials and systems, the roofing and gutters if the house has them, attached or detached garages, porches and decks, all structural elements that are visible, plumbing, electrical, heating and cooling systems, etc. In other words, a top inspector will go over the home with a fine-toothed comb. A typical inspection lasts hours. Be prepared to spend a minimum of three hours while the inspector checks just about everything that operates.

Your fears of being stuck with a lemon are completely understood. Your builder may have a decent warranty, but you don’t want to have to invoke it if at all possible. You want to take possession of a home that should be hassle-free for many years. This is not an unrealistic expectation, but all too often homeowners sign documents at a closing with both patent and latent defects in the home. A great inspector will uncover many, if not all, of these before the closing.

Never close on a home with defects with just a verbal promise from the builder that the things will be taken care of at a later date in other inspections he does after you’ve lived in the home. If defects are identified in the home before the closing, you must have them fixed or have the bank set aside money in escrow account that is sufficient to fix the defects. Once the defects have been remedied, the bank can release this money to the builder. It’s best to have these terms in the original contract you have with the builder.

If you want the absolute best inspection on your new home, it’s really important to build into your contract with the builder that periodic inspections will happen at critical steps as set forth by the inspector you hire. Many builders will resist this condition, but don’t give in. You want your inspector to look at things as the house is being built, not just once after it’s complete.

What’s more, it’s imperative that you have great specifications and plans before you start to build the home. A great home inspector can offer some guidance here. You can also purchase detailed specifications online that exceed the minimum requirements as set forth by the building code or scribbled on a poor set of blueprints.

Remember that your builder is only obligated to do things the way they show on the plans, written specifications and whatever is in your contract. The vast majority of plans and specifications I see are completely inadequate. You really need to hire an inspector early in the process to help guide you through this complicated maze.

EXTRA NEWS from Tim Carter:
Purchase my Easy-to-Use Home Inspection Checklist Now. This Simple-To-Use Tool allows you to spot many defects before you have to hire a real inspector. You can then eliminate a house and move on to one with fewer defects.

You have nothing to lose. If my checklist doesn't work for you, I'll give you your money back. Oh, one more thing, it's an Instant Download! You can have the checklist in your hands just minutes from now!

Column 774

Laying Tile Video

When extending an existing ceramic tile floor into an addition, it is important to keep the grout lines straight and in line. Don’t trust your eye. You won’t be able to keep these lines straight by just eyeballing them. You have to create guidelines to follow.

One method is to use a regular chalk line to make your lines. Place a loose tile on the existing tile floor and wrap the chalk line around the tile, hooking the line to the underside of the tile. Pull the string tight and line the string up with the edge of an existing tile. Run the string down to the end of the existing tile floor and first check to see if the original tiles are in line. If so, you are in luck. Make a mark on the concrete floor just beyond the existing tile and directly under the chalk line.

Then extend the chalk line all the way to the end of the room and line it up with the existing grout line and the mark you made. Mark the location of the string when it is all set. Then place a heavy object on the string to hold it in place. Make additional marks under the string at several locations.

Then using a level or straight edge, draw your line along those marks. By drawing the line with a pencil, you are a thinner, crisper line. This is easier to follow then a chalk line. Plus it will not be erased as easily as a chalk line.

DeWALT Wet Saw Video

Tim examines a new DeWALT Wet Saw with diamond blade for cutting ceramic tile. These saws are good when you have to trim a small piece off a ceramic tile, because you can’t snap it off. This saw is also good for making an L-shaped cut in tile.

Ceramic wet saws feature a blade that is a lot different from a blade used for cutting wood. The ceramic wet saw blade does not have any teeth. It has small pieces of diamonds embedded on the cutting edge. These diamond pieces cut the ceramic tile, slate tiles or granite.

It is imperative that you keep the saw blade wet all the time when cutting tile. This wet saw features its own recirculating pump and reservoir. This water coolant keeps both the tile and the saw blade cool, increasing the life of the diamond blade.

This saw pivots up and down and tilts left and right to make cuts at 22-1/2 or 45 degrees. The saw itself is mounted on rail and it travels the length of the piece of tile being cut. The base features a rubber surface that when wet holds the tile in place while it is being cut. There is a built-in miter gage for assisting in cutting a tile at 45 degrees.

A diamond wet-saw will make those thin cuts or angled cuts easier. Check them out.

Thinset On Concrete Video

When you are ready to install ceramic tile on a concrete slab, here a few of Tim’s tips for proper installation. The first tip when working on a concrete floor is to wear knee pads or a kneeing stool. This will protect your knees over the long haul.

The next tip is to use a crack isolation membrane between the concrete floor and you ceramic tile. If you are matching the height of an existing tile floor, this might not be possible.

Next, apply a layer of thinset down on the concrete. The thinset, when cured, will have a very hard surface for the ceramic tile. This will put the tile from pulling down, due to weight or foot traffic, and end up cracking. Before applying the thinset, be sure the floor is clean and smooth, then take a sponge and some clear water, lightly sponge off the area where you are working. This will remain any remaining dust on the floor. Be sure the floor does not end up too wet.

Use a notched trowel to smooth the thinset to a uniform thickness. Hold the trowel at a 45 degree angle to ensure that you do not scrape off the thinset, making it too thin. Be sure to keep the thinset off existing tiles.

Then press your tile down into the thinset, keeping the edge of the tile parallel with your guideline. Getting the concrete slab a little damp before laying the thinset and tile will increase the bonding between the thinset and the concrete.

Thinset For Ceramic Tile Floors Video

Mixing thinset is needed when you are laying ceramic tile. It is a powder that comes in 50 pound bags. It looks a lot like cement. And a little dusty when pouring it from the bag into the mixing bucket.

The bag will be marked with thin-set mortar. It is available in either gray or white. The white thin-set is useful if you are putting down a white floor. Just in case some of the thinset surfaces between the ceramic tiles.

Thinset is basically Portland cement powder and very fine silica sand. When mixed with water, it makes like a miniature concrete. That’s important when putting down ceramic floor tile. Why? If you were to use spreadable floor mastics, that look like cake icing, the mastic never really gets hard. Thus if you walk on the floor tile or place something very heavy on a tile, it could crack. That does not happen with thin-set. When thinset cures after about a day or two, it is just like concrete.

Some thinsets have water-based, powdered glues, called acrylic hardeners or modifiers, that make the thin-set very sticky. But regular thin-set, when mixed right, is very sticky.

All you have to do is a water to the thin-set powder. Use a mixing knife or a very stiff putty knife, as the mixture gets very density. A flexible blade could bend or break off while mixing. Slowly add the water a little at a time, stir and check to see if you have the right consistency. The proper consistency should be like pancake batter. Thick, but pourable. Don’t get it too wet, slowly add water and continue stirring.

Thinset works well in ceramic tile showers. Only mix up enough thinset that you can put down on the floor and cover with tile in 15 minutes. If it sits in the bucket too long, it will start to crystalize and hard. If you add more water to it, called retempering, that is bad. Only mix enough that you can use in that time frame.

Wet Saw Indoors Video

If faced with wet cutting tile and you have to do it indoors, don’t just pray to the remodeling gods. Get a wet saw enclosure. The water spray will hit the wall, fall into the catch basin and then drip into a bucket under the saw.

You can cut your tile inside and not have water spray all over the place.

Removing Drywall Tip Video

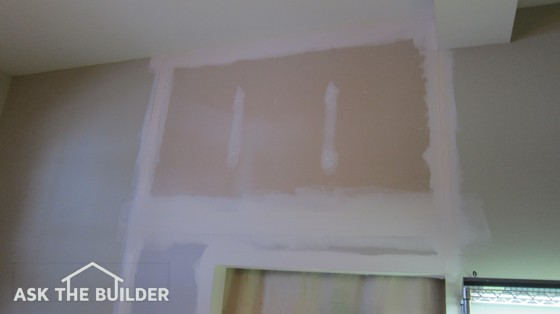
You remove drywall with some effort. To take down large sheets get a wide pry bar under it at stud locations.

Remove Drywall

Revised February 2018

When getting ready to tear down drywall, it's fun to do demolition work. But don’t make this rookie mistake.

In the corners, the drywall probably has a paper tape that bends around the corner. You don’t want to mess up the other wall, you are not removing. If you just tear into the drywall and begin pulling it out, you will tear into the corner tape and pull it from the other wall.

Related Links

Drywall Installation Tips

Taping Drywall With No Blisters

Free & Fast Bids

CLICK HERE to get FREE & FAST BIDS from local handymen that will love to remove your drywall.


remove drywall

You can remove drywall like this by locating the screws and backing them out. Removing just a few screws allows you to rip out large pieces. Copyright 2018Tim Carter

To avoid damaging the second wall, take a razor knife and score or cut through that paper tape right down the middle of the corner. Do this for the entire length of the seam. Now when you remove drywall, it won’t transfer over to the other wall and damage it.

This little demo tip will save you time and money on your next drywall removal project.

CLICK HERE to get FREE & FAST BIDS from local handymen that will love to remove your drywall.


Wall Removal Video

Wall Removal

Before taking down a wall, be sure it is not a load bearing wall or a supporting wall. There are some clues that will assist you with your decision. But first, the adjoining wall is a bearing load. Why? In the next room, there is a big box on the ceiling. There is probably a big beam behind the beam. Therefore, the wall under the beam should be a load bearing wall.

Back in the other room, the big box covering the beam is not there. So, the floor joists are probably running the opposite direct from the room with the beam. But that alone does not mean that the wall to be removed is a non-load bearing wall. Have to do some more checking. Check the floor above the wall to see if there is something on top of it.

In the room above the wall to be removed, there is nothing about that wall. More proof that is probably not a load bearing wall. More checking is still needed. If you have a set of blueprints for your house, check for a structural page, some times marked with an S in the title block. The blueprints will show the direction of the floor joists and the location of that support beam.

Since the floor joists are not located on top of that wall, it is not a support wall and it can be removed. One last check - use a stud finder to be sure the floor joists are running the direction as indicated in the blueprints.

If you are not sure after doing these checks, be sure to call a residential structural engineer. Don’t make a mistake and collapse you house. Check first and be sure.

Featured in the June 5, 2016 AsktheBuilder Newsletter.

Ice Safety Video

(Jaws music theme playing in the background.) Tim is heading out onto the ice on Lake Winnisquam. He has a phobia about falling through the ice and drown. There are many accidents of that nature every year. So, he wants to be sure about the ice thickness and ice safety.

But first, this was filmed on March 13, 2009. That is Friday the 13th!!! Aside from the fear of Friday the 13th, mid-March is a dangerous time of the year to be out on the ice. As the temperature changes, the ice thickness changes rapidly also.

To check the ice thickness, Tim will venture out onto the ice where he knows the water depth is not over his head. So even if he does fall through, he will be okay - water depth wise. He is hoping that the videographer will help save him. (The camera shakes "No.")

The state of Minnesota has a great web site that provides information regarding ice thickness and safety. For example, 4 inch thick, clear ice is more then enough thickness to walk on safely. Ice 12 inches thick can support a pickup truck.

To check the thickness, find a spot where you are comfortable with the water depth under the ice. Use a cordless drill with a chip auger bit. Tim is using a 16 inch long drill bit, measured from the chuck. Drill your test hole. Tim has drilled down until 5 inches of the chip auger drill bit is still showing. That means that the ice is 11 inches thick near the shore line. However, the thickness of the ice can change in different locations on the lake. Be sure to check different locations and each day.

Be safe. Check the ice and have all the proper equipment in case you happen to fall through.