DEAR TIM: The bathroom mirror in my existing home is not installed correctly. There are two problems. The bathroom wall mirror is not attached securely, and the bathroom mirror lighting is off center. It drives me crazy. What does it take to make things right? How could this problem have been avoided when the house was built or last remodeled? Is there an easy way to fix these problems now without tearing into the wall? Marlene H., Anderson, SC
DEAR MARLENE: You need to fix that mirror in the bathroom immediately before someone gets hurt. Glass is very heavy, and it’s possible the mirror can come crashing down on the vanity or the floor without warning. Not only can you get hurt, but the finishes of the top, vanity and floor can also be damaged.
A bathroom vanity mirror is a conundrum when building or remodeling. The problems you’re having can be traced to poor planning, poor construction and/or poor supervision. You can see why it’s so important to select all fixtures for a job long before you start. When this is done, and the technical specifications, as well as photos of the products, are on the jobsite as the framing, plumbing and electric is being installed, the workmen can make sure that wood blocking is in place to support the fasteners for the heavy mirror. The specifications also allow the installers to get the bathroom mirror lights perfectly centered with the bathroom vanity mirror.
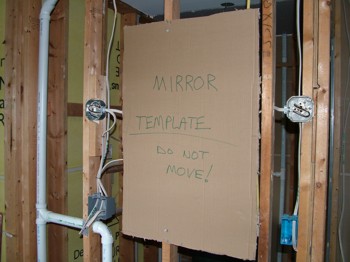
The piece of cardboard is the exact shape of the mirror that will be installed as soon as the room is finished. Using a template like this ensures the bathroom mirror lighting is installed perfectly. PHOTO CREDIT: Tim Carter
There are all sorts of mistakes that can happen if this isn’t done. Perhaps the biggest one I’ve seen happens when the bathroom mirror light is so big it overhangs on the sides of the mirror. In some cases, you can’t even open a bathroom mirror cabinet that has a swinging door. When faced with this dilemma, you often have to rip into the wall to make the necessary modifications to the electric boxes. You hope that no plumbing vent pipes are in the way when you do this type of repair work.
One way that’s worked best for me over the years so I never have to tear into a wall at the end of a job is to make a simple cardboard template of the mirror. I cut the cardboard to the precise size of the finished mirror and attach it to the wall in the exact location it will be when the room is finished. I do this just after the wall is framed so the plumber and electrician can see it.
The plumber knows to keep his vent pipe for the vanity as far away as possible because there’s a great chance there might be wall sconce lights on either side of the cabinet. If the plans for the job have great interior elevations of the bathrooms, they will show the exact location of the bathroom mirror lighting. Keep in mind that the plumber is usually on the job long before the electrician, so it’s very important to communicate to the plumber where the electric boxes will be.
The other benefit of creating the mirror template is that it shows you where any wood blocking needs to be installed so the mirror never pulls away from the wall. Hollow-wall anchors are great things, but my experience has shown me that solid wood blocking is the best thing to screw into when dealing with heavy items. There are heavy-duty anchors for fixtures, but sometimes the hole required for the anchor is so large the trim plate of the fixture will not cover it.
To fix your current problems, you may have to take the drywall or plaster down. Your biggest challenge will be relocating the electric boxes for the bathroom mirror lights. Since you know the width of the mirror and how far away you want the light fixtures from the mirror, you can move the electric boxes to the right locations. However, you may run into a problem if the electric cable that feeds the boxes doesn’t have enough slack.
If you don’t have much electrical experience, I urge you to work with a professional electrician. I would call this person in now before you do anything. See if he or she has a creative solution to the problem that doesn’t involve tearing into the wall. I know you would like to avoid this demolition, but it’s probably necessary to install the wood blocking to support your mirror.
Bathroom wall mirrors cause all sorts of headaches. Don’t forget how tall people are, and how high the backsplash behind the sink will be. I’ve seen many a mirror hung too low and mirrors that are too short.
Another big mistake is underestimating the importance of bathroom mirror lighting. If you’ve ever watched a Hollywood star in a dressing-room scene, you’ve undoubtedly seen the large mirrors surrounded with lights. It’s vitally important to have lights flooding your face if you intend to apply makeup. Down lighting in a bathroom at a mirror is not sufficient as it creates all sorts of shadows. You need lighting that is flooding your face from the mirror to take away all shadows.
Column 788