Sanding Block

sanding blocks

These sanding blocks are the perfect tool to sand the contoured and flat profiles of the baseboard. PHOTO CREDIT: Tim Carter

DEAR TIM: Is a sanding block hard to use? I saw all sorts of sanding blocks at the hardware store just before I was about to purchase traditional sheets of sandpaper. What sand block should I buy? I saw a rubber sanding block, but there were flexible sanding blocks as well. It was fairly intimidating as I don’t know how they work and which one is the best for each task. Help! Leslie C., Stoneham, MA

DEAR LESLIE: I still have my rubber sanding block, but over time the rubber has lost much of its elasticity. In its day, it was an amazing tool. I still use it from time to time, but newer variations of sanding blocks made from different materials are usually my weapons of choice when sanding things.

Years ago when I was a young pup contractor, I used plain sheets of sandpaper to sand things. I quickly discovered that method was fraught with mistakes, wasted time and poor results due to uneven pressure by my fingertips.

Just this morning before writing this column, I was using a grit sanding block. These tools have been around for at least twenty years. The first person I saw use one was my drywall contractor. The flexible sanding blocks he used were about the size of a deck of cards. They were perfect for touching up the joint compound in corners where two walls met a ceiling. I soon discovered they were a multidimensional tool a carpenter like me could use for sanding all sorts of things.

You can use many things to make a sanding block. A simple piece of scrap wood or anything you can get sandpaper to wrap around including empty medicine bottles, dowel rods or pieces of stiff foam board make suitable sanding blocks. The purpose of all these things is to create even pressure on the surface of the material being sanded.

A wood sanding block can mean different things to different users. You may think it’s a block made from wood with traditional sheets of sandpaper attached to it. I’ve used hundreds of these on jobs in the past with fantastic results. To another person, it’s a sanding block made from any material of choice that sands wood. Just hours ago I used a flexible foam sanding block to sand both the flat surface and the profiled contours of a wood baseboard.

Using a sanding block requires about as much skill as it takes to fall off a log. You’ll have more trouble matching the type of grit to the job than you’ll have using these handy tools. If you’ve not sanded much, you’ll discover it helps to experiment with different grits on different surfaces. Coarse grit will shred softer materials leaving deep scratches. But on hardwoods, you may have to aggressively use a coarse grit to make quick progress. You’ll undoubtedly finish all sanding tasks with a fine paper or a fine grit flexible sanding block.

When sanding flat surfaces, you’ll probably get the best results using a rubber sanding block or one that has a pretty stiff surface that’s absolutely flat. Most rubber sanding blocks are sized so that you can get three pieces of paper from a standard sheet of sand paper. If you don’t want to cut your own paper to fit the block, you can almost always get precut pieces of paper made to fit in the block perfectly.

Make sure you get the paper to fit tightly in the sanding block. If the paper has any slack in it, you’ll discover pretty quickly that it will wear out faster and tear where the paper attaches to the pins in the sanding block or where it wraps around the corners of the block.

When it comes to sanding curved surfaces I’m quite confident you’ll agree the flexible sanding blocks are ideal. As you apply pressure to the block, it conforms to the shape of the item you’re sanding. You’ll discover as the grit on the block gets finer, you can wrap the blocks around some very tight radiuses, even the diameter of a standard pencil. That’s amazing versatility.

If you’re working in an older home with sanding blocks, beware of lead-paint hazards. Sanding lead paint creates clouds of toxic dust that can make you or someone else very sick. In extreme cases, it can cause death. Assume that any house that was built prior to 1967 has lead paint inside or outside.

Be sure you take your time sanding. If you want to check for imperfections as you sand, do so in a room with little light. Shine a light across your work at a low angle. The light beams will create shadows where there are depressions. You can also use green light for the same purpose. Green light increases depth perception, and is used by professionals who hunt for surface defects and cracks in materials.

Column 778

May 7, 2009 AsktheBuilder News And Tips

What's in This Issue?

Latest News
Goofy Door Design
Upcoming Product Reviews
Comfortable and Sleek Desk Chair
Product Reviews Policy
Soft Soap
Socks on Drain Pipes
Accurate Level for your iPhone
Hoops and YoYo
Purchase a Lot NOW While Prices are LOW!
Latest Columns and Videos


FOLLOW ME ON TWITTER


Friendly Question Reminder!

If you have a question for me, don't hit the Reply button just yet. Go immediately to my web site and type in the keywords about your problem into my Search engine. The search box is at the top of every page of my web site. You could have your answer in seconds if you do this! Please pay attention to all links you see at my web site. The exact products and services you often need are right in front of you, and you might be ignoring them.


Latest News

 If you're a new subscriber, this is *not* an ordinary newsletter. This issue has an eclectic mix of tips and information and a plethora of new columns and videos. Wait until you see all the new columns and videos below. You'll be busy for a while with all this new information! If you're not a new subscriber, you know I've been on a three-week hiatus. Here's why:

I started writing this a week ago, just after sunrise on a foggy morning sitting in a cottage that's nestled behind the dunes at the Atlantic Ocean. I was at the Inn by the Sea in Cape Elizabeth, Maine, finishing an intense two-day conference that is hosted by a secret Internet mastermind group I'm part of. I always come away with my brain filled to the brim with knowledge. The massive brain dump started just hours after I arrived. A few of my buddies and I were talking about the Stain Solver business. They gave me two ideas that will probably cause sales to triple this year. Holy moly! More about that in a future newsletter.

Another very dear friend reminded me at lunch that same day that I'm really overdue to send out a newsletter. Yes, it's been well over three weeks. I apologize for the lack of communication, but here's what's been keeping me busy besides the conference. Be aware that over the past three weeks there have been plenty of new tools and products streaming into the world headquarters for me to test and review. I'll share some of that just below.

The week I went back to Cincinnati to spend Easter with Kathy and Kelly was supposed to be restful. It was anything but. Three of the six days I was 1,000 miles west of New Hampshire, I was at the Stain Solver warehouse mixing and packing orders. April turned out to be an all-time-record sales month by a factor of three! This month is looking even better as the deck-cleaning season has just started in many parts of the nation. Acccccckkkkkkk! In case you don't know it, my Stain Solver is perhaps the safest and best product to use when cleaning a wood or even a composite deck.

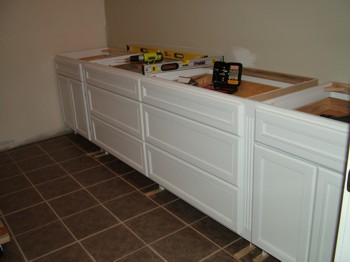
Then, as soon as Meghan and I got back  to NH, we turned the heat up on a remodeling project here at the lake house. You can see me in action in many of the videos and columns that are at the bottom of this newsletter. Oh my gosh, is it looking superb. Two weeks ago, we set the last cabinets, and installed the limestone countertops. When you slide your hand across the tops, they're as soft as a powdered baby's bum. The fossils in the limestone take your breath away they're so gorgeous.

While we were in Cincinnati, the official ice out happened at the lake. I believe the exact day was April 12th. I forgot how beautiful the lake is when the water moves back and forth instead of being frozen.  And how is it the loons know the ice is gone? Within days of the ice disappearing, they were in the water quacking, hooting, calling and making all sorts of noise. I'm told they winter near the ocean. Do they fly back and forth each day hoping the ice is gone? All I can say is those birds make the coolest calls I've ever heard.

Finally, the weather was so nice three weekends ago, I spent three days up on the 90 acres where I'm building the new home. It was spiritual to be there. The waterfalls were roaring, and the solitude in the forest allowed me to really do a hard reset to my attitude after the winter of working. If you're stressed out about things, try to get away to some nearby park on a warm day and just relax or take some buttons with you and repair your clothes. Try to get outdoors and do your own hard reset.


Goofy Door Design

While at the conference, I shared a two-bedroom cottage with a long-time friend Steve. The cottage was really spacious with a giganzo living room and breakfast nook. But the shared bathroom was tiny as can be. It had this next-to-useless pedestal sink that was crammed into the corner. When the bathroom door was open, you couldn't stand in front of the sink, well maybe at an angle.

The architect must not have known about pocket doors. This situation would have been an excellent use of one of those bad boys. Pocket doors save valuable floor space in tight situations like this. If you want to get the pocket-door hardware and track I use in my current home, on all my past projects, and what I'll use in my new home, then visit this pocket-door page.


Upcoming Product Reviews

Here's a partial list of things I'm starting to test:

  • A cordless tool set from Skil
  • Ladders and platforms from Louisville Ladder
  • Drywall tools from Marshalltown
  • A compact vacuum cleaner
  • Impulse Nail Guns from Paslode
  • and much more!

Be sure to open all future newsletter issues so you don't miss these reviews.


Comfortable and Sleek Desk Chair

When you signed up for this newsletter, I got an email. From that I can tell a tiny bit about you. For example, if the @extension is a company name, you probably might sit in an office for eight hours or more working. Or maybe you work from home. As for myself, I sit at my desk way too much.

For years, I used to buy those inexpensive chairs you often see at the major nationwide office-supply stores. Most of the ones I got were uncomfortable and fell apart. I never stopped to do the math to count up the thousands of hours I sat in a chair working. Recently I did. The number is scary - it's way too high.

Recently, I acquired a Herman Miller Aeron chair. I can't say enough great things about it. I'm more comfortable, I'm more productive, I have no pain in my back anymore and the chair fits my body like a glove. It's no wonder as I was able to design it myself so it fits my height and weight! If you're tired of your office chair or the one you sit in at your home office, you should take a look at what I'm sitting in right now. I'll never go back to one of those cheap chairs. You can design and purchase your own chair here.


Product Reviews Policy

While I was at the secret conference with my friends, we discussed this newsletter and how I review products. When asked what happens when a product fails my testing, I exclaimed, "I don't say anything. I don't write about it in the newsletter as I just want my subscribers to get things that work well." One of my buddies mentioned, "Tim, do you tell your subscribers that? Do you tell them that things fail your tests? If not, you're making a mistake."

Yikes! I never thought of that. The point is I do test many things and some just don't meet my expectations. My thought all along was that if I couldn't say something positive, then say nothing at all. A bad review by me could produce long-term damage to a company. What's more, if a particular review is highly subjective without hard science behind it, that could also cause significant collateral damage.

Based upon input from my esteemed friends, I decided that the best course of action is to tell you how many products failed my tests in a particular week, but not the names of the things. I know this isn't the perfect solution, but I'm going to try it to see what happens.

For example, not too long ago I got a small blue cordless drill. It was like a toy. When turned on, the gears inside were so poorly matched, you could hear them grinding themselves into powder. Bottom Line: When you see a product mentioned in this newsletter, I tested it, it's very good or great quality and I'm using it at my own home.


Soft Soap

I get pitched by public relations (PR) companies each week. They know I have an audience. About two months ago, I was contacted by the agency that handles the PR for Soft Soap. Maybe you have some in your home. The PR person sent me a sample and followed up to see what I thought. She guessed - and correctly I might add - that a very large portion of my subscribers are women.

The sample set I received was a pump that fit on four bottles with different designs. Two looked like they would be on a counter at my grandmother's house. Very feminine indeed. The other two were not as masculine as I might like. Let's just say they didn't have pictures of bulldozers on them. The bottom line is that I test all sorts of things, even soap! But you won't find these bottles displayed in the room where I wash my hands. Give me a bar of Lava soap any day.


Socks on Drain Pipes

This is a very interesting email I received from Harish Pithadia from Peoria, Illinois:

"I hired a landscaper guy to do simple french drain and he put perforated pipe with socks in it but didn't put any rocks at bottom. I was wondering if you think it will work or do I have to do it again? I know you have article that stated one should put 2" of rock under the pipe and do NOT use a sock or filter fabric."

Harish, you may dodge the bullet and not have to start over. Why you didn't follow my advice I'll never know. Heavy sigh......... Here's the issue I have with geotextile filter fabrics and socks: they are made to STOP silt from moving through the fabric. They collect the silt and create a virtual dam. This is insane when it comes to a drainage pipe. You want water to readily ENTER the pipe, not try to fight it's way through silt or a fabric.

What's more, if you install the linear french drain the way I propose, then you'll never have an issue. Silt doesn't normally move sideways through the soil profile. You see silt after a storm in streams because it's coming from surface erosion from the raindrops that dislodge the soil particles and move them overland into streams. After a storm, the streams and brooks quickly return to the clear state. This is why well water is crystal clear. The water moving into a trench drain through the soil is clear so there is no need for filter fabric or a sock.


Accurate Level for your iPhone

Stanley Tools released an iPhone application that turns your iPhone into a fantastic level. This application is free, and it features several different styles of levels. Personally, I favor the traditional wood level you see in the app. It's very cool and easy to use. If you have an iPhone, just go to the Apps store and search for: Stanley Level. Enjoy!


Hoops and YoYo

About four years ago, my youngest daughter Kelly burst into my office, took control of my keyboard and blurted, "Dad, you have to watch this!" 'This' was an electronic greeting card featuring Hoops and YoYo, two very cute animated characters that will make you laugh for sure. Kelly and I spent an hour watching all we could, many over and over. We howled with laughter.

Having no fear of a "No" on the phone, I called Hallmark Greeting Cards and asked to speak to the creator indicating that I had an idea how I could help promote Hoops and YoYo. Believe it or not I got a call from one of the creators, Bob Holt. Bob is YoYo, the smaller green character with the long ears, and is one very creative and cool dude.

My rough idea was to create some sort of animation that would relate to my visitors. That's all I said on the phone, and it's all Bob had to hear. The old saying, 'Good things come to those that wait.', is true.

Bob was finally given clearance, two months ago, to create an amazing animation that I feel you'll love. When you get to the page, note that you can send it to a friend via email. Please do this and urge your friends to sign up for my newsletter. You'll see that form on the page. You don't need to subscribe - that's how you're reading this.

I also urge you to visit the official Hoops and YoYo site. Find the Coffee Jitters electronic card. You'll really like it if you drink coffee. It's one of my favorite animations.

Once you're at the Hoops and YoYo page of mine, be sure to click the Play button in the animation to start it. The animation is over two-minutes long and gets funnier as you listen. If you really like it, contact me. I'd love to forward your comments to Bob.


Purchase a Lot NOW While Prices are LOW!

This is an historic real estate market. It's a buyer's market. If you plan to eventually build a new home, NOW is the time to buy the lot. If you want to get the best lot and not make a mistake, you need my LATEST Lot Selection eGuide.

It's a compilation of all I've written on lots, and has all you need to ensure you will not end up with problems.  I decided to sell it for just $7.00, but as always I give you a special price when a new product is released. You can have it now for only $4.99. That's a super deal to get all that information in one document you can easily print out. Go buy it now as I'm going to raise the price back up in just a week.


Latest Columns and Videos

We are backed up on content! Sorry about that. I urge you to make the time to read the columns and watch the videos. I have three more videos that have yet to be edited. These complete the series on installing tile. I show you exactly how to grout floor tile. I'm hoping we have those ready for you by the next newsletter.
 
Need to extend a tile floor? Here's one way to get the lines straight.

Thinset for ceramic tile floors. I explain what it is and how to mix!

Here is how to apply thinset to concrete.

The amazing DeWalt Wet Saw. You use it to cut tile.

How do you use a wet saw indoors and NOT splash water everywhere???

Here's a quick tip when removing drywall.

Wait till you read about the latest LED flashlight!

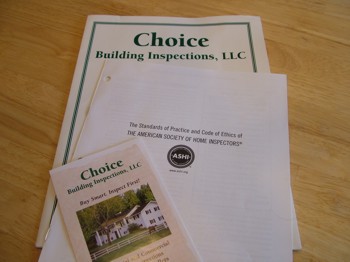
An inspection report is vital when you buy a home.

Are you going to tackle a cabinet-installation job? You better bone up!

Is a rock retaining wall in your future? Get some Advil or Aleve!

Limestone countertops are drop-dead gorgeous.

AsktheBuilder.com

Ask the Builder Pledge – Free Newsletter Tips

E-mail the Project Pledge to someone you know.

Share

Ask the Builder

Become the expert. Sign up for my FREE weekly newsletter right here. I'll send you tips each week so that 15-minute project only takes 15 minutes! My newsletter includes product reviews, special sales and hot tips.


Limestone Countertops

limestone countertops

This limestone countertop is gorgeous. You can see the fossils that helped create the stone! PHOTO CREDIT: Tim Carter

DEAR TIM: Limestone countertops are on my radar for a new kitchen I’m planning. My contractor is trying to dissuade me saying I’ll have problems with a limestone countertop. He says that common foods will stain it, and vinegar or other acidic foods will erode it. The stone supplier says that the limestone counter will perform well over time. How hard are they to install? Can a skilled homeowner handle the installation of the stone tops? Can you share any tips? Diane S., Dousman, WI

DEAR DIANE: Limestone counter tops rank right at the top of my take-your-breath-away countertop contest. If you go to a stone fabricator’s showroom and see a limestone countertop sample that has thousands of fossils in it, you’ll be mesmerized for sure. I love granite tops because of the deep color and some of the magnificent crystals, but the buff shades of limestone mixed with the fossils create a classic look that will generate unending compliments from all that see the stone in your new kitchen.

If you go online, you’ll see all sorts of discussions about limestone counters. Some people rave about them and others rail against them saying they’ll stain, erode, pit, etc. I remember seeing similar comments about granite tops, and now wonder if some of the comments you see aren’t written by competitors who might be spreading false information. For example, the granite tops in my kitchen have never had an issue with staining, even though they are a light granite which supposedly is very susceptible to staining.

You need to know that natural stone, and limestone is one, by their very nature are porous to a degree. But not all limestone countertops are equally porous. Some limestone formations are extremely dense, and as such, liquids have a tough time penetrating into these solid stones. What’s more, there are special sealers and impregnators you can coat the limestone with to minimize staining. It’s wise to reapply these sealers periodically. The stone fabricator that makes your limestone tops will almost always recommend a high-quality sealer.

Even if the limestone gets stained, you can almost always remove the stain by using oxygen bleach. Oxygen bleach will not react chemically with the limestone, but it absolutely will break apart the organic compounds that make up all foods and liquids that you commonly cook with. Red wine, beet juice, grape juice and hundreds of other food stains can be easily removed from limestone, or any other countertop, using oxygen bleach.

Limestone can be chemically etched with acids. Strong hydrochloric acid will make the limestone fizz causing severe damage to the stone. Building supply houses sell this as muriatic acid. Never get this acid anywhere near a limestone countertop. Vinegar, citric fruit and some other foods like tomatoes are acidic. These mild acids might harm the limestone if allowed to sit on the stone for long periods of time. The best practice is to get the limestone countertops damp before you work with these foods and liquids, and immediately clean up rinsing the top well after you get these acids on the top.

A limestone kitchen counter is not a job I would trust to a homeowner that has no experience. The limestone is very heavy. A square foot of the stone that’s one and one-half-inches thick can weigh nearly 20 pounds. A simple island top can weigh nearly 400 pounds! If you don’t transport and carry the limestone correctly, it can crack.

The cabinets that you set the limestone on need to be perfectly level and in the same plane. The limestone needs to rest solidly on the cabinets with no gaps under the stone. It’s best to install 3/4-inch-thick plywood that’s flush with the top of the cabinet frames so the limestone is completely supported. Without this support, it’s possible the stone could crack if someone sat on the counter or stepped on it to paint a ceiling, change a light bulb or even dance. Stranger things have happened on kitchen counters.

If you’re still on the fence trying to decide who’s right and wrong with respect to durability and staining, try to see if the local stone supplier has a list of past customers. Do your best to find a homeowner that has had a limestone kitchen counter for at least three years. Call them and ask them these two questions: How has it held up? Would they use limestone for kitchen counters again?

It requires great skill to install limestone countertops. Seams between slabs of limestone need to be grouted or filled with special epoxies. To make the seams invisible, you need to tint the fillers to match the surrounding fossils and tones of the limestone. You only get one chance to do it correctly.

If you make a mistake setting the stone tops, you can chip an edge with great ease. You can’t allow the stone to bang against another piece of stone. This means that setting multiple pieces in between two walls can be an enormous challenge. It’s mission critical that you slide the last piece of stone in horizontally. If you try to tilt it into place, you’ll chip an edge as certain as the sun will rise tomorrow.

Column 777

Cabinet Installation

DEAR TIM: Can you give me some tips about cabinet installation? I’ve never had to install a cabinet, and need to ensure that mistakes will be minimal as I install cabinets in my kitchen. I’m attempting this after getting a bid from a cabinet installer that took my breath away. He said my kitchen cabinets install job was not that hard, so I expected a lower number that I could afford. What tools do I need for my kitchen-cabinet installation? Kelly K., Beloit, WI

DEAR KELLY: DIY cabinet installation jobs can range from simple to extremely difficult. Without seeing the plan of your kitchen and the cabinet layout, I can’t say whether you’ll be able to successfully complete your kitchen cabinets installation. I’ll tell you right now that the odds are against you, but every now and then the long shot crosses the finish line first. I’ll help you in this very short column be the filly that finishes this job to the amazement of all!

For your job to go as easy as possible, you’ll need an assortment of cabinet installation tools. I recommend these basic tools: accurate 2 and 4-foot levels, a power drill with bits up to 1/4-inch in diameter, several squeeze clamps with jaws that open at least 6 inches, a power screw gun and a belt sander. You may discover you need a table saw or other power saws to cut trim lumber and filler strips.

These cabinets are perfectly level side to side and front to back. That’s mission critical when natural stone tops will rest on them. PHOTO CREDIT:  Tim Carter

These cabinets are perfectly level side to side and front to back. That’s mission critical when natural stone tops will rest on them. PHOTO CREDIT: Tim Carter

Your cabinets may come with their own screws. If they don’t, follow the written instructions from the cabinet manufacturer with respect to the screws needed for all your wall and base cabinets. Wall cabinets must be mounted to the walls so they will not fall when loaded with heavy dishes. Avoid the temptation to use common long drywall screws. These are typically not strong enough to secure wall cabinets. Three-inch screws are needed to mount wall cabinets to wall studs. You’ll use smaller screws to fasten cabinets to one another and for other purposes.

Every carpenter will have his own tips for wall-cabinet installation, but I discovered long ago that it’s infinitely easier to install wall cabinets first. If you have the base cabinets installed, you have to reach over them and constantly worry about scratching the base cabinets. It’s possible to hang wall cabinets with no help, but I’d recommend getting two helpers to hold them up while you fasten them to the wall. Always remove the cabinet doors while attaching them to the wall. This makes the cabinets lighter, and it prevents damage to the doors, hinges and the cabinet frames. Make sure the wall cabinets are level as you install them.

For a professional fit and finish, you should screw the cabinets to one another so the face frames are flush and the gap between individual cabinets is closed. You’ll use the squeeze clamps to align and hold the frames in place as you screw the boxes to one another.

Once the wall cabinets are installed, you can start on the base cabinets. These cabinets must be installed level both side to side and front to back. This means that you must locate the highest point of your floor and start there with your first base cabinet. If you fail to do this, the only way the top of the cabinets will be level is if you shave off the bottom of the cabinets. I wouldn’t wish this fate on my worst enemy.

Wood shims are used to level base cabinets. These thin wedges of wood allow you to easily adjust the height of the cabinets. As you get the cabinets level, you screw them to each other making sure the face frames are flush and the gap between cabinets is closed. The squeeze clamps will become your best friend. Make sure they have rubber tips so the cabinet frames are not damaged. Keep the clamps in place until all screws are driven between the cabinets. Once all the base cabinets are screwed to one another and in the perfect position, you can screw them to the walls.

Most cabinet installation jobs require that filler strips be used. These are normally up to 3-inches wide, and are the same material and finish as the cabinets. If cabinets fit tightly between two walls, you’ll commonly need to install a filler strip on each side of the cabinet that’s closest to the wall. This centers the cabinets on the wall to make for a professional look.

These filler strips require great skill when installing them. They frequently need to be custom cut and scribed as they are rarely shaped like a perfect rectangle. A table saw and belt sander come in handy when trimming and fitting filler strips.

Be sure that the screws used to secure cabinets to walls penetrate into the center of the wall studs. Take your time locating the center of the studs. Wall-cabinet screws need to penetrate at least 1 and ½ inch into the actual stud. You’ll discover that you need at least a 3-inch screw to achieve this requirement.

Column 775

April 11, 2009 AsktheBuilder News And Tips

What’s in This Issue?

Happy Easter and Passover
Abbreviated Newsletter & Stain Solver


FOLLOW ME ON TWITTER


Friendly Question Reminder!

If you have a question for me, don't hit the Reply button just yet. Go immediately to my web site and type in the keywords about your problem into my Search engine. The search box is at the top of every page of my web site. You could have your answer in seconds if you do this! Please pay attention to all links you see at my web site. The exact products and services you often need are right in front of you, and you might be ignoring them.


Happy Easter and Passover

I drove back to Cincinnati, Ohio to spend Easter with Kathy and Kelly. Tristan is up at school as his break was three weeks ago. Meghan came with me as did Brent the videographer. We really lucked out as the weather so far has been perfect. We're here just as Spring is really coming on strong, which means I get to see two springs this year! Spring won't happen in New Hampshire for another month I'm told. When we left this past Wednesday morning, Loch Winnisquam was still choked with ice, although there was open water. In fact, it looked like a geology lesson in plate tectonic with the slabs of ice moving randomly about. But an hour ago, I got a message from a resident that the lake is officially iced out as of today. Woo Hoo! Get out the kayak!

Lake Winnisquam Sunrise

Tomorrow, Easter, is an honored tradition at the Carter house. It's a no-holds-barred scramble for the foil-wrapped dark chocolate Easter eggs. Because my left hip is bothering me, I'll not be able to hip check my kids so much as we race for the eggs. I'm addicted to the those darned things. Now I'll have to start walking five miles a day until I burn off that chocolate I'll accumulate over the next few days.


Abbreviated Newsletter and Stain Solver

Because of the holiday, this is an abbreviated newsletter. Since the last issue, I've added over 1,000 new subscribers, so if you're new, this is NOT the normal newsletter. Next week you're going to get a doozy of a newsletter. Wait until you see all the videos I just loaded to the website. Yeowwwww! Buy popcorn at the store this week. You'll need it.

What's more, I received an email 90 minutes ago that really put me in a pickle. Last week I announced a huge sale - 25 percent price reduction -  on my Stain Solver. If you're a new subscriber, please consider looking at it.  Well, the sale ends in less than 24 hours. Because it was a holiday weekend, I decided a few days ago NOT to send out a reminder. I just thought you would want to spend the time with your family rather than shop.

You need to know I own Stain Solver. It's not some product I hawk as a spokesperson. Kathy - my wife - and I launched this product about 14 years ago. But right now Kathy and Ellen (Ellen runs the Stain Solver business)  are really upset at me because of all the overtime that happened over the past few days at the warehouse.

Furthermore, I know that the next across-the-board sale where you get a promo code for 25 percent off anything in my store is NOT going to happen for awhile. I will have a special on selected items, but no big sale is on the horizon.

I'm in the dog house with Kathy and Ellen. In fact, I was enlisted Thursday morning for four hours to mix and pack Stain Solver myself! You may think, big deal, but realize that just 12 hours before this I was still in a car driving from New Hampshire to Cincinnati, and I'd been in that car 15 hours!   As fast as I was mixing and packing, it was disappearing. It was a record week of sales, and Ellen, Kathy, Roger, Gail, John, etc. are beat. The last thing THEY want are more orders!

But back to the email - Suzanne Weinstein of Wesley Chapel, Florida wrote to me just minutes ago:

Subject Line:  WOW!  (all caps - I didn't make that up)

"I cannot believe how wonderful my tile floors look after using Stain Solver. I actually have only cleaned one part because I wanted to see the before and after. It is amazing. I was VERY skeptical that your product could be as good as advertised. My Dad told me I was wasting my money (I just emailed him several pictures to show him the difference!). Your product arrived only 3 ½ days after ordering. I am so impressed. Thanks for an outstanding product."

Sue sent a photo that you just can't believe. It's a white-tile floor with half the room black grout and the other half is WHITE grout. You can see why she wrote to me, as she never thought the grout would be white again.

Thus my dilemma. I felt obligated to share Sue's email because the product really works. If you want to clean just about anything, Stain Solver can do it. I write this at great risk as Kathy, Ellen and the rest of the crew are going to keel haul me if you respond as I think you might. But maybe, just maybe you won't get this email until Monday when it's too late.

This huge event is over in less than 24 hours. If you want a heck of a deal, you need to act now.

The promo code is:

25off

A regular newsletter is coming in about a week. Lot's of great news and some tool reviews around the corner.

Thanks again!

Tim Carter
Founder - AsktheBuilder.com

AsktheBuilder.com

Inspection Report

DEAR TIM: What should I expect when I get the inspection report from my builder just before I take occupancy of my new home? How detailed are inspection reports? Friends tell me that I should have an independent inspector produce the home-inspection report. Is that the best way to go? Can you get an inspection-report sample before the walk through so you know what is going to be inspected? I’m afraid I’ll be saddled with a lemon if I don’t get a great inspection. Ashley T., Charlotte, NC

DEAR ASHLEY: I’m sure your builder is a great guy, but he’s the last person who should be performing the inspection on your new home. He’s a little too close to the situation, and has a vested interest in not disclosing defects that might cost him extra money. Your friends are spot on in telling you that you need an independent inspector to look at any number of things both inside and outside the home. Be aware that this independent inspector is not to be confused with the building inspector that works for your local county or city.

The building inspector that works for your local government produces a building-inspection report, but this report is often for his eyes only. He’s making sure that the house meets all building codes. This creates tremendous confusion with many homeowners because many believe that if their home passes the building inspection and is granted a Certificate of Occupancy, that all must be well. This isn’t true. Many government inspectors, and top-quality builders will tell you that the building code is a set of minimum standards. Passing the government-mandated building inspection is like getting a 70 percent on a test.


Purchase my Easy-to-Use Home Inspection Checklist Now. This Simple-To-Use Tool allows you to spot many defects before you have to hire a real inspector. You can then eliminate a house and move on to one with fewer defects.

You have nothing to lose. If my checklist doesn't work for you, I'll give you your money back. Oh, one more thing, it's an Instant Download! You can have the checklist in your hands just minutes from now!


You want a real professional to hand you an inspection report when you hire him to discover defects in a new or existing home. PHOTO CREDIT:  Tim Carter

You want a real professional to hand you an inspection report when you hire him to discover defects in a new or existing home. PHOTO CREDIT: Tim Carter

You need to hire a certified home inspector, one that has the best credentials. There are any number of organizations that certify inspectors. The requirements to get certified run from filling out a form and mailing a check all the way to passing a written technical test, performing a minimum of 250 professional, fee-paid home inspections conducted in accordance with published standards of practice and a code of ethics. The best inspectors attend routine continuing education to stay up to date with the latest in home construction techniques, new materials and professional practices. You want an inspector that’s completed all the things I just mentioned.

It may be possible for you to get a copy of the inspection report form before hand, but you may want to take a virtual home inspection online. Some of the top home-inspection societies and associations have this on their websites.

The top inspectors will look at the exterior building materials and systems, the roofing and gutters if the house has them, attached or detached garages, porches and decks, all structural elements that are visible, plumbing, electrical, heating and cooling systems, etc. In other words, a top inspector will go over the home with a fine-toothed comb. A typical inspection lasts hours. Be prepared to spend a minimum of three hours while the inspector checks just about everything that operates.

Your fears of being stuck with a lemon are completely understood. Your builder may have a decent warranty, but you don’t want to have to invoke it if at all possible. You want to take possession of a home that should be hassle-free for many years. This is not an unrealistic expectation, but all too often homeowners sign documents at a closing with both patent and latent defects in the home. A great inspector will uncover many, if not all, of these before the closing.

Never close on a home with defects with just a verbal promise from the builder that the things will be taken care of at a later date in other inspections he does after you’ve lived in the home. If defects are identified in the home before the closing, you must have them fixed or have the bank set aside money in escrow account that is sufficient to fix the defects. Once the defects have been remedied, the bank can release this money to the builder. It’s best to have these terms in the original contract you have with the builder.

If you want the absolute best inspection on your new home, it’s really important to build into your contract with the builder that periodic inspections will happen at critical steps as set forth by the inspector you hire. Many builders will resist this condition, but don’t give in. You want your inspector to look at things as the house is being built, not just once after it’s complete.

What’s more, it’s imperative that you have great specifications and plans before you start to build the home. A great home inspector can offer some guidance here. You can also purchase detailed specifications online that exceed the minimum requirements as set forth by the building code or scribbled on a poor set of blueprints.

Remember that your builder is only obligated to do things the way they show on the plans, written specifications and whatever is in your contract. The vast majority of plans and specifications I see are completely inadequate. You really need to hire an inspector early in the process to help guide you through this complicated maze.

EXTRA NEWS from Tim Carter:
Purchase my Easy-to-Use Home Inspection Checklist Now. This Simple-To-Use Tool allows you to spot many defects before you have to hire a real inspector. You can then eliminate a house and move on to one with fewer defects.

You have nothing to lose. If my checklist doesn't work for you, I'll give you your money back. Oh, one more thing, it's an Instant Download! You can have the checklist in your hands just minutes from now!

Column 774

Laying Tile Video

When extending an existing ceramic tile floor into an addition, it is important to keep the grout lines straight and in line. Don’t trust your eye. You won’t be able to keep these lines straight by just eyeballing them. You have to create guidelines to follow.

One method is to use a regular chalk line to make your lines. Place a loose tile on the existing tile floor and wrap the chalk line around the tile, hooking the line to the underside of the tile. Pull the string tight and line the string up with the edge of an existing tile. Run the string down to the end of the existing tile floor and first check to see if the original tiles are in line. If so, you are in luck. Make a mark on the concrete floor just beyond the existing tile and directly under the chalk line.

Then extend the chalk line all the way to the end of the room and line it up with the existing grout line and the mark you made. Mark the location of the string when it is all set. Then place a heavy object on the string to hold it in place. Make additional marks under the string at several locations.

Then using a level or straight edge, draw your line along those marks. By drawing the line with a pencil, you are a thinner, crisper line. This is easier to follow then a chalk line. Plus it will not be erased as easily as a chalk line.

DeWALT Wet Saw Video

Tim examines a new DeWALT Wet Saw with diamond blade for cutting ceramic tile. These saws are good when you have to trim a small piece off a ceramic tile, because you can’t snap it off. This saw is also good for making an L-shaped cut in tile.

Ceramic wet saws feature a blade that is a lot different from a blade used for cutting wood. The ceramic wet saw blade does not have any teeth. It has small pieces of diamonds embedded on the cutting edge. These diamond pieces cut the ceramic tile, slate tiles or granite.

It is imperative that you keep the saw blade wet all the time when cutting tile. This wet saw features its own recirculating pump and reservoir. This water coolant keeps both the tile and the saw blade cool, increasing the life of the diamond blade.

This saw pivots up and down and tilts left and right to make cuts at 22-1/2 or 45 degrees. The saw itself is mounted on rail and it travels the length of the piece of tile being cut. The base features a rubber surface that when wet holds the tile in place while it is being cut. There is a built-in miter gage for assisting in cutting a tile at 45 degrees.

A diamond wet-saw will make those thin cuts or angled cuts easier. Check them out.

Thinset On Concrete Video

When you are ready to install ceramic tile on a concrete slab, here a few of Tim’s tips for proper installation. The first tip when working on a concrete floor is to wear knee pads or a kneeing stool. This will protect your knees over the long haul.

The next tip is to use a crack isolation membrane between the concrete floor and you ceramic tile. If you are matching the height of an existing tile floor, this might not be possible.

Next, apply a layer of thinset down on the concrete. The thinset, when cured, will have a very hard surface for the ceramic tile. This will put the tile from pulling down, due to weight or foot traffic, and end up cracking. Before applying the thinset, be sure the floor is clean and smooth, then take a sponge and some clear water, lightly sponge off the area where you are working. This will remain any remaining dust on the floor. Be sure the floor does not end up too wet.

Use a notched trowel to smooth the thinset to a uniform thickness. Hold the trowel at a 45 degree angle to ensure that you do not scrape off the thinset, making it too thin. Be sure to keep the thinset off existing tiles.

Then press your tile down into the thinset, keeping the edge of the tile parallel with your guideline. Getting the concrete slab a little damp before laying the thinset and tile will increase the bonding between the thinset and the concrete.