DEAR TIM: My wife wants me to install security cameras in and around our home as I travel on business quite frequently. Are wireless security cameras the way to go or should I consider wired home security cameras? Do you have to buy separate outdoor security cameras so I can view certain parts of my yard at night? How do you record what the cameras see? Greg H., Wooster, OH
DEAR GREG: Security cameras for home use are gaining in popularity. Years ago, you had to have a certain skill set to be able to install a grouping of home security cameras. But technology has advanced to a degree that you can purchase a home security camera kit that has everything you need to install cameras, digitally record what they see and even watch the images of all the cameras at once in real time. If you really want to make sure your wife is safe, you can watch things going on at your home while you are out of town on business!
The home security cameras I have at my own home are very interesting. These security cameras record in full color and produce stunning clarity using natural available light. My cameras are equipped with infrared sensors that allow them to see at night nearly as well as they do in the daytime. To put it mildly, I am amazed at the quality of the images produced by the cameras.
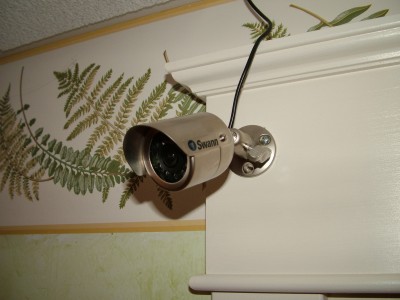
This color security camera is smaller than a can of soup, but it produces clear images in natural light or even total darkness! PHOTO CREDIT: Tim Carter
Wireless security cameras are something you should look at if you need to install a security camera in a location that will be hard to extend thin video cables. Many of the compact home security cameras need a power supply and an additional cable that transmits the video signal back to a monitor or a recording device. Installing the cables so they are hidden can be challenging, so this is why many people are attracted to the convenience of wireless security cameras. But keep in mind these cameras need to have a power supply that can be batteries or a low-voltage cable from a nearby transformer.
Watch Tim's Video on Security Cameras. Click to play.
Many of the cameras kits you can buy have security cameras than can be used either indoors or outdoors. Outdoor security cameras are usually clearly marked for outdoor use. To minimize moisture problems, try to mount the cameras so they are protected by an overhang that will keep them dry from all but the most-violent wind-driven rain.
Be sure you look at home security cameras that are equipped with infrared sensors that give the cameras night-vision capability. My cameras that have this allow me to see my yard at night even when there is no moon in the sky. I am constantly amazed at all of the things I can see outdoors in the dark. You can buy a small camera that is rated for outdoor use, transmits in full color, has night vision and is smaller than a soup can.
The images the cameras see can be recorded on a powerful digital video recorder (DVR). I have a DVR that will record the images from four cameras at the same time. I can set the DVR to record only if the cameras sense motion, it can be set to take still shots every few seconds or it can record all it sees. The size of the hard drive inside the DVR can be huge so that you can record for weeks without recording over images.
There are many other options and recording features you can get with modern home security cameras. The best part is they are affordable, especially when you buy them in a kit. One of the kits I prefer has four indoor/outdoor color cameras that have motion sensing and night vision. You also get a fancy monitor and a high-powered DVR that allows you to record up to 55 days of images.
This kit can be connected to the Internet so you can view the images from a remote location. It can also send email alerts with image shots if you want to know when something happens that the cameras see. You can bet I will be installing this kit to watch over the jobsite of my new home as it is being built. Can you imagine how cool it would be to know when someone pulls up the road to the site or when someone is snooping around in the dark? The cameras would allow me to call the police from 1,000 miles away.
You do not need to be an electronics genius to setup and record images with these home security cameras. In less than an hour, you can have a kit unpacked, cameras in place and recording.
Many of the kits have all of the parts you need. It only takes a few skills to make the connections and be up and running. With a little effort, you can have images streaming out on the Internet so that you or a group of friends can view what the cameras see.
Remember that you must respect the privacy of others and do not record images that you have no rights to. When used properly, security cameras are powerful tools. Use that power wisely and responsibly.
Column 709