AsktheBuilder Live Stream - Non-Toxic Paint For Kids

Click the image below to watch this video.
ECOS Paints
Today's LIVE stream video opens with a discussion of non-toxic paint for kids and then answers random home improvement questions.

Click the image below to watch this video.
Today's LIVE stream video opens with a discussion of non-toxic paint for kids and then answers random home improvement questions.
Yesterday, I reached out asking for your help. I needed to know a great way, and the hardware required, to convert cassette tapes to MP3 files.
I'm always in awe of the collective wisdom that you, and all other subscribers, have tucked away in your tiny gray cells.
You may have been one of quite a few that had several solutions to the conundrum.
I now know how to do the conversion and you'll get all the advice given to me this coming Sunday. I'll be creating a page on my website using all the information that was sent to me. You'll get that link on Sunday.
Read this carefully, please.
Do you enjoy looking for things online? If so, I need more of your help.
I spent over an hour this past weekend looking for something and came up empty handed.
Here's what I was looking for:
I'm looking for a photograph, or the actual product, of a hardwood floor inlay design showing a three-dimensional (3D) optical illusion of a circular staircase.
The illusion is SO GOOD that when you're in the room standing on the hardwood floor looking down at this hardwood inlay, you THINK that you can actually step on the fake staircase treads and GO DOWN to the level below.
I saw this photograph in a hardwood inlay catalog 20+ years ago. I no longer have the catalog.
If you find the photo or the actual product, I'll be forever grateful. Please send me the URL to the page/pages.
Remember, it's a hardwood floor inlay. It's made from different species of hardwood.
It's NOT sidewalk art. It's not painted on a wall. It's not a sand sculpture. It's not a real circular staircase made from hardwood. Don't waste your time looking for all these things, silly!
I'm just looking for this hardwood inlay product if it still exists.
Thanks!
Tim Carter
Founder - www.AsktheBuilder.com
P.S. I'm going to be doing a LIVE stream video today - November 29th - at 4 PM Eastern time. CLICK or TAP HERE to watch it. The opening topic is about the photo below.
You can ASK ANY QUESTION you want about your house during the LIVE STREAM. You don't have to ask about paint for goodness sake.

Is this your first issue? Pretty exciting, right? I don't think you're going to be disappointed as this one is brimming with lots of new stuff.
If this is your 109th issue, you might recall that short video I recorded a few years back showing how you can install or repair copper water lines in your home WITHOUT using a torch that's so hot it will MELT metal and set your house on FIRE!
As crazy as this sounds, on Thanksgiving Day around 2:30 PM, I said, "Son, I could use your skills to help me record a fast video. We'll not be eating for four more hours. It's a great time for some father/son bonding - an afternoon outdoors you'll never forget."
"You mean right now, on Thanksgiving when we should be resting? Can't we do it in the morning? We've been bonding for 30+ years. Remember the Kali Ma scare?"
"Yes, let's do it right now. It's going to be much colder in the morning and no one will be in the mood to do the video. Let's just get it done."
Minutes later, with the help of my not-too-enthused son, I recorded a NEW video that takes you on a psychic journey where you're my apprentice plumber fixing a frozen outdoor copper water line!
This video is UNIQUE because I explain each and every step and WHY I'm doing what I'm doing. Why? To give you the courage to do a repair like this and save HUGE MONEY!
I GUARANTEE you that you'll discover something you didn't know about plumbing repair. What's more, this NEW video has the potential of saving you hundreds or THOUSANDS of dollars. Watch it and judge for yourself.
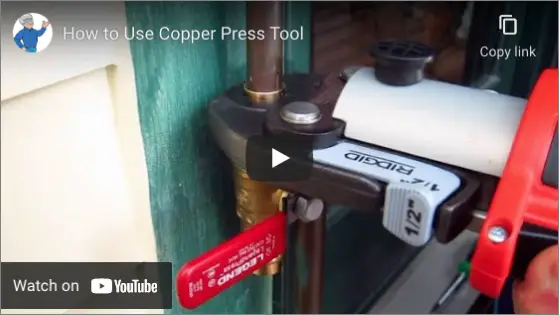
CLICK or TAP HERE to watch the video.
You're NOT GOING TO BELIEVE how easy it is for you to install new copper water lines or REPAIR ones. I'm sure you can rent this tool at any local tool-rental business.
All through the year, I try my best to help you save money and time with tips in this newsletter. I enjoy doing it to say the least.
If you wish to reciprocate and help me in return, you can do one simple thing: Just use my affiliate link each time you shop at Amazon.com.
I get a tiny commission on each item you purchase. This does NOT cause your price to be higher. It simply means Jeff Bezos gets less money to pay for his spaceship rocket fuel.
Thanks for doing this. BTW, that affiliate link is in EVERY ISSUE of this newsletter. You've probably become BLIND to it. Have you stopped looking at this image in the right column or elsewhere on your phone screen?

All during the year, if you want to help, just CLICK that ad graphic to begin your journey at Amazon.
Thanks very much.
Look at this:
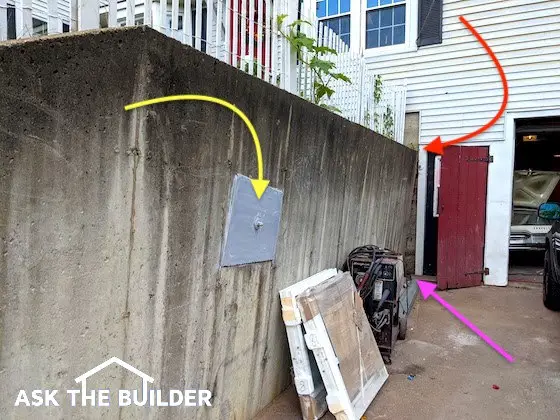
CLICK or TAP HERE if you feel you can correctly identify each thing the colored arrows are pointing to. My guess is you're befuddled.
I URGE you to read that column and WATCH the videos in it. This column will SAVE you thousands of dollars.
Look at this:

That's me shooting a photo of myself in a fogged mirror.
What's it have to do with frost on a wall or in your closet?
EVERYTHING!
CLICK or TAP HERE and watch the video. You'll be amazed.
That's enough for the Sunday after Thanksgiving.
Burp.
Tim Carter
Founder - www.AsktheBuilder.com
CLEAN Red Wine Stains - www.StainSolver.com
LAST Warm Day! - www.W3ATB.com
Do It Right, Not Over!
P.S. Would you be frightened to know your electrical cables MIGHT BE THIS HOT?
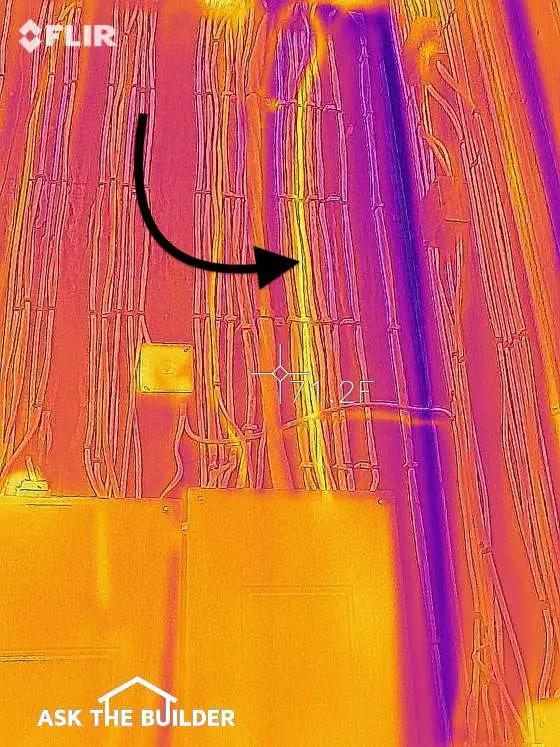
CLICK or TAP HERE to gain Peace of Mind in case you're worried about dying in a house fire. Wait until you see the photo of the back of the dimmer switch.

Build Under a Tent | These odd plastic triangles allow workmen to lay concrete blocks in cold and rainy New Hampshire weather to keep a job moving forward. Copyright 2021 Tim Carter
You’ve undoubtedly heard the phrase time is money. If ever there’s a time when it’s true, it’s now. The talons of inflation are digging into your wallet, purse, and budget with respect to any home improvement project. The sooner you get any job done, the less it’s going to cost. Period.
I’m about to share with you in the next few minutes some stories that should inspire you and your contractor should he need suggestions on how to keep working. Don’t allow him to tell you the weather’s going to cause this or that delay. It’s pure poppycock.
My first lesson in what’s possible when it comes to eliminating weather delays on projects stretches back almost half my life! Thirty-three years ago, I subscribed to every home building and remodeling magazine I could find. Keep in mind, the Internet as you know it wasn’t even a glint in the eye of the tech industry. I consumed tips and tricks from publications and books like you might pop peanut M&Ms in your mouth.
One of my favorite magazines is Fine Homebuilding. I started subscribing around issue 23 or so. I’d read each issue cover to cover and fortunately, I had a photographic memory. I’d store snapshots of the photos in the magazine in my tiny gray cells that I’d use to help me do things each day on my job sites.
I’ll never forget when I turned over to the rear cover of Issue 51 of the magazine. There were four photographs showing how a new house was being built on Long Island in the Hamptons in the middle of winter under a giant inflatable structure. Mind you, this was 1988!
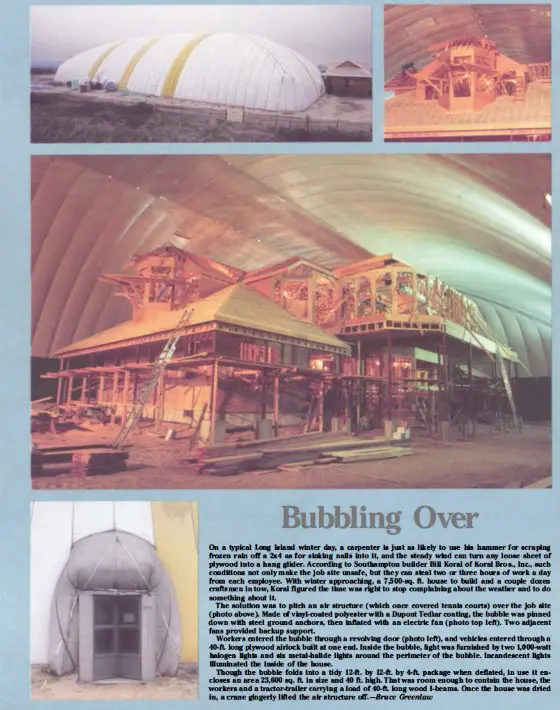
Fine Homebuilding Issue 51 Rear Cover - Copyright 2021 Taunton Press - Reproduced here under the Fair Use Doctrine guidelines. CLICK or TAP HERE to get a subscription to this fantastic magazine.
Can you imagine that? The builder, Bill Koral of Koral Brothers, Inc., was no fool. He knew that at least 30 percent of each day’s worth of productivity for each craftsman could be gobbled up dealing with Mother Nature. It was to his benefit, and that of the owner, to get the house built as fast as possible. Fortunately, the builder had access to an inflatable structure that used to cover a tennis court. It was a win win-win all the way around. The house stayed dry during construction, the workers weren’t miserable and were safer, and the owner got a much better-built house. I share this to show you it’s possible to do what seems impossible!
Twelve years ago, a special painting crew was sent to my house to satisfy a warranty claim on my windows. They had to do extensive work to remove the window sashes and then paint parts of the remaining frames with a very special automotive fade-resistant paint.
The three painters had a huge trailer that was a traveling workshop with all the special spray-painting equipment. It was also filled with every imaginable tool they might need for any situation. One day rain was in the forecast. The painters, in a matter of minutes, fabricated a moveable lean-to out of a sheet of heavy translucent plastic and lumber that was in the trailer.
They constructed the lean-to so it tucked up perfectly under the roof overhang and extended far to the left and right of their work area so no rain would get inside my house nor get the window frames wet they needed to paint. It took them less than 30 minutes to construct the lean-to. Clever indeed and it allowed them to get the job done a day early.
Two months ago, a Seattle entrepreneur scheduled two phone consult calls with me. He was about to start building a wood foundation for a stunning cedar shed kit he purchased online. It just so happens this time of year, the fall can be very wet in the Northwest.
He asked me how he could keep the project moving and not allow the days and days of rain to put the project behind nor get the cedar wet. I shared how he could build a very simple pup-tent design using a giant fiberglass tarp, some rope, and a few 4x4 posts. He built an inverted-V shelter in less than two hours that was both wind and rainproof. He sent me photos of the finished shed under the tarp. It brought a smile to my face, to say the least.
Lastly, I live in a rural part of New Hampshire, and there’s no free trash pickup. You take your own trash to the town dump and recycling center. For the past few months, foundation work has been going on for a giant new garage and service center for the town public works trucks.
Two weeks ago, I saw workmen starting to build an ingenious triangle-shaped structure around the poured foundation. (See photo above.) It was done to create a warm environment for laying concrete blocks. The project is months behind schedule because of a pier-drilling mistake so not a day can be lost to the weather.
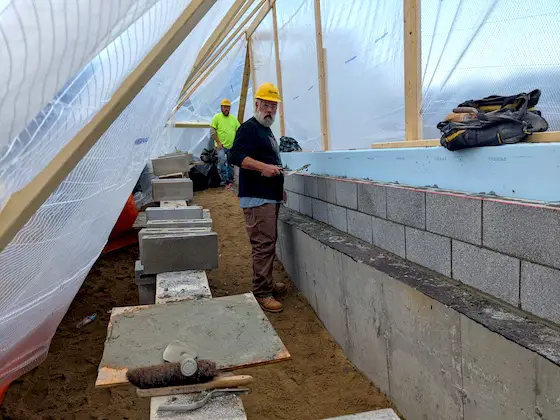
This professional mason is protected from the elements and WARM inside the plastic triangle tent. Ingenious! Think how you can replicate something similar so your job can continue on NO MATTER what Mother Nature throws at you.
The laborers did a fantastic job building this simple structure from sheets of reinforced plastic and some 2x4s. It turned out to be windproof and the concrete block thought it was being laid in June it was so balmy under the plastic with the heaters on.
Should you decide to build shelters as I just described, keep in mind the wind. You must be sure your structure doesn’t blow over or get ripped to shreds. Always use reinforced plastic sheeting. There are plenty of online videos out there that give you tips on how to prevent this. Good luck and get ‘er done!
Column 1432
Are you an audio engineer or audio enthusiast? I need to transform these cassette tapes to MP3 files.
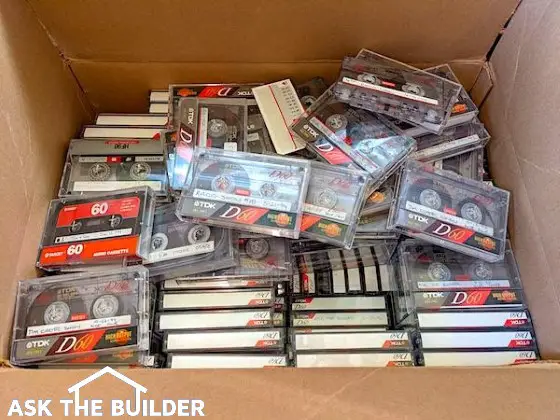
The cassette tapes were brand new when the recordings were made. The tape has rolled just once and they've never been replayed. I need to get them up in the cloud before the tape degrades to where the recordings are useless.
PLEASE ONLY RESPOND if you have experience using a machine that automagically converts the audio on the tapes to an MP3 file.
I'd like to know what machine you've used and what is the QUALITY of the output file. Is the MP3 file clean without hissing or ????
Thanks!
Tim Carter
Watch the video below to discover the magic of making leakproof joints with copper tubing and fittings using a press tool. You'll never set your house on fire using a torch so hot that it can melt metal! Your local firefighters will thank you for using this clever tool!
I swear I can transform you into a master plumber in less than a month! I've been one since 1981, silly, so I know a thing or two about plumbing.
NOTE FROM TIM: The tool used in this video is expensive. A plumber would use it every day or every other day. You might have a use for it once every five years. Guess what? You can RENT IT for a few hours! Get all your measurements done, cut your pipe, assemble everything, go rent the tool, then press your fittings and get the tool back to the rental center. It's not hard to work smart!
Do NOT confuse these press fittings with the age-old compression fittings that are used to make connections between hard piping/shutoff valves and the flexible supply tubes under sinks and toilets. Those compression fittings are not nearly as strong as the crimp created by the press tool. No master plumber worth his salt would EVER install a traditional compression fitting in a hidden space. I don't want you doing it either for goodness sake!
CLICK or TAP HERE to purchase the Ridgid Press Tool Kit I used in this video.

Frost in Closet | This is normal condensation on a mirror. Water vapor in the air has transformed into liquid water on the COOLER mirror surface. The same fog happens in closets and on COLD days it turns into FROST.
You have frost in your closet, right? That's why you're here. It may be on the ceiling or most likely an exterior wall. Should you be worried? Maybe.
The frost is caused by water vapor that condenses on the cold exterior wall/ceiling and then turns to solid ice crystals. WATCH this LIVE stream video I did about the topic. I go into great detail about frost in your closet:
There's no frost on the wall in the room on the other side of the closet for several reasons:
You can stop the frost in the closet by:
Yes, the frost can lead to mold and mildew. Your clothes can become covered with mold and mildew making you sick. The mold and mildew may not be visible to you, but it could be in the early growth stages.
Tim Carter offers phone coaching over the phone to solve your frost problem.
Moments ago, I did a fun experiment. I went LIVE on my YouTube channel with NO prior announcement. It was stunning to see how many viewers found me in less than a minute.
The LIVE video stream lasted for 37 minutes and I shared quite a few funny stories!
I'll have MORE stories today at 4 PM Eastern Time for you.
You can watch my live stream here M-F 4 PM Eastern Time.
Tim Carter
Founder - www.AsktheBuilder.com
Do It Right, Not Over!
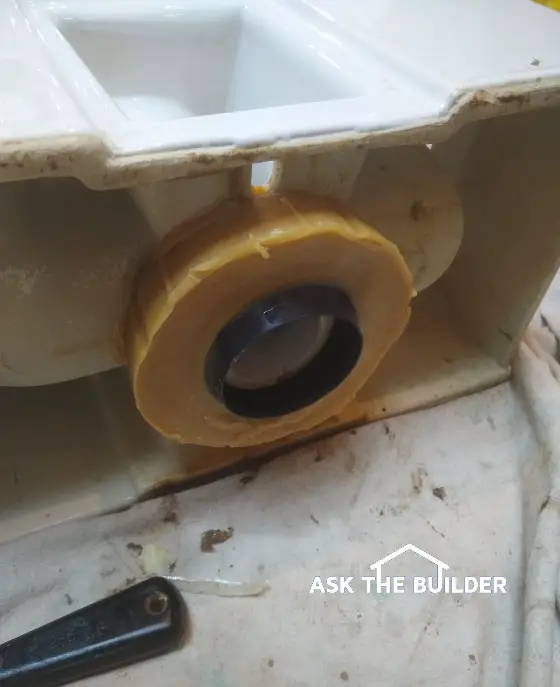
Secret Toilet Tips | Here’s a rare photo of a toilet that you’ve undoubtedly never seen. It’s the underside of the commode with a new wax gasket applied to the outlet hole. Copyright 2021 Tim Carter
Toilets are a pretty important part of your life is my guess. They may appear simplistic to you but in reality, they’re quite complex. I’m going to try to de-mystify the porcelain pedestal in an effort to minimize problems you might have with one in the future.
I’ve been a master plumber since 1981 so I’ve not only installed my fair share of toilets, but I’ve also helped folks like you unclog them and keep them running quietly. Let’s start with the basics.
The toilet in your home connects directly to a drain pipe. In almost all instances the pipe you can’t see has an inner diameter of 3 inches. Toilets have a curved passageway, it’s called a colon, that will normally allow a 2-inch-diameter ball to pass through with no issues. It’s the same thinking for central vacuum cleaners. The opening at the end of the wand as well as the wand tubing are a smaller diameter than the invisible pipe in the wall. You want to make it very hard for the hidden pipes to get clogged.
The connection between your toilet and the plumbing drain pipe must be leakproof for all the obvious reasons. Not only must it not leak water, but it absolutely can’t allow rank sewer gas to seep into your home. Wretched sewer gas is a chronic problem for many people. Each week I’m often or a frantic phone call helping someone solve a sewer gas problem. Most are traced to a failed seal between the toilet and the special flange on the floor that is the termination of the drain pipe.
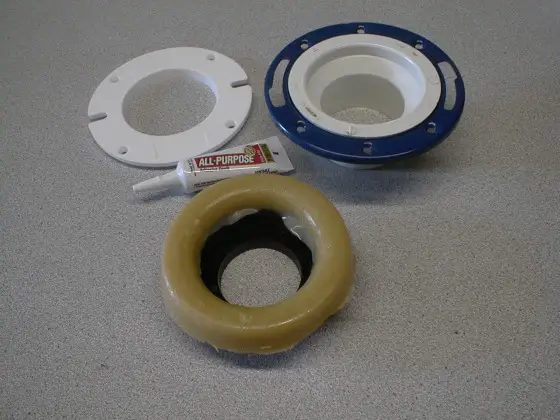
This flange must sit on top of the finished flooring material.
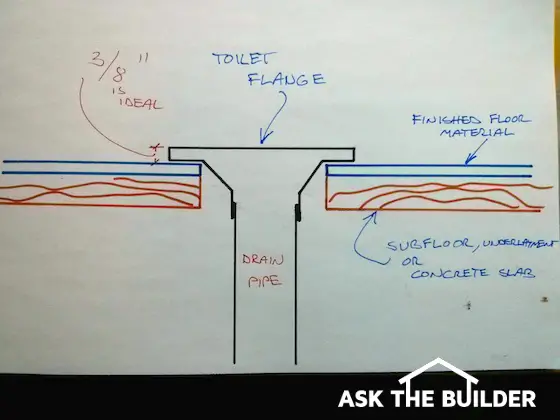
Here's a side view of a normal toilet flange on a floor. The gap between the bottom of the flange and the finished floor is just to show that the flooring goes under the flange. Most PVC flanges happen to be 3/8-inch thick at the edge so you want the flange to be tight to the finished flooring. Copyright 2021 Tim Carter
In many cases, for a host of reasons, it doesn’t. Two classic errors are a plumber that attaches the flange to the house subfloor. Another common mistake is a homeowner will install a new floor on top of an existing one. This buries the flange with its top surface often below the level of the new floor.
When this happens, a rookie homeowner trying to install a toilet might not realize the wax or rubber gasket that creates the seal is not making solid contact with both the underside of the toilet and the top of the flange.
Once a toilet is bolted correctly to the flange, the gap between the base of the toilet and the floor should be grouted using regular tile grout. Don’t use caulk. Grout dries solid because it’s no different than brick mortar. Caulk is normally flexible. You never want the toilet to move whatsoever when you sit on it. If your toilet wobbles when you sit on it, trouble lies ahead as the seal will eventually fail.
The water in the bowl serves a very important function. It prevents sewer gas and vermin from entering your home. All traps under sinks, tubs, showers, floor drains, etc. do the same thing. The issue is these other traps have much less water in them than your toilet bowl. The large amount of water in the toilet bowl acts as a target for your bodily waste.
Clogged toilets are the bane of many a person. I created a very interesting video showing how to use a bucket of water to unclog a toilet. Just a month ago, a young woman avoided shame, her words, as she had clogged the toilet at her boyfriend’s house. Panicked and still in the bathroom using her smartphone to get help, she found my video, watched it, and then used the wastebasket in the bathroom as her bucket. I thought she was quite resourceful! The video is just below.
You might be flummoxed about the fill valve in the tank of your toilet. It’s a very simple valve, although it looks quite complex. Believe it or not, if yours has worn out or is making noise you can usually install a new one in less than 30 minutes. It’s easy to do if the shut-off valve under the toilet works. New fill valves are affordable and extremely reliable. Your slow-filling toilet will stop whistling once you install a new fill valve.
Now’s a good time to talk about those wretched flushable wipes. Millions of these adult wet wipes are sold and sewer-plant operators despise most of them. I invested two full days a couple of years ago setting up a toilet on a pipe-scaffolding platform in my driveway. I then re-created the drain pipes you’d have in your home. I wanted to demonstrate what happens to several brands of flushable wipes when they travel down your pipes to the city sewer or your septic tank. The video I created has become quite popular.
You should absolutely watch the above video. If you must use flushable wipes, never flush them down a toilet. Treat them as you’d dispose of an infant’s dirty diaper. Have a special trash can, with a lid, in your bathroom. Put the soiled flushable wipes in that trash can.
Failure to do this might cause you to have to hire a drain-cleaning company to unclog your drain lines. This will cost you hundreds of dollars. Avoid the problem altogether by just using some common sense, a simple plastic liner for the small trash can, and cooperation from all in your home.
Column 1431
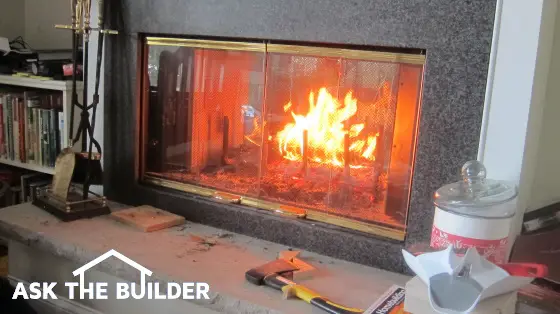
Fireplace and Woodstove Chimney Safety | Here’s a roaring wood fire in my own fireplace. How do you think I keep my family safe? Copyright 2021 Tim Carter
It’s that time of year here in the USA where you might be starting an indoor fire to either stay warm or just produce some ambiance within your home. I happen to have two wood-burning fireplaces in my own home and both are see-through so four rooms in my house get the benefit of a roaring fire.
I don’t know about you, but I’m curious as to the number of residential fires that occur because of something gone wrong when an indoor fire is stoked in a fireplace or a woodstove. I decided to head to the Consumer Product Safety Commission and the National Fire Protection Agency for some data. I wasn’t disappointed in my findings.
It turns out the data is slightly stale as both agencies offer up data from a few years ago. That said, I feel it’s a great reflection of what happens now in every state in the USA. It turns out there are well over 10,000 residential fires each year in the USA that are traced to fireplaces, chimneys, and woodstoves. Depending on your source of information, it equates to about 40 fires per day. That’s over one per hour each day. People like you die or are severely injured/burned in some of these fires.
These numbers should put your head on a swivel. If not, this story should. About twenty years ago, I was tasked with moving a wood-burning fireplace from one place inside a home to another. The original chimney was installed per the minimum code requirement in place in the 1980s.
What I discovered as I removed the drywall that was screwed to the wood furring strips that were nailed to the 4-inch solid concrete block astounded me. I could see soot and scorch marks where hot flu gases had worked their way through tiny cracks in the mortar surrounding some of the concrete block.
I decided to slow down my demolition efforts to carefully look at how the clay flue liners were installed. I could see that fresh mortar was used to connect them. The mortar looked to be in great shape. But there were many cracked flue liners!
I couldn’t see any evidence of house settlement and all the masonry in the house looked good. I assumed the foundations under the chimneys were in good shape and had never moved causing stress on the flue liners. The cracks must have been caused by hot fires. I asked the homeowner about this and he said he would get fires going as fast as possible. I can’t prove it, but I assumed the fires got too hot too fast and the flue liners didn’t have a chance to slowly heat up. The thermal shock, especially on cold winter days and nights when the flue liners would be quite cold most likely caused them to crack.
The shocking thing is that the flue gases had escaped from the chimney and could have set the wood framing near the chimney and the wood furring strips on fire. Fortunately for this homeowner, a fire never occurred.
It’s important to realize this chimney had been built to the minimum standards allowed by the building code at the time the house was built. My takeaway, and it should be yours too, is wood-burning fireplace chimneys should be constructed much better than the code requires.
I’ve had the luxury in my career to employ a master mason, John Hoeh, who built all the wood-burning fireplaces and chimneys on my jobs. It’s tantalizing to watch him skillfully use a thin coating of wet fire clay to create a fireproof joint between firebrick in fireplaces. It’s comforting to see him surround flue liners with 8 inches, or more, of solid masonry.
What does solid masonry mean? To me, John, and many other craftsmen, it means that the space between the outside surface of the flue liner and the outside surface of the chimney itself is completely solid. There are no air gaps, no void spaces, and no pathways for hot flue gases to escape from the chimney.
Lots of mortar, masonry rubble, solid concrete block, solid brick, solid rock, or whatever solid masonry material available is used to create this barrier. It takes a bit more time to do this, but the long-term peace of mind is worth every penny.
I’ve said in many past columns of mine that the building code is a set of minimum standards. I’ve never had a building inspector nor building official disagree with me. Building anything to the code standard is like getting a 70 percent on a test. It means you just barely passed. You can always build things better than what the building code mandates. Never ever forget that.
Keep in mind there’s much more you need to know about building fireplaces and chimneys. The actual firebox needs to be a very specific shape and size so it doesn’t smoke.
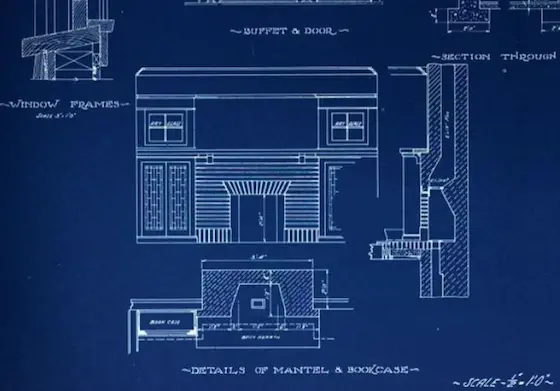
This blueprint is nearly 100 years old. The architect knew EXACTLY how to design the fireplace, chimney, and firebox so it would NOT SMOKE. Use this as your North Star.
Once the last brick or stone is laid at the top of the chimney, it needs the correct cap so the chimney lasts for hundreds of years. Based on my observations of chimneys I’ve inspected, I’d say that not one in 10,000 has the type of chimney cap the Brick Industry Association recommends.
My AsktheBuilder website and discover illustrations of how your firebox should be built. I have a table of all the required dimensions. I have several past columns that go into great detail about how chimney caps & crowns, the roof of your chimney, should be built. Go get this FREE information now!
Column 1430
Subscribe to the FREE Ask the Builder newsletter to receive professional advice for your home. Complete the form below and each week you'll get:
Unsubscribe at any time. We respect your email privacy.