Housing Closing Winterizing Checklist

The following checklist will allow you to close up your home with confidence whether you leave for a weekend or six months. The first items on the list represent what you must do to partially close your home. You must do all of these and more to complete a total closure. Some of the items may seem silly, that is until you have a problem. Don't cut corners. Do them all.

1. Shut Off Main Water Valve
This is indeed the single most important thing you can do. A broken water pipe or a burst hose can deliver tens of thousands of gallons of water into your home over a period of just a few days. If your valve is hard to operate, it is time to have a plumber install a new main valve. Be sure it is a ball valve and have him install a boiler drain on the house side of the valve. This will allow you to drain the system easily.

2. Fill All Drains - Traps with Water
If you are gone for a few days or a week you don't want sewer gas in your home upon your arrival. A rarely used floor drain or fixture may be just hours away from evaporating the water seal in the trap. Pour water into all fixture traps to fill the trap seal completely.

3. Turn Off all Non-Essential Electricity
Shut down the power to parts of your home that do not need electricity during your absence. If you don't want to hassle with this, then install new arc fault circuit interrupter breakers in your electrical panel. These breakers will immediately turn off if there is a short circuit in your absence.

4. Beware of Lamps
Some people leave lamps on while they are gone. If you have indoor pets this can be a mistake. Fires have started when a lamp is knocked over and the bulb heat ignites combustible material. This is especially true of the high temperature halogen bulbs. If you leave lights on, do so with ceiling or wall mounted fixtures.

5. Arrange for Pickups
Sure, you called to stop your paper and the mail, but what happens if it comes anyway? It wouldn't be the first time. Arrange for a friend or neighbor to check your home each morning and afternoon for boxes, door handle circulars, etc. that may litter your house while you are away.

6. Notify Police and Fire Department
I am fortunate to live in a small village. The police department WANTS us to tell them we are leaving. The officers stop by at random times during the day and night to make sure all doors are closed and all is well. It is a free service. If you are lucky you might have the same or similar service. Stop by the fire department as well and give them a number where you can be reached.

7. Empty Garbage
Sounds crazy, but people forget and there is an awful odor once you get back.

8. Refrigerator Food
Plan ahead. Try to leave your refrigerator as close to empty as possible. Food and drinks that have a shelf life that will expire during your absence should be discarded before you leave.

9. Check Sump Pump
If you have a basement prone to flooding, check to make sure the sump pump works. If you feel the pump may be unreliable or is at the end of its useful life, then install a new one before you leave.

10. Computers - File Storage
Shut down your computers properly and unplug them from power, telephone and cable modems. Surges can blow up your machine in your absence. Back up your data, absolutely make two copies of important data and store one off site.

11. Cold Weather House Checks
If your house is in a cold climate and the outdoor temperature is expected to drop below freezing, you must have a friend or neighbor stop by to make sure your furnace is working. You can drop the thermostat temperature to 60 F unless you are leaving behind pets that need warmth. You just want to make sure the heat is working.

Full House Closure

12. Drain Water Supply System
If there is a chance that the inside of the house will drop below freezing, then you must drain all water from all fixtures and leave the valves open. This can be a major undertaking. The water coming into the house may have to be shut off at the street as well and the main line drained. Keep in mind that the basement can freeze and the incoming water line can freeze and burst!

13. Protect Fixtures and Traps
Non-toxic antifreeze needs to be poured into all sinks and toilets. Don't forget about the water in the toilet tanks! If you live down south where the air is dry, water can evaporate from traps and toilets. You can pour several ounces of mineral oil in floor drains and sink traps to slow this process. Cover toilet bowls with plastic wrap to prevent evaporation.

14. Contact Insurance Agent
Ask the agent what, if anything, needs to be done to make sure your policy will be in full force and all is covered if something goes wrong.

15. Pre-Plan Repairs
Meet with a reliable remodeling contractor before you leave. Give him the name of your insurance agent. Make arrangements that the contractor can secure the property in the event of storm or fire damage in your absence. If you try to do this after the fact from a remote location, you will go nuts. Also, you are first in line with the contractor - like making restaurant reservations.

16. Empty Freezer and Refrigerator
Need I say more? Discard or give away to a food bank / free store any food that could spoil in your absence.

17. Arrange for Power and Fuel Shut Offs
If you can turn off the power and fuel, do so. Arrange for professional help to make sure all systems are protected.

18. Equalize Interior Humidity
Water vapor in the trapped air inside can condense as the temperature slowly drops in your absence. Mold growth can and will happen. It can cause extensive damage. You must arrange for windows to be cracked open and then closed over time once the interior humidity has dropped so that condensation is not a risk.

19. Store Valuables Off Site
If you have anything of real value, you must store it someplace secure. Purchase a really good fire safe and store important papers/documents in it. Place the safe in a low spot, but not someplace where it is subject to flooding. Remember, much of the heat from house fires goes up, not down.

20. Get a Guard
Somehow, someway make arrangements to have someone stop by and extensively check the house on a regular basis. You need to know if all is well.

Related Column:

Home Alone - Winterizing Your Home

Column B386

Winterizing – Partial And Full House Closure

I'll never forget the sound. It was a hissing noise quite unlike any I had heard before. My family and I had just sat down for dinner. Our laundry room is just behind us. A water hose feeding the washing machine had just burst. I had a valve behind the washing machine that cuts off the water supply but it didn't work. The valve was frozen open because I had never used it since the day it was installed. By the time I got to the basement to turn off the water, perhaps 60 seconds had gone by. The laundry room floor was a mess and water started to leak through into a basement storage room.

Dodged the Bullet

We lucked out. We were home, heard the water leak instantly, and reacted. But what if we had been at a movie? I can assure you that probably tens of thousands of dollars of damage would have resulted. I bought some peace of mind that night and replaced the washing machine hoses with burst-proof stainless steel wrapped hoses. I intend to install new ball valves on the water lines behind the washer so I can quickly turn them off in an emergency.

Ask Your Agent

I think seasoned insurance agents have a wealth of information that they sometimes forget to share. They know the nightmares that happen and what often can be done to prevent them or at the very minimum, what can be done to minimize damage caused by accidents. Call your insurance agent and ask if there is a list of five or ten things they recommend that should be done before you leave a house vacant for a short or extended period of time.

If I sold insurance, I would seriously consider publishing a quarterly newsletter that told of the previous quarter's worst claims. Many people have email and the newsletter could be sent for free! Talk about building trust and a relationship, this would do it if the newsletter had concise tips and information most people could use. I wish my agent did this!

Stored Vehicles

Some people go away and leave cars behind. I remember doing this years ago, when I went out West for three weeks. Upon my return, I started up my Volkswagen beetle, put it in gear, released the emergency brake and it simply wouldn't go! The darn emergency brake cable had rusted into the closed position! I popped the clutch and the brakes released, but I learned my lesson. You need to pay attention to cars as well.

Contact your local auto repair shop and ask the manager what, if anything, you should do to protect the investment in your car. You may have to do nothing, but watch that emergency brake!

Stored Flammables

What about that can of gasoline in your garage? How about all of those cans of solvents or paint thinner? What happens if they spring a leak in your absence. It is a remote possibility but it can happen. For example, my walk behind lawn mower just sprung a leak two nights ago in the fuel line. I opened the door from the house to the garage and was overwhelmed by the gasoline fumes! If I had a cigarette or some other open flame maybe an explosion could have happened. I had never given it a thought that the darn fuel line would all of a sudden spring a leak. Ask your fire department if they have a travel list of things to do before you go away. I'll bet they have a ton of stories to share as well.

Security Lighting

It is easier than ever to install motion detector light fixtures and timing devices that activate lights at different times. Exterior spot lights and interior ceiling fans can be programmed to provide random lighting. It is a good idea to do this. Houses left completely dark telegraph that no one is home. Arrange for different lights to be on at different times to fool the rookie or timid burglars in your area.

You can purchase very cool remote controlled web cameras that allow you to view your property from a distant location. I can tell you, this is a good idea.

Column B386

Wood Window Installation Tips

Installation Tips

The trick to installing the replacement windows lies in the initial measurements. Take your time and make sure you measure correctly. Always check the width at the top, bottom and middle. Use the smallest measurement. You can always shim out the jamb liners where the opening is "fat" (a carpenter word).

Check the opening for square using an accurate carpenter's square. You can also attempt to measure the diagonals of the opening. The diagonal is the straight line from one corner to another. For example, when looking at a window opening you create a diagonal if you stretch a tape measure from the upper right corner down to the lower left corner of the opening. If the diagonals are equal, the opening is perfectly square (this assumes that the width and length dimensions match as well).

When it's time to install the window, take your time removing the window-stop molding. This is the molding on the inside of the window opening that produces one half of the groove that the inner sash slides up and down in. The odds are this is an old house with multiple layers of led paint. You need to be careful about cleaning up any paint chips. Use wet paper towels, not a wet-dry vacuum.

Use a small pry bar to carefully pry this molding away from the window frame. If this is painted, consider slicing a fine line with a razor knife to break the paint film at the intersection point between the molding and the frame. If the stop molding was nailed in place, don't hammer the nails back through the molding! If you do, you will have massive blowouts of wood. The better way is to use a linesman's pliers and pull the finish nails through the back of the molding. It can be done with little effort.

Give serious consideration to prefinishing the new windows. I did this on virtually all of my jobs. That way, no ladders are required to paint the exterior. It also minimizes the chance of a major paint spill inside the house. Besides, it is so much easier to paint the windows in a garage on a sawhorse. Don't throw away the old windows! An architectural-salvage company in your area may buy them. People use the old glass and window sashes for historical preservation!

Column B385

Programmable Thermostats Save

Programmable Thermostats

Think about it for a moment. In the old days, before programmable thermostats, a traditional thermostat would keep your home at a certain temperature until such time as you went over and adjusted it. Some people were very good about doing this in an effort to save money on utility bills.

But it was not uncommon to forget about making the necessary adjustment when you would go to bed or leave the house for an extended time. It may not seem like much money but even if you only save $1.00 per day in heating and cooling costs, it adds up. In today's market, you can save much more than that.

Look at Your Bill

Study your utility bill. What portion of your bill represents what you spend for heating and cooling? It is easy to calculate if you look at an entire year's worth of bills. There must be certain months of the year when you rarely have your furnace or air conditioner on. Here in Cincinnati those months are April, May, September and October. Look at the energy costs for those months and do the math to create an average. This number is what you might spend on average each month of the year for lighting, cooking, laundry, refrigeration, etc.

If you take this average cost and multiply it by 12 it will be a number less than the total amount you spent all year for your utilities. Subtract the smaller number from the grand total and the remainder is the approximate amount of money you spend to heat and cool your house for one year.

What if I told you that a programmable thermostat could save you 30 percent or more of this number? What if I told you it would do it year after year and that the savings would grow as utility costs go higher and higher? Does it make sense to make a one time expenditure of $150.00 for a top of the line programmable thermostat? I can see you running out the door now to get one!

Artificial Intelligence

Programmable thermostats have come a long way. The first generation ones were simply sophisticated timers that turned the heating and cooling system on and off at specific times. This worked fine if you were really good as guessing how well your furnace and air conditioner could alter the temperature and recover from the previous time period settings. Well those days of trying to guess are over! You can buy a slick programmable thermostat from Honeywell that does all of this guess work for you. They call it Adaptive Intelligent Recovery®.

Thermostats that have this feature actually "learn" how your heating and air conditioning system works. It memorizes how fast it can recover from a setback temperature. You simply set the thermostat telling it exactly what time you want the house to be a certain temperature and within 4 to 8 days it will figure out how to do it. Now that is a very smart thermostat.

Location, Location, Location

The above phrase is an axiom in the real estate industry. It tells you how to get the most from your property. Simply make sure it is in the right location!

The same is true for thermostats. They need to be placed in special locations to work correctly. Here are some guidelines:

  • Keep them away from windows.
  • Never place on an exterior wall.
  • Never place one behind a door. The thermostat needs to be visible.
  • Never place in direct sunlight.
  • Do not place near a return air duct.
  • Try to locate in the central core of the home.
  • Place it 5 feet off the floor.

Column B367

Programmable Thermostat Sources

Programmable Thermostat Sources

I did some research and found out that there are nearly 30 different thermostat manufacturers! Whew! It would take someone with the patience of Job to wade through that list in an attempt to make a sensible comparison.

I will tell you that the programmable thermostats are highly sophisticated and good ones have the best and most expensive parts and engineering. Some low cost thermostats actually have components inside that get hot and create false heat. This heat can trick the thermostat and cause it to turn on or off when you don't want it to.

It has been my personal experience that Honeywell makes a superb thermostat. I have put this brand in all of my jobs for 20 years and have never had a malfunction. I have this brand in my own home. In fact, I recently upgraded my 15 year old Honeywell programmable thermostats to the new Honeywell Chronotherm IV Plus Deluxe Programmable Thermostats. I have two systems in my house so I got two thermostats. Both have the Adaptive Intelligent Recovery™ feature. I love them!

It is my understanding that Honeywell makes thermostats for different heating companies that then place their brand label on it. It is entirely possible that you have a high quality Honeywell thermostat but you don't even realize it. Ask a professional HVAC serviceperson and they should be able to tell you for a fact.

The point is, don't rush out and buy a new thermostat if the one you have now is a good one. The only reason you might want a new one is to enjoy the benefits of ones that have the Adaptive Intelligent Recovery™ feature.

You can learn more about programmable thermostats at the Honeywell website. It is a little tough to get to the thermostat section! Start your journey at:

www.honeywell.com

You can also visit any decent sized hardware store or home center to see and purchase programmable thermostats. Be careful when you shop. Try your best to compare features. Use price as a quality guideline. Always keep in the back of your mind how quick the payback will be! Spend an extra $50 - $75 on the initial thermostat and it may keep you more comfortable and save you more than a cheap 'stat.

Related Column: Programmable Thermostat

Column B367

Suggested Thermostat Settings

Suggested Thermostat Settings

When you purchase a programmable thermostat, it will come with instructions and possibly a booklet of suggested settings for the four different periods of time. Most of the thermostats come from the factory with pre-programmed settings. Beware, these may not suit your needs! If you have a strange schedule or jump out of bed and rush out the door, you can save money and be more comfortable if you take the time to customize the settings. What's more, the factory settings assume you work Monday through Friday and have the weekends off. It seems today that is the exception rather than the rule. So many of us have weird schedules. The point is, take the time and set up your thermostat. Be sure to see if your new thermostat is equipped with the Adaptive Intelligent Recovery feature. If it has this money saving intelligence, use it!


Stop - Check this out!  Want to save money on your winter heating bills, click here to watch my Heating Costs Video.

Or click here to read about another way to spend less on your heating bill. Save on Heating Bills

The first table contains suggested settings for the days you leave the house and go to work. The second table has settings for your off days you run errands and are home for most of the day. The temperatures I picked work for me. You may want them to be much hotter or cooler.

Workday Settings

Period Start Time Heat Setting Cool Setting Fan Mode
Wake 5:45 am 67F /  19C 78F / 25C Auto
Leave 7:30 am 61F / 16C 84F / 29C Auto
Return 5:30 pm 67F / 19C 78F / 25C Auto
Sleep 9:30 pm 61F / 16C 81F / 27C Auto

Offday Settings

Period Start Time Heat Setting Cool Setting Fan Mode
Wake 7:30 am 67F / 19C 78F / 25C Auto
Leave 9:00 am 61F / 16C 84F / 29C Auto
Return 1:30 pm 67F / 19C 78F / 25C Auto
Sleep 10:30 pm 61F / 16C 81F / 27C Auto

Column B367

Wine Storage Solutions

Wine Storage Solutions

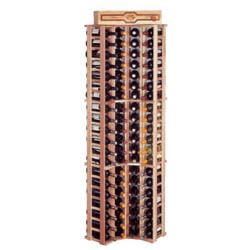
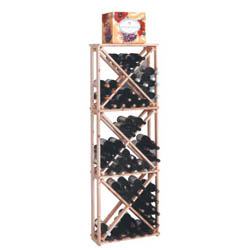
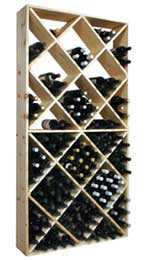
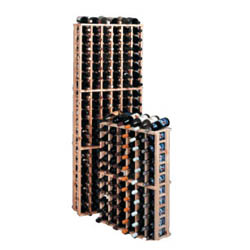
Here are some examples of some wine storage kits and systems. I guarantee you that you will find one that will work for you. The images were taken directly from the Wine Cellar Innovations literature. Contact them to get color copies and see their full line of accessories.

Wine Cellar Innovations
800-229-9813

winecellarinnovations.com


Curved Corners form a smooth 90 degree transition between walls. Made of individual bottle racks 4 columns wide x 21 rows high, this rack holds 84 bottles.


Diamond Cubes are 1 column wide x 3 cubes high. Each cube has 4 quadrants holding 10 bottles for a total of 40 bottles. With a case stored on top, this rack holds 132 bottles.


The Solid Bin Rack is constructed of sturdy 1x10 pine and holds up to 208 bottles.


Individual Bottle Racks are available in 2 different heights. The 21 row rack is 72" high and the 11 row rack is 36-3/16" high. Each rack is 6 columns wide and holds 126 or 66 bottles respectively.


Our Custom Moldings provide a built-in cabinetry appearance to our racking that distinguishes them from the rest.

Toe Kick base wine shelving is also available.

Related Column: A Custom Wine Cellar

Column B356

Wine Storage System Manufacturers

Wine Storage Systems

Who would have ever thought that the largest wine storage system manufacturer would be in my backyard? Well, it is true. I was very lucky and met the owner of the company at the International Builders Show in January of 2001 in Atlanta, GA. He invited me on a plant tour and I was amazed at the size of his operation and the attention to detail. They are very innovative and the quality control is of the highest. This company happens to be:

Wine Cellar Innovation
4575 Eastern Ave.
Cincinnati, OH 45226
800-229-9813
winecellarinnovations.com

The variety of storage systems and accessories blew me away. They have storage systems for the beginner that just hold 10 to 12 bottles to systems that will hold thousands of bottles of wine. The cool thing is their ability to custom design a system for you. Wait till you see the accessories they offer, like custom murals, custom ceramic tile, lighting, wood cravings, inlay flooring, etc. If wine is your hobby, you will begin a very fruitful relationship with this company to be sure!

The other players in the wine storage are:

  • Apex Saunas & Wine Cellars
    Bellevue, WA
    800-462-2714
    www.apexwinecellars.com

  • Baltic Leisure
    Oxford, PA
    800-441-7147
    www.balticsaunas.net
  • Fine Wine Rack & Cellar Co.
    San Francisco, CA
    415-626-9463
  • The Wine Rack Co.
    High Falls, NY
    888-687-2517
    www.wineracks.com
  • Vigilant Inc.
    Candia, NH
    888-812-4427
    http://company.vigilantinc.com

Column B356

Wine Storage Systems

Wine Storage Systems
Tips on Wine Storage & Vapor Barriers

Wine consumption is growing. As the baby boomers age like a fine wine, they are recognizing that this time honored beverage deserves some serious attention. Consumed in moderation, it has proven health benefits and it can make one feel good at the same time. As for me, if I haven't eaten for 4 or 5 hours and have a glass or two of wine, I start to get very happy!

The Next Step

If you start to really get into wine tasting and collecting, then you need to treat the wines with the respect they deserve. Wine can spoil and degrade in quality if it is not pampered. The rules for wine storage are fairly simple: 55 - 58 degrees F and 55 -75% relative humidity, and darkness.

I think you can see why the old wine storage rooms were in the basements of castles or large European homes. These spaces create ideal wine storage conditions.

The trouble is, modern homes are built so that most basements are not cool and damp. You need to build an artificial room that simulates this atmosphere. This task is not hard if you are a serious do-it-yourselfer. If your skill level is beneath this, then you might want to have your wine storage room built professionally.

Humidity

Older wine and even many new ones use traditional cork stoppers. It is important for the cork to stay swollen to lock in the flavor and other fine qualities of the wine. Low humidity levels can shrink corks ever so slightly and cause a degradation of the wine. You can solve this problem by elevating the humidity within the wine storage room. This is accomplished any number of ways, but to do it right, you need humidification equipment that is sized properly and has excellent controls to maintain a constant level of humidity. Wine Cellar Innovations sells such equipment.

Vapor Barriers

The humidity created within the wine storage room wants to migrate to other parts of your house. Moisture levels this high can cause all sorts of problems and condensation if you are not careful.

You can stop the movement of this water vapor by installing a high performance vapor barrier on the warm side of the wine storage room. This means that the vapor barrier goes on the outside of the wall construction.

You can purchase these great vapor barriers at businesses that sell supplies to commercial concrete contractors. You will rarely find them at home centers or regular hardware stores. Two products that work well are:

Super Sampson
800-635-3456

Tu-Tuf
800-435-2621

Call these numbers to find a distributor near you.

Redwood

Consider using redwood for your wine storage system. Leave the redwood unfinished. Chemicals in urethane, stain and paint can travel through corks and ruin the flavor of wine!

Redwood will withstand the humid conditions within the wine storage room. It has natural wood preservatives within it.

Accessories

If you want a grand wine storage room, you can have it. Murals, custom tile, custom cabinetry, tables, wood carvings, etc. are all available. You can easily personalize your wine storage room and make it something you can really be proud of. Remember, drink in moderation!

Column B356

Copper Tubing Flaring Tool Video

Most people are familiar with hard copper tubing. You know the type that has to be soldered at the joints. But, there is another type of copper tubing that does not require soldering. Soft copper tubing is available in a variety of sizes. It can be bent without kinking. In addition, it uses compression fittings or flare fittings to create leakproof connections.

A special copper pipe flaring tool is required. This tool consists of two components. One piece is a clamp with holes for the various diameter tubing. Clamp this on the end of the copper pipe. The other piece has a conical point, holding arms and a screw.

But, wait! Before flaring the end of the tubing, be sure you slide the compression nut onto the tubing first. If not, you will not get it on the tubing. Once the nut is on the pipe, attach the second part on to the clamped piece with the conical point in the tubing. Tighten the screw to create the flared end on the copper tube.

Done this way, the connection will not leak. Working with soft copper tubing is very simple.