Ceramic Tile Repair Video

If you are lucky enough to have extra pieces of your tile flooring, you can replace the broken or cracked tile. This involves matching the grout around the tile that is being replaced. The first step in doing this repair is to clean the surrounding grout with oxygen bleach. Mix some of the oxygen bleach powder with water and apply it to the grout. Let it work for 10 - 15 minutes. Lightly scrub the grout to complete the cleaning. That is just the beginning of the work to replace that tile.

An alternative method is to fill the crack with clear two part epoxy glue. Use a toothpick to fill the crack up to the level of the tile. Once dry, paint over the crack with a fine artist's brush. After the paint has dried, coat it with clear urethane to keep the dirt out of the paint.

Try the alternative method to quickly repair that ceramic tile crack. It is quick and easy compared to replacing the tile completely.

"WOW, that's all I can say! I purchased your product last week to clean the grout on my 800 sq. ft. of tile, and it looks as clean as the day we moved in eight years ago. I must admit, I was a little skeptical when I ordered the Stain Solver, but after having used it, I know I will always have some on hand and look forward to cleaning my wood deck this spring. This is by far one of the best products I have purchased in many, many years. Thanks Tim!" - Ed, Macomb, Michigan
Message from Tim:

Years ago while researching a column about cleaning decks, I discovered the wonders of Oxygen Bleach. It is perhaps the 'greenest' cleaner I know of as it uses oxygen ions to break apart stains, dirt and odor molecules. There are no harsh chemicals, and it works on just about anything that is water washable.

I decided to create my own special blend using ingredients made in the USA. In fact, the raw materials in the active ingredient are food-grade quality registered with the FDA. I call my product Stain Solver. I urge you to use it to help with cleaning your ceramic tile grout. You will be amazed at the results!

Heat Pump Operational Costs

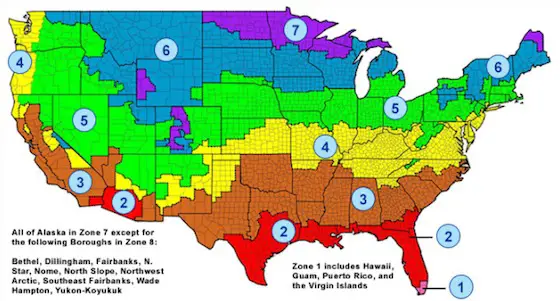
insulation USA map

This is a very good map showing the different insulation zones in the USA. Your heat pump operational costs depend on what zone you're in!

Heat Pump Operational Costs

Different Geographic Regions

Does it make sense to buy the most efficient heat pump available? Well, it depends! Look at the table below. I selected some cities where friends of mine live. It is fairly well distributed across the USA and absolutely in different climates.

Pay attention to the cost of electricity in each city and compare it to your cost. Reference your electric bill. The calculations to arrive at the results below were done by a computer. Just about every heat pump distributor in every city in America has the capability to produce these numbers. They just need to know three things: the size of the system in tonnage, the local electric rate per kilowatt-hour, and the efficiency of the unit you are looking at.

The best thing to do is have a calculation run for three different efficiencies just as the table below shows. I extend my thanks to Jeff Urbanek who works very hard each day at Quality Crafted Systems - the local York distributor. Jeff was kind enough to take time from his busy schedule to run the numbers you see below. Thanks, Jeff!

The numbers below are based on some constants. The system Jeff and I selected is a 3-ton system. The calculations were done taking into consideration the design temperatures for heating and cooling for that city. The lifespan of the heat pump is 15 years. The total lifetime cost value in the last column is adjusted for inflation over the life of the unit.

If you’re interested in learning more about estimates for heat pump replacement I have an article here.

City SEER
Efficiency
Electric Cost
per Kwt hour
1st Year
Cooling Cost
1st Year
Heating Cost
1st Year
Total
Operating Cost
Total
Lifetime
Operating Cost
Charlotte
NC
10 $.076 $359 $602 $961 $16,619
12 $.076 $299 $564 $863 $14,924
14 $.076 $257 $502 $759 $13,126
.
           
Cincinnati
OH
10 $.070 $258 $668 $926 $16,014
12 $.070 $215 $626 $841 $14,544
14 $.070 $184 $557 $741 $12,814
.
           
Orlando
FL
10 $.060 $694 $191 $885 $15,305
12 $.060 $579 $179 $758 $13,108
14 $.060 $496 $159 $655 $11,327
.
           
Seattle
WA
10 $.040 $31 $578 $609 $10,532
12 $.040 $26 $542 $568 $9,823
14 $.040 $22 $482 $504 $8,716
.
           
Toledo
OH
10 $.11 $319 $1,386 $1,705 $29,485
12 $.11 $266 $1,299 $1,565 $27,064
14 $.11 $228 $1,155 $1,383 $23,917

Column B294

Heat Pump Facts

ac units HVAC York A/C Tim's

Heat Pump Illustrations and Facts

Heat pumps are very popular machines. They appeal to many land developers and builders because they are relatively easy to install. Since electricity is already being extended into the subdivision and your home, there is no real extra utility costs. Installing natural gas lines and service is an extra step for a developer and a builder. Heat pumps don't require masonry chimneys for that matter. Do you see why they were easy to market to builders and developers?

Not an Easy Machine

Heat pumps may be easy to market and install, but they are by no means a simple machine. In fact, they are by far the most complicated machine that you will find in the average residential home. The controls, actual machinery, components, etc. are highly complex and require professional attention. They are by no means a do-it-yourself project. In fact, even people who work around them on a routine basis can make mistakes. Just ask my brother-in-law! He regularly helps and assists my heating contractor. One day, my brother-in-law thought he would take pressure readings on the outdoor compressor at his parent's home. Well, before you could say, "Watch what you are doing.", he lost all of the refrigerant out of the machine. I guess he wanted to do his part to increase the size of the ozone hole over the South Pole.

The Heat Pump Coil

Standard air conditioners have two coils. One distributes cooling and the other one disposes of collected heat. One of these coils is hidden inside your home in the furnace or air handler unit where the fan is located. The other coil is outdoors in the big metal contraption. Heat pump coils need to be designed a little differently because they have to serve both purposes. In other words, when the pump switches from heating to cooling, the tasks of the coils switch as well.

High Efficiency

How do heat pumps become more energy efficient? There are several primary ways. One of the most practical things to do is to increase the size or surface area of the indoor and outdoor coils. This will definitely help move heat one direction or another faster.

Heat pump manufactures are also re-introducing the expansion valve. This used to be standard equipment on air conditioners and heat pumps years ago. An expansion valve meters the flow of refrigerant. Because the internal pressure of the refrigerant in the system changed with a rise or fall in outdoor air temperature, metering the flow of Freon delivers just the right amount of heating or cooling to the living space. Prior to the re-introduction of expansion valves, a fixed orifice in the refrigerant system was used to regulate the flow of refrigerant.

Efficiency can also be improved by moderating the flow of air across the coils. You can do this by installing two speed fans or variable speed fans that sense when to move more or less air across the coils.

The Defrost Mode

When the air temperature drops below 32 degrees outside and the outside air is fairly saturated with humidity, frost can form on the outdoor unit coils. This is perfectly natural. The frost can turn to a thin layer of ice rather quickly during periods of operation.

The most efficient heat pumps have sensors that tell the heat pump that ice is forming. When the sense ice, they actually send heat back outdoors to melt the ice. Less efficient heat pump models do this on a time and temperature basis and may send heat to the outdoor coil when it isn't necessary to do so. If this happens, you have to pay more to heat the house back up! Ask about this feature when you shop for a heat pump.

Heat Pump Thermostat

Don't by just any thermostat for your heat pump system. Heat pumps require special thermostats. These instruments separate the two heating functions found in all heat pumps: the heat pump aspect and the auxiliary electric resistance heat. Wiring a heat pump thermostat is different and don't attempt to do it yourself. You can easily short out the device and ruin the sensitive electronic components inside the thermostat. Just ask my brother-in-law. He has burned up at least one or two of these as well.

Heat pump thermostats have a little light that tells you when the heat pump is using electric resistance heat. If you see this light on when the outdoor temperature is 40 F or higher, something is possible wrong with your unit or the thermostat. Call a qualified service person as soon as possible and have them check out all components. Electric resistance heat is very expensive and you can lose all of your energy savings in a short time if you rely solely on electric resistance coils to supply heat to your home.

Heat Pump Mechanics - Some Simple Facts

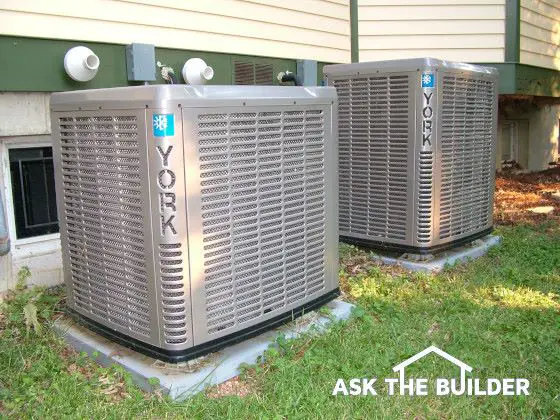
Just what is inside that big metal box/contraption on the exterior of your home? Let me tell you, it is a highly sophisticated machine. In fact, heating and air conditioning are by far the most complex craft in home building and remodeling.

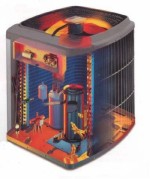
Cut away illustration of a typical heat pump.

Cutaway illustration of a typical heat pump.

The image to the right is a cut-away illustration of a typical modern heat pump. The heart of the heat pump is the high-efficiency scroll compressor. It takes the gaseous refrigerant and turns it into a liquid. The heat pump also contains high and low-pressure switches, accumulators, a filter drier, discharge temperature switches, mufflers, vibration isolation plates, a high-efficiency fan to move air past the outdoor coil, and all sorts of wiring and copper tubing. They are complicated beasts to say the very least! Be sure you have a professional service or install yours!

Three Types of Machines

A heat pump is not much different than a car with a transmission. You can go forward or reverse in a car. Flip the switch at your thermostat and the same thing happens within the heat pump.

A heat pump is not much different than a car with a transmission. You can go forward or reverse in a car. Flip the switch at your thermostat and the same thing happens within the heat pump.

The heat pump shown in the illustration to the left is the most common machine. It transfers heat from one body of air to another - an air to air transfer. Did you know that there are two other types of heat pumps? You bet! You can actually get a heat pump that takes heat from a body of water or from the earth itself. These are called water to air and ground to air transfer machines. The principles of operation are the same in all three. The water to air and ground to air heat pumps are actually more efficient if you have the ability to extract or dispose of heat from/into a body of water or the ground that has a nearly constant temperature of 55 F.

If you’re interested in learning more about prices for heat pumps I have an article here.

Column B294

Topographic Maps Illustrated

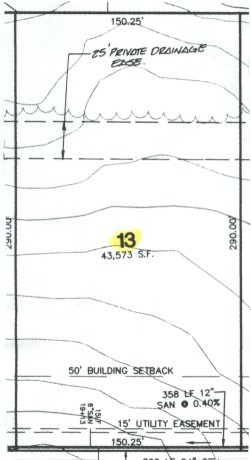
These two lots are in the same subdivision. They are nearly identical in size but the topography is as different as night and day!

Lot number 13 is actually the best lot. Note how the topographic lines are spaced far apart. If the lot was absolutely flat from front to back and left to right, there would be no topographic lines on the plot plan. The highest point on the lot is actually at the front left corner which is the lower left corner of the illustration above. The contour intervals or lines on this plot plan are at two foot intervals. So this seemingly flat lot actually falls 20 feet across the 290 foot lot depth! Lot 27 is a nightmare lot. Why? Because of several reasons. First, it falls 20 feet in elevation from front to back in just the first 140 feet of lot depth!

Second, there is a storm water retention basin in the rear of the lot. That is what those dashed lines indicate. The developer will shape the land so a dry pond is formed at this location. When it rains heavily, storm water will fill the pond and then be slowly released as the storm passes by. These types of retention basins can accumulate herbicides and insecticides from neighboring lots! Your children can be at harm when they fill with storm water. They are a huge liability in my opinion.

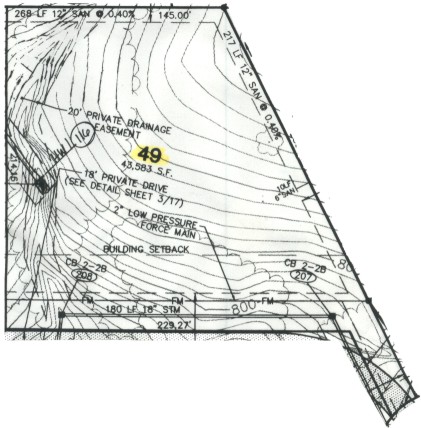
Lot number 49 is a pan handle lot to begin with. Note the little tail of land in the lower right corner. This is where this lot connects to a public roadway. All of the utilities feeding this lot need to come up here and share space with the driveway. Look at the left side of the lot. See the tightly spaced contour lines that are V shaped? These indicate a creek or dry stream bed.

Lot 13
Lot 13
Here are two lots that have real topographic problems and will be tough building sites. Whats more, without seeing the rest of the plot plan you should be able to intuitively figure out that there is high ground above each of these lots that will throw surface water down on top of them. You can easily see that you will not be playing touch football games with your kids on these lots. No way, no how!
 

Lot 49

Lot 49

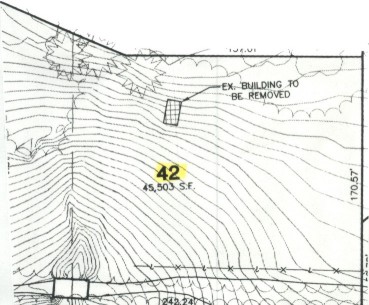
Lot 42 is a very steep piece of land. Once again the contour interval is 2 feet. There is close to 70 feet of fall from the top of this lot to the bottom. That is an enormous amount of fall. Building on this lot will cost lots of extra money and you will need mountain climbing gear to cut your grass! Avoid lots like this one.
Lot 42
Lot 42
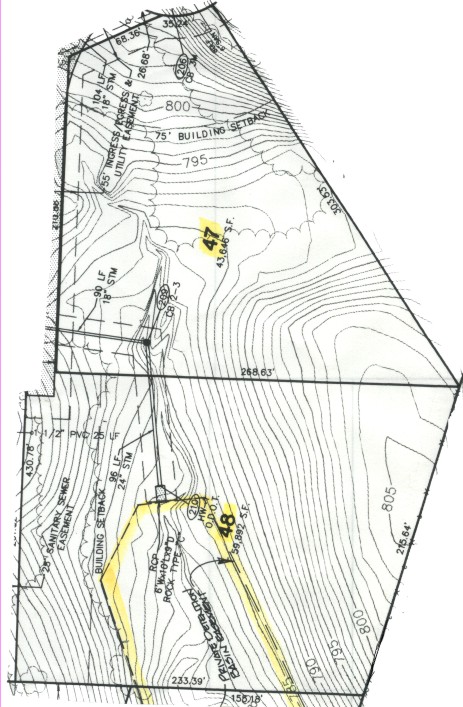
Lots 47 and 48 are interesting. If you rotate this page, you will note that there is a creek or stream bed that starts in the upper portion of lot 47 near the words "55' INGRESS / EGRESS UTILITY EASEMENT. See how the contour lines are V shaped there? If you draw a line between the points of each contour line where it creates the "V", you will be drawing the center line of the creek or stream bed.

Lot 47 actually has a valley in it! Just below the number 47 is a small valley. As you go towards lot 48 the land rises and as you go towards the right side of lot 47 the land also rises. You can clearly see this by reading the values of the contour lines as they are printed. See the numbers 800 and 795? Those represent the height above sea level.

Do you see the outline for the storm water retention basin that will be formed on lot 48? It is smack dab in the center of the lot! Who would want that?

This is why you absolutely must look at topographic maps like this when you go to purchase lots. You need to see what the land is doing and what the planned drainage features are.

Drainage issues are critical and they can cost you huge dollars after you move in. It takes some detective work and some thought to figure out what will happen after you move in. Study the land and look at existing subdivisions to see how land forms and shapes affect drainage.

Lot 47 & 48
Lot 47 & 48

Column B289

Foundation Crack Illustrations

Foundation Crack TIPS


  • Location, shape and size of crack tells much
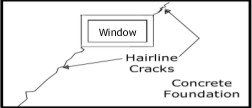
  • Hairline cracks in cast (poured) concrete are normal - See Below!
  • Measure crack width at same location over time to check movement
  • DIY crack epoxy - WATCH VIDEO below - same process for concrete walls
  • CLICK HERE to Get Tim's FREE & FUNNY Newsletter!

Foundation Crack Truth

The truth is that a great foundation can be in place for hundreds of years and never develop more than a tiny shrinkage crack. If you have a foundation crack, here are some of the major reasons why it cracked:

  • Weak soil that's got organic matter or was poorly compacted fill
  • Footing not wide enough to spread building weight over soil
  • Lack of structural steel in footing and foundation walls
  • Foundation wall too thin for height and soil pressure behind it
  • Poor quality materials used for foundation

CLICK HERE to get FREE & FAST BIDS from local structural engineers in your city or town.

Foundation Repair

To repair a foundation, you first need to determine what is going on. This means you need to identify what's causing the crack. There are many different possible causes.

For example, you could live in, or around, Cincinnati, Ohio where foundation problems are common.

The Cincinnati, OH area has some shale bedrock that turns into a weak clay that slides easily when wet. There are two rock formations that are responsible: the Kope and the Lower Fairview. You can easily see where these rocks, and poor soil, are by referencing a geologic map of the area.

Geologic map of Cincinnati

This is a copy of a United States Geologic Survey (USGS) geologic topographic map of the East End of Cincinnati, OH. The downtown area would be just to the left of what you see. The Kope and Lower Fairview formations are the light pink rock just above the magenta-colored alluvium that's north of the Ohio River. (C) Copyright 2017 USGS and every US taxpayer that owns the maps.

House foundations built on this weak Cincinnati soil can shift, buckle, crack and fall apart in no time.

It's best to call in residential structural engineers to assess the problem BEFORE you call a foundation repair company. The money spent on an independent engineering study is the BEST MONEY you'll spend on the repair. CLICK HERE to get FREE & FAST BIDS from local structural engineers in your city or town.

They may suggest you talk with a soil engineer or they may hire one as a secondary consultant.

CLICK HERE to get FREE & FAST BIDS from local Soil Engineers in your city or town.

DIY Foundation Crack Repair

If you've got a crack in your foundation and you know the crack is not getting wider, then you might try to repair it yourself.

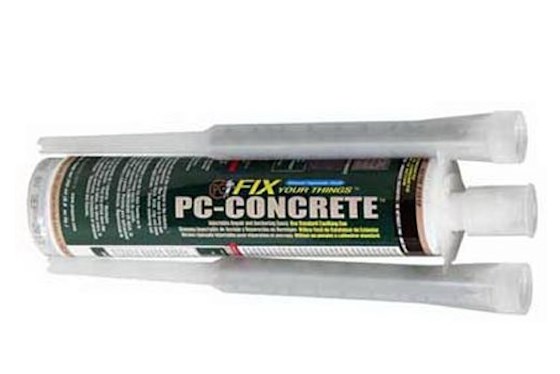
There are any number of concrete, or masonry epoxies that will do a fabulous job. Watch the following video to see one I've used with great success:

CLICK HERE to BUY NOW the epoxy I used in the video.

pc-concrete-tube

This is a wonderful DIY foundation repair epoxy. I've used it with great results. CLICK THE IMAGE TO ORDER IT NOW.

Foundation and Wall Crack Illustrations

The following crude illustrations give you and idea of examples of foundation cracks and what might be causing the problem at your home.

The following illustration shows a very typical crack that can happen in both poured concrete and block foundations. Both materials shrink as they dry, and tight 90 degree corners are splendid places for cracks to originate.

The key is to monitor the width of the crack. Make a mark somewhere along the crack and measure it accurately with a ruler that has millimeter markings. If the crack starts to get wider at the top or the bottom, it could be trouble.


Concrete Foundation Cracks


Concrete Foundation Cracks
Stair step or stepped cracks in concrete block walls or brick walls like this one are trouble. They are telling you that settlement of some type is happening. It could also be caused by possible upheaval of the foundation. Sometimes the settlement or upheaval is minor.

Other times, the crack can grow to 1/2 inch or more in width. Monitor the width of these cracks and call in a structural engineer early in the process to get a professional assessment.


Concrete Foundation Cracks
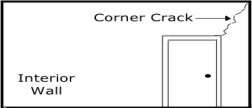
Random cracking above interior doors and windows and archways is not always a sign of structural movement or settlement. Sometimes they are simple relief joints within your house.

Every house has joints in it just like your knees, elbows and hips. These joints move during the changing of the seasons as indoor and outdoor humidity levels change. Often these cracks get smaller as the outdoor humidity rises.


Concrete Foundation Cracks
If you have crown molding in your house on ceilings that are adjacent to the bottom of attic trusses, these cracks are rarely settlement cracks. They are caused by attic trusses that change shape in the winter time and actually raise upwards. It's called truss uplift.

This causes a bow in the ceilings closest to the center of the trusses. The cracks close up usually in the middle of summer. The solution is to install special simple clips between interior walls and the bottom of the trusses. CLICK HERE to read my past column about truss uplift.


Concrete Foundation Cracks
Vertical or nearly vertical cracks in poured concrete or concrete block foundations are bad news. They are a sure sign of serious trouble.

If the cracks are wide at the top, it usually means that one end or both ends of the foundation are dropping or the middle of the foundation is rising or heaving. If the crack is wider at the bottom then the exact opposite is probably happening. You need a structural engineer as soon as possible to evaluate this type of problem.

CLICK HERE to get FREE & FAST BIDS from local structural engineers in your city or town.


Concrete Foundation Cracks
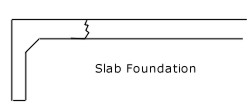
Slab foundations are popular in different parts of the nation. They often can crack all the way through. These cracks may be simple shrinkage cracks or they may be actual settlement cracks if one part of the foundation is poured on poor quality soil. If you live in an area of expansive clay soils and have a plumbing leak beneath the slab, I am quite confident you will see cracking like this in many places in a short amount of time.


Concrete Foundation Cracks
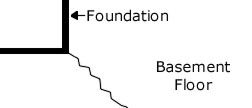
This is a top view of a basement floor. Think if you were a bird flying over your home and could look down at your basement floor.

Many basements have inside 90-degree offset corners like this. It is common to see a crack in the basement slab floor radiating from such a corner. This is NOT a serious problem.

The cracks often take one year to grow to their full size. At the end of one year you can caulk the cracks with the PC Products magic epoxy you saw above. CLICK HERE to order it NOW.


Concrete Foundation Cracks


This crack is one that appears in the horizontal bed joints of either a brick or a concrete block wall. These cracks spell trouble with a capital T.

If you see these in your basement block walls, they are a sign that the walls are in the early stages of failure. The pressure of the dirt behind them has bent the wall and the crack is the hinge point. On a brick wall, the cracks can be caused by corroded wall ties or inadequate ties and wind pressure is actually causing the wall to bend.

The wall can be stabilized on the inside with vertical steel I-beams. CLICK HERE to get FREE & FAST BIDS from local structural engineers in your city or town. This pro can draw up a simple plan that shows you how to SAVE your foundation.


Concrete Foundation Cracks
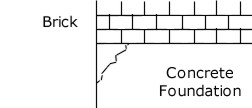
Brick that is laid directly in contact with concrete foundations can cause angular cracks like this in the top 12 - 16 inches of a foundation.

Often a small chunk of the concrete foundation will fall off and the brick will be unsupported. These cracks are caused by the brick expanding and pushing the outer corner of the foundation with it. This problem is not a foundation issue. Your foundation is not going to cave in. Use the magic PC Products Epoxy to glue back on the chunk that fell off.


Concrete Foundation Cracks
If you have doors in your house that have wide angular gaps at the top, this is telling you that the original builders were possibly blind, drunk, or horribly inept. It is probably a sign of severe settlement, especially if the crack is 1/2 to 3/4 inch wide in just 3 feet!

If you see cracks or gaps like this consider them to be huge flashing red lights telling you that major problems are happening somewhere else in the house.

Column B288


Bathroom Cost Breakdown

Bathroom Cost Breakdown

What is it going to cost to do your bathroom? I find the best way to come to a total cost is to break the job down into small cost items. You then check for errors and oversights and add the costs all up!

Here is a list that will help you remember all the major costs involved. It is your job to place an accurate number behind each category. Some categories include both labor and material (examples: Electric, Plumbing, HVAC, etc.).

  • Plans

  • Building Permit
  • Demolition
  • Asbestos Removal
  • Lead Abatement
  • Debris Removal
  • Dumpster or Dumping Fees
  • Rough Lumber Supplies
  • Rough Carpentry
  • Heating / Ventilating / Air Conditioning
  • Plumbing
  • Electric
  • Insulation
  • Drywall / Plastering
  • Finish Lumber Materials
  • Finish Carpentry
  • Ceramic / Marble
  • Painting
  • Wall Coverings
  • Medicine Cabinet
  • Mirrors
  • Lighting Fixtures / Fans
  • Towel Bars
  • Faucets
  • Tub
  • Toilet
  • Sinks
  • Vanity
  • Cabinets
  • Counter Tops
  • Shelving
  • Carpet / Linoleum
  • Shower Door

Totally maximize your profits by using my Bathroom Remodeling Checklist. My Checklist includes a large cost-breakdown table. I offer a 100% Money Back Guarantee for this invaluable document.

Column B287

Y2K Prepare Immediately

Y2K Prepare Immediately!

Chicken Little is possibly basking in all his glory right now. Well sort of. Remember the fable where he runs around saying the sky is falling? To a degree, certain sensationalists are doing the same thing right now. Yes, there are computers that have a programming flaw. Yes, certain basic and other business systems rely on these computers. But what happens each time we have a power outage? In many instances, people still work but they do the best they can without computers. We are all going to do the same thing this coming January.

Think Positive

I know several people who always have a negative outlook. Things are always bad. Their lives are miserable because they get dumped on or whatever. Well, I say get out of the way! In other words, begin to think positive and take pro-active steps to become less reliant on other people and systems. I am not saying to become a mountain man like the character Robert Redford played in the 1970's movie Jeremiah Johnson, but I am asking you to start modifying your lifestyle so that you can fend for yourself for a period of days or weeks without much interaction with the outside word.

Need to Work?

If you must report to work on January 2nd or 3rd, then you better figure out a way to get there if the gas stations are closed or the subway has no juice. Can you walk to work? Do you have comfortable shoes? Is it possible to bicycle to work? If so, buy a bike and start to ride now. You might get some well needed exercise!

A Decent Book

Would you like to learn more about preparing for a possible Y2K crisis? If so, the folks at Chelsea Green have a good book that helps you think about options you have in getting ready. The title of the book is: Y2K & Y-O-U. It is authored by Dermot McGuigan and Beverly Jacobson. You can call Chelsea Green to order the book at 800-639-4099. It is also possible to get the book from their website:

www.chelseagreen.com

Don't Panic

Do I really think there are going to be serious problems? Not really. Are there going to be problems? Yes, and I feel they will be regional in nature. You will get into problems if you panic and start to act without thinking.

Think now about what you really need to survive for a week or ten days. Do you have a relative who lives in Florida or Southern California where the weather will be nice this coming winter? In other words, plan now if there is a big problem in your area and you need to get someplace where there is little need for heat and lots of fresh water around.

Ask your boss what might happen if things go down the tubes. Will your business close? Do you need to start saving money now in case you are laid off? Ask questions now, not on January 2, 2000.

Sanitation

What happens if we all loose our water supplies? If you think you are going to be able to stockpile enough water to flush toilets, and take showers, you are dreaming. An average family uses hundreds of gallons of water each day in normal conditions. You are going to have to alter your lifestyle drastically.

You can use a toilet and flush it once a day, but that can become rather offensive rather quickly. To flush a toilet without water in the tank all you need to do is to pour 3 or 4 gallons of water into the bowl rather quickly. Be careful not to splash!

Anti-Freeze

To protect standing water in plumbing traps should the temperature drop in your home, use recreational vehicle anti-freeze or other non-poisonous anti-freeze. Avoid automotive anti-freeze as it is poisonous. It is also illegal to dump it into public sewer systems in many areas.

Do NOT use anti-freeze if you have a septic system! ! ! Pour salt water into the traps as salt water has a lower freezing point. If you goof up your septic system, you are toast.

The Y2K Prepare Immediately Checklist

I have tried to develop a Y2K checklist that will help protect you, your loved ones, and your property while minimizing an outlay of money. Many lists I have seen seem extreme to me and certain things that are recommended might go to waste if the crisis turns out to be a dud. Here is what I am going to do for my family:

  1. Flashlights - I already own 3 very good aluminum "Mag-Light" flashlights. I intend to purchase 3 more. I have found that these flashlights rarely break and they come with great bulbs. Purchase extra bulbs while you are at it.
  2. Radio / CD Players - The transmitting equipment at the radio station I do my call in show each week WILL work after midnight January 1, 2000. We have our own power supply in the event that we do lose electricity. The point is I am quite sure other radio stations will be broadcasting as well. Buy a small - high quality transistor radio so you can tune into disaster information if there is a crisis.
  3. Batteries - Buy at least 5 changes of batteries for every device that needs them. Get good ones and store them in a cool place until they are needed.
  4. Generators? ? - Are you thinking about a portable generator? If so, you need a huge one to really provide the power you are used to consuming. Big generators and the necessary transfer switching components are very expensive ($3,000 and up) and need to be installed by an electrician. Small generators can only power a few light bulbs, maybe a TV, etc. at the same time. They absolutely will not power any 240 volt equipment, a heat pump, etc. Don't be fooled by salespeople. READ my past column and Builder Bulletin on my website about Portable Generators!
  5. Added Insulation - This is a winner suggestion. Any insulation you add will help you to stay warm when it is cold and cool while it is hot. It will work if we have a crisis and long after a crisis.
  6. Canned Food - I would start to look at food that requires no refrigeration. Get a variety of fruits, vegetables, soups, etc. that appeal to all who need to eat.
  7. Clean the Chimney - If you decide to heat with wood, then you need to make sure your chimney is in excellent condition. Have it inspected pronto! Consider purchasing a fire extinguisher or two or begin to develop a plan to have water nearby so that you can douse a small out-of-control fire in a hurry.
  8. Combustion Air - If you are going to burn wood in the house, then you need to provide a source of combustion air directly to the fireplace or appliance that is burning the fuel.
  9. Gasoline - Do NOT stockpile gasoline for your car. Many cities and towns have strict laws about how much gasoline is allowed on residential property. Simply keep your gas tank filled to the brim during the month of December.
  10. Thrift Clothing - Begin to visit thrift stores or garage sales and buy extra clothes that will work if you do lose power. Look around for sleeping bags and blankets.
  11. Stockpile Wood - If you plan to burn wood for heat, then start to get it. Hardwoods produce more heat per cord than softwoods. Cover the woodpile on top, but not the sides. Stack the wood so plenty of air can get to it. Keep it somewhat close to your back or side door so you can get it easily.
  12. Grilling Out - Plan to cook on a grill, but NOT indoors! Stockpile some charcoal now during the late summer months. NEVER burn charcoal inside as it produces vast amounts of carbon monoxide.
  13. CO & Smoke Detectors! - If you are going to burn things in your house, get several CO & smoke detectors & batteries.
  14. Water ! ! - This is a big one. Save each and every one gallon milk jug from now on, rinse them well, fill them with water and added 3 or 4 drops of chlorine bleach. If you need to use it, pour the water into a bowl 24 hours before it is needed and the chlorine will leave the water making it taste just fine. Stockpile hundreds of gallons of water. If there is a crisis, trust me, you will go through it!
  15. Financial Information - Start to save ALL bank statements, credit card bills, other statements, etc. so that you can create a paper history of your financial transactions over the next 3 months. If computers get into a funk, you can PROVE that you paid a bill or made that house payment.
  16. Flood Prevention - If you have a sump pump that protects a part of your house from flooding, then move any and all valuable possessions to a place where water can't harm them.
  17. Sentimental - Valuables - Consider buying a fireproof home safe to store things that mean a lot to you. If there is a fire, there may be no water or phone service to call firefighters. This safe will work just as good AFTER the crisis!
  18. Face and Body Wipes - Buy some Wet Ones or Baby Wipes to wash your face and hands. These things will help conserve water.
  19. Exercise! - If there is a crisis, you may have to walk to places and do lots of work to keep alive. Get in shape now as there are only 17 weeks left!
  20. Reduce Frozen Food Inventory - If you have a freezer, start to use up the stuff in it. If we lose power, this food will be "toast".
  21. Books and Games - Get plenty of stuff to keep you and everyone else busy or else you will be at each other's throats!
  22. Medication - If you need medication, talk with your pharmacist now to see how easy it is going to be to get drugs. Don't buy ahead as some drugs have short shelf lives and you may WASTE your money!
  23. Caulk and Weatherstrip - Air leaks will rob your home of heat. Caulk gaps around window and door trim, check all weather stripping, etc. This will save you money even if things go well.
  24. Shared Resources - Talk with friends and neighbors and see if you can share supplies and resources. Create a co-op system that is fair and not too complicated.
  25. Wine, Champagne - Party Supplies - What happens if there is no Y2K crisis or it is a huge dud? Let's celebrate as it could have been a big deal. If it is a big deal, then celebrate when things are back to normal!

Column B282

Walk-Through Inspection Tips

Walk-Through Inspection Checklist
Tips & Suggestions

As I write this, I am currently testifying as an expert witness in a major lawsuit. A homeowner has numerous claims pending against a builder. Fortunately the homeowner took his time when he walked through his new home. He made countless observations and wrote them all down. If something was OK or perfect, he noted that. Obvious mistakes or flaws were also noted. These notes are being entered as key evidence in the court.

Many of the defects pointed out in the original walk through inspection were never addressed by the builder. This will help the homeowner. He has proof that the builder has been unresponsive. The detailed notes also show that the defects were there long before the one year warranty expired. As you might imagine, the notes are worth their weight in gold.

Serious Business

Can you remember the last time you bought a new car? You go to the dealership to pick it up. All you see is this gleaming assembly of steel, glass, rubber and fabric. The new car aroma is intoxicating. You are proud and can't wait to drive it away. Tiny flaws and defects often seem invisible.

These same feelings happen with new homes as well. The moving van is coming. You are totally stressed out. You are late for work or an appointment. You must resist the temptation and set your happy feelings and stress aside for several hours. You have a serious job to complete - the walk through inspection.

Be Prepared

You are going to need several things for the inspection: a pad of paper, pens, pencils, camera and film, a small compact or dental mirror, colored sticky dots, your detailed checklist, and a lot of patience. Block out at least 2 - 4 hours of time as well.

The walk through inspection is vitally important to you. It becomes the benchmark against which warranty claims will be judged. If you fail to point out a defect during the inspection, your builder may argue a year later that the defect may not be a defect! In other words, you may have caused the damage or, "...it was like that when we built it." How will you explain this to the judge? How will you prove your claim(s) unless you have clear, concise evidence that shows the defect was, in fact, not there six months ago?

The inspection needs to proceed in an orderly fashion. Start inside and work to the outside. Don't be distracted. Don't listen to comments or accept excuses from the builder. If a builder feels that you are a pushover, he might explain away every defect! You might hear something like, "Well, there was eclipse the night before we poured that slab. The gravitational pull of the moon caused the concrete to weaken...." Believe me, you may hear similar excuses!

Write Down Promises

As you proceed with the inspection, stop and write down any and all promises that the builder might make. Do not underestimate the importance of this! The written record of these promises will be a powerful lever when push comes to shove. What's more, when the builder signs your inspection form and notes that you have completed during the course of the inspection, they will almost be a contract. Be sure to date the inspection form and your notes as well.

If the builder takes a stance and argues that something is not a defect, WRITE down his comments about this item. These comments may help you at a later date should a disagreement occur or you find out from another source that the builder is misinformed.

Check Things That Operate

One of the reasons that the inspection will take some time is that you need to verify if everything works. Every single thing that is mechanical must operate. If not, you may be inconvenienced when you move in. Your life will be in mass confusion after you move in. The last thing you need are service people getting in your way fixing the disposal! Check sump pumps, appliances, windows, faucets, fans, etc.

Show Me The Money!

Money is a powerful motivator. If you pay the builder all his money and there are still defects to fix, you will have lost your leverage. The only motivation the builder will have is his honor. Based upon letters and email I receive on a daily basis, it seems that honor is on the endangered species list when it comes to builders.

You must do whatever you can to delay the closing or set aside a significant escrow to protect your interests. It may cause an argument. If it does, this is a sure sign that the builder may not have honest intentions. A professional builder will not hesitate to fix the defects before the closing or set aside money.

Walk - Through Inspection Checklist

The items shown in my Walk-Through Inspection Checklist are very important for you to look at when you do your walk-through inspection. In addition to this checklist, carry a legal pad to write extra notes. If you write a note, check the box in the checklist - this will remind you to look at your notes. In your notes, reference your entry by the using numbered item on the checklist. Things that are perfect are just as important as things that are not. Don't hesitate to include extra items that I have overlooked or failed to mention. Your walk through inspection is the basis by which all future complaints will be judged. Give a copy of the signed (by you and the builder) checklist and notes to the builder as soon as possible!


Don't try to do your own walk through inspection unless you are armed to the teeth with my 100% Satisfaction Guaranteed Walk Through Inspection Checklist!


Home-Inspection Associations

American Society of Home Inspectors (ASHI)
Top inspectors join this group - tough entry standards and continuing education are required ... 800-743-2744

National Association of Home Inspectors (NAHI)
Loose membership requirements ... 800-448-3942

National Association of Certified Home Inspectors (NACHI)
Large international organization – members must pass examinations before acceptance … 303-502-6214

Housing Inspection Federation
Send them $165 and your dog's name and I think they will send it a certificate ... 602-998-4422

Column B277
Electrostatic Air Filters & Cleaning Tips

Electrostatic Air Filters
Carbon Monoxide Filters & Cleaning Tips

Do you buy things mail order like I do? If so, you have undoubtedly battled the sticky peanuts as I have. You know, those plastic foam doo-dads that look like peanuts? As soon as you stick your hands in the box to fish out what you bought they are all over you. They even stick to the thing you bought.

The plastic that is used to make those peanuts has the same attributes as the plastic that is used in the fantastic tribo-electric air filters. These different plastics maintain a static charge when they are just sitting there minding their own business! If you rub them with anything - including air - it creates friction. This friction increases the static charge.

In the case of the peanuts, they jump onto you or anything else. In the case of dust flowing through your duct system, the dust is attracted to the plastic webbing in the filters. It is an absolutely fantastic and useful attribute - well, I mean for the filters, not the darn shipping peanuts!

Slow Flow

Common sense will tell you that a clogged filter of any type will reduce flow. When it comes to furnaces and air conditioners, reduced flow can cost you money and it can directly affect the performance of the equipment. In the case of air conditioners, a clogged or dirty filter is often the reason why your outdoor unit freezes up. The refrigerant in the tubing lines is supposed to come back to the outdoor unit rather warm. A dirty filter means reduced air flow past the interior refrigeration coil and as such, not enough air flows past the interior coil to make the heat transfer! The outdoor coil gets super cooled and the humidity in the air begins to freeze on the coil!

What's to learn from this? Heating and cooling engineers can measure the flow of air past the interior coil and heat exchanger. As the flow is reduced it can exert pressure on a column of water. When the reduced flow creates enough pressure to raise the column of water one half inch (.5), it can begin to cause problems and reduced efficiency.

The ductwork, grill and register covers alone with no filter in place create enough resistance within the furnace system to raise the water column .2 inch. If you add a filter that is super fantastic or what ever, but has an initial resistance with NO dirt in it of .3 inch, then you are already in trouble. You want a high quality filter that has the least or very low initial resistance. The lower the initial resistance of the filter, the greater the dirt and dust load it can handle before it reaches the .5 resistance level.

This is why you always hear people telling you to change your furnace filters on a regular basis. They are trying to keep the resistance level down in the duct system.

Carbon Monoxide Filters

Some people - like my in-laws - still don't have smoke detectors in their houses. Many more people do not have carbon monoxide filters in their homes. It is nuts! These devices save lives BIG TIME. Just stop by any fire house and talk with a fire fighter. He or she will convince you in a flash. Carbon monoxide filters are really important since the gas is odorless and colorless. It can be present in a house and you don't have a clue. When you start to get poisoned by it, you simply feel tired and like you have the flu. Some people go to bed and never wake up - you know, the BIG sleep!

One of the electrostatic filter makers has a filter that contains a built-in carbon monoxide detector. It snaps in and out when you clean it. I feel that it is an excellent backup detector. If it senses carbon monoxide, it alerts everyone in the house since the alarm travels through the ductwork! I have this type in my own home and use it in conjunction with other carbon monoxide detectors in different parts of the house.

Cleaning the Filters

It couldn't be easier! You remove them from the slot in the ductwork, take them outside and hose them down. Simply follow the instructions included with the filter. Always use plenty of rinse water if you use soap. A residual soap film will inhibit the static properties!

Companion Articles:   Electrostatic Air FiltersCarbon Monoxide FilterElectrostatic Filter Resistance Comparison

Column B273

Carbon Monoxide Filter

Carbon Monoxide Filter Company

I have two separate HVAC systems in my house. One heats and cools the first floor and basement and the other one services the second floor. Eighteen months ago my best friend - Richard Anderson (who happens to be one of the best HVAC people in Cincinnati, Ohio) - introduced me to electrostatic filters. The first ones I used were made by the Lifetime Filter Company. I was amazed at how much dust and dirt the electrostatic filter captured versus the old El Cheapo fiberglass throw-away filters I had been using.

After testing them for a year, I became a believer in electrostatic filters. Believe it or not, one of the original manufacturers of the filters is only 4 miles from my house and I didn't even know it! They happen to be a leader in the industry. They are also the only current manufacturer that offers a built-in carbon monoxide detector in some of their filters. The company name is Newtron Products.

I recently started testing their top of the line filter in both of my systems. It is amazing how much small dust and dirt (and I am quite sure invisible dirt) these filters capture. I can tell a difference in the living area of our house. There simply is not as much dust around as there used to be.


Other Electrostatic Filter Manufacturers:

  • Allergy Free, Inc. ... 713-337-3764

  • Dust Free, Inc. ... 800-441-1107
  • American Air Filter ... 502-637-0011
  • Permatron ... 847-451-0999
  • EnviroGuard ... 713-467-4477
  • Bruhow Industries ... 901-853-1357

Companion Articles:   Electrostatic Air FiltersElectrostatic Air Filters & Cleaning Tips, a href="https://www.askthebuilder.com/electrostatic-filter-resistance-comparison/">Electrostatic Filter Resistance Comparison