Cork Floor Installation

Cork flooring has been available for almost 100 years. However, for some reason, it has never gained widespread popularity. Architects have been aware of its superior qualities for years. Frank Lloyd Wright used it in his "Falling Water" house. Cork flooring has been walked on for years at the Mayo Clinic. It can be seen and walked on in historic Williamsburg, the Federal Court Building, the National Archives Building, and countless libraries and churches throughout the world. Many residential homes have it as well. In fact, a close friend of mine has had cork flooring in his kitchen for 40 years.

Resilient floors are ones that have a spring or bounce to them. Cork flooring has fantastic resilient qualities. They are comfortable to walk or stand on because of this quality. Cork flooring, because 50% of the material is comprised of air, is probably the ultimate resilient flooring material. Cork derives this fantastic quality because its structure is cellular. Virtually every other wood floor product's structure consists of fibers. The reason for the difference stems from the fact that cork flooring is produced from the bark of the cork oak tree. Other wood flooring products are produced from the actual wood of different trees.

Cork flooring is probably the most environmentally friendly wood flooring product available. The cork oak tree, which is limited to the western areas of the Mediterranean, reaches maturity after 25 years of growth. At that time, during the summer months, the trees naturally dehydrate. The bark loosens from the trees and can be easily removed without damage to the tree! After nine years, the bark regenerates completely and can again be harvested.

Sound waves are naturally absorbed by cork. This is the reason it is used in many libraries, churches and museums. These qualities can be very beneficial in a residential home. You can put cork flooring in an entertainment room, family room, kitchen or any other room that normally has high levels or activity.

Cork is available in 12" x 12" tiles, planks and cork planks that have real wood veneers applied to them. Some manufacturers have 12" x 12" tiles that have a 26 mil thick clear PVC vinyl wearlayer. These tiles carry a lifetime warranty when used for residential purposes! Cork flooring can be purchased refinished in either wax or urethane as well. Or, if you choose, it can be finished on site to your specific wants and desires.


Author's Note: If you want a cork floor of your own and want to see how easy it is to install, you should consider buying my Cork Flooring eBook. It has wonderful step-by-step color photos and easy to follow directions. I guarantee your satisfaction!


Installation Ideas - Suggested Applications

Cork flooring is an excellent material for kitchens, bathrooms, hallways, family rooms, entry halls, etc. It can withstand heavy traffic. Because of it's excellent sound deadening properties, it is the flooring of choice in noisy areas. When finished with urethane, or purchased with a factory applied vinyl wearlayer, it will not be easily damaged by ordinary spills in kitchens and bathrooms.

Note: As with any wood flooring products, allowing any liquid to remain on the surface for extended periods of time can damage the flooring. Cork flooring can be damaged by excessive use of water or pooling of water on the floor. Simply use common sense and you will be okay.

Cork Flooring Installation, Care and Maintenance

Cork flooring can generally be installed in any area you would normally install hardwood flooring. However, virtually every manufacturer cautions against installing cork in below grade applications (basements). Often, these areas can be subject to flooding from stopped up sewers or heavy rains. Also, older houses may have untreated basement slabs and foundation walls that allow massive quantities of water vapor into the basement. This water vapor can cause the cork to swell.

Cork flooring is applied with adhesives. If you decide to purchase a refinished cork flooring material, it is absolutely critical that the subflooring is perfectly smooth. If the subfloor is not smooth, you may experience slight raised edges where the tiles abut one another. Once again, exercise common sense. As in anything, the finished product is only as good as the foundation upon which it rests. Your subflooring is the foundation for your cork flooring.

Prior to installation, it is a good idea to allow the cork flooring to get used to its surroundings. Trades people refer to this as acclimatizing. Unpack the cork from its boxes, and remove any plastic wrap. This allows the cork to expand or contract in response to the temperature and humidity levels in the house. Never install cork on a freshly poured concrete slab! Moisture in the slab cannot exceed 2%. The manufacturers will tell you how to test for this. If your house has been newly plastered, drywalled or painted, you should also wait until the indoor relative humidity drops below 65%. Humidity levels of 40 - 55 percent are ideal.

As it is being installed, and after the installation is complete, cork must be rolled with heavy (100 lb.) rollers. These rollers help insure a good bond with the adhesive and help to make the edges smooth. Use of rollers is a must!!!!

After installation, do not wash the floor for at least 5 days. Never flood the flooring with mop water. As with any polished flooring material, do not allow dust, dirt or grit to accumulate. These will scratch the finish. Vacuum or dust mop daily to remove dust and dirt. When you decide to clean the floor, use very mild detergents and a damp mop only.

Depending upon the type of finish you have chosen, each manufacturer has recommendations which you should follow. Vinyl finishes, urethanes and waxes all require different recoating procedures. The manufacturers will provide you with specific instructions.

Regardless of which finish you choose, I'm confident that you will enjoy your cork floor! Contact me if you do have a success story to share with others.

Cork Flooring Manufacturers

  • Environmental Flooring Products, Inc.
    PO Box 125
    2211 Lithonia Industrial Blvd.
    Lithonia, GA 30058
    800-533-CORK (2675)

  • Expanko Cork Co. Inc.
    1129 W. Lincoln Highway
    Coatesville, PA 19320
    800-345-6202
  • Dodge - Regupol Inc.
    PO Box 989
    715 Fountain Ave.
    Lancaster, PA 17608-0989
    717-295-3400
  • WE Cork Inc.
    16 Kingston Road, Unit #6
    Exeter, NH 03833
    800-666-CORK (2675)

I recommend that you call these manufacturers and ask for their product literature. They will be happy to send it to you. Some of the literature includes small samples of the cork flooring. Be sure to request names of local distributors in your area. Often the literature contains excellent photographs, installation guidelines, pricing and care instructions.

Column B44
Faulty Metal Roof Flashings

"Flashings are the weak link in a roofing system.  It's important to realize they should be made from the finest materials that have a life-span that equals or exceeds the life of the roofing materials."

Metal Roof Flashings Checklist

  • Flashings are the source of most leaks
  • Installation requires skills and experience
  • Copper and other metals that can be soldered are best
  • Do not rely on caulk - Sun's UV rays damage it

Metal Roof Flashing - Ones that Solder are Best

Homeowners are continually perplexed and frustrated by roof leaks. My years of experience in the field has taught me that 90 percent of roof leaks happen at flashing points. These are simply places where a roof meets up with something that isn't a roof. When I try to explain this to the average homeowner, their eyes tend to glaze over.

It finally clicked in my head one day that the problem lies in the fact that 80 percent or more of homeowners are terrified of heights. They haven't been up on roofs and as such can't easily visualize what a flashing is or how it is incorporated into a roofing system.

Free & Fast Bids

CLICK HERE to get FREE & FAST BIDS from local contractors who will install flashing for you.

How Old Are Metal Roof Flashings?

Metal roof flashings are hundreds of years old. Roofers of old discovered how to keep buildings dry.

I have seen photographs of some of the cathedrals in Europe. Some of the photos clearly show the 600-year-old roofs with their flashing systems in place. Some brilliant roofer many years ago figured out how to lace metal pieces into different layers of shingles to create a barrier against water.

How Simple is Flashing Technology?

The concept is simple. It is also very effective. I suspect that there was a certain degree of trial and error, but before long the roofer saw that you simply had to overlap shingles, slate, and metal flashings.

Are Flashings the Weak Link in a Roof?

Flashings are the weak link in a roofing system.  It's important to realize they should be made from the finest materials that have a life-span that equals or exceeds the life of the roofing materials. I have done re-roofing jobs where the tin flashings had been painted periodically.

They were basically as good as when they were installed 70 years ago. Remember, when you purchase flashing materials, the labor to install them is virtually the same. If it costs $100 - 200 to get premium materials such as 40 lb. tin or copper, then by all means upgrade!

Is it Okay to Patch Flashings Using Roofing Cement and Caulk?

Roofing cement and caulk are not long-lasting roofing materials. If you can't repair a flashing correctly, then you can use roofing cement and caulk as a temporary patch. Once the weather breaks, you need to substitute proper metal flashing work.

I've seen an alarming increase in the use of roofing cement and caulk on roofs and flashings. These materials - especially roofing cement - are not acceptable.

First of all, many roofing cements are not ultraviolet light (UV) stable. This means they are intended to be sandwiched between two roofing materials hidden from sunlight. Exposing roofing cement to high energy UV light will cause it to break down rapidly.

Caulk, rarely if ever, will last more than 3 - 5 years in the harsh environment of a roof. There can be wide fluctuations of temperature that create wide swings of expansion and contraction of materials. The caulk can separate from the roofing materials and metal flashings. If this happens, a leak is guaranteed.

What Tools are Required to Install Flashings?

The wide variety of common roof flashings can be installed with some very simple tools. A tin snips, a simple hand brake, and a propane torch will allow you to do many tasks. If you have long lengths of sill flashing to do, it would really help if you rented a metal brake that siding installers use. A brake is a tool that allows you to make crisp creases in metal - just like when you fold a piece of paper.

What is a Step Flashing?

The simplest flashing to install is a step flashing. This flashing is used when a roof butts sideways into a wall, chimney, or other object as the roof rises. As a shingle stops at the wall you can see that water would readily get into the crack, no matter how tight you cut the shingle.

metal roof flashing

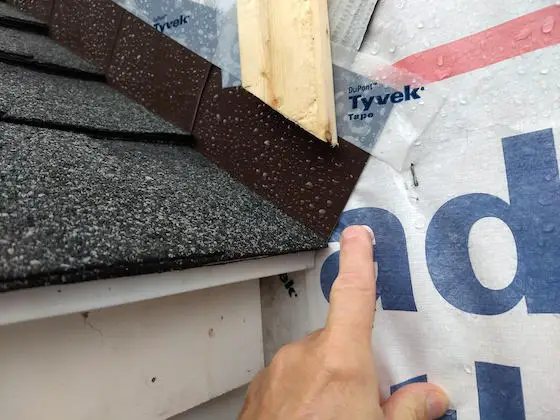
The brown bent aluminum is step flashing. The aluminum extends under the shingle and goes up the roof under the next flashing about 2 to 3 inches. The roofer made a SERIOUS ERROR where my finger is pointing. There should be an additional piece of flashing that's called a kick-out flashing. The lower end is bent and soldered and directs the water out to the front face of the exterior siding or stucco. Copyright 2018 Tim Carter

A step flashing rests on top of the uppermost 7 inches of the shingle This assumes you are using a 12 inch high shingle that requires a 5 inch exposure.

The flashing itself is a 5 by 7 inch piece of flat metal. I like to use 40 lb. tin pieces that come precut to 5 x 7 inches. You can bend these by hand so that the crease goes down the middle of the 7 inch axis. This way 2.5 inches of metal rises up along the wall and the other 2.5 inches covers the end of the shingle. You can also purchase 20 lb. tin, but this has half as much tin coating. Go for the good stuff - 40 lb. tin.

How Are Step Flashings Nailed?

To keep the flashing in place, I always install a nail right at the top of the flashing. I don't like to nail the flashing to the wall as this makes it nearly impossible to remove it years from now when the siding is in place.

CLICK HERE to get FREE & FAST BIDS from local contractors who will install flashing for you.

When you install the next row of shingles, something magical happens. You completely hide the piece of flashing on the row below! This is OK. When you install the next piece of flashing just like the one below, you will readily see that the second step flashing overlaps the one below by 2 inches - even though there is a shingle between the two pieces of metal.

What Prevents Leaks into a Home?

This overlap is what prevents water from entering your house. Remember, shingles and metal flashing rely entirely on gravity to keep your house dry. You can easily create a leak around flashing if you take a hose and squirt water UP the roof under the shingles and flashing.

But in the real world, this doesn't happen except in the fiercest wind driven rain storms. If you have wicked rainstorms in your area, you may want to cut custom flashings that create more than a two inch overlap.

Where Do You Solder Metal Roof Flashings?

Flashings need to be soldered where they turn corners. This happens at the four corners of a skylight, a chimney, or when a dog house dormer projects from a roof. The lower two corners of the dormer will have flashings that run along the front of the dormer and then turn to proceed up the roof.

Professional roofers use a soldering iron that looks like a plumb bob on an iron rod. They heat the plumb bob portion over charcoal or a propane flame. The stored heat in the iron then heats the metal flashing just enough to melt stick solder.

What Metals Will Accept Solder?

Tin, lead, or copper flashing readily accept solder if you wipe the mill oil from them and use liquid red ruby flux. If you don't have a soldering iron, you can use a torch but you must be very careful. Keep a bucket of water handy for fires that you WILL start!

Photo 1: Plumbing Vent

Photo 1: Plumbing Vent

Virtually every house has one of these poking through the roof - a plumbing vent. The flashing actually is a rectangular piece of metal. In this photo #1, 60 percent of the metal is hidden by overlapping shingles. I have seen homeowners and rookie roofers who simply install the entire flashing on top of the shingles!

The reason the flashing works is the fact that at least half of it is hidden. Water flowing down the roof goes over the shingles and then over the flashing. If the top of the flashing was exposed, water would eventually get under it and leak into your home.

Note how you see no tar or caulk in this photo. This flashing has been in place 12 years with not one single leak.

metal roof flashing

Photo 2: Soldered Valley Flashings

This photo #2 illustrates two soldered valley flashings that intersect. Often roofers will not solder the intersection. They just beat the metal flashing down and overlap the pieces. The ridge cap shingles that are at the bottom of the photo are then extend over the metal to seal the lack of solder.

The stains you see in the photo are not rust. Believe it or not they are stains from oak leaves!

Photo 3: Shed Roof Flashing

Photo 3: Shed Roof Flashing

This photo #3 illustrates a shed roof that stops at a second story wall. As the roof abuts the wall on the left, there are inter-laced pieces of metal step flashing hidden under the shingles.

You can see a glimpse of one of these flashings in the groove of the second shingle from the top. Note the light line in the photo.

At the second story wall, note the metal flashing that covers the top 3 inches of the shingle. The shingle actually runs up under the flashing to the wall. The metal flashing is installed before the wood siding. It is bent so it extends up 4 inches behind the wood siding. The wood siding actually acts as the counter flashing for this "sill" flashing.

At the inside corner, where the two walls meet, there is a final step flashing that has been cut, bent and soldered. The solder joint runs up the inside corner and is hidden by the thick corner board. Note how the wood siding does not touch the shingles. You should keep the wood off the roof at least 1/2 inch.

metal roof flashings

Photo 4: Chimney Flashings

Chimney flashings - a huge source of leaks! This photo #4 shows the side view of a chimney base counter-flashing. You can also clearly see the step flashings that overlap one another under each row of shingles.

Note how water can't get in. It flows over the brick, down the counter flashing over the step flashing and finally onto the shingles. The overlap orientation is the key!

metal roof flashings sill flashing

Photo 5: Simple Sill Flashing

This is a simple sill flashing where a shed roof terminates at a second story wall. The center of the photo #5 is actually a soldered joint where two flashings overlap one another.

The shingles extend up under the flashing to the wall. The flashing has a crease in it to keep it flat.

CLICK HERE to get FREE & FAST BIDS from local contractors who will install flashing for you.

Column B25

Wood Desk Video

Using a water based urethane product and wood filler, the wood refinishing of the desk can be done in about six hours. The water based urethane stain is fast drying and has a low odor. Lightly sand the desk and remove the dust. Wood filler is used to cover up and fill any nail holes.

Be sure to stir the urethane. Do not shake it as this will put bubbles into the stain. Brush on the urethane and allow it to dry for about an hour. After drying, additional coats can be applied. Three to four coats makes for a great finish. The paint brushes used with the urethane can be cleaned up with warm soapy water.

Try this method the next time you have a quick finishing project.

Quarter Round Video

Using toe strip will hide that gap caused by uneven flooring. The quarter round molding is flexible enough to follow the floor contour. What do you do when you get to a corner? You can use your miter saw to cut both pieces to a 45 degree angle and slide them together. This works if your corner is square.

If you have a corner that is slightly out of square, use a coping saw and cut the one piece of the molding to match the curve of the other. Once put together, it will look just like a mitered joint.

When nailing the toe strip or quarter round, use long nails. They will reach through the drywall, the floor molding and into the wall base plate.

One last tip, at the door, cut the toe molding at a 22-1/2 degree angle for a better look.

How To Install A Phone Jack Video

There are modular phone jacks boxes available to handle up to 6 lines. Each line requires a pair of wires. If your existing phone wiring only has four wires, that is a maximum of two phone lines. Some phone cable has eight wires, or four pairs for four phone lines or circuits. Just snap in the correct number of phone outlets you require. The phone wires just snap into place on the back side of the phone jacks.

Using the right modular equipment makes phone jack wiring a simple, neat job.

Mortise Video

Using a circular saw, a hammer and a wood chisel, you can cut the mortise. Adjust the circular saw for the proper depth of cut. Mark the width of the groove using either the board that will go into the groove or use a tape measure and a framing square. Take the circular saw and make a number of parallel cuts between the marks. After making several passes, the wood chisel will be able to easily remove the remaining wood.

The simpler method for cutting the mortise is to use a router. With the right size route bit, the router will make simple work of that groove. It is quicker and more precise then using the circular saw.

Paint Stripper Video

A semi-paste stripper are thicker and can be applied with a simple paint brush. Tip - use a metal paint pan, not a plastic or paper one. Some strippers will dissolve those non-metallic trays.

Brush the stripper on, following the manufacturer's instructions. Allow it to sit for the recommended time, so that the stripper does the work. Once the paint stripper has worked, use a putty knife to scrape off the old finish. Steel wool or paper towels will also work. Tooth picks are great for getting into those small areas.

Wipe the stripper off with a cloth. Then lightly sand the wood and remove the dust. You are now ready for finishing the wood.

Wood or paint strippers are wonderful products, but be sure to read the warning labels on the container. These are aggressive products and can harm your skin or burn your eyes. Used properly, you will get great results.

Low Voltage Wiring Video

Using the wrong fastener or staple on low voltage wire can result in a short. This type wire has a thinner insulation than other electrical wiring. The wrong fastener can cut right through the wire.

Low voltage wiring is used for door bells, telephone wiring, computer wiring, thermostat wiring, etc. Be sure to use the right staples to protect the wire. The old fashion staples with a cardboard protector will work great with this size wire.

A hand stapler is available with a special tip and special cable staples designed just for low voltage wires. The staples are rounded to prevent damaging the cable. Be sure to use them on your next wiring project.

Internet Cable Video

Using a standard outlet box, installing computer network cabling is a simple job. Computer jacks use 8 wire cable. This is known as CAT 5 cable. Each wire has an individual color.

The RJ-45 jacks allow the cable to be easily installed. Position each wire into the proper slot and press the wire into the jack to complete the connection. A computer data cable wall jack is available and mounts onto the standard outlet box.

Networking your house when building or remodeling will save time and money. Do it now, you will be using computers in the future.

Heating Costs Video

To lower your utility bill, you have to use low fuel. Turn down the thermostat as low as you can stand it. Install a programmable thermostat to save energy automatically while you are not home or are sleeping.

You can get a good return on your investment will the addition of insulation in your attic. You can install bat insulation yourself or call an expert to blow in a few extra inches or a foot of installation.

Check the weatherstripping around your doors and windows. If you feel cold air coming in, the weather stripping needs to be replaced.

Follow these tips to help save energy and lower that utility bill. You can save money.

This was shared in Tim's January 17, 2019 Newsletter under Critical Thinking And Common Sense.