Plywood

DEAR TIM: Hurricane Katrina destroyed my house and my husband and I are in the process of rebuilding. We are going to build a wood-framed home and wonder what is the best material to use to minimize damage to the structure when the next hurricane hits. Does it make a difference if we use oriented strand board (OSB) vs. traditional plywood? Which material will offer the best performance for both strength and water resistance? Pam R., Gulfport, MS

DEAR PAM: The effects of Hurricane Katrina are going to be felt by many for years to come. I suspect vast changes in the building code will result and more new products will be developed to better resist the wicked winds hurricanes fling at the structures we mere mortals erect. Massive building code modifications happened after Hurricane Andrew had his way with south Florida in the 1990's.

I have no issues with wood-framed construction if you are building at an elevation where you negate the effects of the destructive storm surge. The pounding of tons of water against wood framed homes often produces flotsam that ends up in a beach-side fire fueled with driftwood. If your home has the chance of being inundated with water, you may want to rethink your plans and give serious consideration to poured concrete cast within insulated concrete forms and/or reinforced concrete block construction.

When you look at the technical test data for both plywood and OSB, I am convinced you will buy plywood for your floor, wall and roof sheathing. OSB is a very good product, but the technical data I reviewed indicates plywood has greater screw and nail holding ability when you compare products of equal thickness.

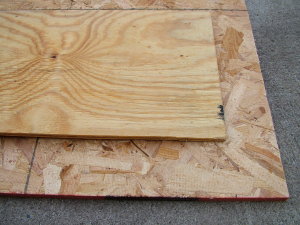
Plywood looks completely different from OSB even though they are made from the same wood products. Their performance characteristics are almost as different as their appearance. PHOTO CREDIT: Tim Carter

Plywood looks completely different from OSB even though they are made from the same wood products. Their performance characteristics are almost as different as their appearance. PHOTO CREDIT: Tim Carter

Plywood used on the exterior walls of your new home can also make it very resistant to wind-load damage if you nail the edges of the plywood to the studs every 3 inches on center vs. the normal 6-inch on center spacing. This 3-inch on center nail spacing increases the strength of the holding power of the nails and the plywood. With this nailing pattern and using 8-penny nails and 15/32"-inch thick plywood, it would require 490 pounds per square foot of pressure to pull the plywood from the wood wall studs.

Plywood also seems to perform better when hit by flying debris. In testing mandated by the South Florida Building Code, a 19/32"-thick piece of OSB was penetrated by a 9-pound 2x4 shot out of a cannon. The same projectile was not able to penetrate a piece of plywood that was 5/8" thick.

Hurricanes produce vast amounts of wind-driven rain. This water can and does penetrate the structure. It can get under roofing, into walls and soaks wood subfloors. Plywood that is rated for exterior exposure will resist damage from water, even if it gets saturated. Plywood can and does swell, but typically once it dries, it returns to its original size and shape. The same can't be said for OSB panels.

OSB panels are created under enormous pressure as the wood strands and resins are compacted. When OSB gets wet, the strands of wood swell and they release some of the compression stress. This expansion is often greater along the edges of OSB than in the center of the panel. When the OSB dries, it rarely returns to its original thickness and you often can see and feel the puffiness of the panels.

Plywood panels are also smoother than OSB. This characteristic is important when it comes to installing flooring materials. Certain flooring materials require the subflooring to be extremely smooth and plywood meets this requirement.

Plywood and OSB are friendly competitors. OSB is a great engineered wood product that helps make the most of our natural resources. But as with many different things, one product can't serve all masters or meet all needs.

I have used plywood for years on many of my projects and have never had a failure. If you use the right product for the job and install it the way you are supposed to, you will get years of trouble-free performance. OSB has also been on my material list for jobs and I have even built things where I use both plywood and OSB on the same job. When making decisions about strength and performance, always trust the test numbers, not necessarily what a salesmen says.

Column 607

Construction Quality Control and Bad Home Builders

DEAR TIM: Why does it seem that you are all against builders? Replace a tub from a nick? The hole from the truss crane? I work for a small builder and it seems you don't mention any of the problems and things customers do. You also fail to talk about obsessive/compulsive customers. I hope you have actually experienced some of the things we do with customers.

We are a small builder that builds more toward the custom end. Do you have any articles about when a range hood that cost $1000.00 was fine and then the next day there were three scratches on it? In this case our customer wanted a new one. Obviously we said we were going to attempt to repair it. The next day there were thirty scratches on it. We repaired it to 100% with a stainless steel specialist.

I would hope you would agree that custom home builders are fewer and farther between considering how many tract builders are in the marketplace. But you have to find a median between quality and cost. We do everything we can to build a great house. Actually, our finished product often costs more than some of our local competition. But what are you supposed to do about the customer that complains because there is a 1/16" x 2" mark in their front stoop? With some of the things you state in you site, it makes me wonder. With picky customers already buying a custom home, if I had to fix every drywall bugger, etc., there will be nothing but tract homes throughout our United States. Anonymous, but indicated she/he was from Chicagoland.

DEAR NO BACKBONE: I built custom homes and did ultra-custom remodeling for 20 over years, so I believe I have enough experience to talk about quality and customer expectations. I also have dealt with my fair share of customers who expected perfection and beyond.

But before we go any further, tell me, why is it that people like you have no guts? If you are so proud of your work and feel your opinion is right, why don't you identify who you are? You have no honor and in reality you do not deserve an answer. But I have decided that your questions are so important I will answer them. What's more, I intend to ask the Court of Public Opinion to weigh in with their comments about your questions and my answers. I will publish each and every one I receive at the end of this column.

I will take your questions one by one. I am not against all builders. I am a rabid supporter of builders who treat their daily work as a vocation. These individuals go out of their way to do things the right way. They do not take shortcuts when it comes to quality. They may have learned shortcuts that make them more productive, but that is totally different than sacrificing quality.

Builders who intentionally try to defraud customers or who display attitudes of selfishness or indifference capture my interest as well. As I have walked down the path of this new media career, it has become crystal clear to me that someone needs to record for the present and for posterity the right way to do things so that the quality of old can be carried forward by those who wish to follow in the footsteps of true and honorable master craftsmen.

The nick in the bathtub is inexcusable. Why? There are countless ways to protect finished surfaces such as tubs as you work above them. In fact, over the past five years an entire industry has developed that features specialized protective finishes you can apply to tubs, countertops, etc. that protect them from worker damage. Once the job is complete, these protective finishes are removed revealing a fixture that is absolutely perfect in every respect.

Any subcontractor that works above the finished work of another subcontractor is obligated to protect the work below. They know the fixtures will be there and they are required to take whatever steps are necessary to protect against accidents. Excuses are reasons for failures.

If a person makes a mistake and damages an item, it is his responsibility to replace it. This is why contractors should carry general liability insurance policies. That is exactly what that product covers. In other professions it is called Errors and Omissions Insurance Coverage.

As for the ragged hole created by the rough carpenter who is working with a crane operator, I explain myself quite well in that column. It is unbelievable to me that you would even question the simplistic way to rig that truss and then nail on the small triangular piece of sheathing once the truss is in place.

That one comment alone convinces me you are not a quality builder. Any carpenter knows it takes 30 extra seconds to cut off the top triangle and nail it back on after the truss is in place. If you think that is not necessary, then you don't take the work seriously.

Who was careless and scratched the range hood? What sub-contractor created the scratches? Why wasn't the hood covered so that nothing could scratch it? The person(s) that scratched the hood should pay for a new one or at the very least his insurance company should absorb the cost.

Why should the homeowner who is paying for new, unblemished things be expected to accept damaged goods? That is totally unrealistic when it comes to finished fixtures. I agree that blemishes in drywall, plaster and even scratches in hardwood flooring can be repaired in place. But damage to expensive fixtures should not be acceptable to any homeowner. This is one reason you often see scratch and dent sales at stores that sell washers, dryers, televisions, refrigerators, etc.

Have you ever visited a well-built older home or even older stately commercial and institutional buildings? Have you ever taken the time to visit the magnificent homes in Newport, Rhode Island or the Biltmore estate in Asheville, North Carolina? What do you think they would look like if those master craftsmen of days gone by had your attitude?

You belong to a very special group of people I focus on when I write. It is people like you that are eroding the quality standard. The mission statement of AsktheBuilder.com is simple: Preserve and publish the time-tested methods of quality construction so that the slow erosion of the quality standard can be stopped and hopefully reversed.

You do bring to light one very good point. You ask about how to deal with customers who are extremely discriminating and demand perfection. Unfortunately for me, I didn't discover how to deal with these people until the end of my active building career. The answer is simple. You deal with these people just as many other product manufacturers have done for many years.

I have two great analogies for you: watches and automobiles. If you go shopping for either of these two items you will find a great range of pricing. You can buy a watch that keeps very good time for $20.00. You can also buy a watch that costs in excess of $10,000. Take a look at cars. I see lots of new automobiles for under $20,000 that will move you from point A to point B just like a $250,000 Rolls Royce.

The biggest mistake that many builders and subcontractors make today is that they do not offer different pricing options that are related to finished levels of quality. Think how easy it would be to show different levels of quality. One could easily describe and create actual examples of slightly blemished drywall finishing, finish carpentry, scratches in cabinets, countertops, etc. Even the length and depth of scratches could be measured and defined.

It might surprise you to discover that some home buyers would accept slightly blemished surfaces knowing full well that ordinary wear and tear will produce the same look in a short amount of time. These customers might be willing to pay less for an item that still works fine but doesn't look perfect. It may take you less time to install things and the material supplier may give a significant discount to take the damaged item from his stock.

For those customers at the other end of the spectrum, you develop a pricing strategy whereby if you have to redo work three or four times to satisfy that customer, they simply have to pay for it. You have priced the job that way from the start. In the end, the customer gets the perfection they were looking for and you got paid for the numerous attempts it took you to reach that standard of quality.

The trouble I see in the current marketplace is that builders price their products at one level for all customers. If you quantify quality and make it so it can be measured, then you have a way to judge if you meet the standard. Not only that, a disagreement between you and the customer becomes black and white, not shades of gray.

Original Email Message Unedited:

Why does it seem that your are all against builders.   Replace a tub from a knick??  The hole from the truss crane?   I work for a small builder and it seems you dont mention any of the problems and things customers do. or are excessive about.  Given customers are the way to a builders living,  cant build houses without customers.  But i hope you have actually experianced some of the things we do with customers.   We are a small builder that build more towards the custom end?  Do you have any articles about when a hood that cost 1000 was fine and then the next day there was three sratches,  custoemr wanted a new one,  obviously we said we were gonna attempt to repair it.  The next day there was thrity scratches on it.   But we repaired it to 100% with a stainless steel specialist.   I would hope you would agree that a custom home builder is fewer and farer between (with all track builders)  But you have to find a median between quailty and cost.   We bar none with quailty,  do everything we can to build a great house,  actually cost more than some local competition, but what are you supposed to do about the customer that complains becasue there is a 1/16" x 2" mark in ther front stoop.   With some of the things you state in you site, it makes me wonder.  With picking customers already buying a custom home,  if i had to fix every drywall bugger, etc,   there will be nothing but track homes thruout our United States.

Reader Comments:

From Karen Maple in Vancouver, Washington:

".. Just read your response to 'NO BACKBONE'S' comment on 'Construction Quality Control and Bad Home Builders' and all I have to say is... AMEN TIM!!!  🙂 "


From Pat Burroughs in Neavener, OK:

"In 1996 we built a house with four bathrooms, two of which have the tub/shower unit which, of course, is hard to replace.  We hired a local man with a long reputation as a good and honest carpenter to build the house and he did most of the work by himself.  He hired a local plumber with whose work we were unfamiliar, because he was the only plumber he could get and the law forbade him to do the plumbing himself.

This 'plumber' piled tools, etc. in those tubs and left a rusty residue in them that we have been unable to completely remove in spite of everything we have tried.  He also crossed up the hot and cold water in another bathroom (shower)and just generally messed things up.  This plumber was probably in his 50's and we were told he actually had a very good reputation as a plumber where he moved here from.

Shortly after we moved in and began to find all the bugs in the plumbing, the plumber had the nerve to die and leave us holding the bag.  As the builder served as contractor at no additional cost to us, and tried his best to please, we did not want to hold him responsible for the problems.  We are still trying to get some of the problems corrected, but we have such a dearth of good plumbers in this area it is hard to do.  In the case of the man whose tub was damaged, I would agree--make them replace it....period!!!  Don't accept 'repairs.'  We could have been spared a lot of trouble and grief if we had had the option of making the plumber responsible for his work.

Author's Note: Pat, Unfortunately all of us have a date with the grim reaper... :->


From  Cindy Schnackel from  Norman, Oklahoma:

"Thanks so much for your column, 'Construction Quality Control and Bad Home Builders!'.  Organizations such as ours, Homeowners Against Deficient Dwellings," HADD.com would not exist if there wasn't a big problem with builders that have the bad attitude demonstrated by the one in your column.  Consumer Reports, in Jan 2004, found that 15% of new homes have at least two serious defects.  That's 150,000 seriously defective new homes a year, not counting the many others with more minor issues such as damaged new appliances and fixtures, or defects that are fixable without that much expense or effort, (relatively speaking!)."


From   Robert Borden in Fenton, Michigan:

"I have been in the construction business for over 40 years.  Being too active to retire and take up fishing, I decided to open a service business.

My clients are attorneys and I perform anywhere from 100 to 150 forensic inspections (mostly residential) per year in Michigan and have been doing so for over 13 years.  My experience has found that 85% of the complaints are real and 15% of my findings indicate the home owner (purchaser, if new) to be unrealistic or downright fraudulent.

Many complaints are against a contractor that bids, for example, $5,000 to build a 2 car garage, then abandones the project with 2 framed-in walls.  Yes, I had this happen once, but this was an extreme case.  Others were not so severe.

Or, the contractor that is so desperate for work that he/she bids a job that he/she cannot begin to comprehend.

It seems to me that many 'workers' want to become builders and contractors without the basic understanding of how to run a business, how to bid on jobs, how to treat their workers, how to get along with customers, and etc.

The sword cuts both ways - - -

I just looked at a house where the purchaser noted 574 things "wrong" on his first punch-list!  I found 10 items that were not completed within industry standards - none of which were major defects.

There are many, many contractors and builders out there that do an excellent job and pride themselves on taking care of complaints.  Too often the customer shops price (only)and gets stuck with an inferior or unfinished product.

Maybe, this is typical of all service businesses, not just residential contruction."


From  Peter Mion in Billings, MT:

"I was commenting regarding the need to establish a standard for workmanship. I agree there are several standards out there. I can remember in my early working days, an architect who used the Woodworking standards which listed workmanship in several levels and each level had acceptable defects.

For example: in wall paneling there was an allowance for gaps of no more than .015-inch gap of greater than 4 inches in length for any 8-foot seam. This was a very definite means of identifying the level of workmanship, and I can remember several contractors getting upset when I would have to come onto the site with a gap gauge and start checking the work for acceptance.

I enjoy your articles and agree with your comments regarding contractors--good vs bad."


From John Aston, a home-performance contractor in East Fairfield, VT:

"I am writing regarding the article you published on 'Quality Control in Construction'. One of the problems that I see in the construction industry is the lack of profitability of contractors. Most, it seems, do not know how to price a job so that they may stay in business. Unfortunately, for the value-conscious consumer, accepting the lowest bid practically ensures a sub-standard finished product - if the project reaches completion. If a builder can't supply references, don't hire him. Good builders are busy. Get on the waiting list and wait.

I just attended a 2-day builders conference that attracted 1,500 people of various disciplines: architects, designers, contractors, etc. All of these people have a genuine interest in providing quality buildings that are durable, safe, healthy and energy efficient. I have a great deal of respect for people who have spent a lifetime in this business and who continue to improve their level of knowledge, and therefore the quality of their construction. I met four of my customers in the trade show area, and they were impressed that I was attending the seminars. I actually introduced one of them to a competitor who could better serve one of his needs. He will be my customer for "life".

Construction is no different from any customer service business. Communication is key. The contractor should explain what he is doing and why he is doing it. If a customer changes his mind about something in the middle of a project, a professional doesn't whine and complain, he assesses the situation and adjusts the bill up or down as necessary. A contractor should be professional in all of his business dealings, whether at the jobsite, or at the local bar. Well --- I am anyway, and it seems to work for me."


From Greg Davis a remodeling contractor in Memphis, TN:

"I totally agree with your response. In my remodeling business I find just a few people who understand what their responsibility to the customer and the final product is supposed to be. That's one reason why I work by myself 99% of the time, so I obviously don't build houses.

However,the quality issue is still the same no matter the size of the job. I tell people who are starting out or struggling to make it in this business that if you just show up there will be work. If you do quality work with a good attitude, referrals will take care of your job flow. I don't understand how contractors with bad attitudes get jobs, but they do."

Author's Note: Greg, the bad contractors cast a spell on customers during the sales call and contract signing. By the time work begins, the spell has long worn off......

Column EM0020
Drill Holes in Ceramic Tile

DEAR TIM: How do I drill holes in ceramic tiles? Are there special drill bits for ceramic tile? What is the worst thing that can go wrong? Lawrence Fefergrad, Montreal, Canada

DEAR LAWRENCE: The composition of ceramic tiles is as different as there are countries in the world. For this reason, there is no one single answer on how to drill a hole in ceramic tile. There is, however, one drill bit that indeed will go through each and every tile, but you may have great difficulty locating it.

Many ceramic tiles have a fairly soft inner core and a thin hard glaze on the outer surface that you look at. These are the very easy to drill through. The easiest tiles to drill into are very soft tiles that are often found in homes built in the southwestern part of the USA. Frequently these have no glaze or a very thin satin finish.

AsktheBuilder Podcast

CLICK this image and listen to the second call on the podcast. I talked to Greg about what can be done with porcelain tile, including borders to offset certain spaces. Copyright 2018 Tim Carter

Tile hardness is a function of the type of clay and its silica content used to make the tile. The final hardness of the tile is also directly related to the amount of time the tile is in the firing kiln and the temperature inside the kiln. High temperature and long baking times can produce rock-hard tile.

Glass and porcelain tiles are very popular right now. These products are the hardest tiles to drill into. You can use a sharp carbide drill, but you need to oil or water the bit to keep it cool as it rotates on the tile. A diamond-encrusted bit will drill into porcelain or glass faster than carbide, but these bits are expensive.

If you are drilling into softer tile, a regular carbide bit works fine. Do not use a hammer drill as the rapid vibrations can crack the tile. The trick is to use a slow drilling speed and carefully grind through the surface of the thin glaze. Once the bit gets into the softer core, the drill will rapidly cut through the softer fired clay.

Do not apply too much pressure when you first drill as the drill and bit can slip away from the marked point and scratch the tile. The worst mistakes you can make are cracking or scratching a tile. If that happens, it will be a considerable amount of work to replace the damaged tile(s). Be careful and proceed slowly as you drill.

Column EM0019

Door Weatherstripping Sticks to Painted Door

DEAR TIM: We repainted our front door last year and I guess we didn't allow for full drying. Now, even a year later, whenever we open or shut the door it sticks a bit to the weatherstripping. What would be the best way to get rid of the sticking so we have a clean door opening and closing? Would petroleum jelly or a spray lubricant offer any help? Dave Wojtkowski, San Francisco, CA

DEAR DAVE: I had this happen to me on one of my jobs years ago and it was a learning experience that I shall never forget. Forget about using any of those products you mention, as they will just make a mess of things. You just need to either repaint the door or possibly touch it up if that is acceptable. There is a very good chance you will need to buy new weatherstripping unless you can carefully remove all paint from the stripping without harming it. If the door is newer, you should have no problems finding replacement weatherstripping.

Both water and oil-based paints need to fully cure before you allow them to contact another object. This curing process can take days and sometimes weeks depending upon the type of paint and the weather. For paint to develop a substantial degree of hardness, chemical changes have to occur inside the paint. The paint-curing process advances as certain chemical compounds evaporate from the paint.

The problem is some weatherstrips are so good, they block this evaporation process when the door is closed. This is why your door continues to stick.

To prevent this problem from ever happening again, all you have to do is remove the weatherstripping from the door jamb before you start the painting job. The vast majority of weatherstripping materials for newer doors have a small fin that fits into a small groove in the door jamb. To remove the weatherstripping, start at one end of a piece of the weatherstripping and pull the fin out of the groove.

Paint the door and leave the weatherstripping out for a minimum of two weeks. Hot, dry weather accelerates curing and cool, wet weather slows paint curing.

Column EM0018

Do it Yourself Roofing

DEAR TIM: My husband and a friend are planning to install a new asphalt shingle roof on our home this summer. My task is to be the chief financial officer and job superintendent. I need to establish a budget for the project and uncover important installation tips. How do I calculate the cost of the project and what are the most important steps that need to be followed to eliminate roof leaks? Michelle L., East Tawas, MI

DEAR MICHELLE: You and your husband are absolutely sailing into uncharted waters. I am reminded of the clever television commercial where a bare-chested man is sitting at his kitchen table with a dinner knife in his one hand. He is on the phone with a surgeon who is telling him where to start the incision. The man at the table has a perplexed look on his face and says to the surgeon, "Shouldn't you be doing this?"

Installing asphalt shingles is not necessarily hard, although it can sometimes involve strenuous, dirty work. As with many crafts in the home building and remodeling field, there are many small steps and tricks that you must employ to ensure years of leak-free performance from your new roof. To think you will learn them all from this column is a folly. Entire books have been written on the subject and many of the ones I have reviewed have skipped very important steps.

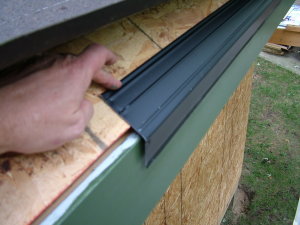
This critical drip-edge flashing is one of the first things that gets installed on top of the slanted wood roof sheathing. It is nailed directly to the bottom of the sloped roof and the roofing felt paper lays down on top of it. Note how the gutter board is already installed, painted and there is a slight gap between the flashing and the gutter board. PHOTO CREDIT: Tim Carter

This critical drip-edge flashing is one of the first things that gets installed on top of the slanted wood roof sheathing. It is nailed directly to the bottom of the sloped roof and the roofing felt paper lays down on top of it. Note how the gutter board is already installed, painted and there is a slight gap between the flashing and the gutter board. PHOTO CREDIT: Tim Carter

Let's talk first about the financial aspects of the job. You need to create a detailed material list that will include the needed building permit, the asphalt shingles, underlayment, possible ice and wind-driven rain membranes, nails, flashing materials, drip and rake edge flashings, new or rental tools ladders, roof scaffolding, safety equipment, possible disposal costs if you are tearing off an existing roof, etc.

Roofing materials are sold by the square. One square of material covers 100 square feet of roof area. There is always a certain amount of waste, so calculate the exact square footage of what needs to be covered and add 8 to 10 percent for waste. Once you have selected the actual roofing shingles, refer to their written instructions for the exact type of approved nails. Try to locate hot-galvanized nails that are ring shanked. These have superior holding power in wood roof sheathing.

You can often get superb advice with your material list by opening your phone book. Look under the heading Roofing Supplies. You should find several companies that sell roofing materials to roofers. They typically do not advertise to consumers, but will often sell to them. They can help you make sure you are calculating all the things you will need. Take in drawings and photographs of your existing roof making sure you have all dimensions. Visit these businesses during their slow periods which are often mid-morning or mid-afternoon.

The best tips I can give you are fairly simple. Select the roofing material you are going to use and then obtain the actual written instructions from the local distributor, the manufacturer's website and/or from the package wrapping of a bundle of shingles. Read these until you absolutely understand what you are supposed to do.

Far and away the largest sources of roof leaks are flashings. Roof flashings are transitional roofing materials that connect the actual roofing material to things that are not roofing. You will find flashings where shingles touch up against walls, chimneys, plumbing vents, ventilation vents, intersection points where two different roofs touch one another, skylights, etc.

I suggest that you set up an experiment between now and this summer. I want you to build a test roof in your garage using one or possibly two sheets of plywood. Support the plywood with several 2x4s so that it is stiff just like a real roof. Create a slope by tilting and supporting the panel so you can get the feel of working on a slope.

Cover this piece of plywood with all of the materials you are going to use on your real roof. See how hard or easy it is to maintain straight lines. Try to install all of the flashing types you will have on your real roof. Your garage is the place to make mistakes, not up on the real roof when time, skill and safety are of the essence.

Be sure to be realistic about all of the costs involved in this do-it-yourself experiment. When you add up all of the costs, you may discover you are only saving several hundred dollars over the cost of a professional installation. Remember, a professional works much faster than your husband and his friend. They know all of the shortcuts and they have all of the right tools to make them highly productive.

Plan for disasters. What happens if your husband or his friend get hurt? Who will complete the job? What will that cost? What happens if the inside of your house gets wet from a leak? Will it cost more to fix that problem than what you saved on the roofing job?

Column 605

Ceramic Floor Tile Installation

DEAR TIM: I am installing new ceramic floor tile in my kitchen and wonder if it can be installed over two layers of sheet vinyl linoleum. Can you purchase ceramic tile that is extremely hard and will resist damage from heavy appliances that may be moved across the floor from time to time? What is the best way to prevent damage to ceramic floor tile? Jennifer S., Albuquerque, NM

DEAR JENNIFER: It is not a good idea to install ceramic floor tile on top of sheet vinyl or linoleum. Had you told me the existing flooring was a dense vinyl tile that was in excellent condition and well adhered to the floor, I might say that the ceramic floor tile could be installed directly on the existing flooring.

Sheet vinyl and linoleum often have some give or resiliency to them. This simply means that when you apply pressure to them, they will compress. Dense vinyl floor tile usually will not compress except if very high pressure is applied to it.

Ceramic floor tile is a hard product that has great strength when you compress it, but it is fairly weak when you bend or stretch it. If you apply ceramic tile on the sheet vinyl or linoleum and then apply pressure to the tile, the sheet vinyl and/or linoleum below the tile may move which causes the tile above to bend and then snap or crack.

Ceramic tile comes in a mind-numbing number of grades and classifications. There are standards for slip resistance, water absorption, breaking strength, impact resistance, freeze/thaw resistance, abrasive hardness, chemical resistance, etc. These tests and standards are extremely valuable to architects and designers who must specify ceramic tile for locations where it might be subject to extremes of weather, wear and abuse.

The bottom line is that you can purchase certain ceramic tiles that are very hard and very resistant to scratches and abuse. These characteristics are achieved by the raw materials used to make the tile and the manner in which the tile is actually manufactured.

The vast majority of ceramic tile is made from clay. Not all clays are the same and some have vastly different mineral content. During the manufacturing process the soft clay tiles are subjected to high temperatures in a kiln. The final hardness of the tile is directly related to the tile's mineral content, the temperature reached in the kiln and the amount of time the tiles are cooked at the high temperature. The longer you cook a tile at a high temperature, the harder it becomes as the heat changes the soft clay into a man-made rock.

Salespeople who work at stores that sell primarily nothing but ceramic tile know which tiles will withstand light traffic and those that will take the harshest abuse. What you will probably discover is that as ceramic tiles get harder and more resistant to abuse, the color palate and styles become more limited. There is a very good chance you may have to compromise on either color and style or hardness when it comes down to making a final decision.

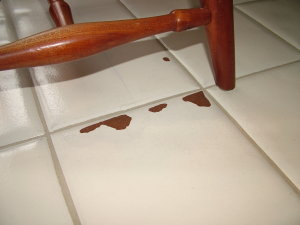
This ceramic floor tile has been damaged by chair leg glides that chipped the glaze off the tile. PHOTO CREDIT: Tim Carter

This ceramic floor tile has been damaged by chair leg glides that chipped the glaze off the tile. PHOTO CREDIT: Tim Carter

Damage to ceramic floor tile happens for two primary reasons. Dropping heavy objects onto ceramic tile can chip and crack tiles. If you want proof of this, just come to my home. You can see a ring of small chips on my kitchen floor around my dishwasher. Family members, including myself, have dropped silverware as it is loaded into the dishwasher and the utensil's direct impact with the floor tile often produces a very tiny chip in the glazed surface.

Dirt, sand and grit that is brought indoors on shoes or pet paws is also an enemy to ceramic floor tile. If these small, hard pieces of rock and grit are ground into the glazed surface, they can and will create permanent scratches in ceramic floor tile. It is best to vacuum a ceramic tile floor every couple of days and walk on these floors without shoes. Wet mopping up dirt and grit is also a good way to clean up this damaging debris.

Some ceramic floor tiles are extremely dense and hard. The glaze on them is also very durable. Years ago I installed some of these tiles and they were so hard they could only be cut with a diamond wet saw. Common ceramic tile can be scored with a glass cutter and then cracked along the cut line with relative ease. If you tried to do that with the tile I was working with, it would shatter every time.

Keep this in mind as you shop for tiles. Ask the salesperson how the tiles are cut and if unsure, request a simple demonstration. Rest assured you will get a very high level of expertise and service when you shop at stores that specialize only in ceramic tile. Shopping at these stores is a delight and you will be overwhelmed with the selection and the sales peoples' depth of knowledge about the different ceramic tile products.

Column 604

Patching Plaster Walls

Patching Plaster

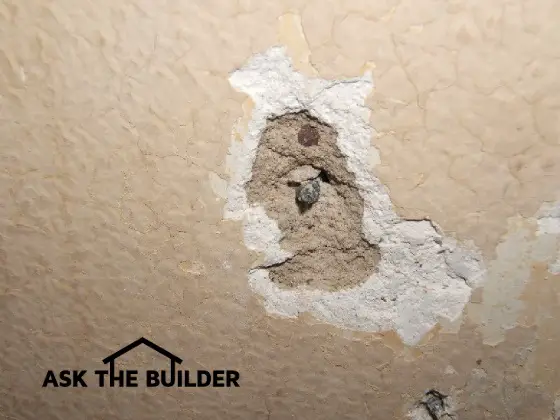
Because of the depth of this hole, it will require two or more applications of patching plaster. PHOTO CREDIT: Amy Caroli

Patching Plaster Walls

DEAR TIM: My husband and I are trying to restore our apartment in an old prewar building. The walls have small to medium-sized areas where some of the plaster is missing and there are numerous jagged cracks in the walls. In some areas I can see down to a rough, sandy brown-colored plaster. Do you think we can repair these defects on our own using skim coat plaster or other tools? All of the paint came off the walls easily to expose the original white-plaster walls. How hard is it to work with plaster? Amy C., Brooklyn, NY

DEAR AMY: My biggest concern at this point is that you may have created a serious health issue in removing the paint from the walls. Because of the age of the building, I would be willing to wager significant money that the paint you removed contained lead. If this is so, there may be significant amounts of small lead paint chips in the rooms and significant amounts of visible or invisible lead dust in the rooms.

Before you do any plaster patching, I urge you to rid the rooms of any residual lead. If you try to vacuum up chips or dust, you must use a special HEPA filter-equipped vacuum cleaner. Some tool rental stores rent these. Change and wash the filter regularly and dispose of the wash water down a toilet. Mop the floors and wash down walls making sure to change the wash water regularly and dispose of the contaminated water down a toilet. Obtain all approved cleaning procedures and cleaning products from the EPA's website: http://www.epa.gov/lead/.

I think you can successfully patch the plaster if you have some patience and a fair amount of hand-eye coordination. To obtain professional results you will need to practice and use the correct products. Many old plaster patching jobs fail because people use the wrong materials for the job.

Do not use the common drywall joint compounds you often find in home centers. These products are only meant to be used with paper-faced drywall. They bond poorly to traditional plaster. Plaster patching must be done with patching plaster and sometimes plaster of Paris for the best results. You can achieve moderate success with setting-type joint compounds and these might be a good product to use to practice your repair techniques.

Setting-type compounds are powders that mix with water. The water starts a chemical reaction that causes invisible crystals to begin growing. These crystals interlock within the coarse open plaster to create a strong bond. The advantage to using this material is that it is often sandable. If you make a finishing mistake, you can sand down any excess material. Traditional patching plaster and plaster of Paris are not sandable.

Before applying any product to the walls, they must be clean and free of any dirt, grime or grease. All loose plaster must be removed and all cracks should be enlarged so that the top of the crack is at least one-quarter inch wide. If at all possible, try to make the bottom of the cracks wider than the top. This will take extra work, but the patching compound will interlock into the old plaster like a dovetail joint once it hardens. Slightly dampen the areas to be patched with water just before applying any patching compound.

The trick to patching plaster is to start with small holes that are no bigger than two inches in diameter. If the hole is deeper than one-half inch, then only fill the hole halfway with patching material. The patching material may harden within several hours and then you can mix new material to finish the job.

Use regular drywall finish tools to work with the patching materials. I prefer to use different knives, my favorites being five-inch, ten-inch and twelve-inch flexible broad knives. These tools held at a 30 degree angle to the wall allow you to spread the patching compounds much like you spread icing on a cake.

Both the setting type compounds and the patching plasters can be finished with a sponge as they harden. Professional plasterers will often use a small amount of water on their trowels to make the setting plaster slick as a piece of glass. It takes great skill to perfect this method. You can try to do this as the compounds set, but you have to time it just right.

The best way to practice is to mix some of the patching plaster and use it to fill a small hole that might be hidden behind a piece of furniture once the remodeling is complete. Use your drywall knives to apply the compound and get it as smooth as possible with little or no excess on the wall. Make sure you use a knife whose blade is longer than the hole is wide. With the blade spanning the hole, make repeated light strokes over the wet patching compound until no excess material collects on the knife blade. If you press too hard, you might create a slight depression in the patched area.

Use the sponge to wipe any excess patching compound off the adjacent, sound plaster. As the patching compound gets quite hard, gently stroke it with a damp sponge to make it smooth.

Column 603

Box Gutters

Box gutters can be found on many older homes, multi-family dwellings, old stores, factories, etc. They were by and large one of the most popular rain collection devices built into and onto structures built between 1880 and 1925. Box gutters date back much farther than 1880, as they can be found on very old buildings in both the USA and Europe. These time-tested gutters are still being built and re-built today.

A box gutter does not hang onto the edge of a roof or on the edge or side of a house as many modern pre-formed metal gutters do. A box gutter is actually built into the bottom of the roof or into the roof overhang. The foundation of most box gutters is wood that is then covered with thin sheet metal such as tin, copper, lead, stainless steel, or some other metal that will not readily corrode.

The shape of the box gutter is created by a skilled carpenter as the shape and slope of the gutter is completely controlled by this craftsman. The sheet-metal trades person follows and simply shapes the metal to match the wood gutter.

Tin-coated steel is perhaps the most common metal used for box gutters because it is affordable, is easy to form and solder. Copper would probably be the second most-popular metal to use as it is very easy to bend and solder. Copper also has another advantage in that once installed, it never requires any maintenance. Tin-coated steel must be painted immediately after it is installed and then repainted every 8 - 10 years after the original installation.

Here are the specifications I would include in a contract:

  • All wood that forms the gutter must be in good condition and securely fastened. Replace any and all rotten wood on re-lining jobs.
  • The wooden structure that creates the gutter must slope to the outlet hole in the lowest point of the gutter.
  • The slope must be uniform and designed so that once the gutter is lined with metal and all seams are soldered, water readily flows to the outlet hole and puddling is minimal.
  • Use 40-pound tin-coated steel or solid copper roll.
  • All seams where one piece of metal connects to another must be constructed with an interlocking-S seam. The width of the interlocking-S seam shall be a minimum of 3/8 inch.
  • All seams shall be lightly tapped flat, but not so flat as to impede solder from flowing into the hidden areas of the seam.
  • All interlocking-S seams shall be soldered and the molten solder once hardened, must be thick enough that it completely covers and hides the interlocking-S seam.
  • If tin-coated steel is used, the tin must be carefully cleaned with rags soaked in mineral spirits or paint thinner. All mill oil and all soldering flux must be removed from the metal before a special metal primer is applied to the tin-coated steel. A finish coat of paint must be applied within 24 hours of the primer application.

Roof Truss Substitution

DEAR TIM: We just put a contract in on a new production home in central Oregon. The builder is quite reputable and builds homes from $200,000 custom homes up to $2,000,000. We loved the model home and bought one just like it. We realized some of the finish options would be different, but yesterday when we toured the jobsite, we found a fairly significant structural change in the home that caught us by surprise.

The model home featured a vaulted great room with 2-foot transom windows above a sliding glass door to the back patio. However, we were told, after our purchase, that the vaulted part of our home utilized more cost[effective manufactured trusses rather than stick frame construction used in the model, which had resulted in a slight reduction in vault height.

We can probably live with the slightly reduced vault height. But when we looked at the home, we were surprised to see that the ceiling pitch did not match at the walls because the bottom ends of the trusses are flat for about 18 to 24 inches beyond the top of the header plate at the top of the walls. In other words, the ceiling extends out at 90 degrees flat from the wall junction about 18 to 24 inches before angling up to form the vault.

What do you think of this? Is this common? We could find no reference to trusses of this design on the web, and to us, it looks like a mistake in the framing. Also distressing is that the nice transom window will now be only about 1-foot high and the ceiling about a foot lower. We are distressed, but wondered how much of a deal to make of this. Is this an example of bait and switch with the design standards, or just the way it goes? Becky Kearns, Corvallis, OR

DEAR BECKY: I am at a significant disadvantage since I do not have access to your signed contract, any referenced plans and any written specifications. My experience tells me that the answer is there in black and white.

The truss that you describe is a common commodity. We call them scissor trusses with a partially extended bottom chord. It is debatable whether the trusses save money for the builder as there are some instances where a common-framed roof can cost less than a truss roof.

Look at all of the documents and determine if there is wording that says if your home was to match the model home. Look at the plans carefully to see if the structural cross section shows the roof framing as it is in the model or the way you see it at your home.

The written specifications may also have valuable clues. Look for sneaky language that allows the builder to make discretionary substitutions. I feel this kind of language in a contract can lead to abuse on the part of the builder and agony for the homeowner.

Your only leverage lies in the written documents. There is a strong possibility you are a victim of a bait and switch, especially if the salesperson told you that your new home would match the model home. But I hate to say that it is your responsibility to ensure that what is promised is put in writing.

I urge you to immediately meet with some of the top level management of the builder to discuss your extreme disappointment. If this is a smart builder, he will try to work with you so that you are happy. Make it very obvious that you are unhappy, but under no circumstances should you threaten him. That is very counter-productive. There is common ground and you need to find it rapidly before it costs too much to frame the roof the way you want it done.

Column EM0016

How To Install a Toilet

DEAR TIM: I want to add a second toilet in our house. The existing toilet is on the opposite end of the house. We are on a septic system. How do I do this? I wanted to have someone come in and run the piping from the floor where I want it to connect to the main sewage line leaving the house, but who do I contact for this? I want to do the rest by myself and most contractors don't want a little project like that. Could I do it myself or is it complicated? Angela White, Vancouver, WA

DEAR ANGELA: Adding this new toilet so that it meets the code and works flawlessly for years requires a moderate amount of skill. Many cities and villages allow you to do the work so long as it passes a rough-in and a final inspection. My advice to you is to try to do the job. You can always call for the cavalry if you get overrun.

This new toilet will require a 3-inch waste drainage pipe. You may decide that plastic PVC is easier to work with, but if I was working with you and it was important that the pipe was quiet, we would use cast iron pipe.

The two biggest challenges with the drainage pipe are connecting it to the existing drain line and then properly venting the new toilet. If you can successfully cut into your existing drain line and install the required 4x3 wye fitting, you have what it takes to complete the job.

In case you do get into trouble, a plumber is the primary contractor you will need to bail you out. This assumes that you can do all of the drywall repairs that will be required after the vent pipe is installed.

Column EM0015