Winterize Your Home

Hello to all National Public Radio listeners. This page is dedicated to you and is a summary of much of what was discussed today on the All Things Considered show. I had the distinct pleasure to conduct the interview in the WMUB studios on Friday, November 25, 2005. John Hingsbergen the WMUB program director produced the Oxford, OH, half of the interview between 12:30 and 1:00 p.m. I was connected to the Washington DC NPR studios via a high-quality ISDN phone line that delivers broadcast sound quality. The interview was conducted by the All Things Considered co-host Ms. Michele Norris and she did a splendid job.

Real Ways to Save on Your Energy Bills

If you want to save lots of money on heating bills during the winter months, you simply need to use less fuel. It is that simple. But the real answer can be far more complex, especially if you decide to spend money in an effort to save money.

But let's talk about saving money now without spending money. You can do that immediately by going over to your thermostat and turning it down. Turn it down as far as you can tolerate. If you normally have it set at 72 F and you turn it down to 65 F or even 63 F, you will save significant money.

Wear long underwear, sweaters and/or fleeces, and thick socks to offset the cool temperatures inside your home. If necessary, wear a hat or hooded sweatshirt indoors. You may look odd, but you will be warm and saving lots of money.

Here I am moments after the interview ended with Ms. Michele Norris. PHOTO BY: John Hingsbergen

Sleep with flannel pajamas and an extra blanket or two. Imagine going back in time 200 years and sleeping in log cabins that had no real insulation or central heating. If our forefathers and mothers could survive below-freezing temperatures, surely you can survive 63 F in your home day and night

Consider operating a humidifier if you have one connected to your furnace. Humidity in the air will make cool air feel warmer. But be careful. Injecting too much humidity in the air can cause hidden problems such as condensation in wall cavities and attics. If you see a slight fog on windows or drops of water forming, then the humidity is too high for the current outdoor temperature. Read my past columns about Condensation and Indoor Humidity to understand the dynamics of water vapor and fluctuating temperatures.

Use towels and other rags to stop drafts under leaky doors. Do whatever you can with what you have to block the movement of cold air into your home.

Spending Money to Save Money

I predict all sorts of scams in the very near future where people will spend thousands of dollars on all sorts of things that claim to save them huge money on heating bills. NEVER forget this: You do not save one penny until such time as you have at least recaptured all of the money you spent, plus any interest that money could have made while you were trying to recapture it.

What does this mean in plain English? Let's say you decide to install new top-quality replacement windows for your home. An average home might have 12 windows and the current average price for a job like this might be $500 - 600 per window. Let's round off the job cost to $7,000.00.

For a real-world example, we will use my employee Ellen. She lives in an average-sized home and it has a new high-efficiency boiler. She recently had Cinergy - our local utility company - give her a revised quote for even billing for the entire year. Ellen needs to spend $314 per month for each of the months in 2006 for both natural gas and electricity to operate all lighting, furnace, air conditioning, stoves, water heaters etc. Her total estimated cost for all of 2006 is $3,768.00.

The breakdown of natural gas cost to electricity cost for Ellen's house based upon her past bills is roughly 55% natural gas and 45% electricity. So this means that Ellen might spend $2,072 in 2006 for natural gas. But wait. This is for all natural gas for heating, cooking, hot water and the clothes dryer. Without getting technical, let's assume heating consumes 65% of the total natural gas usage for the entire year. This means Ellen and her family might spend $1,347 to heat their house in 2006.

If the new replacement windows save 30% on total heating costs, this means in 2006 they will save $404.00. Without adding in interest, it will take Ellen and her family 17.3 years to just break even on the cost of the replacement windows. See what I mean? You don't save money until you break even. It will be possibly 20 years from now that Ellen will save money if all costs stay the same over the next 20 years. If the cost of natural gas does continue to rise, Ellen will break even sooner than 17 years from now.

Real Money Savers

One inexpensive device that will save you real money quickly is a programmable thermostat. Read my past column all about these intelligent devices that work for you while you are gone from home and asleep.

Caulking air leaks is vitally important. If you have painted woodwork and walls, caulk all cracks around each edge of the woodwork trim that surrounds windows and door. Look for very tiny cracks where you see the woodwork touch the walls and where the other edge rests against the jambs of the windows and doors.

Weatherstripping around windows and doors is vitally important. There are new removable caulks you can use to caulk shut windows for the winter. In the spring, you can actually peel these caulks off and do no harm to the window. Doors need traditional weatherstripping kits as you need to open and close doors throughout the season.

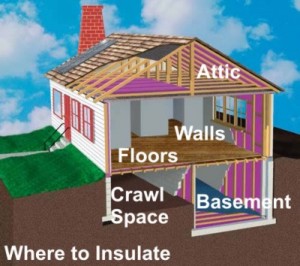
Radiant barriers in attics are superb and there is a brand new one that promises to work very well. This new radiant barrier can be found at the Savenrg website. The layers of the radiant film are separated by a fine nylon mesh that enhances the performance of the barrier. You simply roll this product out over your existing attic insulation and it instantly blocks the movement of heat from your home to the cold attic. These products work just like aluminum foil over hot food dishes. The best part is that the radiant barrier will also save you money in the summer as it reflects hot attic heat back outdoors.

High-Efficiency Furnaces

When it is time to install a new furnace or boiler, absolutely buy one that offers the highest efficiency. These are fantastic products and they are good for the environment. But do not rush out to replace a perfectly good furnace or boiler right now that still has 40 percent or more of its useful life remaining. Always do the math, as we did above in the replacement window example, to ensure your payback time is minimal.

Future News and Tips

If you want to receive a constant stream of energy saving tips and other home improvement news, consider signing up for my free newsletter. Just go back up to the top of this page and look in the upper left for the word Newsletter and click on it. I respect everyone's privacy. I never sell anyone's name or email address. Your information is never revealed to anyone.

How Does Insulation Work

DEAR TIM: How does insulation work? I see all different types: fiberglass, cellulose, foam and rock wool. Is one better than the other? Louis K., St. Louis, MO

DEAR LOUIS: Insulation works by slowing the movement of heat from a hot space to one that is cooler. Heat moves in three ways: radiation, conduction and convection.

Radiation is heat transfer through electromagnetic light waves that we can't see. You feel radiant heat from a burning fire or from sunlight streaming into a window that strikes your body. In the winter, warm objects in your home can radiate heat directly through glass to the outdoors unless you have special Low-E glass that blocks this infrared energy.

Conduction heat transfer happens when heat moves through an object. The heat excites the molecules in a heated object and these molecules excite the ones next to them. The closer packed the molecules are in an object, the more rapid the heat transfer. A great example of conduction is a cool spoon that is placed in a hot bowl of soup. Within a few minutes the end of the spoon not immersed in the soup will be warm or hot to the touch.

Adding insulation in the area shown above may be the best way to improve your home's energy efficiency. PHOTO CREDIT: U.S. Dept. of Energy from <em>Energy Savers Tips on Saving Energy & Money at Home</em> booklet.

Adding insulation in the area shown above may be the best way to improve your home's energy efficiency. PHOTO CREDIT: U.S. Dept. of Energy from Energy Savers Tips on Saving Energy & Money at Home booklet.

Convection heat transfer happens when a fluid such as air or water gets heated by a hot object that touches the air or water. Forced air furnaces are great examples of convection heat as the air moving over the heat exchanger gets warm and then passes that warmth to objects it touches once it is in the room.

You feel convective drafts in a room in winter as well. If you stand in front of a large pane of glass that is not insulated glass, you can feel a cold draft. That is actually air that has lost or transferred its heat against the glass and the warm air that has not turned cold falls towards the ground.

Insulation stops these different movements of heat transfer. The insulation absorbs the heat and slows its movement. It is important to realize that insulation does not block the movement of heat, it simply slows it down.

This resistance to heat flow or movement is commonly referred to as R-value. The best insulations are the ones that have the highest R-value per inch of thickness. But always compare prices of R-value per square foot. See what it costs per square foot of wall or ceiling space to get an R-value of the same number. Remember, if two insulations have the identical R-value, they perform the same.

Tub Defect in New Home

DEAR TIM: Our son recently had a house built. Everything turned out fine except, after he moved in, he discovered a small C-shaped crack at the drain end of the tub in the extra bathroom. The shape of the crack seems to match the shape of a wrench that possibly was dropped by a workman. The contractor has had the crack repaired by a local company. Should my son insist on replacement of the tub/shower unit? Beverly Matulis, Saginaw, MI

DEAR BEVERLY: This is a common problem and there is never a perfect answer. The issue is always a different shade of gray rather than black or white. When someone buys a new thing, they expect, and rightfully so, perfection or something very close to perfect.

First, imagine if a piece of drywall got damaged and nicked badly. With minimal effort a decent drywall contractor can repair the damage and once painted you will never know the defect happened.

But let's say a new granite countertop is specified for the kitchen and just before moving in a corner is cracked off and then epoxied back on by the builder. The epoxy is stronger than the granite and the piece will be permanently bonded, but it is reasonable to live with the visible crack?

The tub defect is like the cracked granite but there is a separate issue. In the case of the tub, the crack may open up in the future and water may leak under the tub causing all sorts of problems. Your son did not specify to have a used or blemished tub. He contracted to have a new tub in perfect condition. Why should he get anything else?

These problems are perfect examples of where a builder or general contractor should file an insurance claim. Most good builders have policies that cover mistakes similar to this. Is there a deductible cost to the builder? Of course there is. Is it possible his rates will rise if he makes a claim? I am quite certain his rates would rise.

But mistakes happen and the people who make mistakes should own up to them. One option, if your son finds it acceptable, is to renegotiate the price of the home. Since the tub is not in perfect condition, perhaps a price adjustment can be worked out between the builder and your son. Your son has to realize that if he makes this deal, all future claims about leaks and the tub warranty may be ignored by the builder.

If it were me, I would insist on a new tub. Will it be a pain to install? You know it will be. Perhaps the builder or his subcontractors will learn a lesson and someone will be more careful in the future.

To avoid these problems in the future, it is wise to make frequent stops to the jobsite. As the finish work is progressing, a visit to closely check each day's work will uncover these problems while they are still easy to solve. Once a room is completely finished, it is harder to solve some problems.

Column EM0002

Smoke from Chimney

DEAR TIM: After a few minutes of starting a fire in our living room fireplace, we can smell and eventually see some smoke in our downstairs basement. Do you know why this is happening? We have a cap on our chimney, and although our fireplace and gas exhaust do share the chimney they are separate. Rich Peters, Brighton, MI

DEAR RICH: I know exactly what might be happening. There are multiple possibilities. My first inclination is that your living room fireplace does not have a proper separate combustion air intake. When you burn a fire in the fireplace, you can see smoke issue forth from the chimney. The draft from the heat might be producing an air flow of hundreds of cubic feet of air per minute up the chimney.

An equal amount of air must enter the firebox to satisfy this partial vacuum created by the fire. The air will enter your home at the point of least resistance. Since you have another hole in your house immediately next to the fireplace flue - the opening of the gas exhaust from your furnace and/or water heater - the fireplace may pull the needed air back down this handy conduit.

In older homes with traditional masonry fireplaces, it is not easy to retrofit combustion air. If the fireplace is on an exterior wall and the outside of the chimney structure is brick or stone, an experienced mason can install a combustion air intake vent that feeds air directly from the outside into the firebox.

The smoke can also be drawn back down into the basement by any other fuel burning appliance that is operating. Remember, all of these devices need air to burn the gas, propane, wood or oil. If your water heater fires up and needs air while a fire is burning in the fireplace, then smoke might be drawn back down a third adjacent flue that is not being used. This back drafting is very serious as it can draw carbon monoxide into a home.

Column EM0001

Cultured Stone® – Installation Costs

Cultured Stone® - Installation Costs

Lower Than Natural

Cultured Stone® installation costs are a fraction of that of real stone. The reason why is it installs so much faster.

Depending on the artificial stone pattern you pick, it can install like ceramic tile.

Nationally, the labor price to install artificial stone ranges from $9.00 to $17.00 per square foot (2017 pricing), depending upon your geographic location.

Cost of the Stone

The price of the stone itself can range anywhere from $7 per square foot up to $12 or more per square foot. (2017 prices).

CLICK HERE to get FREE & FAST BIDS from local stone and brick masons who can install artificial stone.

IMPORTANT TIP: The price can be much higher in different areas. The $17.00 per square foot price is by no means the absolute highest it can be. There are no less than 25 factors that come into play with respect to pricing.

Once again, even though this material is light weight, shipping costs can dramatically affect the cost of the material, especially if you live in a very out of the way place.

The interesting thing about the above numbers is that the national average cost is actually $8.50 per square foot. This means that it is very affordable when compared to natural stone installations.

Other Products

Aside from Cultured Stone®, many manufacturers produce artificial brick, cap stones, planting bed edging materials, brick pavers and cobblestones.

Some of the larger companies, such as Cultured Stone Corporation, have the capability to produce custom colors as well. This means that you can individualize your project to suit your own tastes.

If you are planning a stone project and like a particular color of natural stone, simply obtain a few samples and these companies will do whatever is in their power to match them for you.

CLICK HERE to get FREE & FAST BIDS from local stone and brick masons who can install artificial stone.

Column B358

Manufactured Stone

Coronado Stone Co. and Eldorado Stone Corporation are large manufacturers of man-made stone veneer. They have distributors spread out across the USA and quite likely, one is in your area. Check out their web sites to find the locations of local distributors. Good luck on your upcoming manufactured stone project!

The following is a list of manufacturers of man-made stone veneer products

  • Bradstone
  • Castia Stone
  • Centurion Stone
  • Classic Stone Products
  • Coronado Stone Products
  • Eldorado Stone Corporation
  • L-B Stone
  • Luck Stone
  • Nailite International
  • Nichiha Fiber Cement
  • Owens Corning
  • Stonetile
  • TriLite Stone Company

I have personally seen Owens Corning samples and was dazzled. The realism of their products is unbelievable. My guess is that many other manufacturers may also produce high quality artificial stone as well. You will simply have to compare for yourself.

Column B358

Cultured Stone® Installation Guidelines

Cultured Stone® Installation Guidelines

The Basics

The installation of Cultured Stone® products is really quite simple. You generally only need basic tools such as a hammer, a tin snips, mason's trowel, level, metal jointing tool or wood stick, groutbag, nippers, hatchet, and a whisk broom. A wheelbarrow and a hoe is preferred as well to mix and transport mortar.

Each manufacturer has specific guidelines for their product, but for the most part, the installation guidelines are very similar to the following.

These products are installed in a fresh bed of mortar which is spread onto a wall surface. In all instances, except for fresh or absolutely clean, unsealed masonry walls, expanded diamond mesh lath must be nailed securely to the wall. Prior to installing the mesh, the wall must have an approved moisture barrier such as asphalt saturated felt paper or waterproof Kraft building paper.

When the stone is to be applied on an exterior wall surface, the mesh and all nails must be galvanized. This is very important, as the use of non-galvanized metals can cause two major problems: For one, the stone might fall off the wall if either the mesh or the nails rust, and prior to this failure you will surely see rust stains through the mortar.

If you have a new, or sandblasted, masonry wall that is structurally sound, you can eliminate the mesh. Painted or sealed masonry walls must have mesh applied.

After the mesh is applied, you simply apply a 1/2 to 3/4 inch thick coat of fresh mortar onto the mesh. Only apply mortar to the mesh where you can apply stone within a few minutes. You then butter the back of the stones and press them into place.

For the best results, the stones must be trimmed so that the mortar joints between the pieces do not exceed 3/4 inch. If the wall happens to be a UL listed firewall, the joints can not exceed 1/2inch.

Spectacular results can be achieved by using colored mortar. The setting mortar should be colored as well as the mortar which is used to fill in between the pieces of stone after they are set. This joint mortar is applied using a grout bag. A grout bag is just like the bags a baker uses to apply decorative icing to cakes, only it's bigger.

After the mortar between the joints has hardened sufficiently, you can either strike the joints with a metal tool or use a stick. It simply depends upon the look you want to achieve. The final touch is to brush the joints lightly with a whisk broom. Never brush the joints until the mortar has completely set. If you brush too soon, you will smear mortar on the rocks.

The best way to see what your job will look like is to have your mason build a test panel for you. Build a quick 4 x 6 foot wall and have it covered with stone with the joints completed. This would cost just slightly over $200 in most markets. The benefit is that you can see exactly what the stone will look like on a large surface. It s a good insurance policy!

Column B358

Removing a Low Ceiling

Dear Tim: We want to remove the low ceiling in the living room in a small cottage to give it more space and hang fans. We thought we could just paint the rafters and panel the roof. The problem is the boards between each rafter. Can these be removed or will this cause the rafters to warp or cause structural damage? Carl Gardner, Illinois

Dear Carl: The boards you refer to are probably the collar ties. They form the base of the triangle that forms the typical gable roof. These boards are a critical structural element, but they can be placed in different locations on the rafters and perform the same task as they do now. The only way to get a decision is from a residential structural engineer who knows how to analyze the bearing loads on the roof system.

Be sure that you install the new collar tie first before removing the existing one. Pay particular attention to any nailing schedule the engineer specifies. Install the nails and/or bolts exactly as indicated. If you are required to use bolts, drill the exact same size hole as the diameter of the bolt. You will need to hammer the bolt through the hole, but you want a snug fit so there is no movement between the rafter and the horizontal collar tie.

Column QA

Cultured Stone® Design Ideas

Cultured Stone® Design Ideas and Suggestions

The possibilities of using Cultured Stone® are virtually unlimited. For example, let's say you always wanted a rustic stone fireplace wall in your family room. Well, just do it with stone! You simply nail the wire mesh up over your drywall or paneling and get to work. How about a stone wet bar in your basement? How about turning your entire office or study into a medieval interior room of a castle? How about the side walls of a circular staircase? Have you seen those wood-sided chimneys in condominium complexes? Well guess what, that siding can be taken off and stone applied in a jiffy!

How about a garden wall? Simply construct a concrete block wall (remember, it doesn't have to be absolutely perfect) and face it with stone. Most companies make special cap pieces so the top of the wall is covered as well. This way the wall appears to be solid stone. How about a stone covering for the walls surrounding your garbage cans or the complex dumpster?

Have you ever thought of installing a cut stone wainscoting in a living or dining room? They can be very impressive. How about stone pillars between sections of a wood privacy fence?

Do you like cobblestone walkways or driveways? If so, install one with artificial stone! How about a brick paver entrance hall? What do you think of cobblestones applied in between strips of oak flooring? Yes, I thought you might like it as well. Think of it, the possibilities are endless!

Column B358

Door Closes on Its Own

DEAR TIM: I have several interior doors in my house that are driving me nuts. The doors will not stay open. When you open one of the doors completely and walk away, the door slowly closes. Another door opens all the way on its own when I want it to stay partially closed. I do not want to have to use a traditional door stop. This problem is not caused by wind as it happens even when all windows are closed. Is there a way to stop the doors from moving on their own? Jenni W., Fresno, CA

DEAR JENNI: Doors that move on their own are a fairly common problem. Heavy solid-core doors are usually the most likely to swing open or closed as the weight of the door can have lots of potential energy if the door is slightly out of level.

To stop the doors from moving, the trick is to create more resistance in the hinges. I have stopped doors from swinging shut on their own by bending the hinge pin. In rare cases you will have to bend more than one hinge pin. Bending a hinge pin is accomplished with a hammer and a flat piece of concrete.

Locate some shims or scrap pieces of wood you can use to gently slide under the door at its lower corner under the door handle. This important step prevents stress on the door and its hinges as you begin to remove one of the hinge pins. Use a hammer and a flat-blade screwdriver to carefully drive the top hinge pin up and out of the top hinge.

Take the hinge pin and hammer outdoors, to a garage or a basement and place it on a concrete floor. Lay the hinge pin on its side on the floor and strike the middle of the pin with the hammer. This will put a nice bend in the hinge.

Tap the hinge pin back into the hinge and operate the door. The bent hinge pin should produce enough resistance that the door will not move unless you or someone else operates it. If it does still move ever so slightly, you may have to bend one or more additional hinge pins.

In my January 8, 2013 Newsletter, I provided another Door Adjustment Tip. Click on the link to read that newsletter.