AsktheBuilder.com Auto-Column Feed

"You got mail - Uhhh - a new AsktheBuilder Column or Video!


If you would be kind enough to submit your name and email address below, I will send a simple email announcement to you each time I publish a new column or video clip at AsktheBuilder.com. This allows you to stay up to date with what I am writing and taping.

But be forewarned of how busy we are here at AsktheBuilder.com. I try to write multiple columns and tape up to 15 videos per week. This means I am going to send you lots of sweet links to columns and videos that WILL save you time and moola!. That is a very good thing, wouldn't you say?

Because I know you are busy, I will just send the column or video headline and a quick summary. If the topic interests you, there will be a handy link you click to take you to the full column or video at AsktheBuilder.com.

This service is FREE and the best part is your email address is NEVER shared with anyone for ANY reason.

Subscribe Now - It's Free for Life!

 
Name:
E-mail Address:

Energy Savings Payback

DEAR TIM: The forecast of stratospheric heating bills for this winter has me numb. I wonder if it makes good sense to install new replacement windows and doors to save energy on my natural gas heating bills. Some companies have tempting ads that say I will save lots of money. Is it true? How do you make a sound decision on when you upgrade windows and doors? Are there easier ways to save money on heating bills? Linda, B., New Haven, CT

DEAR LINDA: You and thousands of other people are facing this decision if the recent statistics from the American Gas Association are accurate. They say natural gas prices will rise 41 percent, propane will jump 21 percent and heating oil will go up 27 percent for the 2005-2006 heating season.

Get out a calculator and study your past utility bills. Once you see what you are really paying for fuel to heat your home, you can begin to calculate payback periods on energy-savings upgrades to your home. PHOTO CREDIT: Tim Carter

Get out a calculator and study your past utility bills. Once you see what you are really paying for fuel to heat your home, you can begin to calculate payback periods on energy-savings upgrades to your home. PHOTO CREDIT: Tim Carter

You should save money on your heating bills with new windows and doors, but the question is how much will you save and when will you at least break even? Remember, you never save one penny until such time as you have recaptured the money you spent to derive the energy savings.

To make sound financial decisions when spending money on energy-savings upgrades, you need to know what you have spent for fuel in the past. If you keep your utility bills, you can do this very quickly. If you throw them away, my guess is your local utility company can provide you with past records.

Look at one year's worth of utility bills. If you get your natural gas from the same company that supplies your electricity, the two components are usually split on the bill. Add up your total natural gas cost for the entire year. Since you don't have a separate gas meter that is connected to your furnace, we are going to have to extrapolate what you are probably spending on natural gas to heat your home.

It is my guess your furnace does not operate for 6 months out of the year. If you are like many people, your furnace is probably off from the middle of April until the middle of October. Look at your May, June, July, August and September bills. Add up the natural gas cost for these months and divide it by five. This is the average monthly cost for natural gas to operate everything else in your house such as a stove, clothes dryer, water heater, outdoor gas grill, etc.

Multiply this monthly natural gas cost by 12 and then subtract that sum from the total annual gas bill. The remainder is a fairly accurate cost of what you spent last year to heat your home. I ran this calculation with a neighbor's bills and discovered she spent about $1,435.00 last year to heat her home. That number is significantly above the national average last year of $742.00 to heat with natural gas. The US Energy Information Administration projects the national average natural-gas heating cost this winter to be $1,048.

Installing new windows and doors is going to cut down on air infiltration and direct radiant heat loss. But even with the best windows on the market, I doubt you could really save more than 30% of your total heating cost. Remember, you will still have heat loss through your walls and attic and all other places that are leaking air.

Using my neighbor's past bills, she would save $430.00 in the upcoming year if gas costs remain level and we have an identical winter as last year. But if your heating cost is closer to the projected national average, you would only save about $314.00.

Let's assume my neighbor is considering new windows and doors as are you and that the estimate to install them is $9,500.00. Without factoring in inflation, the rise in energy costs or the amount of interest she could get if she left the $9,500 in the bank, it would take over 22 years just to break even. Once she gets past the break even point, she would finally start to reap the real financial energy savings.

You can save money on your heating bills this winter without spending money. Turn your thermostat down right now to 64 F. Then go up to your bedroom and put on some long underwear, an extra pair of socks, a long sleeve tee shirt, a sweater and/or a hooded sweatshirt. At night, sleep in flannel pajamas and throw one or two extra blankets on the bed. This may seem extreme, but think back to what our forefathers and mothers did when they lived and slept in drafty log cabins in the wilderness. If they survived bitter, cold winters, surely you can.

It is important to differentiate between energy savings and saving real money. Most energy-savings home improvements will produce instant energy savings once the improvement is completed and installed. You will spend less to heat your home. But you personally will not see the real financial savings for some length of time since you had to spend extra money to be able to produce the energy savings.

Programmable thermostats will save money if you program them accurately and really let the thermostat set back the house temperature when you are away and sleeping. You can buy a great one for just about $100.00.

Column 598

Door Fit is Poor

DEAR TIM: I have just had a new steel door installed which goes from my garage into my house. Everything looks fine, except the door does not fit properly on the upper left corner opposite the hinges. It appears that it should go in about a quarter of an inch. You can push it with your hand, in about a quarter of an inch. What is wrong and how can it be fixed? Bob Gile

DEAR BOB: The carpenter that hung the door has twisted the frame to fit both the rough framed and the finished drywall opening. In the perfect world, all wall surfaces and stud walls are in the same plane. This means if you stretched a string from any point on the wall to another point, there would be no high or lows spots whatsoever. But your wall is slightly twisted in our imperfect world.

If you want perfectly flat walls, you need to plan ahead when building. You can achieve this easily with steel studs that are almost always perfectly straight or use engineered lumber studs that look like super-thick pieces of plywood. Standard solid-wood studs can have crowns in them that cause all sorts of problems. A crown is a hump along the thin edge of a stud or any piece of dimensional lumber. A good analogy of the crown in lumber is the shape of almost every suspension bridge. The center of the bridge is always higher than the ends. The deck of the bridge is not flat but a gentle arch.

The carpenter who installed your door wanted the woodwork trim around the door to fit correctly so he forced the door jambs and frame to be flush with the adjacent wall surfaces. Doing this caused the door frame to twist while the flat door itself stays in the same plane.

You can fix it by enlarging both the mortise of the top and middle door hinge as well as tapping the frame out to meet the door ever so slightly. The hinge mortise needs to be enlarged so each hinge moves towards the center of the door jamb about 1/16th of an inch.

I would like to see the frame come out away from the wall only 1/8th inch where the door projects out from the frame. By making both of these adjustments, the door will once again be flush with the jamb at that upper corner. But realize that moving the hinge position in will cause the door edge to not be flush with the jamb once the door is closed. You have to decide which adjustment provides the desired result with the least amount of visual discomfort.

Column EM0003

Cement Mud Floor DVD

Cement Mud Floor DVD
Order Now for Just $19.97 + $5.25 S&H
Total Cost: $25.22

Click Here to Order the DVD!
 

1. Are you positive you can create the perfect slope for your ceramic tile shower?
Yes
No

2. Do you want your spouse to talk to you after the shower tile floor is installed?
Heck Yes!
She Stopped Talking to Me Years Ago

3. Do you really know the right way to mix the mud and smooth it?
Yes
No

4. Do you understand how to prevent clogging the drain assembly weep holes?
Yes
No

If you answered No in two or more of the questions above, you need my Cement Mud Floor DVD.

 
Listen to what Gary Kinnett has to say about the way I explain things:

"Your instructions are so thorough it is amazing. You account for every question & issue possible. One can't fail following your instructions. Thanks so much!"

Here is Bob Fogarty, a satisfied customer:

"I just wanted to let you know my wife and I installed the shower pan this weekend and everything went fine. As you stated, by taking our time and not trying to rush through this, everything fell into place. We have not yet started tiling however that should be later on this week. All four sides are perfectly level and it appears we have achieved the 1/16" pitch we set our goal for. The information from Askthebuilder.com was of great benefit as both the plumber and tile company recommended to us claimed they did not do shower pans. We had no choice but to rely upon instructions from an outside party. I will continue to utilize you on future projects."

Kim Amster has this to say:

"We own both of your DVDs on Shower Liners. Thank you so much for making such a wonderful and clear DVD. It's out first house and we are very excited to be putting your concepts to work."

Minutes after watching this DVD you will be getting out your tools and mixing the sand and mortar for your mud floor. Your in-laws, spouse, friends, neighbors and co-workers will be amazed at your newfangled master ceramic tile skills.

This DVD was shot with High Definition television equipment by a professional film and video company. It is fast-paced and will show you step-by-step how I install a CPE shower pan liner in a standard shower stall with a seat. If you are considering another DVD product, be sure it is shot with high-definition camera equipment. It makes all the difference in the world.

Let me Teach You How I Install a Cement Mud Floor
$19.97 plus $5.25 S+H

Click Here to Order the DVD!

My action-packed DVD is totally interactive and covers the following topics:

  • Required Tools and Safety
  • Details on How to Get the Right Mud Mix
  • What to Do if your Mix is Too Wet!
  • How to Set the Prefect Drain Assembly Height
  • Techniques to get the Right Slope to the Drain
  • How To Install a Marble Shower Seat
  • When to Install the Cement Board for the Walls
  • How to Install the Cement Board to Keep it Dry
  • Preventing Hidden Condensation and Mold Growth in Walls


Shipping and Handling Info: The DVD is shipped Priority Mail with the US Postal Service. We have been getting superb 3-day service to the West Coast and 2-day service to the East Coast. Orders received by 4:00 p.m. Eastern Time ship the same business day!

Return Policy: This product has a money-back guarantee. Please read our Return Policy here.

Click Here to Order the DVD!

Shower Pan Liner DVD


Shower Pan Liner DVD
Order Now for Just $19.97 + $5.25 S&H
Total Cost: $25.22

Click Here to Order the DVD!
 

1. Are you positive you can create a leak-proof ceramic tile shower?
Yes
No

2. Do you want your spouse to talk to you after the liner is installed?
Heck Yes!
She Stopped Talking to Me Years Ago!

3. Do you really know the best liner and drain fitting to use?
Yes
No

4. Do you know how to avoid bulges at the inside corners?
Yes
No

If you answered No in two or more of the questions above, you need my Shower Pan Liner DVD.

 
Listen to what Gary Kinnett has to say about the way I explain things:

"Your instructions are so thorough it is amazing. You account for every question & issue possible. One can't fail following your instructions. Thanks so much!"

Kim Amster has this to say:

"We own both of your DVD's on Shower Liners. Thank you so much for making such a wonderful and clear DVD. It's out first house and we are very excited to be putting your concepts to work."

Minutes after watching this DVD you will be getting out your tools and unrolling your CPE liner membrane getting ready for your first cut. Your in-laws, spouse, friends, neighbors and co-workers will be amazed at your newfangled master ceramic tile skills.

This DVD was shot with High Definition television equipment by a professional film and video company. It is fast-paced and will show you step-by-step how I install a CPE shower pan liner in a standard shower stall with a seat. If you are considering another DVD product, be sure it is shot with high-definition camera equipment. It makes all the difference in the world.

Let me Teach You How I Install a Shower Pan Liner
$19.97 plus $5.25 S+H

Click Here to Order the DVD!

My action-packed DVD is totally interactive and covers the following topics:

  • Required Tools and Safety
  • Different Liner Materials and My Favorite Liner Material
  • Framing Tips for the Wood Stud Walls
  • Creating the Sloped Sub-Base Under the Liner
  • Positioning the Liner
  • Forming Inside Corners
  • Forming and Sealing Outside Corners
  • Poper Solvent-Welding Techniques
  • Selecting the CORRECT Drain Fitting
  • CAREFULLY Cutting the CPE Liner to Fit the Drain Fitting


Shipping and Handling Info: The DVD is shipped Priority Mail with the US Postal Service. We have been getting superb 3-day service to the West Coast and 2-day service to the East Coast. Orders received by 4:00 p.m. Eastern Time ship the same business day!

Return Policy: This product has a money-back guarantee. Please read our Return Policy here.

Click Here to Order the DVD!

Wiring For Your House – Make It Cat5 Cable

Author's Note: Fiber optic cable is fast becoming the new standard in wiring. Ask the Builder is researching fiber optic cables and a new column will be written soon. Sign up for email notification so you know when this new fiber optic column is published. Click here to sign up.


Cat5 Cable - Wiring Information and Tips

I don't care whether you have a 100 year old home or a new one that is being built. All homes today need Cat5 cable. What is this? It is a new standard of wiring that can network computers and appliances and take care of telephone needs all in one.

Category 5 wiring is low voltage cable. It has 4 pairs of wires within one cable. The coloring of the wires is standardized. You will find a solid blue, green, orange, and brown wire. Twisted around each of these is a white wire that has a same color tracer on the wire. So you will have a solid blue twisted with a white wire that has blue dashes or streaks on it.

Cat5 cable allows you to network different electronic devices.

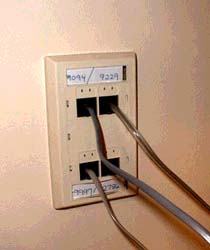
What is really cool about this wiring is that you can network a computer to another one and have two different phone lines all in the same space as you would normally have a regular duplex outlet! Not only that, there is actually space within the box and special outlets for three other connections.

Here is an example of what I am talking about. This is a photo of a special outlet system made by the Wiremold company. In this particular outlet, I have four different phone connections for the four different lines in my office. Notice the blank filler piece in between the phone plugs. I can easily remove the blank and insert a single outlet that would allow me to network my computer to another one. Cat5 wire should be extended to every location in a house where you think you might have a computer or an appliance. In the future, many things may be networked together. Use the right wire and make sure it says Cat 5 and has a UL stamp on it!

Column B348

Remodeling? Smart Upgrades To Make While Changing Your Roof / Attic

Remodeling - Open Structure

If you are doing major roof modification and you are up in the attic, now is the time to add insulation, add wiring, increase ventilation, etc. Since you are up in this space, you might as well get dirty and hot all at once. It is also a good idea to add blank conduits that might make adding future wire a breeze.

Think central vacuum while you are at it. Often the pipes for these devices are installed in an attic space and the power unit is put in the garage. That is how mine is installed.

There are two advantages to this. First, the noise of the motor is outdoors. This is a huge plus. My first vacuum was in the basement and it was loud! The second reason is that the dirt from the vacuum is outdoors. You can transfer the vacuum bag or the canister right to a garbage can. Central vacuums are great. I love mine and would never be without one.

Think ahead. Remember, insulation is the last thing to install! Be sure to exhaust all fans to the exterior, not up in the attic.

Column B348

Trusses – Gain Space with a Scissors Truss

Trusses - Avoid Wasted Space With a Special Truss

There is an enormous amount of wasted space in most homes that are currently being built. The primary reason I believe is that homeowners and builders alike are unaware of the many different trusses that can be used to frame the roof. A standard truss creates a large triangle of dark space up in the attic. What's more, this space is useless as a storage facility. Why? The truss web members are in the way and the truss has not really been designed to handle the weight of stored items.

Options

If you have ever been to a truss fabrication plant you will see a chart that seems to have over 100 possible truss designs. Some are highly specialized and would rarely be used on a residential home. But many others are strong candidates for your home. Be sure to look at how much space you can recapture from the common truss triangle when you use a storage truss, or an attic truss, or a scissors truss. Ask your builder to show you all of the options. The cost is well worth it in the long run.

Call a Professional Engineer

Before you think about changing a traditional roof into a vaulted ceiling, you better call in a pro. Get a residential structural engineer who is familiar with wood and roof framing. Many structural engineers commonly work with steel and concrete. You want to open your Yellow Pages and look under Engineers. Then see if there is a sub-heading called Structural. Ask questions to make sure you get a person who is a wood framing expert. The consulting fee will be several hundred dollars but it will buy peace of mind during the next wind or heavy snow storm.

Column B348

Skylights – Flared vs. Straight Shafts

Skylights - Flared Shafts

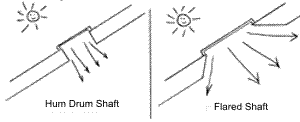
Skylights can make a dim space bright. Flared shafts add even more light by spreading the light beams to other parts of the room.

I goofed up many of the first skylight shafts I built. I simply extended the shaft down square from the roof-slope. You can get lots more light if you just expand the opening. It is easy to do and requires very little extra work. Look at the diagrams to see the humdrum shaft vs. the flared shaft. You can see why flared is supreme.

Notice the extra light gained by simply flaring a skylight shaft.

Notice the extra light gained by simply flaring a skylight shaft.

There are several easy ways to flare a shaft. You do not have to be an expert carpenter to achieve superb results. Commonly just the top and bottom are flared. This is often your only option if the skylight shaft is created within trusses. Remember you can't cut and rebuild a truss unless you do so under the direction of a registered engineer.

The more complex shaft is one that is flared on all four sides. This does take quite a bit of skill as you are basically building a complex hip roof structure beneath the skylight. In fact, if you flare it too much the sides actually get twisted into a slight helix. Be careful about trying to get too fancy! Most people are very satisfied with just the top and bottom flare.

Column B348

Dust Control in Homes

DEAR TIM: My seven-year old home is very dusty. After placing small filters on the bottom of each heating vent diffuser in all of the rooms of my house, I wonder if I made a mistake. Will these hurt the performance of my furnace and air conditioner? I have a standard vacuum cleaner and use it every day, but I still have dust problems. What is causing the dust? What can I do to minimize dust? Patti C., Lancaster PA

DEAR PATTI: Oh how I wish my editors would give me more room for this answer! Dust control is a very complicated subject and there are numerous ways to capture and control the pesky particles that are the source of your frustration.

Let's first talk about dust cleanup. Based upon my own testing and years of trying different vacuum cleaners, I have come to the solid conclusion that central vacuums are the best tool to use to vacuum dust. These machines take the dust and dirt and place it in a cannister or a bag that is often in a garage or basement. Any dust that makes it past the bag or cannister is ejected outdoors.

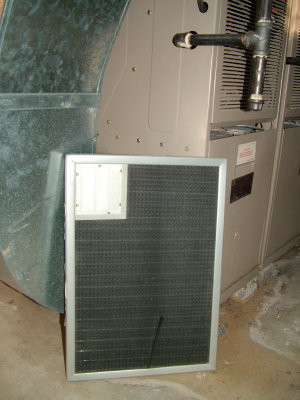
This electrostatic air filter does a superb job of capturing a high percentage of dust in the average home. PHOTO CREDIT: Tim Carter

This electrostatic air filter does a superb job of capturing a high percentage of dust in the average home. PHOTO CREDIT: Tim Carter

Traditional vacuum cleaners like the one you use, exhaust the air inside the room while you are cleaning. Even if you have a great dirt and dust filter bag as part of the vacuum cleaner, some dust may sneak past other parts in the machine and get blasted back into the air. On a sunny day you can often see this dust storm as you vacuum in a room that has sun beams streaming through windows.

Dust on flat and vertical surfaces needs to be wiped off with a damp rag with water or a dust collection liquid. If you use a traditional duster tool, you just broadcast the dust into the air and it will settle back down on the surfaces hours later.

The filters you placed in your heating and cooling vents may hurt the performance of your heating and cooling equipment. The powerful fans that move air through furnaces and air conditioners are designed to do so with minimal resistance to air flow. The filters you installed no doubt are offering some resistance to air flow. Just before you installed them, your system might already have been at the upper allowable threshold for airflow resistance.

The reason adequate air movement within the furnace and air conditioner is so important is simple: In the winter when heating your home, the air must move past the heat exchanger at a given speed to pull off heat; in the summer when cooling your home, the air must be able to readily flow over the air-conditioning coil, where its heat is deposited. If the speed starts to decrease and your system is not designed to sense this change, then efficiency and performance can drop.

I would consult with a seasoned heating and cooling professional about the filters you installed. This craftsman will have special tools and meters that tell him if the static pressure within your system is too high. Static pressure is a measurement of airflow resistance.

If the heating professional tells you to remove the filters from the vents, I recommend that you consider installing a washable electrostatic air filter in the filter rack within your furnace or air conditioner. These wonderful filters attract many dust particles and make them stick to the filter. Every 30 days you take the filter outdoors or into a large sink and rinse it with a high-pressure stream of water. When I do this with my electrostatic filter, the water streaming from the filter is always black and brown.

Many people wonder where dust comes from. The sources can be numerous. If you handle lots of paper in your home, paper fibers naturally become airborne as you read books, newspapers and some magazines. Dust from countless outdoor sources will naturally be sucked into any open windows.

Some inexpensive carpets create dust as fibers from the carpet, carpet backing and even some carpet padding become airborne from simple foot traffic across the carpet. Fibers and dust are released from upholstered furniture, clothes, hobby and craft activities and food preparation.

If you want to try to pinpoint the actual source of dust, take a sample from a surface with a piece of regular cellophane tape. Use a 10x or 20x hand magnifier and look at the actual dust particles. You will be shocked at how different each of the dust particles appears. Dust from newspaper or blank paper is vastly different from flour dust or wood sanding dust. Drywall dust looks completely different from carpet fiber dust. Once you determine what the dust source is, try to stop or minimize the activity that actually creates that dust.

Column 597