DEAR TIM: I am installing new ceramic floor tile in my kitchen and wonder if it can be installed over two layers of sheet vinyl linoleum. Can you purchase ceramic tile that is extremely hard and will resist damage from heavy appliances that may be moved across the floor from time to time? What is the best way to prevent damage to ceramic floor tile? Jennifer S., Albuquerque, NM
DEAR JENNIFER: It is not a good idea to install ceramic floor tile on top of sheet vinyl or linoleum. Had you told me the existing flooring was a dense vinyl tile that was in excellent condition and well adhered to the floor, I might say that the ceramic floor tile could be installed directly on the existing flooring.
Sheet vinyl and linoleum often have some give or resiliency to them. This simply means that when you apply pressure to them, they will compress. Dense vinyl floor tile usually will not compress except if very high pressure is applied to it.
Ceramic floor tile is a hard product that has great strength when you compress it, but it is fairly weak when you bend or stretch it. If you apply ceramic tile on the sheet vinyl or linoleum and then apply pressure to the tile, the sheet vinyl and/or linoleum below the tile may move which causes the tile above to bend and then snap or crack.
Ceramic tile comes in a mind-numbing number of grades and classifications. There are standards for slip resistance, water absorption, breaking strength, impact resistance, freeze/thaw resistance, abrasive hardness, chemical resistance, etc. These tests and standards are extremely valuable to architects and designers who must specify ceramic tile for locations where it might be subject to extremes of weather, wear and abuse.
The bottom line is that you can purchase certain ceramic tiles that are very hard and very resistant to scratches and abuse. These characteristics are achieved by the raw materials used to make the tile and the manner in which the tile is actually manufactured.
The vast majority of ceramic tile is made from clay. Not all clays are the same and some have vastly different mineral content. During the manufacturing process the soft clay tiles are subjected to high temperatures in a kiln. The final hardness of the tile is directly related to the tile's mineral content, the temperature reached in the kiln and the amount of time the tiles are cooked at the high temperature. The longer you cook a tile at a high temperature, the harder it becomes as the heat changes the soft clay into a man-made rock.
Salespeople who work at stores that sell primarily nothing but ceramic tile know which tiles will withstand light traffic and those that will take the harshest abuse. What you will probably discover is that as ceramic tiles get harder and more resistant to abuse, the color palate and styles become more limited. There is a very good chance you may have to compromise on either color and style or hardness when it comes down to making a final decision.
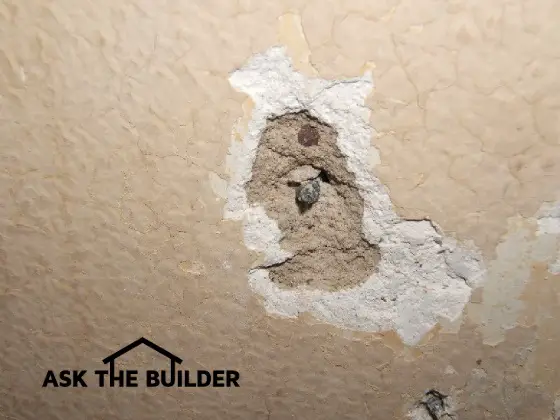
This ceramic floor tile has been damaged by chair leg glides that chipped the glaze off the tile. PHOTO CREDIT: Tim Carter
Damage to ceramic floor tile happens for two primary reasons. Dropping heavy objects onto ceramic tile can chip and crack tiles. If you want proof of this, just come to my home. You can see a ring of small chips on my kitchen floor around my dishwasher. Family members, including myself, have dropped silverware as it is loaded into the dishwasher and the utensil's direct impact with the floor tile often produces a very tiny chip in the glazed surface.
Dirt, sand and grit that is brought indoors on shoes or pet paws is also an enemy to ceramic floor tile. If these small, hard pieces of rock and grit are ground into the glazed surface, they can and will create permanent scratches in ceramic floor tile. It is best to vacuum a ceramic tile floor every couple of days and walk on these floors without shoes. Wet mopping up dirt and grit is also a good way to clean up this damaging debris.
Some ceramic floor tiles are extremely dense and hard. The glaze on them is also very durable. Years ago I installed some of these tiles and they were so hard they could only be cut with a diamond wet saw. Common ceramic tile can be scored with a glass cutter and then cracked along the cut line with relative ease. If you tried to do that with the tile I was working with, it would shatter every time.
Keep this in mind as you shop for tiles. Ask the salesperson how the tiles are cut and if unsure, request a simple demonstration. Rest assured you will get a very high level of expertise and service when you shop at stores that specialize only in ceramic tile. Shopping at these stores is a delight and you will be overwhelmed with the selection and the sales peoples' depth of knowledge about the different ceramic tile products.
Column 604