Smoke from Chimney

DEAR TIM: After a few minutes of starting a fire in our living room fireplace, we can smell and eventually see some smoke in our downstairs basement. Do you know why this is happening? We have a cap on our chimney, and although our fireplace and gas exhaust do share the chimney they are separate. Rich Peters, Brighton, MI

DEAR RICH: I know exactly what might be happening. There are multiple possibilities. My first inclination is that your living room fireplace does not have a proper separate combustion air intake. When you burn a fire in the fireplace, you can see smoke issue forth from the chimney. The draft from the heat might be producing an air flow of hundreds of cubic feet of air per minute up the chimney.

An equal amount of air must enter the firebox to satisfy this partial vacuum created by the fire. The air will enter your home at the point of least resistance. Since you have another hole in your house immediately next to the fireplace flue - the opening of the gas exhaust from your furnace and/or water heater - the fireplace may pull the needed air back down this handy conduit.

In older homes with traditional masonry fireplaces, it is not easy to retrofit combustion air. If the fireplace is on an exterior wall and the outside of the chimney structure is brick or stone, an experienced mason can install a combustion air intake vent that feeds air directly from the outside into the firebox.

The smoke can also be drawn back down into the basement by any other fuel burning appliance that is operating. Remember, all of these devices need air to burn the gas, propane, wood or oil. If your water heater fires up and needs air while a fire is burning in the fireplace, then smoke might be drawn back down a third adjacent flue that is not being used. This back drafting is very serious as it can draw carbon monoxide into a home.

Column EM0001

Cultured Stone® – Installation Costs

Cultured Stone® - Installation Costs

Lower Than Natural

Cultured Stone® installation costs are a fraction of that of real stone. The reason why is it installs so much faster.

Depending on the artificial stone pattern you pick, it can install like ceramic tile.

Nationally, the labor price to install artificial stone ranges from $9.00 to $17.00 per square foot (2017 pricing), depending upon your geographic location.

Cost of the Stone

The price of the stone itself can range anywhere from $7 per square foot up to $12 or more per square foot. (2017 prices).

CLICK HERE to get FREE & FAST BIDS from local stone and brick masons who can install artificial stone.

IMPORTANT TIP: The price can be much higher in different areas. The $17.00 per square foot price is by no means the absolute highest it can be. There are no less than 25 factors that come into play with respect to pricing.

Once again, even though this material is light weight, shipping costs can dramatically affect the cost of the material, especially if you live in a very out of the way place.

The interesting thing about the above numbers is that the national average cost is actually $8.50 per square foot. This means that it is very affordable when compared to natural stone installations.

Other Products

Aside from Cultured Stone®, many manufacturers produce artificial brick, cap stones, planting bed edging materials, brick pavers and cobblestones.

Some of the larger companies, such as Cultured Stone Corporation, have the capability to produce custom colors as well. This means that you can individualize your project to suit your own tastes.

If you are planning a stone project and like a particular color of natural stone, simply obtain a few samples and these companies will do whatever is in their power to match them for you.

CLICK HERE to get FREE & FAST BIDS from local stone and brick masons who can install artificial stone.

Column B358

Manufactured Stone

Coronado Stone Co. and Eldorado Stone Corporation are large manufacturers of man-made stone veneer. They have distributors spread out across the USA and quite likely, one is in your area. Check out their web sites to find the locations of local distributors. Good luck on your upcoming manufactured stone project!

The following is a list of manufacturers of man-made stone veneer products

  • Bradstone
  • Castia Stone
  • Centurion Stone
  • Classic Stone Products
  • Coronado Stone Products
  • Eldorado Stone Corporation
  • L-B Stone
  • Luck Stone
  • Nailite International
  • Nichiha Fiber Cement
  • Owens Corning
  • Stonetile
  • TriLite Stone Company

I have personally seen Owens Corning samples and was dazzled. The realism of their products is unbelievable. My guess is that many other manufacturers may also produce high quality artificial stone as well. You will simply have to compare for yourself.

Column B358

Cultured Stone® Installation Guidelines

Cultured Stone® Installation Guidelines

The Basics

The installation of Cultured Stone® products is really quite simple. You generally only need basic tools such as a hammer, a tin snips, mason's trowel, level, metal jointing tool or wood stick, groutbag, nippers, hatchet, and a whisk broom. A wheelbarrow and a hoe is preferred as well to mix and transport mortar.

Each manufacturer has specific guidelines for their product, but for the most part, the installation guidelines are very similar to the following.

These products are installed in a fresh bed of mortar which is spread onto a wall surface. In all instances, except for fresh or absolutely clean, unsealed masonry walls, expanded diamond mesh lath must be nailed securely to the wall. Prior to installing the mesh, the wall must have an approved moisture barrier such as asphalt saturated felt paper or waterproof Kraft building paper.

When the stone is to be applied on an exterior wall surface, the mesh and all nails must be galvanized. This is very important, as the use of non-galvanized metals can cause two major problems: For one, the stone might fall off the wall if either the mesh or the nails rust, and prior to this failure you will surely see rust stains through the mortar.

If you have a new, or sandblasted, masonry wall that is structurally sound, you can eliminate the mesh. Painted or sealed masonry walls must have mesh applied.

After the mesh is applied, you simply apply a 1/2 to 3/4 inch thick coat of fresh mortar onto the mesh. Only apply mortar to the mesh where you can apply stone within a few minutes. You then butter the back of the stones and press them into place.

For the best results, the stones must be trimmed so that the mortar joints between the pieces do not exceed 3/4 inch. If the wall happens to be a UL listed firewall, the joints can not exceed 1/2inch.

Spectacular results can be achieved by using colored mortar. The setting mortar should be colored as well as the mortar which is used to fill in between the pieces of stone after they are set. This joint mortar is applied using a grout bag. A grout bag is just like the bags a baker uses to apply decorative icing to cakes, only it's bigger.

After the mortar between the joints has hardened sufficiently, you can either strike the joints with a metal tool or use a stick. It simply depends upon the look you want to achieve. The final touch is to brush the joints lightly with a whisk broom. Never brush the joints until the mortar has completely set. If you brush too soon, you will smear mortar on the rocks.

The best way to see what your job will look like is to have your mason build a test panel for you. Build a quick 4 x 6 foot wall and have it covered with stone with the joints completed. This would cost just slightly over $200 in most markets. The benefit is that you can see exactly what the stone will look like on a large surface. It s a good insurance policy!

Column B358

Removing a Low Ceiling

Dear Tim: We want to remove the low ceiling in the living room in a small cottage to give it more space and hang fans. We thought we could just paint the rafters and panel the roof. The problem is the boards between each rafter. Can these be removed or will this cause the rafters to warp or cause structural damage? Carl Gardner, Illinois

Dear Carl: The boards you refer to are probably the collar ties. They form the base of the triangle that forms the typical gable roof. These boards are a critical structural element, but they can be placed in different locations on the rafters and perform the same task as they do now. The only way to get a decision is from a residential structural engineer who knows how to analyze the bearing loads on the roof system.

Be sure that you install the new collar tie first before removing the existing one. Pay particular attention to any nailing schedule the engineer specifies. Install the nails and/or bolts exactly as indicated. If you are required to use bolts, drill the exact same size hole as the diameter of the bolt. You will need to hammer the bolt through the hole, but you want a snug fit so there is no movement between the rafter and the horizontal collar tie.

Column QA

Cultured Stone® Design Ideas

Cultured Stone® Design Ideas and Suggestions

The possibilities of using Cultured Stone® are virtually unlimited. For example, let's say you always wanted a rustic stone fireplace wall in your family room. Well, just do it with stone! You simply nail the wire mesh up over your drywall or paneling and get to work. How about a stone wet bar in your basement? How about turning your entire office or study into a medieval interior room of a castle? How about the side walls of a circular staircase? Have you seen those wood-sided chimneys in condominium complexes? Well guess what, that siding can be taken off and stone applied in a jiffy!

How about a garden wall? Simply construct a concrete block wall (remember, it doesn't have to be absolutely perfect) and face it with stone. Most companies make special cap pieces so the top of the wall is covered as well. This way the wall appears to be solid stone. How about a stone covering for the walls surrounding your garbage cans or the complex dumpster?

Have you ever thought of installing a cut stone wainscoting in a living or dining room? They can be very impressive. How about stone pillars between sections of a wood privacy fence?

Do you like cobblestone walkways or driveways? If so, install one with artificial stone! How about a brick paver entrance hall? What do you think of cobblestones applied in between strips of oak flooring? Yes, I thought you might like it as well. Think of it, the possibilities are endless!

Column B358

Door Closes on Its Own

DEAR TIM: I have several interior doors in my house that are driving me nuts. The doors will not stay open. When you open one of the doors completely and walk away, the door slowly closes. Another door opens all the way on its own when I want it to stay partially closed. I do not want to have to use a traditional door stop. This problem is not caused by wind as it happens even when all windows are closed. Is there a way to stop the doors from moving on their own? Jenni W., Fresno, CA

DEAR JENNI: Doors that move on their own are a fairly common problem. Heavy solid-core doors are usually the most likely to swing open or closed as the weight of the door can have lots of potential energy if the door is slightly out of level.

To stop the doors from moving, the trick is to create more resistance in the hinges. I have stopped doors from swinging shut on their own by bending the hinge pin. In rare cases you will have to bend more than one hinge pin. Bending a hinge pin is accomplished with a hammer and a flat piece of concrete.

Locate some shims or scrap pieces of wood you can use to gently slide under the door at its lower corner under the door handle. This important step prevents stress on the door and its hinges as you begin to remove one of the hinge pins. Use a hammer and a flat-blade screwdriver to carefully drive the top hinge pin up and out of the top hinge.

Take the hinge pin and hammer outdoors, to a garage or a basement and place it on a concrete floor. Lay the hinge pin on its side on the floor and strike the middle of the pin with the hammer. This will put a nice bend in the hinge.

Tap the hinge pin back into the hinge and operate the door. The bent hinge pin should produce enough resistance that the door will not move unless you or someone else operates it. If it does still move ever so slightly, you may have to bend one or more additional hinge pins.

In my January 8, 2013 Newsletter, I provided another Door Adjustment Tip. Click on the link to read that newsletter.

Repair Cracked Concrete Slab

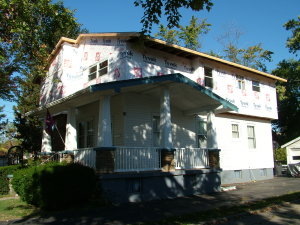
DEAR TIM: The ground level concrete slab in my 30-year old split level home has a few large cracks in it. These cracks are up to 1/4-inch wide and they move up and down with the change of the seasons. Over the past five years, the cracks seem to be getting bigger ever so slowly, but there is no evidence of structural problems on any foundation wall or at any other part of the house. I would like to install wood or cork flooring over the concrete, but I realize the crack must be repaired. What is the easiest thing to do and will give lasting results? Is there a way to stop the seasonal movement of the slab? Lisa P., Boulder. CO

DEAR LISA: Although you don't see any structural problems, they may be present or in the early stages of development. Hiring a residential structural engineer, to do a field visit to your home, may be a very smart thing to do before you move forward with any repairs. The seasonal movement is a strong clue as to what might be happening. Your house may be built on an expansive clay soil.

epoxy-injection products

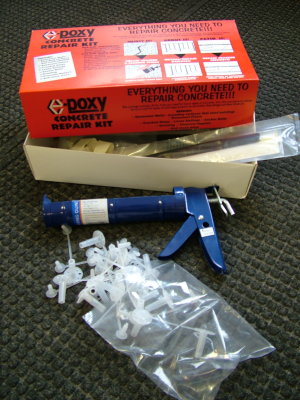
These epoxy-injection products weld broken pieces of concrete together. If you follow directions, the repair can often be permanent. PHOTO CREDIT: Tim Carter

As I was working to get my college degree in geology, I quickly discovered that certain rock formations create clay soils that can expand and contract dramatically in response to moisture content. These expansive clays are also found in some parts of the USA that experienced continental glaciation. The pesky soils can wreak havoc with poorly constructed homes and cause minor irritation with well-built structures. But if you trick the soils into thinking that it rains every week, they calm down and stop moving.

In addition to calling the structural engineer, you might also call the local colleges and universities in your area that have a geology department. Once you get this far, ask for a soil scientist. If you run into a dead end, you can open the Yellow Pages and look for geo-technical engineers. I am confident you will find one. Ask the geology professor, and/or the geo-technical engineer, if your house is located in an area know for expansive clay soils.

If it is, you need to think about stabilizing the soil before you proceed with any repairs. One method, that works well in my area, is to drill two-inch diameter holes 18 to 24 inches deep into the soil around your home. Space the holes about three feet away from the edge of the foundation if possible and drill one hole every six linear feet. Fill the holes to the top with small rounded gravel that is 1/4-inch in diameter. Lay a soaker hose over these holes and allow water to run for 24 hours so water soaks deeply into the ground. Run the water once a week during your dry seasons.

Once the soil is stabilized and you see that the slab is no longer moving, you can proceed with permanent repairs. Since the cracks are 1/4-inch wide, the job should be fairly easy. You can purchase high-strength epoxies that are designed to be injected into cracked concrete slabs from special concrete supply businesses. If you follow the directions and do the job right, the repairs can be permanent.

The finished epoxy repair is very similar to a welded seam between two steel plates. Often the weld is stronger than the actual steel. The same is true for the epoxies as they can have fully cured-strengths in excess of the actual concrete.

After the epoxy has fully cured, you may have to install a thin concrete overlay over part of the slab to mask any unevenness between the cracked portions of the concrete. This overlay mixture is made from one part Portland cement and 2.5 parts of fine sand. Be sure the slab is dust free and clean. I would recommend you lightly wet the slab immediately before applying the mixture of cement and sand.


Want perfect concrete work? Find a pro by using my Concrete Work (Sidewalks, Driveways, Patios & Steps) Checklist. I offer a 100% Money Back Guarantee.


Use a six-foot long straightedge to create wide feathered areas of overlay on either side of the crack. You can use a regular steel trowel to finish this stucco-like material as it begins to set up. It is important the floor be as smooth and even as possible as imperfections can telegraph through cork flooring.

If you have seen mud puddles dry up in your area and large cracks develop in the still-moist clay, you live on or near expansive clay soils. What most people do not realize is the clay is not only shrinking from side to side, it is also losing volume up and down. This seesaw movement is not appreciated by materials such as concrete that are rigid and crack when stressed.

Smart builders who build houses with shallow foundations or houses on slabs can install piping under and around the foundation that allows homeowners a method of getting water into the soil quickly and efficiently. The trouble is, most builders don't have a geology degree and most building codes do not require this inexpensive piping.

Related Links

October 3, 2021 AsktheBuilder Newsletter

Column 596

How To Install Drywall

DEAR TIM: What is the proper way to drywall? Should I butt the pieces of drywall very close together or leave a space between pieces of drywall? Anne S., Tampa, FL

DEAR ANNE: The proper way to install drywall is to butt pieces together tightly. Do this on all flat surfaces such as walls and ceilings. But in corners, I always cut the drywall so there was a one-eighth to one-quarter-inch gap between the two pieces as they meet in a corner. If you try to cut drywall so it fits tightly in corners, you will get frustrated in a big hurry.

The frustration is caused by the rough cut edge of the drywall. When you score a piece of drywall with a razor knife and then snap it in two, the resulting edge is rough. These bumps often stick past your pencil line or razor cut line making the piece of drywall longer than what you want it.

The rough bumps can be quickly removed with a special, small rasp. Professional sheetrock hangers always have one of these in their tool belt. This is a secret trick not often seen by do-it-yourselfers. But rasping off the edges does create additional dust, so keep this in mind.

Remodel or Rebuild

DEAR TIM: My husband and I got a sweet deal on a 50-year old home built by my grandfather on a 5.5 acre, lake view lot. The 1,000 square foot house had been neglected for years and we have installed a new roof, refinished hardwood floors and kitchen cabinets and lots of other cosmetic work. But there are still serious wood rot issues, cracked brick, etc. Is it better to continue remodeling and adding new rooms or should we rebuild? Amanda B., Byrdstown, TN

DEAR AMANDA: Every situation is different and there are perhaps 20 key variables that factor into making a wise decision as to whether or not it is better to remodel an existing home or scrape it from the lot and start over. But you have already provided one very important clue that may be the tipping point with respect to rebuilding the home.

This single story house had its top popped. The roof was removed and the second story added in a matter of days.. PHOTO CREDIT: Tim Carter

This single story house had its top popped. The roof was removed and the second story added in a matter of days.. PHOTO CREDIT: Tim Carter

My father-in-law taught me years ago that nothing enhances the value of real estate like a view of water. The fact that your large piece of land has a lake view and you purchased it for a low price could work in your favor if you get an accurate appraisal as to the amount of equity you might have in the property at this time. There is a distinct possibility that you could be sitting on top of a real estate gold mine. I realize you have already invested time and money in starting to fix up the home, but you may discover that it is a much better investment to put money into a slightly larger mortgage payment.

The first thing you need to do is make a realistic list of the amount of space you and your family need. Try to plan towards the future if you feel your family size will grow. A 1,000 square foot home works for some people, but you may discover you need a larger home to fit family, guests and visiting relatives.

If you discover that you need an additional 900 square feet of living space, the challenge will be how and where to add it. It is not uncommon to pop the top off of a home and add a second story. Professional remodelers do this on a regular basis and often the disruption to your existing home is minimal. But if you decide that room additions that bolt on to the sides of your home are better, then be sure you end up with a floor plan that really works and rooms that are the right size.

Another clue you provided that will help you and any remodelers who visit is the state of the existing structure. Your comments about the cracked brick and wood rot lead me to believe that perhaps your dear old granddad might not have been the world's best builder. Many lake houses I have seen were built in places that did not enforce a building code and the construction standards were minimal. There is no doubt your grandfather had great intentions, he just might have been handicapped by a lack of experience.

The point is you can't always turn a sow's ear into a silk purse as cheaply as you can build a new home. The fact that your lot is so large gives you lots of latitude with respect to placing a new home either close to the existing one or possibly on a more ideal spot on the lot that might take better advantage of the view towards the lake.

One strong possibility is locating a modular home builder in your area. You may discover that you can have a brand new home that is ready for occupancy in as little as eight weeks. The newer modular homes look just like a site-built home and many are very well constructed. If you decide to do this, be sure you look at plenty of plans that afford expansive views on the side of the home that faces the lake. A great plan on a superb lot will help you build even more equity into the future.

The ever-rising energy costs also factor into these decisions. An older home may have countless air leak locations, inefficient insulation, old windows and doors, etc. These functionally obsolescent components can force you to spend hundreds if not thousands of extra dollars per year to keep your house reasonably comfortable. A newer energy-efficient home with state-of-the-art windows, heating and cooling equipment, etc. allows a homeowner to redirect those same dollars to a mortgage payment on a newer home.

Quality of life issues also should be considered. Repairs, things that breakdown, growing honey-do lists add to the stress of daily life. Arguments between spouses about repairs that go undone can lead to all sorts of problems. A problem-free new home can make people feel better about themselves and help build strong relationships. If you can afford to build the new home, you will never regret it.

Column 592