Clutter causes lots of wasted time and confusion. There have been studies made of the enormous amount of time people spend looking for things that are scattered about their offices and homes. All too often the problem can be traced to a lack of too little horizontal space.
Look at your desk at your office or in your home. Is it a mess? Do you have stacks of papers, folders, etc.? Simple wall shelves can alleviate this in many instances. At least the desk will be clear for awhile.
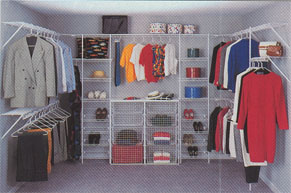
Closets are no different. For years all builders ever did (me included!) is install a simple pole and a plank in a closet. What a waste of space! How many boxes, sweaters, or balled up articles of clothing fall off those simple, singular shelves in a year? Item after item gets buried either on the floor or on that single shelf. Multi-tiered wire or wood shelving can quadruple the amount of usable horizontal storage space in less than one or two hours.
The wire shelving craze seems to have started about 15 years ago. It started small like many new, innovative products. However, this one grew steadily and quickly. It is a major industry now that had significant sales last year - say $585 million dollars! That is a chunk of change.
An Installation Primer
Installing wire shelving is not too hard. All you need to do is follow instructions and have access to several simple tools. A hand drill, screwdriver, hacksaw, tape measure and a level will usually allow you to complete all jobs.
The professional installers possess a very cool tool that could make your life simple. It is a large hole template that has holes punched in it at certain heights. They lay this template against the wall to give them the hole locations for different shelving arrangements. I have seen installers mark a closet out in less than three minutes. Oh well, don't bother making one unless you plan to do lots of shelving.
Wire shelving kits usually contain only a few different parts: the back clips, side wall brackets, support braces and poles, wall anchors and the shelving itself.
The wall anchors for most wire shelving are the expandable type. They are supposed to go in hollow wall cavities, not wall studs. The only hard part of the entire job is actually cutting the shelving to length. Since the wire is quite thin, it is easily accomplished with a regular hacksaw.
Each shelving kit or type has its own specific set of instructions. However, they all install basically the same. You drill holes at suggested heights for the back wall clips. These little clips allow you to connect the back edge of the wire shelf to the wall. The clips contain their own screws and are ideal if your house contains 1/2 or 5/8 inch drywall.
The side wall brackets are used to support the corners that are adjacent to the wall. Support braces are used to help hold up long lengths of shelving. For regular loads in closets you should count on installing one every three feet six inches. Shelves with heavy loads need one every two feet on center.
Often a storage system will have a shelf stop short of a wall. To support this end of the shelf hanging in mid-air, you need a support pole. All of these have pre-drilled holes or channels that allow you to easily attach special clips that support the shelf.
You begin the installation by drawing a level line at the height you want your shelves. Once you have located the positions for the back clips you drill the correct sized hole. Often a 1/4 inch hole is used. You insert the clips, tighten the screws and pop the shelf in place.
The shelf will swing down like a hinge. Using a level you can level the shelf easily while holding a side wall bracket in place with the turned down edge of the shelf. Quickly mark the two holes and drill. Before installing the bracket you must lift the shelf up and rotate it beyond its level position. If you install the bracket while the shelf is down, you will not be able to rotate the shelf into position.
This is basically all you have to do. It often takes far longer to get the tools out, mark the holes, clean up and put the tools away, than actually install the shelves. They really go together quickly.
Wood Systems
If you decide to go with the fiberboard melamine covered shelving systems, you had better possess some extra money and skills. These systems are pricey, heavy and require lots of talent to install correctly. Don't underestimate the difficulty of this task.
In reality, these systems resemble cabinet work. To get a fine fit and finish, you may have to do lots of shimming, adjusting, etc. The weight of the units empty is impressive. You must follow directions and use the correct screws to ensure a good job.
Column B207