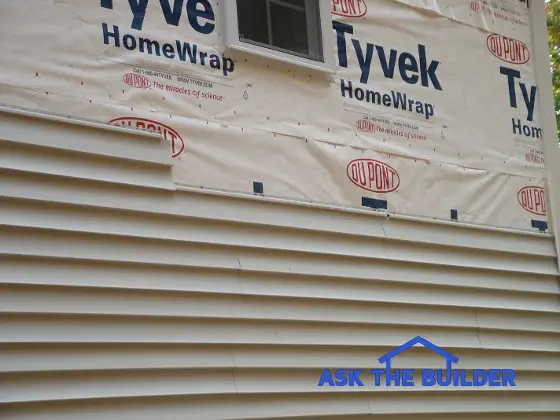
Vinyl siding installation - This is classic double-lap vinyl siding being installed. A small crew of workers can completely cover a house in a day or two if nothing is in their way. Copyright 2018 Tim Carter
"Wind can cause the vinyl siding to rattle. The sun and heat can cause the vinyl siding to grow or expand."
Vinyl Siding Installation Checklist
- Vinyl siding is affordable
- Dark colors can fade
- Never nail the siding tight to the wall
- Water barrier must be installed behind the siding
How Popular is Vinyl Siding?
Vinyl siding is just about the most popular exterior building material in use today. It's used in vast quantities in the remodeling market as people replace old aluminum siding or cover wood siding maintenance nightmares. Over two billion square feet of vinyl siding is produced each year in the USA.
This number is expected to rise significantly because of the arrival of the new solid core siding product. People who were previously turned off by the look of vinyl may be attracted to this product. Rising energy costs will undoubtedly cause more builders to use this siding to make their homes more energy efficient.
Related Links
Painting Ugly Vinyl Siding - SECRET Information - Please Do NOT Share
How To Clean Vinyl Siding
Free & Fast Bids
CLICK HERE to get FREE & FAST BIDS from local vinyl siding contractors.
Is it Hard to Install Vinyl Siding?
Vinyl siding is not too hard to install but it takes a little skill, proper equipment to get you and the product up in the air, and some layout skills. You need to be able to look forward and above you to see how you are going to deal with certain details on the home.
You must always be aware of drainage paths and protection of the framing lumber. Water can get behind vinyl siding and it must not be allowed to touch any wood!
What is the #1 Problem with Vinyl Siding Installation?
Guess what? The number one problem with vinyl siding is improper installation by the installer! Over 99 percent of all problems can be traced to installers.
Unfortunately, many installers use unskilled laborers to install the product. Or, some builders allow untrained individuals to attach it to walls and gable ends. While it is not a hard product to install, there are many things you need to know if you want a professional installation. Here are several of the most important aspects of installing vinyl siding:
What Tools are Required?
Vinyl siding requires some very basic tools. Here is a list of tools that will help you complete the job:
- hammer
- level
- tape measure
- chalk line with blue chalk
- circular saw with a fine blade
- utility knife
- tin snips
- framing square
- caulk & gun
- drill (optional)
- cutting/sawing table
- ladders
- misc. other staging equipment
Here are a few specialty tools that can come in handy:
- snaplock punch
- nail slot punch
- zip unlock tool
How Smooth Should the House Be?
The surface to which the siding will be applied must be as smooth as possible and solid. Now is the time to seal energy leaks. Caulk all cracks around windows and doors at this time.
If you want to increase the energy efficiency, you may want to install foil faced foam sheathing at this time. This is especially true if you are installing vinyl over an existing brick or wood sided house. If you are installing vinyl on a new home, be sure you have instructed your builder to install foil faced foam sheathing AND an air/water infiltration barrier.
CLICK HERE to get FREE & FAST BIDS from local vinyl siding contractors.
When are Vinyl Accessories Installed?
Corner posts, J channels, light blocks, dryer vent accessories, front door cornices, arches, etc. are all installed first. The vinyl siding is actually the last thing that is installed.
The corner posts, J channels, and other trim pieces have a channel into which the ends of the siding rests. This hides the cut end of siding from view. Why? Vinyl siding is not solid. If you were to look at it sideways, it would be quite unattractive.
Is Vinyl Easy to Work With in Warm Weather?
Vinyl siding and trim is very pliable in warm weather. It will cut readily with tin snips. Vinyl siding may crack and chip if you work with it when temperatures drop below 20 F.
What is Vinyl Siding J Channel?
J channel is the trim piece that is used to surround windows and doors on many occasions. It is available in a standard width and often an extra wide width. The extra wide material looks more like real wood trim. I suggest you consider it. There are special ways that the trim must be cut and nailed. Each manufacturer publishes a handy installation guidebook with easy to understand language and illustrations. You must follow the instructions so that rain water does not get behind the siding and trim!
How Does Vinyl Siding Install?
Vinyl siding pieces interlock with one another. You install vinyl siding from the bottom of the structure and finish at the top. The material is blind nailed through slots found at the top of the siding.
How Do You Install the First Piece of Siding?
You install a pre-bent piece of the aluminum starter strip. It must be installed level or parallel with the line you wish to follow as the siding goes up.
Remember, the first piece of siding is pulled up tight to the starter strip. Each successive piece of siding is pulled tight to the one below. So, if you goof up the starter strip, all the rest of the siding will be crooked!
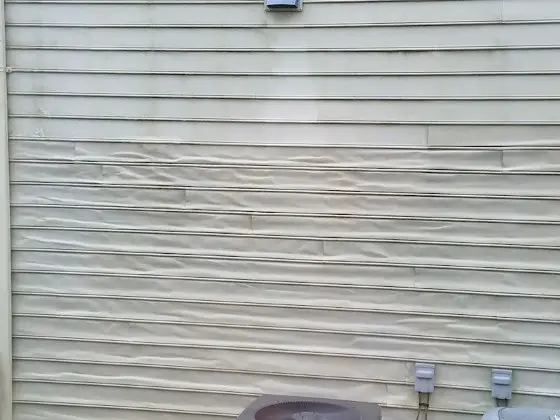
How Much Does Vinyl Siding Expand?
Vinyl siding and trim expands and contracts with changes in temperature. A standard 12-foot piece of vinyl siding can expand just over 1/2 inch from what it measures in the dead of winter to a blistering-hot summer day.
Vinyl siding is plastic. If it gets up over 200F, it can melt and distort. This damage was caused by windows on another house that reflected and concentrated the sun's rays. Copyright 2018 Tim Carter
How Are Corner Posts Installed?
The corner posts must be installed 1/4 inch away from the soffit or another horizontal stop point at the top of each corner. Plumb each corner post and drive the first nail in the top of the nailing slots.
All nails must be nailed in the top of the slots so that the corner posts 'hang' from the nails. Keep the nail head 1/32 inch away from the vinyl. This will allow the vinyl room to expand and contract.
If you need to splice two lengths of corner post together, the upper piece overlaps the lower piece. This allows rainwater to shed off just like a shingle roof.
Should I Study a Piece of Vinyl Siding?
Look at a full panel of siding before you install it. Note the upper and lower corners on the front and back.
There are factory-made notches. These notches are important. You may find yourself replicating them on a cut piece. These notches allow you to overlap pieces of siding. The siding pieces can move sideways independent of one another because of the notching.
Why Does Vinyl Siding Rattle?
Wind can cause the vinyl siding to rattle. The sun and heat can cause the vinyl siding to grow or expand. For these reasons, it's VITALLY important that vinyl siding is nailed properly!
If you nail too loosely, the vinyl siding will rattle and flap as the wind blows. If you nail it too tightly, then it will bubble and bow on a hot day. The proper nailing is somewhat easy.
How Do You Nail Vinyl Siding?
The vinyl siding flange must be tight against the sheathing. The head of the nail must stop within 1/32 inch before touching the vinyl siding. This space is just less than the thickness of a dime! Make sure you and/or your installer does this part correctly!
How Do you Make Angle Cuts?
How do you find these angles? Easy! Slide a full piece of siding so the top corner just touches the angle. Lay a scrap piece of siding against the gable end angle.
Trace along the bottom of the siding a line which is parallel to the roof line. This is the line you need to cut to produce the gable end angle. If, after cutting, the piece fits (it should!), then save the outfall and use it as a template for all future cuts.
Should I Read the Installation Booklet?
Get the booklet from the manufacturer! It will be a great aid to you.
CLICK HERE to get FREE & FAST BIDS from local vinyl siding contractors.
Column B383