New Orleans Flood and Hurricane

The New Orleans flood and hurricane of 2005 will undoubtedly go down in history as one of the worst natural disasters in American history. Even now, a week later, we still are unaware of all of the damage and the dead. Eventually the professionals will put a price tag on the amount of damage that wicked Hurricane Katrina caused, but the impact to lives will be impossible to measure.

What will happen to the tens of thousands of houses and businesses in the city of New Orleans? That answer will come months from now after the toxic stew of sewage, oil, and storm water is pumped from the giant cesspool that once was the historic city of New Orleans. What about the homes and businesses in Mississippi and Alabama? Although they are not suffering from flood waters, the needed resources to rebuild these areas will be in very short supply.

Several things are very certain. Many of these homes will become vacant as a given number of the residents will throw in the towel. They will plant new roots in Baton Rouge, Houston, Dallas or other cities that have opened their arms.

The Big Picture about Rebuilding New Orleans

To understand the complexity of the situation, let's go back in time to just 10 days ago as the vortex known as Hurricane Katrina was gathering power from the steamy Gulf of Mexico waters. In the greater New Orleans area there were probably 100 - 150 heating and air conditioning contractors in the Yellow Pages. Maybe a few more or less. Let's imagine for a moment that each of theses companies had an average of four crews. In the warehouses of local distributors there were a limited number of new air conditioning compressors, parts and furnaces.

An employee and a helper require at least one to two days to completely remove and reinstall new furnace and air conditioning equipment in a typical house. This means that in one year, the average crew could install 167 new furnace and air conditioning systems. If you combine all of the HVAC talent in New Orleans, you could install 83,500 systems in one year.

But many of these professionals have left town. Their equipment could be under eight feet of water. They need to live like the rest of us and may start new jobs in other cities. In other words, when the flood waters are pumped out, it could take years and years to replace just the heating and air conditioning systems in the city, assuming the equipment was available. Keep in mind that factories can only make so many air conditioners per year and other parts of the USA continue to need equipment for normal growth and replacement of old equipment.

Now take just this one trade and project it across all other aspects of home building and remodeling. Think of how many carpenters, roofers, plumbers, drywall finishers, ceramic tile setters, masons, painters, etc. will be needed just in New Orleans. Then look out in an arc of say 50 - 75 miles and imagine how many will be needed in the cities of Waveland, Gulfport, Biloxi, Pascagoula, and Mobile. The rebuilding task is staggering. It will be years and years before the region looks anything like it did just 10 days ago.

What Can Affected Residents Do?

The first thing to do is make an assessment of how many times you want to go through this. After all, another monster hurricane can grind up the area in as little as three weeks, months or years. It is just simple mathematics really. Another storm will devour the area, I just can't tell you the exact date. Why do I know this? Geology was my major in college and hurricanes are just one of the weapons that nature uses to reshape the land and feed the recycling machine we call the planet Earth.

If you are a person who decides to roll the dice and rebuild, then learn from what just happened. Do not build in low areas affected by floods or carnivorous storm surges. Build where the land is high. Look at the houses that survived with minimal damage. Hip roofs that are attached to the walls via metal framing connectors which in turn connect to the actual foundation often are the structures that survive. Houses built with hard outer surfaces such as traditional cement stucco or cement siding tend to resist wind-blown debris better than thin wood or vinyl.

This is part one of a series of articles I am writing about this historic occasion. Hopefully, together we will be able to use this written word to help future generations who will not have time to look at all of the historic video and electronic images. This historic moment in time will eventually become legend if we do not take the time to accurately tell the story and preserve those images for all future generations.
Foundation Cracks

DEAR TIM: Our basement has vertical and horizontal cracks from ceiling to floor on all sides of the basement. Additionally, there is a continuous crack at the level of the brick ledge (second course from the top). The walls leak with every rain and at times the walls appear to "cry". Many of the cracks are wider than a dime and there are 45 blocks that are split in the middle. Our builder (the house is two years old) represents this issue as "normal settling" and has recommended the application of an epoxy product, Florok to resolve the situation. We are concerned about waterproofing the interior walls (especially since we paid for external waterproofing) because we understand that this could cause structural problems if the water enters the CMU and is trapped by the interior waterproofing? Do you have any thoughts on our problem? Barb B.

DEAR BARB: I have quite a few thoughts to share. The first one is that your builder is a liar, inexperienced, ignorant, and/or suffers from partial memory loss. Well, wait a minute, you know what, he may be telling the truth. If he builds every house wrong like yours, he might actually believe that cracks like you have are perfectly normal.

Masonry materials such as concrete block, brick, concrete, stucco, etc. do not react well when you try to bend them. They typically crack. This bending force is called tension. On the other hand, if you try to squeeze or compress masonry materials, the are very strong.

Your foundation is experiencing both horizontal and vertical tension. The horizontal tension is from the dirt that rests against the foundation. This backfill is pushing against your foundation wall since it is really a retaining wall. The vertical tension is caused by poor soil conditions under the footer that supports the concrete block walls. Either poorly compacted dirt was placed under the footers or the soil under the footers was not strong enough to support the weight of your home at the level of the excavation.

Your cracked foundation is not normal, and I feel that you have a very serious problem. I would not hesitate to contact your builder and tell him that you now know the condition is not normal. Tell him that an epoxy cure is not acceptable. Epoxies are great products, but your problem is far more serious. Without looking at your foundation, I am already convinced you need a new foundation and one that has been engineered and installed properly.

You may have to involve an attorney and pursue legal action. I would ask your builder for a copy of his certificate of insurance. If he blinks, hesitates, or refuses to give it to you, then you know exactly who you are dealing with - a true snake in the grass.

Locating Flat Roof Leaks

Tips on Locating Flat Roof Leaks

Flat roof leak roofs can be a devil to locate. The reason is that water can enter one spot and not really express itself inside until it is far away from the leak. The same thing can happen on sloped roofs, however, you can usually discount all the roof area below the area where you see the leak.

Why? Because water doesn't generally flow uphill from the leak location. Flat roofs allow the leak to travel in any direction from the leak point. That is why they are tough to locate.......

Free & Fast Bids

CLICK HERE to get FREE & FAST BIDS from local contractors who can come check your roof for leaks.

Start With a Dry Roof

If you have a flat roof that leaks, get up on it when it is dry and cool. You want to look for trouble spots that generally are the primary source of leaks.

I always start at flashings. Flashings are transitional roofing materials. A flashing connects a roofing membrane to something that is not a roof. For example, If a plumbing stack or chimney pops up through the roof, it will be surrounded by a flashing. Often the flashing materials are metal.

Look for cracks. Look to see if the flashing overlaps the roofing material such that downward falling water will be deflected away from the chimney, wall or plumbing pipe.

Check the edge of the roof. Often flashings are used at these points as well. See if they are secure. Look for little cracks, openings, or breaks in seams in these flashings.

Dry Mini Lake Beds

Often water will pond in low spots in a flat roof. You will see evidence of these areas on a flat roof. Look for concentric rings of dirt as the puddles dry out. Look here for tiny holes or splits in the roof.

Seams - A High Priority

Any seam in the roofing material is a natural spot for a leak. Look closely at all seams. Do you see cracks or holes of any type? Is there a place where you can lift a small edge of a seam?

Testing For Leaks

You can test for leaks using a hose. But you have to be patient and you need to work backwards away from gutters or center drains. It can take hours, as you need to let the water run slowly over areas you think are trouble spots. Remember, it can take 10 minutes or more for the water to begin dripping inside. Start near a drain and let the water slowly run.

Periodically, adjust the hose so water flows across dry portions of the roof. You will need tremendous patience, especially if all portions of the roof appear tight.

CLICK HERE to get FREE & FAST BIDS from local contractors who can come check your roof for leaks.

Related Articles: Newer Rubber Roofs, Membrane Roofing Types, Membrane Roofing, Manufacturers

Column B200

Residential Metal Roofing

Metal Roofing Attributes

Metal roofing is a really distinctive building material. One of the advantages to using the product is its almost zero maintenance aspect. This is one reason it is used so much in commercial and institutional work. Companies that own businesses know how damaging roof leaks can be. They also understand the time value of money. Since they want a roof that will not cause problems for say 30 to 50 years or so, they go metal.

You can see an excellent example of this in my hometown. About 10 years ago Procter & Gamble built a new office building. The centerpoint of the structure are dual office towers. They are both capped with a dramatic hip roof covered with a standing seam metal roof. Procter & Gamble has a reputation for building with quality materials. They did the right thing by using metal roofs on these buildings - that I can assure you!

No DIY Task

Metal roofing is not a weekend challenge for you and your friends. There are numerous tools, tips and techniques that only come from working with experienced installers. Forget about putting a moderate to complex metal roof on yourself. If you can follow instructions and have an assortment of metal working tools, you may be able to complete a simple job on your first try.

Movement

Metal roofing materials move in response to changes in temperature. This movement needs to be accounted for in the design and installation phases. If you do not take it into consideration, you will very likely get a leak at some point. Metal roof manufactures know all about this movement. Almost every one has taken it into consideration in their installation instructions. For this reason, do not treat lightly the instructions with respect to the installation of fasteners, their length, type, placement, etc.

Metal roof systems will move, and when they do they will find the weakest spot to relieve the built-up stress. If that stress is a row of fasteners that have been put in disregarding the instructions, then you just may well have a leak along that row.

Mixing & Matching

A metal roof is rarely just one piece or several pieces of the same metal. There are special starting strips, clips, edge pieces, caps, etc. All of these components make up the total roof system. Don't mix and match components from one system to another. Don't try to save money and fabricate your own. Use exactly what the manufacturer tells you to use.

The metal roof systems simply cost too much to improvise. Besides that, you can immediately void the warranty and lose all help and assistance should you develop a problem down the road.

A Backup Roof

If your roof will be in a cold climate, you need to be concerned with condensation. Water vapor can condense on the underside of a metal roof. If this water can't escape it can actually corrode the roof. It is not uncommon for metal roofs to have some type of continuous air pathway that allows trapped water vapor an escape route. Make sure you look for these points when you look over the installation instructions.

A second roof? Well that means that you might have to install substantial (say 30# felt) underlayment beneath the metal roofing to deflect wind blown spray, condensation or ice dam backups. Once again, do not question the wisdom behind the installation instructions!

Colors and Types of Metals

If you want variety in a metal roof, you can surely find it! Metal roofs are available in an entire palette of colors, shapes, textures, metals, etc. You can get steel roofs, tin, aluminum, copper and if you have the money - I believe - stainless steel!

Old fashioned style standing seam is not a problem. Many manufacturers make this as a standard option. Look around a little more and you will find numerous systems with panels that simulate shingles. Some metal roofs are actually individual shingles that overlap hiding concealed fasteners! If you have tinsmiths in your town, you can still get flat-locked tin roofing.

If your budget permits you to be able to purchase a metal roof, it is worth the effort to look at as many as you have the time for. I guarantee you that you will come across a metal roof that will get your attention.

Also, don't look at samples too closely. When viewed at arms length, they may seem fake or not attractive. You must stand back 20 or possibly 50 feet and look at several pieces together. If you don't do this, you will make a mistake when picking your roof system.

Related Articles:  Metal Roofing - Good Looking, Metal  Roofing Cost ExamplesMetal Roofing Products

Column B237

Metal Roofing Products

Metal Roofing Manufacturers

Following is a list of as many metal roof manufacturers as I could find. I have tried to include a description of some of their products. I can assure you that each one of these companies will gladly send you lots of full color literature. The list is by no means complete. I am quite sure that somewhere out there is a company or two that makes metal roof panels.

Remember to find out about installation details and what you need to do to prevent leaks. Just today I received an email from an individual who is having BIG problems with leaks around exposed fasteners. I used those on a job nearly 10 years ago with absolutely no problems. The roof is leak-proof as I write this. Before you buy a metal roofing system, be sure to get the written installation instructions and be absolutely sure that the installer follows them to the letter.

  • American Building Components
    ABC makes both Thru-Fastener systems and concealed fastener roofs. It appears to me that they have a minimum of nine styles to choose from. They look good on log cabins, Victorian styles and contemporary houses.

  • ATAS International, Inc.
    ATAS International has a growing spectrum of metal roofing, wall, and ceiling panel systems, mansards, soffits, curved panels, column covers, equipment screens, rainware, ventilation, framing systems, and accessories.

  • Classic Products, Inc.
    Classic Products has manufactured residential metal roofing systems since 1980. They have a network of independent dealers across the country and they also export. They produce aluminum and steel products that look like wood shakes and they have recently developed a new textured, multi-toned coating as an option for their products. They also manufacture standing seam and profiles that resemble slate and standard shingles in aluminum, steel, and copper.

  • Custom-Bilt Metals
    This company specializes in residential products. They have standing seam roofing in 24 colors, aluminum shakes, stone coated tiles and shingles, and copper shingles. If they don't have it, you don't need it!
  • Decra Roofing Systems
    These guys claim to be the "Original Stone Coated Steel Roofing System". Find out about their 50 year warranty and 120 mph. wind warranty.

  • Dura-Loc
    This company makes metal roof systems that look like regular shingles and clay barrel tiles. They even coat some of the metal tiles with colored granules to look just like asphalt shingles!
  • Englert
    Here is a unique system. The roof panels are actually formed on-site at your building lot! Sounds to me like the seamless gutter system. They have five different profiles.
  • McElroy Metal
    McElroy makes a metal roofing system available in a variety of colors and types.
  • Petersen Aluminum Corp.
    Their products are available in at least 25 colors. Sounds to me like they never rust!

  • Revere Copper Products
    If you want a copper shingled roof you MUST check them out! They make a truly distinguished metal roof system.
  • Union Corrugating Co.
    Union makes an assortment of metal roof panels, simulated shingles and all trim pieces. They have awesome colors as well.
  • Vail Metal Systems
    This Colorado company makes a concealed fastener metal roof system that looks like shingles. It comes in either solid copper or Kynar 500 coated steel.

Related Articles:  Metal Roofing - Good Looking, Metal  Roofing Cost ExamplesResidential Metal Roofing

Column B237

Metal Roofing Cost Examples

Metal Roofing Cost Examples

The following is a verbal description of some different metal roofs that were applied to residential houses. Note the relationship between the size of the roof area (square feet) and the cost per square foot. Sometimes as the roof gets bigger, the cost per square foot goes down. Also, roofs that have lots of angles and lots of dormers, sidewalls, chimneys, etc. that require flashing will obviously cost much more. Use these numbers as only a ROUGH pricing guide. Every job is different and the same roofing system will cost different amounts in different parts of the nation due to varying labor costs, freight costs and methods of distribution. To find a quality roofer who can install the product, FIRST select the roof you desire to use. Then call the manufacturer and find out who is qualified in your area to install that roof. Do NOT have a roofer install a metal roof system as "on the job" training! in other words, make sure the roofer you choose has - in fact - worked with the material before. The cost examples below are actually award-winning roofs. Each year the trade publication Metal Home Digest has a competition. The roofs below were announced in the July/August 1998 edition of the magazine. If you want to see photos, check out the magazine's website!

Example #1

A two story single family house in Eads, Tennessee. The roof pitch is moderate to steep eight inches of rise for every 12 inches of run. The roof was made by Petersen Aluminum Corp. and is a concealed fastener type. The total roof area is 6,500 square feet. The cost for all labor and material was $4.50 per square foot.

Example #2

This house is in the Bahamas. Seven thousand square feet of metal roof was used primarily on low sloped open roofing. It was an easy roof to do. The roofing was a spruce color BattenLok made by MBCI. you know it has to be good to withstand hurricanes that are sure to test this roof. The total cost of labor and material for this product was $4.25 per square foot.

Example #3

This metal roof was installed in Gig Harbor, Washington. It is a low slope roof - 3.5 inches of rise for each foot of run. The roofing came from Custom-Bilt Metals. The roof is wide open with just two chimneys and a few plumbing stacks popping through the roof. This roof was 3,500 square feet in size and came in at a reasonable $2.50 per square foot for labor and material.

Example #4

Would you believe 240,000 square feet of metal roof on 81 homes? It was all done with DuraLoc Simulated shake roofing in San Diego, CA. The attractive roofing material does not look like metal at all from the ground. Total cost = $3.25 per square foot.

Related Articles:  Metal Roofing - Good Looking, Metal Roofing ProductsResidential Metal Roofing

Column B237

Maintaining Shingles and Roof

Maintaining a Roof and Shingles

Unless you live or travel to parts of the deep South, you may not be aware of how bad roofs can get stained with dirt, mildew and roof algae. I have seen algae-stained roofs in the Midwest, but they are nothing like those I have seen down South. It is an epidemic down there.

What's more, people generally consider roofs to be maintenance free. Sure you have to replace them every 15 to 20 years, but in between those times, one should not have to do anything. Well that may or may not be true, depending upon how well your roof was installed.

Check it Out

It is a good idea to get up a ladder and look at your roof from time to time. Things can happen. A series of storms can take its toll on the average roof. Nails can work loose. Flashings can rust. Things can and do wear out. If you can't safely get up on your roof, then hire a responsible roofer to do the inspection. Ask them to take digital or instant photos to show you the defects, once they get back on the ground. You will be able to see the problems for yourself.

Avoiding Problems

Roof leaks happen at the worst times. I have never seen one on a sunny day! At the height of a rain storm or several days after a heavy snow fall, water can stream into your home. This is not the time to get up on a roof to try to fix a leak. Cut the problem off at the pass.

Most roof leaks happen at flashings. Flashings are roofing system components that connect actual roofing materials to things that are not a roof. You will find flashings wherever something sticks up through a roof or butts up next to a roof. Look for them at plumbing vent pipes, skylights, chimneys, walls, etc.

Flashings are not easy to install. Rookie roofers often have problems because they lack proper training, skill and diligence. It takes time to fully understand how flashings work and how they are created, formed and installed.

Flashing Materials

I happen to prefer 40 pound tin or copper for my flashings. Both of these materials are easy to solder. Solder? You bet you need to solder flashings! When you form a counter flashing around a dormer corner or chimney corner, the only real way to get a tight seal is to solder the flashing at several spots. It is not hard to do, but you must solder nonetheless.

You can't solder aluminum - at least not easily. I have seen lots of aluminum flashing installed and it is caulked! I do not consider caulk to be a long lasting roofing material.

Beware of using aluminum in contact with brick or stone. The alkali compounds in mortar corrode aluminum. I would only use, tin, copper, galvanized steel or sheet lead to flash in contact with masonry surfaces.

Roof Safety

Roofs are dangerous places. I have fallen off them before. I am lucky to be alive and not broken up. But trust me, you can get seriously hurt in a roof fall. Death is a distinct possibility. Permanent disability is also a possibility.

If you are not confident of your roof walking / working skills, then do NOT get up on one. Even if you do get up, you must move slowly and think about what you are doing.

Wet roofs are highly dangerous. If you decide to clean your roof, then you must really be careful. Fall protection equipment is mandated by OSHA rules and it is a good idea to wear fall protection harnesses that are securely attached to the roof!

Related Column: Roof Maintenance

Column B374

Gutters and Gutter Hangers Installation

Gutters and Gutter Hangers - Installation

Continuous aluminum gutters are absolutely the dominant rain handling device in the USA today. It is no wonder, as they are virtually maintenance free. You never have to worry about rust. They rarely require painting, unless you change the color of your home. They are indeed a great product.

Transport

I prefer to use Alcoa aluminum gutters. These come preformed from the factory and are available in lengths up to 36 or 37 feet. That is one long gutter. They come in smaller lengths as well. But don't think you are going to strap these things to the top of your car and drive home. They need to be supported and preferably protected from the wind. They will bend back on themselves if you drive too fast. I have transported them on top of a long ladder. Perhaps the best way is to simply pay the roofing supply company a reasonable delivery fee to bring them safely to your home.

Cutting Gutters

Believe it or not, I use my power miter box saw and an older somewhat dull blade to cut aluminum gutters. It makes a painful sound but the job gets done and the cut edge is very crisp and square. You can use a traditional hacksaw but be sure you use a blade with many teeth instead of an aggressive blade that has fewer teeth per inch.

If you use a power miter box saw as I do, be sure to bring the blade up to speed and drop the blade SLOWLY into the metal. Do not cut quickly. You must wear goggles as little bits of metal go flying all over the place.

Free & Fast Bids

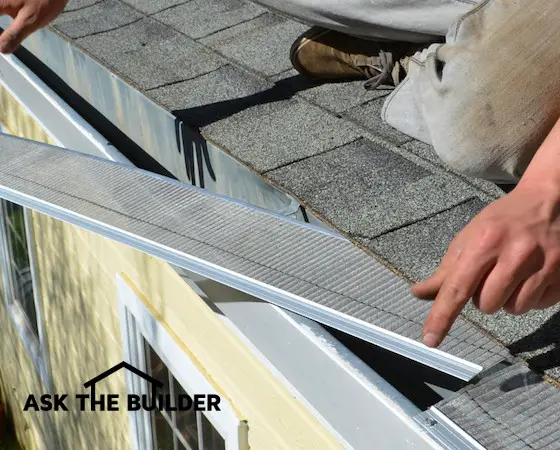
CLICK HERE for FREE & FAST BIDS from local companies that can install micromesh gutter guards.

Consider purchasing a micromesh product from Amazon.com and having your local handyman install them for you. CLICK the photo below for just one of the micromesh products I discovered on Amazon:

micromesh gutter guards

There are many micromesh gutter guard products. You can save LOTS of money putting them on yourself. CLICK HERE or THE IMAGE to see how low-cost they can be.

Other Tools

Assembling aluminum gutter parts requires a power drill with an 1/8 inch bit, a pop rivet gun with aluminum rivets that match the color of the gutters, a hammer, a 1/2 inch sharp wood chisel and a hex nut driving tool to twist the screw on the hanger.

Assembly

I prefer to assemble the entire gutter on the ground and then lift it in place. You need to cut the gutter to length keeping in mind the small overhang of shingles at the edge of the roof. I made a mistake years ago and stopped my gutter just beyond my gutter board. My shingles extended about 1.5 inches beyond the end of the gutter. Each time it rained I would get a drip, drip, drip from the end of the roof. It was a big nuisance!

The gutters come with left and right end caps. They already have pre-drilled holes for the rivets. Pop the caps onto the end of the gutter and drill through the holes to make a matching hole in the gutter. Immediately install a rivet before proceeding to the next hole. Make sure the cap is tightly fitted before you drill into the gutter.

The Outlet Tube

Installing outlet tubes is the hardest part of the job. You must make sure you locate them in the right place with respect to the downspout location. I typically use a framing square on the wall below to translate the center line of the downspout up to the gutter board.

Once you know where the centerline of the outlet tube is in the gutter you can mark its location. Use the actual outlet tube as your template to draw the hole shape. Drop it upside down into the gutter and trace the inside outline of the hole.

Slide a scrap piece of 2x4 or other wood under the gutter at the location of the outlet tube. Make sure the gutter is not on pavement that will scratch the underside of the gutter. The block of wood allows you to use the wood chisel to cut the hole.

Note that the wood chisel has a flat black side and a taper or angled face. The angled face always should be facing to the inside of the outlet hole. Use the hammer to tap the wood chisel. It will cut through the aluminum. It may also slightly bend the bottom of the gutter as you cut the hole. Don't worry about this. Be sure you are cutting the right sized hole. The tolerances are very tight. Cut too small and the tube won't fit. Cut too large and there will be no gutter left at the pre-drilled holes in the outlet tube flange.

Once you have cut the hole, put the block of wood inside the gutter and use the hammer to flatten the bottom of the gutter. The drill and pop rivets are installed now. I prefer to have the rivet heads on the bottom of the gutter. The little dimple points will stick up inside the gutter but who cares.

The Sealant

Alcoa manufactures a special sealant that makes their systems leak proof. This product comes in squeeze tubes and is very sticky. It contains very flammable solvents that evaporate rapidly. The product skins over in just seconds so you must work quickly. I prefer to squirt the sealant into the cracks of the end caps while the gutter is on the ground. You can tilt the gutter slightly to get the sealant to the top of the cracks. After the end caps are finished, apply the sealant liberally over the flange of the outlet tube. Be sure to have it span over onto the gutter and seal each rivet.

Start at the Middle

Believe it or not, you can carry and install a 35 foot piece of gutter by yourself. The trick is to hold it in the middle so it is balanced. Position the ladder in the right place. Be sure no overhead electric lines will come in contact with the gutter. The gutter needs just a little bit of fall as it heads towards the outlet tube. You can't slope the gutter as you would a plumbing drain line. If you do, it will end up hanging below the gutter board.

Always install the gutter hangers at a rafter tail, unless you are lucky enough to have solid framing behind the entire length of the gutter board. This is a luxury. If you can paint your gutter board before installing the gutter, do so. Paint the entire surface of the board.

For color photos of screw type gutter hangers, click here.

Related Column:

Hanging Gutters Requires Skill

Column B402

Gutters – Screw Type Gutter Hangers

Color Photos of Screw Type Gutter Hangers

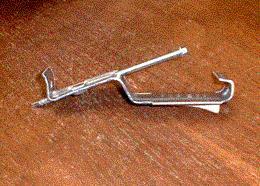
The following two photos should give you a decent idea of how the screw type hanger works. Almost all aluminum gutters have a formed top front edge. The forming process imparts stability. Putting several closely spaced bends in the sheet aluminum gives it significant strength. Without the bends, the metal would be as flimsy as a wet noodle. The J shaped end of the hanger fits under the top front edge of the gutter and locks in place.

You can clearly see the long screw that comes already threaded into the hanger. It has a self-tapping point that drills through the back of the gutter. The screw is angled so that it can be driven more easily.

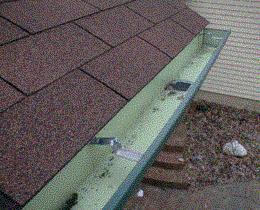
In this photo, you can see two of the hangers in place. I used one at the very end of the gutter to pull that end of the gutter up a tad. The gutter is approximately 21 feet long, and you are looking at the last 4 feet. The gutter slopes the entire way and without lifting the end, I would surely end up with a puddle of water in between the outlet tube and the end of the gutter you see. By lifting it up, I was able to get that portion of the gutter to be nearly level. Just after I took the photo, I installed the bird cage into the outlet tube.

Column B402

Shingles – Clear Tape Mystery

DEAR TIM: I was having a discussion with a couple friends about installing a shingle roof. They both said the clear cellophane tape on the bottom of the shingle is to be removed before installation. I say that is an integral part of the bonding system and should be left on. What's the story?

Thanks,
Ron Tyson

DEAR RON: This is a fairly common question and I feel you will be surprised by the answer. Both you and your friends are wrong. The tape's sole purpose is to prevent the shingles from sticking to one another when they are stacked on top of one another in the pack.

You can clearly see the pieces of tape line up with the blobs of asphalt cement on the tops of the shingles. These dabs of asphalt cement indeed are the glue that allows the shingles to bond together once the roofing is installed. But think for a moment. When you install the shingles, the cellophane tape is five inches up the roof from the dabs of cement and it does nothing to help bond one shingle to another.

You do not have to remove the tape. That would be an enormous waste of time.