The following companies make exterior foundation waterproofing compounds. Some are modified asphalts (Tuff n Dry) and some are rubber (Rubber Polymer Corporation.) I recommend that you call as many as possible and get product literature. Then discuss the systems with your builder. See what products he/she has had the best success with. Good luck on your project!
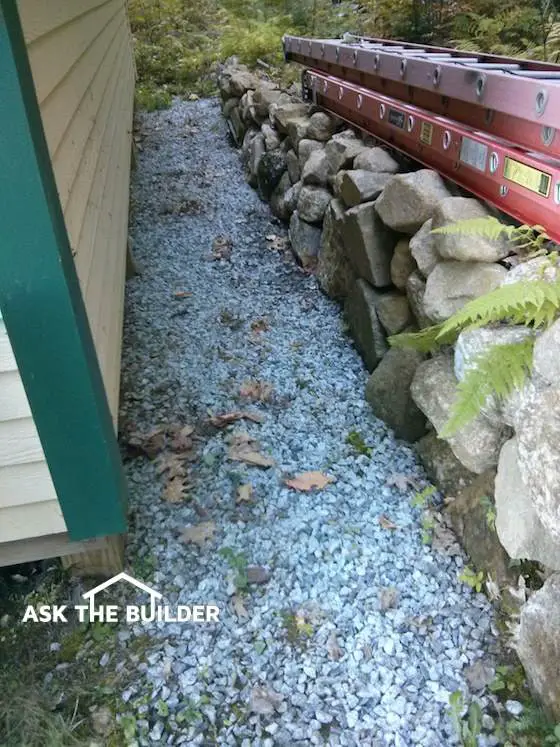
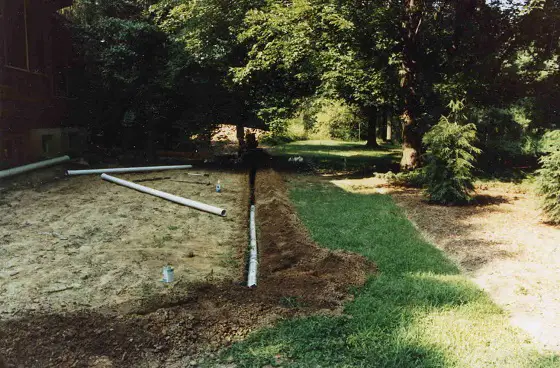
In the center of this gravel is a linear french drain. Some call them trench drains as I dug a trench and put in a perforated pipe. This area never has standing water in it now. Copyright 2017 Tim Carter ALL RIGHTS RESERVED
! ! ! See Author's Notes at Bottom of Column ! ! !
French Drain Systems In The Soil Work
Last year, I did some consulting work for one of my readers here in Cincinnati. She had a massive drainage problem in her rear yard. Half of the neighborhood's water was flowing through and over the soil into her backyard.
Her basement was leaking, the yard was soggy, and she had flooding in heavy rains.
I designed a simple linear French drain system to solve the problem. After seeing my design and asking some questions, I got the feeling she wasn't convinced as to its ability to solve the problem.
I assured her it would work. She indicated that it had better as she intended to hand dig the system. I gave her a handy tip on digging trenches and even let her borrow my duckbill shovel. This tool and a handy square point spade are the only shovels to use when digging trenches.
Why A French Drain Works:
it captures water moving sideways through soil
water prefers to move through the pipe in the trench rather than the soil
surface tension SUCKS water from the soil into the trench drying out nearby soil
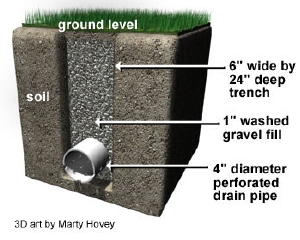
Cross-section of a Linear French Drain including the all-important perforated french drain pipe. Copyright 2017 Tim Carter ALL RIGHTS RESERVED - Do NOT COPY this graphic.
Eight weeks ago, I received the most wonderful Thank You note in the mail. We had a somewhat wet winter with several periods of heavy rain.
My french drain system captured and diverted all of the surface and sub-surface water. Her basement was dry and the yard allowed you to walk in it without leaving a shoe behind! She mentioned in the note that water rushed from the outlet portion of the linear French drain like a fire hose. Needless to say, she was satisfied and most grateful.
French Drain Construction Methods
The woman who I am speaking of built the entire system without any help. I visited the job site to inspect the trench after the pipe was installed. She dug over 165 linear feet of trench by hand (working part-time) in 2 months. It was hard work, but she accomplished the task.
You can often do much of the work with a trenching machine. These handy devices can be rented at a tool rental shop and towed behind any car.
Most tool rental places will even deliver it to you. However, even with a trenching machine you still must do some work by hand.
The trencher does a majority, that is for sure! If you decide to use one, purchase a sheet of 4 x 8 1/2 inch plywood.
Rip the plywood in half lengthwise to yield two pieces 2 x 8 feet. The trencher discharges dirt to one side of the trench while digging. Place the plywood on the ground so the dirt piles up on it, not the bare grass.
It's a breeze to shovel the dirt from the plywood instead of the grass. Remove all loose dirt from the trench and tamp the bottom of the trench to compact the soil at the bottom.
Layout
If your trenching system requires different bends and turns to go around houses, sheds trees, whatever, then your layout is critical. If you do not dig the trenches properly, the pipe will not fit into the fittings that go around the bends.
I always dry fit my pipe and fittings together and lay them on top of the ground exactly as they will be installed. I then use a can of bright orange spray paint to paint the grass right next to the pipe. Always paint on both sides to make sure that you clearly mark the center of the trench. This layout will save you hours of extra digging!
Location of the French Drain Piping
If you want to dry out a leaking basement or a crawl space, then you must locate the linear French drain in such a way as to capture all or most of the sub-surface water that is flowing towards your house. If you have periods of flooding where surface water flows over your lawn, then the drainage system must extend to the surface to capture this water.
Linear French drains that are intended to stop water from entering a house work best if they're located approximately 4 - 6 feet away from the foundation. It's not necessary or recommended that they be placed closer to the house.
You want the piping in soil that was not disturbed during the construction of the house. Placing the piping too close to the house also concentrates water flow at the foundation!
The Effective Depth
Linear French drains do not need to be excessively deep to be effective. Remember, water movement through soils happens where there are air voids. In many soils, air is most plentiful in the upper 24 inches.
You want to install the piping system so that the pipe is level or has a slight downward slope to the discharge point. Do not install the pipe at a consistent 24-inch depth if your lot goes up and down. Doing this will trap water in the low spots of the pipe.
If your lot is rolling in nature, then you will have to use a builder's level or laser to make sure your piping is level or flows downslope. Do not underestimate the importance of this!
Use the Right Pipe
The pipe used to collect water from the soil must be perforated. Once collected and in transit to the discharge point, you can switch over to solid pipe. Only use perforated pipe in the areas to be drained.
I happen to prefer the PVC pipe that has two rows of holes in it. These holes must point down.
Pointing them up is not right. Do you think the water flowing through the gravel aims for and enters the holes? Wrong! Some water may go in the holes but the majority goes past it and simply saturates the soil until the trench fills with water to the height of the holes.
Gravel Fill
Once you have placed the pipe in the trench, fill around the pipe with 1-inch washed gravel to within 1 or 2 inches of the surface. The best gravel is about the size and shape of a large grape.
Cover the gravel with a piece of sod. Do not place any dirt in the trench. Water traveling through the soil will find this gravel and immediately fall down to the pipe. The large voids around the 1-inch gravel will accommodate a rapid flow of water.
If you have to bring the trench system to the surface to capture surface water, dig out soil to make a path. Use colored gravel for the path placed around fieldstone or stepping stones. It will make a unique attraction and landscaping feature in your yard.
You may wonder if my advice is worth anything. Well, read what Jim Sanders wrote to me when he was at the end of his rope:
"Hi, I just wanted to write to give you the results of my "Trench Drain". I have had a wet crawlspace for 15 years. Water would fill the crawlspace at times, so we actually had to drill weep holes at the base so that it would enter the basement and eventually, the sump pump.
have tried everything. Several contractors said that the only thing we could do was to bring the water into the house via drainage tile and let it enter the sump pump. That would work, but because I live on a 6' elevation, there is no reason that I should have water problems. It became like clockwork...when it rained, we would rush home from the lake or wherever we were vacationing so that we could be prepared to start the backup generator, in case the power failed. We even had our alarm company put a sump alarm on our system, so they could notify us if we had a power failure. Battery backup was not an option, because sometimes we lose power for days and during any rain, our sump would run every 7 minutes...just like clockwork.
I found your site and read the article on the trench or French drain. At first, it sounded a bit like "holistic healing" to me. I failed to understand why a 2 ft. deep trench, 4 ft. away from the house would do any good. How could this simple thing correct an extreme water problem that has plagued me for years, cracked my foundation, settled my garage floor and ruined almost every vacation?
The Linear French Drain trench running from the house. PHOTO CREDIT: Jim Sanders
I decided "what the heck". I had to dig by hand using a trenching spade and a pick-ax, because the builder back-filled our property with brick and blacktop. It took quite a bit of time. Because the ground level varies so much on that side of the house, I was not able to achieve exactly 2 ft. deep. It varied from 18" to 30" in spots, but the slope was downhill. The trench is about 80 ft. long. At times, I thought about filling it all in, because I just didn’t believe that it would work.
I stoned it, put tile in, and filled it with #1 round stone. I socked the pipe just for safety measure and I also used geotextile fabric on top, so I could cover with dirt and grass. I also ordered some clay and pitched from the house to the drain.
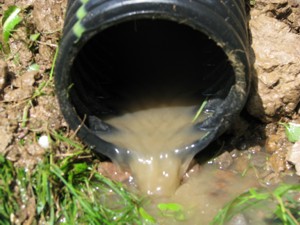
After a short rain, water is running away from the house. PHOTO CREDIT: Jim Sanders
Result? For the last month, we have had 7 or 8 torrential rains, the worst of which was last night. It rained so hard, that our lawn washed out in spots because of the high clay content. Our sump pump, that normally ran every 7 minutes during and after rain, has not turned on for 4 weeks. The silt at the bottom of the sump well is now dry and cracking. Our crawlspace has not shown a trace of water or even moisture.
Since I couldn’t see correcting the foundation cracks or the garage floor settling and tilting until I corrected the problem's source, I waited to see if the trench drain worked first.
This week, I had a company come in and perform sort of a "mud-jacking" technique on the garage floor, which worked perfectly. Also, during the past few weeks, I parged the cracks in the foundation.
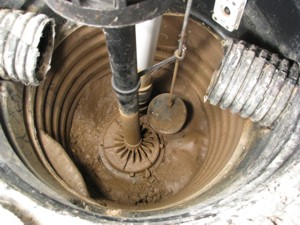
A dry sump pump. PHOTO CREDIT: Jim Sanders
I just wanted you to know how this worked. I stressed for many years over this issue and the solution was nowhere near as difficult as I thought it would be.
As a side note, I went to the end of the drain tile during a hard rain to see what was happening. Water was running out of the drain tile in about the same exact volume that it previously ran out of the weep holes in my crawlspace. This winter will be interesting, because last year, the ground next to the house was so saturated that during a thaw, my sump would run constantly. I'm guessing that the ground between the trench and the house will probably be drier now going into this winter."
! ! ! See Author's Notes at Bottom of Column ! ! !
How Linear French Drains Work
The key to understanding how the system works is knowing that there is a vast quantity of air in the upper horizons of soil. In addition, we know that gravity will pull water downslope. Furthermore, water will absolutely take the path of least resistance. It will flow down through the gravel and into the pipe much more readily than force its way past soil particles!
The French drain system will work wonderfully even if the pipe is installed dead level. It will not work if you install the pipe so that it slopes uphill. If your lot goes up and down, you will have to use a builders level or laser to set the pipe level or with a slight down slope pitch. If you pitch the pipe, 1/8 inch per foot of fall is sufficient. Of course if you want it to slope more than 1/8 inch per foot, that would not pose a problem!
The trick to the whole system is providing a means for the end of the French drain system to "daylight" or expose itself on the lowest portion of your lot. This is where the collected water will discharge. You can often disguise this pipe exit point with decorative gravel, boulders or large rocks. You may also want to plant vegetation that likes to have its feet wet! Anything will look better than a simple pipe sticking out of the ground.
Typical French Drain Design for Soggy Yards
Interconnecting 4 inch perforated pipe in a simple grid work will work well to drain a back or side yard. The system of pipe works like a maze in reverse. Water enters any of the pipes in the maze or system. One of the pipes in the maze continues around the house or the yard to a low spot. The water flows from the soil into the pipes and finally exits at the end of the pipe. Yards equipped with this system will drain in hours, not days!
The grid work of piping is installed exactly as the simple French drain. Gravity will literally pull the water from the soggy soil directly and rapidly into the grid work. Trust me, these systems work and they work very well.
You may wonder if my advice is worth anything. Well, read what Jim Sanders wrote to me when he was at the end of his rope:
"Hi, I just wanted to write to give you the results of my "Trench Drain". I have had a wet crawlspace for 15 years. Water would fill the crawlspace at times, so we actually had to drill weep holes at the base so that it would enter the basement and eventually, the sump pump.
I have tried everything. Several contractors said that the only thing we could do was to bring the water into the house via drainage tile and let it enter the sump pump. That would work, but because I live on a 6' elevation, there is no reason that I should have water problems. It became like clockwork...when it rained, we would rush home from the lake or wherever we were vacationing so that we could be prepared to start the backup generator, in case the power failed. We even had our alarm company put a sump alarm on our system, so they could notify us if we had a power failure. Battery backup was not an option, because sometimes we lose power for days and during any rain, our sump would run every 7 minutes...just like clockwork.
I found your site and read the article on the trench or French drain. At first, it sounded a bit like "holistic healing" to me. I failed to understand why a 2 ft. deep trench, 4 ft. away from the house would do any good. How could this simple thing correct an extreme water problem that has plagued me for years, cracked my foundation, settled my garage floor and ruined almost every vacation?
The Linear French Drain trench running from the house. PHOTO CREDIT: Jim Sanders
I decided "what the heck". I had to dig by hand using a trenching spade and a pick-ax, because the builder back-filled our property with brick and blacktop. It took quite a bit of time. Because the ground level varies so much on that side of the house, I was not able to achieve exactly 2 ft. deep. It varied from 18" to 30" in spots, but the slope was downhill. The trench is about 80 ft. long. At times, I thought about filling it all in, because I just didn’t believe that it would work.
I stoned it, put tile in, and filled it with #1 round stone. I socked the pipe just for safety measure and I also used geotextile fabric on top, so I could cover with dirt and grass. I also ordered some clay and pitched from the house to the drain.
After a short rain, water is running away from the house. PHOTO CREDIT: Jim Sanders
Result? For the last month, we have had 7 or 8 torrential rains, the worst of which was last night. It rained so hard, that our lawn washed out in spots because of the high clay content. Our sump pump, that normally ran every 7 minutes during and after rain, has not turned on for 4 weeks. The silt at the bottom of the sump well is now dry and cracking. Our crawlspace has not shown a trace of water or even moisture.
Since I couldn’t see correcting the foundation cracks or the garage floor settling and tilting until I corrected the problem's source, I waited to see if the trench drain worked first.
This week, I had a company come in and perform sort of a "mud-jacking" technique on the garage floor, which worked perfectly. Also, during the past few weeks, I parged the cracks in the foundation.
A dry sump pump. PHOTO CREDIT: Jim Sanders
I just wanted you to know how this worked. I stressed for many years over this issue and the solution was nowhere near as difficult as I thought it would be.
As a side note, I went to the end of the drain tile during a hard rain to see what was happening. Water was running out of the drain tile in about the same exact volume that it previously ran out of the weep holes in my crawlspace. This winter will be interesting, because last year, the ground next to the house was so saturated that during a thaw, my sump would run constantly. I'm guessing that the ground between the trench and the house will probably be drier now going into this winter."
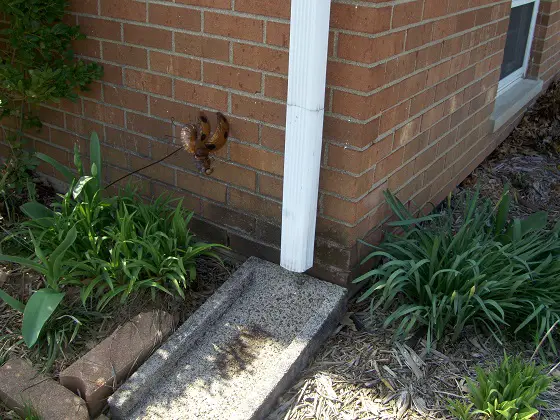
Downspout Drainage Pipes | You're looking at 4-inch PVC SDR-35 sewer and drain pipe. The downspout drain line had to make a bend. In the lower part of the photo the pipe you see connects to a 45-degree fitting. (C) Copyright 2021 Tim Carter
"Never direct roof water to a part of the lot where surface water would not normally drain."
Downspout Drainage Pipes - Use Solid SDR-35
Every year tens of thousands of homeowners suffer from water seepage into their homes caused by nonexistent or poorly constructed downspout drainage systems. Homeowners who are blessed with sandy, well-drained soils escape this problem.
I talk all about sandy soil and how it works at my New Hampshire home in this gutter downspout sizes column.
Does Clay Soil Cause Drainage Issues?
Clay soil causes drainage issues because water can't pass through it. Sandy soil is better
However, a majority of homeowners in the nation face problems with clay-rich soils. Certain clay soils are very resistant to water infiltration. In general the deeper you go in the soil the tougher it is for water to flow. Water builds up in the upper layers of these soils and looks for a place to go. Often that can be your basement, crawl space, or the lower level of your split-level house.
What is Soil?
Soil is made up of solid particles of tiny pieces of rock, organic matter, liquid water, and gas. The gas usually happens to be air. After a rain, this air oozes to the surface as it is replaced by heavier water.
The upper layers of soil usually have the highest air content. The greatest amount of water content and water movement usually takes place in the upper 2 feet or so of most clay soils.
Are Splash Blocks Acceptable?
Splash blocks are not an acceptable way to get rid of roof water. Roof water should be piped away from the house inside a solid 4-inch PVC SDR-35 pipe. This pipe should connect to an approved city stormwater drain system, a stormwater retention pond, or discharge on the ground at a low spot away from the house where the water would NATURALLY DRAIN to the next lot had the house not been built. Never direct roof water to a part of the lot where surface water would not normally drain.
Just before writing this bulletin, I received a book that shows how to make your own concrete splash blocks. These features are common on many homes here in Cincinnati and across the nation. Builders and remodelers have installed these simple 'energy absorbers' for decades. The splash blocks absorb the energy of the falling water. If you think they keep water from collecting around your foundation, well, I've got this bridge I'd like to sell you...
The rainfall that falls on an average roof can be tremendous. I currently live in New Hampshire. The footprint of my house is 1,625 horizontal square feet. During a major storm where 2 inches of rain falls from the sky, my gutters will send 2,0215 gallons of water through my downspout drainage pipes! It's important to realize this is just one storm! Think how much water falls over an entire year.
A typical house in the Chicago area can have in excess of 50,000 gallons of water fall on the roof in just one year. The larger roof in my previous house in Cincinnati, Ohio will send about 145,000 gallons of water through the downspout drainage lines and then exit to French creek in French Park.
Is it a Mistake to Allow Roof Water to Empty Next to a Foundation?
Allowing your roof water to simply discharge next to your foundation and into the soil around your house is a big mistake. This water can seep into full basements or crawlspaces.
The solution is to pipe it away from your house. Some areas allow you to discharge this water onto the soil at the lowest part of your lot. Other cities may require you to hook up your downspout drains to a city stormwater system. Whatever the case may be, you want to get the water away from your house.
What are the Best Downspout Drainage Pipes?
The best downspout drainage pipes are PVC SDR-35 pipes. I prefer 4-inch diameter and it needs to be solid pipe with no holes. You can buy this pipe with fittings that glue on or ones with gaskets that slide together using liquid dish soap as a lubricant.
The worst downspout drainage pipes to use are:
black corrugated pipe
thin-wall 1500-lb.-crush-weight plastic pipe
I dislike these pipes because they crush easily and are tough to clean out should a clog develop and because roots can grow into their joints.
Instead, I choose to use pipes with smooth inner surfaces, thick crush-resistant walls, and tight-sealing joints.
Is Schedule 40 PVC Better Than SDR-35?
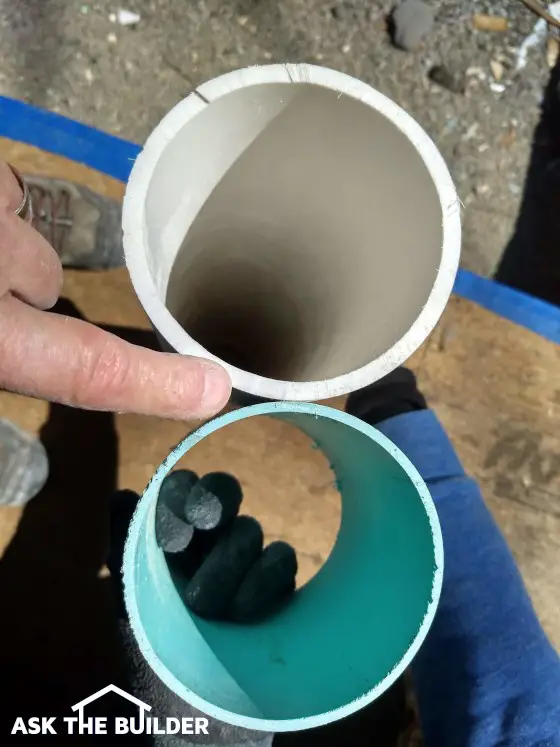
Schedule 40 PVC pipe is better than SDR-35. Schedule 40 has thicker walls and is more expensive. I feel it's overkill for exterior downspout drainage lines. You can use schedule-40 pipe if you want.
Both pipes are 4 inches in diameter, but the white schedule 40 one has much thicker sidewalls than the green SDR-35 pipe. (C) Copyright 2021 Tim Carter
There are two piping materials I'm aware of, both are made from PVC, that meet these criteria. The best material is Schedule 40 PVC. This is the pipe that you see used for indoor sanitary plumbing purposes. The pipe wall thickness is very substantial. The fittings are welded to one another with a special solvent. When dry, you can not separate the pipes. Roots can not penetrate.
The other pipe I like to use is called SDR 35. It is a lighter-weight PVC pipe that is used primarily for sewer pipework. I prefer to use the pipe that has special male and female ends. The female end has two durable rubber gaskets that seal the male connection. This pipe does not leak! You simply coat the rubber with liquid dishwashing soap and push the male end into the hub of the female fitting. BINGO, a solid leakproof connection. The fittings work the same way.
Do You Always Use 4-Inch Diameter Pipe?
I always use a 4-inch diameter pipe for downspout lines. This size can handle vast quantities of water. It is also easy to clean out should a clog develop. If you have a big house and are collecting the 4-inch pipes into one outflow pipe, at some point you may have to upsize to 6-inch pipe. I develop plumbing plans like this and do phone consultations if you need help.
What Fittings Are Used to Change Directions?
You use three primary fittings in buried downspout drainage lines:
sweep 90s
wyes
1/8-bend or 45-degree fittings
A sweep 90 has a gentle bend and it's to be used just below the actual metal downspout. This fitting transitions the water from falling vertically from the roof to begin traveling horizontally under the ground.
NEVER make a bend in a buried drainage line using a 90-degree fitting. If you need to turn 90 degrees, use two 45-degree fittings and it's best to put about a 1-foot piece of pipe between the fittings. This allows a drain-cleaning snake to easily make it around the bend with the least amount of friction.
Wye fittings allow you to connect two downspout drain lines together from two different downspouts. The wye has a gentle 45-degree connection into the main drain line. NEVER use a tee fitting to connect two horizontal buried drain lines.
Tim, Are You a Master Plumber?
I am a licensed master plumber. I was taught years ago that it is a bad practice to install right-angle fittings below ground. Right-angle fittings are generally considered 90-degree elbows. These fittings slow down water flow and make it difficult to rod out or clean out a clogged pipe.
Tim Carter has been a master plumber since 1981. He knows all about plumbing fixture schedules.
If you need to make a 90-degree bend, simply use two 45-degree fittings separated by a small (1 foot) length of straight pipe. If you can put a longer piece in between the two 45's, all the better!
Ninety degree elbows can be used where the buried downspout drain line turns up to capture the actual downspout. In addition to this fitting, you may wish to add a tee or wye fitting just as the pipe exits the soil. This extra fitting can be used as a nifty cleanout. In the event of a clogged pipe, you do not have to remove the downspout from the hub. You simply insert the cleaning snake through the cleanout.
Frequently, I see builders install downspout drain lines close to the foundation of a new house. They do this long before the backfill dirt around your house has compacted. This is a mistake.
Piping installed in uncompacted ground will often develop negative pitch. This means that the pipe drains the wrong way! In many cases, the stress on the pipe caused by compacting soil actually fractures the pipes or cause joints to leak. This is unacceptable.
The better choice is to install this piping in virgin soil which was undisturbed by the original foundation excavation. This may mean staying 5 or 6 feet away from the foundation. What a small price to pay for long term peace of mind!
Always try to lay the pipe in a bed of sand or gravel. Don't allow an underground pipe to act as a beam. If a pipe has a hollow spot beneath it, it will become a beam just as soon as dirt is piled on top of it. The weight of the dirt (often 100 lbs per cubic foot!) will cause the pipe to bend or break.
If your soil is rocky, be sure to cover the downspout drain pipes with sand or smooth gravel. Sharp rocks can crack piping materials.
How Deep are They Buried?
Downspout drain lines do not have to be deeply buried. In fact, if your lot is fairly level, you must be very careful as to how deep they are installed. If you go too deep, the pipe may still be underground when you get to the discharge point!
Think about starting the installation at the point where the pipe will discharge. Work backwards towards your house. Keep in mind that you may have to pass under sidewalks or driveways. Never install a "trap" in a downspout drain line. A trap is a low spot where water or solid particles can collect. The solid particles may eventually clog the pipe. If you live in a cold climate, trapped water may freeze and burst the pipe.
In many instances, I would dig a trench only 16 inches deep. This trench would follow the natural contour of the ground. A trench this deep allows you to have a foot of dirt over the pipe in many locations. Trenching machines work great! Set the depth and it follows the contour of the ground for you. Watch out for buried electric lines! ZOT!
! ! ! See Author's Notes at Bottom of Column ! ! !
Basement Water Seepage & Exterior Drainage
Gravity is a powerful force. It holds us against the surface of the earth so that we don't go flying off into outer space. Gravity is constantly pulling things down hill or closer to the center of the earth. There are many of these things. Some which immediately come to mind are boulders, balls and water. Yes, water!
Plumbers and people who build large dams have made lots of money knowing that water flows downhill. In fact, it (water) has the ability to do lots of work (create electricity, grind flour by turning a millstone, etc.) or do lots of damage (seep into basements, overturn retaining walls, cause mud slides, etc.) The point is, water responds very positively to the force of gravity (quite unlike helium!) and we can use this fact to our advantage.
Crash Course on Soils
OK, admit it, you don't know very much about the dirt you walk on each day in your yard. The only reason I know anything about it is because Dr. Lawrence Lattman, my geomorphology professor, hammered soil facts into my head three days a week in my junior year of college. You see, I thought that majoring in Geology would be neat. It turned out that it was.
Anyway, soil is pretty interesting stuff - just ask anyone who gardens. The only thing you need to know in my crash course is this: Most soils are made up of the following ingredients - small solid particles of rock, organic matter, weathered pieces of rock (clays), void spaces that hold air, and sometimes water.
hose void spaces are the thing that should be of great interest to you. Surely you have dumped a bucket of water or sprayed hose water onto your somewhat dry lawn. Depending upon your soil type, the water may disappear in seconds or minutes. Where did it go? Into the void spaces!
Now for the fun part. We now know that water goes into soil. We can thank the void spaces and gravity for this. Now where does it go? If just a little bit of water enters the soil, it just kind of hangs around that area. The vegetation or small organisms use it. Your trees and grass may be very thirsty. However, things change dramatically after four days of rain, or when two feet of snow melts rapidly.
Things get pretty dynamic at this point. The soil in your yard begins to act like an underground river. As the rain falls, it saturates the soil. The additional rainfall continues to add weight to the soil and pushes (gravity) the water in the soil down deeper AND sideways. The water in the soil is in motion. It, just like anything that is moving, takes the path of least resistance.
In many instances, this path of least resistance is sideways. The reason for this is simple. The deeper you go into most soils one of two things happens: you either hit solid rock (a barrier to the moving water) or the soil simply gets denser and has fewer void spaces to accept the water.
In fact, many of us know that so much water can enter soil that it does become completely saturated. This is why water wells work. Have you ever thought about how a well is built? You dig a hole, line the sides of the hole with rocks, and wait for the water to come in. Hmm, this isn't too much different from the way we build basements! The point I'm trying to make is that if you have a crack in your basement (ANY crack, such as in the wall, floor or where the walls meet the floor), this is a path of least resistance.
Think of it. A bunch of water droplets are in the soil and they are trying to push their way against other droplets, and one says, Hey, look over there! I see a crack and some light! Let's take a shortcut and get down a few feet closer to the center of the earth! I believe I saw this once in a Woody Allen movie.
This is what really happens. Water is constantly looking for a way to get to the center of the earth just as fast as it possibly can. Let's use this fact to our advantage.
Gravity and Gravel
OK, we know about gravity and void spaces. Let's put this knowledge to work. Since we know that water likes void spaces AND that it likes the path of least resistance, what can we use to maximize the quantity of water movement and the speed at which it moves? Of course, I knew you would know the answer. Large rounded washed gravel! Yes, stones that range in size from one inch or so to about one and a quarter inch in diameter!
Think of it, if we make a simulated soil of our own of this gravel, the water will go right for it. I can hear the water droplets yelling at each other now! "Hey guys (& gals), you're not gonna believe what I just found! Huge voids we can pass through. Hurry up, get over here as fast as you can!"
Replacement Soil
Replacement soil is easy. Nothing to it. Now, let's say you have one or more of the following problems: wet basement, soggy plant beds, soggy soil, wet spots in your yard, etc. Let's also say that your yard has some slope to it. Furthermore, let's say that your yard is at the bottom of a very long slope. Think of how much water is in the soil UP-SLOPE from your house! That water is moving and it is headed right for your basement, plant bed, whatever. It kind of reminds me of a medieval battle where an army is about to attack a castle... EUREKA, that's it! What we need is a moat!
Let's surround whatever we want to keep dry with a moat filled with replacement soil and a drainage pipe. Let's call this moat a linear French drain. Those old water droplets are going to come charging through the soil right towards (whatever) and fall through the gravel (gravity) to the bottom of the moat (drainage pipe) and be carried off (run downhill/gravity) away from whatever. Now that doesn't sound so hard, does it?
Traditional French Drains
Building sites that are relatively flat can still employ linear French drains. However, instead of the ends of the drainage pipe daylighting, they instead discharge into a traditional French drain. This structure is simply a large hole, excavated to as deep as you wish to dig, filled with a porous material such as the one inch washed rounded gravel. This structure is simply a large underground 'bucket' which accepts water. It works fine in most instances, unless the local water table is high, or if the water table has risen because of seasonal periods of high rain or snowfall.
If you decide to dig one of these holes, be sure you shore up the hole if you dig below five feet. Trench or sidewall collapse is a real hazard and you could be crushed by hundreds of pounds of falling dirt. BE CAREFUL!
You may wonder if my advice is worth anything. Well, read what Jim Sanders wrote to me when he was at the end of his rope:
"Hi, I just wanted to write to give you the results of my "Trench Drain". I have had a wet crawlspace for 15 years. Water would fill the crawlspace at times, so we actually had to drill weep holes at the base so that it would enter the basement and eventually, the sump pump.
I have tried everything. Several contractors said that the only thing we could do was to bring the water into the house via drainage tile and let it enter the sump pump. That would work, but because I live on a 6' elevation, there is no reason that I should have water problems. It became like clockwork...when it rained, we would rush home from the lake or wherever we were vacationing so that we could be prepared to start the backup generator, in case the power failed. We even had our alarm company put a sump alarm on our system, so they could notify us if we had a power failure. Battery backup was not an option, because sometimes we lose power for days and during any rain, our sump would run every 7 minutes...just like clockwork.
I found your site and read the article on the trench or French drain. At first, it sounded a bit like "holistic healing" to me. I failed to understand why a 2 ft. deep trench, 4 ft. away from the house would do any good. How could this simple thing correct an extreme water problem that has plagued me for years, cracked my foundation, settled my garage floor and ruined almost every vacation?
The Linear French Drain trench running from the house. PHOTO CREDIT: Jim Sanders
I decided "what the heck". I had to dig by hand using a trenching spade and a pick-ax, because the builder back-filled our property with brick and blacktop. It took quite a bit of time. Because the ground level varies so much on that side of the house, I was not able to achieve exactly 2 ft. deep. It varied from 18" to 30" in spots, but the slope was downhill. The trench is about 80 ft. long. At times, I thought about filling it all in, because I just didn’t believe that it would work.
I stoned it, put tile in, and filled it with #1 round stone. I socked the pipe just for safety measure and I also used geotextile fabric on top, so I could cover with dirt and grass. I also ordered some clay and pitched from the house to the drain.
After a short rain, water is running away from the house. PHOTO CREDIT: Jim Sanders
Result? For the last month, we have had 7 or 8 torrential rains, the worst of which was last night. It rained so hard, that our lawn washed out in spots because of the high clay content. Our sump pump, that normally ran every 7 minutes during and after rain, has not turned on for 4 weeks. The silt at the bottom of the sump well is now dry and cracking. Our crawlspace has not shown a trace of water or even moisture.
Since I couldn’t see correcting the foundation cracks or the garage floor settling and tilting until I corrected the problem's source, I waited to see if the trench drain worked first.
This week, I had a company come in and perform sort of a "mud-jacking" technique on the garage floor, which worked perfectly. Also, during the past few weeks, I parged the cracks in the foundation.
A dry sump pump. PHOTO CREDIT: Jim Sanders
I just wanted you to know how this worked. I stressed for many years over this issue and the solution was nowhere near as difficult as I thought it would be.
As a side note, I went to the end of the drain tile during a hard rain to see what was happening. Water was running out of the drain tile in about the same exact volume that it previously ran out of the weep holes in my crawlspace. This winter will be interesting, because last year, the ground next to the house was so saturated that during a thaw, my sump would run constantly. I'm guessing that the ground between the trench and the house will probably be drier now going into this winter."
! ! ! See Author's Notes at Bottom of Column ! ! !
French Drain Design
This sketch is a cutaway view of a linear French drain system. The view would be what you would see if you could stick your head in the ground and look down the trench. The key to understanding how the system works is knowing that there is a vast quantity of air in the upper horizons of soil. In addition, we know that gravity will pull water down slope. Furthermore, water will absolutely take the path of least resistance. It will flow down through the gravel and into the pipe much more readily than force its way past soil particles!
The French drain system will work wonderfully even if the pipe is installed dead level. It will not work if you install the pipe so that it slopes uphill. If your lot goes up and down, you will have to use a builders level or laser to set the pipe level or to set it with a slight down slope pitch. If you pitch the pipe, 1/8 inch per foot of fall is sufficient. Of course if you want it to slope more than 1/8 inch per foot, that would not pose a problem!
The trick to the whole system is providing a means for the end of the French drain system to "daylight" or expose itself on the lowest portion of your lot. This is where the collected water will discharge. You can often disguise this pipe exit point with decorative gravel, boulders or large rocks. You may also want to plant vegetation that likes to have its feet wet! Anything will look better than a simple pipe sticking out of the ground.
You may wonder if my advice is worth anything. Well, read what Jim Sanders wrote to me when he was at the end of his rope:
"Hi, I just wanted to write to give you the results of my "Trench Drain". I have had a wet crawlspace for 15 years. Water would fill the crawlspace at times, so we actually had to drill weep holes at the base so that it would enter the basement and eventually, the sump pump.
I have tried everything. Several contractors said that the only thing we could do was to bring the water into the house via drainage tile and let it enter the sump pump. That would work, but because I live on a 6' elevation, there is no reason that I should have water problems. It became like clockwork...when it rained, we would rush home from the lake or wherever we were vacationing so that we could be prepared to start the backup generator, in case the power failed. We even had our alarm company put a sump alarm on our system, so they could notify us if we had a power failure. Battery backup was not an option, because sometimes we lose power for days and during any rain, our sump would run every 7 minutes...just like clockwork.
I found your site and read the article on the trench or French drain. At first, it sounded a bit like "holistic healing" to me. I failed to understand why a 2 ft. deep trench, 4 ft. away from the house would do any good. How could this simple thing correct an extreme water problem that has plagued me for years, cracked my foundation, settled my garage floor and ruined almost every vacation?
The Linear French Drain trench running from the house. PHOTO CREDIT: Jim Sanders
I decided "what the heck". I had to dig by hand using a trenching spade and a pick-ax, because the builder back-filled our property with brick and blacktop. It took quite a bit of time. Because the ground level varies so much on that side of the house, I was not able to achieve exactly 2 ft. deep. It varied from 18" to 30" in spots, but the slope was downhill. The trench is about 80 ft. long. At times, I thought about filling it all in, because I just didn’t believe that it would work.
I stoned it, put tile in, and filled it with #1 round stone. I socked the pipe just for safety measure and I also used geotextile fabric on top, so I could cover with dirt and grass. I also ordered some clay and pitched from the house to the drain.
After a short rain, water is running away from the house. PHOTO CREDIT: Jim Sanders
Result? For the last month, we have had 7 or 8 torrential rains, the worst of which was last night. It rained so hard, that our lawn washed out in spots because of the high clay content. Our sump pump, that normally ran every 7 minutes during and after rain, has not turned on for 4 weeks. The silt at the bottom of the sump well is now dry and cracking. Our crawlspace has not shown a trace of water or even moisture.
Since I couldn’t see correcting the foundation cracks or the garage floor settling and tilting until I corrected the problem's source, I waited to see if the trench drain worked first.
This week, I had a company come in and perform sort of a "mud-jacking" technique on the garage floor, which worked perfectly. Also, during the past few weeks, I parged the cracks in the foundation.
A dry sump pump. PHOTO CREDIT: Jim Sanders
I just wanted you to know how this worked. I stressed for many years over this issue and the solution was nowhere near as difficult as I thought it would be.
As a side note, I went to the end of the drain tile during a hard rain to see what was happening. Water was running out of the drain tile in about the same exact volume that it previously ran out of the weep holes in my crawlspace. This winter will be interesting, because last year, the ground next to the house was so saturated that during a thaw, my sump would run constantly. I'm guessing that the ground between the trench and the house will probably be drier now going into this winter."
Often, builders or contractors do not install drain tile systems on structures with shallow foundations (crawlspaces, no basements, or slabs). This can be a mistake. Shallow foundations are very susceptible to movement caused by soils that can expand or contract due to changes in moisture.
Many areas of the country have soils which fit this category. They are frequently called expansive clays. These soils are similar to synthetic sponges. When dry they shrink and when wet, they swell. Imagine what this kind of movement does to your structure. This movement is frequently referred to as settling. It often causes structural cracks in foundations, brickwork, plaster, doors and windows that stick, etc. A large majority of this damage can be avoided by simply installing a drain tile system in areas that have this type of soil. The only difference is one added pipe. However, instead of draining water the system will be used to add water.
These expansive clays can be stabilized. As long as the moisture content remains the same, the soils have a tendency not to shrink. Shallow foundation systems are more susceptible to droughts than deep foundations because the footings are closer to the surface. During dry spells or droughts, dry soil can extend 6-8' below the surface.
You can check with your county agricultural office to see if the soil in your area shrinks or swells in response to moisture changes.
The trick to stabilizing the soil is to keep it moist in periods of dry weather. The foundation drain system can easily accomplish this as long as you add a "T" fitting to the system at some point and extend a pipe to the surface. Place a removable cap on the end of this pipe. In dry weather, put a garden hose in the pipe and turn the faucet on low. Let the hose run over night once a week until the dry spell is over. This simple technique will stabilize your foundation for years to come.
A neighbor told me that mushrooms in my yard are a sign that I have termites. Can you tell me if there is any truth in this statement? Thank you,
James
James,
There is no truth whatsoever in this statement. It leads me to believe your neighbor might have eaten one of them and it is the type that produces hallucinations.
Mushrooms are fungal growth that often are based in decaying wood in your yard. The source could be an old branch or a twig.
The mushroom is actually the last hurrah of the fungal growth. The mature mushroom cap releases millions of spores so the fungus can continue to propagate.
Termites do eat wood, but they do not produce mushrooms.
Every now and then in each industry there is a major breakthrough. The newer termite baiting systems shook up the pest control industry like no other discovery in the past. Prior to these systems termites were treated using barrier chemicals. Injecting chemicals into the soil works fine if you indeed treat all of the soil. It also is a good method if you can use a long lasting chemical that doesn't harm any other animals or plants.
Well, some barrier chemicals worked too well and several have been banned over the years, the most recent one being Dursban. Clordane was a powerful barrier chemical that I used when it was legal, but it was removed from the marketplace about 15 years ago. It simply didn't break down and was working its way through the food chain by migrating through soil and ground water. Keep in mind that the barrier chemicals didn't kill. They just made the termites move on to a different food source.
Baiting systems are different. Termites find a bait or poison in a monitoring system. The chemicals are designed to slowly kill the worker termites. The first system to hit the market was the Sentricon system made by Dow AgroSciences. It hit the market about seven years ago and made a huge splash.
Currently it is the only termite baiting system that has been independently tested and certified to eliminate termite colonies. In fact within the past few days it was announced that Sentricon is the only termite bait system now listed with the Southern Building Code Congress International (SBCCI) as a complete stand-alone alternative to liquid termiticide treatments. The other baiting systems may indeed work and over time they may also gain such status, but I have not been able to find evidence that they are equal to or better than Sentricon. Here are the major players in the termite baiting playing field:
On March 2, 1994 the EPA granted registration to Dow AgroSciences for hexaflumuron. This is the active ingredient in Sentricon. It is a slow acting growth regulator. It prevents termites from molting. Termites need to grow a new exterior skin on a regular basis. If they can't, they die. One of the keys of this chemical is that it is indeed slow acting. Termites are smart but they can't seem to figure out that the bait stations are killing them.
FirstLine and FirstLine GT FMC Corporation
Two years after Dow received their EPA registration, the FMC Corporation got one for a similar system. The FirstLine product is an above ground system and the FirstLine GT is a below ground system like Sentricon. The poison is different. FirstLine and FirstLine GT use sulfluramid which is a slow-acting stomach poison. This chemical prevents food from being turned into energy. Within a few weeks, the worker termites simply starve to death.
Subterfuge BASF
This product was introduced in 1997. Its active ingredient is hydramethylnon. It works just like the sulfluramid in FirstLine. Once ingested by termites, they seem to die within two to three weeks. The manufacturer claims that this bait/poison is preferred by termites. Don't ask me how they got them to talk!
Terminate Spectracide
This is a system that homeowners can buy at home centers. They look like fertilizer stakes. You simply hammer them into the ground and they supposedly work like all the others. There is another system like this out there called HomeChoice.
Scientists are very wary of these DIY systems. They feel that these baiting systems need periodic and ongoing monitoring to see if the termites have died and are indeed not attacking the structure. If you think you just hammer stakes into the ground and then walk away with nary a worry, you are mistaken!
Column B373
Expert Advice For Your Home
Subscribe to the FREE Ask the Builder newsletter to receive professional advice for your home. Complete the form below and each week you'll get:
DIY Tips
Tool Reviews
Project Guides
Product Discounts, Giveaways & more.
Unsubscribe at any time. We respect your email privacy.