! ! ! See Author's Notes at Bottom of Column ! ! !
Basement Water Seepage & Exterior Drainage
Gravity is a powerful force. It holds us against the surface of the earth so that we don't go flying off into outer space. Gravity is constantly pulling things down hill or closer to the center of the earth. There are many of these things. Some which immediately come to mind are boulders, balls and water. Yes, water!
Plumbers and people who build large dams have made lots of money knowing that water flows downhill. In fact, it (water) has the ability to do lots of work (create electricity, grind flour by turning a millstone, etc.) or do lots of damage (seep into basements, overturn retaining walls, cause mud slides, etc.) The point is, water responds very positively to the force of gravity (quite unlike helium!) and we can use this fact to our advantage.
Crash Course on Soils
OK, admit it, you don't know very much about the dirt you walk on each day in your yard. The only reason I know anything about it is because Dr. Lawrence Lattman, my geomorphology professor, hammered soil facts into my head three days a week in my junior year of college. You see, I thought that majoring in Geology would be neat. It turned out that it was.
Anyway, soil is pretty interesting stuff - just ask anyone who gardens. The only thing you need to know in my crash course is this: Most soils are made up of the following ingredients - small solid particles of rock, organic matter, weathered pieces of rock (clays), void spaces that hold air, and sometimes water.
hose void spaces are the thing that should be of great interest to you. Surely you have dumped a bucket of water or sprayed hose water onto your somewhat dry lawn. Depending upon your soil type, the water may disappear in seconds or minutes. Where did it go? Into the void spaces!

Underground Rivers
Now for the fun part. We now know that water goes into soil. We can thank the void spaces and gravity for this. Now where does it go? If just a little bit of water enters the soil, it just kind of hangs around that area. The vegetation or small organisms use it. Your trees and grass may be very thirsty. However, things change dramatically after four days of rain, or when two feet of snow melts rapidly.
Things get pretty dynamic at this point. The soil in your yard begins to act like an underground river. As the rain falls, it saturates the soil. The additional rainfall continues to add weight to the soil and pushes (gravity) the water in the soil down deeper AND sideways. The water in the soil is in motion. It, just like anything that is moving, takes the path of least resistance.
In many instances, this path of least resistance is sideways. The reason for this is simple. The deeper you go into most soils one of two things happens: you either hit solid rock (a barrier to the moving water) or the soil simply gets denser and has fewer void spaces to accept the water.
In fact, many of us know that so much water can enter soil that it does become completely saturated. This is why water wells work. Have you ever thought about how a well is built? You dig a hole, line the sides of the hole with rocks, and wait for the water to come in. Hmm, this isn't too much different from the way we build basements! The point I'm trying to make is that if you have a crack in your basement (ANY crack, such as in the wall, floor or where the walls meet the floor), this is a path of least resistance.
Think of it. A bunch of water droplets are in the soil and they are trying to push their way against other droplets, and one says, Hey, look over there! I see a crack and some light! Let's take a shortcut and get down a few feet closer to the center of the earth! I believe I saw this once in a Woody Allen movie.
This is what really happens. Water is constantly looking for a way to get to the center of the earth just as fast as it possibly can. Let's use this fact to our advantage.
Gravity and Gravel
OK, we know about gravity and void spaces. Let's put this knowledge to work. Since we know that water likes void spaces AND that it likes the path of least resistance, what can we use to maximize the quantity of water movement and the speed at which it moves? Of course, I knew you would know the answer. Large rounded washed gravel! Yes, stones that range in size from one inch or so to about one and a quarter inch in diameter!
Think of it, if we make a simulated soil of our own of this gravel, the water will go right for it. I can hear the water droplets yelling at each other now! "Hey guys (& gals), you're not gonna believe what I just found! Huge voids we can pass through. Hurry up, get over here as fast as you can!"
Replacement Soil
Replacement soil is easy. Nothing to it. Now, let's say you have one or more of the following problems: wet basement, soggy plant beds, soggy soil, wet spots in your yard, etc. Let's also say that your yard has some slope to it. Furthermore, let's say that your yard is at the bottom of a very long slope. Think of how much water is in the soil UP-SLOPE from your house! That water is moving and it is headed right for your basement, plant bed, whatever. It kind of reminds me of a medieval battle where an army is about to attack a castle... EUREKA, that's it! What we need is a moat!
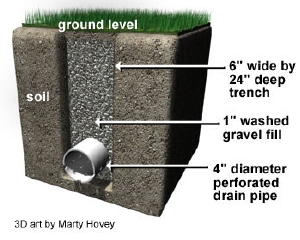
Let's surround whatever we want to keep dry with a moat filled with replacement soil and a drainage pipe. Let's call this moat a linear French drain. Those old water droplets are going to come charging through the soil right towards (whatever) and fall through the gravel (gravity) to the bottom of the moat (drainage pipe) and be carried off (run downhill/gravity) away from whatever. Now that doesn't sound so hard, does it?
Traditional French Drains
Building sites that are relatively flat can still employ linear French drains. However, instead of the ends of the drainage pipe daylighting, they instead discharge into a traditional French drain. This structure is simply a large hole, excavated to as deep as you wish to dig, filled with a porous material such as the one inch washed rounded gravel. This structure is simply a large underground 'bucket' which accepts water. It works fine in most instances, unless the local water table is high, or if the water table has risen because of seasonal periods of high rain or snowfall.
If you decide to dig one of these holes, be sure you shore up the hole if you dig below five feet. Trench or sidewall collapse is a real hazard and you could be crushed by hundreds of pounds of falling dirt. BE CAREFUL!
Author's Notes:
You may wonder if my advice is worth anything. Well, read what Jim Sanders wrote to me when he was at the end of his rope:
"Hi, I just wanted to write to give you the results of my "Trench Drain". I have had a wet crawlspace for 15 years. Water would fill the crawlspace at times, so we actually had to drill weep holes at the base so that it would enter the basement and eventually, the sump pump.
I have tried everything. Several contractors said that the only thing we could do was to bring the water into the house via drainage tile and let it enter the sump pump. That would work, but because I live on a 6' elevation, there is no reason that I should have water problems. It became like clockwork...when it rained, we would rush home from the lake or wherever we were vacationing so that we could be prepared to start the backup generator, in case the power failed. We even had our alarm company put a sump alarm on our system, so they could notify us if we had a power failure. Battery backup was not an option, because sometimes we lose power for days and during any rain, our sump would run every 7 minutes...just like clockwork.
I found your site and read the article on the trench or French drain. At first, it sounded a bit like "holistic healing" to me. I failed to understand why a 2 ft. deep trench, 4 ft. away from the house would do any good. How could this simple thing correct an extreme water problem that has plagued me for years, cracked my foundation, settled my garage floor and ruined almost every vacation?
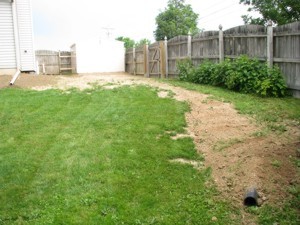
The Linear French Drain trench running from the house. PHOTO CREDIT: Jim Sanders
I decided "what the heck". I had to dig by hand using a trenching spade and a pick-ax, because the builder back-filled our property with brick and blacktop. It took quite a bit of time. Because the ground level varies so much on that side of the house, I was not able to achieve exactly 2 ft. deep. It varied from 18" to 30" in spots, but the slope was downhill. The trench is about 80 ft. long. At times, I thought about filling it all in, because I just didn’t believe that it would work.
I stoned it, put tile in, and filled it with #1 round stone. I socked the pipe just for safety measure and I also used geotextile fabric on top, so I could cover with dirt and grass. I also ordered some clay and pitched from the house to the drain.
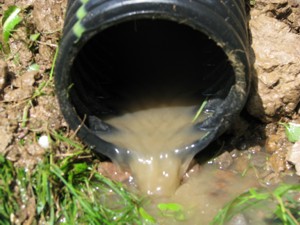
After a short rain, water is running away from the house. PHOTO CREDIT: Jim Sanders
Result? For the last month, we have had 7 or 8 torrential rains, the worst of which was last night. It rained so hard, that our lawn washed out in spots because of the high clay content. Our sump pump, that normally ran every 7 minutes during and after rain, has not turned on for 4 weeks. The silt at the bottom of the sump well is now dry and cracking. Our crawlspace has not shown a trace of water or even moisture.
Since I couldn’t see correcting the foundation cracks or the garage floor settling and tilting until I corrected the problem's source, I waited to see if the trench drain worked first.
This week, I had a company come in and perform sort of a "mud-jacking" technique on the garage floor, which worked perfectly. Also, during the past few weeks, I parged the cracks in the foundation.
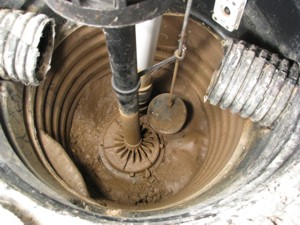
A dry sump pump. PHOTO CREDIT: Jim Sanders
I just wanted you to know how this worked. I stressed for many years over this issue and the solution was nowhere near as difficult as I thought it would be.
As a side note, I went to the end of the drain tile during a hard rain to see what was happening. Water was running out of the drain tile in about the same exact volume that it previously ran out of the weep holes in my crawlspace. This winter will be interesting, because last year, the ground next to the house was so saturated that during a thaw, my sump would run constantly. I'm guessing that the ground between the trench and the house will probably be drier now going into this winter."
- Jim Sanders, Upstate area - New York
CLICK HERE to get FREE & FAST BIDS from local drainage expert contractors.
Column B70
Related Column: Curtain Drain Tips