Stencil Companies

Stencil Sources

Probably the first place to look for some stencils is at your local craft store. There are two national chains located in my town. They are Michael's and Franks. Both have a good selection of simple stencils and overlay stencils.

I would also consider going on the Web. I went to one Search Engine and found several stencil companies that have a wide assortment of simple and overlay stencils. One of the companies - Priscille's Stencils - had a very cool construction equipment stencil for a young boy's room!

Simply spend some time on the Web and you will undoubtedly find 10 to 15 stencil companies.

Other Stencil Companies

Here is a list of stencil companies that I was able to gather with my wife's help. All of these companies make stencils that are very cool. Many of the stencils also tell you right on the package what colors to use to duplicate the pattern that you actually see. There is virtually no guess work. You simply need to practice yourself.

  • Stencil Ease
    This company makes a swell collection of overlay stencils.

  • Provo Craft
    They have lots of animal and vegetable stencils.
  • Delta Technical Coatings
    These guys have a huge selection of stencils. You will not be disappointed with this company.
  • Plaid Enterprises, Inc.
    They make some fine overlay stencils!

Home Entertainment Centers

Furniture Grade

Entertainment centers have been around for a long time in one form or another. Years ago, a visit to a furniture store would yield two or three different types of centers that were made to house all sorts of stereo equipment. Your choices going this route were pretty limited.

You could also contract with a custom cabinet builder to construct a center that had all of the bells and whistles. But this path was often taken by the wealthy and those who had just hit the lottery.

The fast growing trend of entertainment as a whole caught the eye of the cabinet companies that for years produced kitchen and bath cabinets. They were already set up to produce stock and semi-custom cabinets. Providing different entertainment center possibilities was not too much of a stretch for them. The result is a huge dividend for ordinary consumers such as you and I. You can visit just about any kitchen cabinet showroom and walk out with a brochure showing you all sorts of entertainment center cabinets. These different components can be mixed and matched to fill just about any alcove or wall space that you wish to dedicate to home entertainment.

Assembly Tips

The cabinets used in entertainment centers are not much different from regular kitchen cabinets. Well, that isn't entirely true. Some of the cabinets are huge! Take my TV tower for example. The cabinet was so big that I had to cut it into two pieces to get it down my basement steps! Be sure you think about this before you sign a custom order!

How did I cut this cabinet without any visible signs of damage after it was reassembled? Two things worked in my favor: first, the TV tower was 6 inches taller than all of the rest of the cabinets. Who would know if I shortened it by 1/4 inch? Second, the cabinet had nearly full coverage drawers below the TV area. These drawers covered the cabinet frame to such an extent that you can only see 1/8 inch of frame on either side of the drawer front.

My father-in-law, who builds cabinets as a hobby, suggested that I use a router with a brand new 1/4 inch bit to do the job. I built a frame that was attached to the covered sides of the TV tower that the router glided on to keep the cut straight and uniform. The result was perfection. Unless I point out the fine line on the sides of the cabinet, you can't tell where I cut it.

The High Spot

Before you start to install a wide expanse of cabinets like mine, you need to find the highest spot in the floor. Then reference this spot in relation to the TV tower. I found that I had to shim up my TV tower 1/4 inch to make sure that its bottom was level with the highest spot in the floor.

I then installed the TV tower first and worked away from this cabinet going to each corner. One of the things that made assembly simple was that the different cabinets had different depths and heights. This actually makes alignment rather easy.

The only aspect that is critical is to make sure the heights of the side cabinets were in line. This makes installing the decorative crown mold a cinch.


Creating the Design for My Center

I didn't do the plan for my entertainment center. It was important to me to make sure that the available space was fully utilized and that the look was superb. This is why I made sure a professional designer created the plan for my entertainment center.

I urge you to visit a local cabinet company that just sells cabinetry. They usually have trained planners who have taken many design courses and often are tested before they are granted a certification.

The extra time spent working with a professional will pay off because they know where problems happen and how to maximize a design for your needs.

See photos of my Entertainment Center by CLICKING HERE.

Plastic Laminate Manufacturers


Here is a listing of plastic laminate manufacturers you can call for their company information.

Plastic Laminate Manufacturers

  • Arborite
  • Advanced Technology Incorporated
  • Coveright
  • Formica Corporation
  • Nevamar Decorative Surfaces
  • Panolam Industries
  • Wilsonart International Inc.

Laminate Associations

  • Laminating Materials Association
  • Kitchen Cabinet Manufacturers Association

Plastic Laminate Uses

A Strange Beginning

Plastic laminate was born in an entirely different industry. With the growth of the electronic industry in the early 1900's, engineers needed an insulating material to mount electrical components.This material needed to be rigid, non-conductive, easy to work, etc. Somehow, somebody soaked some paper in a melamine resin. After heating, the paper became hard. BINGO! Plastic laminate was born. The engineers used this material to make circuit boards and other insulators.

This process was invented by a company called Micarta. Evidently, someone in management had a bright idea one day. They thought, "Why not use a decorative paper as the top layer?" Yes, you guessed it! Plastic laminate for the home was on its way.

Well, the top brass at Micarta, so I'm told, didn't want to get into this market. They wanted to make electronic equipment. Several of the managers decided to leave and start their own company.

They were sitting around trying to come up with a name and not having much luck. The story goes that one of them said, "Well, we are now former employees of Micarta. What are we going to do?" It was that easy! Believe it or not, this is a true story.

Laminate, What is it?

In a nutshell, plastic laminate is simply multiple layers of thin paper which is soaked in a melamine resin. These impregnated layers of paper are subject to high pressure and temperature which hardens the paper and resin.

The colors, patterns, etc. that you see are just the top layer of decorative paper. Beneath the decorative paper layer lie sheets of brown kraft paper. These layers of kraft paper impart resilience or resistance to impact. The more layers of kraft paper, the better the laminate can withstand impact.

That Brown Line

Probably the biggest complaint concerning plastic laminate is the telltale brown line one often sees at the edge of the laminate. This brown line is simply the layers of kraft paper.

Manufacturers responded some time ago and produced laminate that was merely layer upon layer of decorative paper. This produced a solid color throughout the laminate. However, the cost of this laminate was extremely high. In fact, in some marketplaces, the cost was nearly the same as the solid surface countertops.

Selection Extravaganza

The competition in the plastic laminate market is fierce. This competition is healthy. Two by-products of this competition are low prices and incredible selection. One major manufacturer has over 200 different types of laminate to choose from.

Solid colors, imitation stone finishes, wood grains both natural and frosted, imitation marble, and numerous patterns make for a tough time when trying to select a laminate for a countertop or cabinet face.

Decorative Moldings

If you haven't visited a kitchen cabinet showroom lately, you're in for a surprise. Remember those rolled, rounded bullnose countertop edges? Those are history! Now there are new distinctive decorative edge moldings that incorporate different color and textured laminates or actual wood to finish the edges of countertops.

These new edge treatments take care of the brown edge problem. The laminate that is used in these edgings is actually mitred so that the kraft paper is hidden. The added benefit is the ability to mix and match different laminates within these edge treatments. You can create accent stripes within the countertop.

What's more, there are at least nine different edge treatment styles you can choose from. Some are rounded, while others are square or beveled. Some will accept accent strips of a different laminate or other material.

Solid wood moldings are also available which are specifically made for the countertops. Often the manufacturers will offer these in different species to compliment their entire line of laminates.

Good, but...

Plastic laminate is a great material but it is by no means indestructible. The plastic coating which acts as the top layer can be damaged. Hot pots and pans can scorch the material. Cigarettes will easily burn a plastic laminate top. Abrasive cleaners will scratch these materials.

Certain foods, liquids (grape juice, red wine, etc.) can and will stain plastic laminate. Although the clear top layer of laminate looks impervious, it is not in many cases.

Plastic laminate is hard, but not hard enough to use as a cutting surface. A sharp knife will easily scratch plastic laminate. Don't be tempted to use it as a cutting board.

Different Thicknesses

Plastic laminate is usually available in three different thicknesses: general purpose, vertical surface and post forming.

The general purpose laminate is what most of us are familiar with. This product is the thickest laminate measuring out at .050 inches! Yes, that is pretty thin. That's nothing, the vertical grade material is usually only half as thick as that.

The only difference between the two is the amount of brown kraft paper beneath the decorative paper. The general purpose material, because of this added paper, can absorb more shock. As such, it tends to resist chipping.

The vertical grade material is used on cabinet fronts, display cases or any other vertical surface that receives little contact with objects.

The post forming laminate is very flexible. It is used where laminate is applied to curved or rolled substrates.

Plastic Laminate Care Tips

Soaps

Most cleaning solutions, or soaps, are alkaline. Alkaline substances can etch the plastic top layer of plastic laminate, depending upon how strong they are and how long they are in contact with the laminate.

New laminate countertops can be damaged by residual soap which is not rinsed off a countertop! For example, let's say you inadvertently leave some soap or cleaning solution on a countertop. Then you set a glass or a plate, which is wet, onto the countertop. The moisture on the bottom of the glass and/or plate can reactivate the soap. Hours later you move the glass or plate and see a ring. Try as you may, the ring does not rinse or wipe off. The solution: Always rinse off laminate countertops with clean water after washing.

Difficult Stains

For spots that cannot be removed by a standard mild dishwashing liquid soap, try an all purpose or bathroom cleaner. Be sure that the cleaner is non-abrasive. Abrasive cleaners, like Comet® or Soft Scrub® can easily scratch a plastic laminate surface. If this happens, you will probably be unable to restore the original luster of the laminate.

When using these stronger cleaners, work in small areas. Use good lighting. Monitor the laminate to make sure the cleaner is not etching the surface.

Damaging Household Products!

Certain common household products can really damage or discolor laminate countertops. Common drain cleaners that contain lye will scar plastic laminate. Dyes will discolor and stain plastic laminate. For example, don't use hair, clothing, or food dyes on or near plastic laminate. You may be in for an unpleasant surprise!

Oven cleaners have strong alkaline chemicals in them. Overspray or cleaner which has dripped down the side of a can can scar and etch your new countertop.

Rust removers will cause irreversible damage to your plastic laminate. Keep them away from your countertops! Rust itself will stain your countertop. As such, if you use steel wool for cleaning, don't set it down to dry on your plastic laminate.

Toilet bowl cleaners also contain strong alkaline chemicals. Keep these off your laminate.

Certain foods and liquids are alkaline and acidic: grape juice, citrus drinks (OJ, grapefruit juice,etc.), tomatoes, etc. Be careful - prolonged exposure to these things may stain your new countertop.

Recommended Household Cleaners for most plastic laminates (Be sure to check with your manufacturer!)

All of the following are Trademark or Registered Names

  • Clorox
  • Formula 409
  • Ajax
  • Dawn
  • Dow Bathroom Cleaner with Scrubbing Bubbles
  • Fantastik
  • Favor
  • Pledge
  • Windex
  • Lestoil
  • Glass Plus
  • Grease Relief
  • Lysol Brand Disinfectant Basin/Tub/Tile cleaner
  • Mr. Clean
  • TOP JOB

Solid Surface Countertop Materials & Manufacturers

Solid Surface Countertop Materials

The plastics industry flourished in the 1960's and 70's. It is still a growth industry today. There have been significant advancements in plastics technology which allow plastics to replace more conventional materials.

Certain plastics are extremely durable and have exceptional hardness. These plastics have found their way into the kitchen countertop market within the past twenty years.

Products which are technologically advanced often are very expensive when first introduced into the marketplace. Solid surface countertops were by no means an exception. These materials were very expensive 10 to 15 years ago.

Today, solid surface materials are still somewhat expensive, however, the price continues to drop each year. Even at current price levels, they are a tremendous value. These materials offer many advantages over other countertop materials.

CLICK HERE to get FREE & FAST BIDS from local contractors who can install a new Solid Surface Countertop in your home.

Many solid surface countertops that are currently available are, for the most part, primarily plastic. There are other solid surface materials, such as cultured marble, granite, slate, marble, concrete, etc., however, these materials don't perform like the plastic compounds.

The plastic compounds have superior stain resistance. Many of them have tremendous impact resistance (it's tough to crack them.) Some of them can be seamed together into one solid piece using special compounds. Manyof them can be repaired easily. Certain plastic solid surfacing materials can be bent into curves.

The overall performance characteristics of the solid surface countertop materials made from plastics depend upon the type of plastic from which the countertop is made. There are differences in the chemical makeup of the different plastics. Some of the countertops contain acrylic plastics in varying quantities. While other countertops are a blend of polyester plastic and acrylics.

The 1990 Modern Plastics Encyclopedia states that "Acrylic is selected for many applications because of a unique combination of properties... good surface hardness... exceptional weatherability... chemical and environmental resistance... and excellent mechanical stability..." Based upon this information, one might assume that those materials which have the highest acrylic content quite possibly will outperform the other materials.

My experience with these countertop materials has been extremely favorable. They are very beautiful and easy to care for. Because they are solid, colors and patterns are uniform. Scratches and minor burns can be sanded out.

Virtually any edge treatment is possible, as these materials work just like wood. You can cut any shape you like on the edge. When installed by professionals, it is virtually impossible to determine the location of seams. These characteristics are simply not available in any other countertop material that I am aware of.

Many of my past remodeling jobs included solid surfacing materials. Each and every customer of mine was pleased with the material. Not one customer has ever regretted installing the solid surfacing materials. I suggest that you give them serious consideration as the material for your next kitchen or bath countertop.

Care & Maintenance of Solid Surface Materials

Many of these solid surface materials are unharmed by virtually any liquid you would normally have around your house. However, to be on the safe side, always clean up spills promptly.

These materials clean up with ordinary soap and water very quickly. They never need to be sealed. Do NOT place hot items (pots, pans, pizza pans, cookie sheets, etc.) directly on these tops! Many of them can be permanently discolored and damaged by excessive concentrated heat! Always place hot objects on trivets.

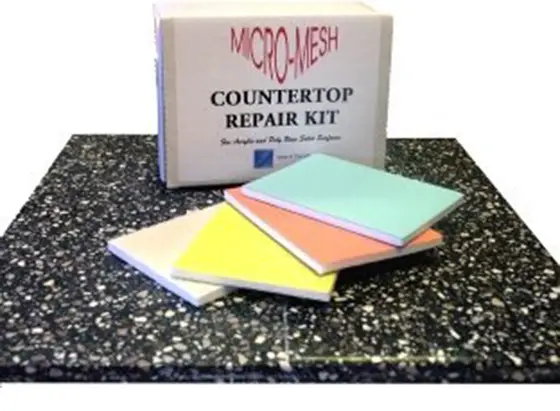
If you've suffered damage to your Solid Surface Countertop CLICK THE IMAGE to get an all inclusive kit to repair the damage.

Minor scratches and burns can often be buffed out using readily available abrasive cleansers, very fine sandpaper, or a 3M Scotch Brite pad. However, do not attempt to buff scratches or gouges unless you receive specific instructions from a local distributor. Each solid surface material has its own distinct method of repairing scratches, burns, gouges, etc.

Most of the solid surface manufacturers provide a very nifty maintenance and repair kit on new installations. If you do not have one, determine who made your countertop and see about getting one.

Check out the manufacturers' web sites for excellent care and maintenance information. As you can imagine, they want the countertops to look brand new at all times. What better selling tool, than your satisfaction! Should you purchase one of these materials, I hope you are as satisfied as my past customers

Solid Surface Countertop Manufacturers

  • Aristech Acrylics
    Acrystone Solid Surface.
  • Corian
    Corian is a solid, nonporous material which contains a unique blend of natural minerals and 100 percent high-performance acrylic.
  • Avonite
    Avonite is a nonporous homogeneous blend of polyester/acrylic alloys and fillers.
  • Formica Solid Surfacing
    Solid Surfacing is a fully densified composite material of modified resin and mineral filler.
  • Cerata - Hartson Kennedy
    Cerata is an isophthalic/neopentyglycol resin with acrylic modifiers, ATH fillers, pigments, matrix chips and catalysts.
  • Florenata
    Non-porous, seamless countertops.
  • Wilsonart Gibraltar
    Gibraltar is a homogeneous blend of polyester and acrylic resins, fire-retardant fillers and proprietary coloring agents.
  • Swanstone
    Swanstone is a homogeneous, nonporous reinforced, modified acrylic filled with natural minerals.
  • Centura
    Centura is a polymerized mixture of polyester resin and hydrated Alumina.
  • LG HI-MACS Volcanics
    Acrylic solid surfaces.
  • Lippert Corp.
    Solid surface countertops and sinks.
  • Meganite
    Non-porous, homogeneous solid surface countertops.
  • Samsung
    Staron 100% acrylic solid surface countertops.
  • Askilan
    Askilan is a fiber reinforced, temperature resistant composite material, like those developed and used for aircraft and space applications. 

CLICK HERE to get FREE & FAST BIDS from local contractors who can install a new Solid Surface Countertop in your home.

Column B041

Functional Kitchen Design Ideas

Dishwashing

Consider elevating your dishwasher. If you elevate your dishwasher by nine to 12 inches, you will be surprised how easy it is to load and unload. Never again will you have to bend over! This idea causes the countertop, in many instances, to be interrupted. The resulting platform is an excellent height for a microwave, TV, or radio.

Lighting

Give serious consideration to both direct and indirect lighting. This means using recessed lighting to cast light on specific work areas and using indirect light for general lighting purposes. Fluorescent lights hidden above wall cabinets can produce magnificent results if disguised well and balanced within the room.

Sound Considerations

Kitchens are noisy places. The materials in kitchens also don't help matters much, as they easily reflect or bounce sound. Consider cork flooring, which is easy on your feet and absorbs sound (see Bulletin Cork Flooring Products). Also, if an island is in your plans, consider building walls around three sides. Make these walls 42 inches high and insulate the walls. The extra height walls provide a great place for electric receptacles. Also, insulate the walls between the kitchen and other rooms of the house if possible. Insulate the ceiling as well. Attempt to reduce sound producing activities. By using pull-out drawers for pots and pans, rattling will be kept to a minimum.

Windows

If you have a window at your sink, consider enlarging it so that the sill of the window becomes an extension of the countertop. It is a dramatic effect and also can serve in certain instances as a convenient pass thru for outside dining.


Avoid flaws and mistakes when planning your new kitchen. Use my Kitchen Remodeling Checklist as your remodel guide. I offer a 100% Money Back Guarantee.


Hidden Waste

Absolutely make every effort possible to put garbage cans and recycling cans in pull out or tilt out cabinets. Open waste containers in the room are unsightly.

Distinctive Cabinets & Countertops

Your cabinets and countertops make up the largest components of your new kitchen. Do whatever you can to personalize these items. For example, if your budget will permit choose a cabinet line which has matching complimentary trims such as crown molding, valances, etc. These items can dress up the tops of cabinets or the room by continuing the cabinet theme towards the ceiling.

Countertops can be highly customized. The edges of countertops, even plastic laminate, can be easily individualized. Different color laminates or pieces of wood can be added to countertops with dramatic results. Solid surface countertop material offers virtually unlimited design possibilities. These materials can be shaped just like wood. This means that you can use any router bit to create the edge of your liking. Countertops, when done properly, will make or break a kitchen design. Spend some time and find the best fabricator in your town.

Wholesale Residential Kitchen Cabinets

The KCMA Connection

The kitchen cabinet (and bath) manufacturers realized some time ago that they had to gain the respect of consumers and designers (those who specify certain cabinets). To do so, they had to develop minimum quality standards which acted as a yardstick by which to measure cabinet quality.

They did this through their association, the Kitchen Cabinet Manufacturers Association (KCMA, www.kcma.org). This association developed a set of guidelines by which cabinet quality could be measured. These guidelines are met by performing over 60 separate tests on cabinets. These tests measure performance characteristics of a cabinet's structure, construction and finish.

It is extremely important for you to realize several things. First, a cabinet manufacturer can manufacture several different lines of cabinets. Just because one line passes the test doesn't mean that the manufacturer is allowed to certify all of the cabinet lines he produces. Each line must pass the tests separately.

Also, the testing standards used establish minimum quality guidelines. This means that you might not be satisfied with the quality of a cabinet, even though it has passed all of the tests! I know that homeowners have a wide range of quality standards. Some people are perfectionists and demand perfection from every other human being. Perfection is a tough standard.

Remember that the quality standards can be exceeded. In other words, a high quality manufacturer can go way beyond the standards in an effort to produce a high quality cabinet. This will cost more, however, you may see that the value is there. When looking for cabinets, look at all the different lines and cost ranges. See what really distinguishes one line or manufacturer from another.

The Cabinet Tests

As I mentioned before, there are over 60 different tests which are used in the certification process. Following is a list of some of the major components that are tested.

Construction

Cabinet joints are checked. They look to see that they are tight.

Hinges are checked. The connection points between the hinge, cabinet, and doors are checked for tightness.

Doors are inspected for alignment. There must be no binding when doors operate.

Face-framed cabinets must have rigid frames.

Frameless cabinets (those with full overlay doors and drawers) must be constructed of thick enough material so as to be rigid.

The materials used in constructing the cabinets must be suitable to resist grease, water, steam, solvents, detergents, etc.

All exposed edges of plywood or composition board must be filled and sanded, edge banded or otherwise finished.

All exterior nail holes or staple holes must be filled.

Base cabinets (those that rest on the floor) must have a toe space. This space must be a minimum two inches deep and three inches high.

Structure

Cabinet shelves and bottoms are loaded to 15 pounds per square foot. After seven continuous days of loading, the cabinet is checked for deflection and separations.

Wall cabinets must be able to support 500 pounds without failure.

The cabinets are subjected to several different impact tests to see how they perform. These tests are designed to simulate everyday events which send objects crashing into cabinets.

Cabinet doors are tested for performance. They are opened and closed through 25,000 cycles. After this test is completed, the door must be in as good a shape as it was in the beginning. The hinges must not be loose and the door must still be in alignment.

Drawers are tested the same way. They are loaded with 15 pounds and opened and closed 25,000 times. They also must perform flawlessly at the conclusion of the 25,000 cycles.

Finish

One of the finish tests involves placing a door in a hotbox for 24 hours. The temperature inside the box is 120 degrees F and the humidity is 70 percent. At the conclusion, the finish must show no appreciable discoloration, no blisters and no checking.

A similar test is performed by subjecting the door to alternating hot and cold temperatures. After five cycles, the finish must not be flawed.

Finishes are tested by applying vinegar, 100-proof alcohol, mustard, lemon juice, etc. for one hour. The finish must survive unaffected. If minor blemishes are present, they must be able to be removed with ordinary polishing methods.


As you can see, the tests are tough. However, you and your kids may be able to dish out greater punishment. You simply need to use common sense prior to making a purchasing decision.

KCMA Certified Cabinet Manufacturers

For an up-to-date list of certified cabinet manufacturers, go to the "Directory of Certified Cabinet Manufacturers" page of the KCMA web site.

Important Note!

Many of the listed manufacturers make several different lines of cabinets. They may choose to have only one line or several lines certified. Be careful!! Insist on written documentation that the cabinet line you are purchasing has, in fact, been certified by the KCMA testing program.

Unscrupulous vendors have been known to use bait and switch techniques in selling. They may have KCMA cabinets on display, however, you may buy a slightly different cabinet or a line which is not certified.
Formica Repair with Tile

What is Involved?

To install ceramic tile in a countertop you first need a reason. Perhaps a hot pot scorched the surface or someone dropped a heavy frying pan that creates a large chip or ding. Deep scratches may be a good reason to consider tile.

The tile repair method is good looking and if you supply the labor, far less costly then buying and installing a new top. The supplies required to perform a ceramic tile inlay often cost less than $30.00.

The tools needed to accomplish this project are easy to acquire. Hopefully you will have a router, if not, just rent one for a few hours. You will need the following:

  • A router with a straight 1/4 inch diameter carbide bit
  • A framing square
  • An accurate tape measure
  • Hot glue gun
  • Tile adhesive trowel
  • Grout float
  • Sponge

That is not an intimidating tool list by any means.

Get the Right Tile

When you select the tile for this repair project, look for one that is good looking and will also wear well. Try to avoid high gloss or shiny glazed tiles. These work fine on walls but not horizontal surfaces where things will slide across the tiles. You surely don't want your new tile to get scratched in a hurry. Select a flat tile or one that is designed as a floor tile. These have a special surface that resists scratches.

Also, look for tiles that look best with a 1/8 or 1/4 inch sanded grout joint. You can buy smaller 4x4 tiles that have rounded edges for this purpose. If you are lucky, you will find ones that are highly decorative. Take your time finding the tile. Visit many stores. All will have something different. Remember, you will be looking at these tiles for a while!

Border Tiles

Some tiles come with decorative border tile that actually frame a tile layout. See if you can find a tile that has these. The look is awesome.

Layout Lines

Once you have the tiles, it is time to lay them out. Obviously, you had to get a rough idea of how many to buy based upon the damaged area of the countertop. The key thing is to always work with full tile. Do whatever is necessary to make the repair area a square or a rectangle that uses full tiles. Cut tiles will stand out like a sore thumb.

Certain tiles are highly accurate in size but often some tiles can vary by as much as 1/16th inch. This may not seem like a lot, but it can make a difference if you are just using four tiles to make a square. This is why I like to use smaller tiles, even 2x2 inch tile if I can find them. The more grout lines in the repair area, the more places you can hide a small tile size defect.

Remember, a grout joint around the outer edges of the tile repair looks better. Butting tile against the top is tough to do and you will have problems at the rounded corners of the cut out.

Test Run

Once you think you know the size of your cutout, you are going to make a test cutout. This is absolutely essential as you only get one chance when you are working on your real countertop.

Get a scrap piece of plywood for this purpose. The first step is to determine the offset of the router. All routers have a plate at the bottom. When this perfectly round surface glides along a straightedge, the bit cuts a perfectly straight path a certain distance away from the straightedge. You need to figure out what this distance is.

Clamp or nail a straight piece of wood to the plywood. Mark the one edge carefully with a sharp pencil. Make a test pass with the router bit set at just 1/8 inch deep. Measure the offset. Use this dimension to expand your required opening on all four edges.

Set the router depth for 1/16th inch greater than the thickness of the tile. Proceed to make the test cutout by attaching wood strips to the plywood at your offset lines. I would actually make a box so that the router cannot travel beyond the desired cutout area.

Make your first cut all the way around the inside of the box to see if you get the desired rectangle or square. If you are successful, then just rout out an area big enough for one tile to check for the proper depth setting. If you are satisfied, then it is time to do the real thing.

Rounded Corners

The router will create rounded corners at each corner of the cutout. These are a must. I recommend a small 1/4 inch bit so that the radius of these corners is small. If you have multiple router bits you can change to a larger one to rout out the center portion of the cutout once the outer edge is created.

Waterproofing

The exposed particle board of the countertop must be protected from water. If you fail to do this, your repair area will blister and bubble in no time. Water based polyurethane works great for this. Be sure to coat the vertical sides of the cutout as well as the bottom. The sides are very important. Wipe off excess urethane from the laminate if you make a mess.

Adhesive

You can use the organic adhesive that looks like thick cake icing or cement based thinset. Thinset is better to use since it will not flex. If the repair area is large, and you set heavy pots on it, there is a remote chance tile may crack if you use the organic adhesives. The tile should set for several hours or overnight before you think about grouting.

Grout

Sanded grouts work fine if the grout line is 1/8 inch to 3/8 inch. I would never go larger than a 3/8 inch grout line. Try to go for 3/16 to 1/4 inch if possible. You can use a light colored grout with confidence. If the grout becomes stained or dirty in the future, just clean it with oxygen bleach. Oxygen bleach is color safe and can be found at www.stainsolver.com.

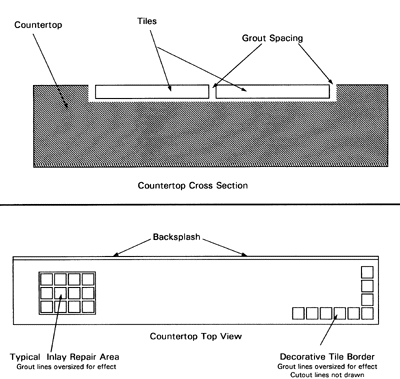
Tile Inlay Countertop Cross Section

The following illustrations should help clear up any confusion about what needs to happen to make the tile inlay work out. The most important aspect is making sure the cutout is the right size. You control the ease of this task by the tile you decide to use. Select a tile with tight grout lines and you could be in for a headache or two! The cross section below is scaled correctly for height but not for width. I have also left off the backsplash. Note the small 1/16th inch space for the adhesive under the tiles. The grout spacing needs to be the same on all four edges of each tile for the job to look right. Butting the tile against the top looks a little funny. A grout border seems to look better. Decorative tiles really are eye catching if you can find ones you like.