Fifteen Point Concrete Checklist
1. The Right Mix - The Portland Cement in concrete is the glue that holds everything together. The more cement that is included when it is mixed, the stronger the concrete will be. Exterior slabs, no matter if they are in Florida or Minnesota, need to be at least a 6 bag mix or a design strength of 4,000 pounds per square inch PSI. This mixture prevents freeze/thaw damage and simply allows concrete to perform superbly for 30 or more years.
A 7-bag mix is better. If you can afford to get 5,000 PSI concrete, do it.
2. Thickness - The minimum thickness of any exterior sidewalk or patio is 4 inches. Driveways should be a minimum of 5 inches. One extra inch of concrete will cost just a little more money, but it will return enormous benefits with respect to strength and durability.
3. Compaction of Base - The soil beneath slabs must be compacted. If slabs pass over trenches that contain uncompacted fill dirt, you can also have problems. All of these areas must be solid. Trenches that pass under driveways and sidewalks can be filled with gravel or some other self-compacting material instead of dirt.
4. Slope - If you live in a cold climate that can experience freezing temperatures, don't install flat slabs outdoors that will get wet! Make sure slabs are sloped so that water does not pond on the surface. Two inches of fall over 20 feet is usually not noticeable. You will think the slab is level.
Want perfect concrete work? Find a pro by using my Concrete Work (Sidewalks, Driveways, Patios & Steps) Checklist. I offer a 100% Money Back Guarantee.
5. Steel - Reinforcing steel is cheap. It is a must to have in all slabs. Use 1/2 inch steel bars if possible and make sure they are a minimum of 1.5 inches up from the bottom of a 4-inch slab. You want the steel bars in the lower third of the slab, but they need to have at least 1.5 inches of concrete under them.
6. No Added Water - Don't add water to the concrete once it arrives at the job site. Don't trowel in bleed water. Don't sprinkle water on the slab as you finish it. All of these things dilute the cement paste glue.
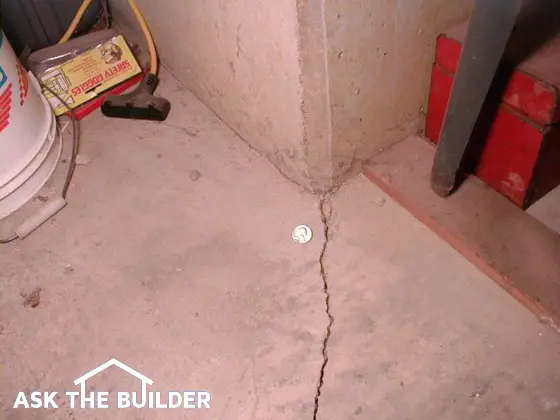
7. The Number of Control Joints - No single slab should be larger than 15 feet on a side. If your driveway is 12 feet wide, then space control joints every 12 feet to make symmetrical slabs.
8. Control Joint Depth - All control joint depths must be a minimum of 1/4 the thickness of the slab. This is non-negotiable.
9. Curing - After the concrete finishing is done, the curing process must start. Cover the slab with plastic sheets or apply a liquid curing compound. This process keeps water in the concrete so that the chemical reaction of hydration can continue. Without this water, the concrete will not reach its design strength.
10. Slump - Avoid ordering exterior slab concrete that is too wet. Wetter concrete that flows like water has a high slump number such as 5 or 6 inches. Four inch slump concrete is perfect, but it requires lots of manpower to place rapidly.
11. Type of Finish - Avoid slick steel trowel finishes for exterior surfaces. They are fine for basements and interior slabs. Garage surfaces should be a moderate steel trowel finish that is slightly abrasive. Drives, sidewalks and patios should have a light broom or wood trowel finish.
12. Sealers - They are not necessary to protect concrete from damage. They can be useful to prevent penetration of oil and other chemicals.
13. Expansion Joints - These are necessary when slabs touch fixed objects like foundations, street curbs, etc.
14. Weather Conditions - Don't pour concrete in extreme hot or cold weather. The ideal conditions are 55 degrees, overcast and high humidity.
15. Observe - If you are hiring out concrete work, try to inspect and watch the work crew. Make sure all of these points are followed or you will have problems. Put these specifications in your contract!
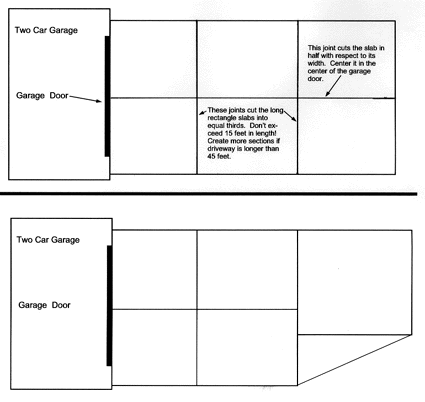
Control Joint Layouts for Driveways
The following two sketches give you an idea of how control joints should look for different residential driveways. The top drawing shows a double wide driveway approaching a two car garage. This is an easy one. The bottom drawing shows a two car garage that has a wide apron served by a single width driveway. Remember that the jointing tools of most concrete finishers will NOT cut the concrete deep enough. The joints need to be sawcut in the center of the joint at the end of the day or the next morning.
 Get a
Get a