Brick and Mortar Literature

Manufacturers of Colored Mortar and Mortar Pigments

  • flamingo-BRIXMENT
  • Solomon Colors
  • Lambert Corporation
  • Lehigh Cement Company
  • Ebonex
  • Dynamic Color Solutions

Study the information on their web sites with respect to the proper techniques to employ when mixing and working with the colored mortars. They can be tricky!


Are you one of the manufacturers listed above? Do you want your company name to be a link to your website? Click here.


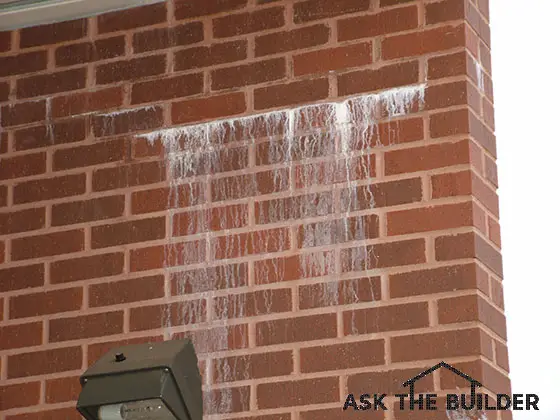
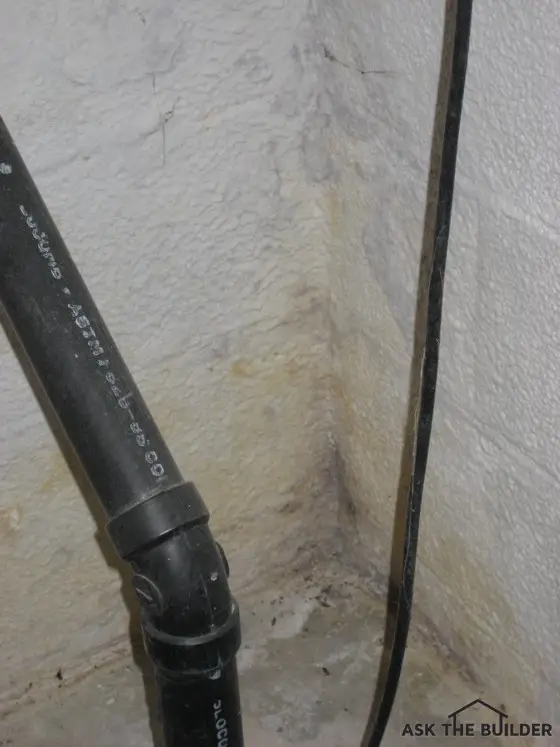
Several of the followings things can cause the color in your brick job to be inconsistent:

  • Using premixed mortar from different runs from the plant - all bags must be from the same run or batch.
  • Using different types of sand throughout the job.
  • Using too much water in the mortar.
  • Acid washing the brick.
  • Using too much or too little pigment in each batch of mortar if adding your own colorant.

***!!!!!READ THE INSTRUCTIONS!!!!!***


Need to repair your masonry? Find a good contractor and learn the secrets of the trade with my Masonry Repair (Chimneys, Stucco & Brickwork) Checklist. I offer a 100% Money Back Guarantee.


Brick Manufacturers

You can find a list of over 100 brick manufacturers at the Brick Industry Association web site. Click the Resources tab; BIA Members tab; and Manufacturers tab. Choose ALL in the drop down lists to display a complete list. You can also search by state.

Most of these manufacturers have web sites with great product information and locations of local distributors.


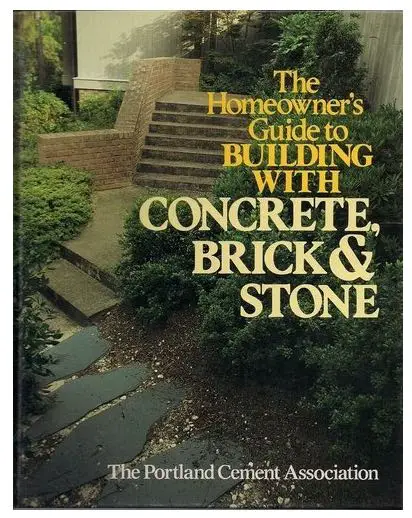
Literature Sources and Installation Tips

Literature Sources

Some of the best literature, concerning brick and masonry construction, can be found in three different places: the Brick Industry Association; the Masonry Institute of America; and the Portland Cement Association. The Brick Industry Association (http://www.bia.org) publishes periodic pamphlets called Technical Notes on Brick Construction. These deal with just about any aspect of brick that you can think about. They also publish an incredible book called Principles of Brick Masonry.

Installation Tips

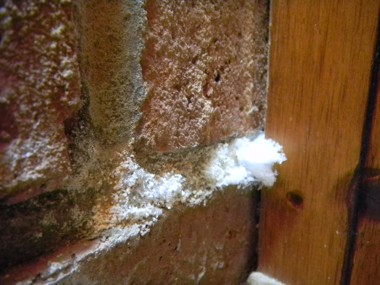
I could write pages and pages concerning installation of brick. The Brick Industry Association listed above has numerous books and pamphlets on this subject, as does the Portland Cement Association (http://www.cement.org). The key points are understanding that mortar is just like concrete. It requires special attention and techniques to achieve maximum strength. This is vitally important, as the mortar holds the bricks together!!! Brick veneer construction needs to be adequately attached to the walls behind the bricks, or else it might simply tip over and fall down. Flashing details and weep holes are important so water does not collect behind bricks. Start reading!

Bricks and Colored Mortar

Why So Strong?

Bricks are basically a form of artificial rock or stone. They do not occur naturally. The raw material from which they are made, however is a raw material which is very abundant. Clay, which is a major portion of many soils, is used to manufacture brick. Shale, a soft sedimentary rock, is used as well. These two materials are found just about everywhere in the world.

The process of turning clay and shale into bricks is a somewhat simple process. The clay and/or shale is refined and then mixed with a small amount of water until it can be shaped into bricks. The bricks are then dried and put into a kiln, sometimes for days. The kiln is nothing more than a very hot oven. Temperatures can reach in excess of 2,000 degrees F. This heating or firing process is what transforms the soft clay into hard bricks. In this manner, the clay and shale become an artificial stone.

Surface Textures

Prior to placing the soft bricks into the kiln, manufacturers can do any number of things to the soft bricks to give them a texture. Some bricks are either rolled, brushed, scratched, or dimpled after they come out of the forming die.

Some manufacturers offer the capability to produce custom textures for a certain brick, however it is very expensive to have this done. But, if you have the money and want a very unusual texture, it can be produced. Patterns, letters, even sculptures can be produced on the face of individual bricks.

Coatings

If you visit a brick showroom, you will undoubtedly come across bricks which have coatings applied to them. These coatings, once again, are applied prior to the bricks entering the kilns.

Some of the coatings commonly seen are sand coatings, colored slurries of fine clay, pigments and water called "engobes", and Portland cement mixed with pigments. The colored Portland cement is mixed with water and applied to the bricks.

All of the coatings are semi-permanent. They do not produce color throughout the body of the brick. If the coating wears off or is chipped, you will see the inside color of the brick. Thus, it is important for you to choose a brick with a high quality coating if you like the appearance of these products. This is especially true of the Portland cement-based slurries. I have seen these coatings wash off of bricks after 15 or 20 years. This can be a severe problem if all the bricks on your house do not receive the same amount of weathering.

Strength

Not all bricks have the same strength. Their strength is a function of the type of clay and/or shale used as a raw material, and the temperature and length of time the bricks spend in the firing kiln. The higher the temperature and the longer you leave a brick in the kiln, generally speaking, the stronger it will be at the end of the process.

This is very important to know when shopping for bricks, as the last two points are directly related to the cost of a brick. Think of it, if you use more fuel to achieve a higher kiln temperature and you leave the bricks in for a longer period of time, your costs per brick are going to be higher.

Bricks which have been fired longer and hotter generally are a deeper color. Deep red, purple, and brown bricks are usually very hard.

A good example of bricks which are not hard and durable are those orange colored bricks you often see from old buildings in our inner cities. These bricks were usually produced in lower temperature crude kilns.

The hardest portion of some bricks is just the outer 1/4 inch. This is why it is dangerous to sandblast bricks. Sandblasting can expose the soft inner portion of the brick and cause it to weather at an accelerated rate.

Paving Bricks

faded and new paving brick

Paving Bricks | Here's a great example of faded concrete paving brick next to brand new ones that have not yet lost the colored cement paste off the sand and gravel. If you have trouble with your concrete paving brick crumbling, you should read this article. Copyright 2021 Tim Carter

Paving Bricks - They're NOT All the Same

Many brick companies manufacture paving bricks. Durable, long-lasting paving bricks must meet certain testing standards. The particular standard for paving bricks is ASTM C902, Standard Specification for Pedestrian and Light Traffic Paving Brick.

If you decide to purchase paving bricks, make sure that they have passed this test. The product literature or brick supplier will be able to supply you with documentation that will prove this. Don't hesitate to ask for it.

What is the ASTM C902 Test?

The ASTM C902 testing requirements ensure that the brick will withstand pedestrian and light vehicle traffic. If you install a brick that does not pass this test, it is quite possible that the brick will crack and/or disintegrate after a few years.

Will Brick Intended for Use in Walls Work as Paving Brick?

Bricks that are used in walls do not necessarily perform well when installed in the ground.

patio brick pavers mortar

This patio was built with traditional clay brick pavers. They could have been set in sand, but laying them in mortar creates a traditional look and feel. PHOTO CREDIT: Tim Carter

Paving bricks are subjected to greater quantities of moisture, and abrasive foot and vehicle traffic. Don't make the mistake of using just any brick for your sidewalks or driveway. You may waste a tremendous amount of work.

Get FREE & FAST BIDS from local contractors who can install your brick or stone patio and walkways.

What are the Types of Paving Brick?

There are two types of paving brick. The best one is made from clay and the also-ran one is the more modern concrete paving brick. The traditional paving brick made from clay has its color solid all the way through. When fired at a hotter temperature for a longer time in a kiln, they transition to artificial rock and are extremely durable. 

Clay paving brick are available in various shades, however, reds, oranges, and browns are most common. They can also come in different thicknesses. Some can be as thick as 2 5/8" while many are available in 1 1/2" thickness.

Concrete paving bricks were developed in the late 1970s and early 19080s. They rapidly became the belle of the ball as happens with many new product innovations. But after a few years sometimes you discover that the product is really a pig wearing lipstick. Many homeowners have discovered this to be the case with concrete paving brick.

These bricks are made using concrete with small aggregate. These bricks often come in different interlocking patterns. They are also available in different colors. Because they are concrete, they can be extremely durable.

What is Wrong With Concrete Paving Brick?

The big issue with concrete paving brick is they look good for a year or two or three, but then slowly start to fade and change color. The rich deep color you saw the day they were installed disappears because the colored cement paste wears off the sand and gravel chips used to create the concrete brick.

Powerwashing also rapidly erodes the cement past uncovering the ugly stone chips inside the brick. You can see this in the photo at the top of this article.

Who are the Manufacturers of Clay Paving Bricks?

The following manufacturers make paving bricks that pass the ASTM C902 test. Most of these websites have informative product literature. Many will give you the location of the closest distributor.

  • Acme Brick Co.
  • Belden Brick Co.
  • Boral Bricks
  • Bowerston Shale Co.
  • Carolina Ceramics
  • Cloud Ceramics
  • Endicott Clay Products
  • General Shale Brick
  • Glen-Gery Brick
  • Pine Hall Brick Co.
  • Redland Brick Co.
  • Summit Brick & Tile
  • Taylor Clay

Who are the Manufacturers of Concrete Interlocking Paving Bricks?

There are hundreds of manufacturers of concrete paving bricks. Many of them are members of the Interlocking Concrete Pavement Institute (www.icpi.org). This website has a search tool to find the names of manufacturers in your area.


Paving Brick Installation Information

The Brick Industry Association (www.bia.org) has three excellent publications explaining and detailing several different methods of installing both clay and concrete paving bricks. These are available for free download from the BIA web site, and are titled as follows:

  • Technical Notes 14 - Brick Floors and Pavements, Part 1 - Design and Detailing - Sept. 1992 (Reissued March 2002)
  • Technical Notes 14A - Brick Floors and Pavements, Part II - Materials and Installation - January 1993
  • Technical Notes 14B - Brick Floors and Pavements, Part III - [Nov./Dec. 1975] (Reissued August 1998)

What is a Great Book Teaching How to Install Paving Brick?

Also, The Portland Cement Association (PCA) (www.cement.org) has an excellent book that speaks to installation techniques of both clay paving bricks and concrete interlocking paving bricks.

building with concrete brick and stone book

The title of the book is The Homeowner's Guide to Building With CONCRETE, BRICK & STONE.

The PCA publishes many excellent books and pamphlets. I'm quite sure you will be impressed. The publications can help you with many masonry projects. Good luck!

Get FREE & FAST BIDS from local contractors who can install your brick or stone patio and walkways.

Column B035

Efflorescence on Masonry Surfaces

efflorescence on masonryThree Ingredients Needed For Efflorescence

Efflorescence requires three primary ingredients in order to occur: availability of water soluble salts; a source of moisture or water to dissolve and transmit the salts; and an environment where the moisture can readily evaporate, thereby depositing the dissolved salts.

Sources of Salts

The efflorescence deposits that you see on your brick or masonry come from many sources. This, of course, often makes it a little tougher to control the problem.

The salts can reside in the masonry units (brick, block, etc.), they may be present in the mortar or cement, the water used to mix the mortar, sand, rain or ground water, soil and backfill dirt, etc.

CLICK HERE to get FREE & FAST BIDS from local masonry experts who can help clean or repair your brick and stonework.

Moisture Introduction

Efflorescence is not always easy to control. Often it is very difficult to locate the source of moisture or water which is dissolving the salts. Efflorescence on exterior masonry might simply be a result of rain water which soaks into the masonry surface or ground water which is being wicked from the soil into the masonry.

Rain water is often considered to be the primary moisture source for most efflorescence problems. Most masonry will absorb rain water. If a masonry job is improperly constructed, massive amounts of water can be absorbed.

What Happens.....?

For sake of this discussion, let's say that the source of the salts that causes efflorescence is within the bricks. Here is what happens:

Efflorescence growing in the mortar of a brick fireplace. PHOTO CREDIT: Michael Hannum

Efflorescence growing in the mortar of a brick fireplace. PHOTO CREDIT: Michael Hannum

When the bricks are laid, the bricks absorb moisture from the wet mortar. In certain instances, the bricks may get wet during construction from rain and snow.

Water has a tremendous ability to dissolve things. It can dissolve sugar, salt, medications, soaps, instant iced tea, Kool-Aid, etc. It should come as no surprise that it can dissolve the 'salts' in a brick.

When water enters the brick in our example from any direction (top, bottom, sides, front or back) it begins to dissolve the salts. The salts are now in 'solution' and travel along with the water.

As happens with most brick surfaces, they eventually see a sunny, breezy day. This is the final element needed to deposit the salts on the surface of our sample brick.

What actually happens is quite simple. The sun and wind evaporate the water from the brick.However, only the water makes it into the air. The salts are left behind at the surface.

Interior Efflorescence

Efflorescence on interior plaster work can be a sign that a major problem is beginning to develop.

Water is a primary ingredient in the mechanism of efflorescence. As such, efflorescence on interior plaster surfaces generally indicates that water is either leaking within or into a structure. Most of us do not want water to travel freely through the inside of our structures. The source of this water should be identified and corrected before major structural damage is allowed to occur.

Over the years, I've seen many different spellings of efflorescence. Here's my growing list: effervesce, effervescence, effervescent, effleresants, effloreflance, efflorescence, efflorressance, effluorescence, eflorescence, eflorescents, ellforesce and ifflorescence.

CLICK HERE to get FREE & FAST BIDS from local masonry experts who can help clean or repair your brick and stonework.

Column B33

Efflorescence Publications

efflorescence on masonryEfflorescence Publications

I also suggest that you consider calling a local brick supplier. They may be members of the Brick Industry Association. Several of the publications listed originated from this source. Also, check out the Bookstore on the web site of the Portland Cement Association (PCA) http://www.cement.org. Several of the publications listed here are available from the PCA.

  • Technical Notes 20 Revised. Cleaning Brick Masonry
  • Technical Notes 23 Revised. Efflorescence - Causes and Mechanisms - Part 1 of 2
  • Technical Notes 23A Revised. Efflorescence - Causes and Mechanisms - Part 2 of 2

These are available FREE on the BIA website www.gobrick.com/.

Books

  • The Homeowner's Guide to Building with Concrete, Brick & Stone
    Portland Cement Association
  • Concrete Masonry Handbook
    Portland Cement Association
  • Masonry Efflorescence, from the editors of Masonry Construction
  • Trowel Tips: Efflorescence
  • Efflorescence: Causes, Prevention, Repair
    These are both available for FREE download from the Portland Cement Association's web site. Search on the term "efflorescence" in the Bookstore search engine.

Companion Articles:  Efflorescence on Masonry, Efflorescence, Efflorescence on Masonry Surfaces, Efflorescence Removal

Over the years, I've seen many different spellings of efflorescence. Here's my growing list: effervesce, effervescence, effervescent, effleresants, effloreflance, efflorescence, efflorressance, effluorescence, eflorescence, eflorescents, ellforesce and ifflorescence.


Column B33

Mold Control

mold in basement corner

Mold Control - Mold is growing in the corner and will continue to do so until its moisture supply is cut off. Photo Credit: Vic Gallina

By: Tim Carter

Mold Control - It's All About Water

Not too long ago, a friend of mine ordered some out-of-print magazines she wanted for a collection she maintained. Several hours after unpacking them, she started having all sorts of coughing and respiratory distress. It turns out the old magazines were saturated with mold. The mold spores were released into the air as soon as she disturbed them. She is fine now and fully recovered, but it just goes to show you that mold can get you when you least expect it!

The Triangle of Mold Growth

I remember a lecture in grade school about the dangers of fire. It showed a simple triangle of what was required to start a fire. All you need is fuel, oxygen, and heat. In almost all cases, fuel and oxygen are available. Think of your home or the dry vegetation in a forest. All it needs is a heat source to ignite.

Mold is no different. Mold spores are everywhere. The only places you probably will not find the spores are in special laboratory clean rooms or totally sterile lab environments. How many of these places do you visit daily? I know I have never been in one!

Mold needs just three things as well to thrive, survive, and propagate: food, desirable temperatures, and water. Just about everything around us seems to be a food source for mold. Certain molds eat dust. Others eat wood. Some love drywall paper. Certain molds thrive on the natural oils found in some highly advertised deck sealers. That is why I love to use synthetic resin deck sealers that do not support mold growth. You name it, a mold will eat it. Did you know that trees and bushes produce a fine mist of sugar spray at certain times of the year? Outdoor molds thrive on this food. This is one reason your deck, patio or other outdoor furniture gets covered with mold and you wonder what it might be eating.

Stopping Mold Growth

The only thing we can do to stop mold growth is to cut off its water supply. Think of mold as grass seed. If you keep the grass seed dry and in your garage, it will not sprout and grow.

To eliminate mold in your home, keep it dry. Prevent roof leaks or sidewall leaks. If you have a wet basement, install a Linear French Drain.

  • Keep bathroom humidity low by opening shower doors and curtains.
  • Leave the bathroom door open when you are not in it.
  • Squeegee water from shower walls when you are done, if possible. Shake shower curtains before stepping out of the shower.
  • Get as much water down the drain as soon as possible.
  • Use your head and do whatever is possible to keep bathrooms dry.
  • Don't allow water to build up in attics.
  • Use great ridge and soffit ventilation.
  • Make sure clothes dryers vent to the outdoors.
  • Never allow them to vent into an attic or crawl space.
  • Fix plumbing leaks immediately.
  • Simply use some common sense to keep your home and possessions as dry as possible.

Want a step-by-step procedure for installing a Linear French Drain? Tim's Linear French Drain Streaming Video shows you how to keep your basement and crawl spaces dry. CLICK HERE or on the image below to order Tim's Streaming Video.

Linear French Drain Streaming Video

Do your own DIY install of a Linear French Drain with Tim Carter's time-tested methods and materials! CLICK IMAGE TO ORDER NOW!

Column B344

All About Tar and Chip Driveways

Tar and chip drive (Tim)

How is a Tar and Chip Driveway made?

Tar and chip driveways are very similar to blacktop or standard asphalt driveways. Both are usually installed on a compacted gravel base. The base is the foundation or strongest part of the driveway. Blacktop and/or tar and chip surfaces are actually flexible. They are the actual wear layer and prevent the erosion of the gravel base.

How is tar and chip different from blacktop?

A tar and chip driveway differs from a standard blacktop driveway in that it is made on site. The hot liquid asphalt and stone chips are actually applied simultaneously on the gravel base.
close up of chips with car keys
Blacktop, a mixture of asphalt, sand, and gravel,on the other hand, is usually mixed at an off site plant. It is delivered, much like ready mixed concrete, to your house and applied with a special spreader. If you are installing a brand new or reconstructed driveway, you will do well to have two layers of tar and chip done. That gives a nice thick coating and a surface that may last up to 12 to 15 years. If you have an existing blacktop driveway, you may get by with a one coat application.


Get the best-looking Tar and Chip Driveway around! Use my Asphalt/Blacktop/Tar & Chip Installation & Repair Checklist and learn what to ask your contractor. I offer a 100% Money Back Guarantee.


Advantages of Tar and Chip

Standard blacktop pavements require protection from the sun and air. The asphalt that bonds the sand and gravel together can become brittle. If you have a blacktop driveway you have probably had to seal it with a liquid coating. Tar and chip driveways do not require this periodic maintenance.

Tar and chip driveways are slightly rougher than a standard blacktop driveway. This characteristic comes from the fact that small, cubical shaped stone chips are dropped directly into the liquid asphalt. The surface, after it is compacted with a heavy roller, resembles a chunky chocolate chip or oatmeal cookie. The surface isn't smooth, yet it isn't sharp and abrasive. It is in between. This surface provides excellent traction in wet or snowy weather.


What Makes up the Paving Surface

Asphalt - Two Types

The liquid asphalt that is used to coat the driveway and act as the adhesive for the chips can come two ways. It can be a cutback asphalt which is specifically formulated for your region. These asphalts are sticky and release hydrocarbons into the air as they cure. Their use is sometimes curtailed when ozone production poses a smog problem.

An alternative asphalt is an emulsified mixture. This is similar to many blacktop sealers you buy in a 5 gallon pail. The asphalt is atomized into small tiny drops and coated with an emulsifying agent. Sometimes these emulsifiers are water based. As the water evaporates the asphalt is released so it can bond to the surface and to the stone chips. If you can arrange to have the old fashioned cutback asphalt, use it. That is what I used on my own driveway.

Loose Chips

If your driveway is fairly level you may wish to top the driveway with a layer of loose chips. It is extremely attractive. The look is just like that of a country lane or a roadway in a park. A 1/2 to 3/4 inch layer is all you need. The loose chips protect the asphalt from the damaging effects of the sun. In addition, should a crack develop in the driveway, the loose chips fill and disguise the imperfection.

Loose chips, however are not appreciated by young bicycle riders and basketball players. If these people live with you, you may wish to create a concrete or standard blacktop surface in these areas. Then extend the tar and chip surface from the play area to the street.


Who Does This Type of Work?

Tar Plant
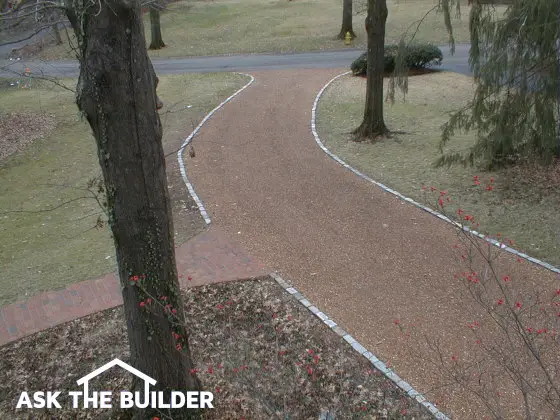
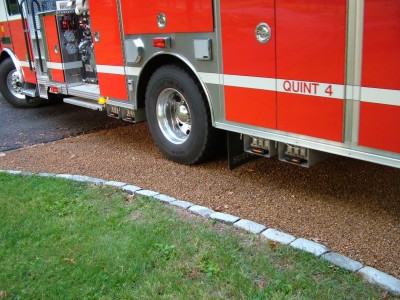
Tar and chip pavement surfaces are nothing new. In fact, there is a strong possibility that you have driven across hundreds of these roads. Many counties use this surface on secondary and rural roads. It is a cost efficient method of repaving and sealing an asphalt roadway.

Businesses and manufacturing plants often pave large parking areas with this material as well.

There is a good chance that a large paving contractor in your city or town does this work. If you are really fortunate, you may find a smaller company that does it as well.

If you have trouble locating a contractor in your town, there is one sure fire way to determine if this paving system is done in your area. If there are blacktop or asphalt driveways in your area, there is an asphalt plant. This is where blacktop is made. This is the same place where the tar and chip people must purchase the tar or asphalt cement. Find out where the plant is and call and speak to the general manager. Ask if he can put you in touch with the contractors who purchase the tar.

Column B127

Tar and Chip Driveway Literature Sources

There are two national organizations that deal with asphalt information and technology. Both have excellent web sites, although much of the material is somewhat technical. The two organizations are:

The Asphalt Institute has a publication in particular that deal with tar and chip surfaces. Although it is technical in nature, it provides you with a good background of what the surface is, how it is made, the equipment used to install, etc. In other words, if you want to make sure your tar and chip driveway is going to be installed correctly, it may be worthwhile reading!


Get the best-looking Tar and Chip Driveway around! Use my Asphalt/Blacktop/Tar & Chip Installation & Repair Checklist and learn what to ask your contractor. I offer a 100% Money Back Guarantee.


The best publication is ES-12 Asphalt Surface Treatments - Construction Techniques. This one has it all. It is a must read. It costs $15.00.

Column B127

Tar and Chip Driveway Installation and Upkeep

Weather & Tar and Chip Driveways

Weather conditions are very important when it comes to these surfaces and their installation. Hot, dry early summer weather almost always offers the best conditions. The liquid asphalt sticks best to warm dry surfaces. It also sticks to falling leaves and flower petals! This means that you don't want these things around when you are installing a tar and chip surface.

CLICK or TAP HERE for a FULL TRANSCRIPT of the above video.

Air and surface temperature are critical. It is important that once the hot liquid asphalt is sprayed that it does not chill or cool before the loose chips are scattered across the asphalt. In fact, in most applications, the chips are usually installed within 1 to 2 minutes. The faster the chips are installed, the better chance they have of sticking to the liquid asphalt cement.

If you have to use an emulsified asphalt, be careful of rain. If it rains before the emulsifying agent evaporates, your asphalt can wash away!

Leaves, Grass & Snow

If you have an obsessive compulsive behavioral disorder, tar and chip may not be for you! If you choose tar and chip and the beautiful loose chip covering, you will not be able to hose down your driveway. You'll blast away the chips! However, grass clippings, fallen leaves and paper can be easily removed with a standard air blower or a lawn mower. That is how I remove these items from my driveway.


Get the best-looking Tar and Chip Driveway around! Use my Asphalt/Blacktop/Tar & Chip Installation & Repair Checklist and learn what to ask your contractor. I offer a 100% Money Back Guarantee.


Snow removal is also a challenge. Hand shoveling is tough. You need to skim just above the chips. However, plowing is possible if you just set the blade up one inch. If you have no loose stones on your tar and chip surface, plowing is no different than a blacktop or concrete driveway.

Cost

The cost of a tar and chip driveway is almost always less expensive than standard blacktop. The cost rises if you choose an expensive colored stone. Maintenance is virtually non-existent. Remember, you don't have to deal with those messy sealers every other year. That saves time and money as well.


Do's and Don'ts of Tar and Chip Driveways

Do's . . .

Do use a contractor who has experience with this surface. Ask for references and go and visit the driveways.

With proper installation, your home tar and chip driveway can stand up to the weight of a fire engine. PHOTO CREDIT: Tim Carter

With proper installation, your home tar and chip driveway can stand up to the weight of a fire engine. PHOTO CREDIT: Tim Carter

Do make sure that the contractor plans to spray a sufficient amount of liquid asphalt. One half gallon per square yard is the minimum amount that should be applied. Applying too much can also be a problem. The tar may bleed through the chips in hot weather!

Do make sure that the base or surface to be coated is sufficiently strong enough to handle the heaviest trucks! The tar and chip coating is NOT structural. It is merely a wear layer.

Do make sure that the chips you use are uniform in size as much as possible. Flat, thin chips are not too good. Cubical chips, similar in shape to rock salt are superb.

Do a good job of blending stone chips if you decide to use two different colors.

Click to watch a video on Tar and Chip Driveways. Click here to watch a video on Tar and Chip Driveways.


Don'ts . . .

Don't consider using loose chips if your driveway is steep. The loose chips may cause tires to spin. Steep drives can only be coated with embedded chips.

Don't drive on a new tar and chip surface for a minimum of 24 hours. The surface is tender, just like fresh blacktop. Avoid spinning tires or turning wheels in place for at least two weeks.

Don't allow a cutback asphalt to be applied to a damp or wet blacktop or gravel base. These surfaces MUST be dry! Emulsified asphalts can be applied to a damp surface.

Don't apply an emulsified asphalt if rain is in the forecast.

Don't apply asphalt if the air temperature is less than 50 degrees F. The temperature should be rising though the process. The surface temperature of the gravel or blacktop to be coated should be at least 70 degrees F.

Column B127

Tips on Patching Blacktop and Asphalt

Tips on Patching Blacktop and Asphalt

Asphalt Patching Kit

©2017 Tim Carter

Square Edges: The sides of the hole to be patched must be vertical. Don't expect to pour cold patch materials in a depression or sunken area of blacktop and expect it to last. The crisp vertical faces of a hole act as retaining walls for the patching products.

Remove Loose Debris: Once you have created clean edges on the hole, remove loose debris from the bottom of the pothole. If the pothole is deeper than 2 inches, then use this coarse blacktop and other crushed stone as fill.

Compact Base: Use a steel tamping plate, a 4x4 or other tools to really compact the stone base. Avoid using rounded gravel as a base. Always use crushed, angular stone.

Correct Thickness: The ideal depth of asphalt patching material is between 1.5 and 2 inches. If you install it greater than 2 inches in depth, it can take much longer for the high performance adhesives to fully cure!

Compact Patch - Do NOT Seal!: After the patching material is in place and about 3/8 of an inch above the surrounding pavement, use a steel tamper to firmly compact the cold patch material. Check it for low spots with a straight edge. Do not under any circumstances cover the patch with asphalt sealer. Wait a minimum of 30 days. The patch needs to be exposed to the air so it can cure.


Do you need to patch your asphalt? Save time and money by using my Asphalt/Blacktop/Tar & Chip Installation & Repair Checklist. I offer a 100% Money Back Guarantee.


Crack and Edge Sealers: Once the patch has cured, you can use a high performance crack filler to seal the edge between the old blacktop and the new patch. Use a 1/2 inch wide disposable paint brush to spread the crack filler so it bridges the crack evenly.

Filling Cracks: Most crack fillers will settle slightly as the water in them evaporates. You can fill a crack level and let it dry and then refill, or you can experiment and see if you can carefully overfill the crack leaving a slight hump to see if the material dries level. Deep cracks may need to be filled with coarse, dry sand before you add the liquid crack filler!

Companion Articles:   High Performance Asphalt Repair Products, Asphalt (Blacktop) Patching Material, Asphalt Patching

Column B283