Glass Block Greenhouse – It’s Easy With ProVantage

Glass Block Greenhouse

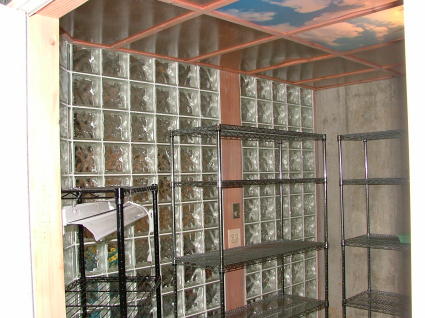
Glass Block Greenhouse | The Pittsburgh Corning glass block stack easily if the first course is plumb and level. Use their ProVantage plastic spacers.

Glass Block Greenhouse - So Easy With Caulk

DEAR TIM: I love the look of glass block and have several projects I am thinking about. One of them is somewhat bizarre - a playhouse for my children. But the process of building with the glass block intimidates me as I have never laid brick or block before. Are there some tricks you can share that will enable me to use this wonderful product that is sturdy but allows abundant light to get into spaces? Andrea G., Lexington, KY

DEAR ANDREA: Wow, did you hit the nail on the head, not once but twice! You have no idea how hard it used to be to work with actual glass block. It was installed in the same manner as brick and block using mortar and thin reinforcing steel.

Is It Hard to Install Glass Block with Mortar?

Yes, it's incredibly hard to install glass block using traditional brick or block mortar.

If you think laying brick and block requires skill, you have no idea how much extra talent you must possess to lay glass block in mortar. Brick and block have an invisible characteristic that actually helps masons install the brick and block. It is called suction.

CLICK or TAP HERE to get FREE BIDS from local GLASS BLOCK contractors who can install this glass block.

What Does Suction Do?

The porous nature of brick and block is such that when the masonry unit comes into contact with the wet mortar, some of the water is instantly absorbed by the brick and block. It is similar to the way paper towels absorb spills. This suction allows the mortar to stiffen rapidly so that you can continue to lay course after course without disturbing the work in place.

Do Glass Block Have Suction?

Glass blocks have no suction whatsoever. The mortar mix must be the perfect consistency - neither too wet nor too dry. You can usually only lay a few courses and then must stop so that the accumulated weight does not squeeze out mortar in the first courses you laid.

Is There an Alternative?

Yes, there's an alternative way to install glass block using caulk and plastic spacers.

Instead of taking years to acquire the skills of a master mason, you can master installing glass block in minutes.

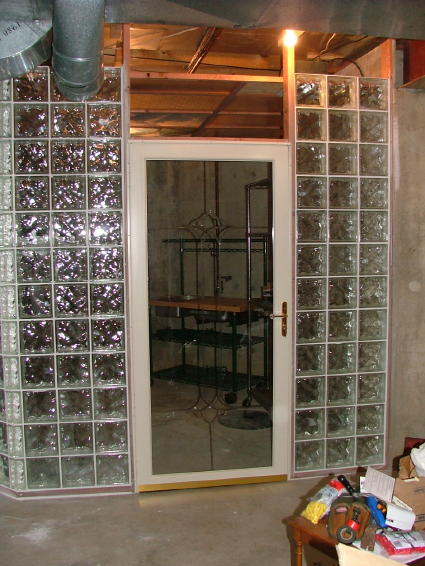
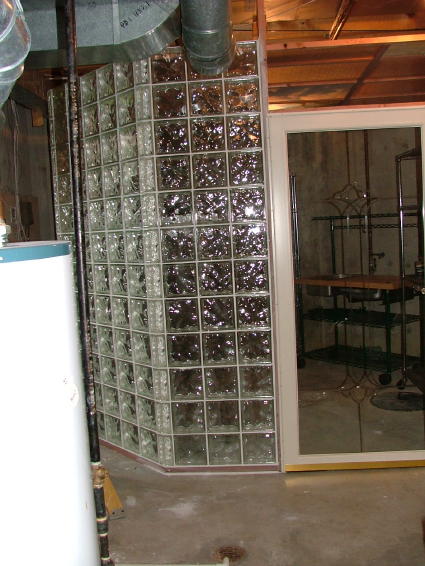
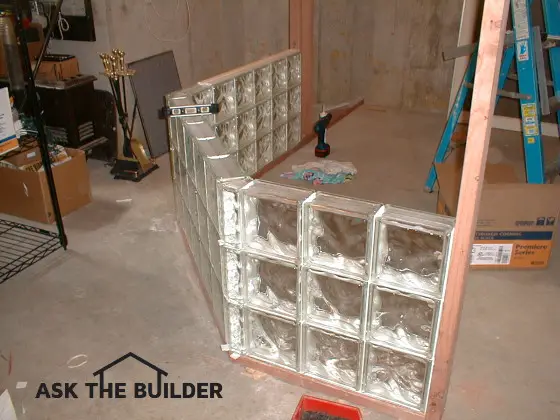
The better method is to put the glass block together the way I did when I recently built a glass block greenhouse for my wife's orchids. The glass block is the exact same one that has been used for years, but the manufacturer developed precision plastic spacers that create perfect horizontal and vertical spacing for the block.

What is the Most Important Step?

The most important step in the entire process is getting the first course of glass block both level and plumb. The manufacturer recommends, no insists, that you build a curb off the ground to install the first course. I did this by using a 2x6 piece of redwood that I got perfectly level using cedar shims. This level base made the installation proceed with absolutely no problems.

What is the Best Caulk to Use?

Silicone caulk is the best to use to install glass block. Instead of using traditional mortar to connect the block to each other, you simply use clear silicone caulk. I was amazed at how easy it was to assemble the block. In fact, it was so easy my 12-year-old daughter helped with the entire job. Not only did she apply all of the silicone to the blocks, but she also placed blocks on the walls. This amazing technology is both simple, effective and the end result will take your breath away.

applying caulk to glass block

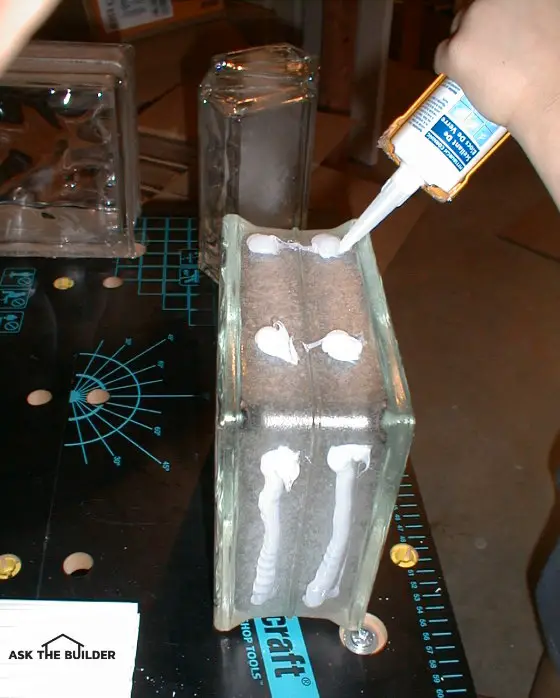
My 12-year old daughter loved squirting the silicone caulk onto the block. Reference: June 22, 2014 Newsletter.

Do you Grout the Joints Between the Glass Block?

Once all of the glass block are in place and the silicone has cured for a short time, you grout the spaces between the block with a mortar-like material. It is nearly identical to sanded grout you might use for ceramic tile floors. Because of the super-smooth surface of the glass block, is very easy to wipe the excess grout film from the surface of the glass block.

Once the grout hardens, you can come back with a damp sponge and remove any light grout film. It is also advisable to take an old cotton towel and buff the surface of the block to make them crystal clear.

Watch this video to see how to grout the glass block:

Can Glass Block Create Other Projects?

Do you want to know how easy and fun it really is to use this new system? When my daughter and I installed the last block we both looked at each other and said, "What can we do next!" We started thinking of cool projects and yours was one that was discussed. The glass block system has special 90 degree outside corners that would allow you to easily build a square or rectangle playhouse for your children. I used special 45 degree angle block corners to create a cool clipped corner inside my greenhouse.

Glass Block Doghouse

Another project I brought up that everyone thought was off the wall was using the glass block to create two or three walls of a dog house. As crazy as this sounds, it just may have some merit. The glass block, silicone and grout are 100 percent waterproof. In colder climates when the sun is low in the sky, the glass would allow sunshine to warm the interior of the shelter.

An insulated concrete slab could capture and retain the heat. A large roof with generous overhangs would stop the summer sun from making the dog house into an oven. I'm sure you will uncover lots of cool projects to use this new glass block system if you stop and think about it.

glass block greenhouse

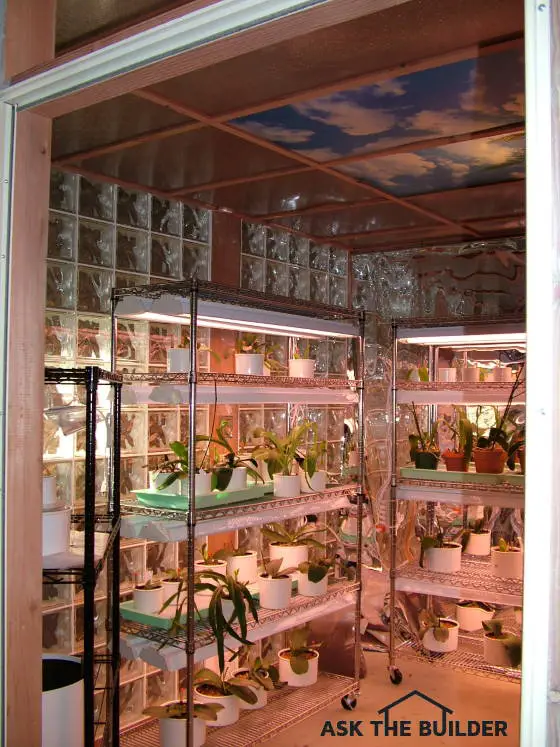
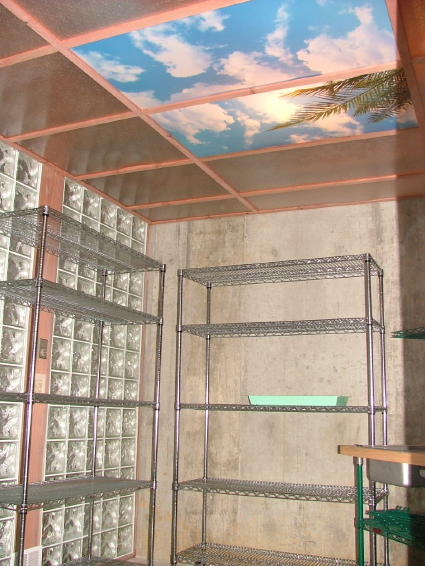
This picture doesn't do the room justice. I need a wider angle lens. The blue sky and cloud ceiling panels rock!

Is This System Revolutionary?

This new glass block installation system is perhaps one of the coolest things I have seen in a long time. I saw it at a recent convention and was immediately attracted to it since I knew how hard it was to install glass block using traditional mortar. The plastic spacers are so well-engineered that the spacing between individual glass block is maintained perfectly as long as you apply the correct amount of silicone caulk.

Companion Articles:  Glass & Acrylic Blocks Do Many Things, Glass Block Installation, Glass Block, Glass Block Manufacturers

Column 532

Build Arch Doorway Using Plywood and String

arched opening

Build Arch Doorway | This arch doorway is more circular than elliptical, but the method to create any curved opening is fairly standard. Note the flat 2x blocking between the pieces of cut plywood.

DEAR TIM: I have quite a few square openings between rooms in my home. These openings do not have any doors but do have finished wood jambs and wood trim as if there was once a door in each opening. I would like to transform these openings so they have gentle curves and are smooth-finished drywall or plaster. How can this be done? - Maria G., Tuscon, AZ.

DEAR MARIA: It's easy to build an arch doorway, especially if it's new construction. I outline the steps below.

This task is so simple you'll be astonished once you are halfway through it. The best part is that it does not require any fancy tools to speak of. If I were invited to help, I would only bring my wide pry bar, a standard circular saw, a small jig saw, a hammer, some string, a pencil and my drywall finishing tools. Many homeowners already own most of these tools. If you don't, I'll bet a friend or neighbor has the tools you need.

How Do You Salvage Wood Trim?

The first step in the process is to remove the existing trim and wood jambs. Try to salvage these if possible, as the trim may come in handy down the road if you damage another piece of door casing somewhere else in the house. Carefully tap the flat blade of the pry bar under the edge of the casing trim and try to pry it away from the wall.

Once you've pried the trim off the wall, do not hammer the nails backwards through it. Doing this often causes large chunks of wood to pop off the face of the trim. Instead, use a linesman's pliers to pull the nails through the wood trim from the back side. This is not as difficult as you might think, unless the trim is made of a hardwood.

Watch this video to see how to best remove finish nails:

Why is Wall Width Important?

With the wood jambs out of the way, you should now be able to tell how thick the wall is all around the opening, and to see how the wall was built. Check the wall width at several points around the opening and find the narrowest dimension. If your home is less than 30 years old, the wall might be 4-1/2 inches or 4-5/8 inches thick. If it's an older home with real plaster, the wall could easily exceed five inches in width.

How Do You Create the Outline of the Arch?

The frame for the archway is going to be prefabricated on the ground or a workbench. It will consist of two pieces of plywood, cut in the shape of your arch, spaced apart by framing lumber. If you are going to cover this arch frame with half-inch drywall on each side, the arch frame needs to be one inch narrower than the narrowest point of the current wall opening. If your current wall thickness measures 4-1/2 inches, you are in luck. You will be able to use two-by-three framing lumber and half-inch plywood to construct the arch frame.

Use Plywood or OSB

The first step is to cut blanks - rectangular pieces of plywood - which will be re-cut to create the sides of the arch. If the wall opening is six feet wide, and if your planned arch has a curve one foot deep (i.e., the lower tips of your arch come down one foot from each corner of the existing opening), then you need two pieces of plywood one foot by six feet.

How Tall Should the Arch Be?

The hardest part is next. You need to create the arch shape you desire on one of the pieces of plywood. It's critical that the apex of your curve come no closer than 1-1/2 inches to the top edge of the plywood blank. This spacing allows you to place a continuous two-by-three along the top of the arch frame between the two pieces of curved plywood. You can substitute thinner wood spacing material if you desire, but it will still need to be the same width as the two-by-three.

How Do You Create the Arch Template?

You can create an arch template by bending a thin, flexible piece of wood into the desired shape and then tracing along its edge onto the blank. Or you can use a trick you may recall from high school geometry for drawing an ellipse. Drive two nails into a separate piece of lumber or the remainder of the plywood sheet. Make sure the nails match the width of the arch frame. With a piece of mason's string, tie a loop that is big enough to place around the two nails with a bit of slack.

If you put a pencil inside the loop and push it away from the nails until the string is taut, then move the pencil in a clockwise motion, allowing the taut loop to guide the pencil, you will trace the shape of an ellipse. For your arch, you will trace only a segment of an ellipse, but the principle is the same.

 CLICK or TAP HERE to get FREE quotes from local carpenters who can build an arch doorway.

Orient one of the plywood blanks so its edges are touching the nails. Depending upon how much slack is in the loop, you can create oval shapes with different radiuses. Place a pencil inside the loop and push the string away from the nails, keeping the string taut. Trace a graceful arch.

What Saw Should I Use?

Once you have created the arch shape, use the jigsaw to cut the pattern. Then nail small pieces of two-by-three between the two pieces of plywood on the three straight sides and at six-inch intervals along the bottom of the curve of the arch. When complete, the sturdy arch frame is rigid and one inch narrower than the current finished opening. A helper holds the arch frame in place as you toenail it to the existing rough walls studs. Cover the arch with drywall and finish it to a texture to match the existing walls.

Circle or Oval - Which is Better?

True circular arches are rare. Almost all arches are oval shaped, and these are not hard to do with the string jig method. The key is determining the amount of slack in the string to create the apex of the oval from the bottom spring line. The spring line is the invisible or imaginary straight line that connects the bottom tips of the arch.

To ensure the arch is centered and consistent in shape, you can also create a grid on the plywood of equally spaced lines. When the shape is perfect, each half of the arch is a mirror image of the other. You can see the curved line pass through the same part of each square or rectangle created by the grid lines.

Aerobics Before Building Prevents Injuries

I notice as I get older it is a struggle to stay in shape. Just recently I constructed a gorgeous glass-block greenhouse for Kathy and those darn boxes of glass block were heavy. Add to that all of the bending and kneeling I had to do for the initial layout and you have a recipe for temporary muscle tears that create painful and nagging injuries.

Down the street from my house, you can find the Fisk home. Steve and Diane have lived there for every bit of 15 years. Diane has always been an aerobic instructor and you can tell by looking at her! I am so envious as she looks so fit and she always has a bounce in her step. I think it is the endorphins that are released after a workout.

Anyway, she has always tried to get me to come to her classes, but I always seem to have an excuse. To be honest, I rarely see any men at them and I have to be honest, I would feel a little embarrassed. But I think it is time to leave my pride at home and give aerobics a chance.

I don't know about you, but I hate it when I pull a muscle. I am miserable and often the job gets delayed or doesn't get finished for weeks. So I decided to do some research on the topic and stumbled across a pretty cool website called AboutAerobics.com. If you are a beginner like me, this may be a great place for you to start learning more about this fascinating way to help keep your body in shape.

I guarantee you would start doing aerobics if you saw how happy and cheerful Diane Fisk is. I swear it has to be aerobics because our houses are both connected to the same water main, so it surely isn't the water she drinks!

Stain Solver

Author's Note: Stain Solver was a brand of oxygen bleach. The owners of the company announced they were going out of business in January, 2025. As of June, 2025 it was impossible to purchase Stain Solver.

You can make your own oxygen bleach using this recipe. CLICK HERE to get the recipe.

Oxygen Bleach

Organic * Color-Safe * Oxygen Bleach

Your Everyday, Everything Cleaner

You're here because you want to know more about Oxygen Bleach. That's a good thing!

There are many oxygen bleach products you may see in grocery stores, big box stores or on TV commercials. The problem you have is figuring out which one is best.

Oxygen bleaches are powders that have been around for decades. They're used each day by hospitals, hotels, and giant uniform companies to clean garments, sheets, pillows, and any other fabric. If you used chlorine bleach on these things, they'd be ruined within a few months.

Oxygen bleach is color-safe and fabric-safe. It's non-toxic. It's safe around plants. It's simply an amazing product all homeowners should use. 

High-quality oxygen bleach safely and powerfully blasts away dirt, stains, and odors from anything water-washable. Mixing the pure-as-snow powder with water creates a fizzing, cleaning solution that’s tough on stains and odors yet gentle on your stuff.

The all-natural and organic solution dissolves stain and odor molecules, leaving your possession restored. Whether a 10-year-old deck, wine-stained carpet, heirloom linens or filthy grout, Stain Solver can save it.

b4After235x209
"We used your Oxygen Bleach on the deck of our summer home in New Jersey with amazing results. The photo clearly shows the striking difference between the mildew-covered decking and the clean wood. We loved your advice about using a garden hose instead of a pressure washer." - Gail M. from PA


See all BEFORE & AFTERS »

Click on any of the images below to view the before and after stories provided by people who have used my oxygen bleach recipe.

Clean with Stain Solver Stain Solver
Stain Solver Tile Stain Solver Deck cleaning
Stain Solver Roof cleaning before & after

Oxygen bleach solves many problems. It cleans and renews safely most anything from decks to grout, to whitewalls and old, yellowed, but favorite sweaters, to laundry and pet disasters .. and more!

Indoor Greenhouse DIY Photos

Storm Door with beveled glass on greenhouse

Indoor Greenhouse DIY - This is outside looking into the space. That is a Pella Storm Door with beveled glass - tulip pattern to match the greenhouse theme.

Indoor Greenhouse DIY - It's Easy with Pittsburg Corning Provantage System

An indoor greenhouse diy paradise is possible if you use glass block you assemble with plastic spacers and silicone caulk. You can build a sizeable indoor greenhouse in a day.

The most important part is to make sure the first row of glass block is perfectly level in both directions.

Watch this video to see how I built the indoor greenhouse diy oasis you see in the photos on this page.

 outside 45 degree corner.

This is the outside 45 degree corner. You use special 45-degree glass block to create the corner. As long as you have the walls plumb, the corner will be plumb too.

Watch this video to see how to GROUT the glass block once you have them all installed:

custom cut redwood ceiling

I'm standing in the door looking in and up to the ceiling. The grid is made from custom cut redwood. Do you like those cool ceiling panels or what? 


Left interior wall with electric outlets

This is the left interior wall looking through the open storm door. See the electric outlets and thermostat control that activates cooling fan when grow lights raise the temperature too high?

Related Column: Free-Standing Shelves

Roof Flashing Repair – Don’t Use Caulk

roof flashing

Roof Flashing Repair | The brown-red strip is a sill flashing. It has a bend in it and extends up behind the wood siding. The siding and the flashing act just like the shingles below.  All overlap one another just like the shingles on the roof.

DEAR TIM: I have a simple sloped roof over a side porch on my new home Each time it rains, water leaks down the wall of the porch. The vinyl siding above the roof simply touches the shingles and there is some caulk that has pulled apart. Can I stop the leak by adding more caulk? Is there a more permanent solution? Demise L., Beckley, WV

DEAR DENISE: Oh my! In my opinion, caulk is not an acceptable substitute for traditional metal roof flashings. Don't use caulk for roof flashing repair. Certain caulks are highly weather resistant, but they can fail if there is too much movement between the roofing materials and the things that are not roofing such as your vinyl siding.

Does Vinyl Siding Expand and Contract?

Vinyl siding, for instance, has an enormous expansion / contraction coefficient. This simply means that as the temperature of vinyl siding goes up and down during the day and night, it expands and contracts dramatically. This movement can and does break the bond between the siding and the caulk or the caulk and the shingles.

What is a Roof Flashing?

A roof flashing is something that connects roofing materials to something that isn't a roofing material. Here are a few examples of something that a flashing touches:

Do Roofers Make Flashing Mistakes?

The roofer that worked for your builder made an enormous mistake by not installing a simple metal flashing that should have covered over the top of the last course of shingles and then continued up the vertical face of the wall. This metal flashing piece is normally eight inches wide and perhaps ten feet long. Four inches of the metal laps over the shingles and the remaining four inches extends up the wall. If the roof is longer than ten feet where it butts up against the house, two or more pieces of flashing are overlapped and soldered to make one large continuous flashing.


Avoid repairing roof leaks yourself! Find a professional using my Roofing Replacement / Repair Checklist. I offer a 100% Money Back Guarantee.


How Do You Make Flashings?

Virtually all professional roofers own a tool called a metal brake that enables them to quickly create a crisp bend in the metal flashing that matches the angle of the roof where it meets the house. They typically add a second small bend of about ten degrees one-half inch in from the edge of the metal that overlaps the shingles. The addition of this second break or bend takes the waviness out of the metal that often happens when the metal is cut using a traditional metal-cutting scissors or snips.

WATCH THIS VIDEO to see a flashing with a similar kick-out bend:

Can A Metal Brake Be a Cutting Guide?

You can minimize or eliminate waves in the metal when cutting sheet metal such as tin or aluminum if you use the metal brake tool as a cutting guide. When I had access to a brake and had to cut sheet metal, I would insert the piece of metal into the brake tool and push the clamping lever to lock the break's jaws down on the sheet metal. Using a razor knife equipped with a new blade, I would make score the metal along the top jaw of the break. The razor would actually cut partially through the metal and when the brake handle was rotated up and down several times, the metal would separate much as the pop tab on an aluminum drink can breaks when bent back and forth.

roof flashing close up soldered seam

This is a soldered seam between two pieces of the 40 pound tin. You can also clearly see the edge that has been created with the break. This bend in the metal actually keeps the metal very straight.

Where Do You Find Most Roof Leaks?

Ask any professional roofer and they will often tell you that flashings are the source of over 90 percent of roof leaks. Unfortunately, many rookie roofers or ambitious do-it-yourselfers do not fully understand how flashings should be made and how they work.

The flashing that is missing at your home will work because it acts just like the shingles below it. The flashing overlaps the shingles and then extends up the wall of the home. The vinyl siding then overlaps the metal flashing. Each successive piece of vinyl siding overlaps the one below it. This overlapping system of materials does a fantastic job of stopping water.

CLICK or TAP HERE to get FREE quotes from local companies that can install your roof flashings.

What are the Best Flashing Materials?

Great roofers readily understand and see this and they know the correct materials to use. Look at professionally installed flashings and you will rarely see caulk. Solder is the product of choice to permanently seal seams and small holes created while overlapping and bending flashing metal around chimneys, dormers, wall corners, etc. that are routinely encountered when roofing materials touch up against things up that periodically penetrate a roof.

Should Aluminum Flashing Be Used With Brick?

Not all flashing materials can be used universally up on a roof. Aluminum works well in many locations, but should not be used in contact with masonry of any type. The alkaline chemicals in mortar can react with the aluminum and cause corrosion.

What About Tin and Copper Flashing?

Tin used to be available in different weights. 20 and 40 pound tin are the most common. I prefer 40 pound tin as it lasts much longer. However, harsh regulations imposed by the EPA have made it just about impossible to find tin-coated steel. It's a regulation I disagree with and is not based on solid science.

Copper, of course, is the premier flashing material. It can last up to 100 years without failure and is as easy to solder as tin. Galvanized metal and sheet lead can also be used, but they are more difficult to work with.

What About Using Thin Stainless Steel Flashing?

Thin stainless steel is a great flashing material. It's easy to bend and some come with self-adhesive backing for uses on walls and under doors and windows.

York 304 stainless steel flashing

This is a fantastic stainless steel flashing you can mold yourself to fit any brick sill opening. CLICK on THE IMAGE NOW TO ORDER THIS AMAZING NO-RUST PRODUCT. York 304 stainless steel flashing

Read my January 13, 2013 AsktheBuilder Newsletter for a shocking article on using caulk with copper flashing! This was one of the finest home improvement magazines.

Column 529

Architect Cost and Fees – Know What You Want

Custom Built Home under construction

Architect Cost and Fees | This custom home was designed by a top residential architect and is being built by a superb builder. The architect does stop by the job site from time to time to check quality and progress. Photo Credit: Tim Carter

DEAR TIM: My husband and I are going to build a new home on a lot we own. After interviewing several architects, we've discovered that the fee charged for the plans is a function of the amount of service they provide as the house is being built. Is it necessary to have the architect part of the building team if we hire a decent contractor? Why pay a higher fee to the architect if the job goes smoothly? What can we do to ensure the job does go smoothly? Henrietta S., Glenview, IL

DEAR HENRIETTA: Congratulations on this exciting project! You are about to take a trip that has many paths. Some of them lead to the Twilight Zone and others can take you to Fantasy Island. All too often, people end up at the wrong place. There is no doubt a superb architect paired with a fantastic builder will help make your building experience a happy one, but unfortunately, it is not an absolute guarantee.

Mr. Blandings Architect - Great Example

A great example of this dynamic situation where an architect follows the house from conception to completion is in the famous movie Mr. Blandings Builds His Dream Home, starring Cary Grant. The architect was routinely in scenes where Cary Grant and his wife needed help dealing with the builder and his subcontractors. Every week during the process there seemed to be new problems that had to be solved, granted some were slightly sensationalized for the movie, but all were based in reality.

CLICK or TAP HERE to get FREE BIDS from local architects to draw your plans.

Watch some of the scenes below to get an idea of what should and can happen. Great architects can add lots of value to your project.

Use Software to See 3D

The problem with building a new home is that many homeowners do not possess the power of visualization. Problems start to happen on jobsites when the homeowner finally sees things that just appeared as lines on a drawing. Great builders and architects have this mystic power and using it allows them to take a two-dimensional set of blueprints and create a real three-dimensional image of the finished object in their heads. Modern computer software is now available that allows planners to create three dimensional views and actual walk-through views of what both the inside and outside of a home will look like.

What About Change Orders?

Architects can be exceedingly helpful during the building process to assist with any change orders and to act as the tie-breaker in minor or moderate disputes between you and your builder. This is an often overlooked tool in a homeowners toolkit. If you can get the architect to agree to this and then put that language in the contract between you and the builder, you may avoid costly legal disputes at a later date.

Should Architects Do Inspections?

Architects also take pride in their work and want to see that the house is built the way it was drawn. Often the methods and materials they specify exceed building code requirements. Periodic field inspections at critical times allow the architect to verify the builder is doing the job right. You may not have the time nor the expertise to do these inspections yourself. Once again, if you decide to use the architect in this capacity, be sure it is spelled out in the contract between you and the builder. Note that the builder must make any and all corrections at his sole expense as pointed out by the architect.

I would talk with several of the architects and see if you can arrive at a compromise. You pay the base rate for all of the design work, working drawings and anything you need to get bids and a building permit. Then see if the consults and inspections can be ordered ala carte as you might need them.

You Need Schedules and Specifications

If you want your job to go smoothly, you must have superb plans and detailed specifications. It also pays for you to preselect all items that will be used in your home. Do not rely on allowances and then try to pick things as you build. Some fixtures need very long lead times. If you delay deciding, you may severely limit the things you can select from. The preselection process eliminates surprises, and allows you to get bids from contractors that are highly accurate as each bidder knows exactly what they need to install.


How would you like to use my specifications for your new home?
I will gladly share hundreds of my tips and building secrets with you and your builder.
Check out my New House Specifications. 100% Satisfaction Guarantee!


Great Plans Eliminate Confusion

The extra money you pay an architect to go along for the ride can be looked at as an insurance policy. Many of us have house insurance policies that protect us in the event of a fire, storm or natural disaster. We don't want these bad things to happen, but still pay premiums year in and year out. I pray that you also have no problems during your homebuilding experience, but having an architect on call might give you tremendous peace of mind during your journey.

Can You Get Perfect Plans?

Perfect plans and specifications are possible. Years ago, I was awarded a job where the plans were great and the Fortune 500 Company executive homeowner had spent the time to create a binder that had photos, model numbers, finishes, paint chips, carpet samples, etc. of each and everything in the job. At the meeting where we signed the deal, he said, "My work includes many trips and meetings. I doubt I will ever see you during this job. It will be nearly impossible for you to contact me with questions so I have tried to think of all you need to know."

CLICK or TAP HERE to get my Sample Blueprint. It's step one to get perfect plans.

Well, he did a fantastic job, but his wife got involved and changed some of his ceramic tile selections as the job progressed. Had that not happened, I would have successfully completed the project with no interaction after the contract was signed. It's a dream come true for a builder as far as I am concerned as I knew what I had to do and never had to wait on an indecisive homeowner.

How Do We Minimize Cost Overruns?

You can minimize or eliminate cost overruns by having a long meeting with the bidding builders as soon as the plans and specifications are complete. It's important to go over every part of the plans explaining all aspects of the job. Do the same with the specifications. This meeting puts the builder on alert of any special things about your job.

Once the bids come back, have a second similar meeting. The builder must submit a very detailed cost breakdown much like the one I've sold for years. CLICK or TAP HERE to see it.

CLICK or TAP HERE to get FREE BIDS from local architects to draw your plans.

Tim Carter Autobiography

Thank goodness for power miter box saws and long-lasting L.L. Bean flannel shirts!

Thank goodness for power miter box saws and long-lasting L.L. Bean flannel shirts!

The Autobiography of Tim Carter

Life began for me in the early 1950's. I was born and raised in the University Heights (South Clifton) suburb of Cincinnati, Ohio. As I replay the tape of my early childhood, it keeps turning up memories of great places to play. A dense stretch of woods started just up the street behind Joe Conrad's house and passed behind my house extending all the way down to McMicken Street. Within these woods one could find a wonderful creek and both the short and long trails that wound through the dense woods down to Central Parkway and the abandoned subway tunnels.

Across the street from my home, directly behind the Little Sisters of the Poor, there was another wooded ravine where the mysterious swamp could be found. The ravaged and charred remains of my Texaco tanker ship are still there. It exploded and sunk in the fabled swamp when an M-80 ignited; by a time-delay cigarette fuse blew it to kingdom come.

In the early 1960's, the ravine was filled in with thousands of truck loads of dirt to create a new connector roadway between Dixmyth and Clifton Avenues. That connector road is now part of Martin Luther King Drive.

It didn't take long for my buddies Roger Boncutter, Pekka and Charles Mooar, Mike Wilson, Billy Gottesman and several others to discover that a few scrap pieces of wood and some rocks piled up on one of these mounds of dirt made a great fort to protect you from incoming mudballs. Many a day my friends and I would play war among the piles of dirt. It was great fun, that is, until you got hit in the head with one of those hard mudballs!

Life Scout and Ad Altare Dei

I was really active in Boy Scouts. I didn't make it to Eagle Scout (I needed just 6 merit badges), because I could not swim. Two of the required merit badges were Swimming and Lifesaving. I had about as much chance of getting those merit badges as growing wings from my ears. However, two of the merit badges I did receive were Home Repairs and Journalism. Now isn't that a coincidence? I made it to the rank of Life scout, and got my religious Ad Altare Dei medal.

Not only that, my first job ever was collecting paper-route money for The Cincinnati Enquirer. I was eight years old. Two years later, I had my own afternoon paper route delivering The Cincinnati Post & Times Star. It was a one-hundred-paper route, and I made one penny per paper. That was huge money back then, as each week I got paid six dollars! To put that into perspective, some of my friends got 50 cents allowance each week while others got maybe a quarter.

High School and the Clumsy Years

High school was a really fun time. I got to date lots of great girls - as none of us were really yet adults. Let's see there was Carol Voss, Mary Chris Funch, Cindy Conrad, Patty Gorman and several others. I also didn't pay attention in Latin class, so I had to go to summer school. That is where I met Mary Gene Helmick.

I went to Roger Bacon High School. Many days after school I worked at Skyline Chili. During my senior year in high school, I was the editor of my school's newspaper, The Baconian. Although I couldn't hear them, the cosmic tumblers were starting to interlock as I had my own opinion column in each issue. I used this column to poke fun at the administration, classmates, and other schools.

Go for Throttle Up

Kathy, my lovely and patient wife, also waltzed into my life during my high school years. The University of Cincinnati felt sorry for me or else they were shy of their enrollment quota. In any event, that's where I got my Bachelor of Science degree. My major was Geology.

My brain finally got jump-started in college. I wasted lots of brain juice in high school just messing around. But once in college, I really took things seriously.

What a difference it makes when you study and turn assignments in on time. Because I knuckled down and got an overall average of 3.46 or something like that, I was offered a full scholarship and an assistantship for a Master's Degree in Engineering Geology. Believe it or not, I turned this opportunity down. I wanted to go into business for myself.

It's Time To Build

Three months after graduating from college, Kathy and I got married. She worked as a clerk at a hospital. I went to work fixing up old houses. Small jobs led to bigger and bigger jobs. Before our first wedding anniversary, we bought our first house. It was in really bad shape. I fixed it up and turned a profit.

Back then we didn't call it flipping, but that is what I had done - I had flipped a house. In fact, the term used in the 1970's was rehabbing. This delightful house was purchased for $8,500.00. I spent $8,000.00 in materials and for some labor to fix it up. It took only five months.

Kathy and I moved into the home, but started to look for another rehabbing opportunity. After one year, we decided to buy a larger home that needed work. Back when I purchased the first home, I had estimated the house might sell for $21,000.00. I goofed up. It sold for $35,000.00 just 14 months after buying it. That enormous profit was enough to tell me that construction and real estate were the places to be. The construction bug had bitten me, and quite hard I might add.

I rehabbed more houses, did contract work for other homeowners, and eventually began to build custom homes. The new houses were always fun. It seemed like a picnic, as I could actually work on top of a foundation that was level and square! The remodeling jobs grew more complex. By the mid-1980's, I was constructing ultra-custom $250,000 room additions and $75,000 kitchen remodels.

Every aspect of residential construction interested me. I read technical journals about how to do everything. Then I tried to do the things myself. Soon I figured out that you can't do every task at the jobsite. You had to invest too much money in equipment that was seldom used, and you couldn't multi-task.

Once a job is under roof, several trades can work simultaneously. I gravitated towards carpentry, plumbing, ceramic tile and concrete. Over the years, I became a master carpenter, a licensed master plumber and a master roof cutter. There is nothing quite like the feeling of completing a complex common framed roof or installing three floors of cast-iron plumbing stacks.

I also became a licensed real estate salesperson in 1975. Ten years later, I had fulfilled the requirements to sit for the broker's exam. I have been a licensed real estate broker in Ohio since 1986.

The New Media Career

In 1993, I was selected as one of the top 50 remodelers in the United States by Remodeling magazine. They publish an excellent trade magazine. This award enabled me to begin a new media career. Kathy suggested that I take my book idea and turn it into a syndicated newspaper column.

I had always wanted to write a book about how the average homeowner gets taken by builders and remodelers, primarily because many workers simply do not do things the right way. She was right! It worked. AsktheBuilder was born on October 2, 1993, and continues to be sold to new newspapers each month.

In March of 1994, I started my radio broadcasting career. I ended this career in the spring of 2006, because I determined I could better spend my time creating more content on AsktheBuilder.com. I also do 90 second television segments that are very popular at YouTube Video. Just click that link and once there, type " Tim Carter" into the search box. I think you will really enjoy what you see.

Sigh.... Not All Information Out There is Accurate

Each year I attend many trade shows and editors conferences so I can report on the latest products and building systems. At these events, I have had the pleasure and good fortune to meet many other media personalities.

What I have learned after talking with some of these people is that very few of them have an extensive background in residential building and remodeling. Be sure to keep that in mind when you read other columns in newspapers magazines or on the Internet.

Also, be careful about the advice you might hear on certain radio shows. As much as I hate to say it, some of the hosts of these shows have no extensive hands-on experience building or remodeling homes. Sure, they may have done a project around their own home, but that does not qualify. The real world of building and remodeling happens when you must satisfy both the building inspectors AND discriminating customers.

Be really vigilant when you watch the bubbly personalities on cable television shows where the advice often seems a little too good to be true. What you see on television is not always what really happened at the jobsite. It is amazing what can be hidden by a wide camera shot, or how an editor can cast a magical spell over the tape during post production editing. I know this as I have seen them do it.

Here at AsktheBuilder.com, I try to tell you the simple facts. Some jobs are easy, but others may be very difficult. Because I have decades of hands-on experience in every aspect of residential construction, I can tell you the truth about the complexity of different tasks.

Why tell you a project is easy, when in fact it is hard and you need $1,200.00 or more worth of tools to do the job right? Some other media personalities, I feel, can be a little misleading. I try to tell you the cold hard facts. One of my mottos is:

A Swig of Reality Juice Can be Bitter,
But It Makes the Job Go Better.

I am proud to say I worked for nearly twenty years, often six days a week, in the field with a tool belt on. I didn't ride around in a truck and call subcontractors on my bag phone. What? You don't know what a bag phone is? They were one of the first cellular phones!

Well, that's the scoop. Hey, are you still awake? If so, I hope you enjoy this and future visits to the AsktheBuilder.com. If you have a question be sure to first use the navigation key words on the left of each page on this website. You can also use the Search Engine in the upper left corner of each page. If you still need help, just click the handy link just below.

Thanks for stopping by AsktheBuilder.com!


Learn more about Tim by visiting his Google Profile.

Matching Brick Color – You’ve Got Choices

matching brick

Matching Brick Color | Are you sure you know where the new brick meets the old? The color match from the roadway and even this close is almost as good as it gets. This is an Ask the Builder job I'm very proud of. Go find this house on the south side of Grand Vista Avenue in Cincinnati, Ohio.

DEAR TIM: I am getting ready to build an addition and need to match the brick on my home. The house is only 12 years old and the original brick had a sand finish. We are told the brick is no longer available. How is that possible? What can I do to get brick to match? Nathan H., Lindo, UT

DEAR NATHAN: I realize this doesn't help, but you are by no means alone. I suspect hundreds of people per week across the nation face the same problem you do. In some cases, a person is looking for a solitary brick to make a repair. In other cases, a person may want to fill in an opening. Accidents happen and brick walls need to be repaired or replaced. In some cases, the homeowner lucks out and finds a brick that is a perfect match or one that is so close that from a short distance you can't see a discernible difference.

How are Bricks Made?

A brick type and style can become unavailable for any number of reasons. First and foremost, the brick is made from clay. The clay deposit in the ground can become depleted and or the characteristics of the clay actually change as the mining pit is extended. The changes in the clay can be very subtle and almost impossible to detect over a period of days or weeks, but when you compare one brick to another made 12 or even 20 years later, the difference can be astonishing.

Your problem could be as simple as the brick company going out of business or the brick itself going out of style. Brick styles change over time like cars, clothes, cabinets, and other consumer goods. For example, 80 years ago a popular brick style was one that was hard-fired and had a distinctive satin glaze. The brick also had a salt and pepper appearance with smaller random dark spots on the surface of the brick. Visit many east coast cities and you can see hundreds of these brick homes in older neighborhoods.

How Do You Locate Matching Brick?

You may have to expand your search for the brick to neighboring states. It is possible the brick is still made but is now called by another name. The original brick manufacturer may have been bought by a larger company and your brick is now sold under a different name by a different distributor.

Take excellent color photographs of the brick using a very good camera so that you capture the true color of your brick. Don't hesitate to mail these photographs to brick distributors in hopes that you might find your brick still in existence.


Avoid mismatching mortar! Find a good contractor and learn the secrets to repairing masonry with my Masonry Repair (Chimneys, Stucco & Brickwork) Checklist. I offer a 100% Money Back Guarantee.


matching brick color

Here's a huge mistake. They matched texture perfectly but the newer brick on the right has too much orange in it.

Should I Match Color or Texture First?

If you discover your brick is not made anymore, then the first thing you must do is strive for a color match. Do not let a brick salesperson talk you out of this strategy. Try to find brick that is very close, if not identical, in color. When trying to match brick, many people strive to match texture first, then color.

You can see texture difference when you stand close to a brick surface, but rarely can you see differences when you stand back 50 or 100 feet. Most people will view your addition from a distance. But color mis-matches stand out from any distance. If the color difference is significant and the texture match is perfect, the result will be glaring.

Can Brick Be Stained?

The last resort may be brick staining. Any number of companies make high-quality stains that may allow you to achieve a perfect or nearly perfect color match if you start with the correct texture.

You probably can buy a handful or two of brick from a distributor and use these to test the staining system. Be sure to stand back 10 or even 20 feet to look at the finished stained brick as they are held up against your existing home. Your eyes can sometimes play tricks on you when you look at the brick up close.

CLICK or TAP HERE to get FREE quotes from local companies that can repair your brick.

What About Matching Mortar?

Don't forget about matching mortar at the same time. Pay close attention to the color and size of the sand particles in your existing mortar. Not all sand is the same. You must use new sand that matches the existing sand as closely as possible.

CLICK or TAP HERE to discover the best way to match mortar color.

How Can I Age New Mortar?

Once the new addition is built, you will probably have to age the new mortar to match the old mortar. You can do this with any number of brick-cleaning chemicals that will wash off the cement and lime paste that covers the sand particles.

Be sure to use an approved cleaner for the brick you buy. Do not automatically think that muriatic acid will safely clean your brick. It can harm some brick and may ruin your freshly stained brick if you have to go that route.

Author's Note:

Here's a comment from Don Foster, a top brick-staining expert:

"Tim, great article. If looking for a great match and staining is involved have them then match size and texture then get as close as they can in color and a stain can do the rest. Make sure it is a Proven Masonry Stain and not a paint-like stain. A Proven Masonry Stain is Transparent/Translucent like in nature and does not create a layer that would crack, peel, blister, or flake and allows the brick to breathe naturally, meaning does not trap moisture. In fact, a stained brick will get wet just like the unstained brick right next to it. A Proven Masonry Stain will not change a Maintenance Free brick to a Maintenance one. I do not know of another product that can say that. Keep up the great work you do, it is appreciated."

Don "Brickman" Foster CLICK or TAP HERE to discover more about what Don's talking about.

Level Sand and Gravel – Use a Transit or Laser Level

builders level

Level Sand and Gravel | This is my builders level and it has served me very well for nearly 30 years. It's highly accurate if you take the few moments and set it up properly. The fiberglass grade pole is leaning against the tripod and extends out to 14.5 feet. It is easy to operate both with just a ten-minute training session.

DEAR TIM: I am in the process of installing a brick patio around a pool. The brick needs to be placed on compacted gravel upon which I then place a two-inch-thick layer of sand. The sand must be smooth and even so the finish bricks look right. How in the world do I establish the proper heights for all of these materials? I need help picking the right tools and the right methods. Jose N., New Brunswick, NJ

DEAR JOSE: Oh gosh, I wish I could just come over and help do this. In the time I spend trying to explain it, I think you and I could have two or three jobs finished. Once you see how easy it can be, you'll be amazed. The methods work for just about any finished surface whether there is a pool nearby or not.

Optical or Laser Level  - Which One?

An optical level is one you look through like you would a telescope. You see a crosshairs much like you see markings looking through a submarine periscope. You need two people to operate an optical level. The second person holds the grade pole. See below for what a grade pole is.

A laser level shoots out a laser light in the same plane. A sensor device on a grade pole emits a sound when the grade pole is at the right height. You can operate a laser level with one person. Watch this short video about how a laser level works:

What is a Good Laser Level?

Look at this one. I have one just like it. You'll need all you see in the photo to work alone. CLICK or TAP HERE to order one.

outdoor laser level

This is a fantastic kit for an outdoor laser level. You get all you need to work alone. CLICK on THE IMAGE to order one.

What is Finished Grade Height?

The first thing one must do is to establish the final finished surface height. In your case, you have this grade elevation. It is the finished edge or lip around the swimming pool. In the case of a regular patio or sidewalk, you might determine the finished surface by the surrounding ground or the relationship between the surface and nearby steps, decks or driveways.

Should the Finished Surface Slope for Drainage?

Yes, in almost all cases the finished surface should slope to drain water to the edges. A gentle slope of 1/8-inch per foot to many looks level to the naked eye.

The next thing you have to consider is any slope you want in the finished surface. Slope is good, as it allows rainwater and snow melt to run off the surface. I would think you would want water from the surface to absolutely drain away from your pool. Who wants debris-filled storm water running into the fresh, clean pool water? A gradual slope of one-eighth inch of drop per every two feet of run should be enough slope in most instances.

Where Should Grade Stakes Be Placed?

I prefer to establish grade stakes driven into the ground for reference points. The tops of these stakes represent the different heights you need to hit. For example, you need three different grade stake elevations: one for the height of the compacted gravel, one for the uncompacted sand and the final one for the finish brick at various points around the pool.

How Close Should Grade Stakes be Placed?

These stakes need to be placed perhaps eight feet on center, so that you can set a very straight piece of wood or perfectly straight metal straightedge on top of the stakes. If there is a gap under the wood or straightedge, this tells you that more material needs to be added. If too much material is placed, then the straightedge will not rest upon the tops of the stakes.

How Do You Know When You Have Enough Fill?

When you have the perfect amount of material in place, with respect to the given stakes, the surface will be perfectly smooth. You and a helper can check by rotating the straightedge, on top of any of the stakes, just as the hands of a watch or clock rotate around the dial. The network of stakes allows you to move the straightedge to different stakes to check that all points are in the same plane.

bottom of the grade pole

The bottom of the grade pole is resting on the top of a piece of rebar. The top of the rebar can represent any height that you determine. Once at the right height, you place the straightedge on top of it and any other grade stake at the same height.

Establishing the proper height of the stakes can be a challenge. I have used by trusty builders level or transit for years to do accomplish this goal. My level looks similar to the expensive transits that surveyors use, but all my instrument does is establish a level sight line as you look through it.

What is a Grade Pole?

A grade pole is a straight rod that has accurate measurements printed on it. By using a graduated grade pole on top of each stake, I can tell if the stake is level or in the same plane as all of the rest. My grade pole is simply a long vertical ruler that is marked in increments of one-quarter inch. The person looking through the builders level focuses on the grade pole markings to determine how high or low the top of a stake might be.

How Does a Grade Pole Work?

For example, once my instrument is set and level, I look through it. If the grade pole is resting on top of the pool edge and reads 4 feet 1 inch, then I need to make sure the top of the stake representing the finished brick produces a reading greater than 4 feet 1 inch. This greater amount is a function of the amount of slope I am trying to create at any given location. So if I am say 6 feet away from the pool edge, the reading looking through the transit might be 4 feet 1 and three eighths inch. Since the instrument is projecting a straight line as you look through it, any reading that gets bigger means the bottom of the grade pole is dropping.

You can often rent builders levels or laser leveling equipment at tool rental shops. The store manager should be able to give you a quick tutorial, just after you hand over your deposit. You will be amazed at how well these tools work, so long as you get them level before you use them.

Are All Grade Stakes at the Same Elevation?

No, in many cases the grade stakes are not at the same elevation. If you want a concrete slab or some other surface to be perfectly level, then the grade stakes should be at the same elevation.

Keep in mind, that not all grade stakes will always be at the same elevation. If the pool patio is not a consistent width around the pool, the grade stakes farther from the pool edge will be lower and lower as you continue to create fall as you move away from the pool edge.

It is always best to make a written plan of the grade stakes and confirm the mathematics. You can also string lines if the stakes are in line with one another. The string will prove if one stake is higher than an adjacent one. Of course the builders levels will do the same as long as you keep track of the different stake heights. See why I wanted to come over to help?

Jackie wrote about leveling her driveway. Read her story in the August 18, 2009 AsktheBuilder Newsletter.