Advertising Rates and Programs

Advertising on AsktheBuilder.com works because people who surf the Internet do so for two primary reasons:

Pleasure and Problems

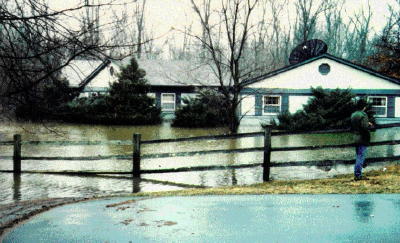
The 40,000 +/- people who come to AsktheBuilder.com each day have problems that need solutions. They are often in pain and need immediate relief. Here are a few simple problems:

  • a leaking roof
  • water pouring into a basement
  • which flooring product is best
  • what contractor to use
  • what tool to buy

Ads on AsktheBuilder.com offer solutions. Order an ad now so you can help people.


Quick AsktheBuilder.com Advertising Facts:

  • Cost - Invest as little as $3.00 per day
  • Demographics - 95% of visitors are homeowners, 65% of which are women
  • Impressive Click-Through Rates - some ads get as high as 12% CTR
  • Traffic - 20,000 - 30,000 Unique Visitors per Day
  • Real-Time Tracking - View your ad campaign success in real time 24:7:365.


Ads at AsktheBuilder.com are Contextual Ads. Your ad is placed adjacent to relevant content that matches your product or service. The ads that get the most traffic appear at the top of the AsktheBuilder.com category pages. Your ad can also appear in a specific column that might reference your product or service. You can place as many ads throughout the AsktheBuilder.com website as you like.

There is absolutely no quid pro quo advertorial at AsktheBuilder.com. No favorable articles will be written about products simply because you decide to buy advertising space. All articles on AsktheBuilder.com are factual and written from Tim Carter's personal experience or research done about the topic.

Here is what our most popular ads look like:


Types of Ads:

There are four different ad types at AsktheBuilder.com. These ads are able to appear on all pages in addition to Google AdSense ads. The current AsktheBuilder.com ad products are:

  • Simple Text Ad
  • Graphic Text Ad
  • Category Banner Ad
  • Large Photo Ad next to Videos

Simple Text Ad:

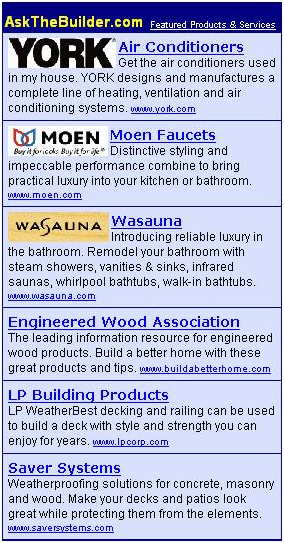
You can see three simple text ads in the above image. The Engineered Wood Association, LP Building Products and Saver Systems ads are Simple Text ads.

Each simple text ad has 25 words or less of descriptive text. There are two distinct links back to your website within the text ad - the company name and the small text URL at the end of the ad.

These Simple Text Ads are sold for a period of one year and they offer Unlimited Impressions and Unlimited Clicks.

Simple Text Ad Prices:

1 Text Ad = $1,000*
2 Text Ads= $1,300*
3 Text Ads= $1,550*
4 Text Ads = $1,750*
5 Text Ads = $1,950*

All prices are NET to AsktheBuilder.com, in case you are an Ad Agency.

Ready to order this ad? Contact Ad Sales now!

* The position of any particular ad in each ad block is determined just like the ads on the right side of any page of Google search results. Those advertisers who want to be at the top of the ad block do so by investing more for that valuable advertising real estate.

When the ad blocks are small with just a few advertisers, visibility is good for all advertisers. You can get great placement for the minimum stated ad-rate price above. But as more ads are sold, the ad block grows longer. Those ads sold for the minimum stated price get pushed to the bottom of the stack.

If you want top billing in any ad block or category, you simply have to make a slightly larger investment than the current top advertiser.


Graphic Text Ad:

You can see three simple Graphic Text Ads in the above image. The York, Moen and Wasauna ads are Graphic Text ads.

Each Graphic Text ad has a 30-pixel-high by 100-pixel-wide graphic and 25 words or less of descriptive text. There are three distinct links back to your website within the Graphic Text ad - the graphic image, company name and the small text URL at the end of the ad.

These Graphic Text Ads are sold for a period of one year and they offer Unlimited Impressions and Unlimited Clicks.

Graphic Text Ad Prices:

1 Graphic Ad = $1,500*
2 Graphic Ads = $1,950*
3 Graphic Ads = $2,325*
4 Graphic Ads = $2,625*
5 Graphic Ads = $2,925*

All prices are NET to AsktheBuilder.com, in case you are an Ad Agency.

Ready to order this ad? Contact Ad Sales now!

* The position of any particular ad in each ad block is determined just like the ads on the right side of any page of Google search results. Those advertisers who want to be at the top of the ad block do so by investing more for that valuable advertising real estate.

When the ad blocks are small with just a few advertisers, visibility is good for all advertisers. You can get great placement for the minimum stated ad-rate price above. But as more ads are sold, the ad block grows longer. Those ads sold for the minimum stated price get pushed to the bottom of the stack.

If you want top billing in any ad block or category, you simply have to make a slightly larger investment than the current top advertiser.


Category Banner Ad:

A Category Banner Ad is a traditional graphic ad that sits at the very top of any category page just under the AsktheBuilder masthead graphic. The banner ads are 625 pixels wide by 90 pixels high. Your graphic team can develop any banner using real product photos, several photos stitched together or any graphic image that communicates your message. You are permitted to place words of text within the image that create a call to action. The graphic must be in .jpg or .gif format. Here is an example of a simplistic Category Banner Ad.

The graphic ad alone is a link to your website or sales page. Only one Category Banner Ad is sold on top of each category.

The Category Banner Ads are sold on a CPM (Cost per Thousand Impressions) basis. The cost is $50 per CPM with a $1,000 retainer paid in advance.

All prices are NET to AsktheBuilder.com, in case you are an Ad Agency.

Ready to order this ad? Contact Ad Sales now!


Large Photo Ad next to Videos:

If you want a large photo ad next to our popular videos, we have that ad product available. Note the large photo to the left of the video on this page.

These Large Photo Ads are sold for a period of one year and they offer Unlimited Impressions and Unlimited Clicks.

1 Large Photo Ad = $1,875
2 Large Photo Ads = $2,275
3 Large Photo Ads = $2,675
4 Large Photo Ads = $2,975
5 Large Photo Ads = $3,375

All prices are NET to AsktheBuilder.com, in case you are an Ad Agency.

Ready to order this ad? Contact Ad Sales now!


Customer Reviews:

"Wow! The ad is currently showing a click through of about 20%. ....26 click throughs to my sales page is a lot of traffic for the very first day, especially since these are highly-targeted prospects. You get a lot of traffic. Impressive!"

Daid Petersen, Owner
Wasauna.com


"The American Plywood Association (APA) has been on board with AsktheBuilder.com for seven fruitful years. The partnership has proven valuable not only in driving traffic to our website, but also through increased exposure in Tim's other media avenues such as radio and newsletters. We have measurable results in hand."

Kevin Hayes - Ad and Publicity Manager
APA - The Engineered wood Association

Do you have any Questions? Contact Ad Sales now!

Geology Homeschool Tips – Lots of Links

Geology Homeschool Tips - From a Real Geologist

My college degree from the University of Cincinnati was in geology. I loved everything about it. Here's a colorful geology map of eastern Cincinnati, Ohio.

geology topo map

Each color on the map represents a different rock formation.

Why is Geology Important to a Homeowner?

Your house is built on soil or directly on rock. You need to be aware of flooding - rivers are a part of geology.

You need to be aware of groundwater. Groundwater floods basements and crawlspace.

CLICK or TAP HERE to discover how to STOP basement or crawlspace flooding.

Those are just a few of the reasons you need to be cognizant of the geology of your area.

What are Soil Maps?

Soil maps show the exact soil under your home. They list all the characteristics and you can get them for free.

CLICK or TAP HERE for more information about soil maps.

Does Geology Provide the Truth About Climate Change?

You bet it does! When you immerse yourself in geology, you discover in the first few days the concept of Deep Time. Deep Time allows you to look at geologic events across the vast expanse of time, not just the past 100 or 200 years, silly!

CLICK or TAP HERE to discover the TRUTH about climate change. Clue: The climate is constantly changing. Mother Nature is a patient woman unlike many others I know that are antsy!

Here's a fascinating geologic map showing the glacial moraines in Ohio that were created by the last huge continental glacier:

glacial geology map of the state of Ohio

This is the glacial geology map of the state of Ohio. It shows the different geologic evidence of the massive continental glaciers. Copyright 2018 State of Ohio

Ms. Anna E. Watson and Dr. John Kiefer, geologists who work with the Kentucky Geological Survey, appeared on my radio show on July 24, 2004. Ms. Watson compiled the following list of helpful websites:

Landslide Information

A Karst Topography .pdf file

Institute for Business and Home Safety Building Codes

U S Geological Survey FAQs

Earthquake Hazards Maps and Information

Kentucky Geological Survey

Ohio Geological Survey

Indiana Geological Survey

Master List of Links to all US State Geological Surveys

Geologic Road Maps from AAPG

Here are some cool photos courtesy of Dr. Kiefer:

The I- beams are being used to stabilize the church.

The I- beams are being used to stabilize the church.

The following three photos show a foundation sliding out from under a house. The hillside gave way and gravity ruled the day.

This house made it...to the bottom of the hill!

This house made it...to the bottom of the hill!

Water in a sinkhole, not a flood.

Water in a sinkhole, not a flood.

Look at the landslide crack.

Look at the landslide crack.


Ouch! Watch the Kope and Lower Fairview formations!

Ouch! Watch the Kope and Lower Fairview formations! This small house is being destroyed by the slippery clay soil produced when the Kope and Fairview shale turns into soil then gets wet.

KDOT's worst nightmare.

KDOT's worst nightmare. This is a giant sinkhole opening up under a roadway.

Watch for falling rock, no try monster rock!

Watch for falling rock, no try monster rock! Rocks tumbling from hillsides are real. Watch these videos:


Outdoor Kitchen Countertops

outdoor countertops

Outdoor Kitchen Countertops | All of these materials will last outdoors. The smaller pieces of material are sitting on my granite bar top. The largest of the small pieces is a piece of solid surface material. The beige square is ceramic tile. The black and red pieces are solid slate.

DEAR TIM: I need a recommendation for the finished surface of a small 42-inch-long and 20-inch-deep exterior potting bench and a somewhat larger outdoor kitchen top. I am on a limited budget and need a surface that is smooth and is more decorative than wood. My daughter would prefer pink if possible. The winters here can be bitterly cold so I want these tops to be maintenance-free if possible. John C., Hartland, WI

DEAR JOHN: You can possibly get what you want and still be within budget with at least one of the tops. The potting bench top might be resting in the boneyard scrap pile of a local solid-surface countertop fabricator. I've seen more than one pinkish-cast solid plastic countertop material that would be an ideal outdoor countertop surface. The craftspeople that make solid-surface countertops frequently end up with a variety of leftover scraps they sometimes sell for a song.

What Are the Best Outdoor Kitchen Countertops?

Actually, you have quite a few options for both of the tops. Ceramic tile, granite, marble, slate, and a few other natural stones will produce the durable surface you need, but the color and cost may burst your budget.

Pink ceramic tile will be your best bet with respect to cost and durability, but it is going to take a little work to construct a stable surface on which to install the tile. There are gorgeous pink granites and if your daughter can compromise to a deeper shade of red, slate may be the perfect material.

CLICK or TAP HERE to get FREE BIDS from local countertop contractors.

Is Concrete a Viable Choice?

Depending upon how handy you are, you can get exactly what you and your daughter want, but the tops will be made from a material you may not have even considered: concrete. You can add permanent pink powdered pigments to Portland cement, get pinkish sand, and even small pink stones for the aggregate to make the concrete. I'll wager that with a little experimentation, you will produce stunning pink countertops that will withstand countless Wisconsin winters.

Do Color Tests

Experimentation is necessary to determine the final color of the cured concrete, once it has dried for 30 to 60 days. The concrete will almost always look several shades lighter once dry than when it was first mixed. The degree of final smoothness of the finish will also affect the color.

Smooth countertops are easier to maintain and believe me, it takes some practice to learn how to wield a steel trowel like a pro. Fortunately, the cost of the raw materials to make the concrete should be minimal and if your experiments produce just one cubic foot of mixture each time, you will waste very little money.

Is Natural Stone the Way to Go?

Yes, natural stone is the best way to go. You already know that natural stone by its very nature can resist damage from ice and snow.

If you decide to use a natural stone material or ceramic tile, you need to make a base for these materials to rest upon. Indoor tops differ from outdoor tops because builders know they will stay dry. But your tops are sure to get wet and water will eventually seep under all of the countertop materials. This water and changes in humidity and temperatures can cause untreated wood to rot, swell, twist, expand and contract. This deterioration will lead to delamination of or cracks in the finished surface materials.

CLICK or TAP HERE to get FREE quotes from local companies that can build your outdoor kitchen.

What is the Best Wood to Use for a Base?

I would consider using treated plywood as the foundation for ceramic tile and natural stone tops. Chemically treated plywood will not rot if it comes into contact with liquid water. If you can't get treated plywood, buy special powdered chemicals that contain borates.

borate wood preservative

CLICK or TAP HERE to order this great BORATE wood preservative.

Dissolve these into water as directed and saturate the regular plywood with the solution. Once dry, the wood will have superb resistance against rot and decay.

What Else Can I Do to Prevent Rot?

It sounds crazy, but I would cover the wood with 15-pound felt paper and let it drape over the edges. Fold the felt paper under the plywood 6 inches on each edge and secure it with staples. I would then screw one-half inch-thick cement board to the treated plywood. The natural stone or ceramic tile will then be permanently bonded to the cement board with Portland cement-based thinset.

What Size Tile Should I Consider?

Keep in mind that the ceramic tile or natural stone products that are somewhat affordable are often found in uniform sizes such as 6 x 6 inches or even 12-inch squares. The spaces between the pieces are filled with sanded Portland cement grout that may or may not be epoxy-fortified. Regular sanded grout will work fine so long as you do not use too much water when you mix the grout and when you finish the joints. The water will dilute the cement in the grout and it will rapidly deteriorate.

Is Water the Real Enemy?

Water is indeed the fiercest opponent that outdoor countertops face, especially in cold climates. The water can freeze and blast apart the countertop. The most common damage is delamination of the finished materials from the concrete base.

How Do You Work With Thinset?

Pay attention to the directions on the thinset. Mix only as much thinset as can be used in 20 minutes. The cement board and finished countertop materials must be dust free. If you can slightly dampen them with water just before applying the thinset, you will greatly enhance the bond between the cement board and the finished materials. Once you spread the thinset onto the cement board, cover it with a piece of finished top material within three minutes if possible. If at all possible, erect a temporary shade shelter to avoid working in the sun.

Vocational Education a New Priority

These young adults will probably end up being true leaders in their fields. Never underestimate the power of desire. They *want* to be the best. That is why they have chosen a vocational education track. PHOTO CREDIT: SkillsUSA

Vocational Education | These young adults will probably end up being true leaders in their fields. Never underestimate the power of desire. They *want* to be the best. That is why they have chosen a vocational education track. PHOTO CREDIT: SkillsUSA

DEAR TIM: I was a teacher for 35 years and wonder why more residential construction workers are not formally educated. It seems we are failing our children by fostering a throw-away society. There is dignity in labor. It seems the houses I see built today are of lower and lower quality all of the time. What can be done, if anything, to energize vocational education? Therese A. New Hyde Park, NY

DEAR THERESE: You have hit upon a subject near and dear to my heart. I couldn't agree with you more about the declining level of quality in residential construction. There is a constant erosion of the quality standard in all aspects of residential construction. The terrifying thing is that for a long time the degradation of standard was slow, but for several reasons the rate seems to be accelerating.

Several years ago, I was very fortunate to become associated with vocational schools on a local basis in my own city and then on a national basis as a member of the national technical committee for an annual competition that picked the best 4-person teams of students who worked together to build a project. It was so refreshing to be surrounded by young people who wanted to learn, who wanted to build things the right way and who had an unquenchable thirst for the latest products, tools and construction techniques employed in the residential construction industry.

I agree with you 100 percent about dignity in labor. For the twenty-plus years I worked each day in the field, I was proud to be a master carpenter, licensed master plumber and a master roof cutter. I tried to constantly work smarter, not harder and took enormous pride in a job well done. Customers of mine knew they were getting work that in many instances would last a lifetime. More importantly, I discovered there are consumers who recognize high quality and they are willing to pay a premium for this type of work. But all too often, many workers out there don't seem to care, or they are motivated to cut corners so they can make more money.

I am by no means an expert in knowing exactly how to reverse the trend of lower quality and promote the awareness of vocational education. But I do know a couple of places we can start. We can begin by mimicking our neighbors in European countries. Students in Europe who decide on a job track that is not white collar are treated with as much respect as those people who decide to be managers and thinkers instead of one who works with their hands. It makes sense because all of those people who work in offices and other places need a roof over their head, a toilet that works and plenty of reliable power for all of the computers and printers they use during the course of a workday. What's more, these same people need all of these things and more when they go home at the end of the work day.

I firmly believe grade school educators in the USA can try on a regular basis to focus on the importance and need for all workers who build things for all of us. We need all sorts of people in this world to do all sorts of things. Any top-paid corporate chief executive officer who thinks for a moment he or she can run the company without skilled labor, better think again. Perhaps he or she should stay late one night at the office to see who cleans up, who changes light bulbs, who installs new faucets in the company facilities and who is responsible for making elevators go up and down.

Product manufacturers, in my opinion, need to step up to the chalkboard as well. It is crucial that their products be installed correctly. This happens when there is a well motivated and well educated work force. Some companies understand this and support vocational education, but there is room for hundreds - no thousands - of more companies.

Building product manufacturers can fund grants, make large donations, help build new schools and support those schools that are already producing our future craftspeople. These same manufacturers can also work with any number of unions in different parts of the nation that have apprenticeship programs that help introduce young people into the many different crafts in the building trades.

Anyone who wishes to help advance vocational education can start by looking for vocational schools within their own state. These centers for intense learning exist in all 50 states and many of the schools are affiliated with a fantastic non-profit organization called SkillsUSA. I had the good fortune to work with people from this organization for four years.

SkillsUSA defines its mission as helping its members become world-class workers and responsible American citizens. They do this by helping guide local vocational schools with respect to what should be taught so that today's workers are prepared for tomorrow. SkillsUSA fosters inclusion among manufacturers and welcomes all who wish to help make Americas workers some of the best on the planet.

Pressure Washer Damage – It Happens FAST

pressure washer

Pressure Washer Damage | That black goo is just one year's accumulation of maple tree droppings, algae and dirt. I can safely use the pressure washer on my patio because the mortar is about 7,000 psi strength and the brick are special outdoor paving brick that are very hard. The secret tips just below are SO GOOD I shared them with the 31,000 subscribers who read my November 3, 2020 FREE newsletter.

Pressure Washer Damage

DEAR TIM: I am on the fence about buying a pressure washer. I have seen how fast they clean things but I recently saw a wood deck that was ruined by a pressure washer. How do you feel about them? If you were buying one, what would you look for? What is the best way to use one to ensure you do not cause permanent damage to a surface be it wood, concrete brick or stone? Meghan T., Mazomanie, WI

DEAR MEGHAN: Come down off that fence and let's chat a while. I have used pressure washers for years and each time I hold the washing wand in my hands I am constantly in awe of their power. As you might imagine, I own quite a few power tools, many of which can create serious damage to a person's body or possessions, and a pressure washer most definitely deserves membership in this exclusive club.

IMPORTANT NOTE: Pressure washer damage photos to stone far below.

Pressure Washers Can Ruin Wood!

Pressure washers work. In some instances, they quite possibly work too well. I have also seen wood surfaces that have been damaged by pressure washers. But that aside, you can use a pressure washer to create a large, wide fan spray of perhaps two or three feet wide to rapidly rinse off a wood surface. To ensure you do not damage the wood, the tip of the wand that creates the spray might need to be three or four feet away from the surface.

CLICK or TAP HERE to get FREE BIDS from local cleaning companies who can SAFELY clean your things.

The damaged wood deck you saw probably was ruined when the person operating the pressure washer held the tip of the wand inches, instead of feet, away from the wood. The tip or nozzle on the wand may have also been the wrong type. Wide-angle tips of 25 or 40 degrees are safest for wood as they distribute the stream of high-pressure water over a wider area.

What Kind of Pressure Washer Do You Own, Tim?

I own a professional or serious-duty pressure washer. Mine is gasoline powered and develops 2,400 pounds per square inch of power while delivering 2.2 gallons of water per minute to the object or surface being cleaned. I use it each year to clean exterior paving brick patios and walkways around my home. These brick have a very hard surface and the mortar between each brick has an extremely-high cement content giving it enormous strength. The water blast from the pressure washer has yet to cause any visible damage to the brick or mortar.

Can a pressure washer damage masonry surfaces?

But don't think for a moment you can safely use a pressure washer on all masonry surfaces. Using a pressure washer, I can actually peel the finished surface from poorly-installed concrete. A well-intentioned do-it-yourselfer using a light-duty pressure washer can inject vast amounts of water behind the brick veneer wall of his home. This same pressure washer can quickly erode soft clay brick.

Should I Test On a Small Area?

Yes, if you're new to pressure washers, test on a small area and look for damage.

Therein lies the problem with these wonderful, yet powerful tools. You must know the limitations of both the tool and the material that is being cleaned by the pressure washer. Unfortunately one often finds out after the damage has been done. Most pressure washer manufacturers recommend that you keep the water spray as far from the surface as possible and slowly move it towards the object constantly checking for damage.

Should I Test Different Models?

If you want to buy the right pressure washer for the jobs around your home, I suggest you test drive several before making a decision. Visit a local tool rental store and see if you can rent one or two different models for a very short amount of time. Talk with the manager of the store and tell him what you are trying to clean and see which model he thinks will work best. Have him demonstrate exactly how to use the pressure washer while you are there.

Do Pressure Washers Require Maintenance?

Be very aware that pressure washers need a certain degree of maintenance and care. When the pumps that create the high pressure are operating, they get very hot. The water moving through the pump helps cool the pump parts. Read all instructions that come with your pressure washer and always follow them closely. Doing this prevents accidents to you, your home and damage to the actual pressure washer.

Can Pressure Washers Hurt Kids?

Children are fascinated with pressure washers. They often think of them as giant squirt guns. These tools should never be used by a child as serious bodily harm can result. If you think for a moment that your child or a neighbors' child might try to operate your pressure washer in your absence, consider doing something to make it impossible to start the machine.

Keep in mind that repeated washings can cause a slow and cumulative deterioration of a surface. You may not see the damage the first time, but after ten washings, a surface may start to show signs of wear.

How Powerful Are Pressure Washers?

How powerful are pressure washers? Read what happened to Robert Rothstein who emailed me on September 5, 2004:

"I was using a power washer to clean off some bricks on a wall. We etched some lines across some of the bricks. What is the best way to get the brick back to near matching the surrounding surface? Can the lines be "cleaned" off? Can the involved brick be stained?"

Bob is in deep trouble. I haven't seen his brick, but my guess is he actually wore away some of the brick surface. Don't ever underestimate how powerful and damaging these tools can be.

I saw this same damage done by pressure washers in Old San Juan, Puerto Rico after the unrest there in September of 2019. After the protests, government workers used them to remove hateful sayings created with spray paint aimed at the corrupt governor. The oolitic limestone on the buildings was ruined forever by the pressure washers. Look:

pressure washer damage stone

They should have just used paint remover. Ricky is now immortalized for centuries.

pressure washer damage stone

What a damn shame.

pressure washer damage stone

Don't put dangerous tools in the hands of those who lack critical-thinking skills.

Column 521

Outdoor Privacy Screen – Lots of Choices

privacy outdoors

Outdoor Privacy Screen | You would think this attached garage wall would be a liability next to the patio. Actually, it creates an enormous outdoor privacy screen from one of my nearby neighbors. The secret tips in the column below are SO GOOD I shared them with the 31,000 subscribers who read my FREE November 8, 2020 newsletter.

DEAR TIM: We are building a home in a subdivision and plan to have both a deck and a patio. But the area is devoid of trees and when I walk on my lot in what will be my future backyard, I feel like a fish in a bowl. How can I get some privacy while relaxing in my outdoor rooms? I am looking for some instant and hopefully affordable solutions. Cary R. Verona, KY

DEAR CARY: The options that are available to you are as abundant as smoking grills on the fourth of July. I can immediately think of no less than 20 or 30 different privacy screens built out of any number of building materials that will work. I understand your need for instant gratification, but I must tell you the most effective and eye-pleasing result, in my opinion, is a mixture of plantings and some long-lasting building material.

Can Architects Solve Privacy Problems?

Architects solved privacy problems years ago with the actual buildings. Buildings that are U-shaped or even square with all four walls opening onto an interior courtyard produce excellent environments for the utmost in person privacy.

A friend of mine owned a home in Florida where a simple wall on the front of his property created a privacy barrier for a small intimate patio where he read his morning newspaper. Hopefully you can modify the design of your home to incorporate a courtyard.

Should I Check Zoning Regulations?

The first thing you need to do is check with your local zoning officials. There are very likely zoning regulations that describe fences, walls and other building structures that you can use to create a privacy screen. Be aware that often there are loopholes in zoning codes.

For example, a zoning regulation may say that free-standing walls can't be any higher than 6 feet. But walls that are an extension of the house may have a height limit that matches the total height of the house. It sounds crazy, but you might be able to get enormous privacy if you just leverage the zoning regulations to the maximum allowable limit.

Can a Garage Provide Privacy?

Quite by accident, my wife Kathy and I created a fantastic privacy barrier with our attached garage. The shape of our lot made it such that we had to stagger the position of our garage with respect to the front of the house. The zoning laws in my village do not allow garage doors to face the street. I wanted an extra-wide garage. When you add all of these factors together, we ended up with this 30 foot long 12 feet high wall next to our patio. It created instant privacy from our neighbor to the west.

We softened the look of this harsh wall with a large arbor that has two gorgeous honeysuckle vines that produce yellow and red flowers all spring, summer and early fall.

Can an Outdoor Privacy Screen Stop Sound?

Don't forget to take sound into consideration when planning your privacy screening. Structures that are solid masonry work very well. They work even better when there is lots of vegetation nearby to help absorb the sound waves. Not only will these barriers keep your sound from traveling to the neighbors, they will help block offensive noise from polluting your private little outdoor space.

Should I Be Worried About Wind?

Be very aware of wind pressure as you think through what you will do. Strong winds can topple masonry walls and other wood structures that have not been designed to withstand the enormous pressure of wind pushing against a flat surface.

Any number of design elements can be included in the wall so that you and your family will be safe. Be sure to have a registered architect or structural engineer approve your design before you head off to the building department to get a permit.

WATCH THIS VIDEO to see the POWER of WIND.

Finally, even though you want an instant privacy solution, I urge you to consult with a landscape architect who can lure you to look into the crystal ball to see what lies ahead. This person may be able to show you photos or actual places where landscaping has been used alone or with a structure to create an outdoor paradise that is beyond your wildest dreams. Be careful, looking at these photos may be the ultimate enticement.

What is the Easiest Privacy Screen to Build?

Wood privacy solutions are among the easiest to construct, but they often become maintenance nightmares. But some wood structures built with redwood or cedar in drier climates can be easy to care for and look good for long periods of time. Simply be aware that wood might require a significant amount of upkeep to ensure it looks good.

Is Masonry a Good Choice?

Masonry walls have unlimited potential. You can stucco a wall, cover it with decorative tile or slate or even face it with real or artificial stone. Brick walls with weeping mortar joints can create a unique look and feel.

What is the Best Outdoor Privacy Screen?

The best privacy solutions are ones that are well-planned and leverage local zoning laws to the hilt. Don't expect the zoning officials to help you find the loopholes. You will have to read the code and, the definitions of the terms in the code. Then start to do some creative thinking!

Deck Piers and Footings

Deck Piers and Footings

concrete deck pier

Deck Pier Footing | Once a deck pier is installed, it's fairly difficult to determine how far it extends into the ground. This pier is twenty feet deep. I know because I installed it!

DEAR TIM: I am building a deck and wonder how far down I have to dig into the ground for the wood deck post. I had been told it must extend to the freeze/frost line. What/where is that? What diameter should the hole be? Is there a need for steel in this pier? Joanne C., Hanover, PA

DEAR JOANNE: The freeze or frost line is the depth to which the soil freezes or has been known to freeze at some point in the past. It is absolutely critical that the foundations of buildings extend below this point in a soil profile. Except for a few arid locations, soils typically contain water and this water expands approximately nine percent in volume when it freezes. The resulting pressure created as the water expands is so great it can actually lift concrete slabs, house foundations and deck structures with as little effort as an Olympic weight lifter expends picking up his gym bag as he leaves the locker room.

How Deep is the Frost Line?

The frost line depth is not consistent around the nation because there is such a dramatic difference in climate from state to state. The frost line in southern Florida is less than a foot, while in northern Minnesota it approaches 6 or even 8 feet.

The best source of information regarding your frost line depth is your local building department. These individuals perform daily inspections on jobs such as yours to ensure two things: the hole is the proper depth and the soil at the bottom of the hole is strong enough to support the concentrated loads being placed upon it.


Building a deck? Make the best decisions with my helpful and thorough Deck Installation & Repair Checklist. I offer a 100% Money Back Guarantee.


How is the Diameter of Piers Determined?

The diameter of the holes for your deck piers is not a number pulled out of the air. You may get the answer from your building inspector or you may have to consult with a seasoned architect or structural engineer.

How Much Do Decks Weigh?

Decks, especially large ones, create significant concentrated loads within the soil. If you calculate the weight of the entire deck, the furniture placed on it, and the combined weight of a large group of people who might be standing on it, you will be shocked at the number. Even a small deck might weigh in at 4,000, or more, pounds. The two connected decks at my house, one is 10 x 65 and the other is 24 x 16 could tip the scales at 12,000 pounds when you count all the lumber, decking, handrails, furniture, plants, etc. Look for yourself:

deck over water

Here's my own Trex Transcend deck. There's lots of railing. You're only seeing about 60% of the long upper deck in this photo. Copyright 2020 Tim Carter

If your deck is like most where it has two wooden deck posts and a rim joist that is bolted to the house, each of the two deck posts holds up approximately 25 percent of the total weight. In your case, the soil under each deck post may be called upon to support 3,000 or more pounds without flinching.

EB015 Cleaning & Sealing Deck eBoo CoverWhat size and shape should the hole be?

The diameter of the hole will probably be no larger than 24 inches in diameter and may be as small as 12 inches. Larger diameter holes spread the weight out over more soil area.

What is perhaps far more important is the shape of the hole as you dig it. All too often people dig post holes for deck piers and fence posts that look like an ice cream cone or a paper ice-ball holder - the bottom of the hole being smaller than the top of the hole.

Surely you've had an ice-ball in your hand on a summer day and squeezed the paper cone. The ice pops upwards with ease. Frost does the same thing with a hunk of concrete that's cone-shaped. Frost can heave a pier up 4 to 6 inches with ease.

Should a Deck Pier Hole Be Wider at the Bottom?

In fact, the shape should be the exact opposite. The bottom 25 percent of the pier hole should be larger than the top. As the frost drives deeper into the soil and tries to force the pier upwards, the flared base acts as a wedge anchor. For the pier to lift upwards the enlarged base would have to tear through the frozen soil. This is highly unlikely. The larger diameter base also helps spread the concentrated load over an even greater area.

Watch this video about how wedge anchors work in concrete block. It's the same principal for your deck piers when they combat frost heave:


Wood deck surfaces need to be cleaned and sealed to keep them in good condition. The cleaner I recommend is oxygen bleach.


Should I Use Reinforcing Steel?

Be sure to include two or three pieces of vertical reinforcing steel in the concrete as you pour the pier. This low-cost item adds enormous strength to piers that are taller than 30 inches. Long concrete piers poured on hillsides are subject to lateral or sideways soil pressure as the soil creeps downhill over time. The steel will help prevent the pier from cracking in two from this pressure.

CLICK or TAP HERE to get FREE quotes from local companies who can install a deck for you.

How Can I Center the Deck Post on the Pier?

If you want your wooden deck posts to be dead center in the middle of the concrete pier, then you need to be an expert surveyor or a person who builds deck like I do. Centering the deck posts is easy if you have the outline of the deck built and suspended in the air. This is very simple to do.

Start by attaching the rim joist to the house. Attach the two end joists of the deck to the rim joist using joist hangers. Temporarily support the other end of the joists with a piece of lumber making sure the joists are level. Nail the outer joist to the ends of the two joists that extend from the house. The outline of the deck is now complete. Check to ensure the deck outline box is both level and square.

Once the deck outline is square, drop a plumb bob from the corners to establish these points down at ground level. Use these reference points to easily locate the proper pier locations.

Related Links:

Footing Depth Below Grade

Column 519

Home Building Photos – Take Thousands of Them

3 film camera

Home Building Photos | This photo above shows you how important photos can be to CAPTURE the past! Modern digital cameras with instant preview screens ELIMINATE the need for two of the cameras above. And FILM? Are you kidding me? This photo was taken in September of 2003 before smartphones even existed.

Home Building Photos - You Can't Take Too Many

DEAR TIM: We plan to build a new home soon and wonder about how best to document the progress of the job. Taking photographs seems so straightforward but I wonder if they will be enough? Are some photographs better than others? Is digital photography acceptable? What cameras would you use? What are the key photographs you would take if you were me? Kristin P., Somerville, MA

DEAR KRISTIN: I can't begin to tell you how many times a photograph has saved me enormous amounts of time and money. I took many photographs as I built my home 18-years-ago and they come in handy from time to time as I do small remodeling projects around the house.

Just last summer the photos helped the crew that installed a buried radio fence wire that created an invisible fence for my new dog. The photos saved these men at least 30 minutes of exploratory digging, as they quickly located a nearby buried gas line and a downspout line.

Should I Shot Remodeling Photos?

You don't have to be building a new home to benefit from photography. Photos taken during remodeling jobs, and even during routine replacement of mechanical systems can be worth their weight in gold at a later date.

Homeowners can also use cameras to capture images of things that can't readily seen such as rotted roof sheathing, cracked and crumbling chimney crowns, and any surface that will be hidden by a building material such as concrete, drywall, exterior siding, brick, etc. These photos take the place of x-ray vision that seems to be available only if you happen to be a superhero.

home building photos

Upload your home-building photos and videos to the cloud for SAFE long-term storage. These are just a few of about 10,000 photos shot of my daughter's new home being built.

Can Photos Win a Lawsuit?

Not only are some photographs more valuable than others, but the actual method of photography can also be more valuable. Let's assume for a moment you and your builder get involved in a dispute in the future that gets dragged into the justice system. Photographs that were taken with a camera that uses traditional film or with cameras that produce instant photographs on real prints can't be altered.

Anyone who purchases an off-the-shelf software program and learns a few tricks can alter digital photographs to such an extent that the image doesn't really match what was shot by the camera. For purposes of evidence, traditional negatives or instant photographic prints are the best.

What Cameras Do Best?

I have three cameras that I prefer to use. They all take excellent photographs, but each camera has its strengths and weaknesses. My 19-year-old single-lens reflex 35 mm camera still works as well as the day it took its first photograph. I have an assortment of lenses and accessories that allow me to take just about any photo I need. Its powerful telephoto lens allows me to take distant photos as if I am standing right in front of the subject.

I own a popular instant camera that spits out the actual photograph within a second of shooting the image. This camera is invaluable if you need to know immediately that you got a great photo, not just any photo.

Digital cameras, of course, offer the same advantage, but you need to do several other steps with your computer and printer to actually produce real photos. A cool printer that does not require a computer simply uses the camera's digital media storage card to transforms the data into actual photographic prints. It can make an actual print in this fashion every 90 seconds. Video cameras capture moving images and allow you to describe with your voice the things you are taping.

I feel the most important photos and video clips are the ones you can't get once the house is built. Anyone can take a photo of a door trim miter joint that is sloppy. But you only have a limited amount of time to take photos of things that will be covered up. I would love to see you take countless photos of the different aspects of the work such as the application of the outer skin is applied to your house, be it brick, stone, stucco, siding, etc.

Take Photos of Utility Trenches

Furthermore, taking photos of open utility trenches showing the placement of pipes and wires may be very important. Photographs of plumbing pipes in interior walls might be priceless down the road.

open utility trench

There's no doubt about where the conduit pipes are! You can orient off the electric meter and the front door.

All structural components such as bearing walls, column to beam connections, truss connections to all walls, seismic connectors, nailing patterns of structural plywood or OSB at outside corners, etc. are just a few photos you would find in my job site album.

You may have to make numerous trips at different times of day to get the photos, but figure out a way to make it happen. If you have to hire a neighbor or a retired friend who can visit the job frequently, then do so.

A common mistake most people make when taking construction photographs is they are too far away from the subject. If you are taking a photo of a distinct item such as a flashing detail behind brick, be sure the camera is no more than 30 inches away from the subject, not five or ten feet. Distant photographs may not provide the needed detail an expert needs to see at a later date.

Take photos of things you think are not important. An expert may see lots of things you would never think to look at or study. It is better to have hundreds of extra photos instead of missing the critical photo that was never taken. The $300 - 500 you spend on film and processing will be the best money you have ever spent.

Column 518

Replace a Front Door – Slow Down!

glass window door farmcrest front door inside

Replace a Front Door | The biggest challenge in replacing this door would be making sure the woodwork surrounding the door is placed back exactly where it is now. The wallpaper will look perfect if this happens.

Replace a Front Door

DEAR TIM: My wife wants to change out the front door on our existing home. But the door is flanked on either side with sidelights. I am puzzled how to attack this project as the frames of the door and the sidelights seem to be permanently attached to one another. Can I easily separate them? Changing out the entire door seems as if it would be a nightmare as the brick touches up against the exterior door trim. What are my options? Jim L., Hickory, NC

DEAR JIM: You have a keen eye for the obvious. The frames of the sidelights and the actual door unit are connected and if they are like most, it will be a tough job to separate them. Perhaps the most challenging part is at your feet and you might have overlooked it. The threshold of the door typically is continuous under both sidelights as well as the door. You can't imagine the difficulty of disconnecting the door frame from the threshold with little or no damage to the threshold.

Is Replacing a Front Door Hard?

The task of replacing the entire door unit including the sidelights is not as hard as you might think. I realize you may be intimidated by the complexity since the brickwork is touching the exterior trim of the door. This is fairly normal.

What you might not realize is a gap on both sides of the door and sidelights as well as a gap between the top of the door and the rough framing. These gaps are hidden by the interior and exterior trim that surrounds the door and sidelight frames. Carpenters must create a larger opening for the actual door for a number of reasons.

The job of replacing a front door can be slightly more difficult if you have to move a front door sideways. This can happen where the door opening was not centered as it should have been during original construction.

Should The Weight of the Wall Bear on the Door?

First, the door itself should float in the opening. The weight of the structure should never be transmitted to the door or the door frame. By creating an opening larger than the door, the weight of the structure above is transferred to the framing material on either side of the door.

Why Should a 1/2-Inch Gap Be Above the Door Frame?

Secondly, the framing of the house can move as the house shrinks and it can move over time with changes in the weather. If the door and its frame were to be a tight fit, this movement would cause the door to bind on a regular basis. Finally, the rough opening might not be perfectly square and plumb. The finish carpenter needs some wiggle room to adjust the door as it is installed so it operates perfectly.


Have you found the perfect exterior door? Make sure you install it perfectly using my Exterior Door Replacement Checklist. I offer a 100% Money Back Guarantee.


Can You Get Replacement Sidelights?

The good news is that many new replacement exterior doors with sidelights are usually the same size or within a fraction of an inch of your existing one. The only exceptions might be door units that are 50 or more years old. Purchasing a replacement door that will fit can be done by discovering the actual unit dimension of your existing door and sidelights. The unit dimension is the actual width and height of the combined door and sidelight frames without any interior or exterior trim applied to them. Remove the interior trim that surrounds the door to begin this measuring process.

When Can You See the Door Frame?

Once the trim is removed, you should be able to see the side edges of the door unit. The sidelight and door jamb frames are typically three quarters of an inch thick. The interior trim often covers one half inch of this material. The next thing you need to discover is the actual bottom of the threshold. Using a tape measure, you should be able to get very accurate measurements side to side of the frame and the measurement from the bottom of the threshold to the top of the door frame.

What Should I Take To the Home Center?

Take these measurements and a photo of the inside and outside of the door with you to an exterior door store. They will have catalogs that list the actual unit dimensions of replacement doors. I am very confident you will find a door unit that will easily fit in your opening.

Do I Need to Make Adjustments?

The exterior trim of the new door may need a small amount of adjustment to make it look as good as new. If you have a gap, simply add some smaller trim moldings that complement the larger molding. If the factory molding is too large, remove the necessary wood to make the trim fit tightly against the brick.

What Mistakes Do Carpenters and Handymen Make?

Some carpenters make huge mistakes when installing exterior doors. They sit them directly upon the concrete slab or wood subfloor. When the interior finished flooring is installed months later, there is rarely enough room for a throw rug. The door bottom is simply too close to the finish floor and pushes the throw rug out of the way.

Should I Use a Flashing Pan?

It is always best to install a special flashing pan in the rough opening first and then place a 5/8 inch thick piece of redwood or CCA treated lumber on top of the flashing. The door threshold sits on this rot resistant wood and is now high enough so that most finished floor materials either slide under the threshold or can be notched to fit under the threshold. This gives you plenty of room for a throw rug in the entrance hall.


Column 515

Landscape Design

Landscape Design

Landscape Design ... PHOTO CREDIT: kevincaron.com

DEAR TIM: I am building a retirement home in Utah. The location boasts lots of sunshine, but winter weather is a reality. Since I don't want to spend lots of time taking care of the yard and the outside relaxation areas of my home, what materials would hold up best in this harsh environment? The area gets very little water so I want to hardscape with different natural materials instead of trying to coax plants to grow. Lacy O. Cedar City, UT

DEAR LACY: Just when I start to wonder if my college education would do anything for me, a question like yours ambles along. Seriously, I did graduate with my brain fairly stuffed with knowledge, but most of it was geology. It didn't take too many field trips out west to quickly learn that some rocks resist weathering much more than others. In fact, all one has to do is look around at the highest mountains or the tops of plateaus to determine which rocks are the toughest.

Where Can I See Durable Stone In My City?

You can sometimes get this same information from walking down a sidewalk in a major metropolitan area no matter if you live in Utah, Florida, Texas or any state for that matter. If the city has older buildings, there is a good chance many will have a stone or partial stone facade. When I look at some of the rock surfaces, they appear to be in the same condition as the day they were installed. But look closely at some buildings, and you will see rounded soft edges where 100 years ago was probably a crisp 90 degree edge. Some stones or rocks are indeed softer than others and subject to deterioration from regular weather including acid rain.

Can granite take repeated freeze-thaw cycles?

Granite is a plentiful rock that has a history of extreme durability. Some granites are much harder than others and repeated freeze-thaw cycles don't harm them in the least. The high-quartz content of this rock makes it naturally resistant to just about the harshest weather Mother Nature can stir up. Other igneous rocks that have a high silica content also tend to last for thousands of years.

Is limestone a good rock for landscaping?

Since your new home location is so arid, you will also discover that many limestones will also wear like iron. Limestones do suffer some surface degradation in regions that suffer from frequent acid rain, but acid rain is becoming less of a problem as utility companies continuously work to lower their emissions from power generating plants. Fine-grained limestone quarried in Indiana graces many of the monuments in our nation's capital and it has an excellent track record with respect to looking good for long periods of time.

What do you need to look for in hardscaping?

I feel the key to successful hardscaping is taking your time to investigate all of the different rocks and stones you have near you. Not only am I talking about size, but texture, color and surface roughness can help you create a magnificent outdoor living area. Visit all of the local landscape or hardscape stores as well as any rock or stone suppliers in your area. If you are lucky enough to have a university nearby, contact them to see if there are one or more geology professors on the staff. They can be an excellent resource with respect to local or regional sources of unique and beautiful rocks.

What Plants Do Well in My City or Town?

I understand why you might not want to deal with living plants in your hardscape areas, but I think you may be making a mistake. Undoubtedly, local landscape experts can show you plants that know how to thrive and adapt to all of the local weather conditions. If you are lucky, there may be some newer hybridized varieties that bloom more often and grow faster than traditional plantings.

Need help with your landscaping, CLICK or TAP HERE to get FREE quotes from local LANDSCAPING companies that can assist you.

Can you combine artwork with your hardscapes?

Landscape Design

PHOTO CREDIT: kevincaron.com

I have seen several very unique hardscapes that incorporate both dramatic and subtle artwork that is often a blend of rock and man-made materials. If planned well, these one-of-a-kind pieces of art can add sound as well as beauty and become a focal point of a patio or veranda. I especially like hardscape art that incorporates recirculating water. The moving water creates soothing sound that you no doubt deserve as you enjoy your endless string of off days.

When done tastefully, hardscapes make for unique outdoor eye candy. Talented landscapers for years have used plants of different heights, colors, leaf densities, etc. to create layers of greenery. That is the trick you must do but with rocks instead. Boulders or longer vertical rocks can act as a tree and smaller and smaller rocks fan out in patterns to create a feel one might get from real vegetation.

Can You Get Gravel in Colors?

Multi-colored gravel of all sizes covers the ground the same way hardwood bark mulch does in traditional gardens. There are many different colored gravels available. If you live near the ocean, do the same thing with seashells. They also work well as a mulch and even a surface for lightly traveled driveways.