DIY Dining Table Plans – Plywood & Reels!

cable spools for table legs

DIY Dining Table Plans| Who would think you could transform these cable reels into a dining room table in minutes? Keep looking below!

"You may find this hard to believe, but I can produce the sturdy table you need in one hour for less than $40.00."

DEAR TIM: It's a very long story, but I have a dining room with eight chairs and no table. Ten days from now, I am having a dinner party and do not have the thousands of dollars at this time to buy the table I really want. I have any number of oversized table cloths so whatever table I use will not really be seen. Money is really tight after the holidays so what in the world can I do? Mary R., Cincinnati, OH

IMPORTANT NOTE: Mary R. wrote to me after her party. Her letter is far below.

DEAR MARY: Oh gosh, you are in a bind! Fine furniture that can last generations can be expensive but it's also worth the wait. But as you outlined, that option is not on the table - pun intended! As desperate as your dilemma sounds, I've been faced with them before on past remodeling jobs where I needed to provide customers a temporary table. You may find this hard to believe, but I can produce the sturdy table you need in one hour for less than $40.00.

What Size Should My Table Be?

The economy table that will hide under your tablecloth needs to be eight feet long, 42 inches wide, and 30 inches high. These dimensions match those of most dining room tables that will seat 8 people comfortably: three on each side and a person at each end of the table.

A table this size can also fit ten people if they get a little cozy.

How High Should the Table Be?

The actual height of a table is fairly critical and is commonly matched to the height of the chairs. If you have a breakfast or kitchen table in your home, move one of your dining room chairs up to it, sit down, and check to see if you feel comfortable at the table. If so, the dining room table you are going to assemble should match that table height plus or minus one-half inch.

What is the Cheapest Table Option?

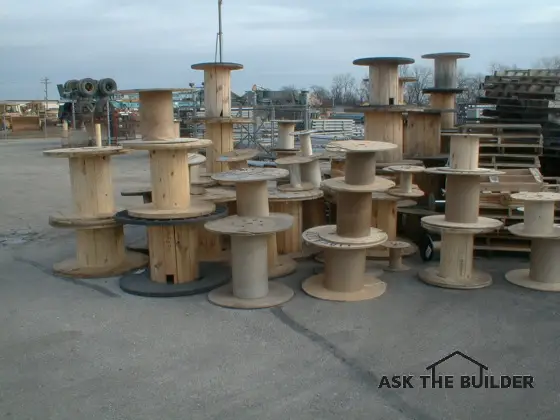
The cheapest dining table you can build will use a 4x8-foot piece of plywood and two large electric cable reels.

This affordable solution can be assembled with minimal ease requires two stops on your trip to acquire material. You need to visit a lumber yard and an electrical parts distribution business.

The electric parts business is one that typically sells all of its products to residential, commercial, and industrial electricians. These are the places where you will find circuit breaker panels, specialty switches, conduit of all types, etc. They almost always have hundreds of large empty cable reels back behind the warehouse. These reels sometimes are available for free or can be purchased for a very small fee.

What is a Cable Reel?

A cable reel is a round object that holds long lengths of electrical cable. It is the same thing you have on a fishing rod, but much larger. They come in all sorts of sizes and I know for a fact you can get ones that are perfect for your needs.

You need two cable reels that measure 29 inches wide and 25 inches in diameter.

Are Cable Reels Stable?

When you place these cable reels on their side, they make solid bases for the table top. The 29-inch width becomes a 29-inch-high platform when the reels are laid on their sides. You will then place a three-quarter-inch thick piece of plywood on top of the reels to create the actual table.

dining room table

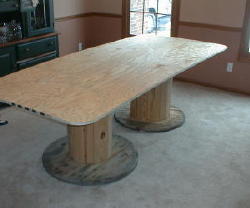
This DIY dining table was assembled in 10 minutes. The rest of the time was spent cutting the plywood and rounding the corners.

How Far Apart Should the Reels Be?

The reels should be placed in the center of the room spaced just one foot from each other. This will create 8.5 inches of overhang on the sides and a generous 17-inch overhang at each end of the table top. Once the plywood is in place, drive four 2-inch-long screws through the plywood into each reel to securely fasten the top to the reels.

How Do You Round Off the Corners?

When you cut 6 inches off the width of the 48-inch plywood to make the top, be sure to create a radius at each corner.

Use a simple wood rasp to round off the corners of the plywood. If you do not do this, there is a good chance the table cloth will tear if pulled against one of the sharp 90-degree corners. It's also a good idea to use some coarse sandpaper on the top edges of the plywood to remove any splinters.

The finished dining room table

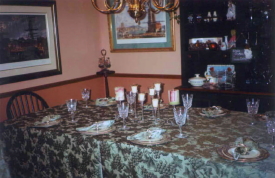
This is the actual finished DIY dining table at Mary R's house!

Should I Stain the Reels?

If you have time, you can apply stain that matches your chairs to the lower half of the cable reels. This is not necessary, but it will help to complete the illusion.

Will You See the Reels?

I wouldn't be concerned in the least about the appearance of this temporary table. When the chairs are in place around the table, there's a very good chance you may not see the cable reels. If you're worried, use the same slight of hand magicians use. Direct your guests attention to a magnificent centerpiece arrangement in the middle of the table!


Mary R. wrote back after the party. Read her email to me below!


Can I Use Saw Horses?

If you can't find cable reels, you can use simple saw horses to support the plywood top. Many home centers have simple parts that allow you to create a saw horse using metal brackets and 2x4 material.

If you choose to do this, be sure you install diagonal cross bracing on the legs of the sawhorses. This bracing is additional 2x4 material that travels from the top of on leg to the bottom of the other leg on each sawhorse.

Without it, the horses can collapse without warning. An accident like this would be devastating while all the guests were halfway through dinner. Cable reels exhibit enormous stability. A table supported with these will rarely tip over.

January 30, 2004 - I am blessed to get wonderful emails from readers of my column. Here are two that provide great suggestions if you need to make an affordable table:

Your column in today's Chicago Tribune, January 30, 2004, recommends using plywood for a table top. I would certainly want to put an extra cloth sheet folded to the right size on the plywood before placing a tablecloth on it This would prevent more snags and serve as a "silencing cloth". Actually, I would rather see the questioner use a 36 inch flat hollow door from a lumber yard that may have a scratch or two on it. They even come prefinished. Something of this sort can be gotten at "Menard's" or "Home Depot". Just ask around. There are amazing items for little money that are damaged. Being a 75 year old woman who has been the handyman of my home for over 50 years, I enjoy reading what young people like you come up with. Believe me, there is wisdom in old age.

Sincerely,

Pat Hutchison

Author's Note: Pat, this youngster appreciates your advice! TC

Jo Potter wrote to me and shared these great comments:

I just read your column on constructing a quick and inexpensive dining table, and thought you might be interested in another method that a friend of mine used. The legs were turned spindles designed for stairs - not the skinny ones, but the ones that would be newel posts or corner posts. They had a square base, probably about 4", then some turning for detail, and a square top. On these was "box" with an edge of wood trim - slightly rounded at the top, then straight. Into this box went a solid core door panel. The whole thing was painted and looked quite nice... not at all like a table made from a door.


Mary R's Follow-Up Letter:

February 17, 2004

Well, I just got an email from Mary, the woman who asked me the question that was the seed for this column. Let her tell you how well the table worked:

Hi Tim,

I couldn't wait to let you know that we fooled 'em! The party I hosted was fantastic - great food, great fun and great friends. With all of my china, crystal, and candles out on the table, my dining room looked awesome. I've always wanted a large dining room table because we love to entertain. Having a sit down dinner for 10 is something we've always wanted to do and after last night, will do more often.

We sat down at the table at 8:15 p.m. and got up at midnight. It wasn't until about 11:00 p.m. that I finally had to spill the beans. Someone commented that they didn't remember this neat, large table in our old house so I said it was new. Then, someone said they were looking for a table and asked where I got it. I told them one of my great clients actually made it for me. Then I couldn't stand it anymore - must be that Catholic can't-lie thing in me - so I said why don't you lift the cloth and take a look. THEY WERE SHOCKED!!! They simply could not believe it. The husband of the couple looking for the table told his wife they were finished looking and going to do the same thing. I don't think she will really go for this, but it was cute how much the husband liked the table.

Mary R.

Sunroom Ceiling Ideas – Vault it & Beadboard

Sunroom vaulted wood ceiling

Sunroom Ceiling Ideas - Go Big & High

The sunroom is a room at the right rear corner of my house. You can access it from either the kitchen or the dining room. It's the private domain of my lovely wife Kathy. She has a green thumb both inside and outside the home. Her creations complement the black thumbs I sometimes get when I strike one with a hammer from time to time!

The house I live in has been a labor of love. As happens with many builders, their own house just doesn't seem to get finished before they jump feet first into another project. That happened to me.

When Did You Finish Your Sunroom?

It is a very long story, but this room sat unfinished for years. My oldest daughter Meghan jump-started me this past Thanksgiving to finally get the room finished for Kathy as a Christmas present. It happened with some help from a college sophomore apprentice and the entire family helped install the slate floor.


Sunroom Shots

What is your Sunroom Ceiling Wood?

The biggest challenge was the Douglas Fir beadboard ceiling. I did the entire thing myself and the countless trips up and down the scaffolding put me back in great shape. I felt like a monkey climbing up and down that pipe scaffold. The ceiling is a 6/12 pitch hip and the beadboard pieces that intersect at the center seam had to be perfect.

Was it Hard To Wrap the Skylight Tunnels?

The real task was getting the wood to wrap up into the skylights. There was no fast and easy way to accomplish this. It is slow, painstaking finish carpentry. All of the wood was pre-stained and urethaned before it was installed. If you have ever tried to stain wood upside down, you know why it is imperative to do this task working with gravity not against it!


Sunroom Shots

What Kind of Register Grill Will You Use?

I am still waiting to receive the authentic Victorian return air grill for this wall. This corner of the room is under the tallest aspect of the hip ceiling. It's 18 feet above the floor to the tip of the ceiling.

Why Did You Wallpaper the Sunroom?

I hung the wallpaper with the help of the apprentice and those first strips coming out of the corner were the longest I have ever installed. Believe it or not, but I really enjoy wallpapering. I find it therapeutic.

The wallpaper is 16 years old! I had bought it just as we moved in. It is/was a fairly popular pattern made by Waverly. I believe it was their English Ivy pattern. It is indeed a perfect paper for this plant room.


Sunroom ShotsWhat is the Wood around the Windows and Doors?

The woodwork is all clear white pine and matches the natural wood of the Marvin windows. The trim was custom milled and the profiles match all of the custom woodwork in the rest of the house. Custom trim is not really that expensive when you run lots of it at once.

The final shot is me laying on my back on the floor trying to show the hip ceiling as it rises to its peak. I wish I had a different lens to show this. A fish-eye lens would probably do a swell job of trying to make this 3D reality come to life on a computer screen.

Column Sunroom

Rehab – Home Restoration

Rehab - Home Restoration

Rehab - Home Restoration | A house such as this one may look great from the street, but your mind looks past all of the defects and sees the finished product. Beware!

DEAR TIM: I am seriously considering buying an as-is fixer-upper home. The boarded-up house has been stripped of all plaster, fixtures and utilities. The price is very low and I have lots of free time and not enough money to buy a home that is livable. Is it possible for me to do much of the work myself, or will I be forced to hire professionals? I know of other people who have succeeded at turning a property around, so it must be possible. What are some of the biggest obstacles? Tricia A., Albany, GA

DEAR TRICIA: I started to answer your questions by telling you that you are insane to consider this venture, but I had to stop typing. All of a sudden, I had a flashback of a 23-year-old young man who had an infinite amount of ambition and energy, few tools and equipment and very little money. This same individual bought an old, abandoned home in poor condition and completely restored it, for a sizable profit, six months later. That person was me.

What is the biggest obstacle to home renovation?

The obstacles you face are many. Some are small and others may sap all of your physical strength and willpower. Perhaps the biggest issue in my opinion is money: Do you have enough money to finish the project? This project financing can be in the form of savings and a loan(s) of some type. Do not purchase this home until you are sure you have written commitments for all of the money. Traditional lenders may not welcome you with open arms as you are not a professional builder / remodeler. The lenders would consider you a very high risk. Grants and low-interest loans may be available through local or regional government programs.

How do I start a Home Restoration?

But how much money will it cost to turn this neglected property into one that is livable? It is not an easy question to answer. You start by making a list of each and every item you will need to make this shell into a finished product. Feel free to use your existing home as a model. For example, go room-by-room and look at all of the finished surfaces. You can calculate the number of sheets of drywall each room will require. You can determine the amount and type of finished lumber trim for each room. Doors, windows, finished flooring, hardware, etc. can all be identified fairly easily. Look at every surface and imagine what it needed to make it finished.

home rehab

The exterior of this home could swallow $25,000, in 2003 dollars, in the blink of an eye.

Expensive items, such as kitchen and bath cabinets, countertops, plumbing and electrical fixtures, can also be priced out with relative ease. There are economy grades that are somewhat affordable that will work for you. Try to select fixtures that are user-friendly with respect to installation. For example, you may save lots of time buying and installing an acrylic tub and shower unit instead of buying an inexpensive steel tub and then installing ceramic tile around this fixture.

Because my new bride had a full time job, that brought in just enough money to pay our bills, I was able to work on my house 12 hours a day, seven days a week. Will you have this luxury? If not, small tasks that might take a professional a day or so could take you weeks of labor. Working on a house after putting in time at a regular job is fine for a month or so, but the added work starts to take its toll on your performance at both jobs.

Do some rehab projects need to be done by professionals?

I have seen people spend years trying to restore and remodel a house such as you describe. Your interest in the project may wane, and if that happens, you start to neglect the house that already has been neglected. Because of local laws and ordinances, some tasks you are thinking of doing may have to be done by professionals. It is not uncommon for a city to prohibit do-it-yourselfers from working with public water supply systems and sewage piping.

I would highly recommend that you try to find other people who have recently completed a project like this. Ask them if they would do it again. Ask them what surprises they encountered. Speaking of surprises, be absolutely sure you have a home inspector look at the house so a full list of defects can be compiled. You may have missed important structural damage, termite activity, lead and asbestos liabilities that can cost tens of thousands of dollars to remedy. Don't forget to assess the water service and sewage/septic situation at the same time.

How do you make sure you haven't missed anything before starting the home rehab?

The list of materials needed to restore a single family house can easily contain hundreds of items. It is imperative that you not miss many of these items. The room-by-room approach is good, but it must also include simple things such as electrical outlets, switches, cover plates, etc. Who would think there are nearly 30 parts or more just to install a circuit breaker panel? Think of all of the individual fittings needed to install all of the drainage and water supply piping in a home.

Certain tasks may require a professional. Heating and cooling equipment is very sophisticated and special tools, gauges, etc. are required to install it. Roofing work may be too intimidating for the average do-it-yourselfer. Certain cities or towns may only allow licensed people to install plumbing or electrical systems. All of these things need to be investigated, before you take the leap.

Column 498

Cracks in a New Chimney

crack in brick chimney

Cracks in a New Chimney | The crack in this chimney could be a problem.

DEAR TIM: My six-month-old block and brick chimney has developed some cracks. These 30 - 36 inch long cracks run vertical through both the brick, block and mortar joints. Should I be concerned? Are the cracks normal settling? Is the bricklayer to blame? Some joints weep moisture after a rain. Is that normal? Nick R., Middlebury, VT

DEAR NICK: Cracks that pass through either brick or block concern me. A hairline crack that appears every now and then in either a vertical head or horizontal bed mortar joint may be a simple shrinkage crack. But a long, continuous crack such as the one you describe most certainly is something to investigate.

CLICK or TAP HERE to get FREE BIDS from local masons to repair your chimney.

How Strong is Brick?

Brick, concrete block and even stone are very strong materials when you attempt to squeeze or compress them. Some can have compressive strengths that easily exceed 5,000 or even 7,000 pounds per square inch(psi). Some granites have an incredible compressive strength of 28,000 psi. But subject these same materials to a different force - tension, and they can readily crack. Tension is a bending or stretching force.

What are some causes of chimney cracks?

Settlement could be the cause of failure. The soil upon which the chimney rests might not be strong enough to support the enormous concentrated load that is being placed upon it. The combined weight of all of the brick, block, mortar can be in the tens of thousands of pounds for an average chimney, especially one that has been built correctly where the masonry is solid around the flue liner.

How Big Should a Chimney Footing Be?

The concrete footing for the chimney may also be inadequate. Most chimney footers should be a minimum of twelve inches thick and extend one foot or even 16 inches on all sides of the actual footprint of the chimney. Steel bars, 5/8 inch in diameter, should be placed three inches up from the bottom of the footer. These bars should be placed every 16 inches on center in both directions. Be sure these bars do not droop or fall to the bottom of the concrete during the pouring process.

Can Brick Be Defective?

The actual brick or block may have been defective. But the likelihood of placing several defective masonry units on top of each other where the defects are in perfect alignment is a one-in-a-million possibility in my humble opinion. There is a possibility the mortar below the defective area is of poor quality and the weight of the masonry above it caused the cracks to appear. This is also a low-probability cause.

CLICK or TAP HERE to get FREE quotes from local companies to repair your chimney.

Did the Wind Crack My Chimney?

Believe it or not, the cracks can be wind-related. The mortar that is used to cement the bricks and blocks to one another does not have instant initial strength as the chimney is built. It takes weeks and even months for the mortar to develop its full strength. Strong winds on a new chimney can exert a considerable tension force within the masonry. Block and bricklayers know this and the smart ones often insert steel rods within the chimney as it is being built to help resist the force of the wind. These same steel rods are vitally important for those that build chimneys in seismic zones.

Are Weeping Brick Joints Normal?

The weeping joints are somewhat normal. Rainwater, especially that rain blown against the chimney, soaks into brick veneer and brick and block chimneys. This liquid water sometimes dissipates into the masonry, but large amounts of water can work its way down the chimney and find a pathway back to the exterior through a mortar joint.

Horizontal Crack in a New Chimney

The crack travels the entire length of the horizontal bed joint.

Can water leak into the chimney crown?

But liquid water trapped in a Northeast chimney in the winter months is a very bad thing. If large amounts of trapped water freeze, the expanding water can blast the chimney apart. You must make sure the top of the chimney - the crown - is watertight. If there are cracks, you can buy wonderful synthetic polymer compounds that have a color and texture that matches the chimney crown.

These trowel on over the existing cracked crown and provide years of leak-free performance. The actual face of the chimney can be sealed with new clear sealers and compounds that will bridge cracks up to 1/8 inch in width.

Are Cracked Chimneys Dangerous?

A chimney that has been weakened by a building defect or even natural deterioration is a dangerous thing. They can collapse with very little notice and cause serious bodily harm or death and do enormous structural damage to the average house.

What is the Best Repair Mortar?

The best repair mortar for brick chimneys is one made with hydrated lime and sand. This is what the brick masons of old used. When the hydrated lime hardens, it's simply limestone and you know how hard and durable limestone is. CLICK or TAP HERE to have hydrated lime delivered to your home.

hydrated lime

This is an excellent hydrated lime. It's a fine white powder and it's going to look great on your home. CLICK HERE or THE IMAGE TO ORDER SOME RIGHT NOW.

It is always a good idea to have a suspect chimney inspected by a residential structural engineer, a seasoned chimney sweep or bricklayer who has 20 years or more experience building chimneys. Rebuild the chimney in fair weather when outdoor temperatures are in the 60 - 75 F range.

Column 495

AsktheBuilder – NewsGator Daily Tips

I get many emails each day. Some are desperate, others are funny, many are cordial. I try to answer all of them and often the answers reflect my mood. But more importantly my answers pull on my 30-plus years of hands-on experience and all of the technical information I have uncovered in my years as a home-improvement journalist.

Each day, I select a unique email from a real person and post it to a special Premium RSS feed that is generated and hosted by NewsGator Online Services. These daily tips come to you automatically and just one of them might save you hours of searching or better yet, hundreds or thousands of dollars!

Here are a few examples of the emails I get and my answers:

Dear Tim,

Merry Christmas! My husband and I are in the process of building a home in North Carolina. We will have about a 400 ft driveway to contend with and are very interested in the "tar and chip" driveway concepts. It may resolve both the aesthetics and cost efficiency we long for. How does the cost compare to that of an asphalt or concrete driveway? Is it considered a hard surface driveway or is it like loose gravel.....we would appreciate any feedback you can provide. Thank you, Nancy

Nancy,

You are going to love tar and chip. I have installed this surface for years for customers and have one myself. There are thousands of miles of main roads, secondary routes, and private drives in the USA that are tar and chip. It is a magnificent surface that requires no maintenance.

You can have the loose gravel look or that of smoother blacktop with no loose chips. The choice is yours. If you want the full story on tar and chip, read thefirst column I did on the topic years ago. I then did a follow-up column as I kept getting requests from people to re-visit the topic.

As for cost, tar and chip is far less expensive than regular blacktop. It costs only 15 - 20% of what concrete might cost. The savings are a function of the size of the job. Just 5 months ago I redid my own driveway with expensive brown Merimac chert from Missouri. Even with that gravel, my cost was less than one dollar per square foot! Since your driveway is so long, you should get a price less than $1 per square foot.

Tim Carter


Here is an amusing one. I am quite sure the answer was comforting to the travel bugs!

Hey Tim,

We traveled to Orlando, Florida this past week and noticed termites in our hotel room. Yesterday, we left the hotel and boarded a plane back to Toronto, Canada. We are worried that if these termites found their way into our clothes, shoes or belongings, including our suitcases, we may have brought them to our home in Toronto. Now they may be spreading and reproducing inside our home. Being that the plane traveled at 37,000 feet, could it be that the termites may have survived the trip and are now in our home and breeding?

Your reply would be greatly appreciated. Thank you.

Dorota & Corrado

Dear Dorota and Corrado,

You can sit back and relax! The termites you saw were probably the worker termites and these eunuchs are not capable of starting a new colony. Furthermore, most termites do not like light and they need moisture on a very regular basis. The stowaway adventure would very likely have killed them for any number of reasons.

Keep in mind that your local variety of termites can infest your home at will. So if you get an infestation at some future time, it may have nothing to do with the ones you saw in Orlando. What's more, I doubt the species you saw in Florida would tolerate your winter climate in Toronto!

Tim Carter


I am sure you get the point by now. The daily tips will be varied and are easy to read and understand. I often include links back to more detailed information.

You should seriously consider joining the Premium Newsgator RSS Feed service. I can assure you my daily tips will save you money and frequently bring a smile to your face!

Tim Carter

Slate Flooring Installation

Slate Flooring Installation

Slate Flooring Installation | Slate is a great flooring material and is not too hard to install. You must first layout the pieces to see how the pattern repeats. Grouting slate is VERY HARD.

DEAR TIM: I have decided to install a slate floor in my kitchen. What must I do to make sure the slate will stay adhered to the floor? What tools will I need? Can I apply the slate to a wood subfloor? Will grouting the floor be difficult? Harold W., McCall, ID

DEAR HAROLD: Congratulations! The slate floor you are about to install will garner you endless compliments. Slate has so much character and is nearly indestructible. Once sealed, its micro-crystalline composition makes it very stain resistant. If you want an eye-popping color, consider using burgundy red slate with a deep gray grout. This rich color goes well with many kitchen cabinets.

What tools are needed to install slate flooring?

Let's talk about tools first. You will need a chalk line, a tape measure, a framing square, a special square-notched trowel, a large sponge, knee pads, buckets, a three-inch wide stiff blade scraper, a grout float and most importantly a diamond-blade wet saw. You can substitute an abrasive blade on an old circular saw or a hacksaw with a carbide rod blade in lieu of the diamond wet saw.

The slate is going to be permanently adhered to your subfloor with cement-based thinset. This powder contains Portland cement, ultra-fine grains of silica sand and frequently special powdered acrylic resins. Once thinset is mixed with water, it makes a sticky mortar that tenaciously grabs onto anything it touches. Perhaps the best attribute of thinset is that once dry, it does not flex. You can install heavy objects on a slate floor with no fear of cracking so long as you use thinset.

What subfloor is needed for slate?

Slate can be installed on a wood subfloor if the wood flooring is a minimum of one and one quarter inches thick. You can do this by applying half-inch thick plywood over a traditional three-quarter inch thick subfloor material. Screw the half-inch thick plywood to the existing subfloor spacing the screws every eight inches on center. Apply a thin coat of water-based urethane to the final layer of plywood. This urethane prevents swelling by stopping water from soaking into unprotected plywood. Installing one-half inch thick cement board on top of the regular three quarter inch subfloor is a better choice if that option still remains.

Do you need isolation fabric under the slate?

You may also decide to use a crack isolation fabric between the slate and the wood flooring. These fabrics work well to offset any differential movement between the wood subfloor and the slate. Wood can expand and contract with seasonal changes in humidity. Slate will not react to these same seasonal changes. The fabric absorbs the differential movement between the materials.

Is there a pattern for slate flooring?

The layout of slate is very important. Although most slate floors appear to be a hodgepodge of random pieces, they are actually different-sized pieces that carefully interlock in a very regular repeating pattern. The pattern is almost always printed on the carton or included in a piece of paper within the carton. You need to remove the slate from just one of the cartons and lay it on the floor carefully spacing to create the pattern the manufacturer has in mind.

What should the spacing be between the pieces of tile?

The spacing between individual pieces of slate will often be 5/16ths or perhaps as large as 3/8 inch. As you dry lay the pieces of slate you will see that the spacing between pieces happens somewhat automatically. Do not begin to mix any thinset until you are sure you have the spacing correct and you know how the slate will interlock from carton to carton.

How long do you have to wait before walking on a newly laid tile floor?

After the slate is installed, let the thinset cure for 48 hours before you gingerly walk on the slate. It is now time to apply a grout-release liquid or better yet, a special wet-look sealer to the slate. These products will make grouting much easier as grout can get trapped in the cleavage texture of the slate. It may take 24 hours for these liquids to fully cure before you can begin to grout.

CLICK or TAP HERE to get FREE quotes from local companies to install your slate flooring.

How Do You Grout Slate?

The grouting process is important. Watch these four videos to understand the entire process. You must not make a mistake when grouting!

CLICK or TAP HERE to watch the four-part video series on another tab.

The grout must be the consistency of cake batter. Wipe off all excess grout from the slate. Squeeze as much water from the sponges as possible when you use them to remove excess grout from the slate. Excess water that seeps into the damp grout will severely weaken it causing it to crack, powder and disintegrate over time. You must get all traces of grout from the slate before the grout dries. There will be a slight haze of grout powder on the slate, but that will come off the slate with a dry towel after the grout has completely dried.

Static pressure is very important. The layout of the slate is extremely critical. The pattern printed on the box produces a shape that is rectangular in nature. Once the spacing between the pieces of slate is uniform, there will be a consistent width and height to the rectangle when you measure to the outside edges of specific pieces of slate that create the shape.

Using these width and height measurements you can make sure the slate installation is square throughout the entire room. Use these measurements to create a grid layout on the floor. The edges of the slate pieces will touch up against the grid lines if you continue to install the pieces correctly.

Column 494

Vaulted Wood Ceilings

vaulted wood ceiling

Install T&G wood on a vaulted ceiling requires special talent, tools and techniques. You will probably discover that some colored wood putty will also come in handy.

Vaulted Wood Ceilings

DEAR TIM: While paging through a home decorating magazine I saw a vaulted ceiling that was covered with wood. The look was stunning. I have a corner room of my home that has two drywall vaulted ceilings that rise from each wall producing a diagonal seam in the ceiling. How difficult is it to install wood on this surface? What tools do I need and what can be done to make the job go as smooth as silk? Barb F. San Diego, CA

DEAR BARB: Stunning you say? My wife and other customers have also been heard to exclaim: sensational, awe-inspiring and dazzling. Based upon your description, it sounds as if your ceiling is nearly identical to one in my own bird room. We call our sun room the bird room because that is where our singing male canary lives. The Douglas Fir bead board ceiling in my bird room gets compliments from every person who walks into the room. For some reason our guests' attention seems to be drawn to the wood ceiling. Perhaps the two skylights that drown the room with light are partially responsible.

Is installing wood on a vaulted ceiling hard to do?

Unfortunately, you have selected perhaps the toughest ceiling to tackle. I would have much preferred it if you had told me the ceiling was flat or a standard one-plane vaulted ceiling. The intersecting ceiling planes of a hip roof add a significant degree of difficulty to the project. Installing wood around skylights adds yet another level of complexity. Be thankful you don't have those to contend with.

Here is a list of tools you will need to complete this job:

  • a miter box saw
  • a chalk line
  • hammer and nail sets or a nail gun(preferred)
  • a circular saw or table saw(preferred)
  • ladders and/or scaffolding(preferred)
  • sandpaper and brushes

How do you find the center-line of the ceiling joists / roof rafters?

The first task you need to complete is locating the center line of the ceiling joists/roof rafters. You can do this the old-fashioned way using a nail and hammer or with a modern stud-finding tool that peers through the drywall and locates the solid wood for you. Use the chalk line to snap a line down the center of the rafters from the intersecting hip to where the rafter passes over the exterior wall. Be sure to check for solid wood along both sides of the giant diagonal seam that extends from the outside corner to the peak of the roof. You need solid wood on either side of this seam to secure the ends of the wood pieces that fall between rafters.

What is the best method to use for installation?

Don't even think of installing one piece of wood until you have pre-stained and urethaned every piece of wood you will need for the job. Trying to apply these liquids upside down after unfinished wood is installed is a nightmare. Wood ceilings look best when you use tongue and groove lumber that interlocks. This method allows for blind nailing so you do not see any nails after the ceiling is installed.

It is extremely important to make sure the actual tongue is covered with stain and urethane. Seasonal movements in the wood can partially expose the tongue. If you fail to stain it, you may have unwanted racing stripes on your gorgeous wood ceiling at some future date.

The nails are installed through the tongues. Drive them at a 45 degree angle in the corner where the base of the tongue meets the actual body of the board. The nails must be long enough to penetrate one to one and one quarter inches into the solid wood rafters that are currently hidden by the existing drywall ceiling.

CLICK or TAP HERE to get FREE quotes from local companies that will install wood on your ceiling.

You will need a circular or table saw to make an angle cut on the groove side of your first starter piece. The angle will reflect the actual pitch of the vaulted ceiling. Failure to make this cut produces an unsightly gap where the wood strip meets the wall. You will also have to face nail this first starter piece so the bottom does not fall away from the ceiling. All other pieces of wood will be blind nailed through the tongues.

How Do You Get the Pieces of T&G Lumber Tight?

Tongue and groove lumber does not always interlock with ease. Never tap or hammer the tongue end to try to drive the board into place. You can flatten and damage the tongue making it impossible to interlock the next piece of lumber. A better method is to use a small one-foot long piece of scrap wood. The groove of this smaller piece should easily fit on the troublesome board. You can then hit the scrap piece of wood which in turn pushes the larger piece into place.

How do you hide the imperfections or small nicks?

Colored wood putty that matches the finished wood is great for filling imperfections, nicks, or small knots. Keep the stain on hand as well to touch up scrapes that will happen as you handle the finished wood. Use a small brush or a cotton swab to apply the stain and/or urethane.

Column 493

Ductwork Design

heating design - Tim's second floor - 5 outside walls

Ductwork Design - This second-floor room has five outside walls! It required two large supply ducts to satisfy its heat loss.

DEAR TIM: We moved into our new home 3 months ago and now that it is cold we have discovered our daughter's bedroom is freezing! The house has vinyl siding, her room has a large double window, faces north and is farthest from the furnace. The builder tells us that is the problem. I have shut down the vents in the basement, laundry room and two other little-used rooms. But my daughter's room is still cold. What is wrong? Surely the builder can't be right. Anne K., Mason, OH

DEAR ANNE: Yes, and there was a full solar eclipse last week as well. Jeeesh! The phoney answers and excuses some builders offer up to cover mistakes seem to be as plentiful as grains of sand on a beach. The following wager may surprise you: Do you think I could keep that bedroom at a nearly constant 72 F even if your daughter's room had floor to ceiling single pane glass with no insulation in the ceiling? Don't bet against me, because you will lose. I can heat or cool an non-insulated house and you will be a snug as a bug in a rug. You'll be a poor bug, but a comfortable one!

Is the builder responsible for the HVAC components?

Your builder is ultimately responsible for this mistake since he entered into a contract with you to supply a livable home. Undoubtedly he will redirect the blame to the heating and cooling contractor who installed the ductwork and the heating and cooling system components. But never forget that it was the builder's job to make sure all heating and cooling components were correctly sized and installed.

Why is a room so cold?

The cold temperatures in your daughter's room can be caused by any number of things. More than one thing can be wrong. The problem could be as simple as a damper control that is blocking air flow within the branch duct(s) leading to the room or the duct(s) could be blocked with construction debris.

What do damper controls do in the ductwork?

Well-designed forced air systems almost always have a simple damper control in each branch line as they leave the main trunk lines. These damper controls allow the installer to fine tune the air flow to each room of the house. The control levers you have at the actual grill in each room are not intended for the purpose of balancing air flow.

The more likely scenario is that the duct system is poorly designed and static pressure within the ducts is not equal throughout the system. Ductwork systems in houses need to mimic our bodies vascular system. Blood vessels get smaller and smaller the farther away they get from our hearts. Doing this allows the blood pressure in our finger tips to be just about the same as the blood pressure in your neck. If you can see the actual main trunk line as it leaves the furnace, it should get smaller in cross section the farther it gets from the furnace.

As the forced air from the furnace starts to head down the smaller branch lines, it takes energy with it. The remaining air in the trunk line still needs to travel to the rooms downstream. If the main trunk line stays the same size, the remaining energy in the moving air simply can't push all of the extra air down the main trunk line.

return duct supply

Look at the duct next to the gray i-beam. Note how it's large next to the steel column but towards the upper left of the photo, the duct gets SMALLER. This is how you maintain static pressure in the main trunk line.

Does each room in the house require different size ducts?

Another possibility is the main ducts are sized properly but the installer failed to put the right size branch line into the room. Each room of a house has its own heat gain or heat loss. As such, the furnace needs to supply a different amount of heated or cooled air to each room so that all rooms are the same temperature.

It is also possible that there are not enough return air ducts in each room. The supply ducts should be located under windows on outside walls. On the opposite side of the room, a return air intake duct should be up seven feet high on the wall. As the furnace operates it pushes air out of the supply ducts and pulls air across the room into the return air ducts. This is where the air begins its journey back to the furnace where it once again gets reheated.

CLICK or TAP HERE to get FREE quotes from local companies HVAC companies in your area.

If you determine that the fix is not easy, don't let the builder tell you to just solve the problem with a space heater. These devices do work and work well. The supplementary heater will not do you any good this summer when it is 98 F outdoors. I guess when you call to complain that it is too hot in that room, the builder will tell you to hang a window air conditioner out of one of those large windows.

What is static pressure?

Static pressure is very important. Professional heating, ventilating and air-conditioning (HVAC) contractors know how to supply enough air to each room so that every room in the house is within a degree or two of what your thermostat reads.

The method used to determine duct sizing is not magic. A professional HVAC contractor performs a heat gain and heat loss calculation using the blueprints. These calculations are done for each room and the final calculations show exactly how many cubic feet per minute (CPM) of air must be supplied to each room. A second calculation converts this CPM quantity to a specific branch duct size. The calculations are so precise they tell the contractor the exact size duct for every part of the system!

Column 491

Whole House Fans

house roof vents

Whole House Fans | These simple pot vents are great exhaust ports for a whole house fan. You may need quite a few to satisfy the power of the fan.

DEAR TIM: While doing a walk through inspection in our new home our builder indicated that he could not put in the whole house fan we wanted. The reason he gave was that both roof vents and eave vents had been accidentally installed. I believe he called them continuous ridge and soffit vents. The builder said the whole house fan would burn up and offered a credit to us. Is this correct? We really want the whole house fan. Kristi B., Manteca, CA

Dear KRISTI: Ooooops! What does the builder mean "accidentally"? The location of your home in the central valley of California needs as much ventilation as possible. If I was building your home, the continuous ridge and soffit ventilation would have been just one part of the roof ventilation package. The great news for you is that you can have the whole house fan installed and it will not burn up so long as your builder and roofer team up and install some extra roof ventilation products.

Do whole house fans work well in all climates?

Whole house exhaust fans come in different types and sizes. Their sole purpose is to move vast quantities of air. They work very well in climates that have moderate to low humidity. As the sun goes down and the outside air temperature begins to drop, a whole house fan can create pleasant breezes through any and all rooms of a house. Ask anyone who has one and they will tell you that even during peak summer months, they sometimes have to sleep under a blanket!

How much exhaust area is needed for a whole house fan?

These fans pull hundreds and even thousands of cubic feet of air per minute into your home. For them to work at peak efficiency they have to push an equal amount of air out of the attic. If there are no places to exhaust air or the exhaust areas are small, the fan blade spins but it doesn't really push much air. Low air flow past the fan motor can cause it to overheat. Spinning car tires on snow and ice are a fairly accurate analogy. A car engine can rapidly overheat in this situation as the car's radiator is not moving through the outdoor air.

When you purchase a whole house fan the written instructions clearly state how much free net area of exhaust the fan needs. The net free area is often called out in square feet or square inches. But don't be fooled. If you cut a one square foot hole in your roof and cover it with some sort of cap, you do not have one square foot of exhaust opening. The insect screening or slits in the metal vent can cut off as much as 50 percent of the hole you created.

I always prefer to exceed this amount by 25 to 50 percent. One way to achieve this required ventilation area quickly is to install simple and affordable spinning roof turbines.

Will spinning roof turbines help exhaust air?

These wonderful roof ventilation products may not look as sleek as the hidden continuous ridge and soffit ventilation you already have, but they also allow massive amounts of air to readily escape from your hot attic space. What's more, they work anytime a slight breeze blows across your roof. I would install these on the back side of your roof so they are not visible from the street.

If you don't like roof turbines you can have your builder install simple static roof pot vents. These are very common roof ventilation products and they work well. I have them on my own home. But depending upon the fan you have purchased, you may discover you need 10 or even 15 of these pot vents to satisfy the whole house fan. Once again, place these vents on a part of the roof that is least visible from the ground.

Don't let your builder pull the wool over your eyes with an expensive change order for this work. The actual materials you need to provide the necessary ventilation for the fan will probably cost you less than $150.00. The time to install the products might be less than 4 hours. In my opinion, the builder should not charge you for the time since he already told you he was going to install the whole house fan in the first place. Necessary roof vents are a part of this package.

The spinning roof turbine vents are an excellent match for whole house fans. The beauty of them is that they do not restrict the amount of opening in the roof. In fact, when they spin either by wind power or air being pushed by the whole house fan, they exhaust far more air than they would if the hole in the roof was simply open to the atmosphere.

The truth be told, you can't have too much roof ventilation. Ask any farmer that raises chickens and they will show you how they ventilate the chicken houses since chickens can't sweat and need to be cool or they die.

Where Are the Fans?

In the June 20, 2021 AsktheBuilder Newsletter, Lewis emailed asking, "Why do you rarely, if ever, see whole-house fans in new houses?" CLICK HERE to read the answer.

Column 491

AsktheBuilder Newsletter

AsktheBuilder logo

AsktheBuilder Newsletter

I can send my column to you via email. I also include interesting questions I get, product news and all sorts of other announcements. In fact, when I travel, I announce where I will be in case you live nearby and want to get together to drink a brewsky or sip a vanilla Pepsi.

See the Newsletter link in the yellow stripe above left? Just go there and fill in your email address and name and you are all set.

PRIVACY POLICY: I do NOT share your personal information with anyone. It is that simple.