Power Tool Differences

DEAR TIM: I am going to buy a one half inch drill and a circular saw for numerous projects around the house. There is a wide range in price between models. Surely this difference translates to performance and durability. What are the differences between professional power tools and the less expensive DIY power tools? Are the professional tools worth the price? F. R.

DEAR F. R.: Several months ago, I helped a friend build a deck. He insisted on using his power tools. His new DIY drill started to burn up after drilling only four holes through a treated 2 by 6. Even though the one half inch spade bit was sharp, you could stop the drill by simply applying significant pressure against the wood. We put away his toy and finished the job with my power drill.

There are major differences between DIY power tools and those used by professionals. The major components of power drills and saws have little in common with one another. Even the electrical power cords are different!

The outer housing of a professional drill or saw is often constructed using a glass filled nylon type plastic. This material is exceptionally stable, it can resist many chemicals, and it is rarely affected by extremes of heat or cold. DIY power tools usually have an inexpensive polycarbonate plastic housing. Polycarbonate plastics can flex when heated. They can be attacked by many construction type chemicals.

The internal bearings found in professional quality tools are usually ball and roller type. These bearings create less drag when the drill or saw is in operation. Less drag means less heat. Many DIY power tools contain lower quality sleeve type bearings. These bearings can heat rapidly if a significant load is placed upon the tool. My friend's drill must have contained these bearings.

The electrical motor found in a professional drill or saw is almost always more efficient and powerful than that used in a DIY tool. A professional tool will develop more torque or power. This is why my drill bored through the 2 x 6 with little effort. The armature, or central core, of the motor is usually precision balanced in a professional tool. Special high temperature wire is also used in the armature and field windings. DIY tools use unbalanced armatures.

Power drills and saws contain gears and transmissions. These components transmit the spinning movement of the motor to the saw blade or drill bit. The cut steel helical gears found in professional tools produce minimum vibration. Their closely machined tolerances deliver long life. DIY tools usually contain simple powdered metal or spur gears. These parts often create vibrations which lead to accelerated wear and breakdown.

Power cords on professional tools contain rubber. This allows the cord to remain flexible in cold weather. The cords are usually 4 to 6 feet longer than those in a DIY tool. DIY tools have nylon power cords which are stiff in cold weather.

In many instances a professional drill or circular saw often can be purchased for just $40 to 60 more than what you might pay for a DIY power tool. My tools usually last 4 - 6 years before a major malfunction. The average homeowner, in my opinion, would have a difficult time burning up a professional tool. Don't play around, buy some real tools.

Attic Access – It Doesn’t Have to Be a Hassle!

floor truss in attic

Attic Access | This is a new home in 2019 and you can see a giant attic space is being created by trusses. A traditional staircase, NOT a ladder, will allow the homeowners to get up into this huge room.

Attic Access - Traditional Safe Steps are Best

DEAR TIM: My new home has an access panel which leads to the attic area. I am tired of using a dangerous step ladder to get to this part of my home. A folding attic ladder is of some interest to me. However, many of them seem flimsy. What should I look for when shopping for attic access steps? How in the world do you cut the bottoms of the stairs so they fit perfectly to the floor? M. O.

DEAR M. O.: Some of the folding attic steps I have seen and installed are not much better than your step ladder. There are major structural differences in folding attic ladders and disappearing stairways. Some folding attic steps are so weak that they will not support my weight while carrying a 50 lb box up to the attic!

What Should I Look for in a Folding Attic Ladder?

If you decide to purchase a folding attic ladder, there are certain things to look for. Be sure that the stringers (side members of the ladder) and the treads (steps) are at least 3/4 inch thick. Both of these components should also be at least 3.5 inches wide. Some manufacturers use materials that are slightly smaller.

Inspect the underside of each tread. Look for a ladder rod. This is a thin metal rod that passes under each tread. It provides strength. Be sure that each and every tread has this rod.

What is the Minimum Safe Weight Capacity of a Folding Attic Ladder?

Not all folding ladders are made equal. They each have different weight-bearing capacities. The minimum capacity you should purchase is 250 pounds. Some models will handle 300 pounds.

What About One-Piece Attic Staircases?

Many homeowners are familiar with the sectional folding attic ladders. Did you know that you can also purchase and install a true disappearing one-piece stairway? These items are usually much more durable and often are more comfortable to climb. The angle of these stairs is often much closer than that of a regular household staircase.

These disappearing stairways have one piece stringers. They actually operate in a similar fashion as a folding attic ladder. You pull a chain attached to a flush ceiling panel. The stairway rotates and slides gently into position. Some of these stairways can support weights up to 800 pounds.

How Much Ceiling Room is Needed for a Folding Attic Ladder?

The average folding attic ladder will fit where the distance between floors is 8 foot 5 inches to 10 feet. Any elevation between these heights is made by trimming the side stringers. The one piece attic stairway can be ordered to accommodate any floor to floor elevation between 7 foot 7 inches and 12 foot 10 inches.

If you decide to install a folding attic ladder, be absolutely sure to follow the instructions supplied by the manufacturer. Many manufacturers require that 16 penny nails or 1/4 inch lag bolts be used to attach the ladder frame to the rough opening. Resist the temptation to use small finish nails or drywall screws! Using these timid fasteners can result in a serious or fatal injury.

Is it Hard to Trim Folding Attic Ladder Legs?

Trimming folding attic stringers to the exact length is simple. Most of these devices have three sections. Unfold the first two sections until they are straight and point towards the floor. WATCH THIS VIDEO:

Make sure the ladder is pulled down completely from the attic. Take your tape measure and slide it slowly along the top of the stringer. While contacting the top of the stringer it will soon touch the floor. Note the distance between the floor and the end of the second section. Record this measurement. Do the same thing on the top of the other stringer.

Unfold the third and final section of the ladder. Translate these measurements to the top edge of the stringer of the folded section. Fold the third section back up and repeat the entire procedure on the bottom of each stringer. The underside measurements should be less than the top side measurements. Connect the two marks on each side of the stringer. If you have performed your calculations accurately, the mark should be parallel with the floor. Cut the stringers off one eight of an inch on the long side of the line. Check the fit of the ladder sections when unfolded. All of the sections should meet perfectly when the bottom cut is right.

This column was featured in the May 30, 2021 AsktheBuilder Newsletter.


Multi-Colored, Rattle-Free Vinyl Siding!

DEAR TIM: My husband does not like to paint or stain. We want the exterior of our new home to be as maintenance free as possible. Vinyl siding has many advantages, however, it doesn't look like real wood to me. In addition, a friend's house covered with vinyl siding rattles and clatters with every gust of wind. Is there a realistic fade-resistant vinyl siding? What can be done to keep the vinyl quiet on windy days? N. I.

DEAR N. I.: I have got some fantastic news for you and your husband. There are numerous vinyl sidings that will address each and every concern that you have raised. Solving the rattling problem is easy. Your neighbor's siding chatters because of operator error. Not only can we fix her siding, but also we will make sure that your siding will be installed correctly the first time.

The vinyl siding industry, like many others, has witnessed much change in the past 15 years. Some of the first vinyl siding products succumbed to the intense ultraviolet (UV) light from the sun. The UV rays caused colors to fade and the vinyl to breakdown and chalk.

Many vinyl siding companies responded to this problem. They increased the quantity and quality of a pigment called titanium dioxide within the siding. This pigment not only absorbs UV radiation, it also acts as a reflector. Other colored pigments have also been developed that resist UV degradation. These new pigments allow vinyl siding manufacturers to create exciting variegated, or multi-colored, siding.


Installing vinyl siding on your house? Find the best professionals by using my Vinyl Siding Checklist. I offer a 100% Money Back Guarantee.


These new vinyl sidings look like stained natural wood. Some of them look like weathered cedar that you might find on a New England seashore cottage. Don't confuse this coloration with the wood grained texture that virtually every solid colored siding possesses. The new sidings have this in addition to the multiple colors!

Some manufacturers have developed realistic trim pieces to replicate the size and shape of wood corner posts and window trim. When used with the new siding the accessory pieces create the illusion of a real wood house.

Because vinyl siding expands and contracts in relationship to the outside temperature, it is installed in a unique fashion. A 12 foot long siding panel can grow by as much as a quarter of an inch as the temperature rises. To make sure that the siding does not buckle or bow, the siding must simply hang on the wall. All vinyl siding has longs slots along the top edge through which nails or staples are driven. These fasteners must be driven in the center of each slot. In addition, they need to be driven to within one thirty-second of an inch of the vinyl siding. This gap allows the siding to move as it expands and contracts.

The individual who installed your neighbor's siding goofed. The gap between the head of the nail and the siding is probably one quarter of an inch or larger. Wind gusts allow the siding to flap against the house. Fortunately this problem can be fixed. Your neighbor can purchase a simple hand tool to unzip the interlocking pieces siding. Once unzipped, the siding can be properly nailed. Using the same tool, you simply lock the siding back together. This is a job which can he handled by a serious DIY'r. Have your neighbor call a professional vinyl siding installer if they feel the slightest anxiety about tackling this job.

Author's Notes:

March, 1999

Recently the Vinyl Siding Institute introduced a voluntary certification program for vinyl siding manufacturers. Those manufacturers who want to prove to you that they indeed make a quality product now have a mechanism to do just that.

If you want to find out more about the certification program and manufacturers who participate, visit the Vinyl Siding Institute's website (www.vinylsiding.org).

Ceramic Shower Seat

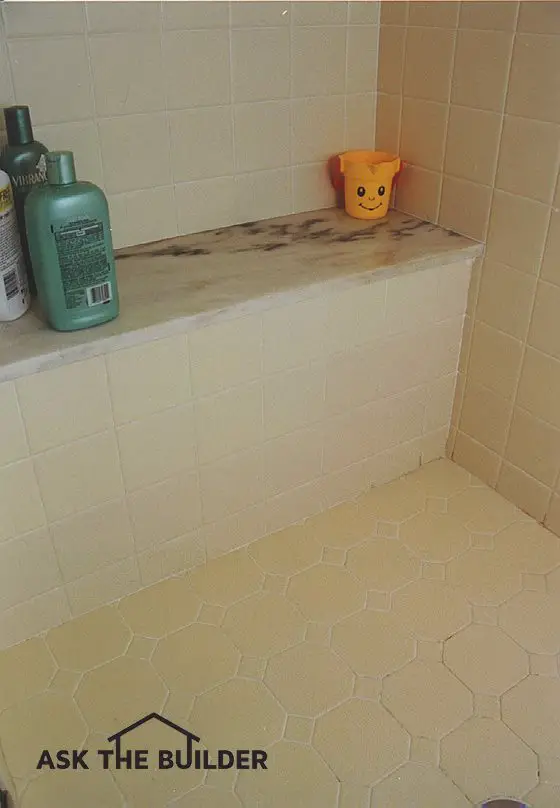
shower seat with smiley face cup

©2017 Tim Carter

DEAR TIM: I am planning a ceramic tile shower for my new bathroom. I would really like a seat in the shower.

What is a good size and height for such a seat? How do you install one to eliminate leaking? Are there options other than ceramic tile for the seat surface? Sarah - Chicago, IL

DEAR SARAH: You are going to really enjoy your planned shower seat. I have installed many of them over the years.

My customers and my wife find them extremely convenient and attractive. Every ceiling below my jobs is bone dry. Yours will be too.

The first thing you need to consider is the overall size of your ceramic shower. Showers with seats work best if they are rectangular. A width of 36 inches will provide excellent elbow room.

The minimum width should be 30 inches. A length of 48 to 54 inches will allow you to comfortably install a 12 inch wide seat.

CLICK HERE to get FREE & FAST BIDS from local ceramic tile contractors.

You can survive with a 42 inch long shower, however, it may be fairly cramped. I have found that a shower seat height of 14 inches off the shower floor provides the greatest versatility.

The rough framing for the seat is completed after you frame the walls for the overall size of the shower. Be sure that you leave a one quarter to one half inch gap where the wood studs would meet at each corner.

This space will allow you to hide the waterproofing membrane within the wall framing. The extra space also makes it easier to nail the cement board. The nails will be farther away from the edge.

The platform for the shower seat can be a scrap piece of half inch or three quarter inch plywood. Construct a small 2x4 wall 13 and one half inches high. This small wall should be built 11 inches out from the back wall of the shower.

A scrap 2x4 nailed horizontally to the back shower wall at the same height of the mini-wall will support the plywood base for the finished seat. Nail the plywood securely to the mini-wall and the horizontal 2x4 cleat.

Waterproofing the seat and the shower floor is accomplished with a PVC membrane. This membrane must be installed on the floor of the shower, up the face of the mini-wall and on top of the seat platform.

In addition, the membrane must lap up onto all adjacent walls a minimum of 6 inches. This membrane should, if possible be installed in one continuous sheet. There is a solvent which can be used to chemically weld one piece to another if it becomes necessary.

Water can and does leak through horizontal surfaces in a ceramic shower. The water is captured by the membrane and directed into the shower drain.


If you want to learn how to work with these special waterproof membranes, you should consider buying my Shower Pan Liner eBook. I go into great detail in this neat instant download book describing the tips and tricks I have learned over the years. The book comes with a 100 percent money-back guarantee.


The membrane is not cut at inside corners. Fold the excess material and slide it through the gap in the framing. Nail it high on the fold to the back of one of the corner 2x4s. Failure to nail in this manner may cause a leak to develop at a later date.

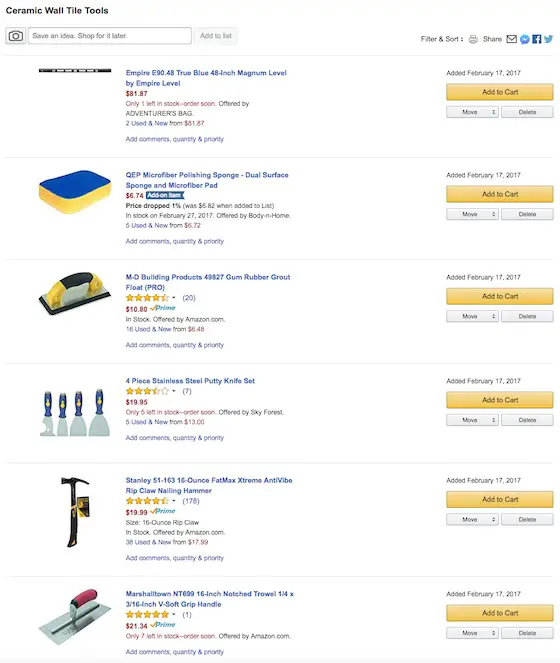
Full Tile Tool List

Here's a list of tools that I've used for years to successfully install thousands of square feet of ceramic tile.

  • tape measure
  • pencil
  • tile cutter
  • nippers
  • a 1/4 by 1/4 inch v-notched trowel
  • a hammer
  • some 6d finish nails
  • 8 lineal feet of straight 1/4 inch wood lattice strip
  • putty knife
  • 3-inch wide-bladed scraper
  • grout sponge
  • rubber grout float
  • several buckets
  • accurate 4 foot level


Click the image below to BUY all, or some, of the tools in the above list.


ceramic tile tool list

CLICK THIS IMAGE NOW TO ORDER ALL THE TOOLS YOU NEED TO DO CERAMIC TILE.

Picking Materials

There are numerous options for your seat material. You can use ceramic tile, marble, granite, cultured marble, or solid surface countertop material. If you use ceramic tile, you must first install a piece of cementitious board over the membrane.

Do not nail the board through the membrane! Simply mix one part cement and one part sand. Make the mixture fairly wet. Apply a one quarter to one half inch thick layer of this cement paste on top of the membrane.

Set the cut piece of cement board directly in the mixture. Use a level to check the seat for level left to right as you face the seat. A slight pitch towards the center of the shower will allow water to drain off the seat.

If you use one of the other materials for the seat, you can eliminate the cement board. The finish seat material is set in the same mixture of sand and cement. Be sure that you install the seat before you install any ceramic tile.

The wall tile should sit on top of your seat just as it would sit on the top edge of a bathtub. Make sure the seat projects one half inch beyond the ceramic tile on the face of the mini-wall.

CLICK HERE to get FREE & FAST BIDS from local ceramic tile contractors.

Column 168

Garage Doors

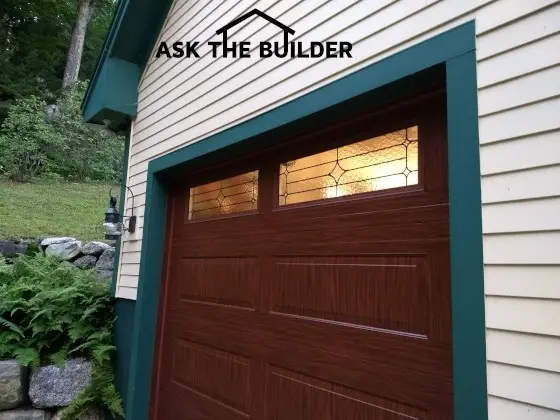
bi-directional wood grain insulated steel garage door

Major building product improvements have happened over the past 25 years like these bi-directional wood grain insulated steel garage doors. (C) Copyright 2018 Tim Carter

DEAR TIM: It is time for a new garage door. Doors I have owned in the past have been noisy, drafty, leaked water during rainstorms and looked rather plain. I'd like for my natural light to enter through the door, but am worried about security. Also, how secure are the radio controlled garage door openers? Is garage door installation and service a DIY project? Paul, Tucson, AZ

DEAR PAUL: I've got great news! They don't make garage doors like they used to. Well, they do and they don't. Virtually every part of garage doors has been improved in one way or another. Advancements in technology allow you to install insulated, quiet, secure doors that are very handsome and for the most part maintenance free.

Garage doors are undergoing their third period of metamorphosis. Wood used to be the material of choice in the first generation of doors. Approximately 20 years ago, insulated, steel garage doors appeared. Fiberglass and other composites are now bringing about further change and advancements. The use of a fiberglass outer skin in garage doors allows you to duplicate the rich look of natural wood on a surface that otherwise would appear very plain. If your door faces the street, a stainable, fiberglass door may be ideal for you.

Many older garage doors allow wind and wind blown rain to enter. This problem has been solved by a new tongue and groove feature on the edge of many doors. In addition, some doors have a weatherstrip gasket that seals tightly as the door sections close upon one another. Certain doors offer a unique crush-resistant safety feature. Should fingers get in between the panels as the door closes, the door design actually can push the fingers or other objects out of the way.

Your security concerns are valid. Often people store valuable possessions in a garage. With standard glass, a thief can easily see your late model motorcycle. New plastic windows are available that appear to be glass. They allow light to enter but obscure the view into your garage. If you want an elegant look, be sure to look for the leaded or brass acrylic panels. These can create a wonderful match to your windows if you have a Victorian or Tudor style home.

Radio controlled garage door openers can be a problem. Deceptive high-tech thieves are routinely stealing the codes from cellular phones and remote controlled burglar alarms on cars. This same technology can easily grasp your remote control code out of thin air. Certain garage door opener companies have technology that changes the code every time the door is opened. There are billions of code choices. High-tech thieves will not waste their time at your house if you own such an opener!

When your door is installed, be sure that the company installs a high quality bottom door seal and perimeter weatherstripping. Air infiltration is the biggest energy thief in garage doors. Your new, well insulated door may prove useless if cold or warm air can easily enter your garage. Insist on a tight fit.

Garage door installation, in my opinion, is not a DIY project. Garage doors are the largest mechanical objects in your house. The springs that are used to open them can store and release deadly force. People are seriously injured and killed each year when they try to install garage doors or perform advanced service on existing doors. The only service you should attempt is the periodic lubrication of the wheels, hinges, and tracks. Use a light weight oil to accomplish this task. Never use heavy bearing grease.


Tarnish Free Brass

DEAR TIM: I have a gorgeous polished brass door knocker, two brass coach lights and a door kick plate. All the items are solid brass and were installed at the same time. They are all tarnishing but at different rates. Why is this happening? How can I restore the finish? Is there a permanent way to keep them looking like new? Terry, Fremont, NE

DEAR TERRY: My wife and I have an identical problem. Our polished brass hardware is protected from rainfall and sunlight by a covered front porch. Even with this protection, our fixtures have suffered extensive tarnishing over the past 10 years.

Brass is a combination of two primary metals - copper and zinc. When brass is cast or forged it has the beautiful golden luster that we find appealing. The brass, however, is very unstable and unhappy. The brass grabs oxygen (oxidizes) or any other compatible ion from the air or rain in a rush to stabilize. This chemical reaction creates the tarnished appearance. The dull tarnish on brass is actually a defense mechanism that slows the corrosion process.

To protect brass from oxidation or tarnish manufacturers apply clear coatings at the factory. Lacquers, urethanes and other clear finishes can vary in film thickness and quality. Some may break down rapidly when exposed to the sun's ultraviolet (UV) rays. Acid rain and other air-borne contaminants can erode and eat through the coatings. The exposed brass then begins to tarnish. The uneven rate of tarnishing of your fixtures is most likely caused by different levels of quality in the coatings and the application process.

If you want brass hardware that doesn't tarnish, it is now available. Several manufacturers offer a lifetime tarnish-free warranty on their products. The brass is coated with different metals such as zirconium, nickel and palladium. The coatings are sometimes applied in a vacuum. They are usually only several molecules thick! This is why you can still see through to the brass.

Those of us who have older brass hardware have to restore and periodically re-coat it to maintain its brilliant luster. The restoration of decorative hardware usually begins with the removal of the old, worn clear coating. This can be accomplished easily with paint strippers. Follow the directions provided by the stripper manufacturer. Try to work in a shady, well ventilated area.

Once the old finish is removed, clean the brass hardware with soap and water to remove any residual stripper. The brass must be perfectly clean or the chemicals may corrode and discolor the brass. Wash and rinse several times if you feel it's necessary.

If the brass is severely tarnished you may have to use special chemical kits to restore the brass. These kits contain a special caustic solvent which chemically removes the oxidation. A neutralizing agent must then be applied. The neutralizer is then washed off with soap and water.

After the brass is dried, it can be buffed or polished to a mirror-like brilliance. Brass which is only slightly tarnished can be polished successfully with many of the off the shelf cleaners and compounds you commonly see at a grocery or department store. Lemon juice and salt mixed together also will do a great job. Once again, after the brass is shiny, be sure to wash it with soap and water. Buff it with a soft cloth to make it shine.

Once you have polished the brass, coat it with 3 or 4 coats of a UV resistant clear lacquer or high gloss urethane. Buff between coats with a soft cotton cloth. To maintain the shine of the brass, re-coat it with the lacquer or urethane at least once a year.


Paint Removal

DEAR TIM: I have to strip some paint and clear finishes from an older home. Some of the paint to be removed is latex while the remaining is older oil based paint. There are places that have perhaps 20 coats of paint or more. Do I need to use different strippers? What is the best way to apply and remove paint strippers? Do you have any tips on making this job go as smoothly as possible? Mark - Kansas City, MO

DEAR MARK: Make sure you take your reading glasses with you to the home center. You are going to need them. There are numerous paint stripping products. Some work better on latex paints while others work better on oil based paints. To further complicate matters, some paint removal products can harm fine furniture that you intend to re-stain and clear coat. You must take your time and do diligent research to obtain the best results.

Paint strippers contain different types of active ingredients. Aggressive solvents such as methylene chloride can be found in certain strippers. Other strippers contain caustic ingredients like sodium hydroxide. There are other new "safe" strippers that contain other chemicals. These chemicals soak into the paint and soften the film. With many strippers, the softened paint finish begins to swell. This swelling produces tension forces that cause the paint layers to delaminate from one another and the wood or metal you are refinishing.

Strippers that contain methylene chloride can often remove 4 to 5 layers of old oil based paint at one time. However, some of these strippers seem to be able to remove only a single layer of latex paint per application. Certain new "safe" strippers do just the opposite. They seem to work better on latex paint films than oil paint.

You can buy a stripper that contains sodium hydroxide that claims it can remove up to 30 layers of paint in one application. This stripper has a very thick paste-like consistency much like drywall joint compound. It is troweled onto the surface and covered with a special paper. The paper inhibits evaporation of the stripper. This allows the stripper to penetrate deeply into multiple layers of paint. Once the stripper has softened the paint, you remove the paper and old paint in one simple step.

Paint strippers work the best when applied and removed in temperatures that range between 60 - 85 degrees F. It is best to work in a shaded area that has good ventilation. Direct sunlight, windy conditions and excessively high temperatures can cause many strippers to dry too quickly. Covering paint strippers with plastic film or aluminum foil will help them stay moist for a longer period of time.

To obtain the highest performance from a paint stripper it must dwell for an extended time on the paint. This means let the stripper do the work, not you. All too often people apply a stripper and expect results within minutes. Some strippers take hours to soften multiple layers. The top layer of paint will bubble and blister very quickly in most instances. However, the stripper may still be working. Often the liquid portion of the stripper is driving deeper into the layers of paint. If you scrape off the paint film too early you may remove active stripper that has yet to do its job! It is best to read the directions on the can and follow them to the letter.

Clear urethane finishes can be tough to remove. To make sure that you increase your chances of success, sand these surfaces with rough sandpaper before applying the stripper. This allows the stripper to penetrate more rapidly into the tough urethanes. Be sure to read the label before you buy the stripper. Some strippers will not work well on certain clear finishes.

Author's Note: We've received other questions about similar problems. Here's one from Leigh, in Columbus, OH.

"I have a cement pad/stoop located in front of my front door. The previous owners painted this a dark brown. The paint is chipping off. I was wondering if you could please tell me how to remove this paint? The pad is in good condition, and I would much rather prefer a 'natural' cement color! Thank you! "

Winged Insects – Termites

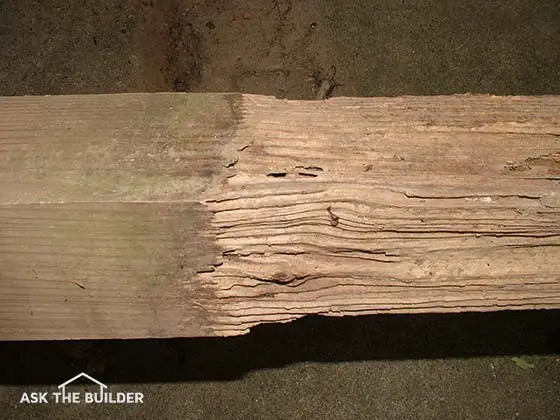
Lookie lookie, Can you see the extensive termite damage on the right side of the post? Imagine my reaction when I pulled this post out of the ground. ©2017 Tim Carter

DEAR TIM: Yesterday morning I noticed a large amount of insect wings on my garage floor. A neighbor said this might be a sign of termites. Is this so? My house was chemically treated for these pests about 7 years ago. Should I be concerned? If I have to retreat, what options are available? Molly, Kinston, NC

DEAR MOLLY: Uh Oh... I've got good news and bad news. The good news is that there are going to be multiple births in your near future. The bad news is that it is going to cost you a lot of money. The insect wings are very likely signs of termite infestation. The wings were left behind by reproductive termites that emerged from an existing, nearby colony. These pests are now in the process of forming a new colony, quite possibly within your garage.

You should be very concerned about this problem. Nationwide, termites chew up over $1 billion worth of lumber and cellulose products each year. The sinister creatures even invade steel framed office buildings. Once there they forage on the paper backing of drywall! Imagine how your delicious spruce and fir 2x4s and 2x10 floor joists are going to taste.

There are over 40 species of termites in the USA alone. They are very well organized. Each colony has a king and a queen. The queen rules supreme for long periods of time. Queens have been known to lay as many as 80,000 eggs in one day in an effort to further the species. Since some termite queens can live up to 70 years of age, they can be responsible for creating millions of new termites.

The rest of the colony is made up of the reproductive termites, soldiers, and workers. Soldier termites defend the colony. The reproductives are future kings and queens waiting around for the debutante ball. The worker termites are the ones you need to be concerned with. These devils are the only ones that leave the nest on a daily basis. The workers are responsible for providing food (your wood) for all of the inhabitants of the colony. This fact is the Achilles heel of the termite circle of life.

The worker termites forage for food 24 hours a day, 7 days a week. They are constantly looking around for new sources of food. They normally eat at 4 - 5 locations during the week. They may eat the wood in your home on a Monday and eat some dead tree roots next to your house on a Wednesday. They fill their stomachs and then proceed back to the colony to regurgitate the food for the other termites. To eliminate termites from your home, you must eliminate the entire colony. This can only be achieved by killing the worker termites.


Termite infestation? Pick the best exterminator using my Termite and Carpenter Ant Checklist. I offer a 100% Money Back Guarantee.


Traditional chemical treatments, like the one performed at your house, simply create a barrier for foraging termites. If the chemicals break down in the soil or fail to create a complete barrier, the termites can invade your house again.

There are two alternatives in the war against termites. Several chemical companies have developed systems that attract foraging termites. Unobtrusive bait stations are planted in strategic locations in the soil around your home. The pest control specialists check them periodically for infestation. Once termites find the bait, the pest control people insert special chemicals into the bait stations. The workers eat the poisoned food and eventually begin to die off. Deprived of their food delivery source, the remaining termites in the colony soon die.

Pest control companies can also apply borate chemicals to the lumber in your home. This can be done in both new construction and existing homes. The boron in these chemicals kills the workers slowly. The other termites within the colony are poisoned as well by the boron tainted carry out food. Borates, however, are somewhat water soluble. Rain can wash them from the soil or any wood exposed to water. Borates are an excellent way to supplement the use of traditional chemicals or the newer chemical bait systems.

Author's Notes :

September - 1999

I recently received a letter from the public relations firm that represents the Bayer Corporation. One of the head scientists at this company was kind enough to review all of my past information on termites and offered some suggestions in order to keep my content as accurate as possible.

This individual, Dr. Byron Reid, said that up until his company developed a new product called Premise, my statements about liquid chemicals not killing termite colonies was accurate. The Bayer Corporation folks maintain that their product will kill foraging worker termites immediately but does not harm pets or humans. I would ask about this system when you speak with professional exterminators. Remember, a barrier chemical treatment system is only as good as the person who is injecting the chemicals into the ground. TC

Exterior Paint – Proper Prep

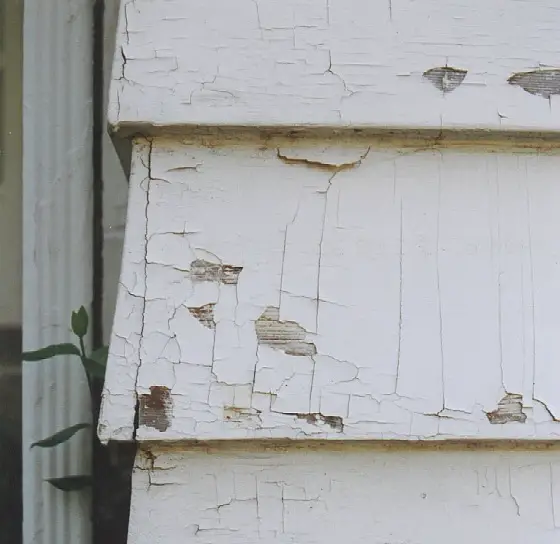
peeling paint

This alligatored house paint is next door to my home. There are probably 10 - 15 layers of paint on this house and many of them are brittle oil-based paint films. Over time, they simply can't win the battle of adhesion.

DEAR TIM: My husband and I intend to paint our 85 year old Victorian house. The wood siding has peeled to bare wood in many places. What can we do to maximize the life span of this new paint job? Should we power wash the exterior or just use a hose? Do the new paints require a primer? What is the best type of paint to use on our older home? Nancy - Utica, NY

DEAR NANCY: It appears that you and I will be doing the same thing this summer. It is time to freshen up my 10 year old Victorian home. Even though we might both follow the same procedures and use the same paints, there is a very good chance that my paint job will outlast yours by 50 percent or more. The first thing you need to do is identify what might be the cause of the excessive peeling on your home.

Paint really dislikes wood. Wood siding and trim are like my son - on the move constantly. Water vapor and liquid water that enter and exit wood cause it to expand and contract. This movement breaks the bond between paint and the wood fibers. Look for possible sources of water that might be getting behind the paint film on your house. Excessive indoor humidity or attic moisture can easily pass through exterior walls and enter the untreated wood siding from behind. Gaps between windows and doors and the siding can allow rain water to enter the end grain of wood. Overflowing gutters, leaking down spouts or roof leaks can drench wood trim and siding.

All of these problems must be corrected before you paint. In addition, you are fighting a losing battle with the 85 year old paint on your home. Old houses were painted with oil based paints. These paints become more brittle with age. As the wood moves back and forth, the paint simply looses its grip. Even though you may scrape loose paint, a year or so later another spot on the siding may succumb to the forces of gravity and peel away. Fortunately I do not have oil based paint or primers on my 10 year old house.

Successful paint jobs are based in surface preparation. This is the most unglamorous part of a paint job. Paint can labels all say to apply paint to a clean, dry surface. Scrape all loose paint and wash your house. Clean your house the same way you clean yourself in the shower. Use soap and water and rub the skin of your house! I happen to prefer using a tile grout sponge with powdered detergents. Be sure to rinse the soap from the old paint. After you wash the house, I guarantee you that you will find additional places that need to be scraped. Look closely for these potential trouble spots. Be sure to fill all nail holes with spackling compound and caulk all gaps between the siding and trim boards.

Power washing does not always remove all of the dirt from your old paint. What, you don't believe me? Take your car to a self-clean car wash that uses power washers. Wash your car and let it dry. I guarantee you that you will be able to remove a thin film of remaining dirt with a white glove or sponge. That same film is left behind when you power wash a house.

Power washers used by rookies can also damage and erode wood siding and trim. They can also drive water deep into bare wood. If you paint before the wood dries, the paint will very likely blister and peel within months - sometimes days.

Water based acrylic primers are a must. Please read a more up-to-date article on primers for exterior use: Exterior Paint - Proper Primers and Cleaning a MUST! These special paints are formulated to stick to bare wood or previously painted wood. Primers also help seal bare wood so that the finish coat sheen is uniform. Be sure to use a primer made by the same company that makes the finish coat paint. The finish coat paint instructions will tell you which primers are compatible.


Is the exterior of your house looking drab? Find the professional painters by using my Exterior Painting & Staining Checklist. I offer a 100% Money Back Guarantee.


Purchase water based 100 percent acrylic paint for your top coat. These paints have the greatest amount of long term flexibility. Remember, paints are simply colored glues. They stick best to surfaces that are squeaky clean and dry. The extra day or two spent hand washing your house could easily add 2 to 3 years of life to the paint job.

Please click the following link to read my latest findings on primers for bare wood. It contains more up-to-date advice that is different from this older column: Exterior Painting  You should also read another column about the exact paint I use on my own home. Since I learn about new and exciting products each week, it is no wonder I come across great paints. Go read about: Urethane House Paint.

Did You Say Hearing Protection!

DEAR TIM: My husband is an avid do-it-yourselfer (DIYr). When I get in our car after he drives it the right stereo speaker is much louder than the left. Could his hearing be going bad. Should I be concerned? Will ordinary household tools cause hearing loss? What do you do to protect your hearing while working on job sites and around the house? Judy - Jasper, AL

DEAR JUDY: It sounds like you have been talking with my wife. I have developed a partial loss in both of my ears. My right ear has suffered significantly. Hearing protection was not even considered 25 years ago when I started in residential construction. I suspect your husband is right handed like me. His use of power tools near his right ear could be the root of the problem. However, there is a slim chance that you are suffering from a hearing loss in your left ear. Don't discount this possibility especially if you cut the grass or play the car stereo too loud.

Besides wax and three tiny bones, our ears contain delicate hair cells. These little cells are the bridges between our ear and the main auditory nerve that enters our brain. If the hair cells become damaged or die from excessive or prolonged loud noise, the brain has no way to recognize "sounds". At this point in human evolution, we can not regenerate hair cells. In my case, this means that I already have permanent hearing loss in my right ear.

Decibels (dBA) are a unit of measure used to compare relative sound intensity. The noise produced by a bowl of crackling Rice Krispies is equal to 30 dBA. An ordinary electric hair dryer may produce 80 dBA of noise. Circular saws and table saws can produce noise in excess of 100 dBA. Believe it or not, a plastic baby rattle can create sounds up to 135 dBA! Hearing loss can begin to accumulate if a person is exposed to noise in excess of 90 dBA for continued periods of time. Young children are especially susceptible to hearing loss. Don't shake a rattle too loudly!

Many household tools, lawn and garden equipment, and automotive stereos pose a serious hearing loss hazard. Lawn mowers can produce noise measured at 120 dBA. Chain saws have been measured at 125 dBA. A high powered car stereo can produce sounds in excess of 150 dBA! Operation of lawn mowers, circular saws, etc. without hearing protection can cause permanent noise induced hearing loss. Remember, hearing damage is cumulative. Each time you operate a circular saw or lawn mower without protection you run the risk of damaging or killing more and more hair cells.

Homeowners, DIYr's and factory workers have an assortment of hearing protection devices from which to choose. Disposable foam earplugs, reusable silicone ear inserts, and full coverage ear muffs do a fantastic job of reducing noise levels in the inner ear. The noise reduction is actually measurable and printed on the packaging.

Believe it or not, when inserted into the ear canal properly, inexpensive disposable foam earplugs can offer the high levels of noise reduction. They can actually cut down excess noise by as much as 15 dBA. Combining earplugs with ear muffs will reduce noise levels even further. However,the cumulative noise reduction rating is not the sum of the two devices. It is usually 125 percent of the sum of the two.

You should urge your husband to select and use ear protection equipment. Have him try all different types. Ask him which one feels the most comfortable. Hearing devices that provide the most comfort will generally be worn most often. I happen to prefer the silicone ear inserts used in combination with padded ear muffs. Do not underestimate the seriousness of hearing loss. My wife constantly has to repeat things to me because of my problems. Hopefully it is not too late for your husband.

These are the Etymotic earplugs I used while target shooting. I found they were well suited for that activity. I know for any building noise, they'd work well.

Author's Notes - November 1997:

Several days ago, I used the simple foam ear plugs while operating a loud leaf mulcher. I was amazed at how well the foam plugs blocked sound.

Prior to using the foam plugs, I had used some silicone ear plugs. The foam plugs did a much better job of sealing the air passageway in my ear.

Be sure you try to find the foam plugs before your next LOUD job!