Synthetic Deck Sealers

DEAR TIM: I have a wood deck, boat dock and picnic table that needs to be cleaned and sealed. I also just purchased new outdoor wood furniture. I have been less than satisfied with previous wood sealant products. Does my new wood furniture require immediate sealing or should I wait a month? What is the best way to clean and prepare wood to be sealed? Are certain wood sealants better than others? What is the average life span of a high quality wood sealant? Pat - Meredith, NH

DEAR PAT: I can absolutely understand your frustration with wood sealant products. There are many products all claiming that they are top performers. The sad truth of the matter is that many of them are inferior products. Fortunately, advancements in coatings technology has produced some synthetic penetrating water repellents that will make you quite happy.

wood deck

Wood that is used to construct boat docks, decks, handrails, picnic tables or any other horizontal outdoor surface is subjected to the absolute harshest weathering conditions. Unprotected wood absorbs enormous amounts of ultraviolet (UV) radiation from the sun. UV rays can actually blast apart lignin within wood. This is the glue that bonds wood fibers together. Rain water and snow melt can pond or pool on flat boards. This water can easily be absorbed by the wood causing it to swell. When the sun or wind dries the wood, it shrinks. The shrinkage forces cause cracking, twisting and warping. Conventional pressure treatment chemicals used in treated lumber will inhibit rotting but will not stop these other destructive and unattractive phenomena. New wood needs to be sealed immediately. Water and sunlight begin to destroy it as soon as it is exposed to these elements.

Cleaning a wood surface prior to sealing is very important. The cleaning will remove any dirt, tree sap, algae or mildew. It also will remove the decaying wood fibers destroyed by the UV rays. All of these things prevent the wood sealer from adhering or penetrating into the wood.

Do not use chlorine bleach (sodium hypochlorite) to clean your wood! It is a very strong oxidizer that will remove the natural color from your wood and destroy the lignin in the wood. In addition, chlorine bleach is highly toxic to any vegetation surrounding your deck. A neighbor of mine systematically tortured and killed a large tree next to her algae covered patio. She achieved this by using chlorine bleach to remove the green haze. Beware! Many off the shelf deck cleaners contain chlorine bleach. Study the product label before you buy. If you see the words sodium hypochlorite, this means the product contains chlorine bleach.

handrail split

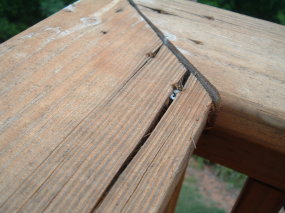
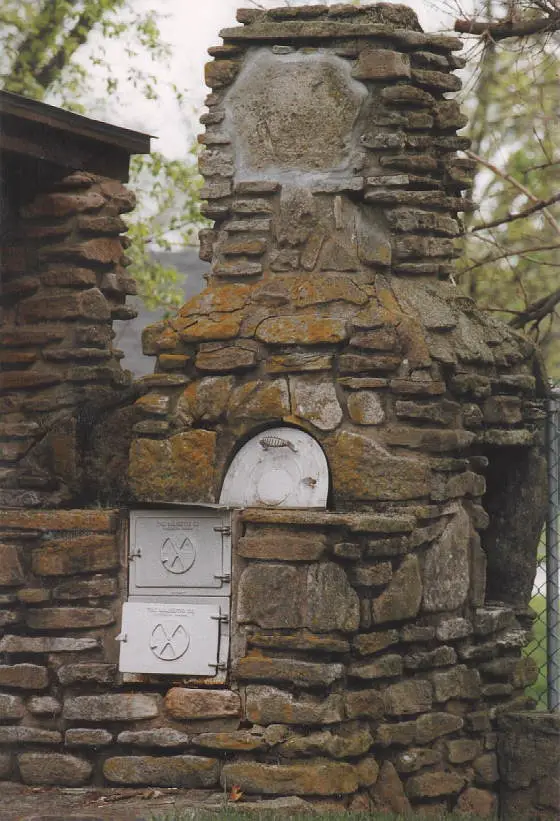
This handrail split was probably caused by not drilling a pilot hole for the screw. The screw had a sharp point and can easily create a tiny split in the wood when it is fresh and wet with treatment chemicals. But as the wood dries, the crack quickly widens as the moisture leaves the wood. Pilot holes will prevent cracks and splits in almost all cases. PHOTO CREDIT: Suzanne Wieczor

A much better cleaner for wood decks is  oxygen bleach. This product will not remove the natural colors from the wood nor will it harm vegetation. Oxygen bleach kills mildew and removes algae and dirt from wood decks and other outside surfaces. This product is a powder that dissolves in water. Thousands of people use oxygen bleach each year to clean exterior wood surfaces.

Oxygen bleach should be used with moderate caution if it is used to clean redwood. It can sometimes darken the wood. This happens most often with freshly cut redwood that has a low pH value. As redwood ages its pH value becomes more neutral and the oxygen bleach will not darken it. The California Redwood Association recommends using oxalic acid to clean redwood.

Dirty and weathered cedar can be cleaned with oxygen bleach. The results are spectacular. Once clean, the cedar looks like new. Oxygen bleach also helps to remove mill glaze from new cedar. It opens wood pores so that your deck sealer will penetrate more deeply.

When selecting a sealer, try to choose one that is a penetrating water repellent. Look for ones that are formulated using synthetic oils and resins. Some are available that are water based. You can often clean and seal your deck the same day if you use a water based product. Choose a sealant that is moderately pigmented. The pigments in sealants do a great job of reflecting and absorbing harmful UV rays.
EB015 Cleaning & Sealing Deck eBoo Cover

Many popular sealants found at paint stores and home centers contain natural oils like linseed oil, vegetable oil, animal fats, and tung oil. These natural oils are actually food for mildew and algae. To stop the organisms from feasting on sealants that contain natural oils, manufacturers have to add mildewcides and fungicides. Unfortunately, these chemicals are often water soluble. Rain and snow can dissolve them and wash them away leaving a deck unprotected. That is one reason why many decks turn black or green in just six to nine months. Synthetic penetrating water repellents do not contain food for mildew and algae.


Message from Tim:

Years ago while researching a column about cleaning decks, I discovered the wonders of Oxygen Bleach. It is perhaps the 'greenest' cleaner I know of as it uses oxygen ions to break apart stains, dirt and odor molecules. There are no harsh chemicals, and it works on just about anything that is water washable.

I decided to create my own special blend using ingredients made in the USA. In fact, the raw materials in the active ingredient are food-grade quality registered with the FDA. I call my product Stain Solver. I urge you to use it to help clean your deck surfaces. You will be amazed at the results!


Avoid using sealers that are film forming sealants. Beware of products that contain acrylic resins, varnish resins or alkyd resins. Look on the label for these ingredients. These products do not readily soak into the wood. They leave a film that will eventually peel. If the film peels unevenly from your wood surfaces, it will become a maintenance nightmare. You will have to strip your wood in the future to add additional sealants.

Be sure to follow the instructions on all cleaning and sealant products. Hot, sunny, windy days can be the worst time to apply certain products. Some synthetic water repellents will last up to 3 years if you apply them according to instructions. I have a synthetic water repellent on my front porch that is two years old. It looks practically like new. There is no sign of mildew or algae growth whatsoever.

Brick Barbeque

brick stone bbq

If the mortarless brick idea doesn't light your fire, then try copying this gorgeous rock barbecue with the fancy chimney!

DEAR TIM: I have had it with my portable backyard grill. The steel parts constantly rust. I was thinking of a more permanent solution. Do brick barbecue grills really work? Are there desirable design features? Is it possible for an average homeowner to construct one? If not, what other options are available? Molly - Whippany, NJ

DEAR MOLLY: Your frustration is understandable. You spend hundreds of dollars on a fancy barbecue grill only to see rust develop within 2 - 3 years. Several years ago I attempted to lift the lid from my grill. The lid stayed put while the handle went up in the air. The rust particles added a little unwanted texture and flavor to those hamburgers!

The old fashioned brick barbecues do work. In fact they work quite well. If you decide to go this route, you do not have to limit yourself to brick. Fieldstone, creek rock or any masonry material that is locally available should do well. Because barbecues do not generally develop extremely hot temperatures, many masonry materials will not disintegrate from heat stress.

If you are ambitious and have good hand-eye coordination you can attempt to construct your barbecue from brick, stone and mortar. This project will require a significant steel reinforced foundation. A 12 inch thick footer that is at least 6 inches wider than the barbecue at all points will be necessary. Be sure to pour the footer absolutely level.

The overall height of the barbecue cooking surface should fall between 28 and 32 inches. This is a comfortable level for most people. The grate that holds the charcoal should not be permanently mounted in the masonry work. In fact, you should construct ledges at different levels below the cooking grate. The charcoal grate should be allowed to rest on ledges that are 8, 11 and 14 inches below the cooking grate. This will allow you to adjust the cooking fire temperature and intensity.

As you construct the barbecue grill, be sure to allow for platforms on each side of the cooking surface. These areas should be at least 16 inches wide and deep if at all possible. This will allow you to place cooking utensils, platters, sauce and spices immediately adjacent to the cooking surface. Be sure to incorporate a small brick or stone ground level patio in front of the grill as well. This paved surface will allow you to prepare your favorite meals mud free.

For those who might be challenged by laying brick or stone with mortar, you can construct a brick barbecue without mortar in a single afternoon. Using approximately 350 solid brick you can dry stack them to create a 32 inch deep by 40 inch wide by 29 inch high barbeque grill. This grill needs only to rest on a level 4 inch thick steel reinforced concrete slab. When finished, it sports an adequate 16 inch wide by 32 inch deep platform for cooking plates and utensils. If you mix brick of different colors, you can create a very unique conversation piece that will be the envy of your neighbors.

Do you have a rich relative who recently mentioned you in their will? If so, you should absolutely consider purchasing a stainless steel barbecue grill. These superb cooking devices will absolutely stand the test of time and will not rust. The low end models start at $1,000 assembled and delivered to your door. You can easily spend up to $3,000 for a deluxe stainless steel grill.

If you have natural gas or propane available, consider installing an underground gas line to your new grill. Have a qualified plumber install a gas log lighter kit just below the charcoal grate in your brick barbecue. This convenience will enable you to easily light your charcoal fire. You will never have to taste lighter fluid fumes again. The stainless steel grills come equipped with fancy quick-connect flexible gas hoses. Just attach these to the end of the gas line and light up!

Air Conditioning Performance – A/C for Older Houses

Air Conditioning Performance

Air Conditioning Performance

DEAR TIM: I have been experiencing poor performance from my central air conditioning. Some rooms are uncomfortably warm late in the afternoon while other parts of the house are chilly. What might be causing this? Is there an easy solution? Also, is there a way to install central air conditioning in my mother's house that currently has hot water heat? She has no existing ductwork. Monica Emporia, VA

DEAR MONICA: There could be many reasons why your air conditioner is not delivering ample amounts of cool air to each room. Some of the solutions are easy to implement. Others may require new equipment or duct changes. Finding the cause of your discomfort may take some effort.

The cooling process within your home involves three primary pieces of equipment: a coil within the ductwork near your furnace or air handler, a powerful fan within the air handler and a condensing unit. The condensing unit is often the loud machine that is outside your home. All of these components must be sized accurately. If they are not, you don't stand a chance at cooling your house during the hottest parts of the day.

Heating and cooling professionals can easily calculate the amount of heat gain your house experiences during the summer time. They measure the size of the house, the amount and types of windows you have, thickness of wall and ceiling insulation, orientation of your house and many other things. These numbers tell them how many "tons" of cooling do you need to adequately cool your home. You need to have a professional perform a heat gain calculation on your home. Once you know how many "tons" of cooling you need, you can see if your existing equipment is sized properly.

If your equipment is sized correctly, it may be low on refrigerant. This is a simple thing for a professional to check. The inside coil near your air handler/furnace may be dirty as well. A dirty coil can not cool the hot air adequately as it rushes through the ducting system.

The air filter within your system may be dirty. Dirty air filters slow the amount of air that passes over the indoor coil. If the powerful fan within your furnace / air handler is belt driven, it may not be spinning fast enough. The belt that runs between the electric motor and the fan may have loosened. Slow fan speeds simply do not allow enough cool air to enter the rooms.

Your ductwork design may also be to blame. The rooms that get warm may not have enough supply ducts. These rooms can be starved of cool air. The rooms that are chilly may have ducts that are too large. The main duct that leaves the furnace may not be sized properly. It should get smaller in size as branch ducts leave this duct to go towards each room. An air conditioning professional can check this for you as well.

Great news! You mother's house can be air conditioned. In fact, any older home, condominium or other structure that does not currently have large ductwork can be cooled with central air conditioning. There are companies that make systems that employ smaller flexible piping that can be snaked through existing floor and ceiling joist spaces. Often the cooling equipment can be placed in an attic space or adapted to fit in-place equipment.

The air that travels through the small tubes enters each room through round outlet holes. Attractive cover plates mask their locations. The systems can operate very quietly. If installed by an experienced professional, you will not hear any noise as the cool air flows past you on those uncomfortable summer evenings. There are other benefits. You can filter your air during the winter months. A heat pump system will allow you to take the chill off indoor air during spring and fall months. This will allow your mother to reduce the amount of time her boiler operates.

If you want to learn more about air conditioning and heating units, I suggest you buy a copy of Refrigeration and Air Conditioning Technology. This book is a little technical, but it has many very important facts and guidelines dealing with the fundamental and practical applications for understanding and maintaining all heating and cooling systems. The color illustrations and photographs are terrific. It is designed and written for students in vocational - technical schools and colleges, community colleges and apprenticeship programs. The content is in a format for students or for those working in the field who want to increase their knowledge and skills. "Do-it-yourselfers" will find this text valuable in understanding and maintaining heating and cooling systems.

Cork Floors are Captivating

cork flooring

Cork Flooring - The Perfect Floor? These cork flooring planks were used to cover the steps as well as the entire recreation room that’s at the bottom of the staircase. PHOTO CREDIT: Tim Carter

Cork Flooring Wears Like Iron - It Absorbs Sound

DEAR TIM: I am looking for an exciting flooring material for my home. I am not interested in carpet, hardwood or ceramic. I have looked at the new floating floor systems that feature laminate products but they just look like wood and cheap marble. Is there an alternative material? I need a product that is long-lasting, easy to care for, and unique. Can you fill the bill? Stanley - Baker City, OR

DEAR STANLEY: I can tell you who will fill the bill for you my friend. They are the harvesters who strip the bark from the cork trees in several Mediterranean countries. I only wish I could be with you when you visit a store that carries cork flooring. You are not going to believe how attractive and durable cork flooring can be. A friend of mine has had cork flooring in his kitchen for nearly 40 years. It is beautiful!

Cork flooring is very likely the most environmentally friendly material I know of besides wool carpeting. Just like wool, cork is a renewable resource. The bark is stripped from the cork trees approximately every 10 years. The average life span of a cork tree is 150 years. Imagine how much cork can be harvested in that amount of time!

cork flooring

If you desire a flooring product that is not only quiet to walk across but will help muffle room noise, cork must be considered. There are over 100 million air cells or pockets per cubic inch of cork. These built-in shock and sound absorbers make it an excellent sound-deadening material. Perhaps this is one reason cork was used in the main library in my own hometown.

The cork flooring can be purchased in glue-down 12-inch by 12-inch tiles or it can be purchased in planks that feature a tongue and groove interlocking feature. The planks almost all have a fiberboard core and are installed in nearly the same fashion as the new laminate flooring products. You simply glue the edges and tap the pieces together. The cork planks become one giant piece that floats across the subfloor. The square tiles are glued down with conventional adhesives.


Author's Note: If you want a cork floor of your own and want to see how easy it is to install, you should consider buying my Cork Flooring eBook. It has wonderful step-by-step color photos and easy-to-follow directions. I guarantee your satisfaction!


You can purchase cork with factory-applied clear acrylic, urethane, or wax finishes. The acrylic finish is very similar to that used by the pre-finished wood floor companies. Under normal residential use, it can withstand nearly four years of foot traffic. Urethane finishes are the same as you might apply to a traditional hardwood floor. You can renew acrylic or urethane finishes by simply applying a periodic coat of clear floor urethane. Urethane finishes tend to be harder than acrylic finishes.

The cork flooring products come in a variety of patterns and colors. The texture of the flooring is extremely unique. Try to block the image of a bulletin board from your mind. Some cork flooring patterns resemble burled lumber. Other cork products have a speckled appearance. Trust me, it is very smart-looking. The coloration of cork ranges from light to deep brown. It can also be purchased in a brilliant white color.

Cork, because of its closed-cell nature, is unaffected by moisture. However, some cells on the bottom and top of flooring pieces get opened up during the sanding process. Water that enters these open cells can cause cork flooring to discolor and/or expand. If you can avoid floods or massive quantities of standing water, kitchens and bathrooms are excellent places to use cork flooring.

If you decide to use the new laminate flooring materials, be sure to consider using cork underlayment beneath them. This is how the laminate flooring products are installed in Europe. The cork underlayment takes away the hollow sound these floors sometimes exhibit.

The people who own your home 50 - 75 years from now will thank you. Cork can easily last that long. If you don't believe me, just visit the First Congregational Church in Chicago, Illinois. The cork floor you will walk on was installed in 1890!

Fiber Cement Siding – It’s a Serious Contender!

fiber cement siding

Fiber Cement Siding

DEAR TIM: My husband and I are building a new home. The style will blend both clapboard siding and stucco-like panels. Wood rot is a major concern. Vinyl siding does not appeal to me whatsoever. I am looking for an attractive solid material that will not rot and is wind and fire resistant. I grew up in an old home that had a hard weather resistant siding material. Is this material still available? Jill - Manitowac, WI

DEAR JILL: This is your lucky day! Your parent's home was very likely covered with a fiber cement product. The technology is nearly 100 years old. Cement fiber siding products are still manufactured today. New styles, sizes and products will allow you to cover the exterior of your new home with a rot, fire, wind and insect resistant material. Fiber cement siding products represent some of the most exciting exterior products available to homeowners today.

At the turn of the century, a French company was making fiber cement siding and roofing plates that had a unique ability to resist "fire, frost, acid and ants." This material was exported worldwide in vast quantities from Australia to America. There are thousands of 80 and 90 year old homes in my own home town that still have this original material on their exterior walls and roofs. Fiber cement building materials have a proven track record for resisting rot - that is a fact!

Years ago, the fiber cement products incorporated asbestos as the fibers. Soon after it was discovered that asbestos posed a serious health hazard, cellulose was substituted as the fiber material. Portland cement, ground sand, additives and water make up the balance of this wonderful building product.

Fiber cement building products are attractive. You can choose from a variety of clapboard siding styles that have embossed wood grained texture or smooth finish. The siding products come in a multitude of widths that will permit you to have clapboard exposures ranging from 4 inches up to nearly 11 inches. The stucco panels you desire are also available. You can purchase those with a smooth, stucco, or vertical rustic groove appearance. The rustic panels have a wood grained finish with recessed vertical channels spaced at 4 or 8 inch centers. You can even purchase fiber cement soffit panels to finish the underside of your roof overhangs.

The fiber cement products are complimented by numerous weather resistant vinyl trim and ventilation accessories. The trim pieces are used at inside and outside corners, where soffit pieces abut against one another and as a flashing material when the stucco panels abut one another. The vinyl trim pieces are extremely tasteful. They must be used if you want your fiber cement siding and stucco panels to block wind driven rain and snow. The vinyl trim readily accepts paint.

Fiber cement siding planks offer a unique capability. Because of the rigid nature of the product, you can blind nail many of the available sizes. Each clapboard is nailed approximately 1 inch from the top edge. The next overlapping piece hides the nails below. This allows you to produce a siding job free from the polka dot appearance nails cause on many traditional wood sidings.

Your color options are virtually unlimited. 100 percent water based acrylic paint grips cement fiber products exceptionally well. The siding planks and stucco panels also accept stains. Because the cement products do not expand and contract to the extent that wood does, paint rarely peels and blisters.

I intend to use cement fiber siding on the next house I build. Aside from its many positive features, it is competitively priced. Fiber cement siding in my region costs slightly less than the highest quality vinyl siding. Redwood siding costs two and one half times more than fiber cement siding. Fiber cement products are ideal for remodeling or repair jobs as well. I urge you to give it serious consideration.

Author's Notes :

March, 1998

I just received an e-mail from Bev A. in Atlanta, Georgia. She indicated that fiber cement siding in that region "... had a warped look to the exterior when regarded (viewed) from the side." This condition could be an installation defect and/or a workmanship error. The wavy appearance might have been caused by using wall studs that were not crowned properly (all humps pointing the same direction) or using wall studs that had a huge range of crowns or none at all.

She called the manufacturer and was told that the siding had probably not been backprimed. The point is this. Manufacturer's instructions must be followed by the builder. You need to make sure that this happens. Sure, I know you expect the builder to do this, but here is a possible instance of where a builder might have taken a shortcut. The Web now allows you to gather good information about critical aspects of home construction. Take the time and educate yourself and you will be rewarded with a great job! Be careful out there!

August, 2008

Richard Huddle of Wauseon, OH, emailed with this additional information.

"Tim,

I really enjoy your newsletter. I hope you enjoy your new home in New Hampshire.

I am writing regarding the "painting fiber-cement shingles" article in this issue. I am not sure what is meant here by "fiber-cement shingles" but I do know that at one time the fiber used in fiber-cement shingles was asbestos. I work in the asbestos removal industry and see this material regularly. At one time it was manufactured by Johns-Manville and sold under the trade name "Transite". These shingles are very hard and brittle and are textured to resemble a cedar shake shingle. If you flip an loose one with your finger it will ring just like a fine china plate.

As long as the shingles are in good condition they provide excellent protection to the house exterior. Just caution your readers to be sure and DO NOT scrape the shingles with a paint scraper or wire brush. The shingles can be washed with soap and water and scrubbed with a nylon or natural bristle brush. Do not use a power washer since the water pressure may dislodge asbestos fibers. As long as the shingles are maintained with a good coat of paint they pose no hazard and provide additional insulation to your house in addition to being fireproof."

Rick

March, 2010

George had a serious problem with a home inspector. Read about his issues in the March 31, 2010 Newsletter.


The Walk Through Inspection – It’s Work!

Walk Through Inspection

These are some of the tools you will need to do a good walk through inspection of your new home.

DEAR TIM: My mother's new residence will be completed soon. Prior to the transfer of title we must participate in a walk through inspection with the builder. It is our responsibility to point out any defects at this time. How important is this inspection if we have a strong warranty? What types of things should we look for? Bert - St. Cloud, MN

DEAR BERT: Yikes! Do not underestimate the enormity of this very important inspection. The walk through inspection is the benchmark by which all future problems will be judged. Without a complete and thorough written documentation of conditions at the time of the walk through inspection, you may find it difficult to prove if a problem persisted before your "strong" warranty expires. Be prepared to spend a minimum of 3 to 5 hours checking out your mother's new home. It is a wise investment of time. Don't hesitate to take photographs during this inspection. They may be worth their weight in gold at a later date.

The walk through inspection report can be a life saver if for some reason you become entangled in a dispute with your builder at a later time. The written report will demonstrate whether or not the builder addressed problems or defects that you pointed out at the time of the inspection. A thorough inspection may identify major structural problems in their infancy. A small foundation, wall or floor crack that gets progressively larger over a period of time can be mentioned in the report. If a crack is not visible, this should also be mentioned. The report allows you to quantitatively identify movement of structural members. If there is no mention in the report of any condition, it will be your word against the builder's - trust me on this one.

I would begin the inspection inside the residence. Do not become distracted by conversation with the builder or his agent. The inspection should proceed on a room by room basis. Walk over all areas of each room listening for floor squeaks, pops or other rubbing noises. Look for defects in the wall and paint finish. Identify cracks or the lack of cracks in all corners. Open and close all room and closet doors and windows. Be sure the doors and windows latch and lock correctly. Take a mirror with you to make sure the tops and bottoms of all doors and windows have been painted or sealed. Unsealed wood doors can loose their warranty and warp.

While in the bathrooms, operate all plumbing fixtures. Look for leaks under toilets or inside cabinets. Operate the stopper controls in sinks and tubs. Make sure water does not leak past the stoppers. Insure that toilet paper holders, towel bars, and other accessories are secure and in place. Operate all bath fans and heating devices. If you have a whirlpool tub, fill it first and turn it on.

While in the kitchen open and close every cabinet door and drawer. Pay attention to the fit and finish of all cabinet elements. Operate all of the appliances. Dishwashers have been known to leak because of faulty installation! Be sure that the refrigerator door swings the correct way. Check that the counter top is mounted securely by trying to lift it at various locations.

Locate the inspection certificates for the electrical, plumbing and mechanical inspections. Ask for a copy of the Certificate of Occupancy (CO) or its equivalent from the building department. Operate all of the security alarms and/or smoke detectors. Be sure that all of the electric circuit breakers are marked. Plug a tester into all electrical outlets. Operate all switches.

While inspecting outside, look for positive drainage. The ground surrounding the residence must slope away from the house. Six inches of foundation should exist between any soil and any siding materials such as wood, brick or stucco. Operate the garage door. Make sure the mailbox and house numbers are in place. Pay attention to humps in the roof or roofing materials. Identify any cracks or surface defects in sidewalks, patios and driveways.


How would you like a 200-plus item Walk Through Checklist that tells you what to look for as you perform your inspection? Would you be interested if I told you I developed this document and it comes with a 100% Satisfaction Guarantee? Oh, and would you like to have it in your hands less than 3 minutes from now? I can do that too!


Once the inspection is complete agree upon a time frame when all defects will be corrected. Note this on the report. Have the builder sign the inspection report. Provide him with a copy the next day. Withhold as much money as the law and your conscience will permit until all items are completed to your satisfaction. Do not destroy the walk through inspection report! Keep it in your safe deposit box. It may come in handy at a later date.

If, for some reason, you feel uncomfortable about performing this inspection, I suggest that you contact an experienced home inspector These people are used everyday by people who purchase pre-owned houses. They are fully capable of performing a detailed walk through inspection. A professional home inspector will have an up-to-date errors and omission insurance policy. Be sure to ask for a certificate of insurance before you hire your inspector.

Deck Building – Ground Level

Ground Level Deck

Deck Building - Ground Level

DEAR TIM: I have a problem. I want to build a deck close to the ground. In some places the joists will actually touch the soil. I realize that the joists can't just rest on the ground. How do I support them? Should I install a vapor barrier under the deck? What are the best decking fasteners to use? Steve K. Waverly, Iowa

DEAR STEVE: Ground level decks are known to stump many people. Everyone seems to have the image of the beam supported by posts stuck in their head. I have seen people who actually buried a wood beam and posts in the ground to support the deck joists. Guess what? They were on the right track. They simply took the wrong turn.

Deck joists need to have a firm support system not unlike those within your house or on a traditional deck. Beams are used for this purpose. A beam is simply a level or nearly level structural member that will support the joists with minimal or acceptable bending. Beams are most often made from wood, steel, and reinforced concrete. A ground level deck, in my opinion, can be most easily supported by using steel reinforced concrete grade beams.


Building a deck? Make the best decisions with my helpful and thorough Deck Installation & Repair Checklist. I offer a 100% Money Back Guarantee.


You will need a minimum of 2 grade beams, if your deck will not be connected to your house. The beams will be parallel with one another. They can be at the ends of the joists or they can actually be tucked under the edge of the deck for appearance sake. The beams must be at the same height and in the same plane so that the deck is level once finished. It is very wise to consult with a residential structural engineer. This qualified person will tell you exactly what you need.

EB015 Cleaning & Sealing Deck eBoo CoverGrade beam are usually constructed by digging a trench at least 8 inches wide. A beam depth of 10 inches is generally suitable. The bottom of the beam will be supported by the soil. If you live in an area where the soil freezes each winter, you must dig piers at the bottom of the beam trench. The piers can be 10 or 12 inches in diameter and spaced no further apart than 6 feet. The bottom of the piers must extend to the frost depth in your area. Your building department will be able to tell you how deep to dig. Be sure that you flare the bottoms of the pier holes. The flared bottom serves two purposes. It increases the surface area of the pier helping to distribute weight. The flared bottom also makes it very difficult for the frost to heave the beam and the piers.

It is often necessary to use form boards at the top portion of the grade beam. The forms allow you to easily level the beams. The concrete for the piers and the beams is poured at the same time. Once the concrete is poured halfway up the height of the beam you need to install two 5/8 inch diameter steel reinforcing rods. These rods should be placed no closer than 2 inches to the side of each form board. You can immediately cover these rods with the remaining concrete. It is now time to install 8 inch long by one half inch diameter anchor bolts. Place a bolt one foot in from each end of the grade beam. Then install them on 6 foot centers along the length of the beam. Be sure that at least 2 inches sticks up in the air. These bolts will be used to hold down a treated 2 x 6 wood plate. Your joists will be attached with nails to this wood plate.


Message from Tim:

Years ago while researching a column about cleaning decks, I discovered the wonders of Oxygen Bleach. It is perhaps the 'greenest' cleaner I know of as it uses oxygen ions to break apart stains, dirt and odor molecules. There are no harsh chemicals, and it works on just about anything that is water washable.

I decided to create my own special blend using ingredients made in the USA. In fact, the raw materials in the active ingredient are food-grade quality registered with the FDA. I call my product Stain Solver. I urge you to use it to help clean your deck surfaces. You will be amazed at the results!


Do not install a vapor barrier beneath the deck. Rain may collect on the plastic and become a breeding ground for insects. Water vapor from the soil can cause severe cupping of the decking. The underside of the decking boards readily absorb moisture that evaporates from the soil. The drying action of the sun and wind dries the top side of the decking. The dry top and wet bottom of the decking produces the internal wood stresses that cause cupping. To minimize cupping you should seal all sides and edges of the decking before you attach it to the joists. If you can afford to seal the decking on the underside with two coats, do so.

I suggest that you give serious consideration to stainless steel nails or screws for your decking. They cost a little more but they will never rust. Be sure to use nails that are ring or spiral shanked. If you decide to use stainless steel screws, look for ones that have smaller heads and a unique knurled shaft that eliminates the need for drilling pilot holes. This feature will save lots of labor.

Asphalt Shingle Roof Leak Locations

shingles close up

Asphalt Shingle Roof Leak

DEAR TIM: Eight years ago, I purchased an existing home. I have no idea how old the standard three tab asphalt shingles are. At this point, I do not have any leaks. How can I tell when my asphalt shingles are worn out? Where do leaks on shingles originate? What causes shingles to fail prematurely? Can minor repairs extend the life of my roof? Beverly K. Minneapolis, MN

DEAR BEVERLY: It sounds to me that you are already fairly roof savvy. Not many people would know the correct name for their shingled roof. A three tab shingle refers to the common shingle that many people have. Its distinguishing characteristics are vertical slits that are usually 5 inches long between each shingle tab. These vertical lines are usually offset by 6 inches on each course of shingles.


These vertical slits between shingles are the first place I look for deterioration. It is not uncommon for leaks to develop in the top 3 inches of each vertical slit. This area is the weak link in a 3 tab asphalt shingle roof. Because of the way your shingles were designed and overlap, only a single shingle thickness stands between your plaster ceiling and the worst rainfall in this narrow 3 inch part of the slit. A majority of the surface area of your roof has at least two shingle thicknesses protecting you from rain and snow. Some areas of the roof have 3 layers!

The deterioration in this area often manifests itself by missing granules. These are the ceramic color coated pieces of crushed rock that protect the asphalt from the destructive ultraviolet (UV) rays of the sun. If exposed to sunlight, the asphalt within the shingle begins to rapidly deteriorate. I have my own idea as to what causes granule erosion in this narrow slit area. I actually believe it is caused by the force of the water that drips from the shingle above. The granules at the top of each slit receive twice as much energy from the dripping water as the granules just one half inch away on either side of the slit. Over time, this makes a big difference.

You should also look for cracks on the shingle tabs and within each slit. The cracks often happen as the asphalt gets older and loses the oils that give it its flexibility. The oil loss can result from overheating or poor quality asphalt from the get-go. Not all shingle manufacturers use the highest quality asphalt. Shingles can overheat if your roof ventilation is sub-standard or non existent. The presence of soffit ventilation and upper roof ventilation allows cooler air to replace the super-heated air that bakes the underside of the shingles.

If you discover missing granules in the top of the vertical slits, you can extend the life of your roof quite easily. All it takes is a little time and pieces of 40 pound tin that measure 2 inches wide by 5 inches long. It will also help to have a pair of lightweight leather gloves and a wide, flat pry bar.


Avoid repairing roof leaks yourself! Find a professional using my Roofing Replacement / Repair Checklist. I offer a 100% Money Back Guarantee.


Try to work on the roof when it is cooler. You will become less fatigued, and the shingles will be easier to work with. Using the flat pry bar, pry up the corners of the shingle tabs at the bottom of slits that have missing granules. Align the piece of tin so that the 5 inch length is parallel with the 5 inch long vertical slit. Center the tin strip and slide it up under the two shingle tabs on either side of the slit. Continue to slide the tin strip up until the top one half inch disappears under the shingles above. The friction of the shingles will hold the metal strip in place. There is no need for caulk, roofing cement or nails. If you bent the shingle tabs up too much, the sun will most likely flatten them within a couple of days. Do not do this work on a cold roof. You can fracture shingle tabs.

Glass Blocks

glass block window installation

A large window like this needs to be installed one glass block at at time. It's a huge window. Copyright 2018 Tim Carter

DEAR TIM: I am intrigued with glass block. I would like to install this material in my basement windows, a bathroom window and as a room partition. Do you think an average homeowner can successfully tackle projects like this? How can I obtain the highest level of security for ground level windows? Can you offer any installation tips? Susan P., Franklin, PA

DEAR SUSAN: I share your fascination with these unique building blocks. Glass block products are very cool. They seem to be a timeless building material. I have installed glass block windows in 100 year old houses with little harm to the aesthetics. To date, I have not heard a complaint from my past customers concerning their usefulness, utility or durability.

I know that you will be able to handle the basement windows with little or no assistance. Depending upon the type of glass block window you choose, you may be able to do the bathroom window as well. The room partition is a job for a professional.

My guess is that you might actually use a combination of materials for your upcoming projects. Traditional glass block maybe the best choice for your basement window project. You can purchase solid glass block that are extremely difficult to shatter. These solid glass blocks will stop bullets fired from .357 magnum pistols!

Your bathroom window may be an excellent location for the clear or tinted lightweight acrylic block. You can actually get acrylic glass block windows that open and close. These will allow you to get plenty of air into these havens of mold and mildew. The acrylic blocks are available in clear, peach, rose and blue.

Your room partition may end up being constructed with thin glass block or the lightweight acrylic blocks to minimize the weight on your floor. The acrylic block can be ordered in widths and heights up to 9.5 feet in either direction. Traditional glass block will allow you to build large sized partitions as long as your mason installs the necessary hidden reinforcement steel.

Installing glass block panels in a basement window is very simple. The trick is to remove the old window and frame. Many cities and towns have fabrication shops that will make the glass block windows for you. You can specify the style of block and order it with little windows, dryer vents, combustion air inlets and other accessories built right into the block window. Your task is to simply install the entire unit at once.

Once you have got your new basement windows on site, check to make sure they will fit. A one half inch gap between the glass block window and frame is preferred. There is nothing worse than tearing out an existing window only to find out your new window will not work. To complete the installation you will need a bundle of wood shims, a small level, cement mortar, a small trowel and a sponge.

Place two one half inch shims about 3 inches in from the bottom corners on the bottom ledge of the opening. Apply your mortar mix to the bottom of the window ledge. Don't cover the shims with mortar. Tilt the window into position. Insert two shims between the top of the window and the opening. Tap them until they are slightly snug. Use the level to make sure the window is plumb. Check to make sure the gap around the window is uniform and that the window is not twisted in the opening.

Once you are satisfied with the position of the window, install the cement mortar around the sides of the window and the foundation. Once the mortar hardens in about 2 hours you should be able to gently remove the shims without disturbing the mortar or the window. Install mortar in the bottom holes. The top gap will be filled with foam expansion material and silicone caulk. Wipe the glass block with a damp sponge to remove mortar smears.

The Perfect Hideaway – Pocket Doors

pocket door

POCKET DOOR - This is the pocket before it has been fitted with a removable jamb. The pieces of jamb are cut so there is but 3/16ths inch of space between the edge of the jamb and the sliding door. The jambs pieces are screwed to the rough frame with decorative brass screws. This feature allows you to remove the jambs easily in the future.

DEAR TIM: I am considering the use of pocket doors for an upcoming project. However, a neighbor of mine has several problems with their pocket doors. Their doors routinely jump from the track and rub the frame. Is it easy to adjust pocket doors? Is there a restriction to the type of door design one can install? Can you install double pocket doors like the ones in my parents' old house? Ed T., Kittery, ME

DEAR ED: You are very wise to consider the use of pocket doors. They offer many advantages. Pocket doors were very popular at the turn of the 20th century. They enjoyed renewed success in the 1950's. I believe their time has come again! I have installed nearly a hundred smooth operating doors in the past 10 years. Every customer has been delighted. I think your neighbor's pocket door problems can be traced to inferior hardware and possibly some critical installation errors.

New housing and room addition construction prices are rising each day. It is vital to make use of every square foot of finished living space. A regular pivoting hinged door can steal nearly 10 square feet of floor space. They require a wasted area for the storage of the swinging door when it is opened. Paintings or pictures can be hidden behind an open door. Unsightly baseboard or hinge door stops become a necessity to prevent door knob holes in walls. Pocket doors eliminate all of these problems.

The secret to smooth, trouble free pocket doors lies in the frame and hardware used to hang the door. A box shaped track and tricycle hangers with nylon wheels are a must. These items prevent the doors from ever jumping off the track. Thin studs that create the hidden pocket for the door need to be wrapped with steel on three sides. The steel prevents warping of the thin furring strips. This warping may be one of the reasons your neighbor's door rubs when it goes in and out of the pocket. The steel also prevents drywall nails or screws from penetrating through the thin studs. Deeply driven fasteners can scratch the door as it opens and closes.

Quality pocket door hardware allows you to easily make adjustments once the door has been installed and trimmed. In many cases all you have to do is temporarily remove one side of the top door jamb. A good carpenter will install these with small head trim screws. Once the piece of wood is removed, you can gain easy access to the door suspension parts. Often you simply flip a lever and the door will separate from the rollers. Adjustments are made quickly and easily with standard tools. It is entirely possible to complete the entire adjustment process in as little as 10 - 15 minutes.

There is virtually no limit to the type of door design you can install in a pocket door frame. Flush, 6 panel, 15 lite glass, and even frosted or hammered glass full lite doors are possible. Many standard pocket door frames and hardware will support doors that weigh up to 125 pounds. With an optional kit you can install a 200 pound door! Double acting pocket doors are no problem. You simply install two pocket door frames that point at each other. I intend to install this setup in the study of my next Victorian house.

Pocket doors are excellent choices for people who use canes, walkers or wheelchairs. If you install a 36 inch wide pocket door frame with a hidden bumper and a U shaped handicapped door pull, you can achieve a finished opening of just over 32 inches. This will allow easy passage for those individuals who are challenged with swinging doors.

Your painter will need to cooperate during the installation process. All hidden edges and surfaces of the doors must be painted or sealed before the carpenter installs the door into the pocket. High humidity in houses can cause unprotected doors to twist and warp. If you seal the hidden edges and use the best hardware and frame, your pocket doors will be highly coveted by your friends and neighbors!