Cracks Need Urethane Caulk

caulk gun and cartridge

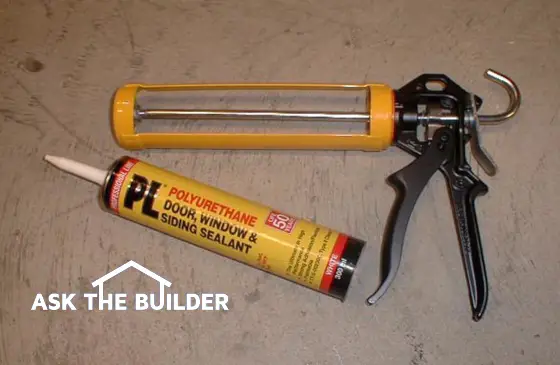
You are looking at a professional caulk gun and a tube of superb urethane caulk. Urethane caulk is sticky, but once it cures it is as pliable as an Olympic gymnast.

DEAR TIM: I have some difficult caulking jobs around my house. One happens to be some wood wainscoting in my kitchen. Each winter cracks appear between the pieces. I also need to caulk numerous exterior cracks adjacent to brick, wood and aluminum. Are there any high quality caulks that can withstand lots of movement? While I have your ear, just how do you create really smooth caulk joints? Sarah G., Bloomington, IN

DEAR NANCY: Ouch! I'll tell you how to get those smooth joints if you would just let go. Seriously, you have entered the caulk market at a superb time. There are some new caulks that have been introduced to the residential marketplace that will work well for all of your jobs.

The caulk industry has seen ever increasing improvements in many of its products. Traditionally there have been two major groups of caulks: solvent based and water based. New federal anti- pollution regulations regarding the release of volatile organic compounds (VOC) found in solvent based caulks have caused the caulk manufacturers to shift their attention and improve the water based products. Water based caulks now have better flexibility and better adhesion on smooth surfaces. Many residential caulks are made that meet or exceed commercial caulking specifications.

Probably the most exciting new residential caulk is urethane based. The product has been around for nearly 50 years but until recently, it was used primarily by commercial contractors. If you like silicone caulk, you are going to love urethane caulk.

Urethane caulks cure chemically just like silicone. They exhibit very low shrinkage, have a high tear resistance, are paintable and have excellent water resistance. Silicone caulk users know that paint and silicone simply don't mix. Once you let a urethane caulk cure, you can paint over it with no problems.

The urethane caulks stick very well to just about any surface. Urethane caulks will fill cracks next to vinyl siding, cedar (or any other wood), aluminum, and any masonry material. The urethane caulks adhere well because of a cross-linking chemical reaction. As the caulk cures, it actually interlocks with the material it is applied to. Water vapor fuels the chemical reaction. Beware, urethane caulks don't discriminate. If you leave some excess on your moist skin, the caulk will stick to you too!

One minor drawback of urethane caulks is their cure time. If you intend to paint a urethane caulk, you need to let it dry for at least 2 - 3 days before coating it with a water based paint. A 7 - 10 day drying period is necessary for oil based paints.

Keep in mind that caulks are a maintenance item. Even those that are advertised with extended warranties (20, 30 or more years) can fail. You need to periodically check exterior caulked seams to see if they are still in good shape.

The art of caulking is fairly simple. Most people are handicapped from the start because of an inferior caulk gun. Inexpensive caulk guns found in most paint stores and home centers have a low pumping ratio action. This means that lots of caulk is released with each squeeze of the gun. Professional caulk guns release far less caulk with each full trigger stroke. This enables you to more easily control the flow of caulk from the gun.

The tip of the caulk tube should be cut slightly smaller than the size of the crack being filled. Apply the caulk so a slight amount of excess mounds up over the crack. Gently slide your finger over the fresh caulk. If excess caulk begins to overflow around your finger you need to wipe this excess caulk into a rag. Water based caulk joints can be touched up with a damp rag or tile grout sponge for that professional look.

Related Articles: Urethane Caulk Benefits, Urethane Caulk Companies

Column 257

Shovels and Spades for Women

shovels and spades

See that shovel second from the left? It is stainless steel! (It was the Tool of the Week in the July 26, 2017 Newsletter.) Oh my, it is a fantastic shovel. The long tool in the center is the very cool post hole digger.

DEAR TIM: I have numerous outdoor digging chores scheduled for this spring. I am a fairly petite woman and struggle with regular shovels. Are there shovels and spades available that are made more for women than men? What shovels are best for digging certain holes? Are there specific shovels and other digging tools that will minimize the work required for digging jobs? Pauline B., Spicewood, TX

DEAR PAULINE: Your back, leg and arm muscles are going to thank you this spring once you purchase some of the awesome new shovels, spades and post hole diggers that I have recently seen and tested. Some of these tools are so beautiful, it is a shame to get them dirty. I believe the explosive growth of gardening as a hobby is responsible for the abundance of new, excellent digging tools that are now available.

Why struggle with regular sized shovels!

I know why you struggle with regular sized shovels. Most are designed for use by construction workers that probably weigh 100 pounds more than you and have considerable upper body strength. A standard sized shovel has more surface area than a smaller tool. This increased area produces lots of extra friction when you try to cut through soil. For example, the blade of a flat spade I commonly use measures 7.25 inches wide by 12 inches long (87 square inches). It weighs in at a hefty 5 lbs. I recently purchased a beautiful border spade for my wife, Kathy. Its blade is only 5.5 inches wide by 9 inches long (49.5 square inches). It weighs in at slightly less than 4 pounds. Kathy looks like a well oiled machine when she digs effortlessly in the garden with this tool!

You can also buy small round point shovels that will allow you to quickly slice into moist soil. In fact, I had to recently purchase a new one for Kathy since I ruined her original one. The smaller round point shovels are excellent tools for mixing concrete and mortar in wheelbarrows.

What finishes are available on smaller shovels?

The smaller shovels are available in all sorts of finishes. You can get super durable high carbon steel, epoxy coated steel, and even rustproof stainless steel! The wooden handles are works of art. You can purchase gold stained Maine ash wood handles or ones made from beech. If you care for these tools by cleaning and drying them after each use, they will last for generations.

Get the right shovel for the right job!

I have seen people struggle when they dig holes for plants or dig drainage trenches. The trick is to use different tools for different parts of the job. If you want to dig a square or rectangular hole with straight sides and a flat bottom, then you will need a round point shovel and a flat spade. A round point shovel has a semi-circular blade that comes to a pointed tip. It requires the least amount of force when slicing into soil.

A flat spade tends to have a blunt tip. If you use this type of tool to make initial cuts into the ground, you may struggle. A flat spade works best to shape the sides of a hole once the majority of dirt has been removed with a round point shovel. Flat border spades work great for cutting and removing sod, especially if you sharpen the tip with a metal file.

What is a post hole digger?

If you need to dig post holes this spring, you may want to consider using a revolutionary post hole digger. Traditional post hole digging tools have two long cutting blades that resemble round point shovels. You drive the tool into the ground and then operate the handles much like a scissors to gather and remove the loosened soil. Because of the tool design, the top of the hole gets bigger as you dig deeper. These diggers also have a hard time capturing dry or sandy soil.

You can now buy a new post hole digger that works much like a mechanical backhoe. The tool has a single cutting blade. Once it is driven into the soil you operate a wooden handle that rotates the cutting blade 90 degrees. The cutting blade scoops and cradles the soil as you pull it from the hole. This new post hole digger allows you to maintain a consistent hole diameter from top to bottom.

Related Articles:  Shovel & Digging TipsShovels / Spades for WomenGarden Tools and Shovels

Mentioned in the July 30, 2008 Newsletter.

Column 258

Wet / Dry Vacuums Have Grown Up

wet/dry vacuum

DEAR TIM: It is time for me to purchase a new wet/dry vacuum cleaner. My older model created a dust cloud when I would try to vacuum fine dust particles. Can you safely use wet/dry vacuums to pick up large quantities of water? What else is new? Mark S., Union City, TN

DEAR MARK: Don't tell me about older wet/dry vacuum models! Mine also blew dust, even with a new filter. I was most upset at how the painted metal drums would rust within a year's time. It is my pleasure to announce that you can now buy any number of wet/dry vacuums that put older models to shame. Gone forever are the days of rust and dust!

I feel the biggest advancement you will find is the increased horsepower (hp) of the motors. 4, 5 and 6 hp motors are common. It is even possible to purchase a 6 hp vacuum with a detachable blower head. This vacuum does double duty. It functions as a standard vacuum but transforms itself with a flip of a lever to a hand held 200 mile per hour (mph) blower you can use to quickly blow leaves, dust and debris from your garage or any other surface. Industrial or professional wet/dry vacuums are available with even more powerful vacuum motors.


Virtually every high quality wet/dry vacuum made today comes with a high strength plastic drum. You will find that the capacities of these are enormous when compared to older models. 12 and 16 gallon capacities are commonplace. If you need more than that, you can purchase ones that have 20 or 25 gallon drums. Years ago it was a struggle to empty liquids from the drums. Just about every model I have seen is equipped with a drain valve. There is no need to remove the top and tip the tank. You just open the valve and the collected water drains in a flash. One vacuum is even equipped with a built-in pump. You attach a garden hose to the vacuum and as you suction water, it pumps the collected water to a remote location.

Modern wet/dry vacuums are equipped with excellent filters. Most models are outfitted with pleated paper single stage rinseable / reusable filters. If you intend to vacuum fireplace ashes, drywall dust, or other fine material you may want to upgrade to a two stage filter. These filters prevent the interior dust storms you and I used to create with older wet/dry vacuums.

New wet/dry vacuums are made to ingest large volumes of water. High quality vacuums are equipped with automatic shutoff devices that tell you when the drum is filled with water. If you intend to vacuum water only, you should remove the filter. Never use a wet/dry vacuum to pick up any flammable liquid or water that is contaminated with solvents. Vapors can ignite and create an explosion or fire.

Always keep the filter clean and in place when vacuuming dry debris or damp debris. You can easily ruin the powerful electric motors if you use a wet/dry vacuum without a filter in place. It is always a good practice to have a new filter in stock in the event you can't adequately clean your existing one or it wears out. Filters are inexpensive and a clean one will prolong the life of a high quality vacuum practically indefinitely.

When you turn on your new vacuum, you will be shocked at how quiet the new models are. Some models come with mufflers that allow you to direct the motor exhaust in several directions. You will also be amazed at the expanded line of accessories. You can purchase inflater nozzles for beach balls, air mattresses, etc. Special narrow car nozzles fit into tight places, hose grips reduce hand fatigue, and hairpin turn gutter elbows allow you to blow leaves from gutters while standing on the ground!

Some wet/dry vacuums can be hooked up to a nifty dust collection network for home shops. Clear rigid plastic pipe allows you to see dust and wood chips scoot to the vacuum. This is an excellent way to keep dust to a minimum if you use a table saw, miter box saw, radial arm saw, sander or any other woodworking tool indoors. I can assure you that the person who dusts around your home will appreciate this feature!

Click here to watch a video on two types of wet dry shop vacuums.


Related Articles:   Wet Dry Vacuum ComparisonWet Dry Vacuum - Your Household WorkhorseKeep Wet Dry Vacuum Filter CleanFilters - Dust Collection - Air Filtration

Column 259

Sheet Vinyl Woes

sheet vinyl manuals

These are actual flooring installation manuals published by the flooring manufacturers. They contain specific step-by-step instructions as well as exact products to use that compliment the flooring.

DEAR TIM: Three months ago, I had a new sheet vinyl floor installed. There are stains that seem to be deep within the vinyl and several seams are cracking. What's more, there seem to be spongy spots in the floor when I walk in certain places. The flooring was installed by a friend who is a serious do-it-yourselfer. He installed a new underlayment. Do you think the problems are his fault? How can I keep the floor looking great? Sandy J., Roseburg, OR

DEAR SANDY: Uh Oh... You are probably going to have to make an uncomfortable phone call. There is a very good possibility that all of your current problems can be traced to workmanship or unapproved material usage errors. I think you are going to be forced to do an autopsy on the floor to discover the source of the problems.

Sheet vinyl flooring requires a tremendous amount of skill and training to be installed properly. The major sheet vinyl manufacturers offer extensive factory training for full time professional installers. In addition, they have detailed instruction guides and specifications for each of their flooring products. If these are not followed you can have all of the problems you described and more! I'll bet that your friend made several critical boo-boos.

There are numerous types of underlayment that can go beneath sheet vinyl. Some are approved while others are not. These products must be completely clean and free of any ink, factory stamps, paints, etc. before they are covered with the vinyl. Sheet vinyl manufacturers publish what underlayments can be used with their products. You must check the list because not all approved underlayments can be used with each sheet vinyl!

The spongy areas of your floor might be traced to sub-standard or unapproved underlayment. I have seen many lumber yards sell overlay grade lauan plywood for sheet vinyl underlayment. The only lauan plywood that is accepted by most sheet vinyl manufacturers is Type 1 - Exterior Grade. A better underlayment would be poplar or birch plywood with a fully sanded face and exterior glue.

Poor quality underlayment can have hollow spots in between the veneer face layers. This might be the cause of the sponginess in your floor. Other poor quality underlayments contain water soluble colored extractive chemicals. These dyes might be causing your deep seated stains.

Sheet vinyl discoloration can sometimes be traced to the use of unapproved adhesives. Chemicals within the glues that hold down the vinyl can leach into the flooring and cause color changes and stains. Old adhesives left on existing floors can also react with new adhesives and create stains. The sheet vinyl written instructions tell you what adhesives should be used and what old adhesives require complete or partial removal. Poor quality floor mats, heat from floor registers, radiators and direct sunlight can also discolor new sheet vinyl flooring.

The seam failure you are beginning to experience can be traced to numerous errors. Sheet vinyl products require very specific seam adhesives and sealers. Off the shelf seaming products often are unapproved. The right products can almost always be found at the location where the sheet vinyl is purchased.

To keep a new sheet vinyl floor looking good, you must keep grit and dirt off the floor. These particles react with foot traffic to make human sandpaper. Regular vacuuming or dust mopping must become part of your housekeeping schedule. Wet mopping will also do a great job of removing grit if you frequently change the rinse water.

Companion Articles:   Common Sheet Vinyl Problems, Sheet Vinyl Defects

Column 260

Play Sets – Fun and Dangerous

261 backyard wooden swing set play set

DEAR TIM: I have decided to build an outdoor activity center for my children. After looking at some of these at stores I am really discouraged at the installed price. I have a small budget of $900.00 and am quite handy. Do you think I can build a nifty play set for this kind of money. Do you have any design guidelines that might help me? Becky T., Winchester, KY

DEAR BECKY: I think you can tackle a project like this if you have some general construction knowledge. You will need an extra hand from time to time, but for the most part, it is a one person job. If you build a play set like mine, you will be able to stay $100.00 under your budget. I feel it may take you about 30 to 50 hours worth of work to build what I have in mind.

The key to this project is to think small. Kids love spaces that are in proportion to their bodies. Their arms, legs, and hands are smaller too. You need to keep this in mind as you build ladders, railings and other grab bars. Ceiling heights should not exceed 6 feet if you want them to feel comfortable in their new clubhouse/fort/vacation home.


I built a combination swing set with slide, first story playhouse with a second story lookout post/fort that my kids are continuing to enjoy. The fort has a steep pitched shingle roof with a plexiglass panel skylight. A climbing rope and trapeze beam are also part of the structure. A fireman's pole is going to be added this spring.

The swing set design needs to be right if you want safety and lots of glee from your kids. The bottom of the beam that supports the swings should be a minimum of 10 feet from the ground. This provides a generous radius for each swing. Use medium grade zinc chromate coated chains that will easily support the weight of an adult. The chains need to be connected to eye bolts that pass completely through the overhead beam. Do not use lag type bolts as they can pull out over time.

My playhouse measures four feet wide by six feet long. It has an interior ceiling height of 6 feet. There is one door and three windows in the walls. Directly above the playhouse is a second story lookout post/fort. It is built just like a deck with a 36 inch high pickets spaced on 5 inch centers. You access this fort outpost by scaling a vertical ladder attached to one side of the playhouse.

The lookout post/fort is covered by a shingled roof that protects the defenders from direct sunlight, rain, or incoming mud balls. The bottom of the roof is just four feet from the lookout post floor. This allows occupants adequate protection from the elements and projectiles.

The four foot wide end of the second story closest to the swing set opens to a platform at the top of the slide. This small platform is one step down from the second story level. It is surround by a safety railing. This same platform is the access point of the future fireman's pole that will be opposite the slide.

The large 4 by 6 inch beam that supports the three swings is supported at one by the playhouse structure. The other end is supported by two angled A frame 4x4 inch posts that are sunk into the ground. If you don't desire to dig angled holes for these posts, you can prevent the bottom of the 4x4 inch posts from spreading apart by using two horizontal 2x6 members that are through bolted into the bottom of the A frame posts.

Be sure to through bolt all structural connections. Lag bolts can loosen over time and pull out as kids stress the structure with swinging, climbing, and jumping. Periodically check the nuts and bolts and tighten as necessary. Always check in the spring before play activity begins and once again in mid-summer. You will be surprised how wear and tear will loosen play set hardware.

Author's Notes: June, 1999

When this column appeared in April, 1999 in the St. Petersburg Times, it was seen by one of the nation's top experts on playground equipment. He quickly contacted me to tell me that the set I had built for my daughter had glaring safety defects - some of them that could cause a fatality. One problem that I knew of from the beginning involved the slide. It does not have a radius landing and simply dumps the rider into the dirt. This can cause cracked or bruised tail bones! I simply could not afford a safe plastic slide when I built my play set. I recommend you purchase an approved slide if you build a set.

I had developed a set of plans of my own play set that I was selling to the public. Based upon the expert's comments, I suspended the sale of the plans. Even though the plans included all sorts of caveats and disclaimers, I didn't want to be held responsible in the event a child got hurt.

The Builder Bulletin that follows this column contains several photos of my play set - green algae and all! If you decide to build one, be on notice that the play set contains all sorts of hazards!

Every time a kid gets hurt or killed on even the safest play set, the experts learn more. A new weak link in the design is exposed. If you don't want to take any chances, then I suggest you don't let your kids play. You can also wrap them head to toe in 3 or 4 layers of sheets of plastic that have sealed bubbles of air (of course they will then suffocate or die of heat stroke). The point is this: Having fun usually involves risk. If you build my play set or one like it, then be prepared to roll the dice.

Column 261

Geothermal Energy

GeoExchange System

Your heating and cooling system loves outdoor conditions where the air temperature is in the 50 - 55F range. Imagine if your HVAC system had access to these temperatures 24 / 7? It can if you bury a large plastic loop in the ground and this loop is filled with a liquid that then connects to your HVAC system!

DEAR TIM: I am looking for an environmentally friendly heating and cooling system for my home. My fuel choices are limited and it appears I have to use a heat pump to achieve my goal. Are there other options out there? I have heard that you can use heat from the soil around you house. Is this true and if so, how is it done? Veronica T., Tifton, GA

DEAR VERONICA: You are right on target. If you combine the technology of heat pumps with the nearly constant temperature of the soil under your lot, you can save money and help preserve resources for our future generations. In my opinion you are a perfect candidate for the expanding use and acceptance of geothermal heat pumps. What's more, the Environmental Protection Agency and the Department of Energy are currently promoting this technology through their Earth Comfort Program.

Geothermal heat pumps transfer heat to and from the soil under your lot. Conventional heat pumps do the exact same thing except they transfer the heat to and from outside air. If you decide that a geo-thermal system makes sense for you, there will be no unsightly and noisy outdoor equipment.

Geothermal systems are quiet and compact. Often all of the equipment fits into one metal cabinet. When operating in the heat mode, the temperature of the air floating from the ducts is around 110 F. This is much more comfortable than the "cool" air that tends to waft from traditional heat pumps.

One type of geothermal system extracts or sends heat to the soil via a buried loop of durable plastic tubing. The tubing contains a liquid similar to automobile anti-freeze. Because soil temperatures below the level that frost penetrates often are constant through the year, it is not uncommon to find soil temperatures near 55 F in most parts of the USA. This is very nearly the perfect temperature at which heat pump technology will operate at maximum efficiency.

When you need heat in your home the solution inside the closed loop delivers heat from the soil to the indoor unit. The heat is extracted from the closed loop solution. Once the loop solution gives up all of its heat, it is pumped through the loop. The chilled solution begins to get warm again as it travels back towards the house. When you need air conditioning in your home the exact same process happens, only backwards. The heat transfer is extremely efficient. During the heating season you might experience savings of 40 to 70 percent and savings of 30 to 60 percent while using your air conditioner. Dense clay soils work best for geothermal heating and cooling systems. Dry, sandy soils transfer heat poorly. Wet, sandy soils are superb!

The buried loop in the soil can be done one of two ways. Relatively shallow horizontal loops can be used on larger lots with greater surface area. Vertical tubes are drilled for small lots. If you have a medium or large pond on your property that does not freeze solid in the winter you are really in luck. You can simply place the plastic tubing loop in the bottom of the pond for maximum heat transfer possibilities. Some people adjacent to large underground water sources can tap this resource and use it to heat and cool their homes.

The geothermal mechanical equipment used to heat and cool your home costs virtually the same as conventional heat pumps. You will experience added costs when you install the underground plastic loop piping. The current average cost is about $900 per ton of cooling load. This works out to about an up-charge of $3,150 (3.5 tons of cooling) for the average home.

Because of the deregulation of the electric utility industry many utility companies are offering rebates or other incentives to homeowners who choose to use geothermal heating and cooling systems. Existing homes as well as new ones can adapt to this eco-friendly technology. New technology is being developed that allows the loop piping to be installed with minimal disturbance to existing lawns and landscaping.

Author's Notes:

November, 2003

Geothermal systems work best in moderate climates. For example, those who live in the boundary between the South and the Midwest can really extract savings from the soil. People who can place the loops in a large pond or lake can also achieve maximum benefits. The soil type, depth of winter frost penetration and assorted other factors will determine how much money a geothermal system will save for you over the long haul.

Tim Carter

Column 262

Log Homes

Log home - log cabin

DEAR TIM: My husband and I have made up our minds. We are going to have a log home built for us. We don't want this dream home to turn into a nightmare. What should we look for in a log home builder? How do you know if the logs are OK? Do log homes need to be treated with preservatives of any type? Help us make a good choice! Lisa M., Moss Bluff, FL

DEAR LISA: Congratulations on your exciting new project! There is nothing quite like a log structure. They telegraph all sorts of feelings to me. Among them are warmth, stability, strength, simplicity and practicality. A log home built in the right setting will be the envy of everyone in your community. Tens of thousands of people move into new log homes each year. You are going to be in fine company.

Log homes were not the first homes built by Europeans who settled in the USA. The first arrivals off the boats made crude huts and slept in roofed over pits. The industrious Germans and Scandinavians who settled the Delaware Bay region in 1638 built the first American log structures. Many people just like you have recognized that log homes make wonderful primary residences. You get the feel of being on vacation year round when you relax at night in a cozy log home.

When you select a builder for your log home, you want experience. Find a builder who has built log homes for at least three to five years. Make sure that he purchases his log structures from a manufacturer who is a member in good standing of one of the national or international log home associations. Get the names of three or four past customers - especially ones who have been living in their homes for at least 3 years. Visit these people and ask if they have had any problems and how they were addressed. You do not want to be a lab rat for a first or second time log home builder.

The most important aspect of log home construction is the actual design. Logs that are protected from sunlight and rain by large overhangs and porches will resist rot and decay. Logs need protection from splashing water caused by roof runoff or snow melt. Pay attention to prevailing winds. Try to orient the structure so that the most frequent wind driven rains have a hard time hitting the logs. Hold the foundation out of the ground and slope the earth rapidly away from the home. This will keep the lower logs away from moist soil.

The logs that are used for your home must be certified and graded. The different associations created standards in 1984 that allow independent third party companies to sort and classify logs into three basic categories from lowest to highest: utility grade, wall grade, and header grade.

The structural design of the home is critical as well. You must make sure that the builder and the log home manufacturer know about log shrinkage. Log homes built with green logs can shrink dramatically. They can actually drop up to four inches for every eight feet in height. Kiln dried logs are not immune to shrinkage. They can shrink about one and one half inches in eight feet. 60 percent of this shrinkage is due to moisture loss while the remainder is due to the weight of the entire house bearing down on the logs. Windows and doors can bind and floors can heave if the builder does not compensate for this movement. In extreme cases window glass can break or pop unexpectedly.

The exterior of your log home needs to be treated with a penetrating synthetic resin water repellent. Avoid using water sealants that contain natural oils like linseed, vegetable, or tung oil. These products are food sources for fungi, mildew and algae. Be sure that the sealant you choose is not a film forming product. These will peel over time and the restoration cost will quickly make you feel like you have entered the Twilight Zone!

If you are looking for a book with invaluable information on tools and materials, detailed drawings and insightful text then Building the Alaska Log Home is it! This 175 plus page book is packed full of glossy color photographs and illustrations telling you everything you need to know about building with logs. Designed for the neophyte cabin builder, this book details, step by step, construction of log buildings, complete from turning trees into logs to the first fire in the wood stove. This book will really help you decide if a log cabin is right for you.

If you are like me you have dreamed of owning a home away from home. Imagine when the weekend comes, hanging out in a hammock at your own lakefront cottage, boating, antiquing in a charming little town, or whiling away an afternoon on your ocean-view porch. If you have imagined these things you need Better Homes and Gardens Second Home. This inspiring volume will help you turn your second-home fantasy into the real thing. This book will take you through tours of gorgeous homes to see how other people have created their own great escapes. Even though this book addresses cottages, there are expert tips on everything from real estate shopping to building, remodeling, and decorating that can help you. There are hundreds of spectacular color photographs of beautiful homes and great locations.

If you are looking for a great book on energy efficient homes then Energy - Efficient Houses is the book for you. This book is a collection of past articles that appeared in Fine Homebuilding magazine. Wait until you check out the glossy color photographs! They are spectacular. They are crisp, colorful and show you details that are tough to describe with words. The articles show how designers and builders have incorporated energy - efficient considerations into their creations. You'll see energy - efficient houses built for hot climates and cold climates, wet climates and dry climates. You'll find houses built in both traditional and modern styles. You'll learn about materials and techniques that can make a major difference in how much energy it takes to make your home comfortable. In, short, you'll discover that the house of your dreams can be built as an energy - efficient home. You must buy a copy of Energy - Efficient Houses, a neat hardback book published by Taunton Press.

Companion Articles: Log Homes & Sealers, Log Home Associations

Column 263

Fiberglass Doors Not Maintenance Free

DEAR TIM: I plan to install a new front door for my home. The fiberglass doors have my attention. They seem to have the look and feel of wood doors but not some of the problems. Some sales people tell me that the doors are basically maintenance free. Is that true? Can you really stain the doors to make them look like wood? What happens if the finish fails? Tony D., Leesville, LA

DEAR TONY: You are on the right track when you choose to use a fiberglass exterior door. They have captured all of the positive qualities of different doors and packaged them into one product. Wood doors appeal to most people because they are so beautiful. Unfortunately wood combined with water usually produces warpage, rot, and premature finish failure. Anyone who owns a fiberglass boat will tell you that you can soak your new door for days and have no problems whatsoever.

stain and finish kit

This is a typical stain and finish kit. It is easy to apply the stain and clear protective coating. But be sure to follow the manufacturer's recommendation for follow-up care. Photo credit: Therma-Tru Corporation

There are few totally maintenance free building products. Vinyl siding requires periodic washings because of air borne dirt, colorized concrete pavers can fade over time, and even your new fiberglass door finish will fail. Accept the fact that maintenance will have to be done. The trick is to keep up with it so that you can avoid a painful total finish restoration job.

The stains and clear coat finishes that are supplied with just about every fiberglass door are similar to regular oil stains and clear urethanes that are used on wood doors. Sunlight, rain and exposure to the atmosphere eventually degrade clear finishes on any surface. The fiberglass door manufacturers are continuing to work hard to produce clear water based top coats that offer excellent protection. Some are now available with 5 year finish warranties.

To extend the finish on your gorgeous fiberglass door, you need to carefully follow the instructions with regard to finishing the door. As with any coating, you must apply the stain to a clean surface. Use the cleaner provided in your specific finishing kit or an approved off the shelf cleaner. Do not use any other soap or cleaner. You may leave behind chemical components that could be incompatible with the stain and/or clear finish!

Pay attention to the air temperature. Most door manufacturers want their finish products applied when the temperature is between 50 and 90 F. Work in the shade if possible or erect a temporary sun screen so that you are not working in direct sunlight. The stain and clear coat products will be easier to work with. Try to avoid working on windy days. The components may dry too quickly or you will find it is hard to maintain a wet edge.

Be careful to follow the staining instructions to the letter. Some kits require that you wait different prescribed times for light and dark colored stains. Failure to do this can result in a blotched appearance. Usually the stain must dry for several days before you apply the final thin layers of clear coat.

Some manufacturers supply you with a cool fiberglass sample that you clear coat as well. Store this inside your house in a safe area where you can find it. Use it each spring to see how the gloss of the door's clear coat has succumbed to the elements. You need to apply a fresh coat of clear coat once the door feels rough or the gloss begins to dull. If you allow the clear finish to fail, you will be stuck with a massive restoration project.

If restoration becomes necessary, you need to remove the old finish with paint and stain removers. Most manufacturers tell you in the original door installation instructions which strippers are safe. You need to be careful as some parts of the door have special primers that can be softened by more than several minutes exposure to common paint strippers. If you allow this to happen, your visions of maintenance free products will evaporate into thin air.

Column 264

A Storage Loft in a Garage

Garage Storage Loft

This loft was built in an afternoon. I can easily move around on it.

DEAR TIM: The past owners of our home built, or I should say threw together, a questionable loft on one side of the garage. Thank goodness it hangs over my husband's car and not mine. He is hoping to build a more professional and sturdy loft on my side of the garage and possibly secure or rebuild the one on his side. We just haven't found any plans or directions to guide him. Help us Obiwan the Builder! Mary P., Streamwood, IL

DEAR MARY: The previous owners must have built that loft on the dark side of the garage. It is also possible that they were construction challenged as I tend to call it. In any event, I can help you build a superb garage loft similar to the one at my own home. It does a swell job of capturing all of the flotsam and jetsam that usually drifts from one corner of my garage to the other.

Garage lofts work well because they make use of the void space that exists over the hood of most cars. Typically you can build a 5 or 6 foot deep loft on the back wall of a garage that will not interfere with the windshield of your car. If your garage ceiling height approaches 9 or 10 feet in height, you can end up with hundreds of cubic feet of excellent storage space.

I constructed my loft as I would any exterior deck project. Because my garage ceiling height is 10.5 feet and I am short (5 feet 8 inches ), I was able to construct a loft that I can actually walk beneath. This is a great feature but it is not necessary in all situations. Believe me, the extra space you gain in the loft will more than offset the few times you have to stoop to go under a lower loft.

You begin the project by determining the height of your loft. Using 3/8 or one half inch diameter lag bolts, attach a 2x6 ledger board to the rear wall of the garage. Use a lag bolt at each wall stud and make sure the bolt penetrates at least 2 inches into the wall stud. Do not over tighten as you can strip the wood and create a poor connection.

Place the loft joists at 16 inches on center and have them project out from this ledger at a 90 degree angle. Use standard joist hangers and special heavy duty joist hanger nails for this job. Do not use roofing nails with joist hangers. They are not structural nails and the loft can fall apart if the nail heads pop off or the nail shafts shear off. High quality joist hanger and framing connecting manufacturers make these joist hanger nails. 3/4 inch thick standard sub floor plywood makes a great loft floor. Metal angle irons with holes can be used to construct a nifty pipe storage rack that is suspended beneath the loft.

garage storage loft

I used angle irons with holes to make a handy pipe storage rack. It is high enough so I can just walk beneath it.

The opposite end of the floor joists are supported by metal joist hangers that are attached to a beam that runs from one front corner of the loft to the other. This beam may be two 2x6's nailed together or two 2x8's. If your loft width or the spacing between 4x4 posts is greater than 8 feet, I would definitely use the 2x8's. This beam is through bolted to 4x4 posts that run continuously from the floor to the ceiling. Through bolts are ones that have threaded ends and use a nut and a washer to complete the connection. You can purchase very nifty metal post bases that allow you to connect the 4x4 posts to the concrete floor using an expansion anchor that is drilled into the concrete floor. Place the posts so that you will not hit them with your car.

Your existing loft can probably be salvaged. The key items to look at are the type and spacing of the lag bolts used at the wall ledger, the type of nails used with the joist hangers and the size of the beam that supports the front of the loft. Be careful of lofts that are suspended from the ceilings. There is a possibility that the roof structure was not designed for these concentrated loads. That is why I prefer to use 4x4 posts that transfer the loft load to the floor.

Companion Articles: Garage Storage - Loft Material List, Floor Plan for Garage Storage Loft, Garage Storage Loft

Column 265

Precast Concrete Foundation Walls

Precast concrete foundation walls are fantastic. They can be assembled in hours, have built-in insulation and wall studs and are strong.

Precast Foundation Walls = Fast Installation

DEAR TIM: A builder in my town has suggested that I use precast concrete foundation walls for my new home. I'm a little skeptical of this new process.

He says the walls do not require concrete footers. They use compacted crushed stone. Do you feel the precast walls are a good choice? Are there any other benefits? Are they code approved? Maria B., Paris KY

Related Content

Waterproofing Foundations Equals Bone-Dry Basements

Poured Concrete vs Concrete Block Foundations - Which One is Best?

DEAR MARIA: If the precast concrete foundation walls this builder is promoting are like the ones I've seen, they may be ideal for your new home. Precast concrete technology has been around for years in the commercial construction industry and only recently has it started to supplant traditional residential foundation construction methods. There are huge advantages in building with precast foundation components.

Free & Fast Bids

CLICK HERE to get FREE & FAST BIDS from local foundation contractors.

Precast Walls Built In Controlled Conditions

Precast Foundation Walls

This is an excellent example of a precast concrete foundation wall system. This one is by Superior Walls. Note how the corners are mitered, the closed-cell insulation and interior wall studs. Copyright 2018 Tim Carter

I have a traditional poured concrete foundation in my own home, but I also was fortunate and had the absolute best foundation company in my town install it. You might not be so lucky.

Here are a few things that can go wrong with a traditional block or poured concrete foundation system. A block foundation hod carrier may mix the mortar too weak. An inexperienced block layer may add water to stiff mortar and weaken it. The block foundation may not have any inexpensive reinforcing steel in it.

Poured foundation walls can have cold seams where one batch of concrete gets hard while the next concrete truck is mired in mud in the middle of the job site. The top of a poured in place foundation wall can be out of level.

If the forms are not checked and braced before the pour, the foundation can be out of plumb and out of square. Many poured concrete walls have no vertical steel in them. Excessively cold or hot weather can harm concrete or block walls as they are built in the field. Rainfall can stop the traditional foundation construction process in its tracks.

Crushed Compacted Stone is Strong

The precast foundation systems solve all of these problems and more. The fact that they do not require a concrete footer does not surprise me.

Virtually every roadway around the word uses crushed stone as a base. Railroad tracks are laid on crushed rock as well. Both of these support far more concentrated loads than the foundation of your home.

If the soil beneath the foundation is weak, the builder can increase the depth and width of the crushed stone. Frank Lloyd Wright used this method to support foundations on some of his works of art.

CLICK HERE to get FREE & FAST BIDS from local foundation contractors.

Precast Walls Built in Factories In Ideal Conditions

The precast systems appeal to me for many reasons. They are poured in controlled conditions in a factory. They use 5,000 pounds per square inch (PSI) strength concrete. Most traditional poured walls use 3,500 PSI concrete.

The precast walls are cured in the factory so they are guaranteed to achieve the intended design strength. The precast concrete walls are poured square. Once assembled your foundation will be plumb, level and square.

Closed-Cell Foam Means Warm Basements - Save Energy

The precast systems have 1-inch, or more, foam insulation built into the walls. This minimizes cold conduction problems in northern climates. Treated lumber nailers are incorporated in the walls as well. There is no need to build an additional wood interior wall if you desire to finish your basement.

Fast Erection Usually In One Day

Perhaps the best feature of a precast system is that it can be erected in most cases in less than a day. Once the crushed gravel base is in place, a crane and experienced crew set the panels like a giant erector set.

The wall panels come in heights from 4 feet to 10 feet. Any shape or size foundation can be built. You can have window or door openings included as well. The panels are bolted together and waterproofed with special high-performance urethane caulks. If you follow the manufacturers' backfill recommendations, you will not have a drop of water enter these foundation walls.

That said, I'd absolutely install a backup traditional waterproofing compound on the exterior to ensure water never enters your basement.

Precast Foundation Walls Meet All Codes

The precast concrete foundations should sail through your building department approval process. The precast system is recognized and accepted by many of the national model building codes. If your building inspector has a problem or has not worked with them before, the manufacturer will assist you in educating the building department in your town.

Photo Credit: Superior Walls

Companion Articles: Precast Concrete Walls, Precast Concrete Foundation Companies, Precast Foundation Wall Illustrations

CLICK HERE to get FREE & FAST BIDS from local foundation contractors.

Column 266