Painting Around Woodwork

Painting Around WoodworkPainting Around Woodwork

DEAR TIM: I have stained oak trim in my home and want to paint the walls an off-white. I have tried using the special blue masking tape to keep the paint off the natural wood trim. No matter what I do, the paint job looks as if an amateur did it. What does one have to do to get crisp paint lines against natural wood trim or even different colored trim? There must be a way! Arthur B., Dearborn Heights, MI

DEAR ARTHUR: You bet there is a way. You need to know a few painting trade secrets, have a special high-quality paintbrush, and possess some decent hand-eye coordination. My guess is that the average person who drinks less than four cups of coffee a day will have a steady enough hand to control the paintbrush.

I have never been a big fan of using masking tape to create a crisp paint line. I have personally seen it used to create the color patterns found on NASCAR race car paint jobs and in the hobby industry, but in residential work many painters simply use skill.

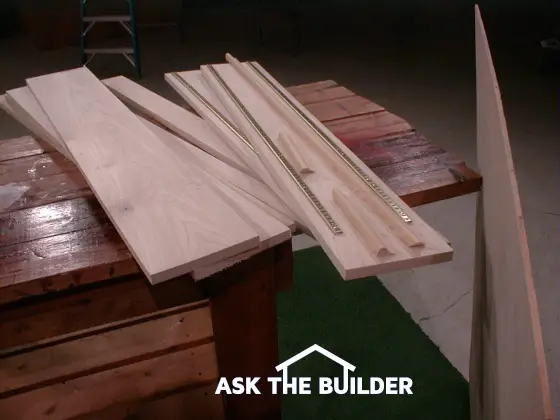
The first thing you need to do is to caulk any small cracks that exist between the back edge of the oak trim and the wall. I prefer to use a siliconized acrylic caulk that is water washable. Take your time and cut the tip of the caulk tube so that the hole through which the caulk flows equals the diameter of a round toothpick. This small hole will allow you to deliver small amounts of caulk into these small cracks.


Is it time to paint your walls? Find the professional painters by using my Interior Painting & Staining Checklist. I offer a 100% Money Back Guarantee.


Apply the caulk in two-foot increments. Once it is applied, strike the fresh caulk with your finger to smooth it out, and immediately wipe the caulked area with a damp sponge to remove excess from the oak trim and the wall surface. It may take repeated strokes with the sponge to achieve this goal. Rinse the sponge as necessary to minimize streaks on the oak woodwork. When you are finished, there should be no caulk on the face or side of the oak trim.

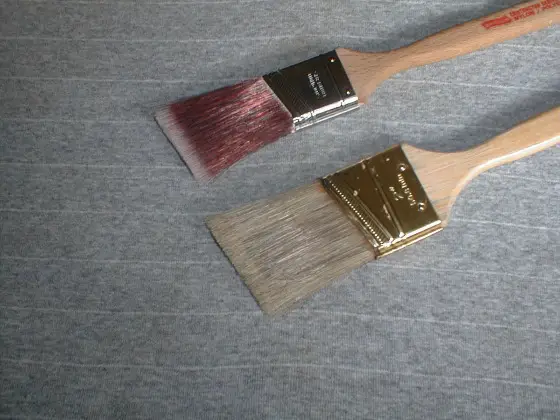
Once the caulk dries you finish the job with a super high-quality paintbrush. Just about every full-service paint store, hardware store, or home center carries deluxe paintbrushes. The paint brushes that professional painters use have the ability to pick up and hold large amounts of paint. The brushes then release this paint in a steady flow. High-quality brushes are usually the most expensive ones you can buy. They are worth every penny.

The most important part of a paintbrush is the stock. All of the bristles in the brush make up the stock. They can be natural bristle or synthetic fibers. The best natural bristle comes from hogs that are raised in China. The color of these bristles is either black, yellow, or gray. Synthetic nylon or polyester fibers come in a range of colors. China bristle brushes are used almost exclusively for oil paints. Synthetic bristles can be used to apply just about any paint.

High-quality brushes have a natural taper when you look at them from the side. The longest bristles will be at the central core of the brush. The shortest bristle in the brush should never end less than one half inch from the tip of the stock. This is very important with respect to paint release and cutting in, the task you are about to do.

stain patio pavers

This is the exact high-quality paint brush I used in the video I did about staining Mexican pavers. The video is just below. Be sure to clean it out frequently and it will last for years. CLICK THE BRUSH NOW to have one delivered to your home.

You also need to purchase a brush that is no wider than 1.5 inches and whose stock has been angle cut at the factory. These brushes are often referred to as sash brushes. The angle-cut sash brush gives you a tremendous advantage when you glide it up next to the oak trim.

Dip the paintbrush into the paint can about one-half inch. There is no need to saturate all of the bristles to cut in against the trim. Gently wipe off the excess paint on both sides of the brush. Make the brush touch the wall one-half inch away from the oak trim. Apply light pressure so the bristles bend slightly and make a gentle curving stroke towards the edge of the oak trim. As you approach the oak, make sure just a few of the bristles in the top half of the brush actually glide up next to the trim. Carefully guide the brush down the edge of the trim for two or three inches and start the process over again to continue. With some practice, you will do just fine.

Column 325

Fiber Cement Siding – Durable and Loves Paint

fiber cement siding

This is a house covered with fiber cement siding. It was built probably in the late 1800s in Laconia NH. It's on Elm Street. That gray siding is fiber cement that could well be over 100 years old. See below for a close-up photo. Copyright 2017 Tim Carter

Fiber Cement Siding TIPS

DEAR TIM: I'm really tired of the ho-hum horizontal lap siding I see on so many new homes today. I'm looking for a unique siding style.

I grew up in an old house that had these tough, thin panels that resembled armor plating. Is this siding still available? What was it and how is it installed? Jenny W., Fresno, CA

DEAR JENNY: I know exactly what you are talking about! There are thousands of homes in my city that sport this incredibly durable siding material. It's simply fiber cement siding.

Related Links

Fiber Cement Installation HACKS

Modern Cement Siding FREEZING Damage!

Fiber Cement Developed in France

The product was developed in France about 100 years ago. In the first place, concrete paving is durable. The French developers modified the concrete making process and produce thin shingles that one could nail to a house.

The good news is that fiber cement siding is alive, well, and flourishing. What's more, several of the 100-year-old patterns are still available.

Free & Fast Bids

CLICK HERE to get FREE & FAST BIDS from local siding contractors who can install cement siding.

Old Fiber Cement Can Be Found In Many Cities

fiber cement siding

This is a closeup shot of thin fiber cement siding on the Laconia, NH house. This siding could well be eighty, or more, years old! Copyright 2017 Tim Carter

I can drive you by existing homes that still have this ancient siding on it. It may be dirty, but it's in excellent condition.

It's important to realize the older siding is still in great shape because the manufacturing process included asbestos fibers in the thin sheets of cement siding. Asbestos is a natural rock product that is unaffected by water.

The Portland cement and fine sand used in the old fiber cement siding are also waterproof. If you're lucky enough to have this old siding on your home or roof, it's the same as having a thin layer of rock protecting you from the elements. It's no wonder it lasts for decades with no wear!

Asbestos in Fiber Cement NOT A Hazard

The asbestos is NOT a hazard in this siding because it's not able to become airborne. It's locked into the Portland cement and sand matrix.

The first thing to remember is you can release asbestos fibers into the air if you cut into the siding creating lots of dust. The asbestos fibers can be contained if you keep water on the siding as you cut.

The water turns the dust into a safe slurry. Bottle the slurry and dispose of responsibly at your local landfill.

Modern Cement Siding

Modern fiber cement siding is a mixture of cement, wood fibers, finely ground sand, additives, and water. It resists, fire, insects, some water, wind, etc.

I have fiber cement siding on my recent home here in New Hampshire and if it soaks up water and freezes, the siding falls apart. I've often wondered why the manufacturers don't use fiberglass instead of the pulpy wood fibers that soak up the water allowing it to freeze and blow up the siding.

You were not far off when you compared the siding to armor plating. Cement siding is very nearly maintenance free. The original shingles developed 100 years ago required no finish.

They had different colored exterior skins. I know of 100-year-old cement siding houses that simply need to be washed to look as good as the day they were built.

CLICK HERE to get FREE & FAST BIDS from local siding contractors who can install cement siding.

Many Old & New Profiles

Fiber cement siding comes in a wide variety of styles. People who like the ho-hum horizontal lap siding that you find boring can find a number of fiber cement products to finish their homes.

The product even comes in large sheets similar to plywood. By all means the shingles you want are by far the most distinctive.

There are three basic types:

  • one with a wavy bottom edge
  • one with a straight bottom edge
  • one with a random notched bottom edge

The random notched edge resembles a thatched wood shingle. All of the shingles have either a combed textured or a wood-grained texture. They are very handsome.

Odd Old Sizes

These old style fiber cement shingles come in very peculiar sizes. The shingles range in height from 12 to 14 and 5/8 inches high and they are either 24, 25 and 3/32, or 32 inches long.

All of them are just under 1/4-inch thick. Not only can they be used for new homes, but they also are made so that they can act as replacement parts for old homes that have broken siding shingles.

They are also excellent materials to use for room additions to old fiber cement sided houses. The owners of those homes end up with an expanded house that matches nearly perfectly with the exterior construction details of the original home.

Easy to Install But Tough to Cut

Fiber cement siding or shingles are easy to install. The new house or room addition needs to be covered with oriented strand board or plywood. This provides a solid nailing surface.

The unique shingles come with factory punched holes that serve as handy alignment guides. It's best to use small headed stainless steel nails as the nail heads are exposed.

Most manufacturers require that asphalt-saturated felt paper or a air and water barrier be used under the siding. Do not use coal tar saturated felt paper.

The oils in this product can stain some fiber cement products. The siding is cut with a saw fitted with an abrasive blade, a snapper, power shears, or it can often be scored and snapped like drywall.

Beware Cutting Dust

The dust created when cutting cement siding is unhealthy. It contains silica. Wear approved dust masks to avoid hurting your lungs.

Paint Loves Cement Siding

Fiber cement shingles and siding can be painted. They hold paint very well because the products do not expand and contract with changes in humidity.

If you buy high-quality paint and follow the recommendations of the siding and paint manufacturers, it's entirely possible that your next paint job will be twenty to twenty-five years from now.

All things considered always wash siding first with soap and water before you attempt to repaint it. You just might be surprised how good it looks!

CLICK HERE to get FREE & FAST BIDS from local siding contractors who can install cement siding.

Column 327

Replace Hollow Core Doors With Solid Wood

kitchen pantry door

This is the door to our kitchen pantry. Look at the next photo to get a close-up view of the raised molding around each raised panel. Now that is a classic detail!

Replacing Hollow Core Doors With Solid Wood

DEAR TIM: I would like to switch out the interior doors in my house. My current doors are hollow core and have a simulated wood grain that I don't care for. The house I grew up in had delightful solid wood doors. I really miss the feel of solid wood doors. Can you still get traditional solid wood doors? If so, what kind of styles and options are available? Tom B. Tampa, FL

DEAR TOM: Welcome to the club! My wife and I also share your feelings about hollow core doors. Hollow core doors are a fantastic product because they allow lumber mills and door manufacturers to efficiently use wood products that used to be wasted. The trouble is these hollow doors are simply not a substitute for a solid wood door.

If you just want the feel of solid wood and the appearance of the door is not too critical, you can buy hollow core styled interior doors that have a solid core. This core is made from engineered wood products that help conserve our wood resources. These are great choices if you wish to help soundproof a bedroom, bathroom, powder room or some other room in a house.

The traditional solid wood doors that were common in houses built 100 or more years ago are still available. Possibly the most popular wood species used is white pine. It is not uncommon to find that these doors have solid wood raised panels. But the structural stiles and rails that make up the vertical and horizontal components that surround the raised panels, can often be different pieces of solid wood that are covered with a high quality veneer skin. Make sure you keep this in mind if you decide to sand a door heavily. Too much sanding will erode the thin veneer.

I recently purchased some gorgeous solid poplar 4 panel doors that look exactly like ones I have refinished in 100 year old Victorian houses. These doors are made from solid pieces of poplar and I had my choice of four different profiles for the raised panels. Different manufacturers have all sorts of door styles to match just about any architectural time period. I had my doors customized for just a small up charge. The door company installed a custom milled piece of molding around each raised panel to give the doors a unique 100 year old look.

To really whet your appetite imagine ordering your new doors and being able to specify that the door company use oak, cherry, maple, mahogany, and knotty pine or several other species. These choices are available and the finished doors will take your breath away.

The cost of the solid wood doors is higher than what you will pay for a hollow core wood door. But you do not need to mortgage the farm to get them. I purchased my customized solid poplar doors with a full 3/4 inch thick solid poplar door jamb for less than $200 apiece. (September 2000)

kitchen pantry door close up

The locksets I put in are authentic as well. They are full-mortise and you use a skeleton key to lock them.

If you really want to make your new doors look like old doors, why not finish them off with authentic hardware as I did? Solid brass square tip hinges are readily available from major hardware manufacturers. Many hinges you find on most modern doors are rounded. This is done because the spinning router bits that are used to create the recessed hinge area simply can't make crisp 90 degree angle corners. You can even purchase accessory kits for the hinges that transform the hinge pins into the old ball style or Victorian chimney style finials.

To complete the transformation, you can also install new high quality old fashioned lock sets that use traditional skeleton keys. This hardware comes with different styled forged solid brass knobs and back plates. You can even get the old fashioned crystal knobs if you like. The total cost for the lock set, back plates and knobs is often less than $90.

Column 328

Finding Replacement Parts – Prepare for the Future!

replacement toilet lid

This silly toilet tank lid can be nearly impossible to find 20 years down the road. It may pay to have an extra one on hand for important toilets that your guests use. Or you may end up having to install a completely new toilet just to get a new lid!

Finding Replacement Parts

DEAR TIM: I have just spent two vacation days trying to locate replacement parts for fixtures around my home. Replacement ceramic tile and a simple toilet tank lid were nowhere to be found. I was able to get replacement parts for an older faucet, but I had to visit three stores to find them. Are there businesses that sell out of stock building materials? Surely there must be an alternative or a way to avoid wasting all of this time. Shelly A. Wilmington, OH

DEAR SHELLY: A similar thing happened to me not too long ago but my search for parts lasted about 2 minutes. I needed to replace a chipped piece of ceramic tile in one of my bathrooms. I went into my basement and found the exact piece I needed. Years of building has taught me to order extra materials and save scrap material when possible. You just never know when it might come in handy.

Replacement parts for many of the fixtures in your house are often readily available when the house is being built. But as time passes, some of these parts can become extinct. Colors and styles change as do peoples' tastes. My in-laws have a pink and gray ceramic tile bathroom. It was the rage 40 years ago when their house was built but finding replacement tile today would be next to impossible. It is unrealistic to expect tile stores to take up valuable stock space with tile that is no longer popular.

Some cities and towns do have shops that specialize in used and salvaged building materials. I am fortunate where I live. There are at least three businesses that have a wide variety of unusual old building supplies. One of them even stocks panes of glass that are over 100 years old. I know because I used to sell it to them when I would remove it from old houses that were getting new replacement windows. These stores are often listed in the Yellow Pages portion of the phone book. Look under the Building Materials, Salvaged Materials, or Architectural Antiques headings of the phone book.

If you are connected to the Internet you might also have some luck at the various auction or swap web sites. The power of the Internet allows a person to have a yard sale and the rest of the world can be the customer base. I happen to know a person right now who is remodeling his kitchen. He hates the old plastic ceramic tile on the walls and was going to throw it away. When I told him there was a market for it, he was surprised. There is an enormous amount of treasure out there, you just have to go hunting for it.

I feel the best way to prepare for the future is to buy replacement parts when you build or very soon after your house is built. Things as common as circuit breakers can become hard to find. If a manufacturer changes an electric panel design, you may be in a bind down the road when you want to add a circuit or two. The trick is to buy things that do not go bad. Ceramic tile, faucet parts, specialty glass for light fixtures, circuit breakers, electric switches, roof shingles, brick, etc. are examples of things that simply don't go bad if stored in a cool, dry location. I have many of these things stockpiled from when I built my own home and believe me, they have come in handy on more than one occasion.

Creating a stockpile like this may only cost several hundred dollars. Circuit breakers often cost less than $5 each. Ceramic tile may be only $3 per square foot. A box of vinyl tile may cost just $40. A square of shingles could cost just $30 now but the color you need may be unavailable in just five years. To make sure stockpiled items don't get thrown away, mark them clearly. Certain items like faucet parts can be placed in plastic zip lock bags and be attached to the inside of sink and lavatory cabinets. Each time you open the cabinet door you will get that warm and fuzzy feeling that you are prepared for that upcoming leak!

Column 329

Cupolas

cupola

This cupola is on my own garage. The wind vane really works well.

Cupolas

DEAR TIM: I really want to put a cupola equipped with a functional weathervane on my garage roof. It seems like a straightforward job but I wonder how to cut the bottom of the cupola so that it will fit the roof angle correctly. What do you do to keep rain from leaking into the garage after you cut the hole for the cupola? How do you support the weathervane? My roof pitch is just 6 inches of rise in 12 inches of run so I can easily stand and work on it. Julie C., Green River, WY

DEAR JULIE: Since your garage roof is a medium pitch roof, you may be lucky and complete this job in just one day. If the roof had been steeply pitched, then this job would require some specialized rigging and an extra helper. Even though you feel comfortable on the roof, keep in mind that this is dangerous work. Stepping on a twig on a roof can cause you to slip and fall, so be careful and alert at all times.

The challenge of cutting the correct roof slope on the bottom of the cupola stumps many rookie carpenters as well as homeowners. Seasoned carpenters will simply use a framing square and a level to determine the particular roof pitch. Once the pitch is known, they can adjust the framing square on the bottom of the cupola and duplicate the roof angle. You can bypass all of this geometry and cut right to the chase using a level, a pencil and a square piece of cardboard that is 12 inches longer than the base of the cupola.

Set your ladder at the side of the roof. Extend it so the top of the ladder is just below the peak. Scale the ladder with your pencil, level and cardboard. Position the cardboard at the edge of the roof. Use the level to make sure the bottom of the cardboard is level. The top of the cardboard should be about 3 inches higher than the peak of the roof. Carefully reach around the cardboard and trace the roof line on the backside of the cardboard. Bingo, you now have a handy template.

Once you are back on the ground, use a razor knife and carefully cut away the top portion of the cardboard. Use the remainder of the cardboard to transfer the roof angle to the base of the cupola. Make sure the bottom of the template is parallel with the bottom of the cupola base or your cupola will be tilted once it is up on the roof!

Cupolas can be installed two ways. You can simply rest the cupola on the roof without cutting a hole in the roof or you can cut a hole so that the cupola actually acts as a decorative ventilation device. If you go with plan A, your chances of a roof leak are next to nothing. You simply need to caulk the heads of the long screws that you will use to penetrate through the sides of the cupola down into and through the roof covering.

If you decide to cut a hole in the roof so that the cupola works as a ventilator, then make sure the roof hole is about 6 inches less in width and length than the outer base of the cupola. This will allow you to install hidden blocks on the edges of the hole. Be sure the cupola can easily slide over these blocks after they are installed. Once the blocks are positioned and screwed to the roof sheathing, install traditional metal step flashing under each shingle that fits snugly against these hidden blocks. With the flashings in place, you drop the cupola down over the flashings and the blocks. To keep the cupola from blowing off the roof, simply screw through the bottom of the cupola into the hidden blocks.

The weather vane rod needs to rest on an internal flat 2x4 block that often needs to be installed inside the structure of the cupola. It is important that the block is centered within the cupola. With the center point marked on the block, drill a hole one half inch deep that is one eighth inch larger in diameter than the weathervane rod. When you slide the weather vane rod through the top of the cupola, it will fit solidly inside this hole. This will insure that the weathervane does not wobble or lean.

Companion Articles: Weathervane & Cupola Tips, Cupola Installation Tips, Weathervane & Cupola Manufacturers

Column 330

Garage Door Openers

Garage Door Openers

DEAR TIM: After tornado damage, our one-half horsepower garage door opener, that was only 18 months old, was replaced by the insurance company with a different brand. The replacement opener looks cheap compared to our original opener. The parts seem simpler and appear to be made of cheaper plastic. Is there a big difference in garage door openers? Did I get ripped off by the insurance company? What should I have known when I was talking with the insurance adjuster? Chad K., Shawnee, OK

DEAR CHAD: Without seeing the two openers side by side, it is very hard for me to tell you if the replacement is of a lesser quality than your original. I am by no means an insurance expert, but it seems to me that it would not be unreasonable for you to get the exact same opener as part of the settlement. Why not call your insurance agent and let them know that you are not satisfied? If they don't hear from you, they will think everything is just fine.

Garage Door Openers

This builder-grade major brand name opener lasted 16 years in my home. Many garage door openers are built very well.

There is no doubt that a good grasp of garage door opener features and designs would have enabled you to purchase a top quality garage door opener, much less make a fair settlement with the insurance company. There are indeed differences in garage door openers, more today than ever before.

The first thing to consider when purchasing an opener is the actual drive system. There are three primary types: belt driven, chain driven and direct drive. Direct drive systems tend to be more reliable as there are no belts that might break or chains that can loosen over time. My own 15 year old garage door openers are direct drive and they operate flawlessly each day. There has never been a reason to have them serviced.

Your choice of a one-half horsepower motor was excellent. This motor should lift any sized residential garage door. Another common size is one-third horsepower. Keep in mind that the openers don't actually do all of the work to lift a door. In fact, they should do very little. The massive springs that are part of the garage door hardware are designed to lift the door. It is vitally important that these springs be correctly adjusted so that the garage door opener motor does not burn out prematurely. NEVER adjust garage door springs yourself. This is a job for professionals.

You may want to pay attention to warranties. There is a big difference between different brands. Look for a long term warranty that covers both the motor and all other opener parts. If you are an impatient driver, keep in mind that some openers operate at higher speeds. The average speed of most openers is 7 inches of lift/drop per second. Some newer models double this speed. For safety and security reasons, it is best to open and close the door only when you can see it.

Pay particular attention to safety features. Government regulations mandate that all automatic door openers be equipped with a non-contact invisible beam system. If a person, animal or object breaks the beam as the door is operating, the door reverses and goes back to the open position. The opener should also have a contact reversing feature, a timed reversing feature, a force adjustment attribute, automatic lights, and a manual emergency release cord. Many openers have these must-have features that will protect you and your loved ones.

If you have living areas above or adjacent to your garage, it may be worthwhile to pay attention to noise output. Some garage door openers are far noisier than others. Keeping the garage door hardware well lubricated will also keep operational noise down.

People who own homes with multiple garage doors might be very interested in the newer remote controls. Some are equipped with multiple buttons that allow you to open the door of your choice. Be sure to look for an opener that has a rolling radio signal code. This system offers you the greatest protection from thieves who might want to grab your code from thin air and then open your door when you are not home.

Column 331

Toilet Flush Problems – Easy DIY Fix

toilet flush problems

Toilet flush problems can be diagnosed with a 3.5 or a 5-gallon bucket. The secret is revealed in the video just below. Watch it for sure. This column was REVISED and shared with the 31,000 subscribers who read my October 12, 2018 AsktheBuilder Newsletter. Copyright 2018 Tim Carter

"Water from the tank rushes to this location to begin to push water and waste out of the bowl. This hole can also be clogged."

Toilet Flush Problems Checklist

  • Was the toilet made between 1992 and 1998? Check date inside the tank and under the lid
  • Do bucket test to check for clogs
  • Check if flapper valve stays open
  • Look for hard-water deposits

Toilet Flush Problems - Easy DIY Solutions

Related Links

Muriatic Acid Fixes Slow Flushing Toilets - SECRET Information here - Do NOT Share

Gross Solids Left After Flushing - Gag Me

DEAR TIM: My toilet is giving me fits. It just doesn't seem to flush with the same force that it used to. It also seems to have a mind of its own as water will randomly rush into the tank. This keeps me awake at night.

I've tried to adjust the mechanical parts inside the toilet, but the problems still remain. What can I do? Jill S., Scranton, PA

Free & Fast Bids

CLICK HERE to get FREE & FAST BIDS from local plumbers who can fix your toilet.

DEAR JILL: No one likes a pesky or cranky toilet, especially since this necessity is one of the most important and heavily used plumbing fixtures in the average house. Toilet woes frustrate many a homeowner, especially when they lift the tank lid and see all of the rods, chains, levers, floats, etc. The fact of the matter is that toilet mechanics are actually quite simple.

How Does a Toilet Flush?

toilet flush problems

Typical toilet tank mechanics. The ballcock valve, overflow tube and the flapper valve.

A toilet flushes when a large volume of water enters the toilet bowl in less than two or three seconds.

The flushing action of a toilet is simple physics. The water in the tank sits above the water in the bowl. This tank water has stored energy because of the force of gravity.

When the toilet tank handle is tripped, this water starts to work by pushing the water in the bowl and its contents out of the way and down the drain pipe.

What Limits the Force of the Flush?

The volume of water in the tank, its height above the bowl, restrictions or blockages between the tank and the bowl, or within the bowl all limit the speed and amount of work the tank water can perform.

When were Low-Flush Toilets Required by Law?

Low-flush toilets were mandated by the 1992 Energy Policy Act in an effort to save water. Traditional toilets used 3.5 gallons of water per flush. Toilets built

Why Don't the First Low-Flush Toilets Flush?

Some of the first low-flush toilets were poorly engineered and the 1.6 gallons of water simply couldn't do enough work. The inside channels the water passed through from the tank to the bowl didn't allow the small amount of water to enter the bowl fast enough.

Designs have improved but many consumers still complain about the fact that they have to flush the toilet two or three times to get the bowl clean. This sure doesn't seem to save water!

Can the Fill Valve Be The Problem?

Toilet flush problems can be caused by the fill valve in the tank.

The tank's water level adjustment has slipped. Perhaps your tank is not filling completely. Low water levels in the tank mean less energy to flush.

How Much Water Should Be In the Tank?

The tank water level, when full, should be just below the vertical water overflow tube.

Most tanks have a water fill line stamped in the interior side wall. See if the water level rises to this mark once water stops flowing into the tank. If the water level is low, adjust the fill valve float mechanism so it allows more water to enter the tank. Be sure to always lay the toilet lid flat on the floor when checking the tank. Lids that are leaned against a wall have a strong tendency to slip, fall and crack.

CLICK HERE to get FREE & FAST BIDS from local plumbers who can fix your toilet.

Can Hard Water Cause Toilet Flush Problems?

Toilet flush problems can be associated with blockages created by hard water. Hard water deposits may be blocking they siphon-jet hole in the base of the bowl or the rinse holes located on the underside of the toilet bowl rim.

The siphon-jet hole is about the size of a nickel. It's located at the base of the bowl in many toilets. Water from the tank rushes to this location to begin to push water and waste out of the bowl. This hole can also be clogged. Gently use a Popsicle stick to clean out this opening.

Use a mirror to look at the small holes in the underside of the bowl rim. These holes can get clogged with mineral deposits over time. Use a large wooden toothpick to open these holes. Never use a metal tool to do this. It can quickly chip or crack the china.

toilet flush problems

This is the hole where water leaves the tank on its way to the bowl. The flapper valve is wide open and in the up position.

Muriatic acid can be used to clear out the hard water deposits. CLICK HERE for detailed instructions on how to use this powerful acid.

Can the Flapper Valve Cause Problems?

Yes, the flapper valve may be closing too fast not allowing enough water into the bowl.

Observe the flapper valve when the toilet flushes. It should stay in the up position until 90 percent of the water leaves the tank. If it drops too soon, it may be waterlogged and/or the chain that lifts it may need to be shortened.

Why Does Water Fill the Tank Without Flushing?

The phantom flushing problem is probably a leaking flapper valve. You can test for this by pouring some red food coloring into the tank after it has filled and the water is calm. Check the toilet in 30 - 60 minutes. If the water in the bowl is pink, this tells you small amounts of water are getting past the flapper valve. When enough water leaks from the tank, the fill valve operates to replace the lost water.

Can Blockages Be in the Tank?

Look at the hole in the bottom of the tank when the black flapper valve is in the up position. See if there are any army men or small boats at the bottom of the drain hole where the tank connects to the toilet bowl. Curious children often play in the water of the toilet tank and toys can get sucked down into the top of the toilet bowl.

CLICK HERE to get FREE & FAST BIDS from local plumbers who can fix your toilet.

Column 332

Hip, Ridge and Soffit Ventilation

rotted sun room roof

This is the peak of my sun room roof. The upper six feet of it was horribly rotted from regular indoor humidity that condensed on the underside of the roof sheathing. The rot was much worse on the north facing roof that you see in this photo. The east facing side of the hip roof had only 50 percent as much rot.

Hip, Ridge and Soffit Ventilation

DEAR TIM: The buzz word in my area about new roof and re-roofing jobs is ridge and soffit ventilation. I don't remember seeing any of these products on the houses I grew up in. Are they really necessary? What happens if your house has a hip roof? A friend of mine who lives in the snow belt had one foot of snow accumulate in his attic because of these devices! I wonder if this ventilation trend is just a clever trick to sell something that is more trouble than it is worth. Charles P., Wahoo, NE

DEAR CHARLES: These new hip, ridge and soffit ventilation products are indeed clever. But don't think for a minute that they are a tricky gimmick sold by a motivated roofing salesperson or a builder. These products are innovative and an absolute necessity. New houses built without ridge and soffit ventilation can have serious roof rot problems. I know it for a fact as it happened at my own home.

The sun room at one corner of my house happens to have a cathedral ceiling that rises on two sides of the room creating a hip roof. One side of the hip faces east and the other side faces north. When I built my house 16 years ago there were no foolproof hip roof ventilation products available. I was very worried that the humidity created by the many plants in this room might cause a rot problem. This year my annual fall exterior walk around inspection revealed that my fears had come true. Serious wood rot had developed on the upper areas of the north face of this hip roof. See above photograph.

There are several good reasons why older homes did not have nor were required to have ridge and soffit ventilation. Older homes often had windows and doors that had no or poor quality weatherstripping. Air infiltration barriers had yet to be invented. The massive amounts of cold dry outdoor air would mix with the warm moisture laden inside air. The net result was that the indoor humidity in older drafty homes was far lower than indoor air you might encounter in your existing home. To make matters worse, as older homes are improved with new windows, doors and other energy saving suggestions they become condensation time bombs.

Since the wall systems of new homes and improved houses no longer leak air, the houses release the moisture into the attic spaces. If this moisture laden air is not quickly released from a cold attic the water vapor can condense on the cold wood surfaces in these spaces. If this happens wood rot will indeed happen as it did on my own house. Soffit, ridge and hip ventilation products allow Mother Nature to vacuum this moisture laden air from your attic with each puff of wind that blows across your roof.

As with most building products necessity is the mother of invention. Your friend that had snow in his attic probably had a low quality first generation ridge vent. Many of these allowed blowing snow and sometimes rain to enter attic spaces. New ventilation products are now available that will block snow and rain from entering attics. In fact, special hip vents can now be purchased that satisfy my tough demands. Hip vents are special because they need to have internal baffles that block snow and rain that can blow sideways across a roof. If you have a hip roof, be sure you install a special vent on these areas of your house.

The ridge and hip vents come in all flavors. You can purchase different colored metal vents that act as the cap shingles at the top of the roof. Other vent products are coils of plastic fabric that resembles coarse steel wool. My personal favorite is the hard plastic ridge and hip vents that are strong enough to stand on. These are applied over saw cut openings at the top of the roof or along a hip ridge. You then nail the roof shingles over the vents. Only a trained eye can detect their presence from the ground.

Column 335

Adding Glass to a Front Door

Front Door Side Glass

I added the stained glass panels to this door. Believe it or not, this used to be a traditional six-panel door. I completely removed the top four panels, the vertical stiles and the horizontal rail. The entire process took less than one day. I did the same with the sidelights.

Adding Glass to a Front Door

DEAR TIM: I know this sounds odd, but is it possible to remove the wood panels in a traditional solid wood six panel door and replace them with glass? There is no doubt in my mind that this would make the entrance hall in our house brighter and make the front of our home more attractive. Is it easy to do? What is the most energy efficient way to accomplish this? Ron M., New Providence, NJ

DEAR RON: If it is odd to do this, then my wife has been right about me all these years. I have performed this door surgery before on many occasions and all of the patients survived and are in excellent health! What's more, I am getting ready to install beveled glass panels in my own six panel wood front door. Not only will you add light and value to your home, but you will also get an avalanche of positive comments from friends, neighbors and anyone else who gets to see the finished product.

Keep in mind that the building code mandates that glass in doors must be tempered. This is a safety feature that prevents serious injury in the event someone thrusts their hand or arm through the glass. Tempered glass does not break into shards that slice and spear.

It is not as hard to accomplish this job as you might think. You will need a steady hand, a circular saw with a fine toothed blade, a sharp wood chisel, a hammer, a miter box, some small finish nails and a small quantity of decorative molding. Many of these tools you might already own. If not, you can rent the circular saw and purchase the others. The first thing you need to do is decide what kind of glass you are going to use. To save as much as possible on your energy bills, I suggest that you install insulated glass in place of the solid wood panels. Once this is in place you can then apply a custom made stained and/or beveled glass panel on top of the insulated glass on the interior side of the door. This decorative glass can be held in place by a decorative stop molding or it can be simply caulked in place. The decorative molding will be more dependable if the door slams shut on occasion.

The glass panels need to be made to size before you start the job. What's more, you need to make sure they are the right size before you start taking apart the door. If you remove the raised panels and then find out that the glass is the wrong size, you will have a huge mess on your hands. Be sure that there is a 1/8 inch gap between each of the four sides of each glass panel and the wood door core. Without this gap, seasonal expansion and contraction can shatter the glass.


Have you found the perfect exterior door? Make sure you install it perfectly using my Exterior Door Replacement Checklist. I offer a 100% Money Back Guarantee.


The removal of the raised panels requires that you carefully cut along the interior edge of the stiles and rails of the door that surround each raised panel. You will notice that the wood has a profiled edge as it dives down towards the raised panel. Set the circular saw cutting depth to 5/8 inch. The entire blade of the saw should be cutting inside the profiled edge of the stiles and rails. Do not allow the saw blade to cut into the flat surface areas of the door. Stop the blade at each corner and complete the cutout with the chisel. When the small profiled area is cut away you will be able to easily remove each raised panel.

Once the panels are out of the way, paint the bare wood that has now been exposed. This protective coating will prevent any wood rot that may begin from driving rains that try to get between the new glass and the wood. Apply a bead of acrylic siliconized caulk to the inside edge of the remaining profiled edge and set the glass in place. The insulated glass panel is held in place by the small wood molding. If possible, try to get one that matches the profile of the one you cut away. Use the miter box to cut the pieces to fit and fasten the moldings to the door with 3 or 4 penny finish nails. Do not drive the nails into the glass. The average door surgery lasts about three hours if there are no complications.

A Dandy Bookshelf in 2 Hours

bookcase

Bookshelf in 2 Hours

DEAR TIM: The holiday season is nearly here and I want to make a gift for my husband instead of buying something. His study is a mess and it is no secret that he needs more shelving. Do you have any ideas for a simple, yet smart looking bookshelf that a novice like me can build? Can it be done for less than $75.00? I don't have many tools so it needs to be easy. Diane H., Kettering, OH

DEAR DIANE: This is your lucky day! If you have an entire day available you can make the same gift for several people. I just completed a practical and snazzy looking four foot high by four foot wide solid wood bookshelf that has a top and bottom shelf and two adjustable shelves. After the wood pieces were cut it took less than 45 minutes to completely assemble it.

To stay within budget you usually need to think modular. Modular construction simply means that you use standard sized materials that minimize cutting and maximize return on your investment of money and time. In my opinion 1 x 8 solid poplar makes the best bookshelf material. A 1 x 8 system creates shelves that are 7 and 1/4 inches deep. A wide majority of books will comfortably fit on these shelves. I purchased all of the materials to complete my project for $72.47.

There are several simple features that you can incorporate into the bookshelf to give it that custom look. A recessed toe kick that rests beneath the bottom shelf creates depth and makes for a very interesting look. What's more, this simple element also provides support for the bottom shelf so that you can put the largest books on this level with no fear of warping the shelf. A similar but narrower strip of wood is placed just beneath the top shelf. This piece of wood needs to be kept flush with the front edge of the bookshelf. It helps support the top shelf and it serves as a foundation for a decorative piece of bed molding that dresses up the top front and side edges of the bookshelf.

Most traditional lumber yards or home centers will have all the supplies you need. Many of these same places also have powerful saws that can cut the lumber to specific lengths. Not all of these businesses will cut the lumber and those that do will not guarantee the absolute accuracy of the cuts. If you wish to cut the lumber yourself to insure accuracy, then I suggest you rent a 12 inch diameter power miter box saw. This saw will slice through the 1 x 8 poplar in one motion. It will also allow you to easily cut the 45 degree miter joints for the decorative bed molding. The only other tools you will need will be a tape measure, a hammer, and a nail set that countersinks the finish nails.

To give the bookshelf enormous strength and to keep it square, I used a 1/4 inch thick piece of luan plywood as the backing. This plywood comes with one clear face and when stained or painted it looks superb. The plywood is nailed directly to the back of the bookcase with 7/8 inch long brass round headed nails. If you start nailing along the top edge of the book shelf and then align the sides of the shelf with the plywood the bookshelf automatically becomes square. You can fill the bookshelf to the brim with books and it will not rack sideways and collapse as a bookshelf without a back might do.

Bookshelf

The poplar lumber I used was of such high quality that I intend to simply apply two clear coats of urethane. You may choose to lightly stain yours or possibly paint it. If you do either of these be sure to wait until you are completely finished before you attach the thin metal shelf standards. It can be very time consuming to paint or stain with these items in your way. It will only take you a few moments to nail these standards into place after the last coat of paint or urethane is dry.

This same concept can be used to build larger bookshelves. There is nothing stopping you from building a taller bookshelf. If you want a wider set of shelves, I suggest that you limit them to the four foot width. Long shelves can -- and do -- warp over time from the weight of books. Simply build two cases and place them side by side. You can dress up the seam where they touch with a small piece of decorative molding.

Related Column:

Decorative Wall Shelf in One Hour

Column 337