Hip, Ridge and Soffit Ventilation

rotted sun room roof

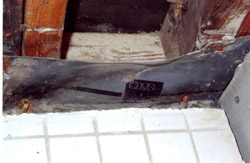
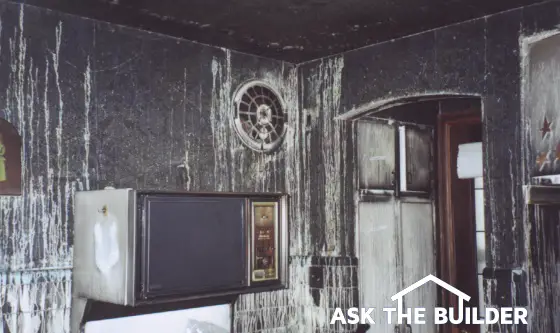
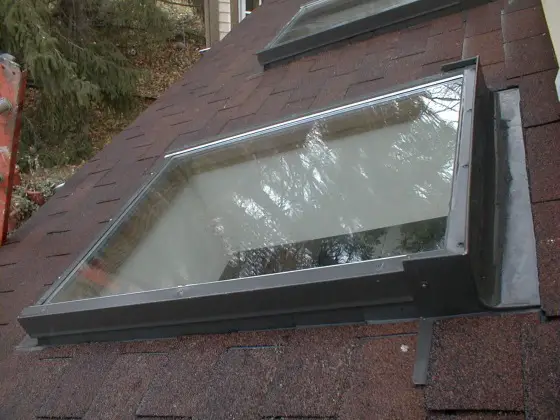
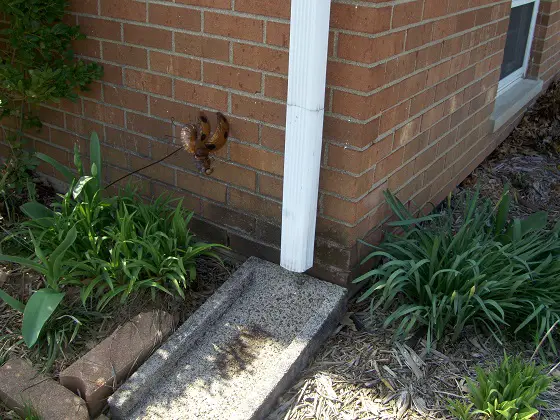
This is the peak of my sun room roof. The upper six feet of it was horribly rotted from regular indoor humidity that condensed on the underside of the roof sheathing. The rot was much worse on the north facing roof that you see in this photo. The east facing side of the hip roof had only 50 percent as much rot.

Hip, Ridge and Soffit Ventilation

DEAR TIM: The buzz word in my area about new roof and re-roofing jobs is ridge and soffit ventilation. I don't remember seeing any of these products on the houses I grew up in. Are they really necessary? What happens if your house has a hip roof? A friend of mine who lives in the snow belt had one foot of snow accumulate in his attic because of these devices! I wonder if this ventilation trend is just a clever trick to sell something that is more trouble than it is worth. Charles P., Wahoo, NE

DEAR CHARLES: These new hip, ridge and soffit ventilation products are indeed clever. But don't think for a minute that they are a tricky gimmick sold by a motivated roofing salesperson or a builder. These products are innovative and an absolute necessity. New houses built without ridge and soffit ventilation can have serious roof rot problems. I know it for a fact as it happened at my own home.

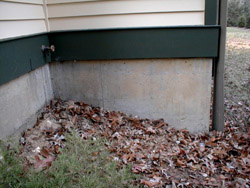
The sun room at one corner of my house happens to have a cathedral ceiling that rises on two sides of the room creating a hip roof. One side of the hip faces east and the other side faces north. When I built my house 16 years ago there were no foolproof hip roof ventilation products available. I was very worried that the humidity created by the many plants in this room might cause a rot problem. This year my annual fall exterior walk around inspection revealed that my fears had come true. Serious wood rot had developed on the upper areas of the north face of this hip roof. See above photograph.

There are several good reasons why older homes did not have nor were required to have ridge and soffit ventilation. Older homes often had windows and doors that had no or poor quality weatherstripping. Air infiltration barriers had yet to be invented. The massive amounts of cold dry outdoor air would mix with the warm moisture laden inside air. The net result was that the indoor humidity in older drafty homes was far lower than indoor air you might encounter in your existing home. To make matters worse, as older homes are improved with new windows, doors and other energy saving suggestions they become condensation time bombs.

Since the wall systems of new homes and improved houses no longer leak air, the houses release the moisture into the attic spaces. If this moisture laden air is not quickly released from a cold attic the water vapor can condense on the cold wood surfaces in these spaces. If this happens wood rot will indeed happen as it did on my own house. Soffit, ridge and hip ventilation products allow Mother Nature to vacuum this moisture laden air from your attic with each puff of wind that blows across your roof.

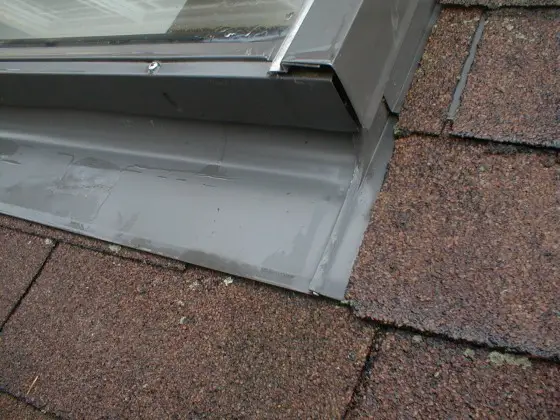
As with most building products necessity is the mother of invention. Your friend that had snow in his attic probably had a low quality first generation ridge vent. Many of these allowed blowing snow and sometimes rain to enter attic spaces. New ventilation products are now available that will block snow and rain from entering attics. In fact, special hip vents can now be purchased that satisfy my tough demands. Hip vents are special because they need to have internal baffles that block snow and rain that can blow sideways across a roof. If you have a hip roof, be sure you install a special vent on these areas of your house.

The ridge and hip vents come in all flavors. You can purchase different colored metal vents that act as the cap shingles at the top of the roof. Other vent products are coils of plastic fabric that resembles coarse steel wool. My personal favorite is the hard plastic ridge and hip vents that are strong enough to stand on. These are applied over saw cut openings at the top of the roof or along a hip ridge. You then nail the roof shingles over the vents. Only a trained eye can detect their presence from the ground.

Column 335

Adding Glass to a Front Door

Front Door Side Glass

I added the stained glass panels to this door. Believe it or not, this used to be a traditional six-panel door. I completely removed the top four panels, the vertical stiles and the horizontal rail. The entire process took less than one day. I did the same with the sidelights.

Adding Glass to a Front Door

DEAR TIM: I know this sounds odd, but is it possible to remove the wood panels in a traditional solid wood six panel door and replace them with glass? There is no doubt in my mind that this would make the entrance hall in our house brighter and make the front of our home more attractive. Is it easy to do? What is the most energy efficient way to accomplish this? Ron M., New Providence, NJ

DEAR RON: If it is odd to do this, then my wife has been right about me all these years. I have performed this door surgery before on many occasions and all of the patients survived and are in excellent health! What's more, I am getting ready to install beveled glass panels in my own six panel wood front door. Not only will you add light and value to your home, but you will also get an avalanche of positive comments from friends, neighbors and anyone else who gets to see the finished product.

Keep in mind that the building code mandates that glass in doors must be tempered. This is a safety feature that prevents serious injury in the event someone thrusts their hand or arm through the glass. Tempered glass does not break into shards that slice and spear.

It is not as hard to accomplish this job as you might think. You will need a steady hand, a circular saw with a fine toothed blade, a sharp wood chisel, a hammer, a miter box, some small finish nails and a small quantity of decorative molding. Many of these tools you might already own. If not, you can rent the circular saw and purchase the others. The first thing you need to do is decide what kind of glass you are going to use. To save as much as possible on your energy bills, I suggest that you install insulated glass in place of the solid wood panels. Once this is in place you can then apply a custom made stained and/or beveled glass panel on top of the insulated glass on the interior side of the door. This decorative glass can be held in place by a decorative stop molding or it can be simply caulked in place. The decorative molding will be more dependable if the door slams shut on occasion.

The glass panels need to be made to size before you start the job. What's more, you need to make sure they are the right size before you start taking apart the door. If you remove the raised panels and then find out that the glass is the wrong size, you will have a huge mess on your hands. Be sure that there is a 1/8 inch gap between each of the four sides of each glass panel and the wood door core. Without this gap, seasonal expansion and contraction can shatter the glass.


Have you found the perfect exterior door? Make sure you install it perfectly using my Exterior Door Replacement Checklist. I offer a 100% Money Back Guarantee.


The removal of the raised panels requires that you carefully cut along the interior edge of the stiles and rails of the door that surround each raised panel. You will notice that the wood has a profiled edge as it dives down towards the raised panel. Set the circular saw cutting depth to 5/8 inch. The entire blade of the saw should be cutting inside the profiled edge of the stiles and rails. Do not allow the saw blade to cut into the flat surface areas of the door. Stop the blade at each corner and complete the cutout with the chisel. When the small profiled area is cut away you will be able to easily remove each raised panel.

Once the panels are out of the way, paint the bare wood that has now been exposed. This protective coating will prevent any wood rot that may begin from driving rains that try to get between the new glass and the wood. Apply a bead of acrylic siliconized caulk to the inside edge of the remaining profiled edge and set the glass in place. The insulated glass panel is held in place by the small wood molding. If possible, try to get one that matches the profile of the one you cut away. Use the miter box to cut the pieces to fit and fasten the moldings to the door with 3 or 4 penny finish nails. Do not drive the nails into the glass. The average door surgery lasts about three hours if there are no complications.

A Dandy Bookshelf in 2 Hours

bookcase

Bookshelf in 2 Hours

DEAR TIM: The holiday season is nearly here and I want to make a gift for my husband instead of buying something. His study is a mess and it is no secret that he needs more shelving. Do you have any ideas for a simple, yet smart looking bookshelf that a novice like me can build? Can it be done for less than $75.00? I don't have many tools so it needs to be easy. Diane H., Kettering, OH

DEAR DIANE: This is your lucky day! If you have an entire day available you can make the same gift for several people. I just completed a practical and snazzy looking four foot high by four foot wide solid wood bookshelf that has a top and bottom shelf and two adjustable shelves. After the wood pieces were cut it took less than 45 minutes to completely assemble it.

To stay within budget you usually need to think modular. Modular construction simply means that you use standard sized materials that minimize cutting and maximize return on your investment of money and time. In my opinion 1 x 8 solid poplar makes the best bookshelf material. A 1 x 8 system creates shelves that are 7 and 1/4 inches deep. A wide majority of books will comfortably fit on these shelves. I purchased all of the materials to complete my project for $72.47.

There are several simple features that you can incorporate into the bookshelf to give it that custom look. A recessed toe kick that rests beneath the bottom shelf creates depth and makes for a very interesting look. What's more, this simple element also provides support for the bottom shelf so that you can put the largest books on this level with no fear of warping the shelf. A similar but narrower strip of wood is placed just beneath the top shelf. This piece of wood needs to be kept flush with the front edge of the bookshelf. It helps support the top shelf and it serves as a foundation for a decorative piece of bed molding that dresses up the top front and side edges of the bookshelf.

Most traditional lumber yards or home centers will have all the supplies you need. Many of these same places also have powerful saws that can cut the lumber to specific lengths. Not all of these businesses will cut the lumber and those that do will not guarantee the absolute accuracy of the cuts. If you wish to cut the lumber yourself to insure accuracy, then I suggest you rent a 12 inch diameter power miter box saw. This saw will slice through the 1 x 8 poplar in one motion. It will also allow you to easily cut the 45 degree miter joints for the decorative bed molding. The only other tools you will need will be a tape measure, a hammer, and a nail set that countersinks the finish nails.

To give the bookshelf enormous strength and to keep it square, I used a 1/4 inch thick piece of luan plywood as the backing. This plywood comes with one clear face and when stained or painted it looks superb. The plywood is nailed directly to the back of the bookcase with 7/8 inch long brass round headed nails. If you start nailing along the top edge of the book shelf and then align the sides of the shelf with the plywood the bookshelf automatically becomes square. You can fill the bookshelf to the brim with books and it will not rack sideways and collapse as a bookshelf without a back might do.

Bookshelf

The poplar lumber I used was of such high quality that I intend to simply apply two clear coats of urethane. You may choose to lightly stain yours or possibly paint it. If you do either of these be sure to wait until you are completely finished before you attach the thin metal shelf standards. It can be very time consuming to paint or stain with these items in your way. It will only take you a few moments to nail these standards into place after the last coat of paint or urethane is dry.

This same concept can be used to build larger bookshelves. There is nothing stopping you from building a taller bookshelf. If you want a wider set of shelves, I suggest that you limit them to the four foot width. Long shelves can -- and do -- warp over time from the weight of books. Simply build two cases and place them side by side. You can dress up the seam where they touch with a small piece of decorative molding.

Related Column:

Decorative Wall Shelf in One Hour

Column 337

Skylight Repair

skylight head flashing

The head flashing is on the right side of this photo. It extends up another 7 inches under the shingles farther up the roof.

Skylight Repair

DEAR TIM: Currently I have a problem with skylights in my home. They are leaking and are very old. I want to replace them with larger units that will not leak. Is that possible? Finding a roofer or contractor to do this has been very frustrating. What kind of contractor do I hire to do this and just how does one find a really good contractor? Do I need a divining rod? George C.,Orlando, FL

DEAR GEORGE: I can feel your pain. You have double trouble because your problem involves a roof leak. Since you already have plenty of water in your house from the leak you can throw away the divining rod. Get rid of your tarot cards and Ouija board too. It can be hard to find a qualified contractor or roofer, but trust me, there is usually one or two in every city or town. You simply need to look in the right places.

Let's solve the roof leak problem first. The vast majority of roof leaks can usually be found where things pop up through a roof. Skylights, plumbing vent pipes, heating vent pipes, chimneys, second story sidewalls, etc. can all abut or penetrate a roof. These non-roof items are connected to roof materials by using flashings. Flashings are simply transitional roofing materials. They can be made from tin, copper, aluminum, lead or even modified asphalt materials. My guess is that your skylight flashings are the source of your trouble.

Many skylights that are sold require a roofer to fabricate some of the flashings while he is up on the roof. This process requires experience and attention to detail. Not all roofers are qualified to do this. The best skylights, in my opinion, are those that include complete factory built flashing materials in the box. They are virtually idiot proof. All the roofer has to do is follow a few easy steps and the hardest wind driven rain will not create a waterfall inside your home.

If you are enlarging the skylight opening by making it longer, then the modifications to the roof structure will probably be very minor. Major structural changes are necessary when you decide to widen a skylight opening. In these instances extra full sized rafters need to be added on either side of the skylight opening. These extra framing members help carry the roof load that used to be supported by the rafters that were cut to make the new opening wider than it is now.

Finding a reliable, competent, and skilled roofer or remodeling contractor that can do all of the work will take some time but it is by no means impossible. If you understand some of the basic principles by which these people work, the task is not as mystical as it may seem. Quality contractors are proud of their work. They want it to be perfect or nearly so and they do not want any call-back or warranty problems. To achieve trouble free results they know that high quality materials are an integral part of each project. Real professionals know that problems are public relations nightmares and drain profits.

skylight flashing

This is the sill flashing at the base of the skylight. It covers shingles that extend up under the flashing. You can also see step flashing on the side of the skylight that is laced into and under the shingles that abut the side of the skylight.

Knowing this you start your search for contractors by visiting the businesses that supply quality materials to these individuals. You might be surprised to find out that these businesses are often places that you have never heard of. In your instance I would open the Yellow Pages and look under the heading Roofing Supplies. Many of the listings under this heading will be businesses that cater primarily to roofing contractors and not consumers like you. Visit two or three of these places if possible. Try to do this in the middle of the morning or the mid-afternoon. Never go early in the morning, at lunch or the end of the business day. These are busy times when contractors are picking up supplies.

Once there ask to speak with the manager or possibly the owner. Briefly describe your job to this person. Ask for a customer who has been buying for 15 or more years, one that routinely buys the highest quality materials, and who pays his monthly bill on time. If the business manager obliges you, you will have a list of high quality candidates. The final question to ask, if possible, would be names of contractors that this person would use to work on his or her own home.

If the manager will not release names, then go to Plan B. Do a stakeout of the business in the early morning and get business cards from the contractors who are buying supplies. Look for ones who are driving well kept vehicles that project a look of professionalism. You will still need to do more detective work, but your chances of hiring a pro are quite good.

Column 338

Positive Drainage Keeps a House Dry

downspout emptying onto concrete splash block

Splash blocks don't do much to channel water away from the foundation.

Positive Drainage Keeps a House Dry

DEAR TIM: I am building a new home soon and I do not want water drainage problems of any sort in my yard. My existing home is built on a slab and I frequently have standing water around the house after a rainfall. My new home will have a basement. Can I build a house with a dry basement or will it leak over time and become damp, musty, and useless? Surely there must be a way to eliminate all water problems around a home. Amy C., Dubuque, IA

DEAR AMY: You bet it is possible to eliminate water problems around the average home. The good news is that many of the things required to achieve a dry, well-drained lot are very economical. The largest expense will be the cost to actually waterproof your new foundation. It is a one-time expense and if you use one of the better systems out there your basement, like mine, will be bone dry for many years to come.

sloping ground away from a foundation

The earth is sloped correctly. Water runs away from the house foundation.

The first thing your builder needs to do is to make sure that the top of your foundation or slab actually sticks high enough out of the ground. All too often builders set houses into the ground too deeply. When this happens it is nearly impossible for a builder to create gentle sloping grades that direct water away from the house and to the lowest point of the lot where water would have drained naturally before the house was built.

The model building codes are very specific about foundation drainage and many state that the ground should slope at least six inches down in the first ten feet of distance away from the house. If your house is built close to the lot line a ditch needs to be built that allows similar natural drainage.

positive slope away from house

Note how the ground slopes away from the house on all sides.

Water that leaves your roof can cause all sorts of problems if it is not collected and piped away from the house. An average one-floor house might have approximately 2,400 square feet of surface area on the roof. When a storm produces one inch of rain, the amount of water draining from the roof to the ground equals nearly 1,500 gallons! Allowing this water to simply collect near the house or discharge from downspouts onto simple splash blocks at the base of a foundation is asking for trouble.

The better solution is to pipe this water away from the house. Many municipalities are now requiring that this stormwater be collected and put into retention ponds before being allowed to enter natural drainage systems like brooks and streams. Interior sump pump discharge pipes should also be connected to these downspout drain pipes. Allowing sump water to discharge alongside a foundation is insanity. The water you just paid to pump will usually enter the sump again in a matter of hours.

waterproofing on concrete foundation protected by stiff fiberglass

You can see the black rubberized asphalt that waterproofs the foundation. The pink is rigid fiberglass that protects the waterproofing material.

Make sure your builder waterproofs your foundation. Do not confuse true waterproofing systems with the thin sprayed-on asphalt that many builders install. The thin asphalt coatings are dampproofing and meet the minimum code requirements for unfinished basement areas. My basement is actually waterproofed. I used a thick modified asphalt compound that actually contains rubber. The rubber allows the material to bridge small cracks that may develop at a later date. The thick coating was then covered by rigid fiberglass insulation that keeps my basement walls warm and helps to channel water directly to the drain tile at the base of my foundation.

There are other high-quality waterproofing systems out there. Some are actually synthetic rubbers that have incredible elastic properties. Other systems use a natural clay that swells when it gets wet. You can even get special urethanes that will waterproof a foundation. Finally, there are some innovative plastic foundation wraps that claim to waterproof a foundation. These plastic products come in large rolls and look like a muffin pan. The bumps in the plastic create a pathway for water to easily flow down the sides of the foundation to the drain tile.

The key to a dry basement and lot is to cooperate with Mother Nature. One of her rules happens to be gravity. Use it to your advantage. Make sure that you use gravity to pipe surface and sub-surface water away from your house as quickly as possible. Do this and you will be the driest person on your block.

This popular column was the Magic Secret Link in the July 3, 2015 AsktheBuilder Newsletter.

Column 339

Maximize Small Home Office Space

Small Home OfficeSmall Home Office Space

DEAR TIM: I am converting a small room in my home into a home office. The remodeling budget is limited and it is imperative that I maximize the space in this room. How do you suggest that I proceed? My preference is wood tops and shelves but I doubt that these are within my price range. I have moderate skills and many common tools and a table saw that I can borrow. Elise M., Oak Park, IL

DEAR ELISE: I have good news for you! Not only are you going to get what you want, but this new office space is also going to be as sleek as a new sports car. The key to success when dealing with small spaces is to think outside the box. Visit a conventional office and you will see much of the office equipment on desktops and counters. If you design your new office like mine, these things will be in the most unusual places.

Capture wasted space by making the corner of a room the center of the work area. This sounds crazy until you start to think about it. In a traditional office, a corner often ends up as depot for lost papers, folders, and books. In my home office it is command central. Large bulky computer monitors tuck comfortably into these areas. If you have a swivel chair, you can twist slightly to the left or right and have access to comfortable writing spaces on either side of your computer keyboard.

Have you ever seen an old roll top desk? Whoever designed the first one obviously had similar space problems. They had lots of pieces of paper and small supplies but no place to put them. The space just above and behind the desktop surface made an excellent storage place. The items were within reach but they did not get in the way of the primary activity that was happening on the desktop work surface. Do the same thing I have done and make use of the space just in front of your face.

The wall space just above your desktop can be covered with super strong and easy to build shelves that will hold your fax machine, printer, speakers, books, supplies, etc. These are the things that take up space on a traditional desktop. If you start the lower shelf just 20 inches off the surface of the desktop, these items will be within reach as you sit in your chair. This height will also allow a typical computer monitor and mini computer tower to slide back to the wall.

You can fabricate the desktop and shelves using affordable 3/4 inch thick fir plywood. This plywood has gorgeous knot free wood grain on the finished side and a nearly knot free surface on the back side. I recently purchased this material for less than $40 per sheet. Four or five pieces will often be enough to build multiple work surfaces and lots of wall shelves.

The laminated plywood edge can be hidden easily with a small solid wood molding that is 1/4 inch thick and 3/4 inch wide. You simply glue and nail this strip onto all exposed plywood edges to give your work surfaces a professional finished look. Four coats of water based polyurethane can be applied in one day to give the wood a waterproof, smooth and durable coating. You can stain the wood to your tastes or leave it natural as I did.

home office

Wall support for the home office desk

Instead of fabricating legs for my work surface I cut triangular shaped brackets from the plywood. These brackets are attached to the wall and the underside of the work surface with blocking and screws. They provide enough support that the work surface will support just about anything you can put on it.

home office

Home office keyboard shelf

I prefer to place the desktop surface at 30 inches above the floor. This is a standard desktop height. Unfortunately, it is uncomfortable to type at this height. This problem is solved by making a simple dropped platform for the computer keyboard that rests 27 inches off the floor. The tools you possess and the access to the table saw will allow you to fabricate all of the fixtures you need in just under 8 hours.

Calm Working Spaces is a wonderful book to explore before you start to build an office space at home. This 176-page book will eliminate stress by offering a wealth of advice on everything from ergonomics and aromatherapy to tax planning and security. Calm Working Spaces is full of beautiful full page color photographs showing working spaces in every possible area of a home. This book covers everything from planning , furnishing, lighting, storage, security and even offers advice on zoning, insurance and tax regulations.

Companion Articles:  Home Office Desk Plans, Home Office Shelves, Home Office

Column 341

Leaking Shower Pan – Membrane Failure

Leaking Shower Pan

DEAR TIM: A pesky leak recently developed just below the master bedroom bathroom in our eight year old home. We have traced the problem to our custom sized ceramic tile master bath shower stall. My son likes to plug up the drain with a bucket to make a shallow one inch deep pool. The water level is 2 inches below the curb. It doesn't seem to leak during a normal shower. While trying to caulk grout seams I discovered that the drywall behind the bottom row of tiles has turned to mush. How serious is the problem and what is the fix? Jackie F., Lexington, KY

DEAR JACKIE: The problem is very serious. The extent of the damage will become evident as soon as you perform a full autopsy on the shower stall walls and quite possibly the ceramic tile shower floor. In all likelihood, I think you will discover that the special waterproof membrane beneath the shower floor has a hole in it, was installed wrong, or has separated from the drain pipe.

Start the examination by removing tile from the lower portions of the walls. Use a 3 inch wide putty knife with a thin flexible blade. The tiles will pop off very easily. As you go up higher on the walls, it will become more difficult to remove tiles. I think you will discover that the wall damage will extend upwards at least two feet or more. The wall tile problem happened because the original installer did not use cement board or some other product that will absolutely not disintegrate when exposed to constant moisture.

Regular drywall and moisture resistant drywall that has a light green paper simply are not long term backing material for ceramic tile shower or bathtub installations. Water passes through ceramic tile grout and gets these products wet. Over time, the paper facing on water resistant drywall starts to fall apart and the untreated gypsum core in standard drywall simply fails. Cement board is a far better product and it will never fail even if immersed in water 24 hours a day.

Once the drywall is off the walls, you should see the top edge of the waterproof membrane that is beneath the ceramic tile shower floor. Ideally, this membrane should extend at least 2 inches above the highest point of the curb. It should maintain this height around all of the walls. This method of construction allows the curb to become the spillway in the event your son allowed too much water to build up within the shower.

With the drywall out of the way, it is now time to recreate the leak. Plug up the drain and use a garden hose to fill the shower floor with water. Use a flashlight to inspect behind the walls to see where and when water bypasses the waterproof membrane. When water starts to leak below and you can't see anything on the side walls, this means the problem is hidden beneath the ceramic floor tile. If this is the case, it is time to take out the ceramic floor and the cement base beneath it. Once you have gone this far, simply start over and install a new membrane liner.


I have written a cool eBook about Shower Pan Liners that shows you exactly how to install a shower pan liner. The book contains many step-by-step color photos and easy-to-follow instructions. Click here to see what other homeowners such as you have to say about it!


If the leak is in the membrane above the floor, you may be able to patch it. You can weld a patch using solvents and identical membrane material. Cut a small piece off the top edge of the membrane and take it to a ceramic tile store or a plumbing supply house. They should be able to match the material with ease. Do a test patch on the back side of the membrane to make sure you have the right material and solvent.

Once you have patched the leak, let it sit for 24 hours. Plug the drain again and fill the shower floor to just below the curb. Let the water sit for several hours and see if your patch holds. Be sure all of the wood studs and sub flooring is dry and in good condition before you close up the walls with new cement board and tile.

Column 342

Door and Window Trim Installation Tricks

door trim gap

The gap in this mitered joint is unacceptable. The carpenter needed an immediate eye exam or an attitude adjustment.

Door and Window Trim Installation Tricks

DEAR TIM: I would like to install some new and different wood door and window trim. Do I need fancy tools to accomplish this? Can you share some simple tricks that will allow me to get very tight miters where two pieces of wood meet one another? What is the best way to fasten the wood trim to the walls? Cristi S., New Castle, PA

DEAR CRISTI: This is a great project to tackle. It requires a certain amount of coordination and patience, but my guess is that you have ample amounts of both. You do not need fancy and expensive tools to do the job but I must tell you that you will possibly get better and faster results if you do use them. If I could come and help you, rest assured that I would bring my 12-inch power compound miter saw, my impulse finish nail gun that shoots and countersinks finish nails with a simple squeeze of the trigger, and other miscellaneous handy tools!

If you want to use great tools and can't afford to buy them there is a very good chance you can rent them. If you have all of your work planned and all of the materials at the jobsite before you start, you can maximize the time you spend using the rented tools. The trick is to spend a few minutes practicing your miter cuts with scrap lumber or inexpensive trim that may be in the scratch and dent bin at the lumber yard. Once you have the hang of the saw, then it is time to work.

Most rookie trim carpenters have trouble with interior trim miters for several reasons. The trim stock that comes from the lumber mills is designed to lay flat in a single plane on the wall. The trouble is, most walls are not perfectly smooth and rarely are they in the same plane. For example, the window or door jamb may project just a sixteenth of an inch from the wall surface. This causes the trim molding to tilt slightly. This can cause enormous fit problems at the corners when each piece of trim is tilting a different direction!

There are all sorts of ways to solve this problem. One way is to slide thin tiny shims behind the trim at the corners so you fool it into thinking it is lying flat. The shims can be trimmed flush with the back edge of the trim and then any remaining gap between the trim and the wall surface can be caulked. This method works great for trim and wall surfaces that are painted.

But wood trim that is stained and coated with a clear finish is much less forgiving. In these instances you may need to actually carve away some of the wood on the inside face of the mitered trim joint. Once two pieces of wood trim are butted together you can't see this face. Use a sharp razor knife to whittle away the wood core at the mitered cut. Be careful that you do not cut yourself or cut into the front profiled face of the wood. The greatest amount of wood is taken away from the bottom of the trim where it touches the wall. Whittle a little away from both trim pieces that are meeting at the miter and constantly check for fit. It is always best to experiment with two one foot long pieces at just one corner to see how well this method works. Once you feel confident that you know how to adjust the pieces for fit, then start with a full sized piece of trim.

To build even more confidence, trim out the inside of a closet door first. Make your rookie mistakes where no one will see them. Do the most prominent windows and doors in your house only after you have gotten lots of practice or mastered using the tools.

When nailing by hand, you will use regular finish nails. Often a 6 penny nail will be of sufficient length to penetrate the trim and plaster or drywall and then bury itself at least 3/4 inch into solid wood framing. Stop hammering the nail when the head is about 1/8 inch away from the surface of the wood trim. At this point you will need to use a nail set to countersink the nail into the trim. Nail sets come in different diameters and the tip of the tool should always be slightly less that the diameter of the nail head. My impressive impulse nailer will fire and countersink eight nails in the time it takes you to drive and countersink one by hand. As you might imagine, I have fallen in love with that tool!

Column 343

Mold

! ! IMPORTANT - Read Author's Notes Below ! !

DEAR TIM: We recently purchased a seven year old home that has a full unfinished basement. The walls have studs, insulation and a vapor barrier but no drywall yet. We are thinking of installing drywall but the rear wall has lots of mold growing on the insulation and vapor barrier. What is causing this to happen? How can we stop the growth? How can the mold be removed? Tim and Peggy W., Eagan, MN

DEAR TIM and PEGGY: You are lucky you discovered this mold before you installed the drywall. Anytime you see mold growing on a surface inside your home consider it to be a brilliant red flashing light signaling that you could have a serious problem or might have one in your immediate future. A wise person takes immediate action to fix mold problems because certain molds can cause serious health problems and in rare instances death.

tile mold

This is typical mold in a shower. There is no excuse for this. The homeowner simply needs to clean the shower every two weeks and keep the shower door open so the space can dry quickly.

Mold is around us 24 hours a day in the form of airborne spores and spores that have settled onto every surface inside a home. These spores are similar to plant seeds. Think of them as time bombs waiting to go off. In almost all instances they already have two of three of the necessary ingredients to grow and thrive. The temperature inside of most homes, crawlspaces and attics is almost always sufficient to support mold growth. The surfaces that the mold spores rest upon are in almost all instances a food and nutritional source. Mold will thrive on drywall paper, wood, certain paints, fabrics, dust, paper, carpet, etc. Soaps and other body care products that often create a film inside tubs and showers are a smörgåsbord for mold. Mold can easily grow inside a cold refrigerator.

The third ingredient that triggers the mold spore time bombs is water. Surfaces that become wet from plumbing leaks, roof leaks, condensation, pet urine, etc. can sprout mold growth in several days or less. If the surfaces stay wet for extended periods of time, the mold can grow at an astounding rate. Relative humidity levels of 50 percent or greater can supply enough moisture in the air that condensation can start to happen at temperatures close to the actual surface temperature of the object. Water vapor from your basement space probably turned into condensation when it came into contact with the cold insulation and vapor barrier on that rear wall.

Common molds that cause health problems in adults and children often fall into two main categories. Penicillium and Aspergillus are two common indoor molds. Cladosporium and Alternaria are common outdoor molds that get brought indoors. Innocent pieces of slightly damp firewood can contain vast amounts of mold. Once thrown onto the fire, mold spores can be pumped into the house by indoor air currents that circulate in and around the fireplace. Seemingly harmless cut and live Christmas trees can be loaded with outdoor mold spores. Damp mulch in garden beds can liberate millions of spores and these can enter open windows. Forget about stopping mold spores from getting into your home. It is virtually impossible

The key to stopping or halting mold is to cut off its supply of water. Vent dryers outdoors. Install high quality fans that remove water vapor from baths and kitchens. Cover crawlspace dirt with high performance vapor barriers. Fix plumbing and roof leaks immediately. Stop water infiltration into basements and crawl spaces by installing hidden linear French drains around your home. These simple trenches filled with perforated pipe and gravel can intercept and redirect water away from your home. Install excellent ridge and soffit ventilation systems. Seal leaks in brick homes caused by wind driven rains with high performance breathable silane and siloxane water repellents. You can stop your mold growth by lowering the relative humidity in your basement or by raising the indoor temperature.

Cleaning mold is fairly simple. A solution of 4 parts water and 1 part chlorine bleach can be used to remove mold from tile, concrete, grout and other surfaces that are not harmed by the harsh chlorine. Fabrics, carpet, painted walls, wood, clothing, etc. can be cleaned using non-toxic oxygen bleach. Oxygen bleach is a powder that is mixed with water. It is readily sold on the Internet and on cable television. Some national club membership stores carry it as well. It is best to buy it in its pure form. Many companies that sell oxygen bleach add fillers to the product. Find one that is 100 percent pure oxygen bleach.

Author's Notes - August, 2004

Today I received a very helpful email from Ms. Sue McGregor-Hunter, the Executive Director of the Peterborough Green-Up in Canada about some new information about mold clean up. Sue wrote:

"... In our research from agencies such as the EPA, we have found that bleach is no longer recommended as a cleaning agent. Yes, bleach "kills" the mold but dead mold is a toxic as live mold. The homeowner has to completely remove it, if they are to suffer no ill health effects. It is recommended that they clean with a unscented detergent (so that the scent does not mask the smell of the mold - one of the clues to the homeowner that mold is still present) and then use a HEPA vacuum to thoroughly clean. They must repeat the process until it is completely gone. Not quite as simple but more effective for health effects ...."

Sue McGregor-Hunter
Executive Director
Peterborough Green-Up
360 George Street North
Unit 42
Peterborough, Ontario
K9H 7E7

Thanks for this heads up! TC

Column 344

Understanding Your Insurance Coverage Before Disaster Strikes!

kitchen fire

The fire never made it into the kitchen. You are looking at classic smoke, heat and water damage. Water damage happens when all of the steam from the water used to fight the fire starts to condense on the ceilings and walls.

Insurance Coverage

DEAR TIM: How do I know if my home owners insurance policy will actually cover the true cost to rebuild or repair my home after a fire or other disaster? Is it possible that there could not be enough money in the policy and that I would have to take money from savings to rebuild my home? How can I tell if I have enough insurance to rebuild my home as it stands now? Terry F., Daytona Beach, FL.

DEAR TERRY: It is said that timing is everything. Just one month ago my neighbor's house caught on fire. They were not home but an alarm system summoned the fire department. Even though the house was less than a mile from the firehouse and the response of the fire department was immediate, it appears the house sustained close to $350,000 in damage. The fire was contained to just one room and two hallways, but the smoke and heat damage was enormous. The fire was so hot that it melted the asphalt in the tar paper under the tile roof!

Aside from losing many of their one of a kind possessions, it appears they might be under insured for the loss. Their home has very unique plaster work, woodwork, leaded glass windows and other custom finishes. They had a fairly standard homeowners insurance policy, but it appears that the cost of construction and remodeling in my area has possibly outpaced the loss coverage. They may have to take out a loan or dip into savings to restore the home to pre-fire conditions. You bet it is possible that the same could happen to you.

Most homeowners insurance policies have a standard feature called an inflation guard endorsement. This feature causes your coverage to automatically increase each year. Most high quality insurance companies use sophisticated computer software to track residential construction and remodeling costs. They do it by postal zip code. One region of the nation may have flat or static construction costs while another part of the nation may experience cost increases of 5 or 6 percent per year. Be sure that your insurance company tracks costs using this method. An experienced insurance agent knows about such matters.

The trouble is that this method of costing and indexing only works if the correct number was used for the replacement cost of the home when the policy was written. It is not uncommon for a homeowner or an inexperienced insurance agent to use the real estate market value of a home when completing an insurance policy application. This is a mistake. What an existing home sells for does not necessarily equal the cost to rebuild the home after a fire, tornado, hurricane or flood!

To determine if you have enough insurance coverage in the event of a loss, there are several things you can do. If you have a top notch insurance agent and they represent a top company, they have questionnaires that you can fill out that allow you to accurately describe your house and its finishes and fixtures to the insurance company. Many of these actually have photographs so you can compare your home to the different types the insurance companies track. Once complete you submit the form and the insurance company calculates what they think it would cost to replace or rebuild the home. Some companies will actually send out an estimator to physically inspect your home and calculate a replacement cost.

fire damaged bookcase

The fire consumed the room to the left. Flames were eating away at this bookcase. The top of the leaded glass doors melted.

You can actually arrive at a very close replacement cost on your own. Visit new model homes in your area. Select houses that are as close in size, style, and finish to yours as possible. This is somewhat hard to do if you live in an older home but keep in mind that the craftspeople who build new homes in your area will likely be the same ones who rebuild your existing home should something happen. Calculate the square footage of finished living space in the new model home. Ask the developer or realtor what the lot cost. Deduct the cost of the lot and the real estate sales commission from the asking price of the model home. Divide this number by the square footage total. The result should be a fairly accurate cost per square foot to replace your home. Multiply this cost per square foot by the number of square feet of finished living area in your home to determine your home's replacement cost.

Column 345