Programmable Thermostats

Programmable Thermostat

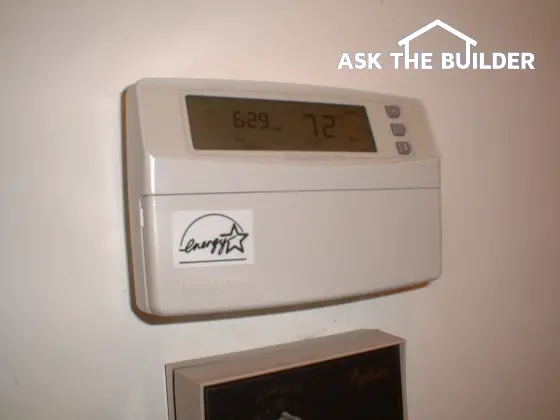
My programmable thermostat works very well. It is dependable and has four different time periods that will cycle on and off each day.

Programmable Thermostats

DEAR TIM: Electricity and heating fuel prices are soaring. I need to conserve energy. Will a programmable thermostat really help me save money? How can you maximize energy savings when using one? Robin T., Auburn, NY

DEAR ROBIN: You bet a programmable thermostat can save you energy dollars. The amount of savings depends upon many factors. Some people save more than others because they fine tune the thermostat for maximum performance. But keep in mind that these wonderful thermostats can't make a silk purse out of a sow's ear. In other words, if your furnace and air conditioning system is poorly designed and not sized properly to match the heating and cooling needs of your home, the thermostat may struggle to deliver the savings and comfort you desire.

Programmable thermostats are not new. They have been around for years in one form or another. But advancements in electronics and small computer chips have allowed these instruments to become more reliable and affordable. These devices allow you to adjust the temperature in your home up to four times a day. The thermostats have a memory and will raise and lower the temperature at different times so that when you wake up or come home the house is at the desired temperature. When programmed correctly they will also adjust the temperature in the home when you have left for the day or are sleeping.

The typical programmable thermostat has four setting periods: Wake, Leave, Return, Sleep. You simply enter these times into the thermostat and then set the desired temperatures for both the heating season and cooling season if you use air conditioning. To optimize energy savings, set the thermostat back eight to ten degrees when you are away and sleeping. These work best in the heating season. You probably will find that these setbacks are too much if you are using air conditioning. For the most part, air conditioners do not recover as quickly as furnaces.

It often requires a few days to properly adjust these thermostats. You need to learn how quickly your furnace or air conditioner can recover from the set back temperature. In my own home, I have found that it takes just 30 minutes for my furnace to make up the eight degree difference. But it takes 90 minutes for it to drop the temperature just four degrees when cooling. Once you learn how long it takes to go up and down, you can program the furnace or air conditioner to turn on at the right time so that when you wake up and/or come home, the house is at the perfect temperature.

You also need to learn how long it takes to go the other direction. There is no reason why the furnace or air conditioner should be still running just before you leave the house or go to bed. The thermostat should set the temperature back some time before so that you are out the door or under the covers just before it gets uncomfortable.

Not all programmable thermostats are created equal. I suggest you buy a high quality one. Some poor quality thermostats contain electrical components that create false heat. This can cause up to an eight degree temperature difference between the actual air temperature and what the thermostat reads. The best thermostats carry an Energy Star label and cost more money because they contain high quality components.

If you have an existing programmable thermostat, look to see if it contains batteries. If so, change these batteries annually. Be sure the thermostat has indeed been programmed. Often a programmable thermostat is operating as a normal one and the interior temperature never changes. Check the thermostat periodically to see if indeed it is raising and lowering the temperature. Come home early one day to see what is going on ... or off!

Related Column: Programmable Thermostat Sources

Column 367

Brighten up Rooms with Mirrored Doors

Mirrored Closet Doors

DEAR TIM: I need to brighten up the bedrooms in my house but am really concerned about energy costs. Is there a way to add more light or create the illusion of light without giving more money to the utility company? I am on a fairly tight budget and can't afford to hire someone to make the improvements. What do you have in your bag of tricks for me? Ron F. Amelia, OH

DEAR RON: Magicians often employ smoke and mirrors to create a spectacular illusion. Forget about the smoke and consider using mirrored closet doors in the bedrooms. Not only will these doors make the rooms brighter, they will also make the rooms feel bigger. The best news of all is that these products can be very affordable and they are quite do-it-yourself friendly. You don't have to limit the use of these in bedrooms. They are excellent choices for entry hall closet doors.

Mirrored interior doors are really nothing new. For many years builders and homeowners simply purchased a large plate glass mirror and use different clips and channels to mount the mirror on the back of a door. The trouble is when the closet door was closed, the mirror was hidden from view. Placing the mirror on the room side of the door is a modern application that looks smart and distinctive. The glass is available with beveled edges and special decorative V grooves as well.

You can often add a mirror to an existing door but I feel switching out your doors and installing new mirrored door kits may be a better long term solution. The mirrored door kits tend to look much better and the glass is far safer than traditional large mirrors.

The new mirrored door kits are available in either hinged bi-fold doors or sliding by-pass doors. They are available with either full coverage frameless mirrors, doors that have a narrow metal frame, doors that have an attractive wood molding frame or doors that have a rich wood surround that are very traditional in appearance. The wood framed doors are available in cherry, whitewash oak and white ash. They will take your breath away.

Mirrored door kits come in various sizes to fit most standard openings. Standard kits reach up to eight feet tall. If you need a custom size door, some of the manufacturers will make it. This is a great option in case your current door opening is an odd size. You can get doors that fit openings as wide as twelve feet and as high as eight feet. The extra cost to make a custom door above and beyond the door kit cost is usually just $75.00.

The installation of these doors is not difficult. The doors have excellent hardware that is often pre-assembled at the factory. Typically you just have to install a top and bottom track. The by-pass or sliding doors are easier to install than the bi-fold doors. Bi-fold doors simply require tighter tolerances with respect to the opening being square and plumb. If you try to install a bi-fold door in an opening that is out of square the gap at the outer edges of the door adjacent to the wood or drywall jambs will not be consistent. The door will operate fine, but the gaps may look a little unsightly.

The mirrored door kits are not budget breakers. A simple door kit can often be purchased for less than $70.00. The top of the line wood door kits that fit the largest openings can cost over $500.00. But if you are building a new home, the eight foot tall floor to ceiling mirrored doors can actually save you and your builder money. By eliminating the drywall and framing above the doors a builder can often save up to $170.00 per closet. That is a significant savings.

Be sure to look for mirrored doors that offer jump proof rollers for the tracks. Not all mirrored door kits offer this hardware. This hardware will keep the doors on the tracks for many years to come. Poorly designed tracks and roller systems allow mirrored doors to jump the tracks regularly. There is no need for this to happen if you simply purchase the best door kits.

Companion Articles:   Mirrored Door Sizes, Specifications & Tips, Mirrored Doors & Manufacturers

A Patio of Concrete – the Right Way

A Patio of Concrete

Concrete Patio

DEAR TIM: I am building a new concrete patio. It is important to me that the patio is sized correctly and built to last a lifetime. Do you have some important design tips for patios? Does the end of the slab away from the house have to be thicker than the rest of the slab? How can I prevent the slab from tilting towards the house over time as the backfill along the house settles? Steve C., Riverside, CA

DEAR STEVE: I can't tell you how many enjoyable evenings I have spent on my patio with my wife and family. My wife and I spent a great deal of time planning the patio and it paid off. There is a special area for our table and chair set, a planting bed in one part that has a wonderful paper bark maple shade tree in it, a secondary sitting area with a glide rocker and two chairs, a barbecue grill area and still plenty of extra room to spare. You can achieve the same or similar results if you just take your time and sit and think.

Patios and decks are nothing more than outdoor rooms. The trouble is many people stake out an area 12 feet by 20 feet and think that this is a huge expanse. It does indeed look big without furniture on it. But once you place furniture on a patio this size, it starts to shrink rapidly. The truth is a 12 foot by 20 foot patio is not that big at all.

Start your planning by determining just what you want on the patio. A standard round table with chairs requires an area 12 feet by 12 feet. This will give you enough room to walk around the table as people are sitting in the chairs. Keep in mind that the patio will have paths within it that allow you to cross the patio to get to the house or to the yard. Do not place furniture in these critical areas. Use graph paper and scale cutouts of the furniture to help you plan. Pay attention to your existing dining and living rooms. Note how much space there is between chairs, end tables and your couch.

Your local building department may have special recommendations with respect to code requirements and the actual concrete slab. If there are no code requirements then I would do several things. Because you live in a very mild climate you don't have to worry about frost heaving. It was a concern of mine so I placed three inches of small rounded gravel beneath my slab to prevent water buildup under my patio. I installed a hidden pipe in the gravel at one end of my patio. This pipe extends about ten feet and eventually comes to the surface. This pipe helps keep soil moisture to a minimum and this helps to minimize, if any, frost heave.

You should pour the slab at least five inches thick. I would use nothing less than a 7 bag mix or specify 4,500 pounds per square inch strength. The more cement you have the stronger the concrete will be. Remember cement is the ingredient that holds the sand and gravel together!

In addition, I would use both steel reinforcing and fibermesh secondary reinforcing in the slab. One half inch thick steel reinforcing rods placed at two foot centers in both directions will help make your patio enormously strong. The fibermesh consists of virgin polypropylene fibers that are added at the concrete ready mix plant. These fibers help prevent plastic shrinkage and settlement cracks. Specify about two pounds per cubic yard. Place the steel rods in the center of the concrete. The steel rods will help keep the patio in one piece in the event of a crack or settlement. You can drill into the house foundation and place steel dowels that extend into the slab as well. These will help prevent settlement if the backfill does drop alongside your home.

Be sure the soil beneath the patio is compacted. Consider treating the soil for termites if you are permitted to do so. If you have a well, you need to have a professional exterminator do this chemical treatment. Avoid pouring the concrete on hot, sunny and breezy days. The best concrete pouring conditions, in my opinion, are damp overcast days with the temperature hovering around 57F. The slab must have a clear curing compound applied to it immediately after you have given it its final finish.

Column 371

Solving Low Water Pressure Problems

water line valves

Low Water Pressure - Now here is a thing of beauty. It is my main shutoff valve with a system drain cock just above it. As you can see, it would be no problem to work on this aspect of my system. I'll never have to as I installed a ball valve for the main shut off.

DEAR TIM: All of the fixtures in our three year old home have had horrible water pressure since the day we moved in. If you have two garden hoses on the second floor toilet will not flush. Our builder has not done a thing to help us. Our next door neighbor's house was built the same year and has excellent water pressure. What in the world could be so different between our two homes? Is there a way to easily diagnose the problem? Shelly W., Spokane, WA

DEAR SHELLY: What a shame your builder is ignoring the problem. An abundant supply of water is one of the most basic essentials in a new home. There most certainly is a problem and the good news is that you will have pressure and volume equal to that of your neighbor's house in short order. Since you are both tied into the same water main and their pressure and volume is fantastic, it is not unreasonable to expect identical results.

There are several things that can cause a low pressure and volume problem. Some are easy to spot while others are hidden. The first thing I would look at are all of the shut off valves from the street into your home. You need to make sure these valves are in the full open position. Two critical valves to look at are the ones on either side of the water meter. If you have an outdoor meter that is in an underground pit, you may have to purchase a special socket wrench to open the meter box cover. Visit a plumbing supply house for one of these special five point sockets.

The shut off valves at a water meter usually have a long bar on top of the valve. This bar needs to be pointing towards the center of the water meter if the meter is centered between the two valves. Often this valve rotates just 90 degrees. To make sure it is in the full open position simply turn the valve to the off position and rotate it backwards 90 degrees until it is totally open. If you choose not to operate these valves, simply call your local water works and ask them to assist you. Frequently they will do this for no cost.

In-ground water meter

You are looking at my water meter. It is in a pit in the ground. There is very little room to work. Don't mess around here if you are a rookie!

Next, check the indoor main water shut off valve. See if it is also in the full open position. Believe it or not, someone may have partially closed it years ago and never fully opened it. Stranger things have happened. If this valve is an old fashioned gate valve or one with a traditional washer and rising stem, a malfunction within the valve can cause the valve to appear to be in the full open position and yet the valve could be partially closed. This is why I prefer to use full sized ball valves that open to the full diameter of the pipe size that they are connected to. If you do not have a ball valve at the main shut off, I urge you to install one.

If all of the valves are fully open and the water pressure is still low at all locations within the house, this indicates that there is a restriction in the line. The buried portion of the water line leading to your home from the street could be crushed or crimped in one or more locations. The plumber that installed the buried line could have accidentally dropped a large rock on the line while backfilling the trench.

Although remote, there could be a large stone or pebble blocking the water line or one of the valves. The only way to determine this is to break open the water line at the water meter and see if you have excellent volume and pressure at that location. If so, you know the trouble lies between that point and your home.

The problem could also be the actual water meter. It may have an obstruction within it. This can be verified by taking the water meter out of its saddle and installing a bypass pipe. If you have excellent pressure and volume you know that the meter was the offender. But do not attempt to perform this test yourself. Virtually all meters are sealed to prevent tampering. You must have your local water works personnel perform this bypass test. Some local plumbing codes may also restrict you from working on the water lines. Be sure to consult your local plumbing inspector to find out what you can and can not do yourself.

Termite

termite floor joist

When checking for termites, closely inspect the rim joists around a home and the first two or three feet of floor joist. Use an ice pick or other sharp metal probe to see if the joists are solid.

DEAR TIM: I am interested in buying a home that has a history of termite infestation. The pests were treated by a professional but I am unsure of what type of treatment was done. Is it foolish to buy this house? Are there other tests I should perform before making an offer? Is there a way to permanently eradicate termites from a home? Barry H., Scranton, PA

DEAR BARRY: Many pest control professionals have a saying that I feel is highly accurate - "There are two types of houses. Ones that have had termites and those that will." But there are precautionary measures homeowners can take to hopefully prove the professionals wrong. As for the merits of purchasing the house, I would say that you still need to gather more data before consummating the deal.

Termite Colonies

Termites are a highly intelligent and destructive insect. Each year, new termite colonies form and these along with existing ones cause hundreds of millions of dollars in damage to businesses and homes. Even steel and concrete skyscrapers are not immune. Termites don't discriminate. They will eat the paper on the back of drywall in these buildings as easily as they might eat a wood stud or floor joist in a single family home.

The social system within each colony is impressive. At its center is a queen termite that stays busy laying thousands of eggs. In addition to the queen, colonies have reproductives, soldiers and worker termites. The reproductive termites are the ones that swarm each spring and summer and leave a colony to form a new one. Soldier termites always stick around the nest and defend the colony against invaders. The worker termites are the ones with an appetite.


Termite infestation? Pick the best exterminator using my Termite and Carpenter Ant Checklist. I offer a 100% Money Back Guarantee.


Worker Termites

We all need to worry about the workers. Worker termites travel from the colony through a vast network of underground tunnels and gather food for themselves and all of the other termites who stay back at the colony. The workers forage for food constantly and randomly. They munch on your wood and then take it back to the rest of the colony. The workers are always in search of new food sources. This is a self-preservation mechanism and provides them with wholesome fresh food on a regular basis. Just because termites have visited this home in the past - and may show up again in the future - doesn't mean you should walk away from the deal. If repairs can bring the house back to sound condition, the house may be a good buy.

To determine the condition of the home I would make an offer to purchase contingent upon the inspection of no less than two different individuals. A top quality pest control person can often be hired to inspect for the presence of active or past termite activity. In your case you know that the house has had past activity but a new colony may have formed nearby and possibly defeated any past termiticide treatments. I would also insist on an inspection by a registered professional structural engineer.

This person can assess the structure of the house and tell you if the house needs any repair work. Use the reports generated by these two people to help you arrive at a fair purchase price. The reports may recommend additional termite treatments and structural repairs. It is not uncommon for the purchase price to be reduced by the total sum of these goods and services.

Termite Infestation

There are numerous methods to minimize and eliminate termite infestation. Professional pest control companies can inject traditional barrier chemicals in and around the soil to repel foraging termites. You can also install colony elimination system that actually kill off a colony by slowly killing the worker termites who ingest poisonous bait. This method has become highly popular and over 50 percent of all termite treatments done in the USA today use a colony elimination system.

Not all colony elimination systems are created equal. Some are chemicals that are injected into the ground, some are chemical laden stakes that are driven into the soil and others have monitoring stations that require periodic inspections. Price is generally a great barometer of performance. The more money you spend for a colony elimination system, typically the better it will perform.

Keeping termites away from your home forever may be a daunting task. New colonies form each spring. You need to constantly monitor your home and inspect periodically for infestation. A colony elimination system may kill one colony now but it may need to be permanently maintained to kill future invaders.

Author's Note: We've received other emails with similar problems or questions. Here's one from Aaron S. of Los Angeles, CA, regarding termite fumigation.

"My house was fumigated for termites covered with a tent etc. After removing the tent two days later, we entered our house but there was no odor of gas at all.  A while later, we saw insects, spiders, roaches etc. moving around. The fumigation company claims that they mix a substance with the gas so that it will not have an odor. My question: Shouldn't there be a gas odor and dead insects? We can't see the termites inside the wall, but we feel that if all the insects are still alive, probably the termites are not dead either. Please, let us hear you opinion. Thank you very much!"

Doing a little online checking, the chemical used during termite fumigation is targeting only termites. It will not kill spiders, ants, bed bugs or cockroaches. So Aaron, you may still see other insects moving around.

Column 373

Roof Maintenance

roof maintenance

Roof Maintenance

DEAR TIM: In a perfect world, I would think that a roof would require little or no care. Is that the case? Do I need to maintain my roof just like other parts of my home? If so, what should I do and how often should I do it. What are the common roof trouble spots? Frank M., Portland, OR

DEAR FRANK: There are a few perfect places on the planet, that have ideal conditions for those who have no interest in roof care and maintenance. One of them is the Atacama Desert in Chile. Portions of this desert rarely, if ever, get rainfall. It is considered by many to be the driest place in the world. Since most of us don't live there, our roofs are quite possibly one of the most important components that keep us and our possessions protected from the weather. I suggest you pay attention to your roof, if you want to stay dry on a regular basis.

Not all roof materials are created equal. Some materials require very little, if any care. Among those are slate, metal, tile and other similar durable materials. Metal roofing materials, that contain steel, need to be protected with a tin or zinc alloy or highly durable paints to stop rust. Copper and stainless steel roofing is rustproof, but it can wear out over time as will all roofing materials. Unfortunately, the roofing materials that are the most durable come with a price tag that will take your breath away.

Asphalt based materials are by far the most common roofing product in the USA. Many of these will last for 35 years or longer, if applied according to manufacturers specifications. I think they are an incredible bargain. Asphalt shingles also last longer on steeper sloped roofs. These roofs shed water faster and this helps extend the life span of the asphalt products. Excellent under roof ventilation will also help extend the life of an asphalt shingle roof. This air movement in the attic space allows the roof deck to stay as cool as possible.

It is a good idea to perform at the very minimum an annual roof inspection. Mother Nature always bats last and she can force water into your home any number of ways. Furthermore, workmanship defects can cause problems to appear at any given time.

The biggest problem areas tend to be roof flashings. Flashings are transitional roof materials that connect roofs to other parts of the house. You will find flashings at chimneys, plumbing vent pipes, and locations where roofs touch up against a vertical wall that rises above the roof. Inspect these flashings and look for rust, cracks, or other openings where water may enter. In my opinion tin and copper make the best flashing material because these metals can be soldered. Never use aluminum flashing material in brick or masonry. The alkaline chemicals in the mortar corrode the metal. If you see caulk or roofing cement around flashings, it is a strong possibility that trouble is just around the corner.


Have a leaking roof? Find a professional to fix it using my Roofing Replacement / Repair Checklist. I offer a 100% Money Back Guarantee.


nail pop on roof shingle
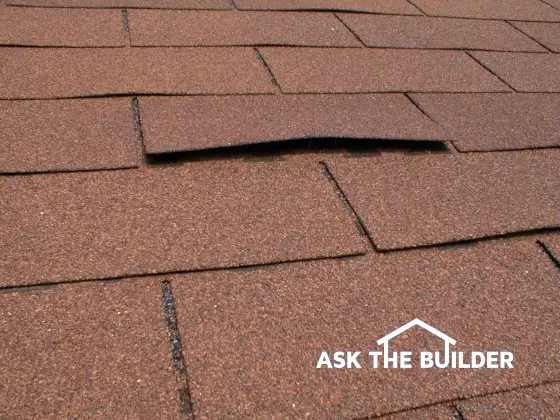
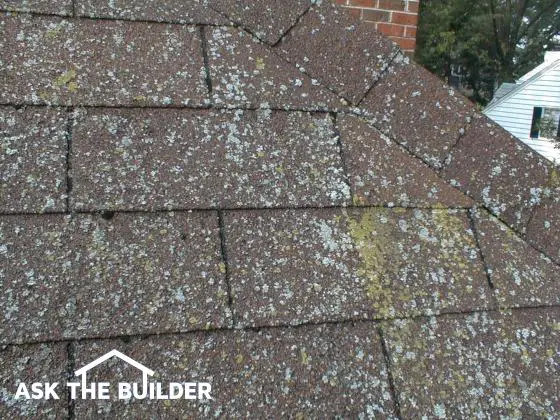
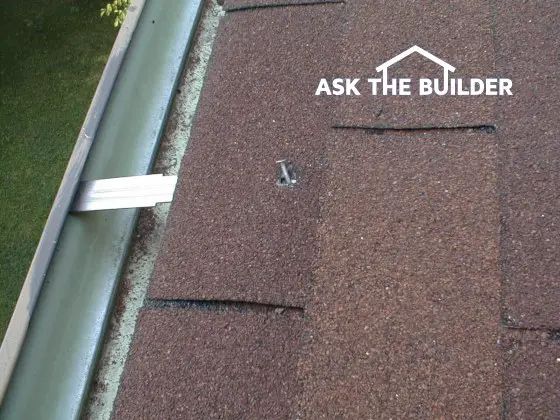
Check the entire roof surface and look for nails that have popped up through the roofing. Believe me, it can and does happen! Look for loose or cracked shingles. Pay attention to the recessed groove areas in between each individual shingle. The top of this knockout or groove is usually the first place you will see loss of the small colored granules. Once the colored granules disappear, the asphalt below is subject to accelerated deterioration.

roof shingle mold


Moss and lichen buildup on roofs can also be a problem, especially on asphalt roofing. These organic materials can keep the roofing material damp for extended amounts of time and this causes premature failure of the roof. Moss and lichen buildup can often be removed by using a garden hose with a good nozzle. Direct a concentrated stream of water at the growth deposits, but always aim the water down the roof. Never direct water up under roofing materials. Once the roof is clean, you can minimize future growth by installing copper strips near the top of the roof. Each time it rains, small invisible amounts of copper are deposited on the roof. This acts as a poison and inhibits moss and lichen growth.

Column 374

Pre Hung Interior Doors

3 in screw into door jamb

Prehung Doors | Here is a trick worth its weight in gold. Drive a 3-inch long screw behind the upper hinge through the door jamb and into the rough frame.

Prehung Interior Doors

DEAR TIM: I want to save some money on an upcoming project. It seems to me that I could successfully hang interior pre-hung doors if I had some guidance. Surely it can't be that hard to do. Of course I want the doors to operate smoothly from now on. What must I do to get trouble free door operation? Scott J., Tiffin, OH

DEAR SCOTT: Hanging interior prehung doors can be somewhat challenging. Don't underestimate the complexity of the job by any means. Fortunately it requires a few simple tools and a minimum of materials. Gather up a two and a four foot level, a hammer, a nail set, a screw-gun, a small square, a bundle of wood shims, a pound of eight penny finish nails and several three inch long drywall screws.

Prehung interior doors have much of the work done for you when you receive them. But there is still some work to do to get a perfect fit. Typically the manufacturer will leave some extra length on each of the side jambs. This is done on purpose so you can adjust for a floor that is out of level across the width of the door opening. This is the first thing to check for.

You do this with a two foot level. If the floor is out of level across the opening, this means that one of the jamb legs - the one on the high side of the opening - will need to be shortened. If you fail to make this adjustment in length, one of the jamb legs will end up floating in the air as you begin to secure the jambs to the rough opening.

The door slab itself is almost always perfectly square. The trick is to adjust and support the jamb in the rough opening so that the spacing between the jambs and the door is consistent all the way around the door. You start the job on the hinge jamb.

Use the four foot level to check the hinge side rough opening to see if it is plumb. If it is not, don't worry too much. If it is out of plumb, try to measure how much and where it is out of plumb. You will need to know this so that you can insert the proper amount of shims between the jamb and the rough opening as you start to hang the door.

(Editor's Note: Read about Don's issue with his door opening not being square.)

Position the door and the jamb in the rough opening and use one or two eight penny nails to temporarily tack the hinge jamb into place. Use the level and necessary shims to get the hinge jamb as plumb as possible. Be sure that the door jambs are flush with the finished wall surfaces on both sides of the wall. Ideally you would like to see the jamb project beyond the finished wall surface by about 1/32nd of an inch.

Slide shims as necessary between the jamb and the rough frame at each hinge location. Tack the door in place with additional nails and close the door. Stand on a ladder and check the top of the door to see if the spacing between the door and jamb is equal across the entire width. It should be a 1/8 inch gap or so. You should have a similar gap on the hinge side. If the top gap is not consistent, you need to readjust the length of one of the side jambs.

Once the gap on the hinge jamb and top is the same, you work on the latch or door knob jamb. Simply slide shims between the jamb and the rough opening until the gap is consistent and the door operates smoothly. If you are satisfied, nail the jamb in place at the shim locations. The space between the shims should not exceed 24 inches if possible.

The key to years of trouble free service is to screw the hinge jamb to the rough opening. Without screws, repeated operations can cause the door to sag slightly. I prefer to hide the screws behind the hinges. All you have to do is remove the screws from one hinge at a time on the door jamb. Gently pry the hinge out of the jamb and install a long drywall screw through the jamb into the solid wood of the rough opening. It is an old carpenter's trick I learned long ago.

Column 375

Building a New Home – Get Organized

notebook manufacture directions new home construction

This is a nifty tool that works alongside your blueprints and any written specifications.

Get Organized

DEAR TIM: My husband and I are getting ready to build a new home. I am astonished at all of the details that need to be addressed. Each time we have a meeting with our builder all sorts of decisions need to be made. I am afraid that lots of information is going to fall through the cracks before the final walk through. What is a good way to keep track of all of this information? Julie J., Stillwater, MN

DEAR JULIE: Many people decide not to build a new home for this very reason! They are overwhelmed with the decision and product selection process and simply don't know where to start. Many people are afraid of making the wrong decision. The key is to approach the task in an orderly manner and start making product selections and decisions long before ground is broken.

The building and remodeling playing field is actually a minefield. Making decisions out of order or selecting a product without checking for conflicts with other products can trigger an explosion of extra costs and delays. Once upon a time a client of mine picked two elegant wall light fixtures that hung on each side of a bathroom medicine cabinet. Once they were installed I quickly discovered they prevented the medicine cabinet from opening. Because the homeowner had fallen in love with the fixtures, the problem was solved by relocating the electrical boxes. It was a costly mistake that I paid for.

You can avoid nightmares like mine with a simple job organizational binder. This is a nifty tool that works alongside your blueprints and any written specifications. I have found that the binder works best when it contains a section for each room of the house as well as a separate section for the exterior. Typical things you would find in each section would be photographs or illustrations of fixtures, installation instructions for appliances, fixtures or products, technical information showing supply pipe sizes, wire sizes, and the proper rough-in locations of these utilities.

Each section of the binder should also have a room finish schedule. This is a table that communicates to the builder and his subcontractors exactly what you want on every wall, floor ceiling, trim, door surface in each room. If the data in these schedules is accurate it is entirely possibly for the workers to finish the job with little or no verbal communication.

You will need more than one binder for the job. At the very minimum you need three: one for you, one for the builder and one that is safely stowed in a lock-box at the job site. The subcontractors need the job site binder to refer to as they work each day. Use clear plastic pocket protectors to keep the individual pieces of paper safe from wet job site conditions.

Creating a complete organizational binder means that you need to make product selections before construction begins. This may seem unusual but you might as well resign yourself to it. There are numerous advantages. Pressure decisions are eliminated. Because it is early in the process, you have time to get items that might have to be special ordered. Waiting until the last minute to make selections often eliminates certain items because the job may have to grind to a halt for weeks or months.

Carpenters, plumbers and electricians need to know what they are installing three or four months from now so they get openings, pipes and wires in the correct spots. Every time I have tried to use ESP because I was trying to guess what a customer would want, I guessed wrong. Providing your builder with the correct information simply takes the guesswork out of the process.

If you really want your job to run smoothly you and your builder need to look at all of your selections and insure that there are no conflicts. Imagine your dismay when you discover that the electrical outlet for your night stand is behind your bed. Similar frustration happens when a central vacuum outlet becomes hidden behind a door that is always open. Pesky mistakes like this can be avoided with a little thought and attention to detail.


How would you like me to build your new home? It's probably impossible for me to fit your job into my schedule, but I will gladly share hundreds of my tricks and building secrets with you and your builder. Check out my New House Specifications.

Column 376

Cleaning Wood Siding – Be Gentle – Pressure Causes DAMAGE

natural wood siding

Cleaning Wood Siding This wood siding can be cleaned with certified organic STAIN SOLVER. It's oxygen bleach. Cleaning outdoor wood is not hard to do at all.

Cleaning Wood Siding - Beware Pressure Washers!

DEAR TIM: We live in a shady wooded area. Our house is covered with natural cedar wood siding that constantly develops mildew stains. Every few years we apply an additional coat of oil-based semi-transparent stain to make the house look fresh. What products are best to use to clean the siding and to seal it? How long will a good water repellent last? Do you have cleaning wood siding tips for me? Susan P., Highland Park, IL

DEAR SUSAN: It's no wonder you have mildew problems on the siding. I want to warn you now to never use a pressure washer to clean your siding before you next seal it. Watch this video to see the damage pressure washers cause.

What Causes Mildew on Wood Siding?

Mildew on wood siding is caused by mold spores that float onto the siding. They eat dust and wood sealers and water activates the mold spores creating the mildew

Millions of mold spores are in the air surrounding your house. They land on the siding and once there are delighted to find out that you have provided them with dinner.

Do Oil-Based Stains Contain Natural Oils?

Many oil-based house stains contain natural oils and resins like:

  • linseed oil
  • vegetable oil
  • tung oils
  • animal fat

Are Natural Oils Food For Mildew and Mold?

Yes, the natural oils found in many wood sealers and water repellents are food for mildew and mold.

These water repellents happen to be food that mildew thrives on. The shady conditions slow natural evaporation and help to raise the overall humidity around the siding. These conditions are excellent for mildew growth.

Do the Manufacturers Know the Oils Feed Mildew?

Yes, the manufacturers of many exterior stains know this. They add chemical mildewcides and fungicides to the stains. But ultraviolet (UV) rays from sunlight and rainwater break these chemicals down. Some stains contain very little of these products and within a short amount of time, the mildew can start to grow.

What is the Best Wood Sealer?

In my opinion, the best semi-transparent stain to use is one that contains no natural oils. I prefer to use products that are made with synthetic resins.

cabot australian timber oil

This is the best penetrating wood sealer I know of as of 2021. CLICK on THE IMAGE to have it delivered to your home.

Does Mildew Eat Synthetic Resin?

Mildew will not eat synthetic resin. It's still possible to get a small amount of mildew growth on the siding but the food source usually can be traced to airborne dust or aerosol saps and sugars that rain down from your trees during the active growing season.

How Do You Deep Clean Wood?

You deep clean wood using certified organic STAIN SOLVER. It's an oxygen bleach made in the USA. It will not damage the wood and it's not harmful to vegetation. You use the exact same product for mold removal on vinyl siding.

Stain Solver black background yellow scoop

Stain Solver is MADE in the USA with USA ingredients that are food-grade quality.

Before you apply any water repellent to the siding, you must deep clean it to get the best results. Avoid cleaners that contain chlorine bleach. You can readily identify this by looking at the product label. The chemical name for chlorine bleach is sodium hypochlorite. This chemical can readily bleach the gorgeous natural color from your siding. It is also highly toxic to vegetation and your valuable trees. A neighbor of mine slowly killed one of her trees by using chlorine bleach to clean a patio each spring.

What is a Safe Wood Cleaner?

A safe deep cleaner for wood siding is oxygen bleach. It is a powder that mixes with water. It is non-toxic to vegetation and trees and will not remove any natural color from the siding. You simply keep the wood siding wet with the oxygen bleach solution for 15 minutes. It will remove the mildew and deep clean the siding. Lightly scrub the siding before rinsing with clear water from a garden hose. Avoid the temptation of using a pressure washer. These devices can force water into cracks and seams. This water gets behind the siding and can travel into your home. The intense pressure from these tools can quickly erode and scar soft woods like cedar and redwood.

How Long Can a Wood Sealer Last on Siding?

A top quality wood sealer and water repellent can last up to five to seven years before it needs an additional coat. These same products can be used on wood decks but will not last as long. The orientation of the siding on your home helps extend the life of the water repellent.

Why Do Wood Sealers Last Longer on Vertical Surfaces?

Wood sealers last longer on vertical surfaces because water runs off and the harsh mid-day ultraviolet rays of the sun give the wood a glancing blow, not a direct hit as they do with horizontal wood on decks.

Rainwater runs off the siding. When the sunlight does hit your house the intense mid-day UV rays glance off the siding. Because deck lumber lies flat, water readily soaks into the lumber and the UV rays at high noon blast the wood with a direct hit.

Is Price a Good Barometer When Buying Wood Sealer?

Price is a good barometer for judging water repellent quality. The synthetic resins contain very expensive raw materials. When you are doing comparative shopping, look for the highest priced product. It very likely is made with synthetic resins.

Where Do You Find the Best Wood Sealers?

I'd shop specialty paint stores or buy wood sealers online.

I have had the best success finding these water repellents at specialty paint stores and some log cabin distributors. Oxygen bleach is readily available on the Internet at www.stainsolver.com. Be sure to buy oxygen bleach that has the highest concentration of the active ingredient - oxygen bleach.

BEWARE OF LOW-COST Oxygen Bleach: Many of the well-known oxygen bleach products contain a significant amount of fillers that simply take up space in the container. Furthermore, many of the heavily advertised oxygen bleaches are made in the Far East, not in the USA!


Message from Tim:

Years ago while researching a column about cleaning decks, I discovered the wonders of Oxygen Bleach. It is perhaps the 'greenest' cleaner I know of as it uses oxygen ions to break apart stains, dirt and odor molecules. There are no harsh chemicals, and it works on just about anything that is water washable.

I decided to create my own special blend using ingredients made in the USA. In fact, the raw materials in the active ingredient are food-grade quality registered with the FDA. I call my product Stain Solver. I urge you to use it to help with your wood siding cleaning. You will be amazed at the results!

I'm proud of my product and have no trouble promoting it in my columns because I know it works. I know it's the BEST oxygen bleach you can buy. Not many entrepreneurs can say that about their product.

If you're a customer of mine and have used Stain Solver, please feel free to leave a comment below and tell the world what you think of Stain Solver. I thank you in advance.

Column 378

Cast Iron Drain Lines are Easy and Quiet

Cast iron pipe & fittings

Cast iron drain lines, pipes and fittings are joined together with rubber seals and stainless steel band clamps. These can be assembled just as easily as gluing PVC pipe. This column was SO GOOD that I shared with the 31,000 subscribers who read my January 12, 2019 AsktheBuilder Newsletter.

Cast Iron Drain Lines

DEAR TIM: We are building a new home soon. The house will have a second story and a finished basement. Every time you flush a toilet in my existing home it sounds like a waterfall in the wall. The builder has said that he will insulate the plastic drain piping to prevent noise problems. Will this really work? Is there an alternative material that can be used? I want a noise-free plumbing system. Iris S., Winchester, VA

DEAR IRIS: Thousands of people suffer as you do because of noisy plastic drain piping. Plastic is an attractive building material for many reasons. It is relatively inexpensive, it is easy to assemble, and it will not corrode over time. But it's not a very dense material. As water crashes around inside the piping as it flows towards the sewer or septic system, it creates the annoying and sometimes embarrassing noise you speak of. Insulating plastic pipes will help control noise but only if the job is very well done.

There is a time tested alternative drain pipe you can use. It is cast iron. New cast iron drain piping is very dense and transmits little, if any, noise as water travels through it. Don't confuse new cast iron to the old cast iron pipe you might see in a 100-year-old structure. There is a huge difference in modern cast iron.

Older cast iron was sand cast. This manufacturing method was a little less than perfect. The side wall thickness of the pipe could vary and it was possible for pin holes leaks and rust pimples to develop over time as a result of this deficiency. Modern cast iron piping is spun cast. This method creates a sidewall thickness that is very consistent and is virtually defect free.

The individual pieces of pipe and the cast iron fittings are not joined with molten lead and oakum, oil soaked hemp, as in the old days. Stainless steel clamps wrap around rubber gaskets that fit at the end of each pipe or fitting. Once the stainless steel clamps are tightened with a small ratchet, the joint is leak free. If you need to adjust a fitting to achieve a perfect fit, you simply loosen the clamp. You don't have this luxury with plastic piping. Once the primer and glue is applied and you slide a pipe into a fitting, you only have a few seconds to get the joint orientation right. If you goof up, you have to cut out the crooked joint and start over.

The cast iron drain pipe does not have to be used in the entire plumbing system. Plastic pipe is a great choice for the vent system. Plumbing drainage pipes contain air before water drains down the pipes. As water enters the pipe it displaces the air. The air needs to be replaced. This is accomplished by a network of pipes that extend from the drain pipes up to the atmosphere at roof top level. Since the in-rushing air doesn't create vibrations, the plastic vent pipes will be whisper quiet.

Working with the cast iron drain piping is not much different than plastic. The biggest challenge is cutting the pipe to length. This can be done with several tools. You can rent a cast iron snapper that actually cleanly cracks the pipe to the desired length. An abrasive cut-off saw with a special metal cutting blade can also be used. The least desirable tool in my opinion is a reciprocating saw with a coarse metal blade. If you use this saw, you have to pay attention in order to make a straight cut.

The cost of the cast iron is more than plastic drain piping. The material may cost, on average, about $200.00 more per full bathroom. I feel this is a bargain since you know you will have a quiet plumbing system. Keep in mind that if you choose to use plastic drain pipes, it will cost extra to insulate them.

Don't forget that your water supply lines can also create noise. To minimize water supply line noise be sure that the water lines feeding each fixture group are at least three quarters of an inch in diameter. A one half inch diameter water pipe should never feed two separate fixtures. Small diameter water supply lines cause the speed of the water to increase as it flows towards the fixture. This increased speed creates turbulence and vibration which in turn creates noise.

Column 380