Blacktop Drive Restoration

blacktop patch repair in progress tools and wood screed

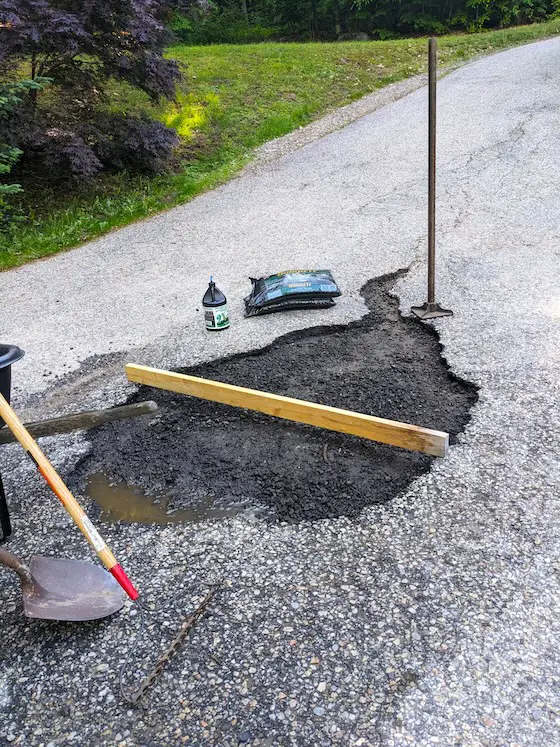
This large area of my asphalt driveway crumbled. I’ve removed all the bad pavement, removed dust from the edges, and have all the tools ready. It’s time to install the patch. Copyright 2024 Tim Carter

Blacktop Drive Restoration - It's DIY For Sure

You might fall into the trap of thinking my house is perfect in every way. You’d be wrong. I suffer from a condition where I know how to do 99 percent of the projects around my house. A deep inner force within me causes me to tackle all of these tasks no matter the size. I often work alone.

For example, seven years ago I decided to install my own new roof. It was a massive undertaking that spanned four months. Smaller projects collect on an ever-growing large honey-do list. Fortunately my lovely wife has the patience of Job.

My current project is the restoration of my asphalt driveway. While not as daunting as the roof project, I expect it to take several weeks. I approach these big jobs much like eating an elephant. You eat an elephant one bite at a time. Slow and steady progress each day is my mantra.

My asphalt driveway is about twenty-two years old. The original contractor did a very good job of preparing the base under the asphalt. The base is everything. Asphalt is a flexible pavement and derives its strength from the thick compacted gravel under the mix of stones, sand, and asphalt cement surface you drive and walk upon. The original specification for my drive called for larger stones in the mix. These provide added strength. Some stones in my asphalt are as large as peanut M&Ms.

Asphalt driveway restoration requires you to have a grasp of what’s known as the adhesive chain. Keep in mind that each product you use be it bagged asphalt patching material, crack filler, and the final buckets of sealer, all need to stick to the old asphalt if you want the maximum life from them.

This means that your existing asphalt must be perfectly clean before you start any phase of the project. If you apply a piece of masking tape to a dusty surface, you know the tape will not hold well. Even though you use a powerful leaf blower or broom on your asphalt drive, I’m sure there is still some fine sand dust sticking to the asphalt. This must be removed with a strong stream of water or a pressure washer if you want the best results.

My project, and yours may be the same, requires five steps:

  • remove weeds and excess soil from the drive surface and edges
  • blow large debris from the drive and wash it with water
  • patch large holes with the correct material
  • fill all cracks larger than 1/16th inch with crack filler
  • apply the sealer to all old original asphalt - wait 90 days before applying it to bagged asphalt patch

Removing weeds and excess soil from the edges of the driveway can be mind-numbing work. It’s necessary for you to remove this soil cover that collects over time so you can seal the edges of the driveway. Weeds growing in cracks must be removed so you can properly fill the cracks.

I have to repair three areas where the asphalt blacktop paving has deteriorated. One area is about 5 square feet, another is 12 square feet, and the final one is almost 20 square feet. This, in my opinion, is the limit of bagged cold-patch asphalt. If you have bigger areas, you probably should hire a contractor to install hot mix asphalt as was done originally.

I use a large hammer drill with a flat bit to help remove the cracked asphalt. The tool chops down through an existing crack with ease. Start at the center of a bad area and work to the edges. Remove all the old paving to a depth of 1.5 to 2 inches. Wet down the hole and direct water to the edges of the hole to remove dust from the old paving.

Compact the gravel base with a tamper and follow the directions on the bag of cold patch asphalt. Be sure the new material is 1/2 inch higher than the old asphalt before compacting it with the tamper.

blacktop patch screed with shim

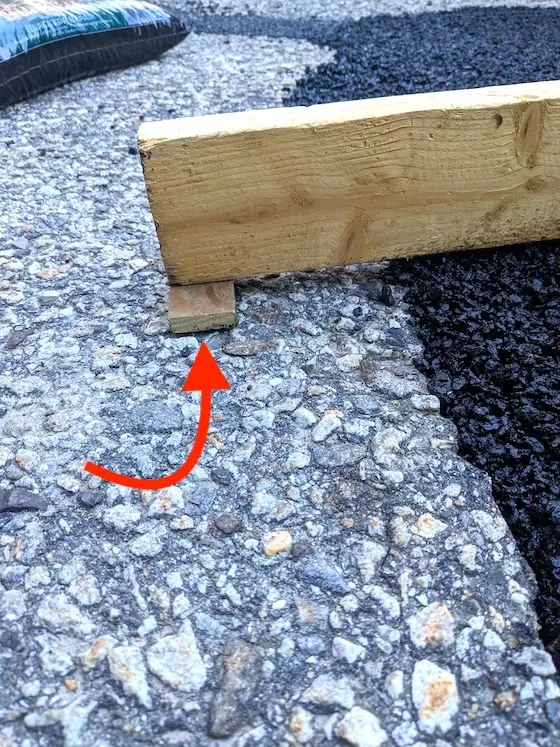
This is a 2x4 with a small piece of 1/2-inch-thick wood nailed to the bottom. I did the same on the other side. When you slide the screed across the soft blacktop patch, it is 1/2 inch higher than the existing pavement. Once tamped down, the new patch is flush with the existing blacktop. Copyright 2024 Tim Carter

Crack Filling is Mission Critical

Crack filling, in my opinion, is the most important job. If you live where it gets cold as I do in New Hampshire, you must be diligent about filling all cracks. Water that enters cracks and freezes destroys asphalt in short order. Water expands by about nine percent in volume when it freezes prying apart the asphalt.

asphalt cracks filled

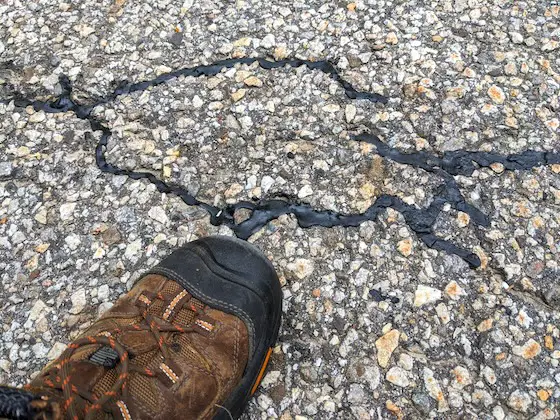
The crack filler is the consistency of mustard. If you get all the dust off the edges of the cracks using water, the filler can last many years. Copyright 2024 Tim Carter

blacktop crack filler

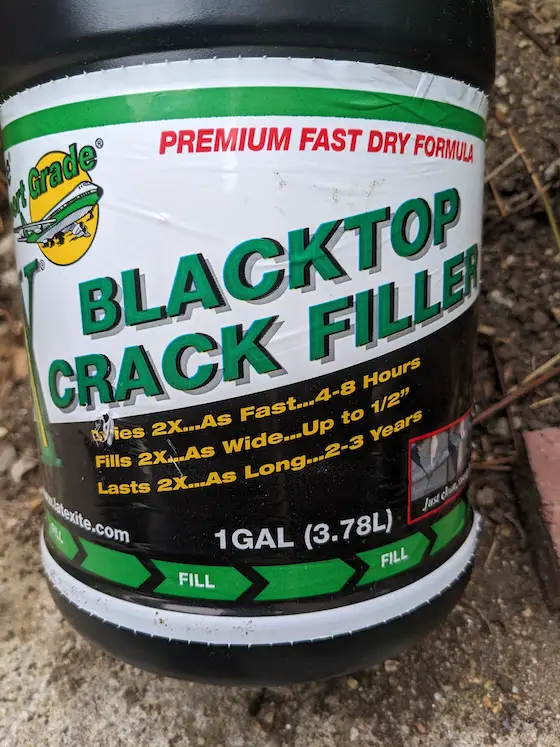
I had great success with this crack filler. It was easy to use. Read the label! Copyright 2024 Tim Carter

Dust removal from the edges of the cracks is imperative. You want the liquid crack filler to bond well to the sides of the crack. I tool the top of the crack filler with a small stick to ensure the filler is feathered out creating a waterproof bond with the old asphalt. I broadcast coarse sand on the fresh filler to help provide texture. Once again, follow the instructions to the letter on the label of the filler you use.

Applying the sealer is the last step. I’ll blow off my drive one last time to remove any sand or debris that may have accumulated over the restoration process. I only apply the sealer if I know for a fact it will not rain for 24 or 36 hours. I shouldn’t have to say this, but read the instructions on the sealer label and follow them to the letter.

Column 1563

Basement Finishing Steps

2x4 walls and foam insulation against basement walls

I’m helping my son transform his unfinished basement into 1300 square feet of wonderful finished living space. There will even be an old-fashioned speakeasy in it! Copyright 2024 Tim Carter

Basement Finishing Steps and Process - It's Pretty Simple

With home loan interest rates higher than they’ve been in years, you may not be able to move to a larger home. You might be able to obtain the added space you need by transforming unfinished space to delightful finished rooms.

Just a few weeks ago I started to help my son increase the finished living space in his home by nearly 80 percent! Two years ago he purchased a new home that had a full basement. Fortunately the builder installed an outdoor bulkhead with a set of concrete steps. This created the all-important egress door required by almost all codes.

Check Code Minimum Requirements

You should do what my son did before you even think of purchasing any materials. I had him reach out to the city building department. His job was to discover all of the minimum requirements that apply to basement refinishing. Fortunately, the building department had a very clear set of guidelines that must be met to successfully obtain a building permit.

The guidelines and requirements discussed minimum ceiling height, ventilation, insulation and heating, and the all-important egress requirement. Some windows meet the egress requirement. Don’t underestimate the importance of egress. You need to have two ways to exit most spaces in the event of a fire.

Create a Plan

Once you determine you can meet the minimum requirements of your local building code, then it’s time to draw up a plan. My son saved about $8,000.00 by drawing his own plan. He used simple software and with my help created a plan that the building department accepted. In almost all cases, the building department will accept hand-drawn plans that you create using a pencil, ruler, and paper.

The plan doesn’t need to be fancy. Here is my son’s plan. It should inspire you to do your own.

basement remodel plan

You can draw something like this yourself. Copyright 2024 Tim Carter's Son

Do Work in a Specific Order

A remodeling project like this proceeds much like building a home or room addition. It’s very important to do the work in a specific order so you don’t make things harder than they need to be. Be sure to check with your local building department about when all the required inspections must happen. You don’t want to cover up things that must be seen by an inspector.

Here are the steps my son and I will follow. I’ve lost count of the number of basement remodel jobs I’ve done for clients in the past, but each job progressed like this.

In cold climates, I like to add closed-cell foam or open-cell with a protective vapor barrier to the smooth concrete walls. The next step is to install all the framing. Don’t forget that any wood that contacts a concrete floor or wall must be treated lumber. You can purchase treated lumber meant for interior use at most old-fashioned lumber yards.

To save time and money, I anchor the bottom wall plates to concrete using a rotary hammer drill equipped with a 1/4-inch bit. I drill through the wall plate once it’s in place and then into the concrete about 3 inches. I take two 16d sinker nails, place them side-by-side and drive them into the hole. If you’re using framing gun nails, try three of those side-by-side. They do a superb job of anchoring the wall so it won’t move sideways.

After Framing - HVAC, Plumbing, and Electrical

After all the framing is complete, it’s time to install any HVAC ducting or ventilation pipes. These often are more than 4 inches in diameter. You need all the space you can muster to get them to go where you want.

return duct supply

Note how the duct on the left next to the beam gets smaller. The air is moving TOWARD you in the photo as it's the supply trunk line.

Plumbing drains and water lines are next followed by electrical wiring.

cast iron lines meghan house

These are cast iron drains. You might use PVC.

Low-voltage wiring for cable TV, speakers, etc. is last. It’s now time for most inspections. Once you pass these inspections, get out your video camera and record talking videos of all the walls. Describe what you’re looking at. These videos will be so handy years from now if you’re wondering what is behind the drywall!

It’s now time to add any additional insulation and a vapor barrier. Next up is drywall. Be sure to screw it to the walls. Try to use large pieces to minimize flat seams. The drywall should be hung horizontally. Skim-coat the drywall to eliminate joint banding. You can also eliminate it using a special primer/sealer paint.

After you finish the drywall, paint it. You can do small touch-up painting after all the other work is complete. In my son’s basement, the ceilings will be suspended. I try to do this all the time so I have access to anything in the floor joists above.

Once the ceiling is finished, my son and I will install all of the luxury vinyl plank flooring. (LVP) It’s so easy to install it now without any baseboard trim or door jambs in the way.. When the flooring is finished, it’s time to install all the interior doors and any trim. I like to paint all of this wood before it’s installed. This minimizes paint spills on the LVP.

All other finish carpentry happens in the final stage. Be sure to put down tarps as you work on the finished flooring. Remember, I offer DIY phone coaching if you need help! GO HERE to set up your introductory phone or video call with Tim Carter.

Column 1562

Hot Attics and Garages

infrared photo of roof 162.9F

It’s no wonder your attic is blistering hot. My roof temperature exceeds 162 F and that heat radiates into my attic and then into my home. (C) Copyright 2019 Tim Carter

Hot Garages and Hot Attics - The Truth About Radiant Heat

In just a few weeks my email inbox will begin to overflow. Homeowners just like you will be asking what they can do to cool down their attics, garages, houses, and sheds. After all, the summer solstice is just five weeks away as I pen this column. Here in the Northern Hemisphere this means the sun’s rays have to travel through the least amount of atmosphere to wreak havoc for millions.

I’m sure you’ve experienced the power of the sun’s infrared rays. Just months ago it was still cold here in New Hampshire where I live. Each morning I stand outside with my neighbors watching our dogs play. On clear days in early March the air temperature was below freezing but the sun was high enough in the sky to allow the rays to penetrate through our winter coats. It felt so warm that one might think it was 60 F instead of 22 F.

Have you ever visited any of the islands in the Caribbean Sea? Several years ago I was on the island of Antigua in May. I was there doing expert witness work walking on the roof of the Brazilian Ambassador’s home. I knew to get started at daybreak because the heat would be unbearable. By 7 AM I was soaking wet and not feeling well it was so hot on the roof.

The next day I went swimming and at 11 AM standing in the sun the infrared rays were so hot on my skin I felt like I was in a blast furnace. Never before in all the years of me working outdoors in the summer heat had I felt such intense heat on my skin. It was frightening to be honest. I couldn’t get in the shade of a palm tree fast enough.

Here are some facts that will help you understand why it’s so very hard to stay cool in your home when the sun is beating on it like a bass drum. I believe the best example I can offer up is that of a dying campfire.

When the fire is at it’s maximum with the logs burning, the maximum amount of heat is being produced by the fire. This compares roughly with the mid-day heat energy being delivered to your home’s roof by the sun. I’ve measured this heat at my own home using an infrared camera. I get temperature readings in excess of 160 F each time I do this.

This heat is transferred to all of the lumber and timbers that make up my roof. They, in turn, might reach temperatures of 140 F or more.

Now, think about that campfire again. Once the flames have died out, you’re left with glowing embers that produce heat for hours. If you’re patient, you know this is the best time to slowly roast marshmallows to a wonderful golden brown.

This same heat is radiated by anything at, or in, your home that was blasted by the sun. I experienced this in a most unusual way about forty years ago. My wife and I were visiting some friends. They had purchased a new brick-veneer home in northern Kentucky. It was a blistering hot summer day.

That evening after the sun had set I had to walk from the rear patio to get something out of our car. I walked past a west-facing brick wall of their home and the heat radiating out the brick was astonishing. It was no different than sitting around the glowing embers of a campfire.

We stayed at their home until just before midnight. Before opening the car door for my lovely young bride, I decided to go back to the side of the house. The brick wall was still sending out low-level infrared heat. I could feel it in the somewhat cool night air!

This same thing is happening at your home. The sun heats up everything the infrared rays hit. Wood, brick, stone, etc. store up this heat and then give it off as night wears on. This is why I find solar attic fans laughable. When you most need them to spin to cool off your home, the fan blades don’t move. Your roof shingles and all the wood creating your roof just radiate all that heat towardsyour living space.

If you want to try to stay cool you need to do what chicken farmers do. Drive past a huge barn that houses chickens and you’ll see something your don’t see on other agricultural barns. Chicken barns have massive fans at each end of the gable roof. They resemble airplane propellers. These huge fans move vast amounts of air through the barn in an attempt to cool down the barn roof structure and everything inside the barn.

If you don’t use an air conditioner, you can also blow more air up into your attic using a whole-house fan. These will help cool down everything in the attic including your entire roof structure.

whole house fan louvers

I prefer old-fashioned wind turbines to do this on houses. Even a slight breeze will cause the turbine to rotate and pull hot air out of a house or garage attic. It’s all about blowing air across hot things like you do to cool a steeping hot spoonful of chili or soup.

Column 1561

Small Retaining Wall Tips

small stone retaining wall

Small retaining wall tips: This retaining wall was rebuilt recycling all the original stone. The original wall stood for over 110 years! Copyright 2024 Tim Carter

Small Retaining Wall Tips - What is Considered Small?

Last week I shared with you the news about my recent trip to southern California. I was fortunate to spend time with a dear friend and his wife. I don’t know that I’ve ever met a person who’s more in love with a home than him. Believe it or not, he’s lived in the same home for all of his seventy-two trips around the sun. It’s a stunning Craftsman home that was built in 1910.

This gorgeous wood-framed house is built on a corner lot in a community that is snuggled in the Crescenta Valley just below the towering San Gabriel Mountains. His lot has about eight feet of downward slope across its 150-foot depth. The original builder wanted a fairly level front yard. A four-foot-tall retaining wall was built along the south side of the lot to achieve this goal.

The San Gabriel Mountains contain a wide variety of granite rocks. Flash floods roaring out of the canyons have tumbled these rocks like clothes in a dryer rounding the sharp edges. There are countless wonderful boulders the size of extra-large watermelons, cantaloupes, and grapefruit you can harvest from nearby streams. They’re the perfect material for building a durable and attractive retaining wall.

Stone Step Treads

These stone steps are on Rockland Place in Montrose, CA. The stones come out of the nearby San Gabriel Mountains each time there's a heavy rain. These treads would be horrible in a climate that gets snow. Copyright 2017 Tim Carter

You may not have granite where you live, so make use of any suitable durable stone at your disposal. Coarse fossil-filled limestone was abundant in my hometown of Cincinnati, Ohio. There are thousands of retaining walls in the Greater Cincinnati area built using this dense strong stone.

Gravity and Tree Roots Tip Over Walls

My friend’s wall started to slowly succumb to gravity over the decades. Several years ago it was leaning so much the city condemned the wall. A public sidewalk next to the wall was not safe to walk on as the wall could collapse without warning.

I was able to view the wall a few years ago before it was condemned. I was amazed that this wall was only one rock-width from top to bottom. This was the primary reason the wall failed. Had the builder constructed the wall so the base was two or three rocks wide tapering to only one rock wide near the top, I’m quite sure I’d not be writing this column.

An Old Stone Mason

A local elderly stone mason rebuilt the wall and it looks as good as new. He salvaged each of the pieces of granite. My friend didn’t take my advice to change the design. The wall was rebuilt exactly how it was done originally. “Tim, the wall stood for over 110 years with it just one stone wide. I won’t be around in 100 years when it fails again.” I didn’t have a plausible objection to his reasoning.

How does this relate to your home? In many respects, my friend’s reasoning is somewhat sound. Earthquakes do happen in southern California and his old wall survived quite a few. Frost is not an issue as it rarely drops below 32 F at my friend’s house. Build his wall at my home and within a few years the deep frost in New Hampshire would start to push over the wall.

Tipping Force is Logarithmic

Retaining wall design is quite complex. As a wall gets taller, the tipping force increases in a dramatic fashion. Double the height of a wall and the force pushing against it can be 3 to 4 times that of the shorter wall. Any retaining wall taller than 3 feet can produce significant tipping forces. This is one reason some retaining walls have a batter or backwards lean to offset this force.

Beware much of what you might see from homeowners and some DIY warriors on YouTube. I’ve watched many retaining wall videos that are filled with very bad advice. I urge you to seek the advice of a structural engineer for any wall taller than 6 feet.

Consider the characteristics of the soil you’re trying to hold back. A well-drained sandy soil is much easier to deal with than a dense-clay soil. Steep hillsides uphill from your wall can be problematic. Soil creep is real. Gravity is working nonstop at pulling all the soil uphill from your wall down to the nearest sea or ocean. Never forget that Mother Nature bats last. Your strong wall design will take you into extra innings but in the end she will win the game.

Leverage physics into your design. An inside curved retaining wall acts much the same as an arch above an opening. Curves also add eye appeal. Don’t feel everything has to be a straight line.

Don't Trap Water Behind the Wall

Provide for excellent drainage behind your retaining wall. Backfill it with rounded gravel the size of walnuts if possible. Water flows through this rock as it does a colander in your kitchen sink. Trapped water behind a retaining wall can add thousands of pounds of weight that is working to topple it.

I have several in-depth columns about retaining wall heights, the four primary types of walls, and detailed installation instructions. Just type “retaining walls” into the search box on this page: https://askthebuilder.com/search

Column 1560

Decorative Exterior Tile

decorative ceramic tile surrounding sewer drain

The decorative ceramic tile transforms a dull storm drain into a festive feature at this condo property. Copyright 2024 Tim Carter

Decorative Ceramic Tile Creates Happiness

I just returned from an eight-day trip to southern California to visit my youngest daughter and several dear friends. I saw some amazing decorative ceramic tile. The weather was excellent, and although I knew about the June gloom, I discovered there was also the May gray. The sun heats the high desert east of the Los Angeles basin, causing air to rise. This movement pulls moist marine air eastward, blocking the morning sun.

It had been a few years since I’d been to this part of our great nation. I traveled alone giving my wife a break from me being around the house here 24/7/365. She calls these adventures little-man self-discovery trips.

If you’re a traveler, one of the first things you notice is that other people and cultures do things differently. I’ve always encouraged my children to travel to open their eyes to what’s possible about everything.

Table Rock Laguna Beach

Here’s an example. One of my friends owns a condominium on the shore of the Pacific Ocean. It’s a very large building and he wanted to show me how the residents access the beach.

We traveled down a series of staircases and concrete paths cut into the cliff above the roiling ocean surf. Just above the beach, there was an outdoor shower and concrete slab with a storm drain. Festive decorative ceramic tile created a border around the dull storm drain. This same tile was also set into the wall below the shower head.

decorative exterior tile on outdoor shower wall

It's not recommended to take a shower here in your birthday suit. People just below on the beach will see your buffiness. Copyright 2024 Tim Carter

The colorful tiles caught my eye and immediately made me smile. I think you’d agree that it’s impossible to have enough happiness in your day. Stop and think about how you can incorporate colorful things in any number of your outdoor facades or horizontal hard surfaces.

Tile or Stone Medallions

You can install colorful tile or natural stone in concrete patios, sidewalks, and driveways. Exterior stone medallions are also possible. Search online and you’ll discover in seconds a vast array of medallions. My favorite ones are those that have a compass rose. Using a real compass, you can install your new medallion so it points to the cardinal compass directions.

Inlays

Don’t hesitate to use simple natural stone inlays. Thin pieces of granite can be purchased with ease at many big box retailers. Slate is another good choice. You can use these to create stripes or borders in concrete flatwork.

If you’re having trouble visualizing this, jump online and search for photographs of what material you’d like to use. I typed “granite border concrete patio” into the search engine I use. I then selected the Images link and was overwhelmed with the creativity of others who have used granite to make a dull concrete surface come alive.

Clay Paving Brick

Don’t discount exterior clay paving brick. Purchase ones that are rated for severe weathering and they can create a eye-catching border for a sidewalk, patio, or driveway. Your concrete mason just has to adjust his forms to create the lowered platform so the finished brick is flush with the adjacent concrete.

clay paving brick old brick road florida

This is a real clay paving brick made by the Southern Clay Brick Company. It's 8 and 5/8ths inches long, 4 inches wide, and 3 inches thick. It was salvaged from the Old Brick Road in central Florida.

If you decide to do this, be sure you incorporate reinforcing steel rods in the concrete. I recommend creating a grid pattern with the 1/2-inch bars set at 2 feet on center in both directions. The steel needs to have a minimum of 1.5 inches of concrete under them. Do not just lay the steel on the compacted earth and pour over it.

Tear a page from a few talented teenager graffiti experts’ playbooks. Think of how colorful spray-painted graffiti on retaining walls, bridge abutments, railroad boxcars, etc. grabs your attention when you drive past the artwork. What’s stopping you from hanging some colorful item on your outdoor fence or the rear of your home?

You might purchase an old stained-glass window at a garage sale. The frame may just need to be repainted to make it look great. You can hang this on an exterior wall or fence just as you hang a painting or mirror inside your home.

Attach a piece of cement board to a wooden frame. Install colorful ceramic tile over the cement board. Once again, get inspiration from photos you see online. You’ll be stunned by what others have already done.

The best part is you can often do this without cutting any tile. You just need to lay out the tile on a flat surface to determine your exterior dimensions. Nothing about this is hard. There are numerous videos online, including my set of four step-by-step videos, that show you how to grout tile.

Have some fun. Think outside the box. Do quirky online searches like “ceramic tile on exterior walls” or “tile inset into concrete” or “colorful tile inlays”. You’ll be stunned by what you see. Be sure to send me photos of your completed projects!

Column 1559

Exterior Paint Peeling

exterior wood steps paint peeling

The paint on these steps and the wood porch above it lasts for only two years. I believe I know why it fails. Copyright 2024 Tim Carter

Exterior Paint Peeling - Water, Water Vapor, Dust, Dirt, and Oil

Are you frustrated with peeling exterior paint peeling? Maybe it’s a fence, a picnic table, a bench, your house siding, a shed, outdoor furniture, or a pergola. You might also share Jan’s misfortune. She visited the Ask Tim page of my AsktheBuilder website requesting help.

Here’s what Jan sent to me:

“Our problem now is our front porch that is subject to the elements here in Des Plaines, Illinois. I am SO tired of repainting every other year or at a minimum, touching up worn spots every Spring. The paint flakes off the railings, stairs, and even floorboards. We have gone as far as stripping it down to bare wood, using primer and then two coats of oil base porch paint. Unfortunately, it lasted no longer than the water-based paints, which were easier to work with. The snow and rain hits the stairs and railings but not usually the decking. Although, a few times the snow has blown up the five stairs to our door. Any idea what we can do to save our backs and knees?”

Jan sent me a set of photos that allowed me to diagnose her exterior paint peeling problem in just seconds. She lives in an older home. The porch is raised above the soil as are her wood steps.

covered front porch exterior wood steps

This is Jan's front porch. It's no wonder paint won't adhere to the wood. Copyright 2024 Tim Carter

The underside of the porch has little or no ventilation. Walls, covered with the same wood shingles as the house, extend from the porch down to the soil. Illinois is east of the Mississippi River and gets quite a bit of rainfall each year. Invisible water vapor wafts up from the soil and enters the wood. The paint doesn’t stand a chance. Here’s why.

John Pendrey the Chemist

I started a summer business with a good friend after I graduated from high school. We painted houses in the summer. John went on to get a PhD in chemistry. He spent his entire career working in a lab for one of the largest paint companies in the USA.

When John was in graduate school, he started gravitating towards a career in the paint industry. One day we were eating lunch together and he handed me a scrap of paper with a chemical formula on it. He asked, “Do you have any clue what this common item is?” I was a geology major not a chemist, “I’m clueless. What is it?”

John responded, “It’s the formula for common yellow carpenter’s glue you use all the time. Now look at this other formula.” He handed me a second scrap of paper with a long formula.

I looked and it was nearly identical to the glue one. I said, “Well, this must be the white glue kids use in school.” John said, “No. It’s the chemical formula for a very standard water-base exterior house paint.”

At that instant of time, a light bulb went off in my head. Why of course, paint does stick to things like glue. It’s hard to get out my clothes, it’s hard to get off my paint brush ferrules as well as ladders. Paint is just colored glue.

Paint Expands and Contracts

Paint expands and contracts. So does metal, plastic, and wood. But different materials have different expansion and contraction rates. Of all the common things you have in and outside your home, wood and plastic move the most. Heat causes plastic vinyl siding to expand. Water, or water vapor, causes wood to grow in size.

Water Vapor and Vapor Pressure

It gets worse. Water can travel with ease through wood. If you recall some of your high school physics, you might remember a class on vapor pressure.

In Jan’s case, water vapor from the soil is entering the underside of all the wood that makes up her porch and steps. The odds of the original carpenter painting and sealing all the sides of each piece of wood before he built the porch are as high as you guessing the Mega Millions lottery numbers.

Water seeps into Jan’s porch wood and works its way to the underside of the paint. When the sun hits the painted wood and warms it, it creates a difference in vapor pressure. The vapor must get out so it pushes the paint off the wood.

If your wood gets wet from rainfall or lawn sprinklers, it can swell. The swelling may be greater than what the paint can expand. If so, the adhesive bond between the paint and the wood fails. This is but one reason paint peels.

Read Paint Can Labels

Other common reasons for peeling paint are on the paint can label. Can you recall the last time you read the label on a paint can? Most say, “Apply to a clean, dry, dust-free, and oil-free surface.”

Adhesive tape doesn’t stick well to dusty or dirty surfaces. I’m sure you’ve had tape fail. It’s no wonder paint will fail if a thin coating of dust or dirt is on the surface you’re trying to paint.

Always clean things you’re about to paint as you would your car. Get a bucket of soapy water and rub the surface with a sponge or brush and then rinse and dry. Good luck!

Column 1558

Architects Design Flawed Garages

two car garage wood-grained doors

Architects Design Flawed Garages - You might think this is a spacious garage allowing you to store many things and get in and out of cars and trucks with ease. You’d be wrong. Copyright 2024 Tim Carter

Architects Design Flawed Garages Time and Time Again

Two weeks ago, on a whim, I recorded a 60-second video that I uploaded instantly to YouTube.com. I wanted to share one of the biggest mistakes I’ve ever seen in the common garage. I’m willing to bet you’re a homeowner who suffers from this oversight by architects and those who draw house plans. I stand by this claim based on the hundreds of thousands of garages I’ve driven by that sport this design flaw.

In less than 24 hours, this short unscripted video was watched over 8,400 times. There were quite a few comments from folks who lamented about having a garage with this same defect. A United Kingdom homeowner said, “Same in the UK. No way you can get the car in and open the car door, even without stuff stored there. Glad architectural mistakes are universal.”

What’s the common flaw? The vast majority of garages are not nearly wide enough. One would think that architects would have eliminated this error long ago, but every new garage I drive by is too narrow. I look at house plans each week for my DrawPlumbingPlans.com business and I see the exact same mistake duplicated time and time again all over the USA.

The 2-Foot Space

For whatever reason, architects continue to create plans where the distance from the corner of the foundation to the beginning of the garage-door opening is just 24 inches. If the garage is framed with standard 2x4s, the distance from the interior drywall covering the wall to the door opening is less than 20 inches.

When you park a full or mid-size car in the garage you might have about 30 inches from the side of the car to the drywall. That’s not enough room to fully open the average car door. My wife’s Volvo XC-90 requires 36 inches of space to fully open the driver’s door.

Garbage Cans, Recycle Bins, and Bicycles

Think about all the normal things you might store on the side walls of your garage. A standard round garbage can is 22 inches in diameter. My stackable recycling bins project 16 inches out from the wall. There’s only 14 inches of space in my garage between the gleaming paint of my wife’s car and the reclining bins. To prevent scratching the paint on her car, I only transfer cans and bottles into the bins when she takes the car out on errands.

I knew all about these issues when I helped my daughter design her home. She followed most of my advice and thanks me each time I see her. Her garage has two separate doors, both of them 9 feet wide and 8 feet high. I begged her to make one of the doors 10 feet wide but she resisted this as she wanted the doors to be balanced. You need a 10-foot-wide door to accommodate a standard full-sized heavy-duty pickup truck.

My daughter’s garage is 28 feet in total width. The distance from each outside corner to where the garage door opening begins is 4 feet. I had suggested she make it 5 feet but the zoning setback lines prevented this.

two car garage with custom doors

This is my daughter's garage. It would have been perfect had the garage been just 4 or 5 feet wider. Copyright Tim Carter 2024

The distance between the two garage door openings is just 2 feet. I had recommended 3 feet. Her home was shoehorned onto the allowable area within all four setback lines. Had more room been available, a 32 or 34-foot width would have created a garage with plenty of room for a big workbench, lawn tractor, snow blower, etc.

Do you own a full-sized pickup truck like I do? If not, perhaps a neighbor has one. My guess is you see it parked outdoors most of the time. I have to fold back one of my big mirrors to squeeze my Ford F-250 into my garage. It’s important to realize I didn’t build the house I live in.

When architects specify garage doors, the final finished opening is never what you see on the door-size callout. For example, let’s say your architect has specified a 9-foot-wide by 8-foot-tall door. The foundation contractor creates a notch in the cast concrete that’s 9 feet wide. Once the slab is poured, the carpenters place the bottom of the beam that passes over the slab at 8 feet off the concrete.

When the finished trim and door weatherstripping is added on the side wall jambs, you lose about 2 and 1/4 inches in width. This means the clear distance between the weatherstripping face is 105 and 3/4 inches. A Ford F-150 will squeeze into this door as the outer distance from mirror to mirror is 96 inches. But my F-250 will not fit. The current width of a new F-250 with the mirrors extended is 106 inches.

Don’t skimp on the depth of your garage. Think about how long cars and trucks are. My wife’s Volvo is 16 feet long. My F-250 is almost 20 feet long. You might want 2 feet of space between the vehicles and the garage door. At the far end of the garage, you would probably want at least 8 feet of space so you can store things on the wall and have plenty of space to walk next to the vehicles. This means the depth of your garage should be at least 30 feet deep.

Column 1557

Room Addition Foundation

room addition roof framing

This room addition is bigger than the original house. Sometimes it makes sense to go to all the effort. Copyright 2024 Tim Carter

Room Addition Foundation - Get it Square and Level

Are you feeling pinched by the current economy? I know I am. I shop for materials each week at the grocery store giving my lovely wife a break. She did it for the previous 45 years. Gasoline, food, insurance costs, interest rates, etc. are all way up with no end in sight. Your plans to move to a larger home may now be on a cool back burner.

The good news is you might be able to create the space you so desperately need by building a room addition. It’s important to realize room additions are small houses and in many ways much harder to build than a new stand-alone home. You need special skills or you need a seasoned remodeling contractor who has deep experience. Allow me to share a few true stories of what happens when you don’t have the right person.

Fixing Out-of-Square Foundations

When I first started in the construction business back in the mid-1970s, I got a job as a fix-it expert for a small local remodeler. Each day I was tasked with righting all the wrongs created by the unsupervised subcontractors. Most of what I did centered around disguising out-of-square and out-of-level foundations. I can’t stress enough how important it is to have strict supervision of the foundation process. It must be square and level.

Carpenters don’t tolerate these conditions and will build a square shell on top of an out-of-square foundation. When this happens, some of the wood framing will overhang part of the foundation and you’ll discover the foundation sits proud of the framing on the other side of the room addition.

My job was to cut long tapered wood shims on one side and add a cement-stucco finish on the other side of the foundation. All this was to disguise the mistake. Some homeowners never said a word, others knew the fix was in and complained to me. I just shrugged it off and did my job telling them to call Dan, the owner of the company.

Foundations must be square and level. It’s not hard to do. I used an optical builder’s level back when I was building my own room additions and homes. These are accurate to within a 1/16th of an inch in 50 feet. You can now download a simple app on your smart phone to give you the necessary diagonal measurements to square a foundation. I used to do those using algebra, a pencil, and a piece of paper.

Stop trusting your contractor. Before you even sign the contract for your room addition, you can already have the diagonal squaring measurement. Some great architects automatically generate it for you on the foundation plan. Here’s an example.

Let’s say your room addition foundation projects out from your home 14 feet and the foundation is 22 feet long. That rectangle is square when the diagonal measurement from two opposite corners is 26 feet and just under 1 inch. You can go online and use any number of websites to generate diagonal measurements in seconds.

You can also rent a laser level if need be for a few hours. If your room addition foundation is made from concrete block, check it for level as soon as half of the block are laid. If four or five courses of block are still to be laid, it’s going to be very hard to correct an out-of-level mistake of just an inch or so.

An optical or laser level can be used to check the pour line inside concrete forms. I know you think I’m crazy to ask you to do this. If you don’t want to do it on your own, then put it in your contract that your builder has to help you with all of this.

It’s imperative the contractor gets the height of the foundation correct. This math needs to be done by making sure the finished flooring height matches where you will walk from your current house into the room addition. Your calculations may show that the room addition foundation needs to be higher or lower than the existing foundation. Don’t guess for goodness sake hoping all will work out.

Room Addition Cost Estimator

I recommend you demand a detailed cost estimate for each phase of your room addition. You want to ensure enough money has been allocated for each task to complete the job. With inflation raging, you can’t afford to run out of money before the job concludes.

Years ago I developed a spreadsheet that helps you do this. It lists every major task and most of the minor things that need to be done from start to finish. This magic spreadsheet can provide you with a rough estimate of the final cost of your room addition if you just know the actual cost of a few of the aspects of the job.

This room addition cost estimator works for room additions just as it does for a new home. It takes into account regional cost differences too.

You can get a copy of this spreadsheet here.

Column 1556

Algae and Lichens on Composite Deck

algae and lichens growing on composite decking

No deck is maintenance-free. You can see algae and lichens that thrive in the shadows on this composite deck and rail system. Copyright 2024 Tim Carter

Algae and Lichens Grow on Composite Decks and Rails - Easy to Clean

You might be one of the countless homeowners frustrated with the annual, or every-other-year, task of cleaning and sealing your wood deck. I’m right there with you as I have to deal with my wood dock and the stairs leading to it. It’s a wretched job that can span days. It’s no wonder you might be drawn to the composite decking displays at local home and garden shows like a sailor to a siren’s song.

Over the past three decades I’ve been lucky enough to obtain inside information about exterior wood sealers. Add to this the knowledge I discovered while researching my Roofing Ripoff exposé book. You probably know that the sun’s ultraviolet (UV) rays are harmful, but you might not know the actual mechanism. Once you do, you grasp why deck sealers are doomed from the start.

UV Rays Contain Destructive Photons

The UV rays can contain active photons. Think of these tiny things as miniature cruise missiles. When the photon crashes into your outdoor flag, wood deck, house paint, metal roof or flashing, etc. it splits molecules apart and rips atoms off objects. These photons have so much energy they can blast atoms of copper or zinc from your roof. It’s child’s play for them to destroy thin deck sealer films that sit up on top of the wood.

To make matters worse, your deck is horizontal and gets a point-blank blast from the UV rays in the middle of the day. The rays have to pass through the least amount of protective atmosphere at midday. Have you ever wondered why your deck railing balusters don’t look so bad? They receive a harmless glancing blow from the UV rays at noon. In the morning they receive a direct hit from the UV rays, but the photons have to pass through so much atmosphere their energy is dissipated. This is why you struggle to get sunburned at sunrise and sunset.

As if this isn’t enough torment, the wood you’re using outdoors is hygroscopic. This means it expands and contracts in response to moisture content. Sealers prevent this movement because they don’t allow water to enter the wood. If you stop sealing wood, within a few years it looks like a neglected fishing pier with cracks large enough to swallow a handful of BBs.

These cracks start off small. They’re very tiny checking cracks. The cracks allow water to penetrate deeper into the wood. As the cracks get wider and deeper, the swelling and shrinking forces become stronger. This is why it’s imperative you keep outdoor wood sealed so water doesn’t rip your lumber apart.

cedar decking with checking cracks

This is 1-inch-thick cedar. They make up my dock panels. You can clearly see how the wood starts to crack and water can enter with ease. Copyright 2024 Tim Carter

I think you can see why a new industry was born four decades ago. That’s when the first composite deck products hit the market. As time marched on, improvements were made and more exterior products were made from plastics so you wouldn’t have the constant job of painting or sealing them.

I have 1,700 square feet of composite decking here at my own home. I didn’t build the house I live in now. The homeowner had the original Trex decking installed. I remember when it was introduced to the marketplace. It had an antiseptic appearance and only resembled wood by its shape. Seven years ago, I ripped it all up and installed Trex Transcend for the decking and railing system.

old trex decking being removed

This is generation one Trex decking. It had no wood grain, was 1-inch thick, and mushrooms could grow from it in moist conditions. Copyright 2024 Tim Carter

My wife, who dislikes all wood-imitation products, was amazed at how realistic the product looks. I’ve never cleaned the decking and it looks as good as the day I installed it. Algae, pollen, and lichens do accumulate in shady areas. The good news is all of these things are easily washed off using a soft brush that you might use to clean your RV.

trex transcend decking

This was my deck just months after it was installed. All the decking that's in the sun looks this good seven years later. The shady areas do have algae and lichen growth. Copyright 2024 Tim Carter

If you decide to free yourself from the chore of cleaning and sealing your wood deck, be aware that composite decking requires great attention to detail when installing it. Add to this the price. The top-line composite deck products are expensive.

Composite decking products, while not hygroscopic, expand and contract. The movement can be substantial. You must take this into consideration when installing the decking or you’ll have a huge mess on your hands. Read the installation instructions and follow them to the letter.

If you decide to install composite decking on a treated-lumber undercarriage, read the installation instructions. The composite decking products can sag if you space the floor joists too far apart. By default this happens if you decide to install the decking at a diagonal on your deck.

You’ll also want to protect your investment by using the newer joist tape products. This tape is applied to the top of the joists before the decking is installed. It prevents water from entering the wood. Without this protection, water can enter tiny cracks created by the decking fasteners. As you already know, these cracks can get bigger over time. When this happens, the fasteners holding down your expensive composite decking lose their gripping power.

Column 1555