Following Instructions Activity

following instructions activity

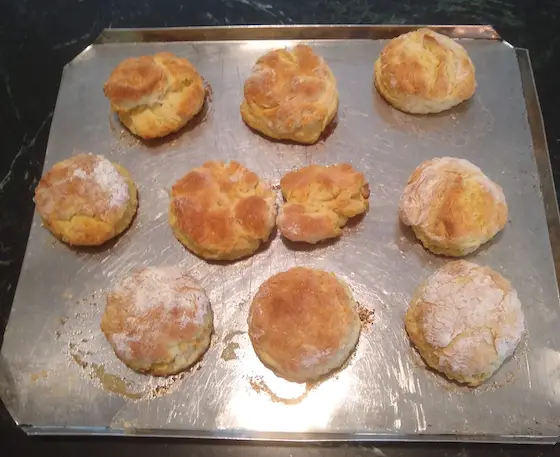
Following Instructions Activity | Here's the finished product. They might not look great, but to a blind taste testing judge at a fair, I might get a blue ribbon!

Following Instructions Activity - A Builder Builds Biscuits

For decades, I've suggested to do-it-yourselfers that following instructions is vital to success. All too often when I do an autopsy on a project that has crashed and burned, it's evident that someone didn't follow instructions. Often they took a shortcut or felt they knew a better way than the manufacturer of the product.

Today I was forced to do something I'd never ever done before and it was imperative I follow instructions to the letter. Thank goodness it was a fun activity.

Hungry for Biscuits

Early this morning, I was texting back and forth with Mary Gene, the editor of my Adventures & Advice book series. Once the business part of the discussion was finished, I made a brief mention of how I had this craving for fresh, hot biscuits.

There was a pause in the conversation and the next thing I saw on my screen was a link to an online recipe.

These were biscuits I had to make from scratch. Never in my 67 years had I made any baked thing from scratch.

"Be sure you use COLD butter when mixing," Mary Gene emphasized.

I thought to myself, "Well, that seems to be too much work. I'll just melt some and pour it in the mix." There I was not following instructions and ready to go off the rails early in the process.

Fortunately, this grave error didn't happen because I texted back my brilliant idea about melting the butter.

"NO! The butter must be COLD." Mary Gene sent back.

Okay, okay, I'll use cold butter for goodness sake.

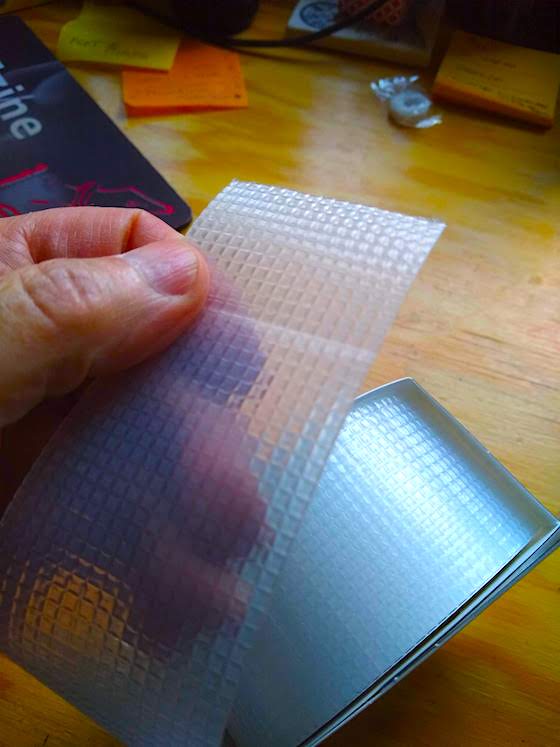
Mary Gene also said I could use knives to blend the butter if I didn't have the special tool shown in the recipe. I hadn't looked yet at the recipe and felt confident that I'd be able to find what I needed.

following instructions activity

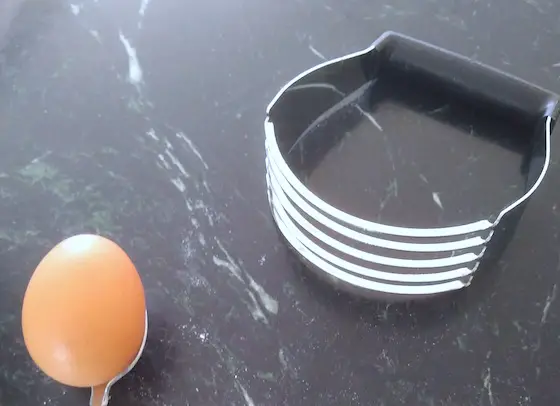
That's the magic mixing tool. It was hidden in a drawer in my kitchen.

Jeepers! Too Complicated!

Once in the kitchen, I looked at the recipe on my smartphone and grimaced. The author of the webpage had all this superfluous text before you got to the recipe and at first blush, it appeared to be way too complex.

"Why were we out of Bisquick?" I mumbled. It's just so easy to use that!

I looked over at the box of Grape Nuts cereal on the counter and exhaled, "Huhh, I can't have BBs again." Mary Gene introduced me to that comparison months ago because those crunchy small nuggets are like eating hard metal BBs if you don't allow at least 8 ounces of whole milk to work on them to soften them up.

I knew I had to dig in to make the biscuits because Mary Gene would ridicule me forever. When in similar situations, the sign over my high school football locker room appears in my head. It said, "Winners never quit. Quitters never win."

I was determined to win the biscuit game. It was time to follow instructions.

My Grandfather's Ghost

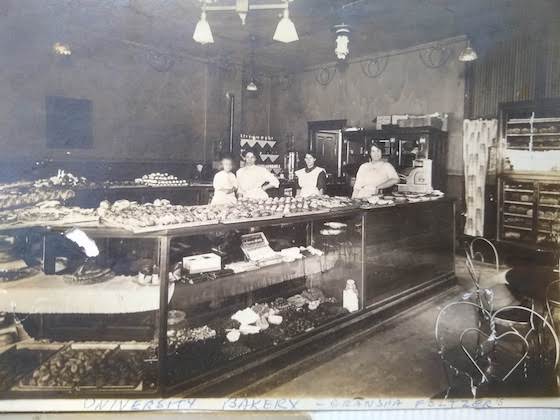
I also had a brief image of my grandfather. I never met him, but he owned a bakery with my grandmother in Cincinnati, Ohio just before the Great Depression. Here's a photo of it. Look at the case full of delicious fresh baked goods. There's no way I could let him down.

What a bakery it must have been!

It was time to focus and make it happen. After all, how hard could it be?

I took the time to read the instructions in the recipe. There was a note that the goal was to blend the butter pads so they became small butter balls in the dough. The recipe said to cut the butter up and put it back into the refrigerator until you were ready to blend it into the dry ingredients.

"Huh, I've got a better idea. Why not just cut the butter up now into small 1/4-inch cubes, separate them and then put it back in the refrigerator to get cold?"

biscuit butter

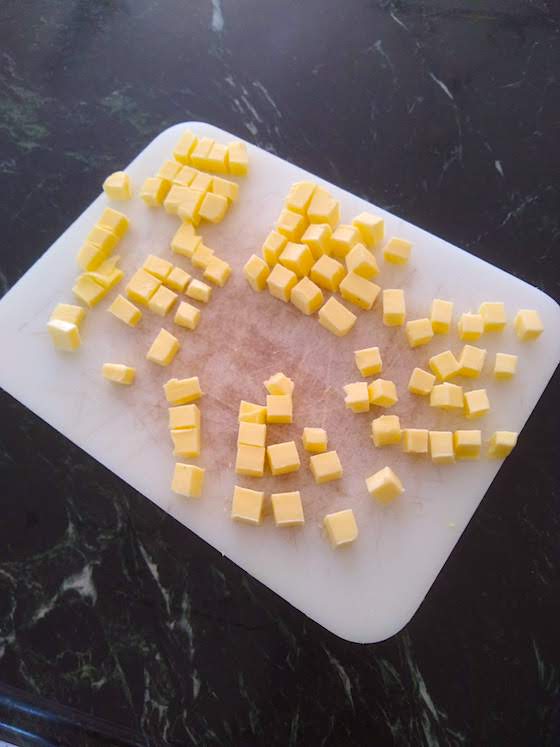
Here are my butter cubes.

The recipe didn't say I couldn't do this, so being a brave new baker boy, I took a chance. My grandfather, no doubt, was smiling up in Heaven.

 Splitting the Recipe

When I saw the recipe called for three cups of flour, I thought, "No way. That's way too much." I made an executive decision to split the recipe in half. How hard could that be? After all, I didn't go to summer school for math, but I did for Latin. Fortunately, the instructions were in English.

I was now in the zone. The flour, baking powder, salt, sugar were all blended and it was time for the butter. I slid it into the mixing bowl and started to use the correct weird tool. I then added the milk and single egg and stirred.

scratch biscuits

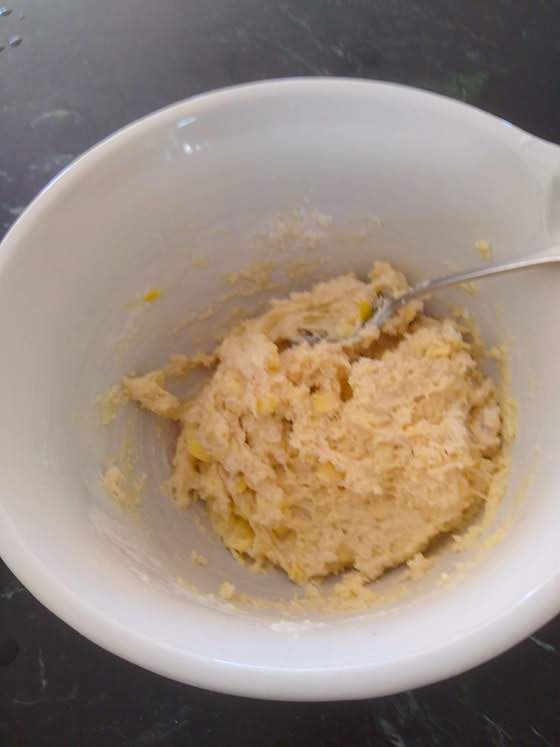
Here's the blended dough. You can see the butter cubes.

Perfection! The dough looked just like what Bisquick looked liked mixed up.

Baked Deliciousness

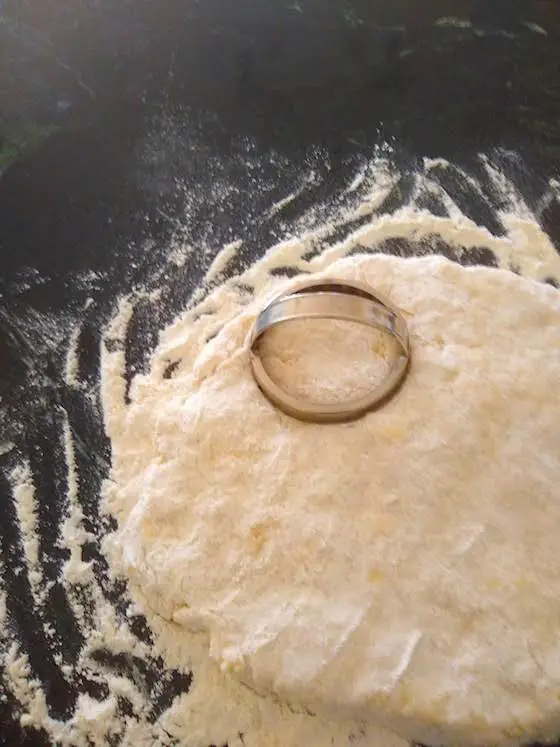
I dusted the marble island top with flour, put the dough ball on, dusted it with more flour, and used my hands to flatten it out to about 3/4-inch thick.

I found a biscuit cutter, cut the rounds, recombined the remaining dough, and seconds later ten biscuits were going into the oven.

I know, I could have taken it to the edge! I'm a rookie, after all.

Victory!

I removed the golden-brown discs from the oven just in time, let them cool, and then cut one in half.

I drizzled on some honey and bit into it. OMG, it was slightly crunchy - I liked that! - and it was delicious.

It was by far the best biscuit I'd ever eaten.

The moral of this story is to listen to your editor, and follow instructions if you want success and the best biscuits in the world!


Vinyl Siding Comparison

vinyl siding

Vinyl Siding Comparison to Wood | This new house is being covered with vinyl siding. The young homeowners don’t want any maintenance. Copyright 2020 Tim Carter

Vinyl Siding Comparison - You Can Get the True Wood Look

DEAR TIM: I’m going to be building a new home and I have to make a decision about the siding. I can afford wood shakes and love the look, but I am concerned about long-term maintenance. Vinyl siding seems to have so many advantages, but it just doesn’t look like wood to me. How would you go about making this decision if you were me? What are all the things I should consider? Would you install vinyl siding on your own home? Margo S., Nashville, TN

How many times have you been conflicted like Margo when trying to choose between two or three building materials? It could be laminate floor vs. real hardwood. Or you might struggle between treated lumber vs. composite decking. So many products try to mimic the look and feel of wood because manufacturers know we humans have a very deep connection to real wood.

How Do You Compare Vinyl Siding to Wood?

My advice to Margo is pretty straightforward, but it takes a little work and honesty. I feel the best way to solve these issues is to do a pros and cons checklist on a sheet of paper. When you write down an honest comparison this way, you can see the facts in front of your eyes. All too often if you do this in your mind, one positive or negative thought may shanghai the decision.

CLICK or TAP HERE to get FREE QUOTES from local vinyl siding companies that can install the siding in the videos below.

What's Good About Wood?

Let’s you and I help Margo down this path. Here are a few positive attributes about real wood siding. It’s the real deal. Wood is a slightly better insulator than vinyl. Wood shakes have a rich legacy of protecting structures in harsh environments. I’m sure you can fill in a few more things you feel are a benefit.

What's Bad About Wood?

Now, let’s look at the flip side of wood. If you want the wood to last and look great - this is subjective! - then you need to maintain it. Some love the weathered look of wood shakes and do no maintenance. Shakes require expert installation and the use of high-quality nails, preferably stainless steel. High-quality shakes can be expensive.

RELATED LINK

Stainless Steel Nails - The Best Onesk Known to Mano or Woman

It’s quite possible Margo hasn’t seen the latest version of vinyl siding shakes. Just two years ago, I was in Downeast Maine visiting builders and I toured a home that I was positive was covered with real wood shakes. It wasn’t until I was nearing the front porch that I realized they were, in fact, vinyl. They were so realistic that I feel most homeowners would never realize they weren’t wood.

These vinyl shakes are expensive and time-consuming to install, but the fact remains that Margo may have found the Holy Grail she’s looking for in this product. Each of the pieces of siding is individual like true wood shakes. They interlock to make a weatherproof barrier.

What's Good About Vinyl?

That said, let’s consider traditional vinyl siding that comes in bigger pieces. You can get any number of designs that mimic wood shakes. Vinyl requires no maintenance unless you live in an urban area where it may require periodic washing to remove dirt and diesel truck exhaust soot. This siding installs so fast that an experienced crew can side an entire house in just a few days. Some smaller houses they might do in less than two days.

What's Bad About Vinyl?

The only negatives I can come up with when it comes to traditional vinyl siding, even the lower-cost shake imitators, is they just don’t look like real wood up close. You can short circuit this issue to a degree if you use a special window, door, and corner trim that has a built-in J channel that hides the open end of the vinyl siding. This trim really looks like traditional painted wood trim and gets rid of the traditional bulky J-channel that makes most wince.

Yes, I'd Install Vinyl Shakes

Margo knows how to put me on the spot! Would I install vinyl on my home? The answer is an unequivocal “Yes”. As with many many building products, vinyl siding is far enough down the development timeline that many of the bugs have been worked out. I would choose the shake vinyl siding I saw two years ago.

Years ago, I would have answered “No” for a number of reasons. I had more energy back then and I was not in love with the look of vinyl. But now, I’m older and I have the same concerns about maintenance. You should be concerned about maintenance too. The primary reason I feel is the steadily declining trend of finding excellent tradespeople that will do the work for you.

Here’s a fact. There are great craftsmen and craftswomen in the residential construction industry. These individuals get up each day to feed their passion and treat what they do as a vocation, not just a job. However, each day there are fewer of these much-needed individuals. It’s easy to come to this conclusion if you read the scads of frightening requests for help I get each week on my AsktheBuilder.com website.

My advice to you is to lobby your public school system and do what you can to bring back vocational schools. We need to begin to foster that desire to build things well in young adults before they succumb to perfume and gasoline fumes.

Column 1354

Build Free Standing Tree House

Build Free Standing Tree House

Joe had noble intentions to build a dream playhouse for his son, but he made lots of critical errors. You can build a real tree house for adults to stay in with great engineering. Copyright 2020 Tim Carter

Free Standing Tree House

IMPORTANT NOTE: Be sure to CLICK or TAP HERE to listen to my podcast about this topic where I answer Joe's questions. I also have very important drawings THERE you should see.

DEAR TIM: I've built a free-standing treehouse for my 9-year-old son but I'm a novice in carpentry. I recorded a video showing my nearly finished project I’d like you to watch. I'm wondering if using 3/8-inch galvanized bolts in 4x4 posts was sufficient. I had a professional carpenter visit yesterday and he said he would not worry about it, that the structure should last twenty years. But my son means the world to me and I just want to be sure that I haven't created a death trap. Thanks for your help. Joe H., Travelers Rest, SC

The instant I read Joe’s overnight email I watched his video. I’ve got it archived on my AsktheBuilder.com website. You should watch it too because it’s filled with love and concern. But it’s also filled with serious building errors. I don’t want you to make the same mistakes Joe made when you build something for your child or grandchild. Joe's video is below.

Seconds after watching the video, I emailed Joe. Had he included a phone number, I would have dialed him up it was that important. I told Joe to STOP WORKING on the treehouse and wait for a recording I’d make to help him fix the errors. I also told Joe I’d draw up a few simple sketches illustrating what he needed to do. I used to draw these years ago sitting at a dining room or kitchen table for customers and future ones as I explained how I was going to build something for them.

Let’s run down the list of errors Joe made. The first one, in my opinion, was a lack of research before he got out his tools. I say this not knowing exactly what Joe did, but if he did do any, he either got very bad advice or if he saw great advice he failed to follow it. The Internet is overflowing with conflicting building advice and if you don’t know what’s right and what’s wrong, it’s easy for you to go down the wrong path.

Allow me to describe what Joe built. For simplicity, he built a 12-foot by 12-foot deck in the air. The top of the platform is about 6 feet in the air and the entire structure is supported by eight 4x4 posts.

This is where all the problems started. It’s important to realize I see “professional carpenters” make this first mistake all the time. Joe bolted the outer 2x6s to the 4x4 posts. He had two 3/8-inch diameter bolts at each post. Can you imagine how much weight is bearing on these bolts? The entire surface area of the top half of the two bolts at each post only adds up to 1.17 inches times the thickness of the 2x6. Realize the actual point loading is much more severe because the surface area of bolt contact through the 2x6 is a half-circle not a flat spot like you might find on top of a post or column!

Joe should have used a notched 6x6 post so the outer 2x6 beam rests on solid wood. The weight would be directly transferred to the buried concrete piers in the ground. I suggested he fix this error by attaching a treated 2x4 to each 4x4 post. This new piece of lumber would extend from under the 2x6 down to the top of the concrete pier in the soil.

As I watched more of the video, I saw Joe had used what appeared to be galvanized drywall screws to attach the joist hangers to the outer beams. Drywall screws are not structural screws. You can purchase special structural bolts made to fasten joist hangers to beams.

Later in the video, Joe brought up how when you stand up on the deck it sways back and forth. No doubt it would! With very little effort a group of boys celebrating a victory in a mudball war with friends on the ground could get the entire structure to collapse as the legs would fold under with very little effort.

This defect can be solved with ease by installing full-length diagonal bracing on both sides of two opposing corners of the structure. A treated 2x6 could be fastened to the top of each corner 4x4 and angle down to the bottom of the center 4x4. This is how builders of structural steel buildings prevent racking. They’ll use solid steel or tensioned steel cables for the diagonal brace.

Another serious defect was Joe’s railing at the top of the deck. He took 4x4 posts, notched them, and just bolted these to the sides of the 2x6 outer beam. When you notch a piece of wood, it’s only as strong as the remaining piece of wood. In his case, he no longer had 4x4s, but a 2x4 railing. This is completely unacceptable. There are special metal connectors that are made that will exceed the minimum code requirements for deck railing safety. I showed these to Joe, and you can see a video about these just below.

There are other issues that you should know about. First, the treated lumber you purchase today has a high concentration of copper in it. This copper, when it gets wet, starts to corrode steel. All bolts, nails, screws, and metal framing connectors must be coated with the best galvanizing to prevent corrosion.

Realize that treated lumber dries out and shrinks. While building a deck or tree house you may feel things are nice and snug, but six months later there’s play in connections. Shrinkage also can cause cracking at stress points within the structure. Lastly, don’t even think of using lag bolts. These are the worst fastener. You can over tighten them and reduce holding power. Only use through bolts that have washers and nuts.

Watch Joe's and Tim's videos above, then CLICK or TAP HERE to LISTEN to Tim's advice in his Free Standing Tree House Podcast.

Column 1353

What Caused the Boston Disaster?

What Caused the Boston Disaster? - Remember, Just Guess

This is the quiz from Tim's May 10, 2020 Newsletter. Remember, don't ask Alexa or Siri for help. Trust the Force within you!

IMPORTANT NOTE: After clicking SUBMIT, scroll back at the top and click the VIEW SCORE button to see how you did!

boston molasses flood drawing

Thank Stain Solver, the Quiz Sponsor, by purchasing a small sample size!

Stain Solver Oxygen Bleach SS02 bottle

Stain Solver is MADE in the USA with USA ingredients that are food-grade quality. CLICK THE IMAGE to order some NOW.

Fixing Puddles on Patios, Driveways and Slabs

Fixing Puddles on Patios, Driveways, and Slabs

Here’s a pesky puddle on an outdoor patio. Kids delight in them, but they make some adults simmer like a steak on a searing outdoor grill. Copyright 2020 Tim Carter

Patio Puddles

DEAR TIM: I’ve got a problem I need you to solve. You see each time it rains I have a puddle develop on the outer edge of my circular patio. It’s older concrete and it appears the puddle is related to a crack that’s above a low retaining wall the patio rests on. Can I just fill in where the puddle is and all will be well? I am worried about the appearance of the patch and how might I disguise my attempt to stop the ponding water? I only want to fix this one time. What are my options? Amy P., Warrenton, VA

Do you have a problem with puddling similar to Amy’s? I see puddles frequently and even have the issue here at my own home where there are depressions in my asphalt driveway and where my front sidewalk meets my drive. It’s important to realize I didn’t build the house I currently live in.

Amy’s repair is not that hard to do, but she threw in a wildcard with respect to what the repair will look like. You may be like Amy and want your outdoor patio to look nice instead of a hodgepodge of different colors and textures. Amy was kind enough to send me excellent photos of her situation and I can tell you that it would be next to impossible to install a patch that blended in perfectly so only a trained eye could tell the patio was patched. You can see all the photos on my AsktheBuilder.com website.

There’s another issue in play with respect to Amy’s repair. She mentioned there’s a crack in the patio that’s directly related to the low curved retaining wall. Remember that she also said she wants to make the repair once. Failure is not an option.

When you add all these pieces of the puzzle together, you only come up with one repair option in my book. Amy needs to do a thin, perhaps just 2 inches, concrete overlay. You may disagree with my choice, but keep in mind she wants the repair to look great and long-lasting.

Concrete overlays can come in a variety of flavors. You can do one as thin as a coat of stucco! This means the overlay is really just fine sand and cement. It’s possible to get the overlay as thin as 1/8-inch, but 1/4-inch would be an easier project to manage for the DIYr inside you.

If Amy hired me to write the simple set of specifications for her job so she could get really accurate bids and be sure the job would be done right here’s what I’d go with.

I’d want the concrete overlay to be 2 inches thick where it starts at the outer edge of the concrete patio where it passes over the low retaining wall. Before I’d even start to do the work, I’d cut a scrap piece of wood 2 inches thick and place it on the outer edge of the patio. Then I’d rest a straightedge on the small piece of wood.

I’d want to check to see how thick the overlay would be when it got back to the house making sure the patio had a consistent slope of 1/8-inch per foot. This way rainwater would drain off the patio with ease. You can get by with 1/16th-inch per foot, but it takes an expert concrete finisher to maintain this slope and not create a new puddle in the middle of the new overlay! Remember, Amy wants this repair done once.

The concrete would have small pencil reinforcing rods in it. These rods are 3/8-inch in diameter. I’d prime and paint them with a rust-resistant paint before the job would begin as I don’t want the rods to start to deteriorate in case Amy broadcasts salt on the patio in the winter months. These rods must have at least 1/2-inch of concrete under them when the overlay is poured.

I’d make sure the spacing of the rods was 2-feet-on-center both directions. Imagine creating a giant piece of graph paper but using the steel rods as the lines. This steel ensures the overlay will stay together as one piece and not have settlement issues where part of the slab drops lower than an adjacent piece as is happening over the retaining wall.

The size of the stones in this concrete overlay is very critical. I’d not want any stone to be larger than 3/8-inch in diameter. Some gravel pits sell a gravel called pea gravel where the stones are round and about the size of small grapes, none being larger than 3/8-inch in diameter. You can also use small crushed gravel that’s a similar size.

I’d specify a seven-bag mix which makes the concrete stronger than the minimum 4,000 pounds-per-square-inch strength recommended for outdoor slabs in a cold climate. My specifications would also state to be sure to pressure wash the existing concrete patio to get a great bond between the old and new concrete.

I’d list as an option the application of a thin layer of cement paint to the old damp concrete before the pour. The steel rods make this quite problematic. If you have enough helpers present, you can do this cement paint application with them brushing it on the damp concrete just before it’s covered with the new overlay concrete. You make cement paint mixing pure Portland cement with water until it’s the consistency of normal paint.

Keep in mind you can add color to the concrete! You can purchase dry-shake pigments and make your new patio look like leather or even the sky!

Column 1352

Newsletter Music Naked If I Want To

Newsletter Music Naked If I Want To

Naked If I Want To was featured in the May 10, 2020 AsktheBuilder.com newsletter. It's a quirky short ballad by Moby Grape. CLICK or TAP HERE to read all past AsktheBuilder.com newsletters.

CLICK or TAP HERE to listen to all the music featured in past AsktheBuilder.com newsletters.

Naked If I Want To Be - Moby Grape

Stain Solver, the best and most powerful certified organic cleaner on Earth, is the sponsor of the Newsletter Music.

Show your support. Purchase a small sample size and behold its magic powers.

Oxygen Bleach

Stain Solver is MADE in the USA with USA ingredients that are food-grade quality. CLICK THE IMAGE to order some NOW.

May 3, 2020 AsktheBuilder Newsletter

WELL, WELL, WELL! It’s a pleasure to make your acquaintance. You’re a new subscriber and I’m so glad you’re here. I’ll do my best to help you save scads of time and money on all your home improvement projects. Did you know I listen to music when I compose this newsletter? Soon you will see all of your fears will pass away safe in my arms. Can you guess what song that’s from? CLICK or TAP HERE and be prepared to relax.

You and I, on the other hand, have been friends for who knows how many months or years? Let’s try to figure it out. Do you remember the video I shot showing how to identify a load-bearing wall? Can you guess how many years ago that was? CLICK or TAP HERE to read the column and be sure to watch the video!

The Day of the Kiln

Yesterday I had so much fun with my youngest daughter! She’s had an interest in pottery for at least eleven years. I’m quite sure it started in a class she took in high school. Over the years, she’s made some fantastic small objects. Here’s one I have in my office.
Kelly's Art Piece in Tim's Office

Two weeks ago she asked, “Dad, can you help me build a wood-fired kiln? I want to see if I can fire my own pottery. It's can be small if it works, then maybe we can build a bigger kiln.”

How could I turn down that request? What an exciting new project and one I’d never done before! I asked her to start to do some research - you’ll see why this is important soon - and at the same time, I jumped on YouTube to start to look for inspiration.

I quickly found a video and decided this method was worth trying. All of the materials I purchased can be reused in case it doesn’t work. But, after watching the video, it appears that success is guaranteed. CLICK or TAP HERE to watch the video.

Here’s the small kiln we built. I recorded a video and I’m creating an eBook with step-by-step photos showing how to build the kiln.
Kelly's Kiln

When I get the eBook complete, I’ll upload the video for you.

The Fun Quiz

You may be participating in the new one-question FUN QUIZ each issue. Oh my, I’m getting great feedback from you!

I know, I know, you could be one who’s not yet dipped yourself in the magic water of the quizzes. I can hear you saying, “Tim, WHAT’S in it for ME? Why should I take your silly quiz?”

Easy!!!! Here are a few reasons why you should take the quiz:

  • I guarantee you’ll LAUGH at some of the answers
  • There’s a good chance you’ll DISCOVER something new and interesting
  • You’ll be able to SHARE your new knowledge, impressing your friends & family
  • Your ego will get a BOOST when you find you answered the question correctly

This week’s quiz features an unusual word. You MUST REALLY read each answer closely and not skip over what may be the right one!
bumbershoot

CLICK or TAP HERE for today's FUN one-question quiz. You'll be able to test the depth of your ignorance as Dr. Caster used to say!

CLICK or TAP HERE to see the quizzes you’ve missed out on!

Joe’s Free Standing Tree House

Joe, who lives in SC, sent me an amazing video two nights ago. He’s been working on this:
Joe's Free Standing Tree House

He’s at the point where all of a sudden he’s losing sleep worrying that the structure could collapse and seriously injure his son and his friends. He’s got GOOD REASON to worry as he made no less than four CRITICAL errors.

As I’ve often said, it’s SO IMPORTANT to do RESEARCH BEFORE you start a project! Joe didn’t do enough, OR he may have ended up at websites that offer up BAD ADVICE. You do know those are more plentiful than pieces of hay in a hay wagon on a cool autumn evening, right?

I emailed Joe as soon as I read his email to tell him the good news. First, I asked him to STOP WORKING and wait to listen to my podcast. Fortunately, Joe will discover that he doesn’t have to spend lots of money to make the structure safe.

You’ll be able to see his video and listen to my suggestions in the next issue of this newsletter. You’ll also see an example of one of the hundreds of hand-drawn diagrams I made giving sales presentations while sitting at dining room tables all those years ago.

I remember doing one for a kitchen remodel where I drew a quick revised floor plan and commented on the blue tile for the countertop. It was a superb choice.

Crawlspace Wall Insulation

Craig emailed me about a mess in his crawlspace. Look at this:
crawlspace wall insulation

He wanted to know how to STOP the insulation from falling down.

What would you suggest he do? Please type your suggestion as a COMMENT at the bottom of this page.

What do you think my solution was to cure Craig’s conundrum?

CLICK or TAP HERE to see if you’re RIGHT. Sit back and listen to what I had to say.

Cat Tongue Tape

I’ve been testing a very interesting grip tape for three months now. I wanted to really put it to the test before I told you about it.
Cat Tongue Tape on Cell

The results are in! CLICK or TAP HERE to see this new product, how I tested it, and what the results are.

I’m pretty certain you’ll be amazed.

That’s enough for a Sunday.

Today is build-dock-panels day here at my house. A wicked Nor’easter devoured and pulverized four of my cedar dock panels last year!

While I’m building the pre-stained cedar panels, my daughter will be stoking the new kiln! Wish her luck on her first firing.

Tim Carter
Supreme Commander - www.AsktheBuilder.com
BEST CLEANER on the Planet - www.StainSolver.com
Generator of Cool Waves - www.W3ATB.com

Do It Right, Not Over!

P.S. Wait, wait. I worry that you may have heard me say, “Get out your pressure washer to clean your deck.” What I said was, “Do NOT get out your pressure washer to clean your deck.” Do you understand? CLICK or TAP HERE to see why I’d NEVER EVER use one. You’ll see me wearing my firefighter’s helmet and bunker pants.

Cat Tongue Tape

cat tongue tape

Cat Tongue Tape - It Grips Well and So Will You

I've been testing Cat Tongue Tape for about three months. So far it works really well.

How Did You Test the Cat Tongue Tape?

I put it on the back of my cell phone to help reduce the chance of it slipping from my hands. I knew this would be a great test because it goes in and out of my pocket at least 50 times a day. If the tape was going to peel off, this was the test.

Did the Tape Peel?

No, the Cat Tongue Tape has yet to peel. The adhesive is really amazing.

Where Can I Buy It?

CLICK or TAP HERE NOW to order some. It will be delivered to your doorstep by a special courier.

cat tongue tape

This is the tape. CLICK or TAP HERE to order it.

cat tongue tape

CLICK OR TAP HERE now to have this in your hands in days.


Build a Wood Fired Kiln

Wood-Fired Kiln - Easy to Do in Hours

This is the video I watched that gave me the inspiration to build our prototype wood-fired kiln. This is the kiln my youngest daughter requested. Read the back story in my May 3, 2020 Newsletter.

Read an update in the February 14, 2021 AsktheBuilder Newsletter.


I've captured all sorts of video of the kiln I made, but haven't edited it and uploaded it. I will soon and it will appear on this page.

What Materials are Needed for the Wood Fired Kiln?

You need:

  • concrete
  • 1/2-inch steel rods
  • concrete blocks
  • sand
  • fire brick
  • a clay flue liner 8x8

How Long Does it Take to Build the Kiln?

It will take at least three days to build the kiln. The first day is spent pouring the foundation. Allow the concrete to cure for at least 48 hours before starting to dry stack the concrete blocks, fire brick, and clay liner.

wood fired kiln

This is the kiln I built with my daughter. It took an hour to pour the concrete slab foundation. Three days later, it took just two hours to stack and make the needed cuts on the firebrick. It's SO EASY.