Concrete Foundation Forms

concrete foundation forms

This shows you what concrete foundation forms look like as they're being assembled. The next day the contractor finished and they filled the forms with concrete! Copyright 2018 Tim Carter

Concrete Foundation Forms Checklist

  • Modular design allows forms to be set in hours
  • Produce perfectly straight and square foundations
  • Allow for the easy installation of reinforcing steel
  • Simple design requires few skills to set up

Related Links

Foundation Footer - Must Be Level and Square - SECRET TIPS HERE - Do NOT Share

 Poured Concrete or Concrete Block? Which is Better?

Concrete Foundation Forms Save Time and Money

Modern concrete foundation forms are modular and can be assembled with almost no tools. All the parts fit together like large children's toys.

Free & Fast Bids

CLICK HERE to get FREE & FAST BIDS from local foundation contractors.

How Were Old Concrete Foundation Forms Made?

Concrete foundation forms used to be made from tongue-and-groove 1x6's assembled by carpenters. After the concrete was hard, they salvaged the wood and used it as the diagonal subflooring for the homes. Whatever was left over was used as roof sheathing.

Modern concrete foundation forms are made with steel and aluminum.

concrete foundation forms

Note the metal cross straps that hold the vertical forms in place against the pressure of the wet concrete. Copyright 2018 Tim Carter

How Long Does it Take to Set Up the Forms?

A simple square or rectangle foundation can be formed up in just a few hours with modular forms. It's important to realize that a level and square footing makes the job go very fast.

How is Foundation Reinforcing Steel Installed?

The cross straps used in some forms have notches in them that hold the reinforcing steel in place. It's best to have two rows of steel bars in concrete foundations. One set of bars should be about a foot up from the bottom of the wall and the other set should be about a foot down from the top of the foundation wall.

concrete foundation forms

The triangular piece of steel helps hold two adjacent forms together. The forms can be assembled with lots of unskilled laborers. Copyright 2018 Tim Carter

Is Skilled Labor Required for Concrete Foundation Forms?

A skilled foreman should be on the job to direct the layout work. However, unskilled labor can do almost all of the assembly of the forms because of the clever design of the interlocking panels and parts.

CLICK HERE to get FREE & FAST BIDS from local foundation contractors.


October 12, 2018 AsktheBuilder Newsletter

Are you new around these parts? Welcome pardner! The local sheriff doesn't take kindly to those that cause trouble. 🙂

If you're a local, then you know all the good stuff happens when you use the search engine at AsktheBuilder.com. CLICK HERE to see it and a dorky video of me.

I wanted to just share a disturbing trend I'm experiencing. I wonder if you're seeing it too.

Yesterday morning, I had a new subscriber yell at me at 5:30 am ET because he had to read a column to get the answer to his question.

He was so busy, or stressed out, or ???? that he vented on me because I didn't drop what I was doing and do exactly what he wanted.

It also happened two days ago when a woman asked me if I had a detailed video that would help her do a job. I simply said, "No." and then went on to explain why I didn't have the extremely long and costly video.

She answered back that I was rude.

I'm not looking for your sympathy or empathy. I'm just asking that we might consider being nicer to one another. Our culture seems to be going down the toilet and people seem to be less patient and more demanding.

This is not good in my opinion.

What's This?

septic tank design

Do you know what this is? If not, you should absolutely CLICK HERE. Wait until you see the FUNNY video of me at the page.

What Can the Bucket Do?

CLICK the photo.

clogged toilet

Chris from Columbus, OH inspired me to revise THIS COLUMN. His house was built in the mid 1990s. Was yours? CLICK HERE to see why that's an issue.

What Are the Best Deck Piers in Life?

best deck pier forms

Yes, that's me in the hole. What is that crazy orange tube and WHY is it so important? Is that pre-bent reinforcing steel in the tube? Who cut and bent it? CLICK HERE for the answers and for a really funny video about how to avoid getting into the doghouse!

What Can Possibly Go Wrong Here?

Vintage Looking Tub

Do you think you know everything there is to know about tubs like this?

What about vintage tubs - the clawfoot ones? You better CLICK HERE NOW and get up to speed before you have a $3,000 MISTAKE.

That's enough for a Friday.

I pulled a muscle in my left shoulder and the two middle fingers on my left hand are giving me trouble. The less I type the better.

I'll be back with more new and revised columns for you soon.

I also recorded a new product podcast yesterday about some revolutionary new IRWIN vise-grip pliers. You'll absolutely want to hear that. I hope to have it ready for you next week.

Tim Carter
Founder - www.AsktheBuilder.com
Certified Organic Cleaner Man - www.StainSolver.com
Morse Code Man - www.W3ATB.com

Do It Right, Not Over!

Septic Tank Design

septic tank design

Septic Tank Design | This is a complete septic tank design. You can see the top of the concrete septic tank and the level leach field on the other side of the vertical green vent pipe. House drain pipes that flow into septic tanks require maintenance to keep the septic tank working well. Copyright 2018 Tim Carter

"The size of the septic tank is determined by the number of bedrooms in almost all cases."

Septic Tank Design Checklist

  • You need a professional design drawn by a pro
  • Each house is different because of load, soil, and topography
  • A leach field can be under a road
  • Use gravity - avoid pumping septic tank water up hills

Septic Tank Design - You Need a Professional

Septic tank design is a science. Professional septic tank designers are trained to know exactly what type of system to put in for each location.

Related Links

Septic Tank Maintenance

Safe Septic Tank Additives

Free & Fast Bids

CLICK HERE to get FREE & FAST BIDS from local septic tank companies.

What Size Septic Tank is Required?

The size of the septic tank is determined by the number of bedrooms in almost all cases. The septic designer has to know how many people might be living in the house. I have a four-bedroom home here in New Hampshire and my tank has a 1,000-gallon capacity.

What are the Basic Septic Tank Design Components?

A basic septic tank design will have:

  • a precast concrete or fiberglass septic tank
  • a distribution box
  • a leach field piping system

What Does a Septic Tank Design Look Like?

The following photos show you an overall septic tank design. Look at the close-up photos to see the specific design details.

septic tank design

This is a large format septic tank design plan with all the information the contractor needs to install the entire system. Copyright 2018 Tim Carter

septic tank design

septic tank design

septic tank design

septic tank design

septic tank design

septic tank design


What Soils Are Best for Septic Systems?

A well-drained soil is best. The more sand that's in the soil the better. Dense clay soils are the worst.

What is a Raised Leach Field?

A raised leach field is one where the pipes and sandy filter soil are placed up above the normal grade height. These raised leach fields resemble Indian burial mounds.

Can a Leach Field be Placed Under a Driveway or Road?

Yes, a leach field can be placed under a driveway or road. These require a special pre-cast concrete panel system that protects the sand filter medium under the roadway or driveway. Watch the following video to see one.

Should I Have a Pump in My Septic Tank Design?

I'd avoid septic tank pumps at all costs. Pumps fail and are expensive. Request a septic tank design that uses gravity flow at all stages. If that's not possible, consider purchasing a different building lot.

CLICK HERE to get FREE & FAST BIDS from local septic tank companies.

Different Deck Piers and Wet Basements and Yards

Tim setting deck pier form

This is me setting a deck pier form. Yeah, they need to be that deep in the ground in New Hampshire to prevent frost heave. (C) Copyright 2018 Tim Carter

Different Deck Piers

QUESTION #1: Tim, can you explain why I need concrete deck piers under the wood support posts that hold up my deck? I saw an older deck where the posts just rested on pre-cast concrete stepping stones. The deck seemed fine to me. Are deck piers overkill and a way for contractors to just rip me off and make more money? - Cynical Sarah, Cincinnati, OH

You might be a distruster like Sarah if you’ve been burned once or twice by unethical and dishonest contractors. The ecosystem deals with these bad people and it’s harder for them to operate now that you can use the Internet to share your horror story.

However, any contractor that says you need deck piers for your new deck or to expand an existing one is giving you great advice. Deck piers are the foundation for a deck just like your home most likely has footings and foundation walls.

There are quite a few reasons why you need piers not the least of which is to spread out the concentrated loads of the deck posts across a larger footprint on stable and strong soil.

Decks are heavy, very heavy. Pick up just one treated-lumber 2x12x16-foot floor joist to get an idea. If your deck is bolted to the side of your home and has two posts that support the structure, usually half the total weight of the deck is bearing on the tiny 4x4 posts.

These wood posts resemble spike high heels some women wear. Several thousand pounds of weight might be pressing down on the two posts. This kind of concentrated load on 2-inch-thick precast concrete paving stones can crack them like you’d snap a fresh saltine cracker.

Another key point is the deck structure must be immune from frost heave damage. Here in central New Hampshire where I live, the soil freezes in the winter and I’ve seen it rise up at least 4 or 5 inches. The bottom of the deck piers must be placed deep enough in the soil so the pier can’t move up and down. This movement can wreak havoc on any structure.

It’s important to realize that the shape of the deck pier is critical. It’s a good idea to make the bottom of the pier larger than the top. The base of the larger bell-shaped pier can then distribute the weight across more soil.

Reinforcing steel should be placed in deck piers to make them as strong as possible. In almost all cases two 1/2-inch steel bars extending vertically in the pier is sufficient. Some DIY deck pier forms come with the reinforcing steel already cut and bent.

I’ve created a page at my website that has illustrations of different deck piers and numerous videos of me showing the deck pier I love to use. Go to: Deck Piers

Wet Basements and Yards

QUESTION #2: Hello Tim! A spate of recent rainstorms has created not only a wet basement at my home but also a backyard that resembles the Okefenokee Swamp. Is there a way to prevent the water from entering my basement as well as drying out my yard? If a method is available, is it DIY friendly? - Wet Walter, Woodstock, VA

Wet basements, crawlspaces, and soggy yards are some of the most frequent problems homeowners like you ask me to solve. The good news is I’ve helped tens of thousands of homeowners stop water from entering their homes. What’s more, I’ve dried out thousands of acres of land at the same time!

My college degree is in geology with a focus on hydrogeology and soils. Water tends to move sideways through most soils that have a medium to high clay content. Almost all land has a slope to it that you can use to your advantage to capture subsurface water before it comes in contact with your foundation.

It’s important to realize you need to capture all roof water from your home and pipe it to the lowest part of your lot. You then need to dig a 6-inch-wide trench around two, or more, sides of your home that resembles a moat around a castle. The trench might be as shallow as one foot or it can be several feet deep. A perforated pipe is placed in the trench and the trench is filled with rounded or angular gravel the size of grapes or walnuts.

The perforated pipe extends to the lowest part of your lot as well. Water flowing through the soil encounters the large gravel, it drops through the gravel and then enters the pipe. The water flows through the pipe, out onto the ground away from your home and continues its journey to the ocean.

I’ve got lots of other trench drain installation tips at my website as well as a video showing you easy DIY methods to install one of these superb trench drains. Go to: Stopwater

October 7, 2018 AsktheBuilder Newsletter

New subscriber? Welcome! This is a fairly odd issue. When I have RARE sales on my stuff, I send out a reminder email when the sale is hours away from ending. This is one of those days.

But hang in there, as this issue has some very cool stuff.

Notable subscriber of past time? Please tell the new subscribers that the last time I had a big sale at the shopping cart Henry Ford was playing patty-cake with this friend Pedro.

Two years ago, when I was writing my Roofing Ripoff book about the huge scam concerning your asphalt roof shingles I included a small part about a light bulb.

It's not just any light bulb mind you. My advisors said to take out that part of the book because it had nothing to do with shingles.

The point I was trying to make is that there are all sorts of products that have been made to last and last but ethics and money sometimes get in the way. I wish I would have left it in the book now. But that's water over the dam.

centennial light bulb

CLICK HERE to read the fascinating story about this light bulb that burns CONTINUOUSLY.

Be sure to pay attention to WHO bought the company.

LAST CALL for ATB Anniversary Sale

This is the LAST CALL for my sale.

You can get 25% off MANY, not all, items at my shopping cart.

You can't get a discount on Stain Solver, the copper strips that protect your shingles, stainless-steel flashings, and some of my DVDS. Anything made from atoms is pretty much exempt except for my helpful Linear French Drain Stream Video.

Here's what you should look at in the cart to take advantage of this sale:

Basic Structural Concepts eBook

Linear French Drain Streaming Video

I Draw Your Plumbing Plans

New House Cost Estimator

Sample Blueprints - What YOUR Plans should look like!

Roofing Ripoff book PDF version

There are MANY MORE products I could name, but I'd bore you. This is a RARE opportunity to SAVE BIG MONEY.

The promo code to use is:

25ATB

The sale ends in HOURS.

CLICK HERE to see all products.

Enlarge Opening in a Bearing Wall

Have you thought about the process of creating an opening in a wall?

Do you know where to start?

PLEASE GO WATCH the video of me in this new column. I'm talking about the video where you see me standing in a room with red walls.

enlarge opening in bearing wall

That's quite enough for a Sunday morning. I'm wearing my spiffy American Flag bow tie today at church.

I always get lots of compliments about it. Here it is before I tie it.
American-Flag-Tie

I should have some great revised columns for you this coming week.

Watch for your next issue.

Tim Carter
Founder - www.AsktheBuilder.com
Certified Organic Man - www.StainSolver.com
Radio Operator - www.W3ATB.com

Do It Right, Not Over!

Enlarge Opening in Load Bearing Wall

enlarge opening in load bearing wall

Enlarge opening in a load bearing wall is sometimes easy like this job. The header is already in place above the hole in the drywall. See finished opening photo below. Copyright 2018 Tim Carter

"You can make an opening higher in a load-bearing wall much easier than creating a wider opening."

Enlarge Opening in Load Bearing Wall Checklist

  • Build temporary walls to support the load
  • Bearing points of columns must be stacked and extend down through the house to a footing
  • Hire a structural engineer to size the beam
  • Be sure your insurance will cover collapse if you goof up

Enlarge Opening in Load Bearing Wall - Do It Carefully

Related Link

Removing a Load-Bearing Wall - SECRET INFORMATION - Do NOT Share!

Below is the video he mentioned you should watch in his October 7, 2018 AsktheBuilder Newsletter.

You can enlarge an opening in a load-bearing wall. It can be difficult and dangerous.

You can enlarge an opening in a wall making it wider, or you can sometimes make an opening taller.

It's important to realize you must not alter the beams and columns that exist until such time as you install temporary support walls.

Free & Fast Bids

CLICK HERE to get FREE & FAST BIDS from local bearing wall carpenters.

What is a Temporary Support Wall?

A temporary support wall is just like a normal wall but the vertical wall studs are placed directly under the ceiling joists above. The wall should have a continuous top plate and bottom plate to help stabilize the temporary wall.

What are Bearing Points?

A bearing point is where an overhead beam rests on a vertical support. Some of the weight resting on the beam is transferred to the bearing point.

How Can I Discover Basic Structural Concepts?

You can discover basic structural concepts like beams, columns, and stresses by browsing through a very easy-to-read ebook called:

Basic Structural Concepts eBook

How Do You Size a Support Beam?

A structural engineer is the best person to use to help size a beam. There are very precise calculations that must be done so the beam is the correct size.

How Many 2x4s Must be Under Each End of a Beam?

Any opening that's 6 feet or less can have just one 2x4 under the beam. This creates a bearing point 1.5 inches wide. Any opening wider than 6 feet should have a minimum of two 2x4s under each end of the beam.

enlarged opening in a bearing wall

This is the enlarged opening in the bearing wall. Jan, who's not a spring chicken, did it herself using encouragement from me. Congrats Jan! Copyright 2018 Tim Carter

CLICK HERE to get FREE & FAST BIDS from local bearing wall carpenters.

October 5, 2018 AsktheBuilder Newsletter Update

Several hours ago I sent out my newsletter and told you about this amazing FREE offer to get a jigsaw blade.

I've been inundated with emails and complaints about how the form at the Lenox website is not working.

There might be ten, or more, reasons why the Lenox website form is borked. No one knows why but the Lenox webmistress/master.

One of the reasons might be that you, yes you, overloaded their server because so many AsktheBuilder subscribers went to the page at once. You could have been the straw that broke the server's back! 😉

I do appreciate you telling me about your frustration.

However, I'm sure you realize I don't own the Lenox website and had nothing to do with the programming that supports the FREE OFFER page.

When you experience difficulties like this when I send you to some other website, you've got a few choices:

1. Accept the frustration and come back the next day to see if they have it fixed.
2. Keep hitting REFRESH on your browser and hope for the best.
3. Forget about the FREE OFFER and watch a funny video on YouTube to lower your blood pressure.

Speaking of funny videos on YouTube, here's one of me. WAIT FOR IT AT THE END!

CLICK HERE to watch it.
chain saw test

October 5, 2018 AsktheBuilder Newsletter

New subscriber? You just missed the big party a few days ago. CLICK HERE to see what it was all about!

Distinguished database subscriber? Offer a cannoli or shrimp to our new friends! Be sure to tell each new subscriber about the Ask the Builder podcasts! Don't forget to mention they're FREE!

Ten days ago, I was out West with one of my closest friends, Dan. Dan and I met about fourteen years ago. We were both part of a secret Internet entrepreneur mastermind group that I helped get off the ground.

My college degree is in geology and most of the western USA is a paradise for geologists because you can see the rocks. Dan and I went hiking for four days in southern Utah, and then we played nine-holes of golf at a fantastic small course in Mesquite, NV - Coyote Willows.

Kathy, my wife, loves it when I go away. She's not a big fan of traveling and since I work at home (for the past twenty-five years I might add!) she gets a vacation from me when I travel. It's a win-win for both of us.

I'm back with my shoulder against the millstone and working to revise more and more of my past columns. I did one yesterday morning that I feel you'll really love. It's got two of my hand-drawn illustrations in it. I used to do drawings like that sitting at customers' dining room tables.

Get Your Free Jigsaw Blade NOW!

A couple of issues back I mentioned that you can get a FREE new Lenox jigsaw blade. These are revolutionary and it's RARE that a manufacturer makes this offer to the general public.

The offer is only good for people that live in the USA.

CLICK HERE to get your FREE Lenox blade. Be SURE to watch the three videos on that page showing the blades in a REAL TEST and a tour of the factory where the blades are made.

Drainage Issues at Your Home

Do you have water drainage issues at your home? Look at this:

standing water around shed

You may not have standing water as you see in the above photo, but how about water leaking into your basement or crawlspace?

Do you have a SOGGY yard?

You can STOP THIS WATER. It's best to stop it outside before it gets to your home.

CLICK HERE to see how to do it. There is a great video in the column for you to watch.

I just revised this column and you'll see at the bottom a link to my Linear French Drain Streaming Video. It's a professionally produced video and shows you all you need to know to stop water from entering your home. You can also use my linear french drain to dry out your SOGGY yard.

For the next four days you can get 25% off that video using the following promo code:

25ATB

That's a fantastic deal and it's going to go away in just a few days.

P.S. That promo code works for 99.78345 percent of the items in my shopping cart. You should really consider getting the PDF Basic Structural Concepts eBook.

The Ask Tim Page

I get the most fascinating questions each week. You may be one that's asked me a question.

CLICK HERE to submit a question.

Overnight, I got a great question from Mike. He wanted to know the best wall anchor to use on exterior walls. He knew that a metal anchor could cause condensation in a cold climate.

I pointed Mike to this column and told him to CLICK the photo at the top of the column to see my favorite plastic wall anchor that really works well.

You should do the same.

Revised Columns

Here are some revised columns did for you the past few days:

Deck Piers - You've Got Choices!
deck pier

Stay Cool! Get the RIGHT AC Unit!

ac units

Cut Ceramic Tile - But Porcelain????

ceramic tile cutter

That's enough for a Friday.

Meghan is moving back to the East Coast tomorrow! Big weekend here at the Carter house.

Tim Carter
Founder - www.AsktheBuilder.com
Certified Organic Man - www.StainSolver.com
Morse Code Man - www.W3ATB.com

Do It Right, Not Over!

October 2, 2018 AsktheBuilder 25th Anniversary

New subscriber? Well, you picked a pretty special issue as your first one!

Distinguished subscriber of old? Pop the corks, pull the tabs, or unscrew the caps. Party time!

25th Ask the Builder Anniversary

It all started twenty-five years ago on a dark Saturday morning. I was waiting outside at the curb for my newspaper carrier. He must have thought I was nuts when he handed me the paper through his car window.

I wanted to see my first Ask the Builder column in print. I was alone and everyone else was asleep at the house as I came inside and opened the paper.

ask the builder anniversary

Can you believe it's been twenty-five years? Wow!

CLICK HERE to read a special column I wrote about this special day.

Connections - How it All Started

Here's how Ask the Builder was born. It's important to realize I had always wanted to write a book about how homeowners got the shaft from some builders.

This frustration bubbled to the surface frequently for me. I'd give a quote for a job and often I was the high bidder. I'd explain to homeowners my number was right and that the other bidders might be putting in artificially low allowance numbers or they might be cutting corners.

Sometimes homeowners believed me and sometimes they didn't.

One Saturday in the late fall of 1992, I was in Dayton, OH, with my wife, son and oldest daughter Meghan. She was participating in an Irish dancing fesh or contest.

I was sitting in a folding metal chair and two chairs over was another dad. Somehow we got to talking and he found out I was a builder and remodeling contractor. I'll never forget his name, Biff Roberts.

"Tell me, do you use nail guns?"

"Oh yeah. I LOVE them. They save so much time and increase productivity!"

"Which one(s) do you use?"

"Are you kidding me? There's only one nail gun to use, Senco."

It turns out he was the head of marketing for Senco. Not too long after, he nominated me to Remodeling magazine as one of the Big 50, a huge award and honor. I had NO IDEA this was in the works.

In May of 1993, I got a phone call from Remodeling magazine telling me I was selected as one of the Big 50. I thought it was a prank call from Sister Susan who ran an orphanage in Jamaica. That's a long story for another day.

It was no prank. Several months later Kathy, my wife if you're a new subscriber, said, "You should take your book idea and write a syndicated newspaper column."

I saw a vision when she said it, went into my office and proceed to write three columns. The following Monday morning I walked into the newsroom of the Cincinnati Enquirer and found the home editor, Ann Haas.

She loved the columns and said she wanted to buy them and start running me each week. She also encouraged me to sell the column to other papers.

I took her advice and by the end of 1993 I had self-syndicated Ask the Builder into about 30 newspapers. Eventually about 120 papers across the USA were running the column.

It still runs today in about 60 USA papers.

That's my story and I'm sticking to it!

Big Party Promo Code

To help celebrate, Kathy and I decided to have a very big sale on all of the electronic products and consult services at the shopping cart.

Use the following promo code to get a RARE 25% off just about everything at my shopping cart. The sale ends in one week.

25ATB

If you're a seasoned subscriber you know the last time I've had a sale on just about anything in my shopping cart was eons ago.

Now's the time to grab things of all sorts that will help you save time and money and help you find the right contractor.

Do yourself a FAVOR and browse through my cart. You'll be stunned by what you'll find!

How about the Structural Basics Handbook?

How about my PDF copy of my Roofing Ripoff book?

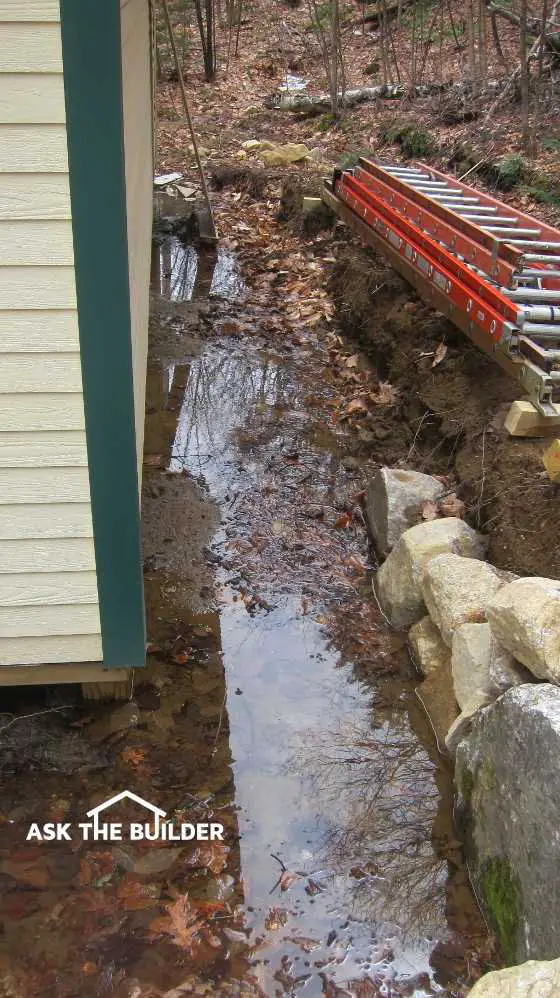
Is water leaking into your basement or crawlspace? You can get my Linear French Drain Stream Video for 25% off!

How about a rocking set of plans for a deluxe shed? Yep, I've got them.

CLICK HERE and start browsing.

The promo code will not work on the Stain Solver you see, most of the other DVDs and maybe one or two other items.

But believe me, it will work on about 98% of what's in the cart.

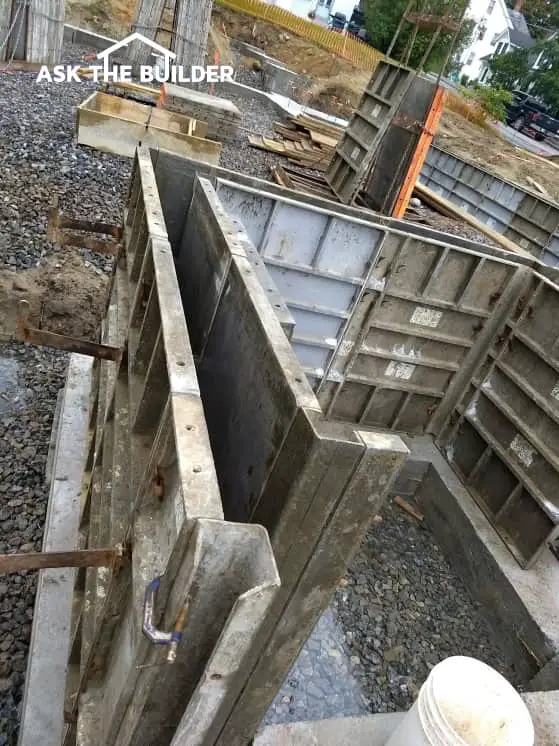
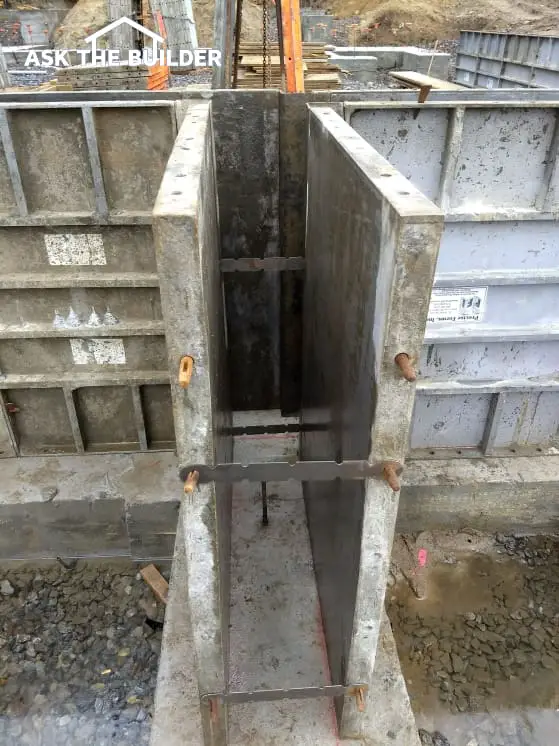
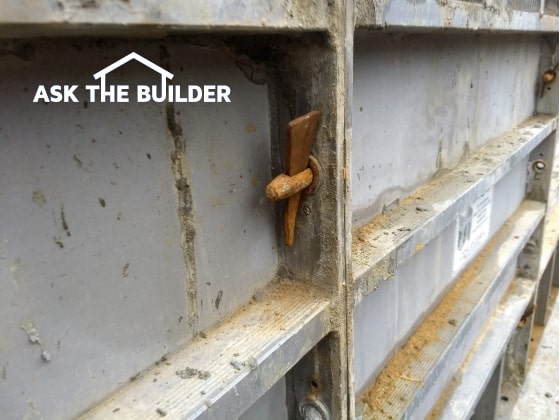
Concrete Cracks - Why and How to Prevent Them

I just revised this column this morning. I GUARANTEE you'll discover something new that will save you lots of anguish. CLICK HERE to save money.

concrete shrinkage crack

This is a concrete shrinkage crack. The concrete touched the lighter gray foundation the day it was poured. Over a period of months, even up to a year or more, the concrete slab shrinks in size. Copyright 2018 Tim Carter

That's enough for today.

Thanks for hanging with me for twenty-five years. If you've got an Ask the Builder story to share, or I've helped you in any way, PLEASE share it in a comment at the bottom of the anniversary column page. CLICK HERE.

Tim Carter
Founder - www.AsktheBuilder.com
Magic Cleaner Man - www.StainSolver.com
Radio Man - www.W3ATB.com

Do It Right, Not Over!

Smoking Fireplaces and Expanding Cement Patching

stone fireplace

This stunning stone fireplace doesn’t smoke. All the dimensions are perfect. (C) Copyright 2018 Tim Carter

Smoking Fireplaces

QUESTION #1: Oh Tim, I need your help. I’ve got a masonry fireplace that puffs smoke into the room when a fire is burning. It gets worse as the fire dies down. I’ve spoken with three different bricklayers who build fireplaces and have received three different answers. Confusion reigns at my home and my wife is none too happy. Can you share what might be wrong and if there’s an easy fix to the problem? Gary N., Dayton, OH

When the cold weather starts to descend across the great fruited plain, I start to get quite a few emails like Gary’s. Smoking fireplaces are a nuisance and unfortunately, the solution is not always easy.

The physics that are involved in chimneys, drafting, and smoke prevention is quite complex. The Brick Industry Association (BIA) has tackled this topic in no less than three detailed white papers that show exactly how to build a fireplace that will work perfectly and not smoke. The white papers also help you diagnose why your fireplace might be smoking.

The issue is that most masons that build fireplaces have no clue about these fantastic easy-to-understand documents. A mason that’s been building bad fireplaces for years not realizing it may pass on his faulty knowledge to the young apprentice working for him. The young lad thinks he’s being taught the right way to do the job.

It’s important to realize there’s a very distinct mathematical relationship between the width and height of the fireplace opening for a standard fireplace. All the dimensions and shape of the firebox, the throat, the smoke chamber height, the flue size and the total height of the chimney are determined by just the width and height of the fireplace opening.

Here’s an example. Let’s say your fireplace opening is 32 inches wide. The height of the opening should be 29 inches. The depth of the firebox less the outside facing material of the fireplace should be 16 inches. The width of the rear of the firebox should be 19 inches. The smoke chamber height should be 24 inches and the nominal flue size should be 12 x 12 inches. The height of the chimney using this flue liner should be 19 feet.

You can sometimes solve a smoking fireplace problem by making the chimney higher. But before you go to all this work, you need to be sure all the other dimensions of the entire fireplace are correct. If there are significant design flaws in the firebox and the smoke chamber, it’s quite possible the entire fireplace will have to be rebuilt.

I’ve created a page at my website that has a full table of all the sizes and dimensions for all common fireplaces, links to the BIA white papers and a few videos showing you what you need to know about how to create a fireplace that won’t puff smoke at you! Go to: fireplace

Expanding Cement Patching

QUESTION #2: Tim, I’ve got water leaking through a crack in my foundation. I’ve tried to patch it with regular mortar and the leak is less, but it’s still happening. Is there a magic material I can use to stop the leak permanently? Why do you think my repair failed? Angie P., Tacoma, WA

You might have the same problem as Angie. You could have water coming through your foundation or crawlspace walls. The water may be entering around water pipes, cracks, or other penetrations through the wall.

The good news is there’s an easy-to-use product that’s been around for years that usually solves these leaks within minutes. Commercial contractors use this material as well, so you can rest assured it works if you do the job right.

I’d start with hydraulic cement. Hydraulic cement is a powder that looks just like typical Portland cement but it’s radically different. Once you mix hydraulic cement with water an irreversible chemical reaction occurs and the plastic mix expands in volume. As it hardens it retains this change in volume and exerts pressure against the hole or crack so normal water pressure can’t leak through.

Normal Portland cement mixes do the opposite. They shrink as they harden. This is why Angie’s repair effort failed.

It’s important to realize the surfaces that the hydraulic cement touches should be free of all dust, dirt, oils, etc. For the best bond, just before pressing the cement mixture into the void, you should spritz the surfaces with a little bit of water so they’re damp. This small amount of water helps increase the bond of the cement.

The hydraulic cement hardens rapidly so you want to mix small amounts. You can slow down the hardening rate by mixing the powder with ice-cold water. It’s also not a bad idea to freeze the powder so it’s cold before you mix it.

I’ve got lots of other installation tips at my website as well as three videos showing you easy DIY methods to install hydraulic cement. Go to: cement