Homeowner Insurance Nightmare

hardwood flooring ruined by water being removed

A silly little mouse caused this damage. You'll be suprised when you file a claim if you have similar damage. (C) 2023 Tim Carter

Homeowner Insurance Nightmare Catch 22

Do you have homeowners insurance? How much do you know about your policy, or should I say contract? When was the last time you read your policy cover-to-cover? If you’re like me, you purchased a policy sight unseen assuming that you and your possessions are protected in case of a fire, flood, storm, water leak, etc.

If you have a loss, there’s a very good chance you’ll suffer a secondary shock when you discover your policy has more holes in it than the colander in your kitchen cabinet. I know because it just happened to me.

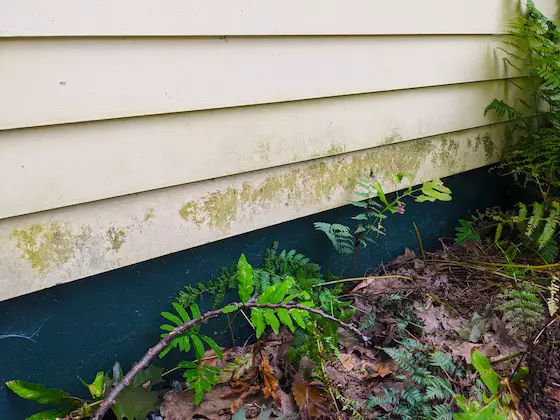
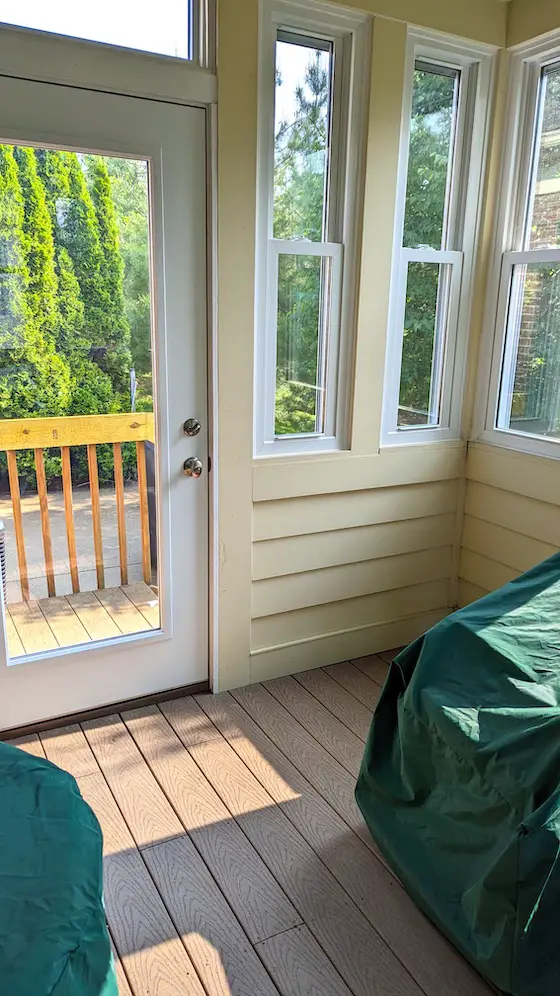
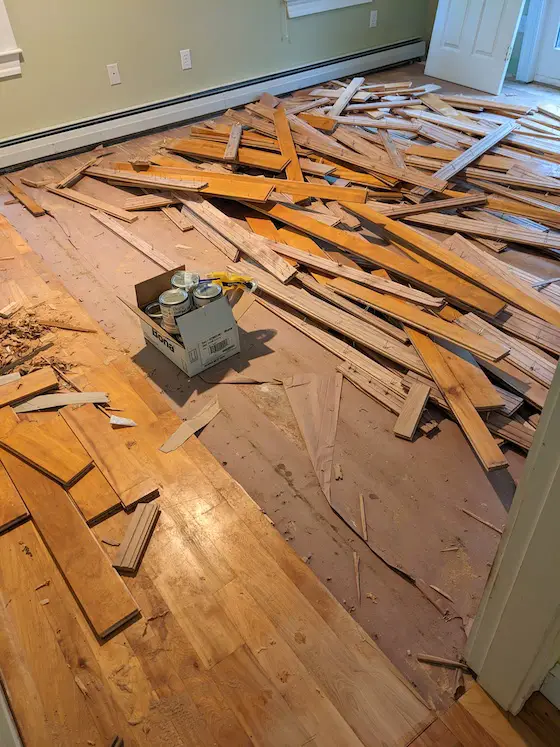
Seven months ago a mouse caused an overnight water leak in my home. The hardwood floor in our bedroom buckled and a floor beneath it was also damaged. Some drywall had to be repaired and replaced. All the flooring in the first floor of my home had to be refinished to match the replacement hardwood installed in the bedroom. The total loss was just under $30,000.00.

I soon discovered several things. First and foremost my insurance agent was worthless. She told me on the phone she couldn’t do anything about the claim and that I had to deal with the insurance company. My insurance company then offloaded me to a third-party adjuster. If I had questions, the adjuster was to answer them even though my contract was with the insurance company.

The damage occurred on March 23, 2023. I didn’t get a written estimate from the adjuster until May 18, 2023. The adjuster encouraged me to get bids when he visited my home days after the leak.

It’s a good thing I didn’t sign any contracts because his stern authoritative letter that came with his estimate informed me that if the repair cost was higher than his estimate, the insurance company would not pay for the overage unless it was pre-approved.

Three weeks before the adjuster’s estimate arrived, I did get a check from the insurance company for a little over $14,000.00. That was $1,000 lower than just the cost to do all of the floor restoration work.

Before I go on, let me ask you something. Do you happen to have $10,000, $15,000, or $30,000 in a checking or savings account you can tap into without causing you financial stress? I’m talking about money you could use to pay contractors to do work on your home. My insurance company expected me to have this and if I didn’t they told me to take out a loan or pay the contractors with my credit card.

After the restoration work was complete, I submitted all the invoices to the adjuster. His company came back and said, if you want all the money due to you, you need to provide us with the canceled checks you wrote to the contractors. I said, “I can’t pay the contractors until you give me the money you owe me.” It was a stalemate. Catch-22

A month of back-and-forth communications got me nowhere. Out of frustration, I filed a complaint with the New Hampshire (NH) Insurance Department. Within 48 business hours of their intervention, a FedEx driver handed me an envelope with the money I had deserved to get months before.

The bitter experience with my insurance company lit a fire inside me. I reached out to my state representative. She was keenly interested and three weeks later I was sitting in a chair next to the NH Insurance Commissioner and his top staff members. The commissioner wanted to know exactly what happened with my claim and he was most interested in the reforms I proposed.

My first suggestion was to require insurance agents to do what real estate agents are required to do in most states. An insurance agent should be forced to produce a one-page agency document that informs you their fealty is to the insurance company, not you. It should clearly state what the agent’s responsibilities are and where they end.

My second idea is that insurance companies should be forced to produce a simple bullet-point list of all the things that are and are NOT covered in the policy you’re about to purchase. In your lifetime have you ever received this list before purchasing a policy? Can you see how invaluable this would be allowing you to compare one policy against another?

I then recommended that the insurance companies should release money much faster. It should be just like in the home-building industry. When I delivered notarized affidavits to a bank or savings & loan, they issued a check to that contractor or supplier. My insurance company, once the heat was turned up by my state insurance department, cut a check in 30 minutes and I had it the next day!

Lastly, insurance agents and companies should be forced to give you, the day you file a claim, a roadmap of what to do, what not to do, and how long the process will take under normal circumstances. I had no guidance whatsoever.

Column 1529

Deposit Money to Contractors

new house being built roof framing rough carpentry

The bank financing this project would ROFLOL if the builder asked for money upfront to build this house. Copyright 2023 Tim Carter

Stop Giving Contractors Money Upfront

I’ve set an ambitious goal for this column. It’s my hope it will save collectively at least 100 million dollars. If you and every other reader follow the advice I’m about to share, we can make sure your money will not disappear through the hands of a dishonest contractor like sand in an hourglass.

I do quite a few short 15-minute consult phone calls each week with homeowners. This past week I talked with a man who wanted to know how he could motivate his contractor to start work on a small room addition. The contract sum for the job was just a bit over $100,000.00.

This homeowner and contractor had worked on plans early this past spring and finally signed a contract five months ago in May of 2023. Five months later the only thing accomplished was a heat pump has been disconnected. It was in the way of the room addition. An excavator also ripped out two large tree stumps in the back yard.

excavated earth in back yard tree stump removal

The backyard has looked like this for months. Sad. (C) 2023 Tim Carter

About five minutes into the call I asked the man, “How much money did you give the contractor when you signed the contract?” There was a pregnant pause. He then said, “I wrote a check for $77,000.00. The contractor said he needed to purchase supplies.”

In all my years of building and doing autopsies on failed jobs, I had never heard of someone that gave so much money to a contractor. I was in a state of shock and it took me a moment to process this. Sadly just three weeks before I had a very similar call where a husband and wife had advanced $71,000.00 to a contractor for a job costing several hundred thousand dollars. Months had transpired and all that happened was a hole in their backyard.

There are countless reasons why you should never give any contractor money upfront. There are a few situations where it is warranted. You should adopt the same time-tested practice that banks, savings and loans, and credit unions employ. I’ll share that at the end of this column.

First and foremost, contractors don’t pay their employees, subcontractors, or material supply houses in advance. If a contractor does have to pay for materials at the time he purchases them, that tells you the supply house doesn’t trust him to pay a month from now. That should be a huge flashing danger light to you.

When a contractor asks you for a deposit, he’s basically telling you that he doesn’t trust you to pay him. Trust is a two-way street in any situation. You can make the same argument should it come up that you don’t trust the contractor will do the work and do it well!

Pros Don't Need Deposits Normally

Great contractors don’t ask for money up front for a host of reasons. They have tens of thousands of dollars in their business accounts. They can easily pay for things for weeks or a month or two without needing your money. They know they’ll show up and satisfy you so that you’ll gladly pay them.

Fantastic and honorable contractors will negotiate a very fair payment schedule. They might ask that you pay for completed work at the end of each week, every other week, or at the end of a month. These same contractors will produce, if you ask, signed and notarized affidavits in exchange for your check or checks. These affidavits are valuable legal receipts that protect you from mechanic liens.

Don't Advance Job Profit

It’s insanity for you to give a contractor his profit before a job starts. When you do this in the form of a deposit, you remove his incentive, other than his honor, to finish your job on time and with excellent workmanship. Money is the only leverage you have and never forget that.

Any banker or home-loan officer reading this column knows that what I say above is true. A bank would NEVER give money up front to a contractor. Banks and financial institutions require the work to be done and done correctly before they release money. They send out inspectors to jobs before they release construction loan proceeds.

The contractors and suppliers have to provide the affidavits I mentioned before. As soon as those documents are produced, the inspector comes back with a satisfactory report on the completed work, the banks then quickly release the money to pay the contractors and suppliers. You should consider yourself a tiny bank and do the same.

If a contractor asks you for a deposit, you need to stand firm and reply, “Why do you need a deposit? Why should I give you your profit before you start the job?” In rare instances he may give you an honest answer. Your job may require some custom-made item that’s non-returnable. In these cases, the supplier often asks for a 50 percent down payment.

If nothing on your job is custom-ordered, then you’d be foolish to advance money to a contractor. Simply negotiate a fair payment schedule where you pay for work that’s complete and satisfactory.

To protect yourself, you need an itemized quote from the builder or contractor showing what each aspect of the job costs. I happen to sell this list. I developed it using the same percentages banks apply to each part of your new home. This document is invaluable when it comes to you protecting yourself.

Column 1528

Algae, Mold, and Mildew Removal and Prevention

algae growing on house siding

The green stain on the yellow siding is algae here at my own home. Copyright 2023 Tim Carter

Algae, Mold, and Mildew Removal and Prevention - Remove Water & Food

Days ago Jerry stopped by my www.AsktheBuilder.com website. He reads my column each week in his local paper and was perplexed by algae growth on the exterior of his home. Jerry hales from Chesterton, Indiana, the gateway to the massive sand dunes at the south end of Lake Michigan.

Here’s what he said, “My vinyl-sided home has a northern exposure that gets an algae-like film on it. It gets dark enough that I have to power wash it every year. What's really confusing is that the south side of the house, the sunny side, doesn’t have this problem. With one-foot eaves, the north side never gets any sun. The south side gets diffused sun shade by honey locust trees. Do you have any idea what causes this?”

It just so happens that I know exactly what’s going on. In fact, I have this exact same problem at my home in central New Hampshire. You may have the problem too unless you live in a very dry and arid location.

Algae, mold, and mildew are quite similar to fire. You may think that’s an odd analogy. To create a fire, you only need three things: fuel, oxygen, and heat. That’s it, nothing more.

Water and Food

To grow algae, mold, and mildew you just need three things and sometimes just two! Typically for some algae, mold, and mildew you need: the spores, food, and water. There are some algae that create their own food and only need carbon dioxide and water to create their own food.

It’s far easier to control the growth of the three organisms inside than outside. I say this because inside your home you often can minimize the presence of water. You have mold and mildew spores everywhere in your home and food sources are abundant. Add water and in a short amount of time, you’ll have mold and mildew proliferating.

You may struggle with mold and mildew in your tub and shower area. You can prevent it from growing with some effort. All you have to do is to dry the tub and shower walls and floor each time you get them wet. I know that’s a huge ask. Most people will never do it. At the very least, squeegee as much water to the drain, shake off the shower curtain, and leave the shower door and shower curtain open as well as the bathroom door to get everything to dry out as fast as possible.

Controlling algae, mildew, and mold growth outdoors is very hard. You can’t control the water part of the equation. Rainfall, dew, and water vapor coming up out of the soil provide a nearly constant supply of water.

As Jerry observed, he has no algae on the south side of his house. He recognized the sun hits that wall. The small amount of sunlight in the morning and early part of the day is enough to evaporate any dew or fine dew haze that’s on the siding.

All you or Jerry has to do to prevent the growth of algae, mold, and mildew is to take the food away from the growth triangle. Your body is no different. If you don’t want to have offensive body odor and filth on your skin, you typically have to take a shower each day. You rub your skin with soap and water to remove the bacteria that create body odor. That same soap and mechanical agitation of your skin with your hand gets rid of dirt.

Jerry just needs to increase his cleaning schedule from once a year to possibly three or four times a year. Here’s what not to do. Avoid using chlorine bleach outdoors in an effort to clean or kill the organisms. Chlorine bleach will poison any valuable landscaping or prize trees in your yard.

No Chlorine Bleach!

Years ago I advised a neighbor of mine against the use of bleach. Each spring she’d pour three gallons of chlorine bleach on her concrete patio to remove the algae. She had a magnificent maple tree overhanging the patio that provided much-needed shade. I said, “Barbara, the chlorine bleach will kill the tree.” She thought I was dumber than a box of rocks. After all, I was just a blue-collar builder.

Each year the tree got sicker and sicker. She spent thousands of dollars with an arborist trying to feed and care for the tree. I often wondered if Barb told the professional about her chlorine treatments. My guess is the arborist never thought to ask.

After about ten years, the arborist came out with his chainsaws and crew and cut the tree down. Barb was about fifteen years older than I was and I think she thought her age automatically made her wiser. It may have in other areas, but not when it comes to chlorine bleach.

When you go to clean the outside of your home, just use regular liquid dish soap and water. Rub the siding with a sponge just as you’d wash your car. Avoid pressure washers because they can damage your home and they don’t always remove all the dirt and food that feed the organisms.

Column 1527

Repair Front Porch

mosaic tile front porch repair

This porch was constructed in 1949. Its best days are undoubtedly behind it. Copyright 2023 Tim Carter

Repair Front Porch - Mosaic Tile and Concrete Base

In the past week, Don asked me for advice. He lives in the extreme northeast corner of North Carolina just 15 miles from the Atlantic Ocean. His front porch stoop is in very bad shape. Back in 1949 when the house was built, the tile setter used quarry tile to create a mosaic look on the flat surface. He then mortared full tiles to the sides and front of the poured concrete stoop.

Don shared that the repairmen he’s talked with are very nervous as to how to proceed. Some of the mosaic tiles are cracked and when you tap on some tiles it produces a hollow sound. Many of the full edge tiles are falling off. In other words, the 74-year-old porch is in poor condition.

Don mentioned that he and his wife want to keep the original look and he wondered what might be the best plan of attack. Based on the photographs he sent, my opinion is it’s time to get rid of all the old tile and rotten concrete base beneath the tile.

If Don hired me to do this job, the first thing I’d do is take photographs of the mosaic tile layout that forms the flat surface of the porch. If there was enough money in the budget, I’d create a map of the mosaic tiles. I’d take the time to trace the pattern of the tiles onto construction paper. These templates of each of the pieces of the random-shaped tile would be numbered and put on the map.

I know this is obsessive-compulsive, but if Don and his wife wanted the exact same look and money was not an object, then this is exactly what should be done. I’ve worked for customers in the past that had these financial resources. While it’s rare to have a budget that will allow this, I have to tell you it’s intensely rewarding work.

There are many possible reasons why Don’s porch fell apart. The truth be told, there’s no reason why it shouldn’t have lasted 150 years or more. For starters, Don lives in a very mild climate. While it does get cold and the temperature drops below freezing in winter months, it’s not the extreme cold I suffer from where I live in New Hampshire. It could even be worse had Don’s house been in International Falls, Minnesota!

I’m quite sure if I visited Don’s city I could locate several railroad bridges that were constructed in the early 1900s. The concrete abutments supporting the bridge beams are probably in good or very good condition. I can take you today to similar ones in Cincinnati, Ohio that suffer from much worse weather than what Don experiences. These railroad structures are in great condition.

The reason the railroad bridges are in such great shape is because the bridge engineers and designers specified that lots of Portland cement be used in the mix. Today the minimum specification for most exposed concrete is 4,000 pounds per square inch (PSI) or a six-bag mix. This means six 94-pound bags of cement are in each cubic yard of concrete. You can always add more cement. The cement is the glue that holds together the sand and stone in the concrete.

I would order an 8-bag mix for Don’s new concrete stoop. This might elevate the strength up and over 6,000 PSI. I’d also be tempted to add a bit more pure Portland cement to the thinset mix used to bond the new quarry tile to the concrete.

There are a few other things I’d do if Don hired me. For starters, I’d tell Don that the best weather to install the concrete and tile would be in the fall or spring. I’d want daytime temperatures to be around 60 F with no threat of rain. I’d want the nighttime temperature to not drop below 45 F.

I’d precut all the new mosaic tile and lay it out on a flat surface that matched the size of the new porch. I’d want to make sure all the tile were the correct size. This would be done before the new concrete porch stoop was poured.

I’d pour the new concrete porch late in the day on a Monday or Tuesday. I’d plan on installing new tile on the concrete the next morning at 7:30 AM. Cement paint would be used as a bonding agent between the fresh concrete and the thinset mortar. You add clear cold water to Portland cement mixing it to the consistency of gravy to create cement paint. I was taught to do this by wise concrete masons who applied cement stucco to exterior steps in Cincinnati many years ago.

Once the tiles were all set, I’d cover the tile with plastic to help retain the moisture in the fresh thinset and concrete base. I’d wait at least 48 hours before I’d think about grouting the tile. Once grouted, I’d cover the porch and edges again with plastic to hold in the moisture. I’d not take the plastic up for at least three days.

The concrete stoop, the thinset, and the cement-based grout all need water to cure properly. If water leaves these things too rapidly, they never attain their desired strength.

A month or two after the porch was finished, I’d apply a clear silane-siloxane sealer to the new porch. This would minimize water infiltration into the grout. Water that seeped into the grout and original concrete is what destroyed Don’s porch. Don’t let it happen to you.

Column 1526

Elliot Moore Smart House Colony

Elliot Moore Smart House Colony Scam

On September 16, 2023 at 1:18 AM in the morning, I received an email from Elliot Moore.

Elliot claims he is a writer/photographer for a website called SmartHouseColony. He put forth an allegation that I had stolen one of his photographs which you see on this page of my AsktheBuilder website.

elliot moore email

Here's the text of his email if you can't read what you see in the above screenshot:

My name is Elliot, and I am the photographer & writer for the website SmartHouseColony. Once in a while, I do routine checks on my images to try and check for people using them without permission.

While doing my checks, I saw my image of the bricks on https://www.askthebuilder.com/brick-water-repellents/. I'm happy for it to stay up, as long as I get credit!

Please add somewhere on the page, "Image By SmartHouseColony" and then link to the page: https://smarthousecolony.com/ so people know where to find my writing work!

Thanks so much,

Elliot Moore
Photographer & Writer | SmartHouseColony
Charlotte, North Carolina

I immediately responded to Elliot. Here's my reply:

Good Morning, Elliot.

TNX for reaching out. I'm flummoxed. I just went to that page of my website. I shot each of the photos on that page. Can you please give me a screenshot of what photo you think is yours and tell me where it was taken?

Looking forward to your response.

Tim Carter - CEO Ask the Builder

All My Photos

All of the photos on my page are mine. I shot each one. They were taken at the home of one of my newsletter subscribers. I was at the home applying the water repellent to the brick with the help of an employee of the company that made the water repellent.

Did Elliot Respond?

Elliot never responded to my email reply. IN MY OPINION, I believe he's trying to run a clever SCAM with website owners. He's trying to get website owners to LINK to his website. These links would help his website appear higher in Google's organic search rankings.

In my opinion, I feel that Elliot is counting on any number of website owners to not bother checking WHERE they got a certain photo and just insert his requested link. It takes seconds to create the link he asks for.

If my suspicions are true, then Elliot is not only a clever guy, but he's also, IN MY OPINION, a very unethical person. Let me know what you think in the comments below.

If Elliot is as smart as I think he might be, he's probably got a Google Alert set to his name and he'll see this page I created in his honor in less than 48 hours.

Elliot, if you read this, chime in and let all know WHY you never responded to me.

Three Season Room Problems

three season room door and windows

Does your three-season room look similar to this? These rooms, if not built correctly, can create a plethora of problems you’d never imagine. Copyright 2023 Tim Carter

Three Season Room Problems - There Can Be Many

Not too long ago Philip reached out to me. I’ve mentioned in past columns that each week I solve countless problems for homeowners just like you. For me, it’s similar to putting together a jigsaw puzzle or playing the board game of Clue. You present me with all sorts of jumbled data points that make no sense to you and it becomes my challenge to solve the problem. Believe me, it keeps my tiny gray cells limber!

In Philip’s case, he had a three-season room constructed up off the ground about 30 inches. It had composite decking for the floor with the requisite 1/4-inch gaps between the decking boards. Philip and his wife wanted to install solid luxury vinyl plank (LVP) flooring. As you may or may not imagine, this presents all sorts of problems.

In a normal three-season room, if it rains through open windows and gets on the decking, it’s normally no big deal. The water can drain through the gaps in the decking to the ground below. No harm, no foul.

LVP flooring interlocks. There are no gaps. Add to this, most manufacturers require a solid underlayment of some type under the LVP. I just installed some LVP at my own home and used a thin foam one that had a waterproof coating. Can you see where this is headed?

Water is your biggest enemy when it comes to a three-season room. The best ones are constructed like a four-season home. If your home is constructed properly and you have generous roof overhangs and closed windows, rainwater rolls off the windows, doors, and siding to the ground just like water off a duck’s back.

Water Can Get Into a Three-Season Room

The issue is some three-season rooms are not built like your home. The exterior walls of your three-season room may rest on top of the finished flooring and pass under the wall to the outside. Your three-season room may be on a slab and the slab is wider/longer than the exterior walls. This is very common in warmer climates. I’ve seen countless photos of situations like this.

You never want water to get on the flooring in your home for all the obvious reasons. Imagine in Phil’s case if water or snow enters his room and gets under the LVP flooring. While most, if not all, LVP is waterproof as well as the underlayment, where will the water drain to? Will it get trapped under the LVP and start to create mold issues?

Fortunately, Phil’s room is built like his home and the only danger of water getting on the new LVP flooring is from a window left open by mistake during a rainstorm. That can happen to anyone at any time even in a regular home.

Water Seeping Under Doors

One of the biggest conundrums you’ll face is with your exterior door or even sliding doors that allow you access to the great outdoors. In Phil’s case, his existing composite decking runs under the exterior door to a landing outside the room. This is a huge problem.

Water can work its way under the door threshold via capillary attraction, wind, or even negative slope on the exterior landing causing water to run towards the room! These same water infiltration issues are common on many condominiums that have exterior concrete patios poured at the same level as the concrete floor inside. Cantilevered decks using wood floor joists have a history of creating interior wood rot for the exact same reason.

Decks & Landings Must Be Lower

If you’re building a new three-season room that might become a four-season space, be sure exterior decks, landings, etc. are always 2 or 3 inches lower than the interior finished floor to prevent water from getting inside.

Make sure your contractor building the room constructs it just as you would a normal home so it’s impossible for water to enter inside a wall or flow under a wall. If you think this might happen, perhaps you should frame your walls with treated lumber to prevent future rot. You can also purchase treated plywood to sheath the exterior walls.

Don’t forget to raise the pre-hung exterior door so the bottom of the metal threshold is at the same level as the top of the finished floor. This allows you to install a proper flashing under the door and gives you plenty of room for a thick throw rug or mat on the interior floor next to the door.

Give serious consideration to a hip roof if possible. You’ll enjoy the spaciousness of a vaulted ceiling in the room with a slow rotating paddle fan on those warmer days. Plan for how you’ll heat the room should you transform it into a year-round room. I’m happy to help you should you get flummoxed!

Column 1525

Minimize Exterior Maintenance

cupped exterior wide facia board peeling paint

Minimize Exterior Wood Maintenance - You may have exterior wood on your home that looks similar to this. There are several ways to minimize or eliminate maintenance of these surfaces. Copyright 2023 Tim Carter

How to Minimize Exterior Wood Maintenance

One of the things I enjoy most about writing my column is communicating with readers just like you. As often happens, a reader will visit my www.AsktheBuilder.com website and use the form on the Ask Tim page to get help.

Not too long ago Bob did this. He lives in Coeur d’Alene, Idaho, and reads my column in his local paper. Bob said, “I really enjoy your columns. Your practical knowledge and no-nonsense approach remind me of my father-in-law who was an architect and builder. He answered all my questions until we had to send him back to Heaven.” Bob mentioned that he was also an amateur radio operator like me. It’s loads of fun to hear from readers with similar interests!

Bob then went on to ask for my advice on how to replace his cupped and cracked 12-inch-wide wood facia boards with a more durable material. One of the dealbreakers was that he wanted to paint the replacement material to match the dark green color of his existing trim.

Three Possible Methods

Three different methods immediately popped into my mind. The least expensive method is to paint the existing facia boards assuming they’re still in fair shape. Bob did send two photos and the boards have seen better days. There are quite a few exterior spackling compounds and epoxy wood fillers that do a magnificent job of filling large cracks and holes. These materials can be sanded and they all accept paint. Cupped boards can sometimes be made flat using stainless steel screws.

Urethane House Paint

You may have had bad luck with paint in the past. Believe me, I understand that frustration. What would you say if I told you I know of an exterior house paint that can last 25 years if you simply apply it according to the simple instructions on the label? You’d probably think I fell and hit my head. I used this paint on my own home in Cincinnati in 1997 and it still looks as good today as the day I painted my redwood siding.

The resin component of the paint is urethane. Realize that paint at its most basic level is nothing more than colored glue. You want to use a paint that is ultra-sticky and urethane fits the bill. Visit a traditional national-brand paint store and you’ll discover that urethane exterior house paints can be purchased in any color and different sheens.

Wrap Facia in Aluminum Coil Stock

The second method I thought of was to wrap the facia boards with painted aluminum coil stock. Millions of feet of wood trim on houses has been covered in this manner over the past fifty years. My childhood home had it done in the 1960s. Aluminum holds paint exceedingly well and some coil stock comes from the factory painted a dark green color.

You can rent a metal-bending brake from a tool rental business. These simple machines allow you to make precision bends so the aluminum conforms to the shape of the facia boards. There are numerous videos on YouTube that show you exactly how to use a brake. It’s never been easier to discover how to do something. You can also watch other videos showing you how to install coil stock over facia boards.

Replace Facia With Plastic or Composite Trim

The most expensive and time-consuming method is to remove the facia boards and replace them with a non-wood material. Fiber cement is an option. I have fiber cement siding on my own home and a shed I built. You can paint it any color you prefer. While it has wood fibers in it, the cement prevents the boards from cracking, cupping or rotting like ordinary wood.

You can also use a plastic facia board. There are several brands. The only drawback with plastic is it has a very high expansion/contraction coefficient. The manufacturers caution that painting the material with dark colors can lead to catastrophic paint failure as the plastic material expands beyond the limits of the paint.

I have tested this material on my own home with great success. I had to replace my front door several years ago and used this plastic trim instead of going back with wood. This door faces south and doesn’t have any protection from the sunlight. It’s painted a fairly dark green and after six years the paint has not peeled. I did use the urethane paint and because it’s so sticky I feel that’s the reason the paint continues to bond to the plastic.

You can often avoid the expensive process of replacing wood trim by simply protecting it from the ravages of water. Water and wood trim don’t play well together. If your wood trim, siding, fencing, railings, etc. are in great shape, think about taking the time to do what I did with my house all those years ago. Get the urethane paint, read the label, and apply it exactly as directed. You may never have to paint it again!

Column 1524

How to Prevent Cost Overruns

cracked concrete slab

Prevent Cost Overruns - This new concrete sidewalk cracked within months. The homeowner was distraught. There are things he could have done to prevent or minimize the crack. Copyright 2023 Tim Carter

How to Prevent Cost Overruns on Your Projects

You have a county coroner who performs autopsies on some who have been sent back to Heaven. I do autopsies too each week. Many of them. You may have been one of the many homeowners who have reached out to me asking for me to throw you a life preserver as you splash and flail about in the waters of misery. Your repair or remodeling job has gone off the rails. Or perhaps your new-home project is sinking faster than the Lusitania.

To help prevent you from losing vast sums of money, I’m going to share a few recent tales as well as my autopsy results. Often there’s a common thread. It’s my hope you’ll soon see that you need to hold back the trust you place in contractors. Let’s get started.

Several days ago Michael reached out to me. Months ago he invested many thousands of dollars in a new concrete sidewalk, driveway, and front porch at his home. Not too long after the work was completed, he noticed a large crack in the sidewalk leading to his porch. The crack was getting wider by the week.

He asked me, “…is this normal cracking for new concrete and should I accept a patch or should another repair method be used?” I responded that it’s normal for concrete to crack. I pointed him to a past column of mine that explains in great detail the dynamics of concrete. You can read this column on my www.AsktheBuilder.com website.

In a nutshell, concrete cracks because tension forces build up within a slab as it cures. On average you can expect concrete to shrink 1/16th of an inch for every ten feet of slab length. Cracks happen for lots of other reasons too. Expert concrete masons install control joints in slabs to try to encourage the crack to happen where it can be disguised rather than a random irregular crack across the slab.

I shared with Michael that had he purchased a small guide I created a few years ago the crack might not have appeared. In the guide, I share an illustration showing how inexpensive reinforcing steel could have been used to minimize the crack ensuring it never grows beyond a hairline crack.

concrete sidewalk illustration steel reinforcing

This is a watercolor illustration I made showing how to install concrete. CLICK IT to get all the tips. Opens in a new window.

I garnered from Michael’s tale of woe that he had placed far too much trust in the contractor. He assumed the contractor would do everything right to ensure the concrete would look great for decades. Misplaced trust often leads to disappointment. Michael should have invested a few hours time to discover how to prevent concrete cracks.

Days before I heard from Michael, I was talking on the phone with a woman who’s hired me as her virtual general contractor to rebuild a house from the foundation up. You can do the same as I take on a few clients like this each year.

She’s in the midst of a massive remodel of a home in Maine. A flaw in the house’s block foundation was discovered by a contractor doing demolition work. The project architect never saw it or if she did she didn’t think it was a big deal. I’m not sure if an ASHI home inspector was used when the house was purchased. She/he may have spotted the flaw allowing the woman to negotiate a better price on the house.

The block foundation might have to be removed and a new cast-concrete foundation will go in its place. If this needs to happen, I estimate this will create an immediate painful cost overrun of about $60,000.00. Imagine having to swallow that so early in a huge project. It’s very possible the flaw would have been identified in a $650 house inspection by one of the top inspectors out there.

It's possible the concrete block foundation might be able to be reinforced with pea-gravel concrete, rebar and/or junior I-beams. This conundrum is being discussed as I write this column.

The day after dealing with the block foundation issue I spoke on the phone with Rita. She’s invested in past consult calls with me about a failed garage foundation. This time is was an issue with her son’s new three-story townhome. The temperature on each level varies by a great deal.

She wanted to know what could be done to try to create more even temperatures throughout the residence. I shared with her that she had a few options that might work. I also shared with her that I didn’t have that issue at all with the heating and cooling in any of the houses I built.

My houses had all the correct-sized ducts leading to each room. Detailed calculations were performed to determine exactly how much hot or cold air needed to be put into each room to keep it at the desired temperature. Each room except kitchens and bathrooms had strategically placed return air ducts.

You can avoid financial and emotional heartache by investing time BEFORE you sign a contract. Never before has it been easier to get up to speed on the right way to do things. Many manufacturers and trade associations have fantastic videos you can watch to get a feel for how products are supposed to be installed.

It’s your job to watch these or read installation instructions ahead of time so you can determine in conversations with bidding contractors if they know how to do the job correctly. You can also hire me to help you get up to speed. The last thing I want to do is perform an autopsy on your failed project. Do your due diligence or suffer the consequences.

Column 1523

DIY Dangers and Structural Collapse Hazards

diy pole building structural collapse soon

DIY Danger Structural Collapse - While you may think this structure looks sound, it’s not. Fortunately the town inspector saw it and is forcing the owner to tear it down. Copyright 2023 Tim Carter

DIY Dangers - You Can Cause Structural Collapse

I live in rural central New Hampshire. It’s the Live Free or Die state. I believe in that motto to a very large degree but I’m also interested in making sure innocent people don’t get hurt or killed should a building or deck collapse.

Just a few days ago I was driving along the main backroad I have to take to get groceries. Lo and behold out of nowhere a small pole barn was taking shape. I was stunned simply because I had not seen any excavation or foundation work in progress. Understand that I travel up and down this road at least four times a week.

I decided to stop by, say hello to the owner, and ask if I could look at the large framed building. The homeowner was very cordial and welcomed me. “I’ve got four days labor into this and just yesterday the building inspector nailed a STOP WORK sign on it,” said the perturbed man.

“The inspector told me not only was it too close to the road, but it had to come down. He said there are all sorts of mistakes and it’s unsafe,” said the DIY homeowner. I offered him as much consolation as I could muster as I didn’t want to share with him I was in total agreement with the inspector. There were far more things wrong with the structure than were right.

I felt his story was worth sharing with you because had this structure not been seen by the inspector, there’s a very good chance someone could have been killed or severely injured when it would collapse in the next windstorm or snowstorm.

Allow me to share many of the mistakes I saw standing just 20 feet away. Then I’ll offer up how to build something the right way should you get the itch to swing a hammer.

First and foremost this small pole barn had no foundation. I’ve seen some New Hampshire barns built where the giant timber base plate is set on stone. But this homeowner had tacked together treated landscape timbers and simply laid them on the grass and some coarse gravel he scattered about. He did a very poor job of leveling the ground and one wall had a huge sag in it.

The vertical wall supports were just the same landscape timbers as was the top plate of the walls. He had used regular 16-penny nails toenailing these thick timbers together. It was the worst framing job I’ve ever seen. Any structural engineer would have nightmares about this while personal-injury lawyers would be salivating.

There were crude small diagonal braces at the base of some of the vertical supports, but these were no doubt temporary. They would have to be removed to install whatever siding was going to cover the walls. Diagonal bracing in walls is necessary so they don’t rack and fold up like a row of dominos might fall when you tip the first one.

The roof rafters were the correct size but the center ridge board was very much undersized. The well-intentioned DIYr installed small collar ties just under the ridge but their location offered minimal resistance to the roof collapsing under three or four feet of wet snow which is quite common in this part of the state.

Great Homeowner Structural Book - Easy to Understand

How do you avoid this situation if you’re trying to be a weekend warrior or hire the job out to a carpenter? Step one is to obtain a very basic understanding of all the structural elements in what you’re building. There are all sorts of books you can read but I have a nifty PDF e-book written specifically for homeowners like you.

basic structural ebook cover

This is an easy-to-understand book telling you how to avoid building collapse. CLICK IT NOW for INSTANT DOWNLOAD - Opens in a new window

No matter what you’re building or remodeling, this is something you should have handy. You can get it by going here.

Once you have an idea how to build something, visit your city or town zoning office to see what laws or ordinances are in place you must follow. You’ll discover that most residential building lots have no-build zones adjacent to the property lines. The zoning employees will share what the distinct setback lines are.

Assuming you can build what you want on your lot, now it’s time to secure a building permit. You’ll need some plans for this. There are any number of websites that sell plans that should enable you to secure a permit. If there are deficiencies in the plans, the plan reviewer will instruct you on what you need to add to the plans to get the permit.

This will give you a good start, but realize that plans are no substitute for decades of building experience. If you intend to do the work yourself, it would behoove you to establish a lifeline with a seasoned pro who can offer advice. If you decide to hire the work out, you must invest the time to go visit finished jobs of the pro to prove to yourself she/he can meet or exceed your quality expectations

Column 1522

Long Lasting Asphalt Shingles

worn asphalt shingles cupola with copper roof

Long-Lasting Asphalt Shingles - Look at how the shingles getting regular doses of copper ions look as good as the day they were installed. Copyright 2023 Tim Carter

How to Make Your Asphalt Shingles Last 50 Years

Eight years ago I was in the middle of a roof replacement project on my own home. My thirty-year warranted asphalt shingles looked like they were fifty years old. They were curled, large patches of felt paper with no granules were showing, and each time it rained my deck and sidewalk were littered with the colored ceramic granules.

I was furious because I thought I’d never have to install another roof in my lifetime. On one particularly hot day, while removing the wretched pieces of crap, I got so disgusted and angry that I not only swore like a sailor at the shingle manufacturer, but I also vowed to get to the bottom of the issue.

My quest for the truth started with an outreach to the national association that many of the shingle manufacturers fund. The professional public relations person whose job it is to deflect attacks or hard-hitting questions stonewalled me. He said, “It sounds like you need to reach out to our members individually.” Challenge accepted.

I did just that and the tough questions I sent to each of the top manufacturers generated milk-toast answers and some answers had nothing to do with my questions. The manufacturers knew I was hot on the trail of something that was seriously wrong but they were hoping I’d give up or not discover the truth. Never ever underestimate the strength or stamina of your opponent was my mantra back when I played high school sports.

Tens of Thousands of Bad Roofs

It was then I decided to see how bad the issue was. After all, I was seeing ads in my local newspaper for a roofing company that helped homeowners settle claims against manufacturers for defective roofs just like mine. I decided to tell this story in one of my past columns and set up a form you could use to tell me if your roof was failing before its time just like mine. The responses flooded in from all over the USA.

The day my column ran in the Washington Post, I received an email from a person within the shingle industry. He said we needed to have a phone conversation. This professional was ethically challenged and was rejoicing there was finally someone, me, who was poised to expose what was going on. He allowed me to record the interview and just asked for me to protect his identity so would not lose his job. Thank God for whistleblowers!

The reason my roof, and possibly yours, was failing early was tied to making more money plain and simple. Rather than have shingles last 25, 30, or more years, many of the manufacturers decided they wanted each homeowner to purchase a new roof. Back in 2015, the National Association of Realtors shared with me that the average length of stay in a residential home is but nine years.

My deep-throat source told me that some of the manufacturers were pre-aging the asphalt by blowing an excessive amount of air into the virgin asphalt. You do need to blow some air into asphalt to prevent it from melting and running down your roof into your gutters or onto the ground. But blow too much air into it and the asphalt becomes over oxidized making it brittle from the get-go.

I decided to take all I had discovered, including the facts in the interview, and write a short book. It’s called Roofing Ripoff - Why Your Asphalt Shingles are Falling Apart and What You Can Do About It. It’s available as an INSTANT DOWNLOAD PDF file from my shopping cart. It's also available as a paperback and an audiobook on Amazon.

roofing ripoff book cover

Here's my Roofing Ripoff book. It's an easy one-hour read. You'll save $5,000 reading it. GUARANTEED.

As I was compiling the book, I went to lunch one day with a friend of mine. As we left the restaurant the sun was shining on the roof of the vacant Tilton, NH post office. The south-facing roof was in horrible shape with the shingles curled and most of them missing the protective ceramic granules.

However, there was a ten-foot-wide strip of roofing from the peak to the drip line that was in very good condition. The difference was night and day. Perched just above this strip of asphalt shingles was a large cupola with a copper roof. Instantly I theorized that copper ions blasted off the cupola roof by the photons in ultraviolet light were washing down on the shingles with each rainfall. My theory was the copper was somehow keeping the asphalt supple.

I consulted with three physical chemists and they confirmed that copper would bond to asphalt molecules that were also split apart by the photons. Copper, however, prevents cross-linking of the asphalt. Cross-linking happens when oxygen bonds with the asphalt. When this happens and too many asphalt molecules connect together, the asphalt becomes brittle and loses its ability to stay flat and hold onto the ceramic granules that are shingles’ sunscreen.

You can extend the life of your asphalt shingle roof by installing ten inches of thin copper up at the peak of your roof. You can blind nail a 12-inch-wide strip of this copper just as I did at my daughter’s new home. It’s important that the copper be exposed to sunlight and it must rain periodically for the magic to work.

copper roof strip on roof peak

I was the first person in the world to identify that copper prevents the oxidation of asphalt molecules on asphalt shingles. See how easy it is to install this copper on a new installation? 

Column 1521