February 4, 2018 AsktheBuilder Newsletter

I was born and raised in Cincinnati, Ohio - a town that not only has a strong Midwestern culture, but it also possesses a rich stock of grand homes in its older neighborhoods.

It wasn't until I approached my mid 30s that I started to fully appreciate how many wonderful things the old houses contained. It's important to realize that I worked on and in many of these sturdy and well-designed homes.

Thousands of these houses were built in the early 1900s and had one or more unique and beneficial features that you don't often find in modern homes. Here's a partial list and I'm leaving out for the time being my favorite feature (you'll see my favorite farther down in the story):

  • laundry chutes
  • window seats
  • built-in pantries
  • closet access panels for tub and shower faucet access
  • dumbwaiters
  • full attics - not wasteful standard trusses

How many of the above things are missing from your home?

Much of this simple and useful technology was kicked to the curb by yet-to-be-born architects who have diligently tried to fill the shoes of the master architects of old.

These new-age young architects made use of the fog of disregard to shroud from you and millions of other homeowners many of the above items.

It didn't matter to them that the things in the above list were great technology. Who cared that they functional? My guess is the new architects thought all the things in the list were dated, frumpy and archaic.

The untested, youthful architects thought they had better ideas. After all, who wants antediluvian design? "Bah!" they probably proclaimed as the thumped their chests.

Did you read the fantastic Lord of the Rings book series by J.R.R. Tolkien? Tolkien knew about this unfortunate chain of events that happens all through time. This famous passage from his book says it all:

“And some things that should not have been forgotten were lost. History became legend. Legend became myth. And for two and a half thousand years, the ring passed out of all knowledge.”

What's the coolest item I didn't list above, and you can find in many of these stately well-built and designed homes?

Simple, yet elegant, pocket doors and their new, modern variations like multi-bypass pocket doors.

I'm about to show you many modern examples that will take your breath away. Seriously. I guarantee you're about to see one, or more, doors that you'll want to put in your home this year.

You wouldn't think it possible to improve on the functionality of pocket doors, but you're wrong.

Imagine two bypass doors that also fit into the SAME pocket?

The double doors of 100 years ago each had their own pocket and the met it the middle of an opening. Yes, you can still do that, but what about a large opening where you only want a single pocket on one side?

​​​​​​​Here's a photo of that magical door. CLICK the image to discover the exact hardware you need to make it work.
pocket doors
What about fancy doors? I mean really fancy doors.

Can you put them in pockets? If you can dream it, you can do it. Wait until you see all the examples below!

Any door you can dream of can be suspended and slide smoothly using made-in-the-USA LE Johnson hardware.

It's the only hardware I'd use for pocket doors or all the other variations I'm about to show you.

I've used LE Johnson hardware in my past two homes. I used it on countless jobs of mine. I've never had a failure.

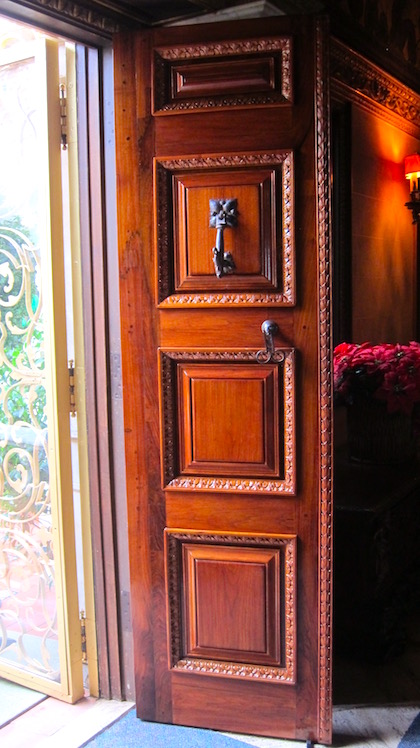
See this door just below? My daughter and I got to walk through it fifteen months ago on the coast of California. We were touring the Hearst Castle.

You can hang doors just like this using LE Johnson gliding hardware. They'll open and close for decades with no issues.

hearst castle door
It's time now for you to see how you can incorporate into your home some of this amazing old technology that's still made by a humble business located in northern Indiana - L E Johnson Products Inc.

CLICK HERE to discover more about this company that's been around since I was six year old!

CLICK THE FOLLOWING LINKS to see modern-day examples of doors that disappear and get out of the way like the doors of old.

WARNING: You're going to see amazing doors and rooms. Pay close attention to what you see.

When you land on the page, be sure to CLICK the photo so it enlarges. You need to see all the details in the photos.

Secret Sun Room

Two Doors Share One Pocket - BRILLIANT!

BeetleJuice Table - No Kidding!

Sports Gear Hide-away With Ventilation!

Dogs and Kittens Living Together!

Magic Mirrored Sliding Door - What's Behind it?

Fruit & Flowers and Classic Lines

The Hidden Compact Office

The Scavenger Hunt Shall Now Begin

Did you click all the links above? You'll need to so you can answer five easy questions.

If not, go back up and click all and look at what you see.

THANKS in advance for doing this. You'll be amazed at some of the doors.

Let's see how much you remember. Feel free to revisit the pages if necessary.

CLICK HERE and answer the simple easy questions.

Crown Molding Gap Ceiling

crown molding ceiling gap

Here's a crown molding gap at the ceiling. The red arrows point to the ugly gaps. See below how to avoid and fix them. Copyright 2018 Tim Carter

"Crown molding ceiling gap happens because the rough lumber behind the drywall shrinks. It can be prevented by nailing the ceiling molding to the ceiling allowing it to float up and down on the wall."

Why is There a Crown Molding Gap at Ceiling?

Ceiling molding, or crown molding, can pull away from the ceiling because the humidity inside a home is less in the winter months.

Charlie from Easley, SC has a crown molding gap where it meets the ceiling. I have the same issue at my own home.

It's important to realize he’s got ceiling crown molding in at least one room of his home and in the winter months a gap appears between the top of the crown molding and the ceiling.

He felt it was a temperature-change issue, and in some ways he’s correct. However, it’s important to realize the temperature in his home is very likely fairly consistent month to month. Perhaps it varies by eight to ten degrees.


Related Links

Lumber Shrinkage Facts and Secrets

Installing Fancy Crown Molding - Stunning Inside and Outside Corners

Free & Fast Bids

CLICK HERE to get FREE & FAST BIDS from local painters who can caulk the ceiling gap.

crown molding ceiling gap

This ceiling crown molding gap happened because the wall drops down in the winter from lumber shrinkage. Copyright 2018 Tim Carter

Does Rough Lumber Shrinkage Cause Crown Molding Gap?

Yes, rough lumber shrinkage is the cause of crown molding gap.

Crown molding ceiling gap happens because the rough lumber behind the drywall shrinks. It can be prevented by nailing the ceiling molding to the ceiling allowing it to float up and down on the wall.

Another key point is the outside temperature and humidity is much different in South Carolina during the year. As the air cools down during winter months, it holds much less humidity.

The lumber in Charlie’s, and my, house dries out and shrinks. This rough-framing lumber shrinkage is the source of our joint woes.

How Can I Fix Ceiling Molding Gaps?

You can fix ceiling molding gaps temporarily in the winter by caulking the crack. Do this when the gap is the largest and use the most expensive flexible caulk you can buy.

crown molding ceiling gap

This small piece of ceiling molding is affected just like long pieces. It's easy to do it right, but hard to repair. Copyright 2018 Tim Carter

How Can Crown Molding Gap Be Prevented?

The problem could have been prevented had the carpenters that installed the crown molding attached it to the ceiling instead of the wall studs. The foot of the crown molding would then just ride up and down the wall surface as the lumber expands and contracts with the change of seasons.

A simple triangular block of rough lumber that just about fills the void space behind the crown molding could have been nailed to the ceiling joists on two walls and blocking on the other two. The crown molding would then be nailed to this wood with the nails aiming up towards the ceiling.

crown molding nailing

Crown molding gaps at ceilings can be eliminated if you attach the crown molding this way. NO nails should enter the wall studs or top plate. Note the blue triangular block that is custom cut to fill the void behind the crown molding. Nail it to the ceiling joists or blocking in lieu of joists. Then nail the crown molding up through the triangular block into the ceiling. Copyright 2018 Tim Carter

Charlie’s best chance of fixing the crack without reinstalling the crown molding, a huge pain in the keister, is to caulk the gaps in the middle of winter when the gap between the molding and the ceiling is the greatest. I’m going to fix mine by using the most expensive caulk I can locate that has the greatest amount of long-term flexibility.

Six months from now the caulk seam may squeeze out of the gap a little bit, but come next winter if the caulk performs as expected, there will be no gap.

CLICK HERE to get FREE & FAST BIDS from local painters who can caulk the ceiling gap.

Efflorescence Damage Concrete

efflorescence damage concrete

Efflorescence damage concrete? It's almost never a problem. You just need to brush off the white powder. But, the salt that causes the efflorescence CAN cause damage to concrete. READ BELOW. Copyright 2018 Tim Carter

Efflorescence Damage Concrete - Not Usually a Problem

Efflorescence is a white powder created when saltwater evaporates from a masonry surface like concrete. It's a very common problem in cold climates on garage floors. Rarely will it cause a problem inside of your garage.

The first thing to remember is cars carry in snow and ice slush on the underside of the car body. Most cities and towns treat roads with salt. This salt mixes with the snow on the roads and becomes an unwanted parasite under the wheel wells of your car or pickup truck.

Concrete Absorbs the Saltwater Brine

When the salty slush melts, it coats your garage floor with a salty brine. Concrete absorbs this brew like a paper towel. The saltwater brine readily soaks into the concrete, even that which is smooth.

Another key point is the water will evaporate into the air later, but it leaves the salt behind sitting on the surface of your garage floor. That white powder you see is just fine crystals of salt.

efflorescence damage concret

This is a closeup shot of efflorescence. The width of the area you see id about 5 inches or so. The efflorescence looks like Just sweep it away. Copyright 2018 Tim Carter

Wet the tip of your finger, touch the powder and taste it. It's just regular salt mixed with some road dirt. You ate some dirt when you were a kid, right?

Related Links

Long Lasting Concrete is Easy to Make

Salt Damage To Concrete Happens More Outside Than In Garages

It's Not Mold

You may think the white powder is mold. It's not. It's just salt. Mold can grow on your garage floor, but mold usually would tend to flourish in the warm months of summer.

Efflorescence Video - Super Easy To Clean

Watch me and the efflorescence in my own garage:

How to Clean Efflorescence

Do NOT clean up the white powder with water. That just causes the salt to be driven back into the concrete. When the garage floor dries again, the efflorescence will come back.

It's best to just use a broom to sweep it away. It can take many sweepings until the salt is all drawn up out of the concrete.

You may notice the white powder months later after the snow and ice is gone and you've decided to spring clean your garage. You wet the garage floor, scrub it with Stain Solver oxygen bleach and the next day the white powder is back!

Not to worry. That just means there's still salt in the slab and less and less white powder will form as you continue to just brush it outdoors.

Salt Damage to Concrete

salt damage to concrete

The center of the photo looks like salt damage to concrete. The top surface of the concrete scales off and reveals the rough rock and sand below. Blame the concrete contractor, not the salt. Read below how to prevent salt damage. Copyright 2018 Tim Carter

Salt Damage to Concrete - Don't Blame the Salt

Salt is often blamed for damaging concrete. The top surface of concrete sidewalks, driveways and patios may spall or scale off after you broadcast salt on it to melt snow and ice.

The salt is indirectly responsible only because it helps promote more freeze and thaw cycles within the top surface of the concrete. The first thing to remember is water soaks into concrete.

It's important to realize this water inside the top of the concrete expands about nine percent in volume when it freezes. This expansion blasts apart the concrete if it's not strong enough to resist this stretching force.

Related Links

Long Lasting Concrete is Easy to Make

The Truth About DeIcing Salts and Concrete

Free & Fast Bids

CLICK HERE to get FREE & FAST BIDS from local concrete surface repair contractors.

Add Air and More Cement to Concrete

There are many examples of concrete around you that withstand attacks by rock salt and winter weather.

I grew up in Cincinnati, Ohio. Construction of a subway was started just after World War One. On or about 1925 the concrete railing and sidewalk you see in the photo just below were built. That was almost 100 years ago.

Both of these are separated from the wide Central Parkway by the grass strip to the right. Salt spray from traffic got on both the railing and the sidewalk no doubt.

salt damage to concrete

This cast concrete railing was built in 1925. The photo was taken in 2017. The sidewalk next to the railing was poured in the mid 1920s as well. A major roadway is on the other side of the grass strip. Read below why the railing and sidewalk are still in great shape. Copyright 2018 Tim Carter

The concrete railing and sidewalk alongside Central Parkway resist attack from salt spray simply because they contained more Portland cement when they were constructed. It must be remember the master craftsmen that built them also did not add extra water to them as they finished the concrete.

You can add chemicals to modern concrete that create tiny air bubbles in new concrete. These air voids are places where the growing ice crystals can expand to prevent damage from freezing weather.

Contractor Errors When Pouring Are the Real Cause of Damage

The most compelling evidence of scaling and spalling damage to concrete is basic workmanship errors.

Here are the most common mistakes made by contractors that cause damage to concrete:

  • adding too much water to make the concrete
  • adding water to the concrete at the job site to make it easier to place the concrete
  • troweling in bleed water as the concrete starts to harden
  • failure to spray on a clear curing compound to prevent water from evaporating from the concrete

A point often overlooked is how contractors of old installed lasting concrete. Here's what they did:

  • they had enough men on the job so each one finished a smaller area
  • concrete was poured with a 4, maybe, 5-inch slump - this is stiffer and requires more work
  • bleed water was allowed to evaporate or it never happened because minimal water used to mix
  • the finished concrete was wet cured with burlap kept wet for 48-72 hours after the concrete hardened

Recipe for Concrete That Withstands Salt Attack

If you order ready-mix concrete, get it with a 4.5-inch slump and order it with an eight-bag mix or 5,000 PSI minimum.

If you're going to mix small batches with raw materials use this formula:

  • 3 parts gravel
  • 2 parts sand high in silica content
  • 1.5 parts Portland cement
  • 0.5 parts hydrated lime

CLICK HERE to get FREE & FAST BIDS from local concrete surface repair contractors.

2018 L E Johnson Scavenger Hunt Game

The L E Johnson Scavenger Hunt as featured in the February 6, 2018 AsktheBuilder Newsletter. Click the link to see a great pocket door photograph. Tim explained in his January 31, 2018 Newsletter what these games are about and "What's in it for me!"

Step One: CLICK the following links and STUDY what you see. When you get to the page at the LE Johnson website, be SURE TO CLICK the photo to get it to ENLARGE.

Step Two: Answer the following questions. After you click SUBMIT, be sure to SCROLL UP so you can see your score!

Long Lasting Concrete

Long Lasting Concrete

This is part of the exposed massive concrete footing for the Waterfall Bridge in Acadia National Park built by John D. Rockefeller Jr. in 1925. This photo was taken January 28, 2018 and the concrete looks to be in excellent shape. The concrete is exposed to freeze / thaw cycles and moving water in heavy stream flow. Copyright 2018 Tim Carter

Long lasting concrete is very easy to make. The best part is it's not that expensive to do.

Long Lasting Concrete Examples All Around

There's a great chance that within fifty miles of your home there's long lasting concrete that's close to one hundred years old. I'll bet it's in great shape. All you need to do to locate some is to find a railroad bridge near you.

Look at the concrete abutments and see if there isn't a date cast into the concrete. It was a common practice to put the date in the concrete.

Yet roadways, sidewalks, driveways etc. near you that may be less than twenty years old are spalling, cracking and generally in bad shape.

What's the difference? Why is newer concrete falling apart so fast?

Waterfall Bridge Concrete Footer Acadia National Park

I hiked to the stunning Waterfall Bridge on the morning of January 28, 2018 while in Acadia National Park.

Waterfall Bridge Acadia

Here's Waterfall Bridge built by John D. Rockefeller, Jr. in 1925. The left bottom of the arch is where you can see the exposed concrete footer. Copyright 2018 Tim Carter

Two months prior, I had read Ann Rockefeller Roberts book about her grandfather's exploits of building the breathtaking carriage trails in Acadia National Park.

carriage trails on Mt. Desert Island

Here's a tiny section of the carriage trails on Mt. Desert Island. This is a great book. CLICK THE PHOTO NOW to have it delivered to your doorstep.

In her book Mr. Rockefeller's Roads, there's a rare photo of the construction of one of the bridges and it shows the giant cast concrete steps or footers that lie beneath the seventeen bridges in Acadia NP.

It's important to realize I had no idea that I'd be able to see any exposed concrete from the construction work. But there it was. The concrete you see in the above photo that supports the first row of granite stones was mixed and cast in 1925, ninety-three years ago!

It's in excellent shape.

The Secret to Long-Lasting Concrete - More Cement

I don't have access to the construction specifications for the concrete in Mr. Rockefeller's bridges. I suspect though that it was an eight or nine-bag mix.

Currently the Portland Cement Association suggests a six-bag mix, or 564 pounds, of cement in each cubic yard of concrete for exterior use. They say this will create a compressive strength of 4,000 pounds per square inch (PSI).

If you're mixing a small amount of concrete and using your own raw materials, here's an ancient formula that you'll see in many publications:

  • 3 parts gravel
  • 2 parts sand
  • 1 part Portland cement

This recipe makes the standard mix that won't hold up like the concrete holding up the Waterfall Bridge above.

I recommend this recipe for long-lasting concrete:

  • 3 parts gravel
  • 2 parts sand (silica sand or volcanic sand if you can get it)
  • 1.5 parts Portland cement
  • 0.5 parts hydrated lime

I maintain that you just need to boost the amount of cement in concrete to increase its strength.

It's my opinion that the PCA has a dog in the fight. Their members may want you to replace your concrete more often than needed. After all, this could start a long-term trend that concrete is really a disposable product.

Perhaps it's not in their best interest for concrete to last 40, 60 or 100 years? This is all conjecture on my part, but Mr. Rockefeller's Waterfall Bridge footer is prima facie evidence that concrete can be made that lasts a very long time.

Hydrated Lime Is The Secret Additive

It would also help to add hydrated lime to the mix and use volcanic sand that has a high silica content.

The Romans made mortar and concrete well over 1,000 years ago that's extremely durable. They didn't have Portland cement. All they had was hydrated lime and they must have figured out on their own that mixing it with volcanic sand made for a very durable compound.

Silica is a primary component of granite and you already know how durable it is!

If you want to know how much hydrated lime to add to your concrete, just get this amazing book:

Hydrated Lime Book

I own this book. It's contains magic formulas to help you make long lasting concrete and brick mortar. CLICK THE PHOTO now to have it delivered to your home.


January 31, 2018 AsktheBuilder Special Announcement

Happy end of January 2018!

I'll make this as short as possible. I'm usually not too good at doing that if you're a seasoned subscriber.

You may have been one who contacted me yesterday about the upcoming Scavenger Hunt game on Sunday.

Here's a typical email I get when I announce an upcoming game:

"Tim, I don't like your games. Why should I play your silly scavenger hunt game on Sunday and click the links? What's in it for me?"

The answers are pretty simple. Allow me to share a story with you.

Chuck - Mr. "What's-in-it-for-ME"

Years ago, I helped launch a very secret Internet mastermind group. I was one of the founding charter members.

Not too long after it was formed, a new member was added to the group. His name was Chuck and he lived in Michigan.

Chuck was a programmer / software engineer early in his life and he leveraged that into some successful websites as personal computers became part of our lives.

Chuck and I became very good friends. Little did we know it but we had a connection before he joined the group.

My syndicated newspaper column used to be published in The Detroit News. Way back in the 1990s, I used to sell mail order Builder Bulletins that contained extra information that wouldn't fit in my column.

Chuck had bought one of my Builder Bulletins.

He had a very high IQ and was super analytical. He'd always point out, in a very helpful way, mistakes I might be making in my own business.

One day I was gritching (a word combining gripe with bitch) to Chuck,

"Why can't I get my newsletter subscribers to do what I'd like them to do?"

Chuck replied, "I'm one of your subscribers. What's in it for ME?"

Those words hit me like a giant bucket of ice water.

I was just thinking of MYSELF and not you the subscriber.

Chuck forever changed how I think about YOU.

You should be the focus of all I do. You should get something out of each column, video, newsletter I produce.

If you don't, then eventually you go somewhere else.

What's In It For YOU?

You want to know what's in it for you to participate in the games and surveys I put in the newsletter, right?

Please answer the following questions:

Do you like my newsletter?

Yes
No
Maybe

Do you get helpful information in the newsletter every now and then?

Yes
No
Maybe

Do you want the newsletter to continue?

Yes
No
Maybe

Do you want AsktheBuilder.com to stay online so I can produce new columns and videos?

Yes
No
Maybe

If you answered YES to all or a few of the questions above, that's why you should participate in the games and surveys.

The games and surveys allow you to continue to get a stream of information that helps you save time and money. Hopefully sometimes I bring a smile to your face.

The games and surveys are sponsored by companies that want you to see their fine wares.

I get much-needed revenue from the game and survey sponsors.

This revenue pays the salaries of my employees. It pays for the costs to maintain the website. It keeps AsktheBuilder.com alive.

It's that simple.

If you want to GRITCH at me about the games, now's the time to do it. Tell me what more I can do for you. Reply now to this email and rant to me. Don't hold back.

If you want to HELP AsktheBuilder.com continue to deliver you laughs, tips, stories, honest reviews about products, etc. then by gosh participate in the Scavenger Hunt this Sunday.

Questions? Comments? Ideas to make the games better?

You know what to do. Reply and let me know what's on your mind.

Thanks Chuck for opening my eyes all those years ago!!!

January 30, 2018 AsktheBuilder Newsletter

This past weekend I was on Mt. Desert Island (MDI) on the coast of Maine. I went there to evaluate a building lot for my oldest daughter Meghan and her husband Brent as they live in California. It's only a five-hour drive from my house to MDI.

I've shared lots of tips over the years about finding the perfect building lot. Based on the questions I get, I feel the average person often doesn't know what they're looking at when they saunter across a piece of vacant land.

Please click the following three links to get a handle of what's important when you're thinking of buying a lot:

Lot Selection - Part One

Lot Selection - Part Two

Lot Selection - Part Three

It was an ideal time to look at the lot on MDI for two reasons:

  • recent rainfall melted the snow and revealed frozen wetlands
  • the deciduous trees had no leaves allowing you to see the lay of the land

After I looked at the lots on Saturday, I ate lunch and did some amateur radio next to the ocean. It was a monochromatic gray day I'd say!

Sunday morning before driving home, I took a delightful hike on a small section of the infamous carriage trails and made it to Waterfall Bridge. John D. Rockefeller Jr. built it along with the entire carriage trail network. CLICK HERE to read all about this unbelievable gift he created for you to enjoy.

CLICK HERE to see all my photos and videos I shot this past weekend.

Mt. Desert Island

waterfall bridge

Super Sunday Scavenger Hunt Game

If you're one of my seasoned subscribers, you know this time of year we have some fun.

In the past few years, I got into a rut and just had you find a small snippet of a photo.

This coming Super Sunday you're going on a scavenger hunt! I recommend you get some sleep and if you wear glasses like I do, clean them well.

You may have been one who's chided me for making the games too easy in the past. Well, if you like a fun challenge, a few of the things you need to look for are going to test your sleuthing skills for sure!

While you're playing the fun game, you're not only going to exercise that noodle of yours between your ears, but you're also going to glean quite a few ideas.

You're going to discover how LE Johnson hardware can make your own home MORE beautiful and how you can re-capture some wasted space taken up by traditional hinged doors.

Want to see how good you might do in the game? Let's do a warmup one-photo game. On a scale of 1 to 10, I'd rank this one about a 5 for difficulty.

I want you to CLICK THIS LINK and once at the page, you need to hover your mouse over the photo and click or double click it to get it to ENLARGE so you can see the detail in the photo.

Got it? You've got to enlarge the photo.

Look up and down, sideways, etc. for a clue that will allow you to answer this question:

Sometimes there are very subtle clues in a photo that allow you to know when a photo was taken. Imagine this wonderful hidden work area is in a home in Queensland, Australia. What was the season of the year when the photo was taken?

Don't worry, you'll be able to answer this on Sunday. I'm going to be fascinated to see if you get it right.

BTW, what did you think of that full-access door hardware that allows the bi-fold doors to get completely out of the way of the opening?

Brilliant engineering I'd say!!

Andrea's Nightmare Walk Through

Let's see if you can answer another question. As I was driving to MDI last Friday, Andrea sent me a question via my Ask Tim page.

She was under contract to buy a new home and did a walk through the day before the closing. That's always a good idea.

However, she didn't use my Walk Through Inspection Checklist.

It turns out she didn't need it once she opened the front door.

My question to you is, WHAT WOULD YOU DO if you were Andrea?

CLICK HERE to see what Andrea discovered.

Crazy New Frostproof Hose Bib

One of the products at the Builders Show three weeks ago was a new outdoor hose bib.

You may think it's impossible to improve on a faucet but you're wrong.

hose bib

This is the new Aquor house hydrant. You don't have to thread on your hose each time you want to use it.

The blue plastic extension just twists into the stainless steel hydrant and an o-ring makes it leakproof. You can connect your hose and have water flowing in less than one second.

WOW!

The instant you twist and lock the blue plastic extension, the water comes on.

I got one to test and I'm currently talking with the company to see what kind of sideways pressure testing they conducted to see what it takes to make the plastic extension to fail if you tug a hose sideways.

They also have a secondary extension that has a ball valve on it so you can regulate the water flow at the hydrant if you want.

My initial reaction to this new product is it's very nice, it's very durable and I like that once you disconnect the hose and extension, it's nearly flush with the house. Very sleek.

CLICK HERE NOW to order one.

That's enough for today.

Start getting pumped up for the Scavenger Hunt on Sunday.

Let's see if you can score 100 percent! BWAHAHAHAHA!

Tim Carter
Founder - www.AsktheBuilder.com
Creator of Challenging Games for Fun and Sport

Do It Right, Not Over!

New House Walk Through

Andrea S, from Little Rock, Arkansas wrote to me. She was in a huge bind. Two weeks ago she was planning to close on a house. Fortunately for her, she did a walk through inspection with her realtor the day before the closing.

New House Walk Through Nightmare - Broken Water Pipe

When they opened the door to the house, they walked into a swimming pool of sorts. The recent cold weather had frozen a water line in the attic, it burst while no one was in the home and water was everywhere.

Related Links

Mold Grows Fast - You Must Clean Up Water FAST

Best Walk Through Checklist Known to Woman or Man!

She told me, “Water was pouring down above the ceiling in the laundry room. The ceiling in the laundry room had already fallen out. The floors (some carpet and some hardwood veneer) were covered in a couple inches of water in most of the rooms in the house. On the brick on the outside back of the house, where the laundry room is, was a huge icicle.  Apparently, the water was seeping from the inside of the house out.”

Free & Fast Bids

CLICK HERE to get FREE & FAST BIDS from local water restoration contractors. Don't hesitate!!!

Andrea didn’t close on the house and wanted to know what to do. Here’s the best part. The insurance adjuster offered $7,000 to repair and restore the house.

Without being there to see the damage, I think the adjuster left off a zero on his estimate. Based on Andrea’s description of the house, there could be all sorts of hidden issues. Mold in walls, the attic and other places is a definite possibility. I’ve known water damage repair bills like this to exceed $70,000.

I’d want to strip out lots of the finished walls and inspect for hidden damage. Warped doors, woodwork, ruined cabinetry and damaged flooring are all very likely.

My advice to her is to walk away from this home. If the plumber put a water line up in an attic where it could freeze, what other bonehead mistakes did he make? If this was a new home, how could the builder allow this to happen? What other latent poor-quality mistakes are going to show up months or years from now that the builder allowed?

I told Andrea to hire an ASHI certified home inspector for her next home. This association, in my opinion, has the best home inspectors in the USA.

CLICK HERE to get FREE & FAST BIDS from local water restoration contractors. Don't hesitate!!!


January 28, 2018 AsktheBuilder Newsletter

This is going to be super fast. Just as this arrived in your email Inbox, I was waking up on Mt. Desert Island on the coast of Maine.

It's so beautiful here on MDI it will take your breath away. Acadia National Park is here. Fifty-five miles of gorgeous gravel carriage trails are here for you to hike or ski on.

Here's a photo I shot this past October from the ocean-walk trail within the park.
ef="https://www.stainsolver.com/size-survey-want/">
If you clicked the photo and ended up at the Stain Solver website, the correct thing happened.

If you want your cloth colors to be that bright - so bright they hurt your eyes - then fill out that survey by gosh!

If you want to know more about Acadia National Park, then CLICK HERE by all means.

Stain Solver Spring Sale SURVEY

Kathy and I own the Stain Solver business. Stain Solver is a magical all-purpose oxygen bleach cleaner.

You name the stain, Stain Solver can almost always clean it.

If the object you need cleaned is water washable, then you can almost always use Stain Solver on it.

Here's the issue we have.

We need to manufacture it in 20,000 or 40,000-pound batches. That's no typo.

We have to GUESS how much of each size might sell so as inventory gets low, we have a small amount of each size left.

We've NEVER BEEN ABLE TO FORECAST correctly.

For example, we've been Out of Stock of the 9.2-pound size for months!!!

I came up with an idea this morning to survey you so you tell us how much of each size to make. If you tell us what you want, then we'll be sure to make ENOUGH OF THAT SIZE.

Let's see if it works!

CLICK HERE to take the SIMPLE SURVEY.

As soon as we finish making it, you'll hear about the sale.

The To-Die-For Date-Filled Bar Recipe

Well, your patience has paid off.

date recipe

I took a photograph of the date-filled bar recipe and posted in on my website.

The flavor of these date-filled bars will EXPLODE in your mouth. If you scrunch your nose at the thought of eating dates, you'll want to try these bars.

BEWARE: I've been told they're more addicting than many controlled substances.

CLICK HERE and start to preheat the oven.

I'll have more usual home improvement news for you in a few days.

Tim Carter
Founder - www.AsktheBuilder.com
Date-Filled Bar Official Taster - BURP!

Do It Right, Not Over!