This past weekend I was on Mt. Desert Island (MDI) on the coast of Maine. I went there to evaluate a building lot for my oldest daughter Meghan and her husband Brent as they live in California. It's only a five-hour drive from my house to MDI.
I've shared lots of tips over the years about finding the perfect building lot. Based on the questions I get, I feel the average person often doesn't know what they're looking at when they saunter across a piece of vacant land.
Please click the following three links to get a handle of what's important when you're thinking of buying a lot:
CLICK HERE to see all my photos and videos I shot this past weekend.
Super Sunday Scavenger Hunt Game
If you're one of my seasoned subscribers, you know this time of year we have some fun.
In the past few years, I got into a rut and just had you find a small snippet of a photo.
This coming Super Sunday you're going on a scavenger hunt! I recommend you get some sleep and if you wear glasses like I do, clean them well.
You may have been one who's chided me for making the games too easy in the past. Well, if you like a fun challenge, a few of the things you need to look for are going to test your sleuthing skills for sure!
While you're playing the fun game, you're not only going to exercise that noodle of yours between your ears, but you're also going to glean quite a few ideas.
You're going to discover how LE Johnson hardware can make your own home MORE beautiful and how you can re-capture some wasted space taken up by traditional hinged doors.
Want to see how good you might do in the game? Let's do a warmup one-photo game. On a scale of 1 to 10, I'd rank this one about a 5 for difficulty.
I want you to CLICK THIS LINK and once at the page, you need to hover your mouse over the photo and click or double click it to get it to ENLARGE so you can see the detail in the photo.
Got it? You've got to enlarge the photo.
Look up and down, sideways, etc. for a clue that will allow you to answer this question:
Sometimes there are very subtle clues in a photo that allow you to know when a photo was taken. Imagine this wonderful hidden work area is in a home in Queensland, Australia. What was the season of the year when the photo was taken?
Don't worry, you'll be able to answer this on Sunday. I'm going to be fascinated to see if you get it right.
BTW, what did you think of that full-access door hardware that allows the bi-fold doors to get completely out of the way of the opening?
Brilliant engineering I'd say!!
Andrea's Nightmare Walk Through
Let's see if you can answer another question. As I was driving to MDI last Friday, Andrea sent me a question via my Ask Tim page.
She was under contract to buy a new home and did a walk through the day before the closing. That's always a good idea.
One of the products at the Builders Show three weeks ago was a new outdoor hose bib.
You may think it's impossible to improve on a faucet but you're wrong.
This is the new Aquor house hydrant. You don't have to thread on your hose each time you want to use it.
The blue plastic extension just twists into the stainless steel hydrant and an o-ring makes it leakproof. You can connect your hose and have water flowing in less than one second.
WOW!
The instant you twist and lock the blue plastic extension, the water comes on.
I got one to test and I'm currently talking with the company to see what kind of sideways pressure testing they conducted to see what it takes to make the plastic extension to fail if you tug a hose sideways.
They also have a secondary extension that has a ball valve on it so you can regulate the water flow at the hydrant if you want.
My initial reaction to this new product is it's very nice, it's very durable and I like that once you disconnect the hose and extension, it's nearly flush with the house. Very sleek.
Andrea S, from Little Rock, Arkansas wrote to me. She was in a huge bind. Two weeks ago she was planning to close on a house. Fortunately for her, she did a walk through inspection with her realtor the day before the closing.
New House Walk Through Nightmare - Broken Water Pipe
When they opened the door to the house, they walked into a swimming pool of sorts. The recent cold weather had frozen a water line in the attic, it burst while no one was in the home and water was everywhere.
She told me, “Water was pouring down above the ceiling in the laundry room. The ceiling in the laundry room had already fallen out. The floors (some carpet and some hardwood veneer) were covered in a couple inches of water in most of the rooms in the house. On the brick on the outside back of the house, where the laundry room is, was a huge icicle. Apparently, the water was seeping from the inside of the house out.”
Andrea didn’t close on the house and wanted to know what to do. Here’s the best part. The insurance adjuster offered $7,000 to repair and restore the house.
Without being there to see the damage, I think the adjuster left off a zero on his estimate. Based on Andrea’s description of the house, there could be all sorts of hidden issues. Mold in walls, the attic and other places is a definite possibility. I’ve known water damage repair bills like this to exceed $70,000.
I’d want to strip out lots of the finished walls and inspect for hidden damage. Warped doors, woodwork, ruined cabinetry and damaged flooring are all very likely.
My advice to her is to walk away from this home. If the plumber put a water line up in an attic where it could freeze, what other bonehead mistakes did he make? If this was a new home, how could the builder allow this to happen? What other latent poor-quality mistakes are going to show up months or years from now that the builder allowed?
I told Andrea to hire an ASHI certified home inspector for her next home. This association, in my opinion, has the best home inspectors in the USA.
This is going to be super fast. Just as this arrived in your email Inbox, I was waking up on Mt. Desert Island on the coast of Maine.
It's so beautiful here on MDI it will take your breath away. Acadia National Park is here. Fifty-five miles of gorgeous gravel carriage trails are here for you to hike or ski on.
Here's a photo I shot this past October from the ocean-walk trail within the park. ef="https://www.stainsolver.com/size-survey-want/">
If you clicked the photo and ended up at the Stain Solver website, the correct thing happened.
If you want your cloth colors to be that bright - so bright they hurt your eyes - then fill out that survey by gosh!
If you want to know more about Acadia National Park, then CLICK HERE by all means.
Stain Solver Spring Sale SURVEY
Kathy and I own the Stain Solver business. Stain Solver is a magical all-purpose oxygen bleach cleaner.
You name the stain, Stain Solver can almost always clean it.
If the object you need cleaned is water washable, then you can almost always use Stain Solver on it.
Here's the issue we have.
We need to manufacture it in 20,000 or 40,000-pound batches. That's no typo.
We have to GUESS how much of each size might sell so as inventory gets low, we have a small amount of each size left.
We've NEVER BEEN ABLE TO FORECAST correctly.
For example, we've been Out of Stock of the 9.2-pound size for months!!!
I came up with an idea this morning to survey you so you tell us how much of each size to make. If you tell us what you want, then we'll be sure to make ENOUGH OF THAT SIZE.
As soon as we finish making it, you'll hear about the sale.
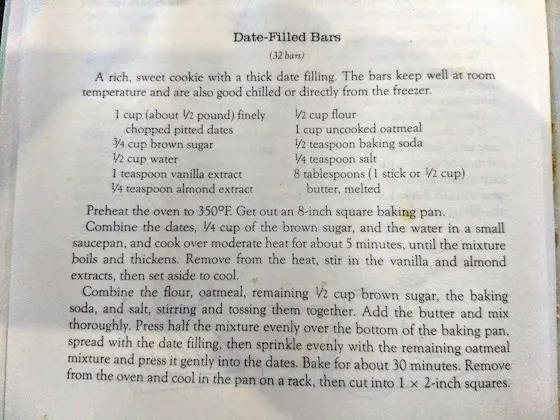
The To-Die-For Date-Filled Bar Recipe
Well, your patience has paid off.
I took a photograph of the date-filled bar recipe and posted in on my website.
The flavor of these date-filled bars will EXPLODE in your mouth. If you scrunch your nose at the thought of eating dates, you'll want to try these bars.
BEWARE: I've been told they're more addicting than many controlled substances.
"Fantastic. I'm stoked because we've only got five more weeks of possible wretched weather. Once we get to March 1st, we know we're out of the woods."
Nadine is an adroit counter clerk at Middleton Lumber Supply in downtown Meredith, NH. I was there buying 300 pounds of rock salt.
What's buying 300 pounds of salt at one time tell you about the woebegone winters in central NH? Keep in mind I've got a pretty long driveway that's all hill.
We had a fierce ice storm two days ago that exhausted my salt supply. Here's what it looked like driving to town to pick up the salt.
The scene was so much more spectacular in person when you could see the ice glistening like crystals on all the tree branches.
Quick Home Improvement Survey
I'd like to get a handle of what you might have planned at your home in the next 12 months or so.
Would you be kind enough to take this FAST and EASY four-question survey? CLICK HERE to get started.
L. J. Smith - Stair Parts Extraordinaire
When I was in Orlando, FL, two weeks ago I got to meet three people who work for a company you've probably never heard of but you've quite likely SEEN and touched their products.
Beth Galigher, J. Kelly Miller and Craig Kurtz ate dinner with me the first night of the Builders Show. They're the top management of what I feel is the best stair parts company in the USA.
Your hands probably have grasped their handrails. Your eyes have marveled at their balusters, newel posts and other stair trim. You may have their products in your own home and don't realize it.
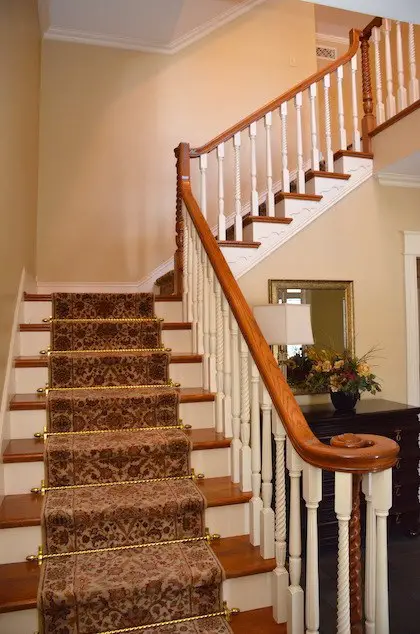
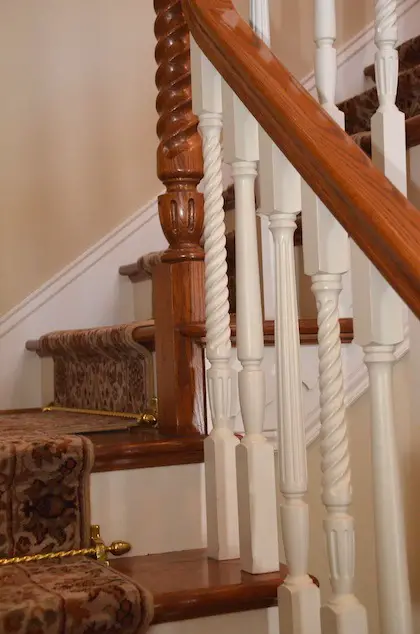
I used their parts for the grand staircase in the last house I built for Kathy and the kids. If all goes well, I'm going to be ordering more of the same parts for my final dream home.
Check out these two photos of the L J Smith stair parts that I installed thirty years ago. The photos are one month old and look how good everything still looks!
Did you pay close attention to the close-up photo just above?
Notice how Kathy selected three different balusters and we just kept repeating the pattern down the staircase.
It made for a very interesting look. The staircase, including the oriental runner and brass carpet rods, looks exactly like it did the day we moved to NH.
Kathy and I miss this staircase and I'm working my you-know-what off so I can finally build the final dream house for Kathy and me.
CLICK HERE to check out all the different stair parts L J Smith offers.
Fun Way To Cap a Retaining Wall
Please watch the videos at the page just below.
You'll be amazed. Be sure to WAIT FOR IT! Don't bail out!!!
This is a cramped and cumbersome laundry room. The owner should have thought more about laundry room plans before building the home. (C) Copyright 2018 Tim Carter
Laundry Room Plans - Common Sense Tips
DEAR TIM: One of my New Years resolutions involves my laundry room. It’s a long story, but my husband and I are building a huge room addition and I finally get my dream laundry room.
I think I know what I want, but I’d like to get your opinion as no doubt you’ve built more than your fair share of these utility rooms. If you had a magic wand and could create a functional and practical laundry room, what would the size be and what would it have in it? I’ll take any and all advice. Amy C., Grand Island, NE
DEAR AMY: I’ll bet you’re excited! Not only have I built many large room additions, but I’ve also had the good fortune to construct quite a few laundry rooms. The possibilities are endless and it’s impossible in this tiny column to do a complete brain dump. Let’s get started and see how far we can get.
In the first place no one laundry room works for all. Each person has different goals. For this reason I decided to go online and look at lots of photos of what many consider to be dream laundry rooms.
In just about all the photos I looked at I saw what I consider to be fatal function flaws. When a designer or person feels the final look or form of the laundry room is more important than the way the room makes it easier to accomplish what you’re doing, you end up with function flaws.
Minimum Laundry Room Size
It’s important to realize, based on nearly forty years of dealing with laundry rooms, I feel the minimum size for one of these rooms should be 9 feet wide by 11 feet long.
Bigger is better. The door leading into the room should be at least 32 inches wide. Most are only 30 inches wide. I’d install a pocket door so no floor space on either side of the laundry room is wasted.
Plan For Water Leaks
Laundry rooms by their very nature involve water. Just yesterday I had to replace the drain pump on my own washer and because there was no floor drain in the room, my job was made much harder.
Don’t let your plumber talk you out of installing a gorgeous tile or natural stone floor that has a waterproof membrane under the entire room. The floor drain should be in the center of the room in open sight and the floor should gently slope to the drain. You’ll never regret having this floor if something leaks or you want to give a dog a bath in the winter!
Make Water Shut-Off Valves Visible
Another key point is easy access to the mechanical aspects of the washer and dryer. Ball valves that control the hot and cold water should be visible and above and behind the washer. Yes, they make those small in-the-wall boxes for laundry valves but these are substandard in my opinion.
I’ve been a master plumber since age 29 and have come to realize the value of standard valves that are easy to turn off each time I’m finished doing laundry. Supply hoses burst, even the newer braided ones, and you should be able to turn off the water to the machine easily after each use to prevent a flood.
Dryer Vent Pipe Must Be Easy Access
The dryer vent pipe should either go up through the roof or out the wall directly behind the dryer. In my last home I had the vent pipe turn up out of the dryer go up the wall behind the dryer and turn out to exit the wall just about 6 inches above the top of the dryer.
This piping setup allowed me to disconnect the pipe in seconds. This functionality made it easy to periodically clean out the vent pipe to prevent fires.
I’d have a 7-foot-tall pantry in the laundry room and scads of base and wall cabinets. The layout should favor the way you handle dirty and clean clothes.
Platform for Laundry Basket
Think long and hard about the ideal height you’d like to have your dirty clothes basket so you don’t have to bend over so much to load the washing machine. Perhaps an 18-inch rolling platform that parks under a bench in the room would be ideal for you to set your laundry basket on as you get dirty clothes out and into the washer and clean clothes back into it after folding them.
Placing baskets up on 36-inch-high countertops works great if you’re 7-feet tall. Putting baskets on the floor is no fun as you bend over too much.
This is the exact wall-hung laundry sink in my laundry room. They look good and are easy to clean. CLICK THE PHOTO NOW to have one delivered to your house.
You can get single or double width. Consider a high-arc faucet that has a flexible spout like you see in commercial kitchens.
I wish I had more space! Oh, I do! I’m going to create another column with more suggestions titled Laundry Room Ideas at my AsktheBuilder.com website that will have a floor plan idea for you too. Visit my website to continue the discussion!
The drain tile is the white pipe under the gravel. The red arrow points to it. The builder has it in the right position, but it needs 2 inches of gravel under it and at least 2 FEET of gravel over it. READ MORE BELOW Copyright 2018 Tim Carter
"Water moves horizontally through soil. Water occupies the void spaces between the particles of soil. The deeper you go into a soil, especially if it is clay, the less space there is for water. Drain tile needs to capture this water and pipe it far away from your home."
! ! ! See Author's Notes at Bottom of Column! ! !
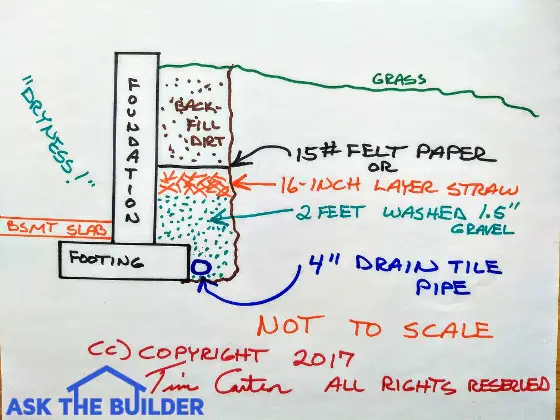
What is Drain Tile?
Drain tile is a perforated pipe that allows water to enter into the pipe. It's installed at the base of a foundation. Water in the soil flows through washed gravel on top of the pipe and is carried away from the foundation where the pipe exits the ground.
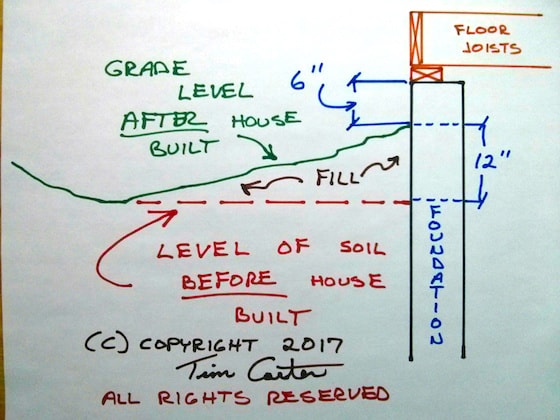
Here's drain tile and how it should be installed. The missing part is what happens with the round drain pipe. It will either extend sideways to daylight if the slope is steep around the house, or it will go under the footing to a sump pit in the basement or crawlspace. (C) Copyright 2017 Tim Carter
Is Drain Tile Part of a Foundation Waterproofing System?
Yes, drain tile is just one small, but important, part of a foundation waterproofing system. There is a big difference in exterior foundation waterproofing treatments. You may think that your new home foundation has been waterproofed because you saw some black stuff sprayed on the poured concrete in the top left corner of the above photo.
I'm willing to bet that fewer than 1 in 100 new houses in the Greater Cincinnati housing market have waterproofed foundations. Most are dampproofed. What do you think is happening in your city?
It's important to realize I had the good fortune to work on many older homes in Cincinnati, Ohio early in my building career. Quite a few of the homes were built in the late 1800s and early 1900s. Most of those never had drain tile or any foundation waterproofing.
Drain tile started to appear in the late 1920s and 1930s. It was very crude and consisted of 4-inch diameter red clay pipe that was 12 to 14-inches long. Pieces of this pipe were butted up against one another next to a poured concrete foundation footer.
The laborer would put a 1.5-inch-wide strip of asphalt felt paper over each butt seam to prevent mud from getting into the pipe.
Water entered the butt seams where two pieces of clay tile touched one another. Rarely was washed gravel put on top of the clay pipe. It was a mistake to leave out the gravel.
Does Brush-on Asphalt Waterproof a Foundation?
Beginning in the 1950s there was widespread use of asphalt on new foundations. This was hand brushed or troweled onto a new foundation by laborers.
Does Asphalt Stop Water Vapor?
Yes, asphalt is a great material to stop water vapor. Concrete soaks up water. If you place moist earth around an unprotected foundation, your basement will be damp. Surely you have been in an older basement and smelled this moisture. Older homes rarely had any treatment on the concrete or stone.
The asphalt did a great job of minimizing water soaking into the foundations. However, it did not possess the ability to bridge or fill a crack which may develop in the foundation. You see, after a period of time, asphalt becomes somewhat brittle. When a foundation treated with asphalt cracks, the asphalt cracks too!
Are there Rubber-Modified Asphalt Recipes for Waterproofing Foundations?
Yes, Owens Corning modified standard asphalt by adding some rubberized compounds. The result was a compound that had a certain amount of flexibility. Other companies developed synthetic rubber compounds that have far greater elasticity than the modified asphalt.
Even before either of these products was available, commercial builders used cardboard panels filled with bentonite for waterproofing. Bentonite is a special natural clay product that swells when wet.
Water carries the clay into the crack, it swells and plugs the leak! The bottom line is that you can truly waterproof your foundation. It just takes a little homework on your part to select the right product for your particular building situation.
Do Dimple Mat Waterproofing Systems Work?
Yes, the dimple mat waterproofing systems work well if installed correctly.
The latest technology is to install a barrier that allows water to freely drain down to the drain tile along the entire height of the foundation wall covered with soil.
One product is Delta MS. Look at this install:
This system connects to the drain tile. It's a great waterproofing solution. I'd add more gravel and no matter what the MS Delta people say, I'd cover the gravel with a foot, or more, of straw. This column was SO GOOD that I shared with the 31,000 subscribers who read my December 19, 2018 AsktheBuilder Newsletter. Copyright 2018 Tim Carter
Why Is Drain Tile Important?
The company who waterproofs your foundation will most likely insist that they install or monitor the installation of your drain tile system. Very few builders that I'm aware of take the time or interest to adequately install drain tile.
Water naturally flows toward your foundation. This is especially true if you live on a hillside or even a slight slope which, by the way, most of us do!.
To make matters worse, the soil that is used for backfill around your house is rarely compacted. When it is dumped around your house it has huge amounts of air in it.
Backfill dirt is a problem because it contains lots of air and void spaces.
This dirt was fluffed up and pumped full of air when it was dug from the ground. It can take years and years for this ground to naturally compact. In some cases, where roof overhangs protect the dirt, it can take decades for it compact.
The soil can always have more air in it than the soil that is only 5 or 6 feet away. This can spell BIG trouble for your foundation if it is not waterproofed AND if you have a bad drain tile installation.
From the above discussion, you can see why draintile is important, I hope. The point is this: the backfill soil has the capacity (because of the large volume of air) to hold large quantities of water. You need to collect this water rapidly and get it away from your foundation. That is the job of the drain tile.
That is a phrase I often used to tease my coworkers after we would finish a task. It was an inside joke. However, the phrase applies to drain tile.
You only have ONE chance to put it in. It gets buried deeply. It can clog up if not installed right. It's expensive to redo. For these and several other reasons, you need a quality installation.
Where Does the Drain Tile Go?
I always like to install the drain tile on the side of the foundation footer. Many builders simply install it on top of the footer.
The water in the soil enters the drain tile from below not at the top. Most homeowners feel the water flowing down through soil magically finds its way into the slits or openings at the top of drain tile. That's folly.
Installing the drain tile on top of the footer means that your water table will be at the top of the footer. My method puts the water table about 6 inches below the top of the footer. You want the level of water as low as possible.
When Should the Drain Tile Be Installed?
I recommend that the drain tile is installed the day after the footers are poured. I used to help strip the forms and then put a 1 to 2-inch layer of 1-inch gravel alongside the outside of the footer.
I would then install the drain tile continuously around the footer. Finally, we would cover the drain tile with 1-inch gravel flush with the top of the footer. This would complete phase one of the operation.
There are advantages to doing the job this way. First, the space between the side of the footer and the wall can fill with collapsed dirt and/or concrete overflow from pouring the foundation wall. This stuff is tough to dig out and remove once the basement walls are poured. Besides, it is tough to work in the narrow area left along the foundation after the walls are up and poured.
Complete Installation After Waterproofing Foundation
Once the foundation is waterproofed, you can continue the drain tile installation. I recommend that you install an additional 2 to 3 feet of 1-inch gravel cover above the footer. On top of this, install tar paper or a 6-inch-thick layer of straw before installing any backfill dirt.
The tar paper and straw prevent the drain tile from getting clogged with silt.
The elimination of the straw or tar paper is a huge mistake. The backfill dirt is fluffed up. Rainwater carries small silt particles down into the soil until it self-compacts.
The first thing to remember is the backfill dirt has lots of air voids that are waiting to get filled with this silt. This silt will clog the gravel and drain tile if you don't stop its downward movement.
Best Drain Tile Empties to Daylight Like a Natural Spring
So where does the drain tile water go? Good question!
If you're lucky, it drains out to daylight somewhere on your lot. Here is what I mean. If you're building on a sloped lot, maybe you are lucky to have enough fall within your property line whereby the drain tile can daylight. There is no need for the pipe to have a slope. It can be laid virtually perfectly level from the footer until it daylights. The net result is that you are simply providing a resistance-free path for the water around your foundation to escape.
If you are unlucky, like me, you need to install a sump in your basement. The draintile pipe gets to the sump either through or under your footer. I always install a 6-inch pipe under the footer right where I know I will install the sump. I actually install this pipe before the footer is poured. It's tough to tunnel!
An electrical pump pumps the water from the sump to either the outside of your house or into a stormwater drainage system. Never allow the sump water discharge pipe to dump the water alongside your foundation. This simply soaks the soil again!
Battery backup sump pumps are available to assist the regular pump in the event of primary pump failure or a storm-related electrical outage.
Backfilling Basement Foundation Walls
Many a foundation crack is related to backfilling. Very few homeowners realize the risk of backfilling a foundation too quickly.
Don't forget that your foundation walls are simply beams or retaining walls. The walls act as a beam once the basement floor and the first-floor subfloor are attached.
Without these two elements, a foundation wall can tilt inwards, crack, or even slide off the footer! Don't allow your builder to backfill until these floors are in place!
Also, did you know that it takes approximately 28 days, under ideal conditions, for concrete to reach 75 percent of its design strength?
I know of builders who backfill foundations within four days of being poured! I've seen huge cracks develop from foundations that were backfilled prematurely. Don't let it happen to you!
Slope Dirt Away From House Foundation
Model building codes mandate that the soil must fall away from a foundation. They actually state that there must be 6 inches of fall within the first 10 feet of horizontal distance away from a house.
If lot lines are too close for this to happen, then there must be some sort of drainage channel that allows gravity to pull water away from a foundation.
I made this drawing. You can see the foundation wall with a typical sill plate and floor joist. The red line is the lot before the excavator shows up. The top of the foundation should end up 18 inches ABOVE the red line. Use the dirt from the hole to create the slope away from the foundation. (C) Copyright 2018 Tim Carter ALL RIGHTS RESERVED
Furthermore, once this water is away from the foundation it needs to be directed to the lowest part of the lot. In other words, the lot grading plan needs to be completed so that water drains off the lot much like it did before a house was built on the lot. It is a common sense issue. This can be easily accomplished if the house foundation sticks up out of the ground and backfill soil creates the needed slope.
If you have ponding problems now and it is too difficult to re-grade your yard you can drain these swampy areas fairly easily. All you need to do is install a linear french drain system in the yard. This is a simple trench system that contains perforated drain pipe and gravel. The trenches are just 6 inches wide and about 18 to 24 inches deep. They follow the contour of your yard until they go past your house. Then the bottom of the primary trench levels out and before long the pipe will daylight!
You may wonder if my advice is worth anything. Well, read what Jim Sanders wrote to me when he was at the end of his rope:
"Hi, I just wanted to write to give you the results of my "Trench Drain". I have had a wet crawlspace for 15 years. Water would fill the crawlspace at times, so we actually had to drill weep holes at the base so that it would enter the basement and eventually, the sump pump.
I have tried everything. Several contractors said that the only thing we could do was to bring the water into the house via drainage tile and let it enter the sump pump. That would work, but because I live on a 6' elevation, there is no reason that I should have water problems. It became like clockwork...when it rained, we would rush home from the lake or wherever we were vacationing so that we could be prepared to start the backup generator, in case the power failed. We even had our alarm company put a sump alarm on our system, so they could notify us if we had a power failure. Battery backup was not an option, because sometimes we lose power for days and during any rain, our sump would run every 7 minutes...just like clockwork.
I found your site and read the article on the trench or French drain. At first, it sounded a bit like "holistic healing" to me. I failed to understand why a 2 ft. deep trench, 4 ft. away from the house would do any good. How could this simple thing correct an extreme water problem that has plagued me for years, cracked my foundation, settled my garage floor and ruined almost every vacation?
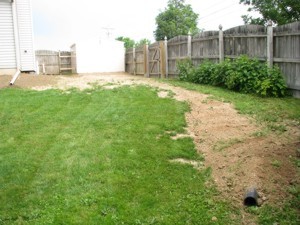
The Linear French Drain trench running from the house. PHOTO CREDIT: Jim Sanders
I decided "what the heck". I had to dig by hand using a trenching spade and a pick-ax, because the builder back-filled our property with brick and blacktop. It took quite a bit of time. Because the ground level varies so much on that side of the house, I was not able to achieve exactly 2 ft. deep. It varied from 18" to 30" in spots, but the slope was downhill. The trench is about 80 ft. long. At times, I thought about filling it all in, because I just didn’t believe that it would work.
I stoned it, put tile in, and filled it with #1 round stone. I socked the pipe just for safety measure and I also used geotextile fabric on top, so I could cover with dirt and grass. I also ordered some clay and pitched from the house to the drain.
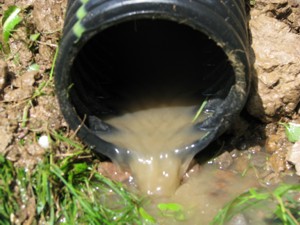
After a short rain, water is running away from the house. PHOTO CREDIT: Jim Sanders
Result? For the last month, we have had 7 or 8 torrential rains, the worst of which was last night. It rained so hard, that our lawn washed out in spots because of the high clay content. Our sump pump, that normally ran every 7 minutes during and after rain, has not turned on for 4 weeks. The silt at the bottom of the sump well is now dry and cracking. Our crawlspace has not shown a trace of water or even moisture.
Since I couldn’t see correcting the foundation cracks or the garage floor settling and tilting until I corrected the problem's source, I waited to see if the trench drain worked first.
This week, I had a company come in and perform sort of a "mud-jacking" technique on the garage floor, which worked perfectly. Also, during the past few weeks, I parged the cracks in the foundation.
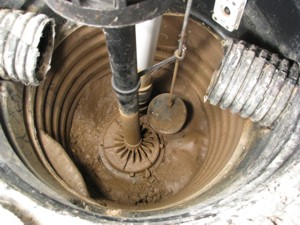
A dry sump pump. PHOTO CREDIT: Jim Sanders
I just wanted you to know how this worked. I stressed for many years over this issue and the solution was nowhere near as difficult as I thought it would be.
As a side note, I went to the end of the drain tile during a hard rain to see what was happening. Water was running out of the drain tile in about the same exact volume that it previously ran out of the weep holes in my crawlspace. This winter will be interesting, because last year, the ground next to the house was so saturated that during a thaw, my sump would run constantly. I'm guessing that the ground between the trench and the house will probably be drier now going into this winter."
You can't make this stuff up. I just had another run in today with a PR firm that represents a major manufacturer.
I was going to sit on this news for a few days since I just sent out a blast to you, but this is a life-safety issue.
And as one of the subcontractors that works for my very good friend Nick Motz in Cincinnati says, "Life safety takes precedence over all else."
In this case he's right.
This one's all about propane.
I BEG you to Forward this news blast to anyone that's a big DIYr or any young people that you feel might not know about the DANGERS I'm about to reveal.
See that cool blue flame? It's anything but cool. Put a sensor in the white area and it will probably measure 3,600 F. Copyright 2018 Tim Carter
Once again, LEAVE A COMMENT at the bottom of the column after you read it if you want to send a message to manufacturers or PR firms.
I want to add that I've offered my consulting services to manufacturers for years to punch holes in their products BEFORE they go to market or BEFORE they go to press.
I obviously do a horrible job of marketing this service because no one has ever hired me. My guess is they feel they know better.
Date Bar Cookie Recipe
I got numerous requests for Kathy's delicious date bar cookie recipe. She's going to share it.
Believe me, you're going to thank her.
I'll have it next issue.
That's enough for tonight.
Tim Carter
Founder - www.AsktheBuilder.com
Provoker Extraordinaire'
Do It Right, Not Over!
Expert Advice For Your Home
Subscribe to the FREE Ask the Builder newsletter to receive professional advice for your home. Complete the form below and each week you'll get:
DIY Tips
Tool Reviews
Project Guides
Product Discounts, Giveaways & more.
Unsubscribe at any time. We respect your email privacy.