I hope you had a great past week. I've been crazy busy!
Lots of news to share and a new look for me!
Surprise news too!
Bermuda Meet Up
Two days ago, I got a text from my very close friend Dan:
"How would you like to go to Bermuda on a cruise? Cancellation has created an empty cabin. It's yours if you want. Completely FREE."
Here's the ship:
I've NEVER BEEN on a cruise! My answer was an immediate, "YES!"
So what are you doing three weeks from today? The Norwegian cruise ship Dawn leaves Boston at 4 pm on June 23rd and gets back just after sunrise the following Friday June 30th.
Be IMPULSIVE! Let's have a party! Come with me on the cruise!
Book the cruise and let's do an Ask the Builder Meet Up on the high seas or the beaches of Bermuda!
The cruise packages are not too bad. CLICK HERE to see what I mean.
I do NOT get a commission or anything from Norwegian Cruise Lines. I'm just inviting you to come and relax on this magnificent vessel.
If you live in Bermuda, get in touch with me so we can get together. If you book the cruise, ABSOLUTELY get in touch with me so we can meet on the ship.
New Look
I've been putting off getting an eye exam for a few years. No reason other than pushing it off.
BIG MISTAKE!!! I'm STUNNED how clear things are now. My entire visual experience is so much better.
My eyes are fine but I didn't realize my eyes had changed and I wasn't seeing as CLEARLY as I could with new glasses.
If you've not had an eye exam in the past two years, SCHEDULE ONE!
My youngest daughter Kelly had gotten some glasses online from Warby Parker and I liked the look. I decided to move away from my old-man wire rims to a different frame. I think it makes me look smarter. Kathy HATES them.
Oh well! What do you think? Sorry my eyes are in the shade from the bright sun.
Here's a photo of the table after I rinsed it off. The reason the center of the table is bent is simple. It's an ingenious design where the table extension folds up and tucks under the other two sections should you want the table smaller.
Whole house fans - This is not one. This is an attic fan but can also be called a powered attic ventilator (PAV). They are often visible on the outside of a house either on the roof or on a side wall of an attic gable. Whole-house fans are located inside homes. Both perform entirely different functions. Copyright 2018 Tim Carter
"A whole-house fan is a fixture that is often located in the ceiling of a home. In rare occasions, they can be located in a wall."
Whole House & Attic Fan Checklist
Whole house fans cool you AND your attic
Attic fans only cool the attic - AVOID solar attic fans!
Both fans need lots of NET FREE AREA to push out hot air
For best cooling, you need both types of fan in your home
DEAR TIM:What's the difference between a whole-house fan and an attic fan? Which is the best one to have in a home?
What's the best way to cool a home using these fans? Can either of these fans cause problems? Renee H., Littleton, CO
DEAR RENEE: Whole-house fans and attic fans are as different as apples and watermelons.
What's the Difference Between a Whole House and Attic Fan?
Both fans move air just as apples and watermelons are both fruit, but the similarities end there.
What are Whole-House Fans?
A whole-house fan is a fixture that is often located in the ceiling of a home. In rare occasions, they can be located in a wall.
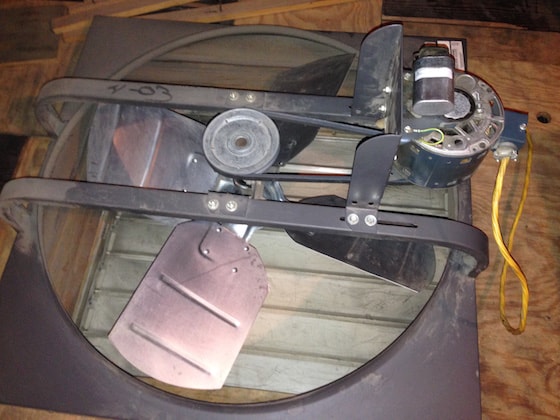
It turns out the motor was the issue! Copyright 2018 Tim Carter
Where are Whole House Fans Located?
A whole house fan might be in a hallway or some other central location of the home. The fan is always located on the highest ceiling or wall and oriented so that it blows air directly into an attic space.
This is a typical whole house fan. It can be set horizontally as you see here or vertically in a side wall. CLICK THE PHOTO NOW TO SEE ALL THE DIFFERENT TYPES YOU CAN HAVE DELIVERED TO YOUR HOME IN DAYS.
The whole-house fans cool you because they pull air through open windows and doors in your home. The breeze in a house can be significant depending on how many windows you open and where they are in relationship to the fan.
A typical whole-house fan moves vast amounts of air. The blades of the fan can be large, and they can have significant pitch so they can move thousands of cubic feet of air per minute.
Turn one of these bad boys on inside an average-sized ranch home that has 2,400 square feet of finished floor space, and you can replace every bit of stale, hot inside air with cooler outside air in less than five minutes.
Do They Push Air Through an Attic?
These fans are designed to pull air through a house and exhaust the air by pushing it through an attic space. Since you live in an area that has low humidity, they are superb and highly efficient cooling devices.
They work best when they are operated in the early evening or night hours as outdoor temperatures start to nosedive and the inside air temperature of a house is still high. As outdoor humidity rises, the cooling effect from whole-house fans drops.
What are Attic Fans?
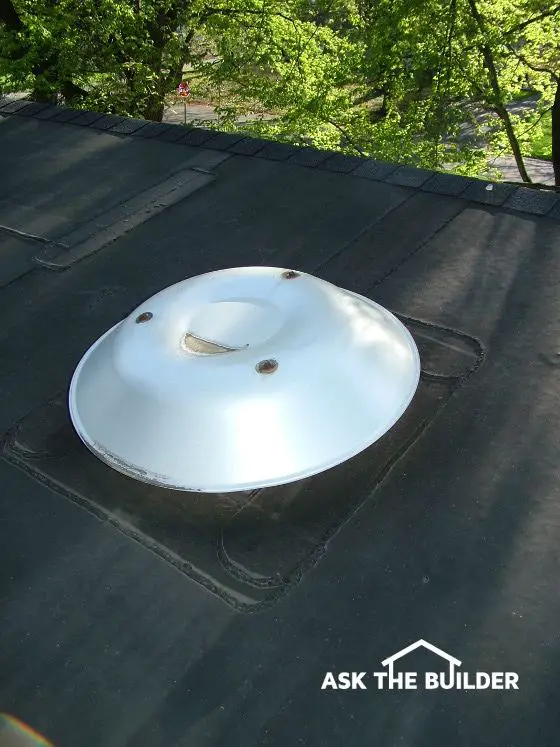
An attic fan is completely different. These are smaller fans designed to move hundreds of cubic feet of air per minute out of your attic area only. These are mounted to the surface of your roof in most cases looking like a small space ship has landed on your home.
This is a typical attic fan. It just mounts up on your roof. You need to run 120-volt electric to it to power it. Do NOT get the solar-powered fans. They're WORTHLESS as they don't move air when you really need it late in the day. CLICK THE PHOTO NOW TO SEE ALL THE DIFFERENT TYPES OF ATTIC FANS SO YOU CAN HAVE ONE OR TWO DELIVERED TO YOUR HOME IN DAYS.
In some cases, the fans can be mounted INSIDE your attic on a vertical gable wall. You then see a louvered vent in your gable wall.
Do Attic Fans Move Air Through a House?
No, these fans are not supposed to move air through your home. They only move air through an attic space above where you are.
The cooling principle here is simple: If you replace the extreme hot air inside an attic that might be 140-160F with air that is 85-95F, the inside of your home should also be cooler.
How Long Does it Take To Cool the Attic?
The issue is it can take many many hours before the attic lumber and insulation cools enough that you might feel a difference down inside your home.
The heat gain from extremely hot ceilings adjacent to hot attics can stress air-conditioning systems, and push them to the limits of their ability to cool a home.
Where do the Fans Exhaust the Air?
For both fans to work properly, they need to easily exhaust the air to the outdoors. The attic fans do this by default, as you typically have to cut an opening in the roof or a side wall of an attic to mount the fan. When installing a whole-house fan, you need to install several static pot vents in the roof that allow air to get out.
You can also install very large gable vents if your home design permits this. The whole-house fans come with instructions that tell you how much NET FREE SPACE of ventilation you need so the fan works properly.
The attic fans also need lots of intake air vents along the lower edges of the roof. Continuous soffit venting is the best and the air from the outdoors needs to be able to easily enter the lower reaches of the attic where the roof passes over the outside walls of the house.
Since most attic fans are located high up on a roof, this design allows for excellent cross ventilation of the entire attic space.
Can Attic Fans Can Rob Air From Home?
If you don't provide enough intake air vents for attic fans, they can draw air from inside your home. This happens because the moving blades of the fan create a partial vacuum.
It's not a good idea to send cool air from the inside of your home up into an attic, since you are paying good money to cool inside air with an air conditioner.
Do Whole House Fans Need Lots of Vent Space?
Whole-house fans also need plenty of exhaust air vents through the roof or through side gable walls of attics. Each whole-house fan manufacturer tells you for each size fan how much net-free area of exhaust ventilation the fan requires to work properly. If you don't provide this exhaust ventilation area, the fan blades will spin, but not move the maximum amount of air.
Do Both Fans Remove Hot Attic Air?
Whole-house fans serve double duty as they remove hot air from the attic as they work. But you do not necessarily want the whole-house fan operating in the middle of the day as your attic heats up.
IMPORTANT TIP: For this reason, it makes sense to have both types of fans in a house. They operate at different times of day and night, since they are designed for two different purposes.
Whole-house fans work so well, they are often equipped with timers. If you operate one all night long, you might need to sleep with blankets. They often can cool a house to a comfortable temperature in just several hours.
What Windows Should Be Open With a Whole House Fan?
You can get concentrated cooling with a whole-house fan by opening the windows in selected rooms. As the fan operates, it creates a comfortable breeze in the rooms with open windows.
Should You Close Fireplace Dampers?
Be sure you do open windows before you turn on a whole-house fan. If you don't and you have a fireplace with ashes in it, you will create an ash storm as air is sucked down the chimney and rushes across the dry fireplace ashes.
The dirty ashes are then broadcast through the house as they are sucked towards the whole-house fan. How do I know this? It's the voice of experience talking.
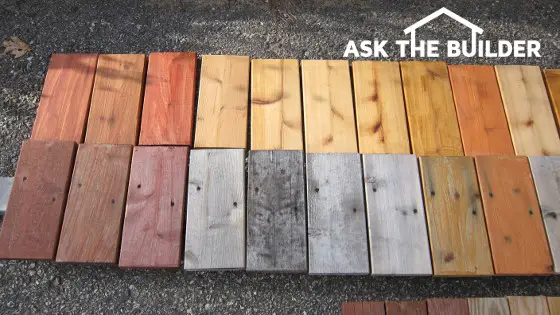
Here are the side-by-side before and after wood samples. The faded pieces of wood were out in the weather for only six months. CLICK THE PHOTO ABOVE to see all of the Before and After Photos of the deck sealers. Copyright 2017 Tim Carter
Failed Deck Sealer TIPS
Deck sealers and stains fail in just a few years
Sun's UV light blasts apart the resins or glue in the sealer
Darker stains tend to last longer, but it's not a guarantee
DEAR TIM:I put my wood deck to bed for the season about a month ago. Suffice it to say I was really upset.
Back in the spring, I went to great lengths to clean the deck and reseal it. I purchased an expensive semi-transparent sealer that did have a small amount of pigment in it.
However, after several months the wood started to gray and then the mildew set in. Now I have to start over when spring arrives. This time I want to do it right.
What advice can you offer when purchasing wood deck sealers? Brandy S., Albany, GA
DEAR BRANDY: This is no consolation, but you're in a large group of consumers that are deeply disappointed with the performance of certain deck sealers.
My Own Failed Sealers
I've been interested in this topic for years, both as a contractor and a homeowner. I've also been on the short end of the stick several times as sealers have failed on my own wood deck surfaces.
Wide Variety Creates Confusion
Wood deck sealers come in all flavors. There are water-based sealants as well as a few oil-based products. Some are heavily pigmented while others have just a hint of pigment. Many homeowners love the look of the lightly pigmented products as they tend to really show off the wood's natural color.
The trouble is these nearly clear sealers and water repellents are ill-equipped, for the most part, to deal with the harsh ultraviolet (UV) rays of the sun. Five percent of the sun's UV rays contain active photons.
These high-energy particles are like miniature cruise missiles. Whatever they hit, they destroy. They're so powerful they can break the atomic bonds of certain metals like copper and zinc. You can imagine that a deck sealer resin is no match for these powerful photons.
Sun & Skin Analogy
The best analogy I can offer up is what happens to me every spring.
Without fail, I go outdoors on the first balmy spring day and shed my shirt that's been on all winter. I really enjoy the warmth of the infrared rays of the sun on my pasty white skin that's been hidden all winter from any sunlight.
While I'm basking like a seal on a rock, the invisible UV rays are causing sunburn.
You can prevent sunburn by using a sunscreen lotion. The pigments and other nano particles in wood sealers act to block damaging UV rays. They can't stop it, but some sealers can slow down the damage.
More Pigment Is Better
However, lightly pigmented wood sealers simply don't have enough pigment to block the UV rays of the sun that turn wood gray in color. Heavily pigmented sealers and water repellents that are deep in color are akin to applying a sunscreen to your deck that might have a SPF value of 100 or higher!
My Own Huge Test
This past year I decided to do an extensive side-by-side test of about sixteen different wood sealers. Some were heavily pigmented and others were nearly clear. I carefully followed the instructions with regards to cleaning the wood and applying the products.
Furthermore, I created two sets of wood samples. Each set contained treated lumber wood and cedar. Both sets were sealed at the same time inside a garage out of the sun. The samples were allowed to dry.
Control Pieces In The Dark
One set never left the garage. Once dry, I boxed up one set and set them aside so they could be the control samples. The other set was attached to pieces of wood to simulate how they would be applied to a real deck.
These samples were then taken down to my boat dock where they are punished by the sun from sunrise until mid-afternoon. I can't think of a better way to test deck sealers than a dock setting where the wood has no place to hide from the sun.
Dock Stain Videos
I taped the following two videos two years BEFORE I did the extensive deck sealer test. I just wanted to show you how wide-open it is down at the dock.
Some Failed Within A Month!
The shocking thing, and you'll not be surprised based on your experience, is that I started to see failure in some of the finishes within a month. What's more, the sealers and water repellents on the cedar performed worse than those same sealers applied to pieces of treated lumber.
Severe Mold & Mildew
Some of the cedar samples developed severe mold and mildew even though they were inches away from the treated lumber samples. I suspect the copper used to make the treated lumber rot resistant was leaching through the sealers. Copper is a natural biocide.
Medium & Dark Pigments Performance
The sealers that have medium to dark pigment are doing the best so far. My test has only been going on for seven months, so I'll have more data as we approach summer. But suffice it to say that the lightly pigmented products on cedar have already failed my test.
This is a reliable hot water recirculating pump you can install on top of your water heater. The weird threaded fitting goes under the sink that's farthest away from the pump.CLICK THE IMAGE NOW TO ORDER THIS PUMP.
"To get instant hot water as you often find at hotels and other institutions, you need to have a loop in the piping system that circulates hot water back to the water heater."
Hot Water Recirculating Pump TIPS
Loop needed to get cold water back to the heater
Can be created easily under a sink - See Below
WATCH my Video about Recirculating Pumps BELOW
Gravity loops work great but must be done in a new home or large remodel
DEAR TIM:I believe I need a recirculating pump. It takes about 30 seconds for hot water to reach my shower each morning. It's frustrating to wait that long.
Is it possible to have hot water within a second or two after I turn on the valve? I have seen different recirculating systems that promise hot water instantly and they talk about huge energy and water savings.
Is this true? Is there a way to get hot water using simple gravity instead of a pump? Chad G., Birmingham, AL
Can a DIYer Install a Hot Water Recirculating Pump?
A DIYer probably doesn't have the skills needed to install a hot water recirculating pump.
Keep in mind that the work to achieve your goal is not something the average do-it-yourselfer can tackle. If you've not worked with water supply lines, you could get into trouble fast with a water leak.
What's more, certain cities and states have strict regulations with respect to modifications made to water supply systems that are connected to public water systems. Be sure to call your local plumbing inspector before you cut into your piping system.
Clean water is a valuable natural resource and it should not be wasted. The trouble is, in many localities, water might be a very cheap commodity. When prices are low, people tend to waste. The trend is for higher and higher water and sewer bills if you get water from a city or county supplier.
I grew up in Cincinnati, Ohio and the Cincinnati Water Works constantly ratchets up the cost of water. In Cincinnati, your sewer bill depends on how much water you buy, so if you water a lawn or plants, you pay more even though you're not allowing that water to go into the sewer system.
You have to add in the cost of your sewer bill when you try to calculate what water is really costing you. Don't forget to do this.
For example, a cubic foot of water used to cost me just a little over 1.6 cents. Once again, it's a moving target so you have to look at your water bill and see what you pay per cubic foot. Don't forget to take into account your sewer bill.
How Much Water is Wasted Waiting for the Hot Water?
There is a very good possibility that you waste less than a tenth of a cubic foot of water each morning. To prove this, assume that there is 25 linear feet of three quarter inch piping between your shower faucet and water heater.
Do the math and you will find out that there is just .076 cubic feet of water inside the water pipe. When I was paying just 1.6 cents per cubic foot of water, to waste one dollar's worth of water, I'd have to take over 800 showers.
How Do You Get Instant Hot Water?
You need to have a loop in the piping system that circulates hot water back to the water heater to get instant hot water as you often find at hotels and other institutions.
Most houses do not have a dedicated loop as the hot water pipe typically dead ends at the plumbing fixture that is farthest away from the heater.
Can A Recirculating Loop Be Added to an Existing Home?
It's possible to install an effective return loop in single-story houses that have a basement or crawl space where the water supply pipes are visible below the floor joists. Two-story houses make this task nearly impossible, as the piping system is typically hidden in the walls of the home.
Yes, it's very easy and inexpensive to add the return loop leg in new construction.
If you're building a new home or doing a major remodel where you can expose the water lines going to the second floor, you can install the second half of the return loop in less than four hours in many cases.
The alternative to a hot-water piping loop is to use the existing cold water line to a sink as the return leg of a loop.
But, you don't have to install a return loop if you choose to use a modern recirculating pump system. These products employ a nifty temperature actuated bypass valve that connects the cold and hot water supply lines at the fixture that is farthest away from the water heater.
The bypass valve uses the cold water line as the return loop back to the water heater.
Are All Recirculating Pump Systems the Same?
Not all recirculating pump systems are the same. One system places the pump under the sink at the farthest fixture. You have to push a button to start the pump.
The trouble with this system is that you still have to wait for hot water. What's more, this pump needs high voltage electric to operate. It can be a huge challenge to install an outlet under a sink.
Another system activates a remote pump that can be near the water heater. The trouble with this system is that it pumps water through the system whenever the temperature drops at the activation valve. This system wastes energy dollars as it pumps hot water while you sleep and are away.
What Does the Best Recirculating Pump System Have?
Perhaps the best pump system is one that has a temperature controlled bypass valve under the farthest fixture sink and a timer on a pump that can be conveniently located adjacent to the water heater.
The timer can be set to go on and off at 15-minute intervals depending upon when you feel you need hot water at the fixtures. CLICK HERE to see this great pump with a timer.
The pump is equipped with a handy extension cord that can be plugged into a convenience outlet near the pump. There is no water waste with this pump and it also minimizes energy waste since it only sends hot water into the water supply lines during the programmed times.
Can I Just Install a Gravity Hot-Water Loop?
Gravity hot water recirculating loops that do not require a pump can sometimes be installed after a house is built. They will only work when the water heater is below the water supply lines in a basement or crawl space. This system requires that the hot water line return back to the heater after it services the farthest fixture.
How Much of the Piping Needs to be Insulated?
The entire hot water pipe, plus the return piping must be well insulated for the loop to work. The last 15 feet of the return line must not have insulation on it for the convection to happen.
Modern water heaters have a pesky rubber flapper on the hot water outlet pipe and sometimes the incoming cold water inlet. These must be cut out or a large hole drilled in it. If you don't do this, the hot water can't float up through the gravity loop.
The rubber flapper works well when water pressure forces it open when you call for hot water. But it will not open if water is trying to gently float up the pipe.
Best House Windows: These are Marvin double-hung windows in a new home. It's a Queen Anne Victorian house Tim Carter built in 1986 but it looks like it was constructed in 1890. Copyright 2020 Tim Carter
Best House Windows TIPS
Buy windows with the AAMA Gold Label - simply the best
Look for the NFRC energy-rating label - study it closely
AAMA gold label is attached to the side of the window - not visible after install!
A higher price is a secondary barometer of quality
You may not realize it, but the windows in your home are the weakest link when it comes to energy efficiency. This is why you should strive to get the best windows when you go to build your new home.
If you’re remodeling, you should look for the best replacement windows for your home. But in the long run, it’s more than energy efficiency at stake. You should also want a window that will not fall apart in ten or twenty years.
Old Up-Down Sashes
When I first got into the construction business, I worked exclusively on older homes in Cincinnati, Ohio. There were tens of thousands of old homes that had simple up-down sash wood windows.
These were very common windows in houses built in the late 1800s and early 1900s. To this day, thousands of these wood windows are in use and in great shape. The primary reason is the lumber used to build them was old-growth timber that had tight wood grain with lots of dense summerwood in them. Homeowners over the years cared for them and painted them regularly. It’s possible to have windows that last generations.
Maintenance-Free New Standard
In my lifetime, I’ve seen a huge shift away from maintenance. Newer materials have become available that have practically eliminated the need to paint windows. Perhaps you’re on the hunt for the best vinyl windows for your home. Vinyl is indeed an attractive material as it never needs paint, it doesn’t rot, and it’s easy to clean. My own home in New Hampshire has vinyl-coated windows.
If you want the best windows for your home, no matter if they’re wood, vinyl, fiberglass, aluminum, or a combination of these materials, you can get them. But the first thing to do is to temper what the window salesman says and stick to the facts. There are two primary independent testing associations that should act as your North Star as you shop for the best window.
AAMA Gold Label
The best new windows and the best replacement windows are ones that have been certified by the American Architectural Manufacturers Association (AAMA) and the National Fenestration Rating Council (NFRC). AAMA is the golden standard as they test the actual quality of the materials used to make the window and how those materials are assembled.
Their testing is rigorous and random. Once a manufacturer has a window certified, they have to sign a contract with AAMA that allows AAMA to come to the factory unannounced so they can take a window from the assembly line to test. That total transparency works in your favor as the manufacturer constantly must be producing quality windows.
The best AAMA certification is their Gold Label program. CLICK HERE to discover more about this topic.
NFRC = Energy Efficiency Focus
The NFRC focuses more on energy efficiency, so they do testing for air infiltration, R-values of the glass and assembly, etc.
IMPORTANT TIP: To get the best windows possible, you need both certifications. Be aware that the AAMA certification is a special label usually found on the side of the window frame. You can’t see it after the window’s installed.
The NFRC label can be misleading. They’ll install the label on windows that meet their minimum standards, but some windows are much better at saving energy than others.
This means you have to be able to interpret the numbers and values you see on the special label. They provide a guide, but it’ll be up to you to determine what the highest values are in the marketplace.
Higher Price = Better Quality Usually
If you’re looking for the best wood windows, not only look for the two labels, but use price as a barometer. The best windows will typically cost more.
This isn’t always true, but you can shop feature for feature and see what you discover. More often than not, the higher-priced window will be better. Be sure to factor in support after the sale. That’s really important.
Beware High-Pressure Sales Tactics
When it comes to the best vinyl replacement windows, be very careful of the sales pitches you might get from a person who visits your home.
Don’t fall for any Jedi mind tricks, and ask for written verification that the windows you’re being pitched have the AAMA and NFRC certifications.
The salesman may say Yes, but you want to see the letters from the two associations that prove the manufacturer indeed has up-to-date certification. Get it in writing. Remember that you can contact each association to verify that a manufacturer is indeed certified and in good standing.
Less than two hours ago, I was having breakfast with a reporter from our local daily newspaper, The Laconia Daily Sun. It’s a wonderful small newspaper published in central New Hampshire. He was preparing a story about my new book Roofing Ripoff and asked me a fascinating question, “Are new homes built better than older homes?”
Complex Question - More Complex Answer!
Ten minutes later, I still hadn’t finished my answer. It’s a complex question and the answer requires lots of thought and examples. As I drove home from the interview I thought, “This would make a very good column topic.”
I could probably write a small book about this question so please understand this tiny column will not do the topic justice. Let’s get started.
Break Down Question
You need to break the question down into at least three parts to get to the answer. I maintain you need to look at the labor aspect, the materials and the overarching economics of the building industry to drive towards the correct answer.
Always Substandard Construction
Let’s start off by saying that years ago you could absolutely find poorly built homes. There were some builders and contractors back then that did bad work and the houses have since decayed.
I have no proof or data to back it up, but I have a feeling that low-quality contractors didn't last long years ago.
I can also take you to downtown Laconia, NH and show you a building that’s right next to the old train station. It’s our public library. (See photo above.) This magnificent stone structure is in excellent condition and it’s now approaching 120 years in age. It was built to last. Great magnificent buildings like this are in abundance in smaller towns and larger cities all over the USA. They might be homes or public buildings.
There are many older homes still in magnificent shape that are not as extravagant as the Laconia Public Library and they might be built with a mixture of stone, wood and stucco.
Growing Poor Quality Trend
It’s my guess my email Inbox would be considered by a PhD mathematician to be a statistically relevant sampling of the problems most homeowners face here in the USA. I get vast amounts of emails from homeowners who suffer from poor workmanship. I’d venture to say that today’s workforce in the residential construction industry, as a whole, is not as concerned about quality as the craftsmen from 150 years ago.
Vocation vs. Job
Back then many workers considered what they did a vocation. They made it a career choice and took lots of pride in what they did. Today it seems that many workers treat what they do each day as a job. There’s a vast difference between a vocation and a job.
Old vs New Materials
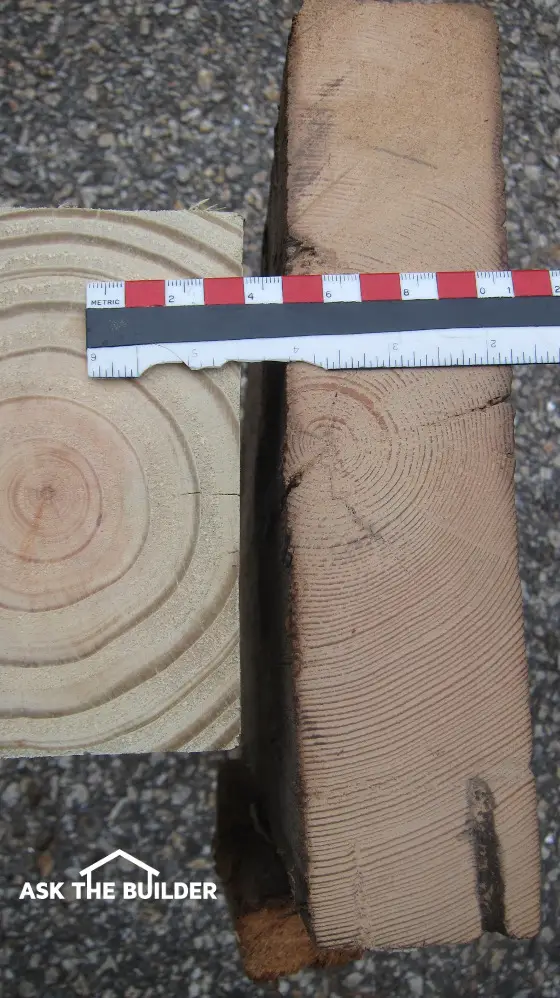
Let’s touch for a moment on materials. Look at the end of a piece of dimensional lumber like a 2 x 10 and note the width of the growth rings of the tree. You may shrug your shoulders. But those of us who have decades of remodeling experience can tell you that the lumber used in older homes was very much different than what you can get today.
I have pieces of old lumber taken from buildings built in the late 1800s. The light-colored growth rings that represent the wood added to the tree in the spring of each year are much narrower than those from modern trees.
New lumber is nothing like the lumber of old. Look at how wide the lighter-colored spring wood bands are in the timber to the left! (C) Copyright 2017 Tim Carter
The percentage of darker bands, summer wood, to lighter bands - spring wood in older lumber is almost equal. Today there’s much more spring wood in the hybridized lumber grown by the timber companies. Dark summer wood is more rot resistant and it’s stronger.
The reporter and I talked about plaster. You can take your fingernail and press on a modern wall made from drywall and create a depression. Try it. Forget about doing that to an older plaster wall.
A properly mixed plaster with a white lime finish coat has a compressive strength that approaches 3,000 pounds per square inch. In other words it’s rock-like material not something similar to cardboard.
Cast Iron Drains vs. PVC
I’ve been a master plumber since age 28. While there are many positive qualities to modern PVC drain pipes, I’ll take cast iron all day long.
Cast iron is soundproof, it’s fireproof and it’s much stronger. When you flush a toilet and the water cascades down a cast iron stack, you don’t hear Niagara Falls in your walls as you do with modern PVC pipe.
Great Modern Materials And Tools
Please don’t misunderstand me. There are many modern materials that are far superior to the materials of old.
We have better tools today that make us more productive and more accurate. But you need to have them in the hands of the people that are interested in producing the best product.
Complicated Economics
The overall economic issue is far harder to discuss and digest for us mere mortals who aren’t trained economists. The ever-rising standard of living here in the USA has put intense pressure on trying to keep the labor costs of building in check.
Regulations, laws, benefit packages, etc. that didn’t exist one hundred years ago add to the cost of building. To keep a job affordable something has to give. You can imagine what that might be.
High Quality Can Be Had
Fortunately if you have the budget and the time, you can build a home today that will last for centuries. It doesn’t have to be the Biltmore or some other extreme mansion.
There are still some builders and craftsmen that still know how to take available high-quality materials and create a home that will be far better than the baseline standard home I see being constructed today.
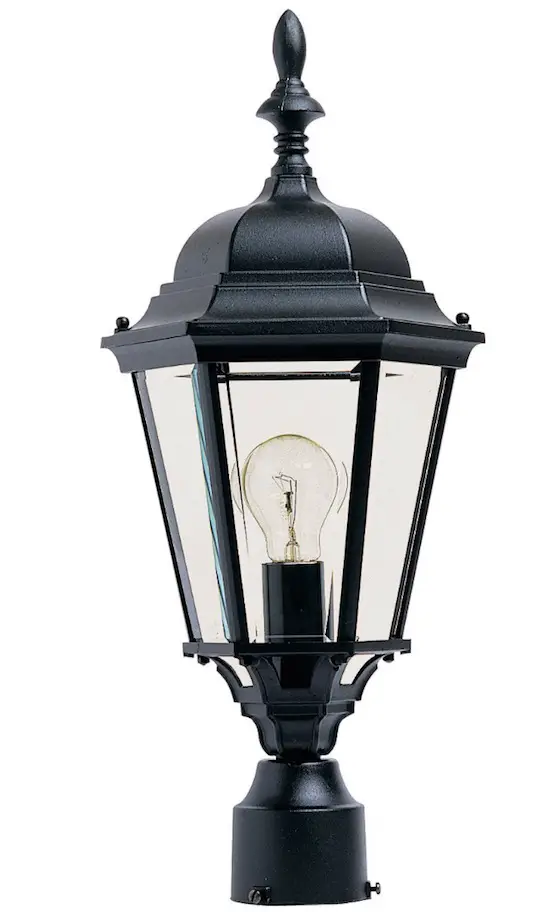
Post lamps are very handy. They can help guide people to your home when it's dark outside.
Consider getting one that incorporates a powered outlet to it so you can add extra Christmas lights to decorate the post lamp.
This is but one of HUNDREDS of different outdoor post lights. Every style, finish, etc. is available. CLICK THE PHOTO NOW TO SEE ALL OF THEM AND HAVE ONE AT YOUR HOME NEXT WEEK.
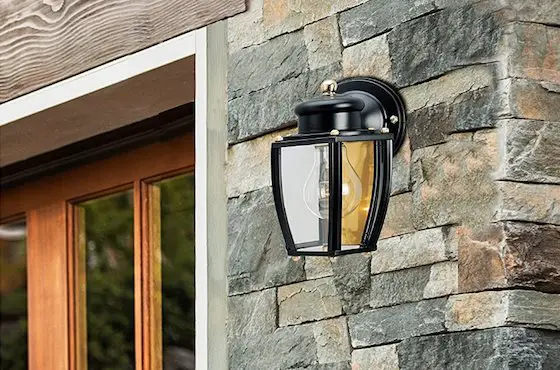
Porch Lights
You can get wall-mounted sconces or if you have a covered porch, you can install a light or two in the ceiling.
These same fixtures work well beside a garage door or on a shed.
If your front door is distinctive and you have a grand entrance, it's usually best to put a light on each side of the door.
Here's a wall sconce fixture next to a garage door. It would work next to any door. There are HUNDREDS of styles and finishes. CLICK THE PHOTO NOW TO SEE THEM ALL AND HAVE ONE OR MORE DELIVERED TO YOUR HOME NEXT WEEK.
Spot Lights
These are handy lights that work like the lights at an outdoor football or baseball field. They're designed to illuminate a LARGE area.
You can use them for security or you can use them to play sports outside your home at night.
I love the newer ones that have motion detection, a built-in video camera, a speaker and an alarm! You can TALK to people that are walking outside your home no matter if you're inside or 3,000 miles away as the video and audio portion work through the Internet and your smart phone.
Low-Voltage Patio or Deck Lights
While many of these are advertised as DIY friendly, they're not.
There's much to understand about how these systems work and how to run the direct-current cables so you don't overload the network you've set up.
If you're a serious DIYr, then you may have good luck. Start with a small project and cut your teeth on that before starting a massive project.
If you're doing a giant install around a new patio, you'll want to plan ahead and install underground conduits to make installing the lights so much easier.
While the use of up lighting to highlight trees in your yard is dramatic, it adds to light pollution in the area and it could upset your neighbors.
I urge you to read up on the Dark Skies project and be sensitive to outdoor lighting and how it affects others before you embark on some massive up-lighting project at your home.
Seasonal Outdoor Lighting
If you make a habit of installing outdoor seasonal lighting of any type, you might consider installing several strategically located outdoor receptacles which are controlled by an indoor switch.
Many people struggle with extension cords which have to be draped through windows or doors. These cords have to be plugged in and out each night. The indoor switch makes the job easier and safer. Extension cords are major sources of electrocution and fires. Avoid using them at any expense.
With a little extra effort, these outdoor receptacles can be wired in such a fashion that one socket is hot all of the time. In other words, it operates independently of the switch.
This is often referred to as a split receptacle. This way, if you want to plug in a hedge trimmer, or any other electrical appliance when the lights are not in use, you will not have to go indoors to turn on the switch. It is easy to do. It just takes a little preplanning.
Lightning Arrestors
Consider installing a lightening arrestor in your main electrical panel. These devices have the ability to capture massive voltage surges that enter your service entrance cables which power your entire house.
The devices, when installed with a first class grounding system, bleed the voltage surge to the ground. These devices must be used in conjunction with point of use surge protectors that are commonly sold with sensitive electronic equipment in order to provide the highest level of protection for electronic equipment.
These devices can be installed by a homeowner who is familiar with service panel wiring. Do not install these devices unless you are 100 percent positive you know what you are doing. If installed improperly, they are ineffective.
GFCI's (Ground Fault Circuit Interrupters)
These devices are highly sensitive circuit breakers which can protect you from electrocution hazards. They can sense extremely small current leakages across the circuit long before you would begin to be electrocuted.
The National Electric Code continues each year to expand the locations where these devices should be used. Generally speaking, any location where water is likely to be present with an electrical device is a candidate.
Bathrooms, kitchens, basements, garages, outdoor receptacles, swimming pools, etc. are examples. They are inexpensive and they work. Don't hesitate to install them in as many locations as you can afford.
These devices are manufactured so that you can protect several outlets that are downstream from the GFCI. This makes it possible to protect different locations with one device.
These devices can be installed by an amateur with success. Simply follow the directions carefully and all should go well. Consider installing them today, as they can be lifesavers!
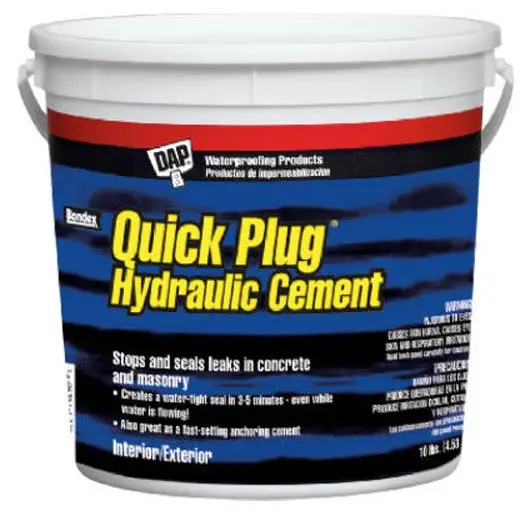
It expands because the cement contains expansive clays such as bentonite and a few others.
Expansive clays start to puff up when in contact with water. The best analogy is adding yeast to flour to make bread. The dough starts to rise increasing its volume.
Yes, hydraulic cement retains its expanded size once it's hardened.
When the bread is baked, the larger size is permanently locked into place.
The same thing happens with the hydraulic cement. And it happens fast usually within minutes. The Portland cement sets up and the larger volume of the mixture is locked in place permanently.
Can You Slow the Setting Time?
Ice water will slow down the setting time of hydraulic cement. You can even freeze the hydraulic cement powder before mixing it to get a few more minutes working time.
Where Can I Use Hydraulic Cement?
In new construction I use hydraulic cement to
fill the void areas in foundations around water pipes
Get rid of all dust from the surfaces that will be in contact with the fresh cement. The dust will prevent a good bond between the old masonry surfaces and the fresh mixture.
Should I Dampen Existing Concrete or Masonry?
Dampen the concrete that will be in contact with the fresh hydraulic cement to get the absolute best bond. It doesn't need to be dripping wet, just spritz it so some water soaks into the dry concrete or masonry surfaces.
Author's Note: The following email comment was received from Art, a Cement Manufacturer's Representative in Southern California.
Hi Tim,
I hope you take this in the spirit in which it is intended and that is to just help your site be better. Your definition of a hydraulic cement is misleading. According to ASTM (American Society for Testing & Materials), a hydraulic cement is a cement that creates a chemical reaction when it comes in contact with water (hydration) and will cure under water.
Being a hydraulic cement in itself has nothing to do with expansion, although some hydraulic cements will shrink less than others, but this is due to them being a sulfoaluminate based cement, not a Portland cement and has nothing to do with them being a hydraulic cement. Being a sulfoaluminate cement is also the reason you have the shortened working times.
I've waited for this day for over eighteen months.
My Roofing Ripoff book is NOW AVAILABLE in paperback as a print-on-demand via CreateSpace.
CreateSpace is a cool company that Amazon.com owns. It allows authors to bypass the traditional publishing rat maze of getting a book printed and distributed.
Years ago if you were going to self-publish, that's what I'm doing, you'd have to go to a printer with a finished book design and they'd run off 5,000 or 10,000 copies.
You have no idea how complex it is to create a file for a printer to publish a book. Not to mention the cover design!
Then, the printer would print your book, put them in boxes, ship them to you and they end up in your garage for YOU to sell and distribute.
Many an author has dust-covered cardboard boxes of her/his book stacked up in their garage.
Technology was developed about ten years ago that allows CreateSpace to print one copy at a time much like you'd use a copy machine to make a copy of a letter.
But the QUALITY of the one copy is the same or BETTER than what a traditional printer would do printing 5,000 at a time.
Wait until you see the glossy COLOR photos in the book.
Wait until you see the full-color GLOSSY cover to the book.
Wait until you see the very cool COLOR graphic that's at the bottom of each page.
It was originally only going to be at the end of each chapter, but my book designer Sheridan Stancliff insisted it be at the bottom of each page of text. She was so right and I was so wrong! CLICK HERE now to order your copy of my Roofing Ripoff book.
Want to read the first three chapters of Roofing Ripoff for FREE? CLICK HERE.
My Discovery
STOP AND READ THIS
Do you own a home or commercial building with an asphalt shingle roof?
If you answered YES, then keep reading.
While writing my Roofing Ripoffbook, I was the FIRST PERSON in the world to make a discovery.
I discovered that copper ions prevent asphalt molecules in shingles from connecting to one another.
If too many asphalt molecules link together like a LONG freight train, then the shingles:
become brittle
they curl
they loose the ceramic colored granules
You don't want this to happen because it means you have to put a new roof on your house SOONER.
Introducing copper to your asphalt shingle roof can allow the shingles to last DECADES LONGER - like shingles USED TO LAST.
Here is what I saw when I made my discovery on December 26, 2015. You're looking at the roof of the old Tilton, NH post office below.
Unfortunately, I was unable to patent my discovery. You can't patent a *benefit*. You have to patent the thing that CREATES the benefit.
Copper sheets have been patented for years.
So I spend nine months trying to figure out the MOST AFFORDABLE copper to use, the easiest way to apply it and to set up a simple distribution model so you could get all you need at one place.
I wanted copper Made in the USA.
I wanted copper nails Made in the USA.
I wanted a USA distribution partner.
That's why it took so long to get the book out. I didn't want to publish the book and then have you all FRUSTRATED not being able to get the BEST copper.
Be patriotic. Display an American Flag at your home. CLICK THE PHOTO OF THE FLAG NOW AND HAVE ONE DELIVERED TO YOUR HOME IN DAYS.
Flagpole Tips
I wrote the column about flagpoles as a result of the tragic September 11, 2001, terrorist attacks on our country. Within days of the events, I was flooded with emails from people just like you who were flush with renewed patriotism.
I think it is wonderful and am so happy that so many people have decided to install a flag pole to fly Old Glory.
"Both Buildings Are Going to Collapse"
Firefighting happens to be a hobby of mine. The morning of the attack my wife frantically called down to my office and told me to come upstairs and look at the live TV coverage.
I knew that firefighters were rushing to the scene and I knew they were going into both buildings to rescue people and try to extinguish the fires. But I also knew something else.
I knew both Trade Center Buildings were going to collapse. I said that within a minute of seeing the rerun of the video of the second plane striking the second World Trade Center building.
The structural steel that supports the buildings was severely damaged. Load bearing columns were ripped out by the planes. Other columns had the fireproofing material scraped off. It was just a matter of time before the steel would soften and collapse under the weight of the floors above.
But yet, I knew that firefighters and police officers were climbing the stairs knowing the same thing. They were in a race trying to cool the steel before the collapse would happen. As we know, they lost both races. And we lost hundreds of heroes.
The wind exerts a very strong force on flags. Simply hold up a flag on a windy day and you will see what I mean.
This means that poles need to be sized for the wind speed and for the size of the flag(s) to be flown on the pole. Tall poles need to be large diameter to offset the pull of the wind.
Be sure to match your flag to the size of the pole you buy or make. Most good flag pole manufacturers have sizing charts to help you do this.
Here's a telescoping flag pole. It's perfect for most homes. CLICK THE PHOTO NOW TO HAVE THIS DELIVERED TO YOUR HOME IN DAYS.
In-Ground Pole Drainage
If you decide to do a ground-set pole be aware that the sleeve needs to be able to freely drain collected rain and ground water. If it can't do this, then the pole may rust away over time.
The danger is that the pole can weaken over time and blow over and hurt you or someone else. You can minimize corrosion by making sure the pole is not surrounded by water.
Cut slots in the bottom of any pole sleeve. Set the sleeve on a metal plate and have it welded if possible.
This sleeve sits on a poured concrete footer. Before you pour the concrete that holds the sleeve in place, pour three inches of washed gravel on top of the footer. This is done after the sleeve is in place.
Any water that goes down around the pole drains into the sleeve, exits the sleeve through the slots and then passes through the gravel to the soil. The concrete is simply poured on top of the gravel and it will not clog the gravel passageways. This drainage is very important. Don't overlook it as you build the foundation for your pole.
If you are on a tight budget there is no reason why you can't make a pretty nice flagpole on your own. The most challenging parts to get are the truck (flagstaff cap) that sits on top of the pole and the sleeve that is placed in the ground. In reality, only the sleeve may present a problem for you.
Different Truck Designs
The truck I saw that works perfectly for a homemade flagpole was sold at a local flag shop in Cincinnati, OH called Flaggs U.S.A.
At this store, I held in my hand a cast aluminum truck that would fit perfectly over the end of a 2 inch diameter galvanized iron pipe.
The cost was about $20.00. If you decide to look at other truck assemblies, you must determine if they fit inside a tube or over the end of the tube.
It makes a big difference! The ones that fit inside a pipe or tube must fit very snugly or you will have all sorts of problems. The one that I saw has mounting bolts that you tighten around the outside of the flagpole pipe. Once tight, the truck will not move on top of the pole. The manufacturers listed below also sell truck parts.
The Sleeve
In the column about flagpoles, I tell you to make a sleeve with a steel plate base. This makes it easy to install the sleeve but the plate is not necessary.
You simply need a pipe sleeve that has an inner diameter slightly larger than the outer diameter of the flagpole pipe. This pipe can rest on the concrete footer at the bottom of the hole.
The challenge is to keep it plumb as you pour the concrete. One method is to tap a slightly oversize square peg into the end of the sleeve. This peg can stick up about a foot or so.
Then extend two pieces of wood over the hole in the shape of the letter X that are nailed to the square peg. Drive stakes into the ground and nail the X pieces to the stakes once the sleeve is plumb.