Connect Deck to House

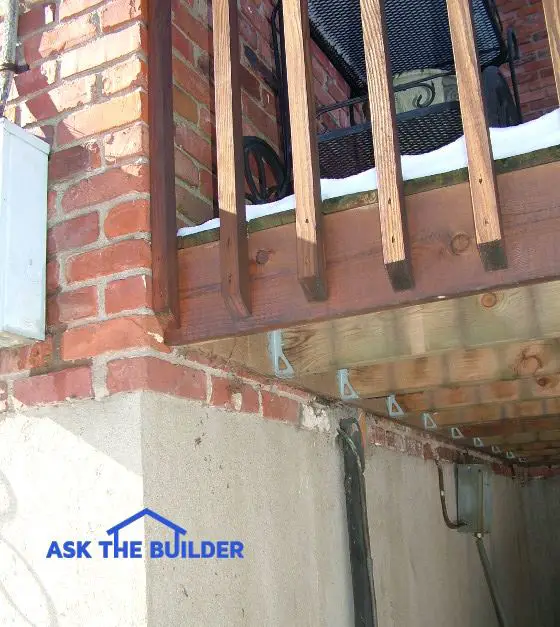
This deck ledger board is bolted directly to the house. If water gets between the ledger board and the brick, or siding, or stucco, it may never dry out. What's more, imagine if water trickles through the bolt holes into the house! PHOTO CREDIT: Tim Carter

Connect Deck To House TIPS

  • Decks collapse each year and people die or are seriously injured
  • Poor deck building practices lead to ROTTING WOOD
  • WATCH deck collapse video below
  • Detach deck from house converting it into a table
  • CLICK HERE to Get Tim's FREE & FUNNY Newsletter!

DEAR TIM: The house I purchased five years ago has a very large treated lumber deck off the back. Just recently, I discovered spongy drywall inside my home where the deck connects to the house.

Upon further inspection of the exterior, serious wood rot was discovered. The cause appears to be no flashing where the deck ledger board connects to the house.

Does the deck have to be torn down so that I can do all of the needed repairs? What are my options, if any? Gates O., Pittsfield, MA

DEAR GATES: I realize you have problems, but believe me they could be much worse.

Deck Collapses Are Real

Imagine if you had not discovered the wood rot until after the deck collapsed? Each year, decks fall off houses and people are seriously injured or killed. The reasons for the collapses are many, but structural failures where the deck ledger board attaches to the house are commonly involved.

Watch people get seriously injured in this video:

Free & Fast Bids

CLICK HERE to get FREE & FAST BIDS from local deck carpenters who can make sure your deck is SAFE and will not collapse.

Deck Ledgers Are Beams

The deck ledger board acts as a primary support beam for most decks. The board is attached to a house and the deck joists are fastened to the ledger board with special structural metal joist hangers.

At the other end of the deck away from the house, the builder often places another beam under the joists or in the same plane of the deck joists. The deck ledger board at the house often carries 50 percent or slightly less of the combined weight of the deck structure, any furniture on the deck and any people who are standing, sitting or dancing on the deck.

The combined weight of all of these things is often measured in tons.

Retrofit Your Deck

The good news is I doubt your deck has to be torn down. As for your options, my guess is that if ten carpenters were asked the question, you would end up with ten different solutions.

Disconnect Deck From The House

But I wonder if any of the carpenters or remodelers you interview will come up with the fix I have in mind. I am tempted to permanently disconnect the deck from your home and make it freestanding. Once this separation is complete you would never know it when standing on the deck.

From below, you may see two new deck support posts several inches away from your house wall.


Building a deck? Make the best decisions with my helpful and thorough Deck Installation & Repair Checklist. I offer a 100% Money Back Guarantee.


Through Bolts & Flashings

I used to attach deck ledger boards directly to houses. I took all kinds of precautions and installed flashings and caulked the holes where through bolts passed into and through the side wall of the houses.

But I never felt entirely comfortable with the long-term performance of the caulk at the bolt holes. The caulk manufacturers would say the caulk lasts for 20 or even 50 years, but how does one know?

CLICK HERE to get FREE & FAST BIDS from local deck carpenters who can make sure your deck is SAFE and will not collapse.

Deck Becomes A Table

EB015 Cleaning & Sealing Deck CoverFreestanding decks offer enormous peace of mind. The builder knows there are never going to be any leaks and collapse due to rot is simply not going to happen.

The deck is constructed in a similar manner as a beach house is built on piers. In other words, the deck simply has four or more legs much like a table in your kitchen or dining room.

Special Connectors To Stop Sway

There are some very important structural aspects you must consider when you build a deck in this manner. The method of connecting the deck to the posts or columns is very critical.

Failure to do this in an approved manner can lead to the deck collapsing from racking or sway forces.

Back & Forth Motion

Racking can happen when dancing people start to get a deck moving back and forth sideways. It's a real and powerful force that has contributed to the collapse of many decks.

To prevent racking, residential structural engineers can recommend affordable metal connectors, special diagonal bracing under the deck and a simple yet sound design for how and where the deck posts connect to the deck beams and floor joists.


Wood deck surfaces need to be cleaned and sealed to keep them in good condition. The cleaner I recommend is oxygen bleach.


Deck Posts On Footings Or Piers

Your deck can possibly be retrofitted very easily if you choose to make your deck free standing. The additional support columns might be able to rest upon your existing house footer.

The new beam that will replace your deck ledger board only needs to be spaced 2 inches away from the existing exterior wall of the house. This spacing is more than adequate to allow water to drain between the house and beam.

New Treated Lumber High Copper Content

The extra lumber you buy to retrofit your deck may look like the treated lumber on your existing deck, but it might contain different chemicals that can be highly corrosive to certain nails and metal framing connectors. The leading structural framing connector manufacturers sell new connectors that have extra galvanizing treatment that resists the corrosive brew of treated lumber chemicals and rainwater.

Special Fasteners / Timber Screws

Just as important are the fasteners you use to connect the lumber together and to fasten the metal connectors to the lumber. These screws, bolts and nails must also be rated to resist corrosion when in contact with the new treated lumber.

This is a Simpson Strong-Tie Timber screw. I've used them on my own home. CLICK THE IMAGE NOW TO ORDER THEM.

You can't go wrong with stainless steel fasteners. Stainless steel will absolutely stand the test of time. The structural engineer you hire should specify the exact model number of all connectors, lumber type and the size and type of fasteners. CLICK HERE to read why these screws are IMPORTANT.

Read my article on Is Your Deck Safe? in the October 29, 2013 AsktheBuilder Newsletter.

CLICK HERE to get FREE & FAST BIDS from local deck carpenters who can make sure your deck is SAFE and will not collapse.

Portable Generator Tips

smaller portable generators

Here are two dandy smaller portable generators. I own the one on the left. It can put out 2,200 watts and is VERY QUIET. CLICK THE PHOTO NOW TO HAVE ONE OR BOTH OF THESE DELIVERED TO YOUR HOME.

Portable Generator TIPS

  • More power or watts means more noise and weight
  • Answer checklist questions to help get the right one
  • Start up power needs for large appliances can stall mid-sized generators
  • WATCH stand-by generator video
  • CLICK HERE to Get Tim's FREE & FUNNY Newsletter!

Decision To Write About Generators

Did you know that writers like me, magazines and other periodic publications often develop editorial calendars? These are simply a road map of what is going to be written when.

I decided on the topic of portable generators a few months ago. I felt it would be a ho-hum column and bulletin. Boy, was I wrong!

Loss Of Power Is Popular

Evidently hundreds of thousands of people, probably more like millions, out there have suffered just like myself and my family during storms. My suggestion to you is to consider buying stock in one of the top portable generator companies for your IRA or Keogh plan.

Free & Fast Bids

CLICK HERE to get FREE & FAST BIDS from local electricians who specialize in portable and stand-by generators. They can help you size one!

More Watts = More Noise

Portable electric generators are often powered by the same gasoline engines that deliver power to air compressors, lawn mowers and similar equipment. As you know, these engines produce lots of noise.

Some generators are quieter than others. It's something you should absolutely consider when purchasing a unit.

I can tell you from experience that the droning of a 5 or 8-hp gasoline engine for countless hours can drive you crazy. I used a gasoline-engine air compressor for years and by mid afternoon you wanted to throw a rock at it.

When you need electricity in an emergency, you'll already be stressed. You don't need some extra noise grating your nerves as well!

Countless Options / Variety

I'm astonished at the variety of sizes and types of portable electric generators. You're not going to have an easy time making up your mind!

Many are air cooled. However as you approach 5,000 watts or more of power you might start to run into a few liquid-cooled engines.

Stand-By Generator

If you want the ultimate generator, get a monster stand-by generator like I have. It comes on automatically and I don't have to switch out extension cords. It's connected directly to my breaker panel.

Watch this video of my generator.

CLICK HERE to get FREE & FAST BIDS from local electricians who specialize in portable and stand-by generators. They can help you size one!

Multiple Outlets / Levels Of Power

Some models offer multiple outlets of different power, AC & DC current capabilities, built in GFCI safety breakers, electric start, etc. It reminds me of buying a car! You will have a tough time keeping all of the options clear in your head.

The DC power created by most portable generators is very dirty. It's good enough to recharge a car battery, but don't even think about using it to operate a ham radio or other precision electronic device that needs a clean DC power stream.

portable electric generator

Here's a beefy portable electric generator that produces 5,500 watts. These are what you need to be reasonably comfortable for an extended power outage. CLICK THE PHOTO NOW TO HAVE THIS GENERATOR DELIVERED TO YOUR GARAGE.

Create A List Of Must-Haves

I suggest you make a list of "must haves" before you start shopping. Here's a list of questions that might help you narrow down what you need:

  • Where will you store the generator when not using it?
  • Where will the generator be when operating?
  • How will you move it into position?
  • Will moving it require wheels?
  • What are you going to connect to the generator?
  • How will you make the connections?
  • Do you have the correct-sized extension cords?

What things would you love to have if money was no object?

Calculating Power Needs

Don't go to Amazon.com just yet to order one! CLICK HERE if you can't wait and need a beefy portable generator.

You have to wander around your house and do a power study first. I want you to imagine that the power has just been cut off to your house. It's 20 degrees outside. What do you need electricity for, to keep you partially comfortable and your water lines from freezing?

A power study is simply a list of everything you MUST operate at some point during the power outage. While it would be nice to have everything operate at once, you'll discover it's not necessary to survive.

You may have to have your furnace on for an hour, then you can plug in the refrigerator. Different light circuits can be plugged in depending on the time of day.

Common Watt Requirements

Find the wattage of the electrical devices and write down this number. If you can't find watts on the appliance or motor, write down amps. We will convert amps to watts in a moment. (Refer to the Appliance Wattage column for common appliance wattages.)

  • cell phone battery charger - 25 watts
  • furnace fan blower - 700 watts
  • electric crock pot - 240 watts
  • microwave - 700 to 1,200 watts
  • video game device - 40 watts
  • refrigerator - 550 watts
  • water well pump - 575 watts
  • hand hair dryer - 1,200 watts
  • window air conditioner - 1,500 watts

Once you have this list, add up the total wattage. Don't forget to add lights that must be on.

Not every light mind you, just the ones that are a necessity.

Now, what things on the list MUST be on at the same time? Often you don't have to have the refrigerator, freezer and the furnace on together. Why? A winter emergency will require reduced refrigeration (the house temp may fall into the 50's and 60's). A summer emergency will require full power to the refrigerator and freezer but none to the furnace.

Once you have the list of the things that must be on at the same time, you can calculate the total wattage you must have as a minimum.

CLICK HERE to read a column about start up or reactive load for generators. It's very important when sizing one!

CLICK HERE to get FREE & FAST BIDS from local electricians who specialize in portable and stand-by generators. They can help you size one!

Column B178

Flagstone Mortar Mix

flagstone mortar mix

Flagstone mortar mix needs both of these bags. The bag on the left with the tiger is hydrated lime. The bag on the right is Portland cement. While the bags look almost identical, what's inside them are as different as cats and dogs. CLICK THE PHOTO to order hydrated lime. It's the best ingredient you can buy. (C) Copyright 2021 Tim Carter

"Flagstone mortar mix is made by mixing sand, hydrated lime, and Portland cement in precise quantities. The hydrated lime is often left out but it adds long-term strength and durability."

Flagstone Mortar Mix Checklist

DEAR TIM: I'm installing flagstone and some paving brick on top of a concrete patio. A book I read suggests mixing sand, cement, and hydrated lime in different proportions to make the mortar mix.

What is hydrated lime and is it necessary to add it?

Lastly, as cold weather is around the corner, when should I stop working so as to prevent freeze damage to fresh mortar? Rick A., Blacksburg, VA

DEAR RICK: Here is a subject near and dear to my own heart.

Flagstone & Brick On Concrete

The first thing to remember is I can't begin to tell you how many paving brick and pieces of flagstone I have set in cement mortar over the years.  It's been more than I care to remember. The great news is that each and every one is still solidly set and shows no sign of delaminating from the concrete base below.

flagstone mortar mix

This is a flagstone patio I installed. You can't see the hydrated lime in the mortar, but it's there. Copyright 2018 Tim Carter

It's important to realize that using basic and readily available building materials as you describe above, you can create a decorative patio surface that will last for many years.

What is Hydrated Lime? - Mythical Material

The hydrated lime you read about is a dry fluffy powder. It's an ultra-strong mortar that's been used for thousands of years and still performs well.

Lime is made by first taking limestone, a very durable rock, and heating it up in giant kilns. The rock is then crushed and is now chemically unstable.

Please watch this informative video about hydrated lime mortar.

How is Hydrated Lime Made?

To make the hydrated lime you'll buy in a bag, the manufacturers add a very specific amount of water to the crushed and cooked lime and mix the two in large mechanical mixing machines. The small amount of water activates the calcium oxide in the lime but does not turn it into a paste or putty.

Mortars that contained traditional lime were often subject to popping, pitting or disintegration if they were not carefully proportioned and mixed. Hydrated lime takes the guesswork out of mixing mortar and as such is very user-friendly.

hydrated lime

This is excellent hydrated lime. It's a fine white powder and it's going to look great on your home. CLICK THE IMAGE TO ORDER SOME RIGHT NOW.

Is Lime a Necessary Mortar Ingredient?

Hydrated lime is not a necessary mortar ingredient, but mortar made with hydrated lime is perhaps the best mortar you can make. You can make mortar with just Portland cement, sand, and water.

The mortar that I used to permanently attach the brick and stone to my patios did not contain any hydrated lime. But adding hydrated lime to the mortar mix can be very beneficial.

The plasticity or workability of the mix will improve. When hydrated lime is added to the mix, the sand and the cement do not separate. The final mortar is also more waterproof. Shrinkage cracking can often be eliminated or minimized when hydrated lime is added to the mixture.

Flagstone Mortar Mix Secret Recipe

Replacing 10 to 15% of the total volume of cement with hydrated lime usually produces optimum results. Keep in mind that the Portland cement is the glue that holds the flagstone and brick to the concrete patio.

Years ago many recipes I looked at suggested a ratio of three parts sand to one part cement for cement mortars. I altered that recipe and always mixed my ingredients 3 parts sand to 1.5 parts cement.

After surviving twenty-five years of brutal winter freezing temperatures, my patios look like the day they were finished. I'm convinced that my recipe is one that will work for you as well.

paver patio brick

I built this patio using true paver brick. The mortar between each brick is made with a rich recipe of fine sand and Portland cement. I wanted it to flow through a mortar grout bag. Hydrated lime would have been a good thing to add, but I didn't do it on this job. The mortar, after 30 years, looks like the day it was installed. (C) Copyright Tim Carter 2021

Hydrated Lime & Cement Recipe

If you decide to use the hydrated lime, you can use this recipe for the mortar:

  • three 5-gallon buckets of dry sand
  • 6.38 gallons of Portland cement
  • 1.12 gallons of hydrated lime

I'd use medium sand. It's available at local gravel pits or businesses that sell brick and concrete block.

Blend these ingredients together well before adding any water to the mix. Add water slowly until you get a mixture that resembles regular bricklayers mortar.

The consistency should be like a stiff applesauce, not runny applesauce.

IMPORTANT TIP: Only mix as much mortar as you can use in one hour or less. If it's hot, windy and sunny, only mix as much as you can use in 30 minutes. Do not add water to the mortar if it starts to get stiff.

Is Cool Weather Best To Install Flagstone?

Cool weather is your friend but cold weather is indeed your enemy as you attempt to finish this job. If the mortar had its choice of weather conditions, it would undoubtedly tell us to install it on days when the air temperature was in the mid-50sF with overcast skies.

A nighttime low temperature of 40F would be ideal. Believe it or not, sunny hot, dry or breezy weather are not great conditions for working with mortar and concrete.

Should I Avoid Freezing Temperatures?

I would not install any flagstone or brick if the air temperature is forecast to drop below 28F for 48 hours after you install them. You can help yourself immensely by preheating the materials you will be working with.

Should I Keep Flagstone Mortar Mix Materials Warm?

If at all possible, keep the sand, cement, and hydrated lime indoors at room temperature and only bring it outdoors to mix it. Use very warm or hot water to mix the mortar. Try to heat the brick or flagstone as well although this may be far more difficult to accomplish.

Can I Use Insulated Blankets If Freeze Danger?

After you lay the flagstone or brick, cover them as soon as possible with waterproof insulating blankets. These can be rented at tool rental businesses.

The mortar actually creates a small amount of heat as it cures and hardens, and if retained within the masonry instead of released to outer space, it helps the mortar get stronger faster. Keep the masonry covered with the blankets for at least 48 hours if possible.

Do Cold Temperatures SLOW the Chemical Hardening Reaction?

As the air temperature drops so does the temperature of materials stored outdoors and the actual concrete to which the flagstone and brick will be attached. These cold temps radically affect the chemical reaction of hydration that starts the moment water is added to the powdered cement and hydrated lime.

Hydration is the reaction that turns the powdered cement and lime into actual microscopic cement paste crystals that interlock the sand particles together.

Can I Trick The Temperature?

To resist the expansion forces of freezing temperatures, a certain amount of crystals need to form. The way to accomplish this is to fool the mortar into thinking it is 55F or higher. You do just that by preheating all of the ingredients and by storing all of that heat as you do each night when you sleep under blankets or a comforter.

Column 488

Wiring 3 and 4 Way Switches

3way switch - Tim's hand

4-way switch wiring requires you to also install two 3-way switches. This is a 3-way switch. Copyright 2018 Tim Carter

"The placement of the switches is critical. The 4-way switches must be in between the 3-way switches."

4 Way Switch Wiring TIPS

  • Connect the traveler wires to the right screws
  • 3-way switches must be used with one, or more, 4-way switches
  • WATCH the 3 and 4-way switch videos BELOW
  • 4-way switches go in between two 3-way switches
  • CLICK HERE to Get Tim's FREE & FUNNY Newsletter!

DEAR TIM: I need to know how to wire a 4-way switch. I have two interior hallway lights that are controlled by three separate electrical switches.

My husband tried to install new decorative switches and now the lights come on only part of the time. What in the world do you think he did wrong? I need an aspirin! - R.L.

DEAR R. L.: In all fairness, he may have done nothing wrong.

Related Links

4-Way Switch Wiring Diagram - Very Easy

Troubleshoot a 4-Way Switch Yourself - Save $$$$

4-Way Switch Wiring is Easy

You possibly have a defective switch. However, the smart money is on your husband. Sounds like another weekend warrior who was not prepared for battle.

The problem could be in the two 3-way switches that are part of the circuit. Watch this video first:

Your problem is a fairly common one. It involves what are known as 3-way and 4-way electrical switches. These simple devices create more problems than they deserve.

What Are The Traveler Wires?

There are special wires called travelers that pass between the two switches. These wires must connect to the bright brass screws on each 3-way switch and on to the bottom two, or top two, screws of a 4-way switch.

I know that seems confusing, that's why I created two videos for you to watch below. Watch the 3-way switch video first.

What is the Continuous Hot Wire?

The continuous hot wire is the line wire from the electric panel and as long as the circuit breaker is on, there is always power in this wire.

This continuous hot wire connects to a special black screw on a 3-way switch. You'll see it in the video below.

Free & Fast Bids

CLICK HERE to get FREE & FAST BIDS from local electricians who can correct your husband's mistake if he can't figure it out.

Common Single Pole Switch Video

Watch this video about a standard single-pole switch. This is the most common switch in any home. A single-pole switch is a switch that turns on an overhead light, possibly controls a table lamp or causes a fan to operate.

I need you to understand how power passes through this basic switch before we move onto the 3-way and 4-way switches.

Watch this video first.

3-Way Switch Video

Now that you understand how current is controlled by a simple switch, let's look at the 3-way switch.

Why Use A 3-Way Switch?

You use a 3-way switch to control one, or more, lights from two different locations.

Common locations where you'd find a 3-way switch useful are:

  • hallways
  • staircases
  • large rooms with two entry/exit doors


4-Way Switch Video

Watch this video to see how to properly install a 4-way switch. Here's what's fascinating. You can install one, or more, 4-way switches between two 3-way switches!

4-way switch wiring is used to control lights, fans, or other electrical fixtures from three, or more, points.

CLICK HERE to get FREE & FAST BIDS from local electricians who can correct your husband's mistake if he can't figure it out.

Where Does a 4-Way Switch Go?

The 4-way switches must be in between the 3-way switches.

In other words, the power from your circuit panel must first enter the 3-way switch before it goes to the 4-way switch. From that 4-way switch, it then travels to an additional 4-way switch or, in your case, to the final 3-way switch.

The path that the electricity follows as it passes between the switches is not unlike a railroad switching yard.

Three-way and 4 way switches are easy to distinguish.

A 3-way switch has three screws plus the green grounding screw. Remember, the one screw will be painted BLACK. Go back and watch the video to see what wires go to what screws.

A 4-way switch will have four screws plus the green grounding screw. Just watch the 4-way switch video once more to see how easy it is to connect the wires to the correct screws.

Your lights will work perfectly in just a few minutes.

hidden

Wattage for Household Appliances

Wattage for Household Appliances TIPS

    • Look on label of appliance for watts
    • Small things can draw LOTS of watts - e.g. hair dryer
    • Microwaves need more power than refrigerators

Watts - Measurement Of Power

Watts are a unit of power. You probably studied that in high school physics class.

Remember James Watt?

I'm sure you've seen the wattage rating on a light bulb. Most older incandescent bulbs have a rating from 60 to 100 watts.

LED light bulbs can produce the same amount of light but require far fewer watts.

Appliances Need More

If you want to operate a refrigerator, a microwave oven, a hand-held hair dryer, a vacuum cleaner or even a cell-phone charger, you're going to need lots of watts at the same time.

A double oven that operates on 240 volts in your home is perhaps the biggest energy glutton. It consumes thousands of watts per hour.

Free & Fast Bids

CLICK HERE to get FREE & FAST BIDS from local electricians who can help you compute total watts you need for a generator.

Typical Watts For Appliances

  • cell phone battery charger - 25 watts
  • furnace fan blower - 700 watts
  • electric crock pot - 240 watts
  • microwave - 700 to 1,200 watts
  • video game device - 40 watts
  • refrigerator - 550 watts
  • water well pump - 575 watts
  • hand hair dryer - 1,200 watts
  • window air conditioner - 1,500 watts

Lights That Go Dim in the Night

Have you ever noticed your living or family room lights dim for just a second or so when your refrigerator, AC or washing machine turns on?

The dimming of the lights is caused by the reactive load of the major appliance that was starting up.

Have you ever had to push a car? It takes a tremendous force to start it rolling. However, once it is rolling, the effort to keep it rolling is reduced.

Electric motors and refrigeration compressors are no different.

Start Up Load Can Be Double!

The reactive loads can be double the running load! Wattage demand can soar!

Unfortunately, you must account for this when sizing a generator.

You'll find out very quickly that if your power is interrupted, and you depend on a portable generator, the experience will remind you of a backpacking trip.

You'll have some fun, but for the most part your life will be miserable until the power is restored.

Right-Sized Portable Generator
Portable electric generators are very nice. When I lost power for three days in a winter storm, my kids had fun for the first eight hours.

You don't realize how much you depend on light bulbs, TV and even the toaster each day. I didn't have a generator, but wish now I had this one:

beefy portable electric generator

Here's a beefy portable electric generator that produces 5,500 watts. These are what you need to be reasonably comfortable for an extended power outage. CLICK THE PHOTO NOW TO HAVE THIS GENERATOR DELIVERED TO YOUR GARAGE.

It's also very depressing to go to bed at 7:30 p.m. when the sun goes down. Flashlights are no substitute for a table lamp. Buy as much generator as you can afford. You will never ever regret it!

CLICK HERE to get FREE & FAST BIDS from local electricians who can help you compute total watts you need for a generator.


Column B178

Portable Electric Generators

Here are two dandy smaller portable generators. I own the one on the left. It can put out 2,200 watts and is VERY QUIET. CLICK THE PHOTO NOW TO HAVE ONE OR BOTH OF THESE DELIVERED TO YOUR HOME.

Portable Electric Generator TIPS

  • Allow you to have heat and cooling in power outages
  • Small ones, 2,000 watts, are for minimal power requirements
  • 5,500 watts is more realistic for output
  • WATCH video below of automatic stand-by generator
  • CLICK HERE to Get Tim's FREE & FUNNY Newsletter!

DEAR TIM: Last year, we lost electric power to our home three times. One of the outages cost us approximately $400 in spoiled food.

Will a portable generator solve this problem? How do you size a generator?

Can they be safely connected to the electric panel, or do you have to use extension cords to power separate items?

Will these generators supply sufficient power to run sensitive electronic equipment such as my computer? Doug Turner, Oregon

DEAR DOUG: Two years ago, the exact same thing happened to me.

My Own Outages

A few years back, a summer storm left my family and I without power for 36 hours. Then a freak fall snow storm knocked out my power for three days.

A portable electric generator would have allowed me to run my refrigerator and freezer just enough to save my food.

Plenty Of Natural Gas - But NO HEAT

I could have also powered my furnace for 10 minutes an hour to keep the pipes, my wife and kids from freezing. October is normally a balmy month but this storm brought in a bubble of cold air that made it feel like December.

I had an unlimited supply of natural gas coming into my home, but my furnace was ice-cold because there was no electricity to power the thermostats and giant fan that blew hot air to all the rooms.

Sleeping in the family room in front of the fire made us feel like we were in a log cabin.

All because I didn't own a simple portable generator that would have allowed us to not go back in time 100 years!

Free & Fast Bids

CLICK HERE to get FREE & FAST BIDS from local electricians who specialize in sizing and CONNECTING portable generators. Think SAFETY!

Great Machines & Reliability

Portable electric generators come in all sizes and levels of quality. They can provide you with emergency power to run virtually any electric appliance in your home.

They can also provide electric power for picnics, camping and construction needs.

Portable Generators For Smaller Loads

However, if you plan to power a whole house air conditioner or heat pump, you are dreaming. These large electrical devices will overwhelm an average or large size portable generator.

Sized In Watts

Portable electrical generators are sized by the amount of watts they will produce when operating. A 2,500 watt generator will supply enough electricity to power twenty-five 100 watt light bulbs for 30 minutes.

After that, you should reduce the load by 10 percent to avoid overheating the generator.

The total capacity of a generator cannot always be delivered to a single appliance. The power you can deliver to any one appliance is determined by the size of the outlets on the side of the generator.

Add Up Watts To Size One

Sizing a generator for your household emergency needs can be a bit complicated. You need to calculate the total amount of watts (electrical load) you might have connected to the generator at any one time.

Appliances and motors have labels that tell you how many watts the appliance requires while operating. You'll discover quickly that if you want to power several things at once, plus have a few lights burning, you'll need at least 4,500 watts, maybe even 5,500 watts.

Typically you'll discover even with a larger generator you'll have to switch out what things get power.

In other words, you may let the furnace run for an hour, then switch that power cord to the refrigerator. Not all things can have constant power unless you get a massive generator.

beefy portable electric generator

Here's a beefy portable electric generator that produces 5,500 watts. These are what you need to be reasonably comfortable for an extended power outage. CLICK THE PHOTO NOW TO HAVE THIS GENERATOR DELIVERED TO YOUR GARAGE.

Giant Generators - In Case You Must Have One

Watch this video to see my automatic stand-by generator at my own home. It comes on automatically if the main power is out for ten seconds.

This generator can produce 17,000 watts. That may seem like a vast amount of electricity, but it's not enough to power a 240-volt large oven.

CLICK HERE to get FREE & FAST BIDS from local electricians who specialize in sizing and CONNECTING portable generators. Think SAFETY!

Typical Watts For Appliances

  • cell phone battery charger - 25 watts
  • furnace fan blower - 700 watts
  • electric crock pot - 240 watts
  • microwave - 700 to 1,200 watts
  • video game device - 40 watts
  • refrigerator - 550 watts
  • water well pump - 575 watts
  • hand hair dryer - 1,200 watts
  • window air conditioner - 1,500 watts

Start Up Draw

In addition, certain appliances require significantly more power at start-up than while actually running. It takes a big initial surge of power to get the core of the electric motor spinning.

Refrigerators, furnace blower motors, freezers, washing machines, etc. are examples of these appliances.

If you've ever seen your lights temporarily dim while your refrigerator starts up you know what I am talking about.

This is called reactive load and it can be as high as double the running load of an appliance. You need to keep this in mind when sizing a generator.

Well pumps, larger AC units, etc. can have crippling reactive loads and stall out a generator that's too small.

Transfer Switch Is Complicated

Connecting a portable generator to your main electric service panel where the circuit breakers are located is accomplished using a transfer switch. These switches completely take your house off line while the generator is operating.

If you don't use a transfer switch and simply feed power to the electric panel, you could kill a utility company linesman who is attempting to restore power to your neighborhood. These switches also protect the generator when power is restored by the utility company. Make sure a qualified electrician installs your transfer switch. It must be inspected by your local electrical inspectors and/or the utility company.

Generators & Extension Cords

Almost all portable generators come with electrical outlets. You plug in an extension cord into these outlets.

Extension cords are inherently dangerous because all too often they're under sized. This means if you try to put lots of electricity through them they can overheat and cause a fire.

If you choose to use them, be sure they are sized adequately to handle the flow of electricity. An undersized cord can overheat, short out and cause a fire.

CLICK HERE to read my past column about Sizing Extension Cords.

Modern Generators SAFE For Electronics

To power sensitive electronic equipment, you need to purchase the highest quality portable generator you can afford. The quality of electricity produced by different generators can vary.

The gasoline engine and the generator must provide consistent, smooth power. Inexpensive motor or generator components can adversely affect electrical power production.

Consider purchasing an engine that has an automatic shut off that can detect low engine oil levels. This simple feature will protect your engine from failure. Remember, higher quality usually means higher initial cost. The most economical generator may not be the best long term investment.

CLICK HERE to get FREE & FAST BIDS from local electricians who specialize in sizing and CONNECTING portable generators. Think SAFETY!

Column 178

Paperless Drywall

Paperless Drywall

It is really hard to see, but the paperless drywall in this photo has a texture like ultra-fine steel wool. PHOTO CREDIT: Tim Carter

Paperless Drywall TIPS

  • Many different types of drywall some with no paper
  • Inner gypsum core is different and more resistant to water damage
  • Slightly rougher texture easily made smooth by skim coating
  • Use in high-humidity locations of home
  • CLICK HERE to Get Tim's FREE & FUNNY Newsletter!

DEAR TIM: Paperless drywall is causing me some consternation. Is it as easy to cut, install and finish as traditional drywall that has a paper facing?

Why would I want to use paperless drywall? The texture of the paperless drywall is definitely rougher, and I am worried the walls and ceilings in my house will not be smooth.

Would you use this paperless product in your own home? Joy B., Olive Branch, MS

DEAR JOY: The paperless drywall is a fascinating product.

Great For Wet Locations

To me it is one of those, why-didn't-I-think-of-that products. While traditional drywall with paper facing is fine in many instances and I have it on virtually every surface of my own home, the paperless drywall solves a few pesky problems the paper-faced drywall has had for years.

Paper Sandwich

Traditional drywall has a firm gypsum core that is wrapped with special paper both front and back. Not all drywall has the same paper facing.

Some drywall products have colored paper facing (blue or green) that inhibits the absorption of water that might otherwise soften the gypsum core.

Free & Fast Bids

CLICK HERE to get FREE & FAST BIDS from local drywall contractors who can bring paperless drywall to your home.

Fiberglass Is Immune To Water

The paperless drywall is covered both front and back with fiberglass which is naturally highly water resistant. It also comes with a moisture-resistant gypsum core. Not all traditional drywall has this type of core.

Slows Mold

First and foremost, the paperless drywall was created to help minimize the spread of mold in homes.

Is it mold-proof? Absolutely not. It's mold resistant simply because the fiberglass mat that replaces the paper is not a known food source for many common molds.

Some molds actually feed on the paper facing of traditional drywall if the drywall becomes wet or damp and stays moist.

I Loved It

I have used this paperless drywall on two recent projects in my own home. Aside from the slightly rougher surface when handling it, I could tell no other difference when cutting the paperless drywall with a traditional razor knife.

Drywall screws and nails penetrate the paperless drywall just like traditional drywall.

View From A Distance

When viewed in daylight at a distance over six feet away, the surface of the paperless drywall appears nearly identical to that of traditional paper-faced drywall. But when you get closer and look at the surface of the paperless drywall, you can see and feel the fine fiberglass matting.

At night when light washes down a wall from above at a low angle, the texture of the fiberglass matting is very apparent.

Finishing Fills Texture

If a rookie drywall finisher and painter work on the paperless drywall, you might see smooth polka dots where the screws and nails are covered with finishing compound in the drywall.

Smooth racing strips might also be visible at corners and flat seams where joint compound and tape was used to finish the unsightly seams where two pieces of drywall touch one another.

The smooth areas are created when the creamy joint compound fills the small voids in the fiberglass matting. The filled glass matt has a very different texture than unfinished paperless drywall.

CLICK HERE to get FREE & FAST BIDS from local drywall contractors who can bring paperless drywall to your home.

Simple Skim Solution

This problem is easily solved if the entire surface of the paperless drywall is skim coated with drywall topping compound. There are many different methods of skim coating as well as large tools to make the job go faster.

One method, that has worked well for me, is to add some water to drywall topping compound transforming it into a thick paint. Apply the topping compound to the paperless drywall with a thick-napped paint roller, and then immediately remove it with a wide flat knife. If the humidity is low, the skim coat dries very rapidly.

Skimming Last Step

It's best to skim coat the paperless drywall after it has been sanded. The skim coat offers a secondary benefit of fixing minor imperfections that might appear in the drywall finish.

Use In High Humidity Locations

The paperless drywall can be used in bathroom areas where you might expect high humidity, but not necessarily water contact. An example of this would be exposed wall surfaces above ceramic tile in tubs and showers, around vanities and toilets, etc.

The paperless drywall can be used in any other part of the home where you might otherwise use traditional drywall. It has one slight disadvantage. The drying time of finishing compounds is slightly slower.

This stems from the fact that the fiberglass matt facing allows little or no water to penetrate in towards the gypsum core. When using traditional paper-faced drywall, the water found in finishing compounds can soak into the paper allowing for more-rapid drying times.

CLICK HERE to get FREE & FAST BIDS from local drywall contractors who can bring paperless drywall to your home.

Column 688

Doorbell Extension

Fancy shelf? Elaborate crown molding? NO! It's a doorbell!

Fancy shelf? Elaborate crown molding? NO! It's a doorbell!

Doorbell Extension TIPS

  • Kits are available to install a second or third doorbell
  • Wireless is the way to go.
  • Video doorbells are even better - answer door and talk to guest from your smart phone
  • Get free bids from local pros to help - see links below
  • CLICK HERE to Get Tim's FREE & FUNNY Newsletter!

DEAR TIM: When my wife and I sit on our back patio, we can't hear the door chime. I was thinking of adding a doorbell extension adjacent to the patio door.

This way both door chimes would work when the front door button is pushed. Is it possible to do this?

If so, what do I have to do? I'm not an electric wizard.

In case the wiring process is too difficult, is there an alternative solution? Dale M., Arlington, TX

DEAR DALE: You bet you can hook up an additional door chime.

Multiple Doorbells Are Easy

In fact, it is possible to install up to 3 standard door chimes that are activated by front, back, or side door buttons. This is handy for people who find themselves working in a basement or up on a second floor area away from the primary door chime.

Easy Install

The electrical wiring process is not too difficult. There are wireless kits now available that can install in minutes.

You just need to install a small radio transmitter to your existing wired door chime.

Here's a simple doorbell extender kit. Easy install. CLICK THE PHOTO NOW TO HAVE IT DELIVERED TO YOUR HOME.

Hard-Wired Solution

You might have to install a new transformer if you choose to add a second traditional doorbell. Single door chimes work best with 16 volt, 10 watt transformers.

To power your additional chime, you will need to install a 16 volt, 30 watt transformer. The voltage and wattage of transformers is stamped or printed on the body of the transformer. When you install the 30 watt transformer, it can go in the same location as your existing transformer.

Free & Fast Bids

CLICK HERE to get FREE & FAST BIDS from local electricians who can add a complex hard-wired second or third doorbell for you.

Turn Off Circuit Breaker

Before you begin to install the new transformer or modify any of the low voltage wiring from the transformer, you need to disconnect the high voltage power to the transformer. If you don't do this, you can easily cause an electrical short that will harm the transformer, the door chimes, and/or yourself.

Light-Gauge Wire

The wiring of the second chime is not too difficult. You need to make sure that you use the proper wire. Purchase 18 or 20 gauge wire that's UL approved.

Make sure the wire is the solid type, not stranded. Purchase a large spool containing several hundred feet. You will be surprised at how much wire you'll use. The existing wires in your walls do not require upgrading.

Remove Covers

Next, remove the covers from your door chimes. You will probably see four screws. Three of these screws are used to connect to the door buttons.

They're usually clearly marked: Front, Rear, and Side. The other screw is marked Transformer.

Your challenge will be to run four separate wires between the two door chimes. All you have to do is hook each individual wire to the same screw on each chime.

For example, the first wire you run should attach to the screw marked Transformer on each chime. Be sure to leave the existing wires in place on the original door chime.

CLICK HERE to get FREE & FAST BIDS from local electricians who can add a complex hard-wired second or third doorbell for you.

Turn On Power

Once you have made all of the connections, re-energize the new transformer. As long as you installed a standard 2 note chime (Ding - Dong) to match your existing chime, both chimes should activate when someone pushes the front door button.

Don't make the mistake of trying to install a fancy four or eight note chime if you have a traditional two note door chime. These fancy door chimes require a fifth wire to be run between the door chime and the door buttons. That can get complicated.

Wireless Is The Way

If you wish to avoid all of the wiring hassles, you can solve your problem by installing a new separate wireless door chime. These are very clever devices.

They require no wires at all. The door chimes themselves are very attractive.

Many have up to a 100-300 foot operating range. You can even get one that has a fancy eight note chime.

Because the wireless models come with over 50 different codes, your TV remote and garage door operators will not cause the door chime to activate.

Video Too!

You can now get a doorbell that has video with it so you can see who's at your door no matter where you are. Even if you're not home, you can answer the doorbell, see and TALK with the person at the door! You do all this using an app on your smart phone.

Video doorbell. You gotta love technology. CLICK THE PHOTO NOW TO SEE ALL THE VIDEO DOORBELLS. YOU CAN HAVE ONE DELIVERED TO YOUR HOME NOW.

CLICK HERE to get FREE & FAST BIDS from local electricians who can add a complex hard-wired second or third doorbell for you.

Column 209

Surge Protector Power Strip – They Can Catch on Fire!

surge protector strip

Surge protector | These come in all sorts of configurations. IMPORTANT: They wear out and when they do they can become FIRE HAZARDS. CLICK or TAP HERE to see the different ones.

Surge Protector TIPS

Read in my August 16, 2020 Newsletter how my mistake of not calling the power company, lead to Elaine getting back to me about surge protectors.

DEAR TIM: I'm getting ready to build a new home. I'm aware that many of my new electronic devices including my computer and stereo equipment can be harmed by invisible power surges in the electric lines.

I thought only lightning could destroy my stuff. Are there other power surges besides lightning? If this is so, what's the best way to protect all of my electronic equipment?

Do those inexpensive surge suppressors really work? Alan O., Clanton, AL

DEAR ALAN: Invisible disruptions in electrical power are real and they are becoming more of a threat to electronic equipment regardless of whether or not you live in a new home.

What Causes Electrical Surges?

A voltage surge or spike caused by a blown transformer, downed power lines, lightning, electric power grid switching, etc. doesn't discriminate between old and new houses. What's more, surges travel down telephone, cable, and TV antennae wires as well.

That innocent telephone line connected to the back of your TV or computer can be the source of destruction in the blink of an eye.

Free & Fast Bids

CLICK HERE to get FREE & FAST BIDS from local electricians who can install surge protectors in your home.

Can Large Appliances Cause Power Surges?

Well over 50 percent of the power surges your equipment will experience are created within your own home when appliances with large motors (air conditioners, refrigerators, freezers, washing machines, etc.) turn on and off.

What's more, just about every electronic device manufactured today contains smaller and smaller micro-processing chips that are more sensitive to voltage spikes than ever before. You need surge protection and lots of it if you want to protect your computers, printers, fax machines, garage door openers, stereos, etc.

What are the Two Types Of Surge Protectors?

There are two basic types of residential or light commercial surge suppressors. One type connects to your electric panel where your circuit breakers or fuses are located. These devices are designed to stop harmful surges before they can travel towards the electronic equipment in your home.

This is a surge protector that you install at your electric panel where the circuit breakers are. It's HEAVY DUTY. CLICK or TAP HERE or THE PHOTO NOW TO HAVE IT DELIVERED TO YOUR HOME.

They're not DIY friendly. A professional, licensed electrician should install a whole house suppressor.

A good electrician can complete the task in less than one half hour in almost all cases. The whole house surge suppressors are affordable. You can find several in the $200 range. Watch this video to see how to install one:

Free & Fast Bids

CLICK HERE to get FREE & FAST BIDS from local electricians who can install surge protectors in your home.

What is a Point Of Use Surge Protector?

Most people are familiar with the point of use surge suppressor. These are the ones that contain multiple electrical outlets for your computer, printer, scanner, stereo receiver, CD player, etc. and often connection points for telephone and cable TV wires.

This is a pretty decent point of use surge protector. It's all about how many joules they have. This one is close to 5000! CLICK THE PHOTO NOW TO HAVE THIS DELIVERED TO YOUR HOME IN DAYS.

These surge protection devices come in varying levels of quality and protection. If you purchase the wrong one, your brand new computer or stereo can become toast in less than a second.

Do Surge Protectors Wear Out?

Surge suppressors wear out. They're like car brake disc pads. Each surge they capture takes a toll on the protection circuits inside the surge protector. When they wear out, they can become fire hazards.

Inside most suppressors you will find metal oxide varistors (MOVs). These electrical components are sacrificial.

Small surges that enter your house slowly destroy the MOVs. A large surge can cause instantaneous destruction of all of the MOVs in an instant.

The MOVs ability to block surges is measured in joules. Buy a surge suppressor that has a high joule rating. Look for ones that offer joule ratings of 1,900 or more if possible.

What is Clamping Voltage?

Clamping voltage is the lowest voltage where the protector will spring into action to save your electronic devices. You want a protector that has a low clamping voltage.

Pay attention to clamping voltage as well. This rating tells you when the surge suppressor will react. High quality suppressors have low clamping voltages.

If the equipment you're trying to protect contains micro-processing or computer chips, purchase a suppressor with a clamping voltage of 330 volts or LESS.

Look for the Underwriters Laboratory (UL) UL-1449 voltage rating on the suppressor's packaging. This is the true measure of clamping voltage.

Should I Replace Old Surge Protectors?

Yes, you should replace old surge protectors.

Because surge suppressors wear out, your older surge suppressor might be an open gateway for destructive electrical surges. Newer high quality suppressors come with lights and audible alarms that tell you when the MOVs have given up the ghost.

Both the whole house and point of use surge suppressors are available with this convenient feature. Look for suppressors that come with connected equipment and total replacement warranties.

Can I Get a Free Replacement Protector?

Numerous manufacturers will send you a free replacement suppressor when and if yours fails. In addition, some will even pay up to $100 towards the electrician's repair bill when your whole house suppressor needs to be replaced.

Do you Know of Great Electrical Books?

Yes, I've wired houses for years and know of a few great electrical books.

A spectacular book for learning all about residential electricity is Wiring a House. With its wealth of practical know how this book, written by a master electrician, is sure to become an indispensable reference for anyone who wants a common sense guide to residential electricity.

This is a superb book that will give you the skills you need to tackle installing a surge protector. CLICK THE PHOTO NOW TO HAVE THIS BOOK DELIVERED TO YOU KINDLE OR YOUR HOME.

The photos and illustrations featured in this book are clear, crisp and easy to understand. You must buy a copy of Wiring a House, a great hardback book published by Taunton Press.

Here's a complete, full-color guide to all aspects of residential wiring and how to apply them to the wiring of a typical house. Electrical Wiring Residential is another must have book.

electrical wiring residential book

This is a fantastic book. You should have it in your library. CLICK THE PHOTO NOW TO HAVE THE BOOK DELIVERED TO YOU FAST.

It's everything anyone could need to know, from wiring a lighting branch circuit, to installing a service entrance or swimming pool.

Loaded with examples, wiring diagrams, spectacular photos and illustrations explaining all the new NEC requirements throughly. This book is easy to read and understand, yet has all the instructions and details needed to perform virtually any residential wiring job properly.

If you are looking for a book with invaluable information on tools and materials, detailed instructions for how to repair or replace wiring in old buildings and bring them up to code then you need a copy of Old Electrical Wiring.

If you have an older home, this is a must-have book. CLICK THE PHOTO NOW TO HAVE THIS BOOK DELIVERED TO YOU BY SPECIAL COURIER.

This 400-plus-page book tells you everything you could ever imagine about switch layouts, troubleshooting, and design change.

It also has an extensive glossary of old wiring terms and slang. Packed with drawings and illustrations, including pictures of old devices, this practical book will tell you whether an old electrical system should be torn out or repaired. This book will really help you.

CLICK HERE to get FREE & FAST BIDS from local electricians who can install surge protectors in your home.

Column 235

Night Stand Makeover

Night Stand Makeover

Here's the nightstand before Joy started working on it. It's seen better days! Copyright 2017 Tim Carter

Night Stand Makeover

Joy Davis had an old night stand that wasn't quite right. So she decided to restore and refinish it. Here's her story.

If you pay attention during her story you're going to be inspired.

Why?

With a little work and effort, she transformed something with little utility to something that works quite well.

Here's Joy's story:

The Ugly Duckling Night Stand

"I had an old, not pretty, night stand. I used it for many years. It was ugly so I kept it covered.

It had a shelf inside the door and was deep so it was inconvenient to get to the stuff in the back, and I had to get on my knees to see back there. So recently, I decided to redo the night stand.

Major Surgery

I took it all apart and sanded it down and put it back together without the shelf, and added an old drawer that was laying around.

I had to shorten the drawer but it worked. I added trim left over from other projects.

New Legs

The only thing I bought was a set of new legs. The old ones were fine but I wanted the stand to be a little taller, so I got legs that were 2-inches taller.

Night Stand Makeover

The newly remodeled night stand. Copyright 2017 Tim Carter

My husband loves it now."

Joy Davis

You Can Do It

My guess is Joy didn't have lots of expensive power tools. She just thought it through and did it.

After all, what's the loss if something didn't go right?

All she had to do was look at other furniture and COPY what that builder did to make what she wanted.


If you want to submit pictures and the story behind your project, CLICK HERE to go to the Before & After Submission Page.