Match Grout Color | It’s not too hard to match grout color if you invest a little time and effort. DIY floor grout color problems can happen FAST if you don't know what you're doing. Keep reading to see how to get perfect grout color matches. (C) Copyright 2017 Tim Carter
Match Grout Color TIPS
- Requires patience, diligence, and discipline. Luck helps too
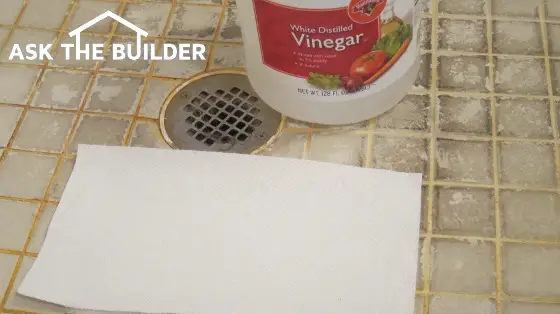
- Deep clean existing grout first using Stain Solver oxygen bleach
- Dry grout out of the bag is what it looks like once installed and cured
- WATCH Grouting videos below
- This column was so popular, it was featured in Tim's January 10, 2021 Newsletter
- CLICK HERE to Get Tim's FREE & FUNNY Newsletter!
DEAR TIM: I’m about to remodel a bathroom. I’ll be switching out a shower stall and know my tile floor will have to be patched.
Fortunately, the previous owner left behind lots of tile for me, but there’s no grout. I’m afraid if the grout doesn’t match, the repair will stand out like a sore thumb.
What’s worked best for you when you have to match grout on your jobs? Are there a few secret tips you can share? Karen J., Marblehead, MA
DEAR KAREN: You should locate that past homeowner and give her/him a huge hug.
Should I Always Save Leftover Unmixed Grout?
It was quite thoughtful to leave behind some of the extra building materials. I did that with my last home whenever I could. In my case, I used an oversized brick to construct my chimneys. Knowing it would be almost impossible to locate in the future, I saved about fifty for a future homeowner should they need them for any reason.
CLICK or TAP HERE to get FREE BIDS from local tile contractors who can match grout color.
Does Matching Grout Requires Patience?
Matching interior grout can be a challenge, but it’s not impossible. As with most things if you want perfection you need to invest some time and effort. I agree with you about how important it is to match both the grout color and texture. No matter how wide the grout lines are, if they don’t match you can see it right away.
Should I Deep Clean Existing Grout?
The matching process starts by deep cleaning the grout. I’ve had the best success doing this with Stain Solver certified organic oxygen bleach. This is a powder you mix with hot tap water.
Once all the powder is dissolved, you pour the solution onto dry grout allowing it to soak and bubble for about 15 minutes.

Stain Solver is MADE in the USA with USA ingredients that are food-grade quality. CLICK THE IMAGE to order some NOW.
At the end of the wait period, you scrub the grout vigorously with a stiff nylon scrub brush. Be sure the brush bristles touch the grout. Don’t use a flimsy toothbrush.
You want to really scrub. The longer you allow the oxygen bleach solution to soak, even up to an hour or more, the less you have to work.
If the solution soaks into the grout while you wait to scrub, add more so a film of solution is on top of the grout.
Rinse Well
Rinse the floor after cleaning to ensure all the dirt is up. Allow the grout to dry overnight. You can usually tell if you got the grout clean by looking at the edges of the floor where no foot traffic has touched it.
The grout along walls and in corners usually is much cleaner than where you walk. If all the grout looks the same color at this time, you can start the matching process.
What is the Difference Between Sanded Or Unsanded Grout?
Sanded grout contains fine silica sand and Portland cement. Unsanded grout is just Portland cement. Dry pigments are added to both types to create the colors you see.
Sanded grout is easy to spot because you can see the tiny bumps of sand in the texture of the grout. Unsanded grout is very smooth.
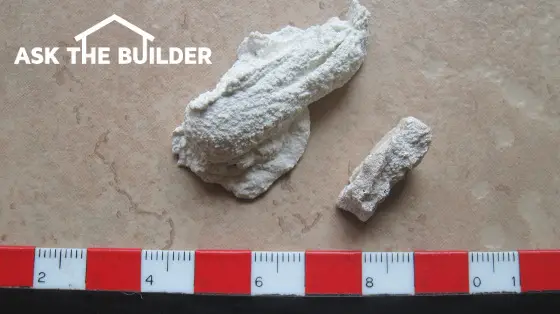
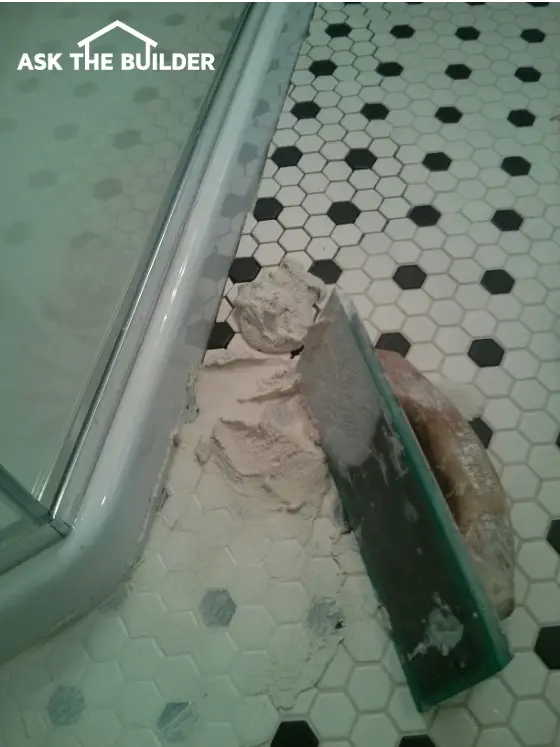
The larger blob of this is a test batch of sanded grout. You can see the small bumps of fine silica sand in the texture. The small chunk to the right was salvaged under a piece of baseboard at the edge of the floor. I soaked the small chunk in Stain Solver oxygen bleach for hours to make sure it was clean. You can see the new and old grout are almost a perfect match. The ruler is metric with millimeter markings. Copyright 2017 Tim Carter
When is the Best Time to Match Grout Color?
The time of day to match grout color is midday. If you try to match grout color at night the color temperature of the light bulbs in the bathroom can interfere with your ability to get a perfect match.
Some incandescent bulbs are available that render a color temperature close to the natural sunlight towards the middle of the day. Consider using those if you have to match when the stars are shining.
Should I Start With Color Charts Or Sample Sticks?
The first place to start is to get samples or a color chart of new grout and hold it next to your existing grout. If you can salvage a chunk of existing grout from under a baseboard next to a wall, this is the best way to start the matching process.
The original tile setter undoubtedly put grout at the edges of the floor before the wall trim was installed. Pry off a piece of baseboard and see if you can get a chunk of the grout.
Is it Best to Use Dry Grout To Match Color?
The color of the grout out of the bag before you add water to it is the color it’s going to be once dry. You can prove this by mixing up some new grout and allow it to dry. Add just enough water to the dry grout to make it the consistency of stiff applesauce.

I used the amazing Laticrete Permacolor system to get a perfect match. The powdered grout to the right of the wide metal knife was the first attempt. I then added one more measure of the darker pigment and the perfect match is on the knife blade. Look how the color matches the clean dried grout in between the tiles! Copyright 2017 Tim Carter
Can You Blend Different Grout Colors?
Yes, you can blend different grout colors to obtain a perfect match.
Often you can’t get a perfect match from one bag of grout or one brand. You may be forced to do some creative mixing and blending of different colors of grout to get a match. This requires great discipline and diligence as you need to be very exact in your measuring, blending and mixing as you create test batches. Record keeping is everything in this exercise.
What is the Laticrete Permacolor System?
The easy way to get perfect color matches is to use the Laticrete Permacolor dry-pigment method. I did this in southern California in November of 2017 to get a perfect match for some outdoor Mexican tile.
The grout comes in bags and it's pure white. You then buy small bags as you can see in the photo above of dry pigments. You then make small batches of dried grout blending one, or more, pigments until you get a perfect match.
Just keep track of what you mix and measure all quantities very carefully.
Does Wet Grout Show Up as a Deeper Color?
Wet grout shows up as a deeper color than when it will be dry. When you add water to the dry grout, the color gets deeper and it can be frightening. This is why you need to mix up a test batch and allow it to dry before you commit to the actual grouting of your new tile.
Is Water My Enemy When Grouting?
Yes, water is your enemy when grouting.
If you’ve never grouted before realize that water is both your friend and foe. You need water to mix and clean up the mess on the tile. But too much water will ruin the new grout.
Water in excess during the mixing process or as you clean and strike the joints will dilute the amount of Portland cement in the mix. If you allow this to happen, the grout will crumble and crack over time.
Do You Have DIY Grouting Videos?
Watch these four videos to see how to properly install sanded floor grout. Yes, I should have used knee pads.
Properly mixed unsanded grout is the consistency of slightly warm cake icing. As mentioned earlier, you want sanded grout to be the consistency of stiff applesauce. When you wipe off excess grout from the tile surface, the grout needs to be somewhat stiff in the joints.
If you touch the fresh grout too soon, the sponge will remove grout creating a depressed grout line. Squeeze out all the water you can from the rounded grout sponge before you allow the sponge to touch the tile!
Column 1196