Gutter Guard Truth

gutter guard cross section

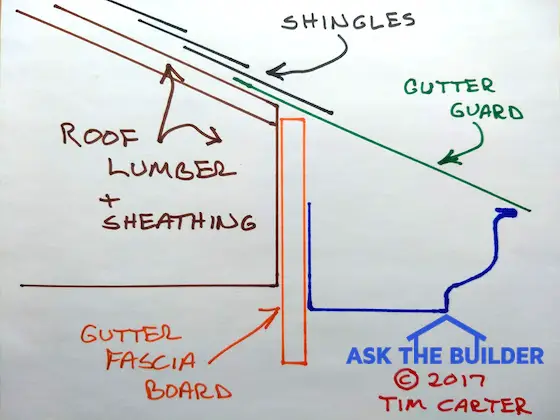
Gutter Guard Truth | Here's a quick cross-section showing how the gutter guard - in green - is in the same plane as the roofing material. The drawing is not to scale. I used to make drawings like this sitting at customers' kitchen tables. CLICK or TAP HERE to purchase an affordable MICROMESH gutter guard I'd put on my house. Copyright 2018 Tim Carter

Important Author’s Note Update: Since this column was written, I've discovered a gutter guard that actually WORKS! It worked so well in my testing that I installed it on my own home.

It's a stainless-steel micro-mesh gutter guard that doesn't allow ANY organic debris into a gutter but allows water to flow into the gutter even in torrential downpours.

gutter guard mastershield

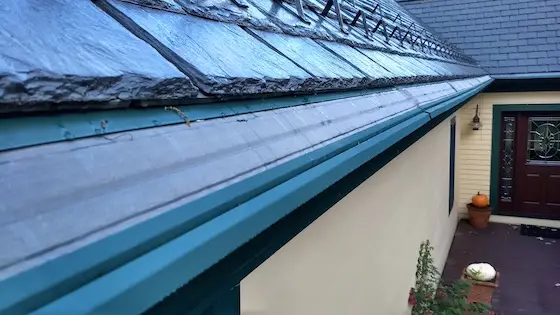
This is the best gutter guard I've ever tested. A stainless-steel micro-mesh prevents any debris from getting into the gutter. You're looking at the front door on my NH home.  CLICK on the photo to purchase DIY stainless-steel gutter guards that will save you thousands of dollars. Copyright 2018 Tim Carter


! IMPORTANT - Read Author's Notes at the End of This Column # # # Watch Videos Below!

Dealer-Installed Gutter Guards are Outrageous

Not too long ago, I was talking with a salesman who worked for a gutter guard company on the Eastern seaboard. He was astonished that people actually paid the prices he quoted them.

When he told me he was routinely getting $20 per linear foot for installed gutter guards, I almost fell out of my chair. It's imperative that you sit down and do some calculations before you decide to sign a contract for gutter guards. Some people have paid as much as $30 a linear foot.

DO NOT PAY THESE INSANE PRICES. Purchase gutter guards from Amazon.com and have a local handyman install them. CLICK HERE to order.

Free & Fast Bids

CLICK HERE for FREE & FAST BIDS from local companies that can install micro-mesh gutter guards.

Consider purchasing a micro-mesh product from Amazon.com and having your local handyman install them for you. CLICK the photo below for just one of the micro-mesh products I discovered on Amazon:

gutter guard being inspected

There are many micromesh gutter guard products. You can save LOTS of money putting them on yourself. CLICK ON THE IMAGE to see how low-cost they can be.


DEAR TIM: Every fall, I get deluged with both leaves in my gutters and advertisements from companies selling gutter guard products that promise me I will never have to clean my gutters again.

The few estimates I have requested have taken my breath away because of the high price. First, do these products fulfill their claims?

If not, why? Is one better than the other? What is the most cost-effective way to keep my gutters free of leaves and debris? Stephanie W., Cranberry, PA

DEAR STEPHANIE: I'm not surprised at all by your comments but wonder why you only mentioned half of your problem.

Spring Is The Biggest Gutter Problem

If you have deciduous trees, that drop leaves onto your home, then you undoubtedly suffer in the spring as well as the fall.

All deciduous trees produce organic litter in the form of buds, flowers, seeds, small bits of bark, twigs and leaves on a never-ending annual cycle until they die and then fall over. Evergreen trees are just as guilty as they shed needles and other bits of debris throughout the year.

gutter guard blocking leaves

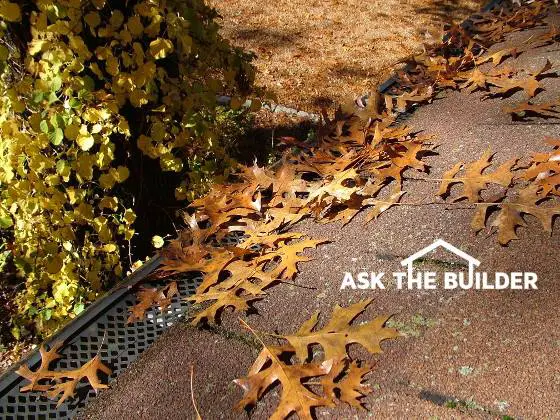
This simple gutter guard is working well now but wait until spring. Those knock-out holes you see will be clogged with twigs, flowers, bark, seeds, flower buds, etc.

Stratospheric Prices

The prices you speak of for these gutter guard systems not only take my breath away, but they knock me back on my heels. I'm convinced the pricing is based solely on emotion.

The companies that sell these products play upon the frustration the average homeowner experiences when faced with the periodic cleaning one has to do several times a year to keep gutters clean.

It's not uncommon for a homeowner to get a price of $2,000 to $3,000 to install gutter guards on the average home. The pricing varies from region to region, and the type of system being installed.

There are do-it-yourself products you can get that will cost less than $200 for the average house so you can see there is a vast array of choices.

Free & Fast Bids

CLICK HERE for FREE & FAST BIDS from local companies that can install micromesh gutter guards.

Consider purchasing a micro-mesh product from Amazon.com and having your local handyman install them for you. CLICK the photo below for just one of the micro-mesh products I discovered on Amazon:

micromesh gutter guard

There are many micromesh gutter guard products. You can save LOTS of money putting them on yourself. CLICK ON THE IMAGE to see how low-cost they can be.

Related Links

Gutter Guards and Icicles

Payback Period for Guards - How Fast?

Actual Cost of the Guards

To put the final retail price in perspective as to how high it is, you just need to look at the manufacturing cost. Doing some research I've come to the conclusion that the price ranges from ten or twenty cents per linear foot up to two dollars for the most complex micro-mesh guard. These are 2017 prices, so adjust for inflation.

Invest Your Money? Maybe!

But for the moment, let's consider the system installed by a professional roofing company. For the sake of discussion, I'd like to assume an installed price of $2,500.00.

I'd also like to assume that you could invest this same money in a conservative stock that might go up in value just 7 percent per year. If you let the stock just grow in price, at the end of ten years its value would be nearly double having risen in value to $4,917.82. This means you still have your original money plus a gain of $2,417.82.

Annual Cost to Clean Gutters

If you paid a roofing company or handyman just $125 per visit to clean your existing gutters three times per year, you would have paid out $3,750.00 over the same time period. Granted, you need to factor in inflation as the price of the labor will undoubtedly rise.

But you don't need a Ph.D. in Mathematics to see that at the end of ten years you'll have clean gutters and over $1,100 still in your account if you simply pay a roofer to periodically clean your gutters.

Maybe it's a better idea to not put on gutter guards, especially if you plan to move within five years.

Almost All Gutter Products #FAIL

The real truth is that all of the gutter guard products I have tested for years at my own home fail in one way or the other. As soon as new designs become available, the manufacturers tend to discover me and ask me to test the new products.

All gutter guards do stop large leaves from entering gutters, but most of the designs allow small organic debris to enter the gutter system or this debris clogs the gutter guards causing water to cascade off the roof!

Gutter Guard Videos

Watch all these gutter guard videos of mine. You'll see WHY most fail and you'll see the one I put on my own home!

Layer Of Muck And Goo

If this organic debris that does enter the gutter is not cleaned out on a regular basis, you end up with a layer of goo and muck in your gutters.

If you must install gutter guards, then absolutely make sure you buy ones that allow you to easily see through them to the bottom of the entire gutter.

Avoid Solid-Topped Guards

Avoid gutter guards that have solid tops and small slits near the front edge. Look for gutter guards that have a larger mesh-type open structure that resembles a fishnet or even a chainlink fence. These systems allow you to aim a garden hose nozzle through the guard so that water can easily flush away the organic goo that will collect in the gutter. Remember, you'll have to clean your gutters or the gutter guards themselves UNLESS YOU GET A GUTTER GUARD THAT STOPS ALL DEBRIS BUT ALLOWS WATER INTO THE GUTTER.

I've tested no less than twenty different gutter guard products over the past eight years. Each year, I get to look at ones that offer new hope or more of the same.

Some of the gutter guards get horribly fouled with the spring-time debris that falls from the trees onto my roof. My pin oak trees create flower blossoms that resemble miniature lace. This mass of organic debris has terrorized each and every gutter guard. When my maple tree is not hit with a spring frost that kills the flower buds, the gutter guards are clogged within days with hundreds of thousands of maple seed helicopters.

Half-Truths By Salespeople

Beware of salesmen who tell you all of the organic debris is washed away by rain or blown away by the wind. It's not true if the organic debris can get trapped in the openings of the gutter guard.

Home & Garden Show Test

You can test it yourself the next time you visit a home and garden show that has a small gutter guard setup with water cascading down a little roof, across the guard and into a gutter. Tear off a small piece of paper about the size of a postage stamp or your thumbnail and drop it onto the running water. I guarantee that it will be carried into the gutter or it will clog the guard. It will not fall onto the floor of the convention center.


In need of gutters? Pick out the right ones with my Gutter & Downspout Installation / Repair Checklist. I offer a 100% Money Back Guarantee.


Author's Notes - 

As you might imagine, columns written as the one above have the potential to ignite a firestorm of controversy. Manufacturers of gutter guard products that do fail and the distributors who sell them are immediately cast in a deep shadow of doubt.

But imagine how I felt when I received the following email from Ms. Ann Pattison on November 7, 2004 the day the above column ran in The Toledo Blade:

"Hello, Tim,

My name is Ann Pattison, I am the proud owner of A -1 Gutter Cleaning based in Toledo, Ohio. I am writing to you regarding your article in The Toledo Blade that appeared on November 7, 2004, about gutter guards. I absolutely agree with your article.

For years I have been telling customers the same things you mentioned in your article. It is the truth. I have been in business for 15 years and have been cleaning gutters for 20. I will install a screening if a customer really wants some type of cover. However, I also still go out yearly to maintain this screening. Each year I have to clean off the screen I installed and then I must flush out the gutters.

I also take a lot of screening off because it was never maintained properly. If you install a cover, you cannot find a clog unless you take everything off. This is very time-consuming. There is lots of labor involved. Gutter guards that allow you to see the bottom of the gutters do work best just as you say. But if you use a cheap roll out screening, it will be pushed right into the gutter as soon as leaves fall on it. So you must check out the material you are having installed. That also makes a big difference.

I just wanted to write you and thank you for your article. You are absolutely right on everything you said especially on the pricing. It is ridiculous. I do install a good screening cover that is a very thick gauge and works very well with proper maintenance for less than $3.00 a foot. If I can be of any service to you, please let me know. You can reach me at 419-865-1941 or 888-888-0842.

Ms. Ann M. Pattison A-1 GUTTER CLEANING"


Several days later, I received a letter from a homeowner who lives in Bensalem, PA with comments of his own. Thanks Louis! You really proved my point.

November 11, 2004

"Dear Mr. Carter:

Thank you - Thank you - Thank you. Your article on Guarded Gutters hit the nail on the head. Every time I see a full page ad in The Courier-Times or other papers or on TV I get so angry. The guys who installed my gutters were called "Gutter Solutions." They came out once to clean the gutters, then when they clogged up again I called them back. They said the guy who signed my contract no longer worked there. I was out of luck.

I paid a lot for these gutters - so-called Clog-Free. What a joke! Sure, big leaves don't get in, but the other stuff which is even worse than leaves really clogs things up. My gutters overflow during a heavy rain like Niagara Falls.

If a gutter company says they will come out and clean your gutters for free if they clog. . . Get it in writing!!! Their bill even said: Guaranteed not to clog. It's a bunch of baloney.

Years ago I had seamless gutters installed. They added 3-foot screen covers, and they put them on upside down. Yes, Mr. Carter. Upside down. It took lots of phone calls to get them to come back out and fix things.

Thanks for listening to me, Mr. Carter.

Yours truly,

Louis Cesarone, Jr. (Senior Citizen)"


Tim,

I've read your article about gutter covers and agree completely. Yesterday, I spent 2 hours cleaning out this foul muck in the bottom of my gutters that had clogged them up. I ripped off my gutter covers and threw them in the trash.

While looking for solutions to my being lazy and not wanting to clean out my gutters EVER again, I came across _ _ _ _ _ . (Named Removed by Tim Carter to Protect the Guilty) Have you tried these? Do they work or am I just hoping that I never have to be covered with muck and mosquito bites again anytime soon.

Thanks!

Amiee Staggs

Bloomington, IN


This email just arrived today, August 29, 2005.

Loved your discussion of gutter guards. I bought into the "never clean" line and purchased a system that had a solid cover over the gutter. Clogged up within 6 months! The company did come out and clean them, but after we had a major overflow and basement flooding. The company knows its product is not clog free -- they even had the gall to give me a special hose adapter so I could flush out their "clog free" gutters.

Eileen G.

Upstate NY

Solid Wood Interior Doors

Solid Wood Interior Doors

My wife never liked the imitation six panel hollow core interior doors I used when I built our house 15 years ago. At the time, it was all I could afford, as I was near the end of the project and money was running short - the money actually ran out.

Recently, I started to do some interior remodeling and it was a perfect opportunity to change out the doors. I did some research and lucked out to find this medium sized Canadian company - Byron Wood Products - that had exactly what we wanted.

The best part is that the price for the doors was extremely affordable. CLICK HERE to get to Brycon and be SURE TO MENTION MY NAME.

Apples and Oranges

You have to be careful when shopping for wood doors. They may look the same, but there can be vast differences.

For example, some doors say they are solid wood, but they are actually a solid wood core with a veneer skin. I am not saying this is bad, as it would indeed be a solid wood door.

But if you want wood interior doors the way they were made 100 years ago, there are but a handful of companies that still make them. Fortunately, they are easy to contact and work with. Often companies like this just wish to deal with lumber companies and not the general public.

When you go shopping for doors, pay attention to how they are made. Be sure you are comparing similar doors.

Mixing Old and New

My interior doors combine new technology with old world craftsmanship and techniques. I am painting my doors. The raised panels in older doors usually gave painters headaches.

The actual raised panel floats between the thick stiles and rails of the door. This is a necessary design feature.

The solid wood raised panels expand and contract with changes in humidity. This would crack the paint where the panels connect to the stiles and rails. Byrcon solved this problem by using medium density fiberboard (MDF) for the raised panel. Since the door will be painted, you will not see the particle board. The MDF is very stable and does not shrink and swell like solid wood. If you want stain quality raised panels, Byrcon makes those, so don't despair!

Hardware

Buying period door hardware is a little bit more troublesome. You have to be on the lookout for low quality reproduction hardware.

Believe me, it is out there! If you have ever had the pleasure of taking apart 50 or 75 year old well made mortise locksets, you will know what a quality lockset feels and looks like.

I was able to locate a company in Texas that makes really good reproduction hardware. They are Nostalgic Warehouse. They have about 8 primary styles that range from early Victorian up through and including Art Deco. They even sell those classic crystal door handles.

Look for differences in the backplates of some companies. Some are thin pressed metal.

The ones I got from Nostalgic are forged solid brass. The forged process allows for very crisp detail. I also especially like the mortise lockset that I bought. It is made in England and is a true piece of craftsmanship. The remarkable thing is that the retail price for this lockset is not hundreds of dollars, it was less than $100! Yes, that may seem like a lot of money compared with a $15 brass plated tubular lockset from a home center, but the difference is night and day.

Hinges Are Important

Go the extra mile and use period hinges. You can get fancy design ones, but I went with precision solid brass smooth hinges from Stanley - the same company that makes all of those great tape measures and hand tools.

Stanley offers kits to dress up then hinges. You can get the old fashioned ball tips for the hinges or you can get the Victorian chimney caps.

These little pieces make a huge difference. As for mortising the hinges, the folks at Byrcon did it for me with no questions asked. My hinges fit perfectly when I got the doors!

Column B328

May 9, 2017 AsktheBuilder Newsletter

AsktheBuilder May 9, 2017 Newsletter

Welcome if you're a new subscriber! This is going to be a fun issue.

What better way to start the day listening to the entire soundtrack of The Hobbit? Yesterday was The Outfield. Their songs Your Love and Banging on My Heart are fantastic.

I'm about to make a big change and am pretty excited about it. It's been at least fifteen years since I've had a new eyeglass frame.

My youngest daughter is helping me get more in tune with the times. We ordered five sample frames online and they should arrive in the next few days to try on.

You wouldn't think one would get amped up about new eyeglass frames!

This afternoon, I'll be along the coast of Maine and intend to do some outdoor amateur radio if the WX cooperates. We've been locked into a week of rainy, cool weather here and there's not much hope it's going to end soon.

Roofing Ripoff Paperback News

Three weeks ago, I did a soft launch of my new expose' book Roofing Ripoff. It's all about the unethical practices I uncovered that appear to be rampant in the US asphalt shingle market.

But the BEST PART of the book is I also discovered how you can use copper to make your new, newer or existing good-condition asphalt roof LAST FOR ADDITIONAL DECADES.

Yes, for a few hundred dollars you can extend the life of your roof for many, many years.

Did that sink in or do you have UNLIMITED MONEY and you don't care if you put on a new roof every ten years?

roofing ripoff

After I click the SEND button so you're able to read this, I'll sit down and go over the FINAL design draft from my book designer Sheridan.

She's done a magnificent job with the layout of the book. You have no idea how complex it is to do this. Sheridan's a real pro.

The bottom line is I'm now so very close to getting a true copy of the book into your hands. Hang in there.

If you'd rather have a PDF version or one for you Kindle, you can buy it NOW.

CLICK HERE NOW to buy a PDF or Kindle version.

Please Send Me a Review

If you already purchased a copy of Roofing Ripoff in either format, I sure could use a favor!

If you went to Amazon and bought a Kindle version, can you go back and leave a review?

If you purchased a PDF version from me, can you email me a short review I can post on the RoofingRipoff.com website?

Finding the Real Pro

Every week, I get emails from homeowners who've gotten SCREWED by a contractor.

Just a few days ago here in NH, there was a news story about a contractor that took nearly $50,000 in deposits from homeowners and then never showed up to work.

Years ago, I taped a series of four simple videos that show you how to locate the BEST CONTRACTOR in your city or town and how to PROTECT YOUR MONEY and HOME.

Don't ask me why, but I just finally uploaded them to YouTube this past weekend.

I URGE you to watch the four videos now. Video number one takes you through the simple steps of finding the pro.

In video number 2, I share some vital secrets about contracts. You MUST WATCH this one.

Video number 3 is super important. I share with you how to PAY the contractor so you don't get left holding the bag.

Video number 4 is about change orders. These are Death on a Stick. In this video I show you how to avoid them.

CLICK HERE for video #1.

CLICK HERE for video #2.

CLICK HERE for video #3.

CLICK HERE for video #4.

If you want the EASY BUTTON approach and don't have time to watch all the videos, then CLICK HERE NOW to get FREE & FAST BIDS from local contractors in your city or town.

Pergola Ideas for Your Patio

The latest column I wrote for all my newspaper clients - yes, I still write the weekly Ask the Builder column that appears in about 70 newspapers nationwide - is about a very gorgeous pergola.
pergola
About six weeks ago, I did a phone consult with the man that built what you see in the photo above. He wanted me to share some tips about how to make it safe and I obliged over the phone.

Want me to call you on the phone to give you advice?

CLICK HERE to make it happen.

Suffice it to say, Joel did a spectacular job after talking with me.

CLICK HERE to see more photos of the pergola and read the column to absorb all the tips and inspiration so you can have a similar pergola at your home.

IMPORTANT TIP: There are links in the pergola column that allow you to get FREE BIDS from local carpenters that can build the EXACT pergola you see in the photos!!

The Mystery Tab

Have you ever wondered how in the world that one wall outlet in your home is controlled by a wall switch but the outlet just above or below it is always hot or has power?

What's the magic to make that happen?
electrical outlet
It's pretty simple sorcery believe it or not.

CLICK HERE to see some large photos that explain it all and show you what to do.

CLICK HERE if you're afraid of getting ELECTROCUTED and want to get FREE & FAST BIDS from local electricians who will repair your split outlet or INSTALL A NEW ONE for you.

Latest Revised Columns

If you're a new subscriber, I'm working on revising all of the content at AsktheBuilder.com. It's a massive months-long project and there's still much to do.

Here's a list of my latest revisions. There's some very helpful tips in these columns!

How to Calculate Square Foot Cost of New Home

Stay Cool This Summer With PROPER Return Air Ducts!

Dimmer Switches - Why Your LED Lights FLICKER

Lightning - HOW TO SAVE Your Flat Screen TV, Computers, and .....

Deck and Patio Cleaning

Are you about to clean your outdoor wood deck? How about your patio?

Use Stain Solver oxygen bleach.

It's NON-TOXIC, it's certified organic and Kathy and I MAKE IT.

CLICK HERE do discover more about Stain Solver.

That's enough for today.

Tim Carter
Founder - www.AsktheBuilder.com

Do It Right, Not Over!

Square Foot Cost to Build a House

building cost

This home will be finished soon. The owners got very close on the actual price by comparison shopping. ©2017 Tim Carter

Square Foot Cost to Build a House TIPS

  • Find a new market home in your town that's a match for what you want
  • Deduct sales commission and lot price
  • Use easy software tool - see below
  • Measure exterior footprint dimensions not room sizes
  • CLICK HERE to Get Tim's FREE & FUNNY Newsletter!

DEAR TIM: I purchased some building cost software to try to help me calculate the cost of a house I want to build. However, the costs I’m getting back don’t seem to be accurate.

Is there a simple and foolproof way to go about estimating home building costs? I’m trying to do this before I spend lots of money on blueprints only to discover what I want is out of reach for my budget.

Surely others struggle trying to estimate house building costs. Connie L., Chicago, IL

DEAR CONNIE: The building cost estimator you’re using may not be adjusting correctly for your market conditions.

Many Variables = Apples & Onions

There also may be some settings that you overlooked that have you comparing apples to onions. There are so many variables that come into play when estimating building and remodeling costs, it’s a miracle that any of that software works.

Costs Vary By Region

The first challenge you have to consider is that building cost data is different for varying cities and regions. Usually there are settings in software that track the costs in many cities and states.

But these can be inaccurate depending upon the level of fit and finish you’re looking to achieve.

Options Blow Budget

Think about new cars for a second. Most have four wheels, an engine, transmission, doors, varying sizes, etc., but they can have vastly different prices.

A Mercedes Benz is going to cost you much more than a Kia, although they will both transport you from point A to point B. This is true in houses.

Tour New Market Homes

To get a pretty close approximation of the current construction building cost in your city or town, you just have to go on a tour of new homes for sale. Be sure to visit ones that have been recently constructed.

I'd look at ones in all different price ranges so that you can get an idea of the level of quality of each home. Some will have standard appliances and finishes. Others might have premium and top-quality appointments. Take great notes.

Length Of Time On Market

One thing you have to consider is the length of time each house has been on the market and if there have been price reductions. The state of the current economy might cause a certain amount of deflation as sales prices are lowered to get houses sold. This means that a house might currently sell for less than what it actually cost to build. Be careful and ask lots of questions to see if this is the case in your area.

Inflation can cause jumps in building costs per square foot on a monthly basis. Material shortages can also cause price increases.

Back Calculate

Assuming that the marketplace is fairly stable, here’s a method of generating home building cost estimates that should get you fairly close to the number you’re looking for. I generate new home building costs by trying to back calculate the cost to build the house per square foot.

Once you know this number, you multiply it by the projected size of your new home to get close to the actual cost.

Locate A Close Match

Start this process by finding one or two homes that have lots the size you expect to have and the houses are close in size, style, and finish level that you desire. It’s very important all these things match.

Even better, make sure the houses you’re looking at are in the same neighborhood if possible. Prices of the same house can vary depending on the community they’re in.

Back Out Commission & Lot Price

To determine the approximate construction building cost, you need to back out the cost of the lot and any sales commission. I would estimate the sales commission at six percent.

To determine the cost of the building lot, you’ll have to look for lots for sale that are similar. I'd talk with knowledgeable Realtors.

Don’t forget to account for utility connections. In other words, the new houses you tour may be connected to city sewer and water and you’re looking at lots that need a well and septic system. It can be very complicated.

Once you subtract the sales commission and lot cost from the asking price of the new home, you then calculate the actual square footage of finished living space. Leave out garages and unfinished basements from this calculation.

Software Estimator

I developed a cool software tool that can help you calculate the cost of your new home. You just need to enter in the cost of one aspect of the house and the software does the rest.

It's a ROUGH estimating tool because it averages regional costs. The software uses mortgage industry percentages so lenders don't give out too much money on each draw as a new home is built. Here's a tiny screenshot of the cool spreadsheet:

spreadsheet

This is a very cool software spreadsheet that can help you calculate the cost of your new home. Divide the square footage of the home by the cost to get cost per square foot. CLICK THE IMAGE ABOVE TO DOWNLOAD THE SOFTWARE.

Exterior Wall Footprint

I prefer to always calculate this using the dimensions of the outline of the exterior walls. Don’t fall into the trap of using room sizes. Get the overall square footage.

Divide this square footage into the cost of the home less the sales commission and lot cost to arrive at the cost-per-square-foot of that house.

Not Foolproof - But Close

This method of determining home building cost estimates is not foolproof, but it will get you close. The key is to make sure the houses you’re using as your benchmark match what you want as closely as possible. If you don’t match this up, you can easily be off by a factor of 25-40 percent!

Cost Of Plans

If you’re planning a custom home, you then need to add in the cost of the plans. They might easily run 5 to 6 percent of the cost of the home. You can get plan estimates from architects that draw custom homes.

Meet Custom Builders

You can also talk to custom home builders to get a range of building costs per square foot. Be sure to talk to several builders and go look at recent houses they’ve built to see if you’re looking at houses that match what you want.

Column 836

Pergola Ideas for Small Patios

pergola idea

This is a stunning pergola for a small patio built with advice from Tim Carter, founder of AsktheBuilder.com. (C) Copyright 2017 Tim Carter

Pergola Ideas for Small Patios TIPS

    • Scale is very important - think Big for small patios
    • Wind load is real and pergolas can blow over or away
    • Use DIY copper rot treatment for buried posts

DEAR TIM: I need to build a pergola to separate a small patio from my driveway. I’m trying to create a privacy screen and as much shade as possible.

The issue is I have only a tiny strip of ground to work with and the pergola needs to be more like a fence than a table with four legs if that makes sense.

Can you offer up any ideas about how to accomplish this? What should I be concerned about and how can I attach the support posts so the pergola is safe? Any and all ideas would be welcome.

If you can make me look like a superhero in front of my wife, friends and neighbors, I’ll cast a protective spell on you forever! Buddy B., Sylvania, OH

DEAR BUD MAN: I’ll take any and all protective spells you can offer up!

Follow Instructions And Wear Funny Costume!

This could turn out to be a spectacular deal for both of us. If you can follow my instructions, the only downside is that you might be forced to wear an odd-looking costume from now on!

Plan For Wind & Snow

Let’s first talk about the structural challenges all pergolas face, then we’ll chat about some cool design ideas. Yours is of particular concern because it’s going to be a tall fence as you already understand.

Your primary concern should be horizontal wind load. The total weight of all the materials used to build a typical pergola can be in the hundreds of pounds. You don’t want it falling on someone at a later date.

Free & Fast Bids

CLICK HERE to get FREE & FAST BIDS from local carpenters who can build a GORGEOUS pergola like the one in the photo.

Vines Add Weight

While you may not intend to have vines on the pergola, some future homeowner may decide to have flowers and fruit grow on the structure. Not only does this vegetation add hundreds of pounds, but the dense growth also increases the wind load.

Your safety and that of all who sit by or under the pergola are subject to how well you obey the laws of physics.

Strong Lumber & Fasteners

All lumber used needs to be strong enough to resist cracking or snapping under the force of the wind or snow loads. You live where wet heavy snow can coat the pergola so plan accordingly. All the fasteners need to be premium hot-dipped galvanized or stainless steel.

Special Framing Connectors

If you decide to use modern treated lumber, the fasteners and all metal framing connectors must be approved for the newer treated lumber that has a higher copper content. Failure to do this will cause advanced and rapid corrosion of the metal from galvanic reaction when the pergola gets wet.

post cap connector

Here's a post cap connector. Simpson makes them in all different sizes to connect different posts to different width beams. CLICK THE IMAGE TO SEE ALL THE SIMPSON PRODUCTS YOU'LL NEED FOR YOUR PERGOLA.

Wind Loads Are Real

You’ve got to be very concerned about strong winds that can blow your pergola over. A traditional pergola that might have as few as four posts can blow over, but it’s harder to do if the four posts are bolted securely to concrete piers.

You can’t bolt your posts to piers as it would tip over with little effort. You need to bury your posts much like utility poles along a road or street are installed. My guess is your pergola is going to be about ten feet high once it’s all done, so I’d want to see the posts buried at least 4 feet into the ground.

DIY Rot Treatment

I’d coat the wood that’s going to be in the ground with a readily available copper naphthenate solution and surround the posts with angular crushed gravel that’s the size of  large grapes.

oil-based DIY copper liquid

Here's an excellent oil-based DIY copper liquid you can use to treat your own lumber. CLICK THE IMAGE NOW TO HAVE IT DELIVERED TO YOUR HOME.

This type of gravel interlocks and acts much like concrete, but it provides for great drainage once the water leaves the soil in the spring.

Design Ideas - Mix Lumber Species

Let’s talk about the looks of the pergola. I’m a big fan of multi-colored and multi-textured looks. You can achieve this by using different species of wood or different colored exterior semi-transparent stains. Mixing rough-sawn Western red cedar with redwood can produce a stunning look.

CLICK HERE to get FREE & FAST BIDS from local carpenters who can build a GORGEOUS pergola like the one in the photo.

Scale - Use Large Posts & Beams

It’s all about scale at the end of the day so you need to use big posts. You may get by with 4 x 6 posts, but trust me 6 x 6 posts would be better.

Your top beams that will be on either side of the posts need to be at least a 2 x 10s so they don’t look undersized. I’m a big fan of cutting quarter circles out of the ends of all the crisscrossed lumber that creates the shade aspect of the pergola.

Cantilever For Shade

Think about cantilevering the top of the pergola a little bit. The horizontal rafters don’t have to be equal on each side of the main beams or the posts.

I’d not exceed a 3:1 ratio because it will add a rotational force that could cause the pergola to tilt from the offset weight of the overhang. It’s a stunning look and will give you more shade on the small patio depending on the pergola’s compass orientation.

Use Depth For WOW Factor

Use depth to your advantage in the center sections of the pergola between the posts. I’d install flat 2 x 4s spaced about 2 feet on center with the first one no more than 16 inches above the final mulched grade. On either side of these 2x4’s, attach pieces of diagonal or square lattice pieces in a shadow-box layout.

This is a side view of the stunning pergola, built with advice from Tim Carter, founder of AsktheBuilder.com. (C) Copyright 2017 Tim Carter

Be sure the lattice is also a different shade of wood or finish if possible. This will add to the stunning masterpiece you’re about to create. Most people forget to do this and miss out on a huge opportunity to induce the WOW factor from those who’ll marvel at your pergola the first time they see it.

Trim Post Bases

Add a final touch at the base of the posts by trimming them out in different layers of wood that resembles baseboard you might have in your home. Bevel the top edge at a 45-degree angle to shed water. Once again, think about using a different wood species here to highlight this accent trim.

Good luck and let me know how your wife and friends feel about it.

CLICK HERE to get FREE & FAST BIDS from local carpenters who can build a GORGEOUS pergola like the one in the photo.

Column 1195

HVAC Return Air Ducting

HVAC Return Air

The red arrow points to a large wall-mounted return-air vent. The furnace or air handler is probably on the other side of the wall behind that door. How many return air vents should be in your home? The number MAY SURPRISE YOU! Copyright 2018 Tim Carter

HVAC Return Air Ducting - You Better Have One in Many Rooms

"An HVAC return air duct should be in every room except a bathroom and kitchen. They should be on interior walls across the room from the supply ducts that should be washing exterior walls with conditioned air."

Get FREE BIDS in hours from local HVAC companies to have new return air ducts installed in your home.

HVAC Return Air Ducting TIPS

Two years after this column was published, it was still receiving comments. So Tim shared it again in his June 23, 2019 Newsletter.

Should HVAC Return Duct Be the Same Size?

The air ducts in your house should be designed exactly like the blood vessels in your body.

Think about it. Half of the blood vessels supply blood to every part of your body all the way to the tips of your fingers and toes. The other half of the vessels return the blood back to your heart. Along the return trip back towards your heart, the blood gets resupplied with oxygen and your heart sends it back out again.

Have you ever wondered how blood pressure can be measured accurately at the tip of your finger? This magic happens because the blood-vessel diameters decreases as they get farther away from your heart.

Your heart, like your furnace fan, creates a finite amount of energy each time it pumps. As blood is delivered to your shoulder, there's less energy left to deliver the remaining blood down your arm. If the blood vessels all the way to your fingertips stayed the same size as up at your shoulder, there wouldn't be enough energy to push all that blood and maintain the pressure at your fingertips.


Tim Carter Consult Call

Mother Nature designed your body this way for a reason. Your HVAC person needs to do the same thing with the supply and return ducts in your home!

If an HVAC installer laughs at this concept, show him to your door. He's not a professional and he doesn't know the most basic things about fluid, yes air is a fluid, dynamics!

What's the Best Location for Return Air Ducts?

Supply air from furnaces and air conditioners should be on outside walls. The return air vent openings need to be on the opposite side of the room so the conditioned air is pulled across the room.

If the supply ducts are in the floor, then the return air should be located up high. This pulls the air across your body.

If the supply ducts are high or in the ceiling, then the return-air ducts or grills should be low on a wall.

FREE Call From Tim Carter About Your Ducts - Set up a Call with Tim.

Related Links

Cold-Air Returns - Be More Comfortable

Static Pressure In Supply & Return Ducts Is Important

My House is Hot or Cold. Is This a Return-Duct Issue?

Yes, if your house is either hot or cold, I'll bet you have inferior or lacking return air ducts.

If you live in a home that has rooms that are either too hot in hot weather or are cold in cold weather you could have a return-air duct issue.

Return air ducts are necessary for just about every room. However, there are two rooms that I never place return air ducts - kitchens and baths. Let's try to keep the garlic odors and hairspray in these rooms if you don't mind!

The reason for return air is simple. Your furnace is simply a recirculating pump. Instead of pumping water, it is pumping air.

We need to get the air back to the pump. Furthermore, without a return air duct in each major room, the supply duct air has to "push" all of the air in the room out of the way as it makes its way towards you. The return air ducts help pull the air as it is being pushed.

HVAC Floor Vent

An HVAC return air can be in the floor, but they work much better on walls up about 7 feet. It's best to put them on an interior wall across the room from the supply duct. © 2018 Tim Carter

Where Can You Put Return Ducts?

If you have an existing ranch style home, installing return air ducts in each room can be done fairly easily. You do what we do in new homes.

You use the wall cavities as the duct. Think of it. Drywall that is nailed to 2x4s is really a duct - a box with 4 sides. All you have to do is cut out the floor immediately below the wall cavity as well as the bottom wall plate. Once you have created the opening, sheet metal will allow you to connect this to your existing return air system.

Two-story houses can be more of a challenge. You have to figure out a way to get return air from the ceilings of the second floor to the basement or furnace room.

Do you have a laundry chute that you don't use that often? Can it be sacrificed for the cooling cause? We have used these with tremendous success.

Sometimes, you can use a kitchen pantry closet or a hall closet. We have often been able to put a duct in one corner of the pantry or closet. This duct extends up to the second floor where it often lines up with an interior hallway wall.

Often you can collect the ceiling air through a network of flexible pipes in an attic. These pipes join together in one central location that permits you to run a duct down to the basement or a second-floor closet.

As a last resort, you may have to put a duct in the corner of a room(s). These can be drywalled easily. To effectively disguise it, you may build another one several feet down the wall. Shelves can be put between these two "stacks". If they are in a child's room, they can often be painted in a decorative manner as if it was intended for them to be there.

It was common in many older homes to have projections in rooms such as this. These bump-outs often were fireplace chimneys as they rose through to the roof.

How Do You Balance Return Air Flow?

If you want to really have a way to get the most bang for your return air buck, think of installing grill covers on the wall that have operating louvers. This will allow you to choke down rooms possibly on the first floor that are drawing too much air.

This, in turn, creates a greater suction in the rooms that really need cool air. This principle is no different than dampers which are used on supply lines to regulate airflow.

The grills with louvers are inexpensive and effective. On an older existing home that is being retrofitted for central air-conditioning, they are a must.

Go HERE to get FREE BIDS in hours from local HVAC companies to have new return air ducts installed in your home.

Do Old Homes Have it Backwards?

Do you have a house that is approximately 80 years old? If so, your supply ducts may be on inside walls. You may have a single giant return air grill on the floor or at the bottom of a staircase. This is all wrong.

Supply ducts should be located on outside walls, preferably under windows and near doors. The intent is to wash the exterior walls with heated or cooled air. You are trying to combat the heat or cold at its source.

The single giant return air grill in the floor balances the load at the furnace motor but does nothing to promote cross-ventilation in each room.

Here's an example of a giant return air grill near the floor. It's much better to put a return-air duct in each room.

What, you don't think you can match the hardwood flooring? Rubbish! Go to a first-floor closet and get the flooring from there. A good hardwood installer can make the repair and no one will be the wiser. Who cares if the flooring inside the closet doesn't match.

I wish you luck in your effort to stay cool. Don't hesitate to contact me if I can help. CLICK the Ask Tim navigation button at the top of this page.


Air Conditioning Sizing Considerations

Residential air conditioners, both central and window units, are like shoes. They come in various, different sizes. Buy the wrong shoe and you will be uncomfortable. It is no different with air conditioning.

Bigger Is NOT Better

So you really want your house cold. What are you going to do?

Buy a monster 5-ton central unit? That could be a mistake. If you put in a unit that is too powerful (produces too much cooling), it will short cycle.

It will turn on, blast out vast quantities of cool air, and then shut off. The result will be improper dehumidification. You will be cool and clammy.

The air conditioner needs to run for a sufficient time to squeeze out the humidity that has seeped into your house. You achieve the highest comfort when the air conditioner removes as much humidity as possible from your interior air.

How Are They Sized?

To properly size an air conditioner, one has to perform a heat gain calculation. In other words, you must determine how fast heat is getting into your house and what things inside the house are contributing to heat gain.

To perform the calculation, you need to know how much insulation is in your exterior walls, how much is in your attic, the size and type of glazing for each window, the type of construction of each window, extra special lights or cooking appliances that generate heat, compass direction that each wall of your house faces, etc.

In other words, you have to do some work to get the equipment sized right. Tables and charts have been around for years that convert these measurements into BTUs. Once you know how many BTUs your house is gaining, you can purchase the correct sized air conditioner.

When purchasing a unit, ask for these calculations! Don't just buy the same size unit you now have. Maybe it was not sized right. Maybe you have upgraded your windows or insulation. Maybe you added a small or mid-sized room addition or remodeled an attic space.

Replacing An Existing Unit - BEWARE!!

If you have an existing house that needs a new central AC unit, be careful! For you to achieve the published efficiency and performance that is sold to you by the salesperson, the interior coil housed in the furnace must be compatible and matched for size!

If it is not, the outdoor unit will struggle to keep your house cool. It is a question you must ask the installer. Make him/her prove to you that the interior coil will handle the outside unit.

Remember, the inside coil could have been wrong from the beginning! The original furnace contractor could have downsized one size to save money. The AC will work, but not as well as it should have!

This revised column was featured in the August 8, 2021 AsktheBuilder Newsletter.


Column B143

Dimmer Switch

Dimmer Switch TIPS

  • Fire hazards are REAL with dimmer switches
  • Can only handle so many watts before they overheat
  • NM-B cable and wire must be used in modern houses
  • Some LED bulbs will flicker causing headaches
  • CLICK HERE to Get Tim's FREE & FUNNY Newsletter!

DEAR TIM: I would like to install several dimmer switches to control light output. Do I need special wiring to accomplish this?

Older dimmers I have used scared me because the switch is very warm to the touch when they operate. Are these things a fire hazard?

Are there specialty dimmers for individual lamps or fixtures?

Are there some lights that do NOT WORK with dimmers? Jo Anne C., Edison, NJ

DEAR JO ANNE: Light dimming switches are not only very safe, but the variety of sleek and efficient dimmers you can purchase today is outstanding.

Fire Hazard Is Real

In my opinion, the only fire hazard you might introduce to your home while installing one would be failure, on your part, of reading and following any enclosed instructions. I have installed dimmer switches for years and not one has ever caused an electrical fire.

The most common fire caused by dimmer switches is putting too much power through them. CLICK HERE to read about a dimmer switch fire. A friend of mine almost burned down his home because of an overheated and overtaxed dimmer switch.

Transform Electricity To Heat

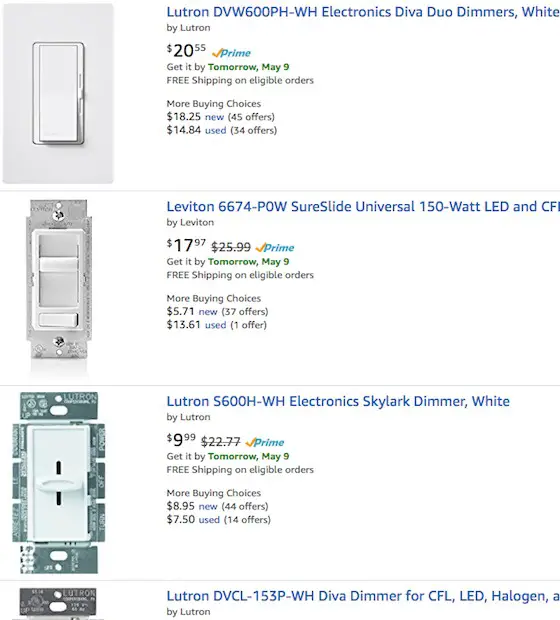
The reason dimmer switches get hot is fairly simple. Some dimmers get hotter than others because of their design.

Old dimmer switches typically were rheostats that varied the amount of voltage going to the light bulbs. As the rheostat was turn down to lower the voltage, the electricity was changed into heat. These old dimmers wasted lots of energy.

Free & Fast Bids

CLICK HERE to get FREE & FAST BIDS from local electricians who can ensure the correct wires are connected to your dimmer switches to PREVENT FIRES.

Modern Dimmers Somewhat Safer

Modern dimmer switches use slick internal electronics to dim the lights. These components can turn the light on and off 120 times per second. This is too fast for you to see.

By altering the amount of time the switch is off rather than on, you see a lower amount of light out of the bulb. This method of dimming is highly efficient. Well over 90 percent of the electricity that does flow into the switch gets used in the light bulb.

dimmer switches

CLICK THE IMAGE ABOVE to see a vast assortment of modern and older dimmer switches.

Too Much Friction Is A Problem

The heat that you feel in modern dimmers simply is a result of the ordinary friction of the electricity flowing through the device. If you try to push lots of electricity through a modern electronic dimmer, you can overtax the electronic components and cause a fire.

Internal Heat Sinks

Modern electronic dimmers have a heat sink or metal plate that directs this heat towards the room. This is why you feel the heat on the cover plate.

This is done intentionally. Over time, excessive heat could damage the house wiring or the internal components of the dimmer switch.

Use Modern NMB Cable / Wire

You don't need any special wiring to connect a typical residential dimmer switch. The National Electric Code for quite some years has required the cable in your home be stamped NM-B. This acronym stands primarily for non-metallic covering. The wires in the cable are protected by a plastic PVC coating.

NM-B cable may be used for both exposed and concealed work in normally dry locations. The temperature of the spaces where the wire is used should not to exceed 90°C. The National Electric Code limits ampacity to that for 60°C conductors.

CONFUSED and AFRAID?

CLICK HERE to get FREE & FAST BIDS from local electricians who can ensure the correct wires are connected to your dimmer switches to PREVENT FIRES.

3-Way Dimmers

If you have a standard toggle switch in place now that operates the light, a dimmer can replace this switch. You can even get three way dimmer switches that allow you to operate a light from two different switches.

Watts Allowed

Be aware that dimmer switches can only handle a specific amount of light load. You can typically purchase dimmers that are rated for 600 or up to 1,000 watts of lighting.

Light bulbs are usually clearly marked as to their wattage. Determine the total wattage of the bulbs that are being controlled by any one dimmer. Just add up the number of bulbs and multiply it by the wattage of the bulbs. Example:

  • 5 bulbs controlled by the dimmer
  • Each bulb is 75 watts
  • 5 x 75 = 375 watts total

Altering Heat Sinks Means Less Wattage

Purchase the correct size dimmer switch to suit your needs. But keep in mind that the metal heat sink plate on the front of many dimmers can be altered so that you can place multiple dimmer switches next to one another.

If you break off the side tabs of the heat sink, as allowed in the instructions, you need to derate the capacity of the dimmer. If you snap off the tabs on both sides of the heat sink a 600 watt dimmer becomes a 400 watt dimmer.

Lots Of Choices

Be prepared for tough decisions when you buy your dimmer switches. There are so many cool ones out there. You can buy one that has all of its controls in the tiny space that is used by a standard on and off toggle switch.

Dimmer switches are made with tiny LED light level indicators, softly glowing night lights, and tap-on and tap-off capabilities. Perhaps my favorite dimmer switch is the one that has a hand held remote control. You sit on a couch or in a chair, point the remote towards the switch and you can dim the lights while still seated. It is the ultimate couch potato gift!

LED Light Issues

Some modern LED light bulbs can't be controlled by a dimmer switch. They start to become strobe lights causing discomfort and seizures in some people.

Be sure to read the label of the LED bulb to see if it's approved for use with a dimmer switch.

Point Of Use Dimmers

Point of use dimmer switches are also available. You can purchase a dimmer switch for a table lamp.

This device allows you to stop buying three way light bulbs. You can buy a standard higher wattage bulb and use the dimmer to create an infinite amount of different light levels to suit the task. These dimmers are very handy.


Consumer Dimmer Switch Story

Tim,

While the older light dimmers had a potentiometer (variable resistor - rotating or slide type) as the method of controlling the semiconductors within them, they never were truly a 'rheostat' as you explain. The power to the light was not directly handled by the potentiometer, but by a semiconductor switch called a triac, which had a control signal provided by the potentiometer.

A true rheostat to work the common load of 600 watts handled by the standard light dimmer would be about half the size of a toaster (which is a 1200 watt resistance load typically) and generate as much heat ... really think that would have worked well in a wall box?

It is possible that the writer to the column experiencing the warm dimmers had several dimmers ganged in the same enclosure, and that the proper derating (typically a 600 watt max load for the first dimmer in a box, derated to 500 if there are two, 400 watts each if there are three) was not followed during installation OR someone installed larger or more lamps than the original installation intended ... seen both of these happen in my career.

While some newer dimmers have eliminated the potentiometer in favor of touch plates, and the working components are about the same, the efficiency of the semiconductor devices have improved tremendously, and improved efficiency leads to less loss on the switching which results in lower heat dissipation.

I hope this helps you for future reference. As a former electrician and now engineer, I am alarmed sometimes at what I read from everyone who is an expert on electricity, and am alarmed at what I see on TV in some of these home improvement shows, etc. EVERYONE is an expert when it comes to electrical work it seems. I hope you take this constructively. If I can be of any help in the future, let me know ... I love teaching.

Sincerely,

Walt Flasinski, PE

West Chester

CLICK HERE to get FREE & FAST BIDS from local electricians who can ensure the correct wires are connected to your dimmer switches to PREVENT FIRES.

Repair Switched Outlet

Repair Switched Outlet

This is a traditional duplex wall outlet without the cover plate. Copyright 2017 Tim Carter

Repair Switched Outlet TIPS

  • Standard duplex outlets can be wired so one outlet operates via a switch
  • Brass screws are for black HOT wires - silver screws are for white neutral wires
  • Study large photos below for wiring secrets
  • Break off brass tab for magic to happen!
  • CLICK HERE to Get Tim's FREE & FUNNY Newsletter!

DEAR TIM: I have a standard duplex electrical wall outlet where the top outlet is controlled by a wall switch. The bottom outlet is always powered as is any standard wall outlet.

I decided to change the color of the outlets and wall switches in my house. Ever since I replaced them, the outlet operated by the switch does not work.

What I mean is this outlet is always powered. Then yesterday neither of the outlets worked. What did I do wrong? Harvey S., Charlevoix, MI

DEAR HARVEY: I can think of several things that might have gone wrong.

Get Skills First

Every time I get a question such as yours I cringe. The question often telegraphs to me that the person who attempted the repair possibly lacks the necessary training to safely and successfully complete the job.

You can get away with this with certain things such as plumbing and roofing tasks. Make a mistake and dripping water tells you to start over. But electrical repairs are different.

Free & Fast Bids

CLICK HERE to get FREE & FAST BIDS from local electricians who will come fix your split switched receptacle that you can't figure out.

Demands Respect

Electricity must be treated with the utmost respect. It can be a silent killer, one that waits for days, weeks, months and even years to claim a victim or two.

Untrained people who tamper with electrical repairs can make unsafe connections, crimp wires, create nicks in insulation, etc. All of these things can lead to hazards that can start fires.

Power Down Circuit

The first thing you should do is turn off the power to the circuit in question.

Switched Outlet

I suggest we start with the obvious. The duplex wall outlet (a wall outlet that accepts two separate plugs) in question is often called a split outlet.

As you described one of the two receptacles in the outlet has continuous power as do most outlets. But the other receptacle is controlled by a wall switch.

Table Lamp Light

This arrangement is a very convenient way to illuminate a room that does not have an overhead light. A table or floor lamp is typically plugged into the receptacle controlled by the switch.

At my own home, I have several split outlets strategically placed both indoors and outdoors. They come in very handy each Christmas. I never have to go outdoors nor do I have to bend over to plug in or unplug holiday lights.

Multiple Screws = Multiple Options

Many people don't think twice about how a standard duplex outlet is wired. If you inspect one, you'll see that it has five screws: two brass, two silver and one green.

Repair Switched Outlet

I've rotated the outlet to the right. You can see the two silver screws, they're a little tarnished, and the green grounding screw. Copyright 2017 Tim Carter

Look inside the electrical box and you often see two different cables that connect to all of these screws. In a typical installation, one cable feeds power to the outlet and the other cable goes on to another switch or outlet location delivering power to that device.

Brass Screws are HOT

The brass screws are the ones you pay close attention too. These are where you attach the BLACK, or hot, wires. The white wires are attached to the silver screws.

Repair Switched Outlet

CLICK HERE to get FREE & FAST BIDS from local electricians who will come fix your split switched receptacle that you can't figure out.

Tiny Metal Tabs

There are two very important and very small pieces of metal on each receptacle located between the brass and silver screws. These tabs allow you to have power in both of the outlets if it's the last outlet in a circuit. In this case only one cable enters the electric box.

Remove these small tabs of metal and the electricity does not transfer from one screw to the other.

Repair Switched Outlet

The red arrow points to the metal tab that needs to be bent back and forth until it breaks off. Do this and each of the outlets will require a SEPARATE hot wire to produce power. You connect the one black wire from the wall switch to one of the two brass screws. Copyright 2017 Tim Carter

Remove The Tab

In the case of a split SWITCHED receptacle, you must remove the tab of metal between the two brass screws. If the tab of metal is not removed, both of the receptacles in the outlet get power even though you want one of them to be switched. I think this was your first error - you failed to remove the metal tab.

No Power Is A Problem

The total loss of power at the wall outlet is more troubling. One of the wires attached to one or more of the four screws may have broken.

As you bend wires around the screws the wires can become fatigued. Further fatigue often occurs as you push the wires back into the box as you begin to screw the outlet to the electrical box.

In addition, if the outlet is not tightly attached to the box the wires can move and flex each time you push and pull a plug into the receptacle.

Bend Wires Carefully

You must exercise great care when pushing the wires back into an electrical box. The wires need to tuck away neatly and sharp bends in the wires are to be avoided.

The insulated wires should tuck away into the rear of the box such that they do not rest next to the screws on the sides of the outlet. If you cannot achieve results that meet these simple requirements, I strongly urge that you hire an electrical professional.

What's more, I want you to pay to have your local electrical inspector come out and insure your personal safety. It will be the smallest life insurance premium you have ever paid.

CLICK HERE to get FREE & FAST BIDS from local electricians who will come fix your split switched receptacle that you can't figure out.

Column 452

How to Lightning Surge Protection

The final line of defense, a battery backup surge protector will keep your electronics safe from damaging power surges. CLICK THE IMAGE to keep your data safe.

Lightning Surge Protection TIPS

  • 50,000 F and 30,000 amps - normal lightning bolt
  • Small induced voltage surges FRY sensitive circuit components on electronics
  • Grounding systems in most homes are inferior
  • Unplug all electronic devices for best protection during storms
  • CLICK HERE to Get Tim's FREE & FUNNY Newsletter!

DEAR TIM: My neighbor's house was struck by lightning. Fortunately, it did not cause a fire. However, the lightning apparently ruined their computer, phone answering machine, and many other electronic devices.

Why didn't their house catch on fire and what, if anything, can be done to prevent my electronic devices from being destroyed? P. F.

DEAR P. F.: Your neighbor was very lucky.

50,000 F - That's HOT

Lightning strikes generate temperatures close to 50,000 degrees F. The most likely reason a fire did not start was due to the fact that the duration of the strike lasted only a few thousandths of a second.

This type of lightning strike is commonly referred to as a "cold bolt." It is also possible that they have an excellent exterior lightning protection system in place.

30,000 Amps

The average lightning bolt has about 30,000 amps of current. To put that into perspective, your electric double oven may draw a whopping 40 amps when it's on as well as all burners are on high. One robust and tall thunderstorm cell can have 100,000,000 volts of potential.

The voltage potential of a lightning bolt varies because of any number of variables including, but not limited to, diameter of the bolt, humidity, dust and other impurities in the air, etc.

Free & Fast Bids

CLICK HERE to get FREE & FAST BIDS from local electricians who can protect your home from lightning surges.

Small Current Surges FRY Electronics

Electronic devices such as computers, VCR's, televisions, modems, etc. can be ruined or "short circuited" by relatively small current surges. Because lightning can produce enormous voltage surges, special measures should be undertaken in an attempt to protect this equipment.

Lightning can create havoc in your home even if it does not strike the house directly. The lightning can strike a power line that feeds your house. Telephone lines and power lines can experience voltage surges simply from the electromagnetic energy created by a nearby direct strike.

Best Protection

If you want to protect your important electronic devices like:

  • computers
  • modems
  • routers
  • expensive flat-screen TVs
  • laptops
  • any other valuable plugged-in item

then UNPLUG them from the wall before and DURING a violent thunderstorm. I do this in my own home and I know it's saved my equipment and days of being without equipment while I settle with my insurance company and go out shopping for new stuff.

Be SURE TO UNPLUG your cable TV cable from your TV and modem too! Lightning surges travel down these lines too.

Excellent Grounding

The first line of defense is to have an excellent grounding system with respect to all electrical outlets. The reason is simple.

The voltage surge in the power lines will, in many cases, quickly "bleed off" to the grounding system.

Ground wires need to be large and connected to multiple ground rods driven into a wet clay soil.

This is especially true if the grounding system has a very low resistance. This low resistance means that the electricity will travel extremely rapidly through it into the ground or soil surrounding your home.

The Art and Science of Lightning Protection book cover

Learn how you can protect your home from damage caused by lightning. This book provides plenty of diagrams and photographs to easily understand the topic. CLICK THE IMAGE to get the book now.

Soil Type Means Everything

However, different types of soil have varying capabilities to dissipate electricity quickly. Generally, moist sticky clay soils tend to dissipate electricity rapidly.

Sandy, or rocky soils often dissipate this energy more slowly. Soil types can vary greatly in short distances, so you must be sure of the type you have.

If you live in an area with very little or no soil, you have to install specialized grounding systems.

Grounding Rods & Wires Typically Inferior

Most houses have only one grounding rod attached to their electrical system. The ability of your electrical grounding system to quickly dissipate voltage surges increases dramatically if you install numerous grounding rods.

These rods should be spaced at least ten feet from one another in a series. The solid copper wire connecting these rods should be continuous and welded to these rods if at all possible. A mechanical connection, such as a clamp, is the weak link in a grounding system.

Secondary Sacrificial Arresters

A secondary line of defense is to install a secondary lightning arrester inside of your electrical panel. Some of these arresters can withstand 15,000 amp surges. These products capture voltage surges on the "hot" 120 volt power lines feeding your house.

aPC surge protector

The simplest way to protect your electronics from damage. CLICK THE IMAGE to get a new Surge Protector.

Pro Installation Required

These surges are then directed to the grounding system we just spoke of. These items should not be installed by an amateur, due to the fact that you are working with dangerous house current when installing these devices.

Surge Protectors - Not All Equal

The final line of defense consists of transient voltage surge protection devices. These are the most common surge protectors on the market.

They're available at electric supply houses and stores that sell electronic devices. There are many different varieties of this type of device.


Some even protect telephone lines and electrical outlets at the same time. Remember, all three systems must be employed in order to provide the highest level of protection to your sensitive electronic devices.

CLICK HERE to get FREE & FAST BIDS from local electricians who can protect your home from surges.

Column 021

Find the Best Contractor Video 4 of 4

Avoid Change Orders

Tim Carter, founder of AsktheBuilder.com, shares tips about change orders in this last video of a four-part series.

Change orders are Death on a Stick.

Change orders delay jobs.

Change orders mean your plans were HORRIBLE.

Change orders lead to big arguments.

Tim shares how to AVOID change orders in this video.

Free & Fast Bids

CLICK HERE to get FREE & FAST BIDS from contractors who will help you avoid change orders.